manuals.online logo
Brands
  1. Home
  2. •
  3. Brands
  4. •
  5. Team Young
  6. •
  7. Switch
  8. •
  9. Team Young EZCon RX02-1 Technical manual

Team Young EZCon RX02-1 Technical manual

󾋷󾋹
Power Switch/RX02-1
User Guide/Warranty
Thank you for choosing EZCon®Power
Switch RX02-1.
This Quick Instruction Manual explains the
basic installation and using procedures. For
the introduction of detailed product installa-
tion and troubleshooting, please visit the
official website at www.teamyoung.com.tw
for downloading.
●The product complies with NCC Administrative Regula-
tions on Low Power Radio Waves Radiated Devices:
Article 12:Without permission granted by the NCC,
any company, enterprise, or user is not allowed to
change frequency, enhance transmitting power or alter
original characteristic as well as performance to an
approved low power radio-frequency devices.
Article 14:The low power radio-frequency devices
shall not influence aircraft security and interfere legal
communications; If found, the user shall cease operating
immediately until no interference is achieved.
Precautions for safe use
Package contains
Power Switch RX02-1
Quick Instruction Manual
Screw *2






 
The said legal communications means radio communi-
cations is operated in compliance with the Telecommu-
nications Act. The low power radio-frequency devices
must be susceptible with the interference from legal
communications or ISM radio wave radiated devices.
2Plug the live(L) wire & naught(N) wire of supply mains
into the “IN” ports of Power Switch RX02-1, and plug the
live(L) wire & naught(N) wire of electrical appliance into
the “OUT” ports of Power Switch RX02-1 respectively.
• If the indicator light of Power Switch RX02-1 displays red,
the supply wire is properly connected.
• If the indicator light flashes red and green by turns, it
means that the connected electrical load exceeds the
rated OCP. Please turn off the electrical appliance and
notify the electricians to check.
• When the Power Switch RX02-1 outputs power, the
indicator light on the Power Switch RX02-1 will displays
green.
• The mounting base of product is pre-fixed with screw to
the back of Power Switch RX02-1. Please remove this
fixing screw to detach the mounting base for installation.
*If the information of RoHS Compliance Declaration is required, please visit our
website at www.teamyoung.com.tw . How to Set up RX02-1
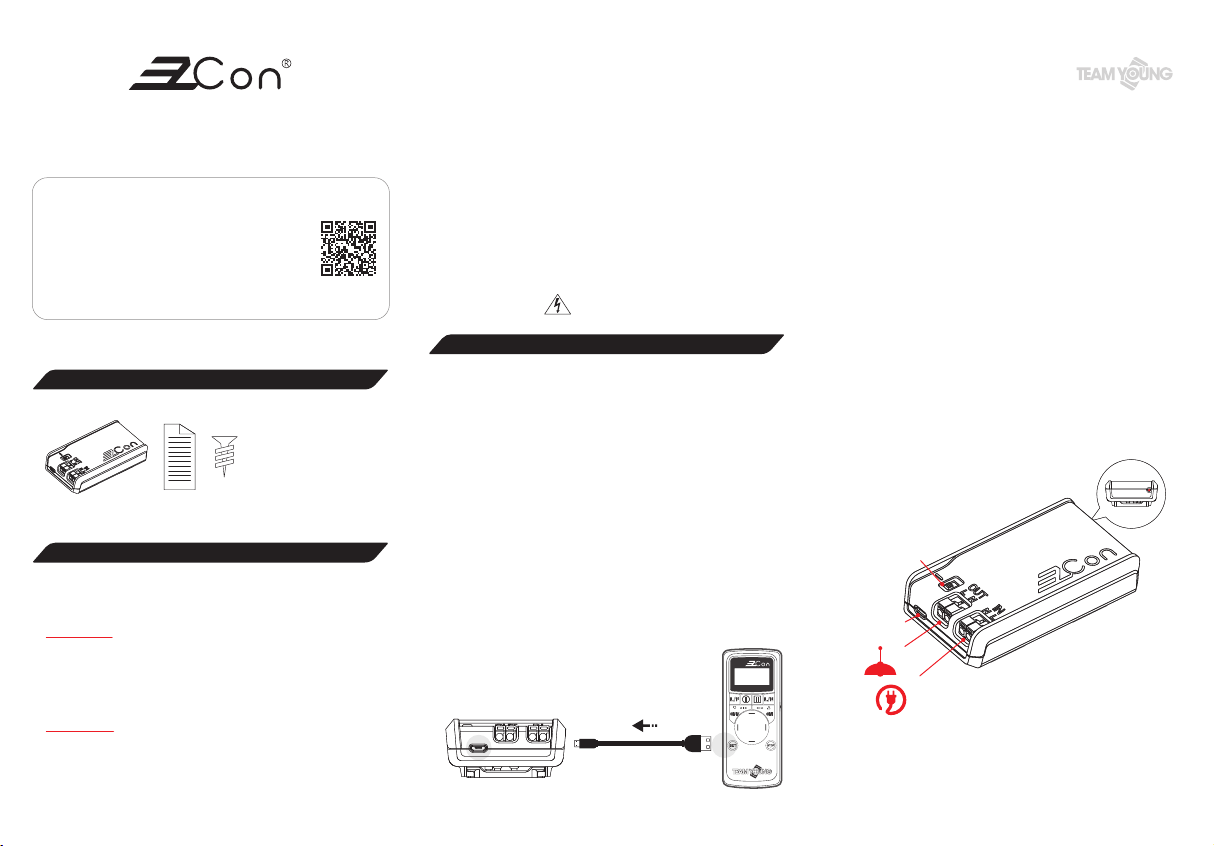
1Confirm that the Power Switch RX02-1 is not connected
to supply mains, and its indicator light should not be
on at this stage. Use the USB cable to connect the
smart remote controller TX-RC-1 (Type A transmitting
terminal) and the corresponding Power Switch RX02-1
(MICRO-B receiving terminal) as shown below. The
indicator light in the Power Switch will turn red under
correct connection. Then select the control point of
Power Switch RX02-1. Long press “SET” button of
the smart remote controller TX-RC-1 to enter into
setting mode. Select the RX burning mode, press “ON”
button to confirm (or use hotkey: Press “SET” button
+ Down direction button). The setting program will
start automatically. When the setting is completed, the
screen of remote controller will display success and
return to the layout menu.
●The Power Switch RX02-1 is recommended to be
installed by a professional electrician.
●Indication of safety signs: if the recommended precau-
tions and safe operating method are not followed, it
may cause personal injury or equipment damage.
●To avoid the danger of electric arc to user and damage
of electrical switch contact, please do not plug or unplug
powered-on RX products.
●Notice for use : WARNING! Dangerous voltage!
Type-A-female connectorMicro-B connector
Dimming control switch
USB port Micro-B connector
“OUT” ports of electrical appliance
“IN” ports of supply mains
Indicator light
Product specications
󾋷󾋹
Warranty term & product guarantee certicate
●With this product guarantee certificate, this product is
subject to limited one-year free repair service since the
date of purchase, but the warranty does not include
consumables (e.g. battery).
●Within the warranty period, damage caused by the
following conditions is not included under warranty.
If repairing is required, Team Young Technology Co.,
Ltd. or authorized distributors will charge the material,
inspecting, repairing, and administrative costs:
A. Without following the instruction of this Quick Instruction
Manual to install and operate the product or use unap-
proved accessories for the product.
B. Damage caused by irresistibly natural disaster, pest, rodent,
and human negligence.
C. Damage caused by misuse, abuse, vandalism, poor
temperature/humidity environment, without following
instructed power supply under rated voltage/current, or
Power switch / RX02-1
Made in Taiwan
100~240VAC/50~60Hz
100~240VAC/50~60Hz
Max. 2A
Max. 2A
433.92MHz
L108.5 * W61 * H30mm
96g
Product
Name/Model
Country of Origin
Radio Frequency
Output voltage/
Frequency
Rated input current
Rated output current
Net Weight
Dimension
Input voltage/
Frequency
*The Republic of China (R.O.C.) Patent No.I63439
the product exceeding the rated voltage/current.
D. Failure and damage caused by transportation, movement,
dropping, and collision of product after purchasing.
E. Damage resulted from unauthorized disassembling of
EZCon®related products, which is not executed by
authorized distributors and technicians of manufacturer.
F. Using product in extreme environment of corrosion is also
excluded from warranty, such as in high temperature and
humidity, in sulfur areas, at the beach, and on the ship etc..
Product Model
Power Switch / RX02-1
912-1800000052
Name of Customer
/Company
Place of Purchase
Date of Purchase
Stamped by Distributor
/ Manufacturer
Product Batch
(Year of manufacture)
*This certificate will not be reissued, please keep it appropriately.
*The 5th~6th code of Product Batch indicates the year of manufacture, e.g. the year of manufacture for 912-18XXXXXXXX is 2018.
Product Guarantee Certificate
18th Floor, No. 400, Huanbei Road, Zhongli
District, Taoyuan City, Taiwan, R.O.C.
Tel : +886-3-2805160 Fax : +886-3-2805182
www.teamyoung.com

Popular Switch manuals by other brands

ZyXEL Communications GS-4012 user guide

ZyXEL Communications

ZyXEL Communications GS-4012 user guide

Gefen GTV-AUDDEC-N user manual

Gefen

Gefen GTV-AUDDEC-N user manual

NEC QX-S5500G Series installation guide

NEC

NEC QX-S5500G Series installation guide

Ubisys S1 Reference manual

Ubisys

Ubisys S1 Reference manual

Fantech DB10 installation instructions

Fantech

Fantech DB10 installation instructions

KinAn MH2415 user manual

KinAn

KinAn MH2415 user manual

Fujitsu Siemens Computers KVM s2-0411 user guide

Fujitsu Siemens Computers

Fujitsu Siemens Computers KVM s2-0411 user guide

axing premium SES 5216-06 Operation instructions

axing

axing premium SES 5216-06 Operation instructions

AlzaPower APW-HCC7B user manual

AlzaPower

AlzaPower APW-HCC7B user manual

Encore ENH905-NWY Specifications

Encore

Encore ENH905-NWY Specifications

IBM ThinkPad 600 Product overview

IBM

IBM ThinkPad 600 Product overview

Bticino HS4434 quick start guide

Bticino

Bticino HS4434 quick start guide

Tektronix ECO422D instruction manual

Tektronix

Tektronix ECO422D instruction manual

HPE Aruba 6300M Product End-of-Life Disassembly Instructions

HPE

HPE Aruba 6300M Product End-of-Life Disassembly Instructions

Alcatel-Lucent 1850 TSS-3 brochure

Alcatel-Lucent

Alcatel-Lucent 1850 TSS-3 brochure

SignaMax C-600 Series Solution guide

SignaMax

SignaMax C-600 Series Solution guide

SMC Networks SMCGS26P-SMART - FICHE TECHNIQUE Product overview

SMC Networks

SMC Networks SMCGS26P-SMART - FICHE TECHNIQUE Product overview

National Instruments SCXI-1130 Getting started guide

National Instruments

National Instruments SCXI-1130 Getting started guide

manuals.online logo
manuals.online logoBrands
  • About & Mission
  • Contact us
  • Privacy Policy
  • Terms and Conditions

Copyright 2025 Manuals.Online. All Rights Reserved.