TECE Lux Mini Instruction Manual

FLUSH PLATES
Sanitary systems
TECHNICAL GUIDELINES

Overview -
Cleaning TECE flush plates -
TECEantibac -
Flush-mounted installation -
Dry-wall – toilet flush plate -
Installing the toilet flush plate in a dry-wall -
Brick-wall – toilet flush plate -
Installing the toilet flush plate in a brick-wall -
Dry-wall – urinal flush plate -
Installing the urinal flush plate in a dry-wall -
TECElux Mini -
Wall-mounted installation of the toilet flush plate -
Flush-mounted installation of the toilet flush plate -
Installing the transformer with connection cable -
Programming the electronics -
Installing the anti-theft device -
TECEsquare -
Installing the TECEsquare II metal toilet flush plate -
Wall-mounted installation of the glass toilet flush plate -
Flush-mounted installation of the glass toilet flush plate -
Wall-mounted installation of the glass urinal flush plate -
Flush-mounted installation of the glass urinal flush plate -
Installing the metal urinal flush plate -
TECEloop -
Wall-mounted installation of the plastic toilet flush plate -
TECEloop modular system -
Wall-mounted installation of the glass toilet flush plate -
Flush-mounted installation of the glass toilet flush plate -
Wall-mounted installation of the plastic urinal flush plate -
Wall-mounted installation of the glass urinal flush plate -
Flush-mounted installation of the glass urinal flush plate -
TECEplanus -
Installing the toilet flush plate -
Installing the urinal flush plate -
TECEplanus infrared electronics -
Toilet infrared electronics -
Programming the toilet infrared electronics -
Installing the toilet infrared electronics, V battery -
Installing the toilet infrared electronics, V mains -
Contents
-
Flush plates

TECEplanus urinal infrared electronics -
Programming the urinal infrared electronics -
Technical data -
Installing urinal infrared electronics for the U urinal flusher, V battery -
Installing the urinal infrared electronics, V mains -
TECEplanus electronics, remote release -
TECEplanus radio switch -
Toilet electronics, remote release, V battery -
Installing the toilet electronics, remote release, V battery -
Toilet electronics, remote release, V mains -
Installing the toilet electronics, remote release, V mains -
TECEplanus electronics, cable-connected remote release -
Toilet electronics, cable-connected remote release, V battery -
Installing the toilet electronics, cable-connected remote release, V battery -
Toilet electronics, cable-connected remote release, V mains -
Installing the toilet electronics, cable-connected remote release, V mains -
TECEnow -
Wall-mounted installation of the toilet flush plate -
Flush-mounted installation of the toilet flush plate -
Installing the urinal flush plate -
Flush-mounted installation of the urinal flush plate -
TECEambia -
Installing the toilet flush plate -
Installing the urinal flush plate -
TECEbase -
Installing the toilet flush plate -
TECEfilo urinal -
Bare wall – mounting and installation -
Installing the wall-mounted TECEfilo urinal flush plate / V -
Installing the flush-mounted TECEfilo urinal flush plate / V -
Programming the urinal electronics -
Toilet flush handle -
Installing the rotary mechanism -
Insert chute -
Operating the insert chute -
Installation dimensions for TECE flush plates -
-
Flush plates

TECE flush plates – Overview
Overview
TECE flush plates come in a wide variety of shapes, mate-
rials and colours. The various materials meet the require-
ments of dierent application areas. These flush plates,
with their robust actuation mechanism, can be installed
from the front or from the top. TECE flush plates are some
of the most compact models available on the market.
Thanks to the cistern's special design, the mounting space
inside is easily accessible, despite the flush plate's small
size.
Overview of TECE flush plates
TECElux Mini
TECEsquare II metal
TECEsquare glass
TECEsquare metal
TECEloop plastic
TECEloop glass
TECEplanus
TECEnow
TECEambia
TECEbase
Toilet flush handle
Single and dual-flush technology
Depending on the flush plate, the TECE flush-mounted
cistern oers the option of single or economic dual-flush
technology. When installing a single-flush system, just one
actuating rod is installed, whereas for a system with dual-
flush technology, two actuating rods are installed.
Single and dual-flush technology (here, the TECEplanus model)
-
Flush plates

Cleaning TECE flush plates
To ensure that the surface of the flush plate retains its orig-
inal appearance, we would ask you to pay attention to the
following information:
• Always clean the flush plate with a soft cloth.
• Use warm water to clean the visible surfaces.
• To clean glass surfaces, you can also use a mild, colour-
less glass cleaning product.
• Do not spray the cleaning product directly onto the
glass.
• Remove any dirt with a moist cloth, gently applying pres-
sure.
• Never use frothy, aggressive cleaning agents or cleaning
sponges.
TECEantibac
The “TECEantibac” versions of the TECEambia and TECE-
loop (toilet and urinal) flush plates have antibacterial
properties. They are only available in white. Both TECEan-
tibac flush plates are available with single and dual-flush
technology.
What is TECEantibac?
The TECEantibac flush plate is made of a new, high-tech
plastic containing microscopically small silver ions. The
silver ions eectively prevent the spread of bacteria on the
flush plate surface.
As the silver particles are distributed within the material,
the eect continues throughout the plate's entire useful
life. So it is more than just a coating. Therefore surface
wear through use or cleaning does not impair the long-
term eect.
The antibacterial eect of the TECEantibac flush plates
has been demonstrated in an expert report written by the
Hohenstein Research Institute: “Under practical conditions,
this test demonstrated that the TECEantibac product exhib-
its significant or strong antimicrobial activity”.
The measured reduction in germs achieved by TECEan-
tibac was, on average, .%. The test method used
was the only standardised method that currently exists
in accordance with the Japanese Industrial Standard JIS
:. This method is internationally acknowledged
and used in Japan, the USA and Europe. The expert report
can be requested from TECE.
-
Flush plates
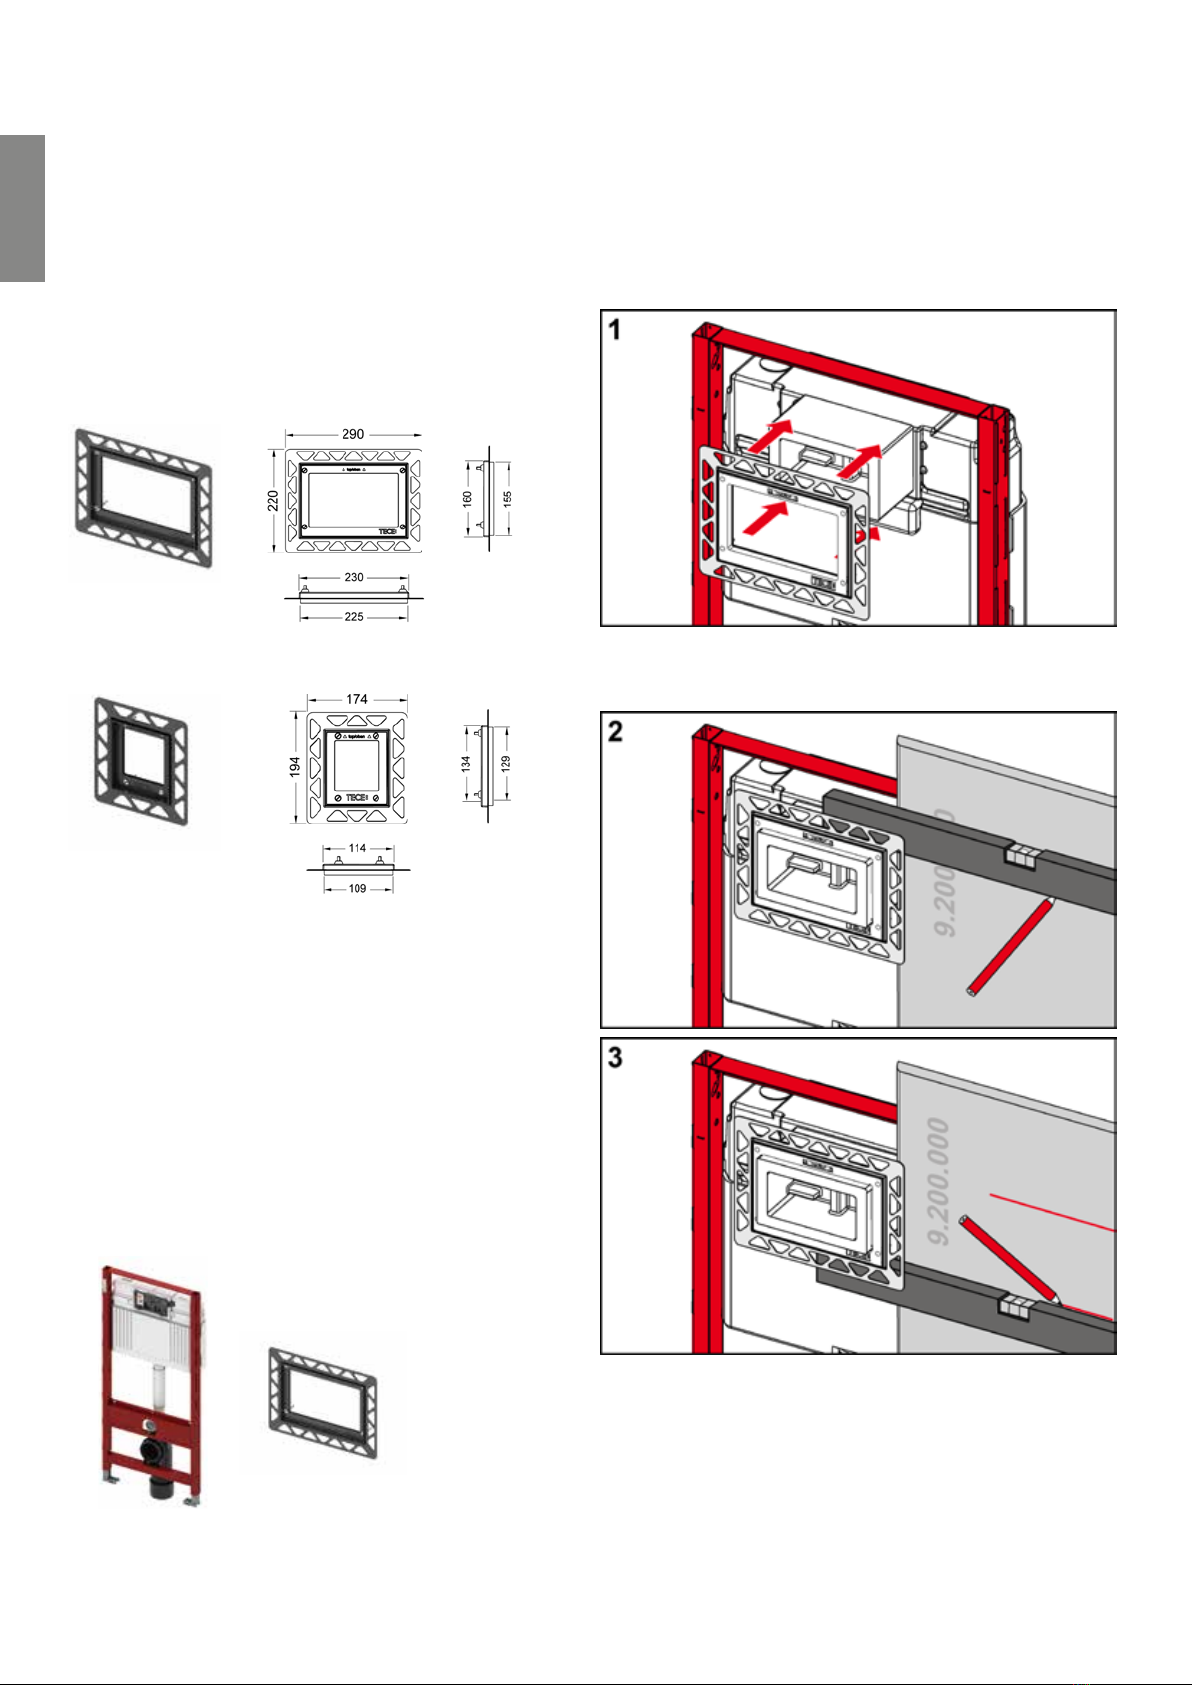
Flush-mounted installation
Flush-mounted installation is a distinctive characteristic
of the TECElux Mini, TECEloop glass (toilet and urinal),
TECEsquare glass (toilet). and TECEnow flush plates (instal-
lation including spacing frame). When using the installation
frame, these flush plates can be flush-mounted as required
both in dry-walls (toilet and urinal) and in brick-wall struc-
tures (toilet).
Flush-mounted installation frame for toilet flush plate
Flush-mounted installation frame for urinal flush plate
Dry-wall – toilet flush plate
The TECEprofil dry-wall module and the toilet installation
frame are required for installation in dry-wall structures.
Dry-wall modules of all installation heights can be com-
bined with the flush-mounted installation frame.
Components required:
TECEprofil module Installation frame for
toilet
Installing the toilet flush plate in a dry-wall
To insert the flush-mounted installation frame into the
plasterboard, a recess for the cistern's inspection opening
must be made in the plaster board.
To do this, place the installation frame over the polystyrene
bare-wall protection.
TECE flush plates – Flush-mounted installation
-
Flush plates

Mark the dimensions of the inside of the installation frame
– width mm, height mm – in the centre of the
plasterboard.
Saw the required opening for the installation frame in the
board.
Screw the plasterboard centrally over the module.
Remove the protective foils from the bonding surfaces on
the installation frame, and stick them, together with those
of the support frame, onto the plasterboard. Observe the
correct position of the “TOP” marking, and ensure horizon-
tal alignment.
-
Flush plates
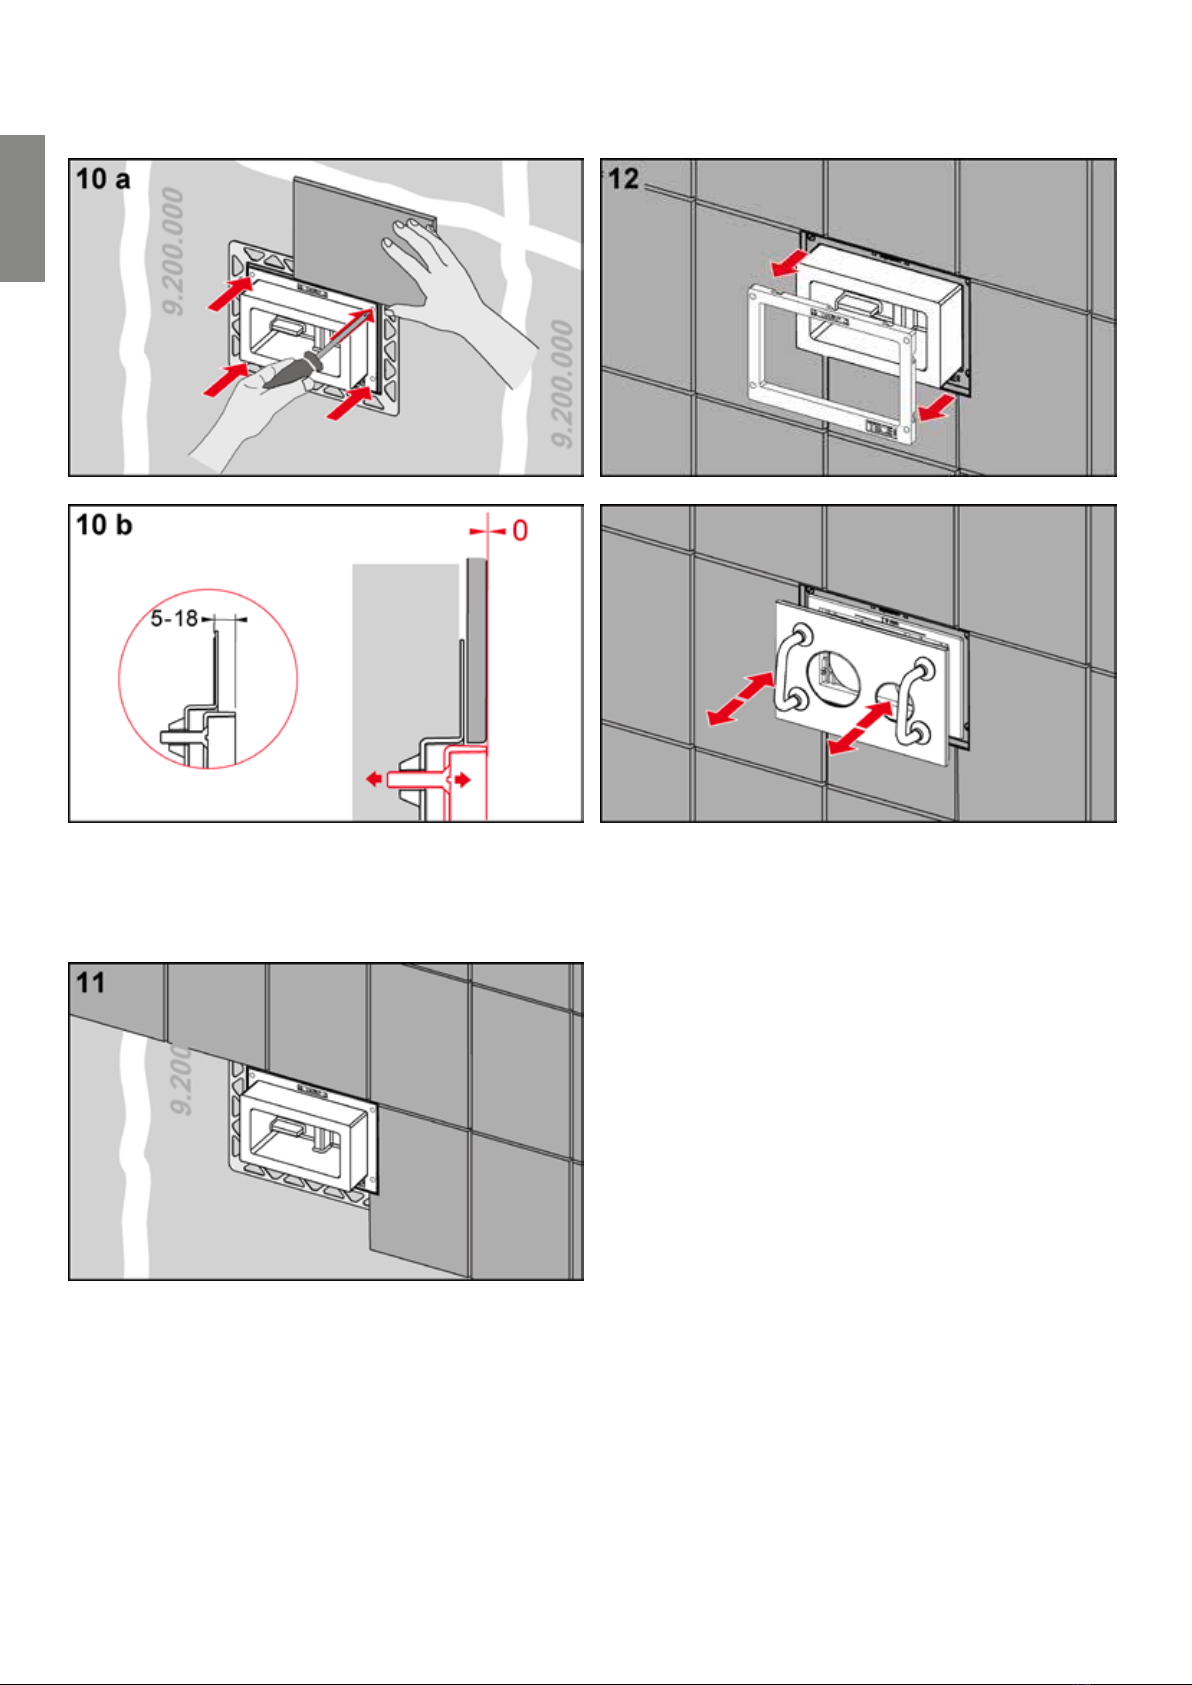
Adjust the depth of the installation frame to the tile thick-
ness (– mm). If the wall structure is thicker (up to
mm), as is the case for example with natural stone, you can
use a suitable upgrade kit (order no. ).
After adjusting the depth, you can tile right up to the instal-
lation frame.
Tip:
To obtain a perfect tile edge around the installation frame,
TECE recommends cutting the tiles with a water jet cutter.
Remove the support frame and polystyrene bare-wall
protection. Then mount the matching support frame as
described in the respective installation instructions (TECE-
loop or TECEsquare). Finally, insert the flush plate with the
aid of the bow-type handles (supplied with the installation
frame) into the flush-mounted installation frame.
TECE flush plates – Flush-mounted installation
-
Flush plates
Installation from above
The flush-mounted installation frame can also be used for
top actuation. Installation is the same as installing the flush
plate from the front. The frame must be mounted in the
“reading direction” (= “TOP” lettering to the wall).
“Flush-mounted installation from above”– dimensions
However, thicker minimum panel facing is required due to
the dimensions of the installation frame:
A minimum panel facing of mm corresponds to a panel
facing with
- x mm or
- x . mm thick plaster board.
“Flush-mounted top actuation” installation – minimum wall structure
On a minimum wall structure, there is no space left
between the installed flush plate and the wall (see picture
above). However, for aesthetic reasons, an equal distance
in front of and behind the flush plate is preferred (see
picture below). This also applies to the installation of the
TECEsquare metal flush plate which has slightly larger
dimensions.
“Flush-mounted installation from above” – wall structure (suggestion)
Brick-wall – toilet flush plate
In contrast to the dry-wall, for the brick-wall, an extended
bare-wall protection is required in addition to the TECEbox
brick-wall mounted cistern.
However, TECE cisterns of all installation heights can also
be used in brick-walls.
Components required:
TECEbox module Brick-wall bare-wall
protection
Installation frame for
toilet
Installing the toilet flush plate in a brick-wall
Remove the standard bare-wall protection and mount the
larger brick-wall bare-wall protection for flush-mounted
installations (order no. ).
-
Flush plates

Mount the expanded metal, reinforcement fabrics or similar
in the cistern area. Apply a layer of plaster of at least
mm thick (measured from the front edge of the splash
guard) to the wall.
Remove the brick-wall bare-wall protection.
Remove the protective foils from the bonding surfaces on
the installation frame, and stick them, together with those
of the support frame onto the plastered surface. Observe
the correct position of the “TOP” marking, and ensure
horizontal alignment.
TECE flush plates – Flush-mounted installation
-
Flush plates

Adjust the depth of the installation frame to the tile thick-
ness (– mm). If the wall structure is thicker (up to
mm), as is the case for example with natural stone, you can
use a suitable upgrade kit (order no. ).
After adjusting the depth, you can tile right up to the instal-
lation frame.
Tip:
To obtain a perfect tile edge around the installation frame,
TECE recommends cutting the tiles with a water jet cutter.
Remove the support frame and polystyrene bare-wall
protection. Then mount the matching support frame as
described in the respective installation instructions (TECE-
loop or TECEsquare). Finally, insert the flush plate into the
flush-mounted installation frame with the aid of the bow-
type handles. The handles are included in the installation
frame's scope of supply.
-
Flush plates

Installation from above
In a brick-wall structure too, the flush-mounted installation
frame can be used to install the flush plate from the top.
Installation is the same as installing the flush plate from the
front. The frame must be mounted in the “reading direc-
tion” (= “TOP” lettering to the wall).
“Flush-mounted installation from above”– dimensions
Due to the installation frame's dimensions a thicker wall
structure is necessary:
Minimum wall structure = mm
“Flush-mounted installation from above” – minimum wall structure
On a minimum wall structure, there is no space left
between the installed flush plate and the wall (see illus-
tration above). However, for aesthetic reasons, an equal
distance in front of and behind the flush plate is preferred
(see illustration below). This also applies to the installation
of the TECEsquare metal flush plate which has slightly
larger dimensions.
“Flush-mounted installation from above” – wall structure (suggestion)
Dry-wall – urinal flush plate
A flush-mounted installation frame also exists for uri-
nals. The TECEloop urinal flush plate can be installed by
flush-mounting this frame in dry-wall structures.
Installing the urinal flush plate in a dry-wall
To insert the flush-mounted installation frame into the
plasterboard, a recess for the cistern's inspection opening
must be made in the plaster board.
To do this, place the installation frame over the urinal bare-
wall protection.
TECE flush plates – Flush-mounted installation
-
Flush plates

Mark the dimensions of the inside of the installation frame
– width mm, height mm – in the centre of the
plasterboard.
Saw the required opening for the installation frame in the
board.
Screw the plasterboard centrally over the module.
Remove the protective foils from the bonding surfaces on
the installation frame, and stick them, together with those
of the support frame, onto the plasterboard. Observe the
correct position of the “TOP” marking, and ensure horizon-
tal alignment.
-
Flush plates
Adjust the depth of the installation frame to the tile thick-
ness (– mm). If the wall structure is thicker (up to
mm), as is the case for example with natural stone, you can
use a suitable upgrade kit (order no. ).
After adjusting the depth, you can tile right up to the instal-
lation frame.
Tip:
To obtain a perfect tile edge around the installation frame,
TECE recommends cutting the tiles with a water jet cutter.
Remove the support frame and proceed as described in
the installation instructions (installing the urinal cartridge,
installing the support frame, etc.). Finally, insert the flush
plate into the flush-mounted installation frame with the aid
of the bow-type handles. The handles are included in the
installation frame's scope of supply.
TECE flush plates – Flush-mounted installation
-
Flush plates

TECElux Mini
The TECElux Mini is a real glass flush plate with electronic
flush actuation. A sensor recognizes when somebody
approaches the toilet – at which point, the contours of the
sensor surfaces light up through the seamlessly smooth
glass facing.
Flushing is activated without contact or by a light tap.
The safety glass plate only stands out slightly from the
wall. Thanks to the installation frame, it can also be flush-
mounted in the wall.
150
220
8
TECElux Mini toilet flush plate, dual-flush technology
Wall-mounted installation of the toilet flush
plate
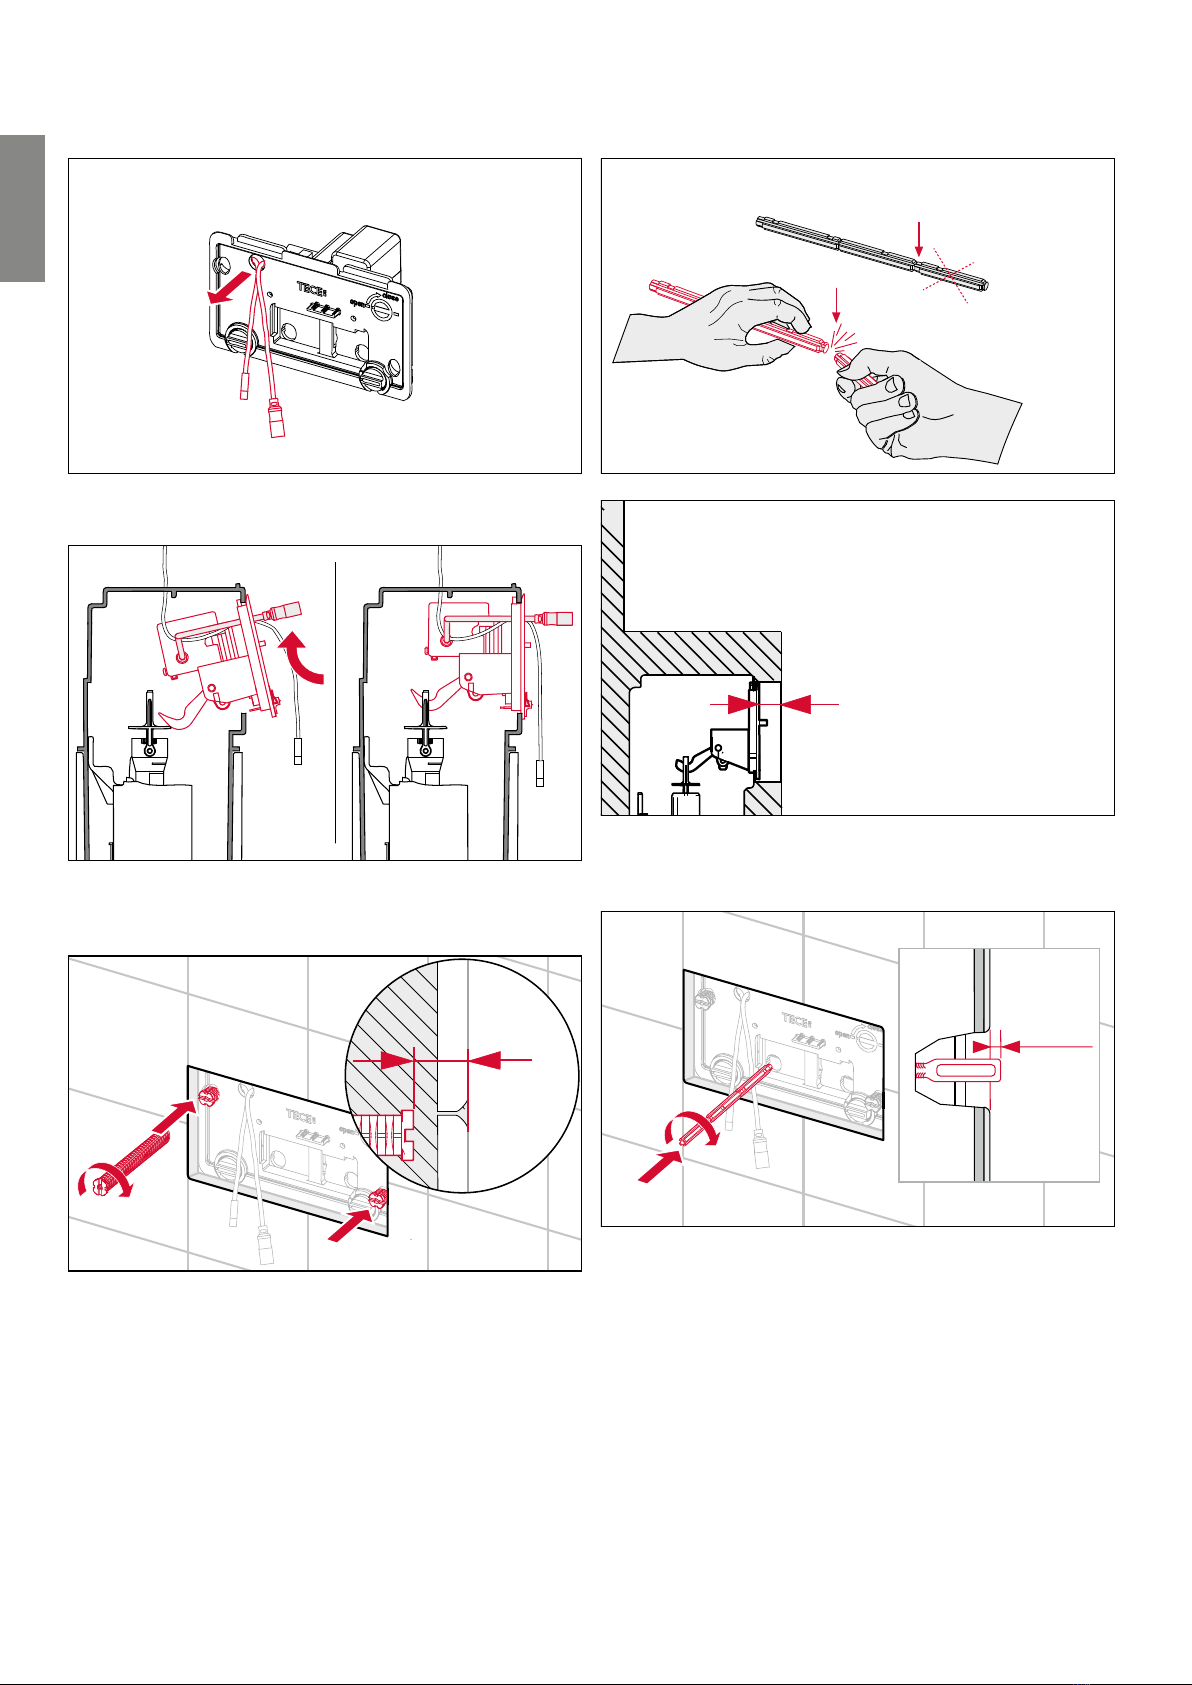
1
Open the splash guard.
2
Open the corner valve and suciently flush out the pipe.
3
Turn the corner valve to close it again and connect the
reinforced hose to the filling valve. If you wish to fill the
cistern with water (e.g. for the initial operation), you must
open the corner valve again.
4
40
18
Ø 14
If there is no hole in the splash guard, drill a hole on the
splash guard in the area shown.
5a
Mount the actuation motor onto the splash guard.
TECE flush plates – TECElux Mini
-
Flush plates
5b
Guide the cable and plug through the splash guard.
6
Place the splash guard and actuation motor back in the
cistern.
10 mm
7
Screw in both attachment rods – distance of attachment
rods to wall surface = mm.
8a
A
8b
< 60 mm (A)
Break o the actuating rods according to the wall struc-
ture.
9
3 mm
Screw in both actuating rods – distance of actuating rods
to wall surface = mm.
TECE flush plates – TECElux Mini
-
Flush plates

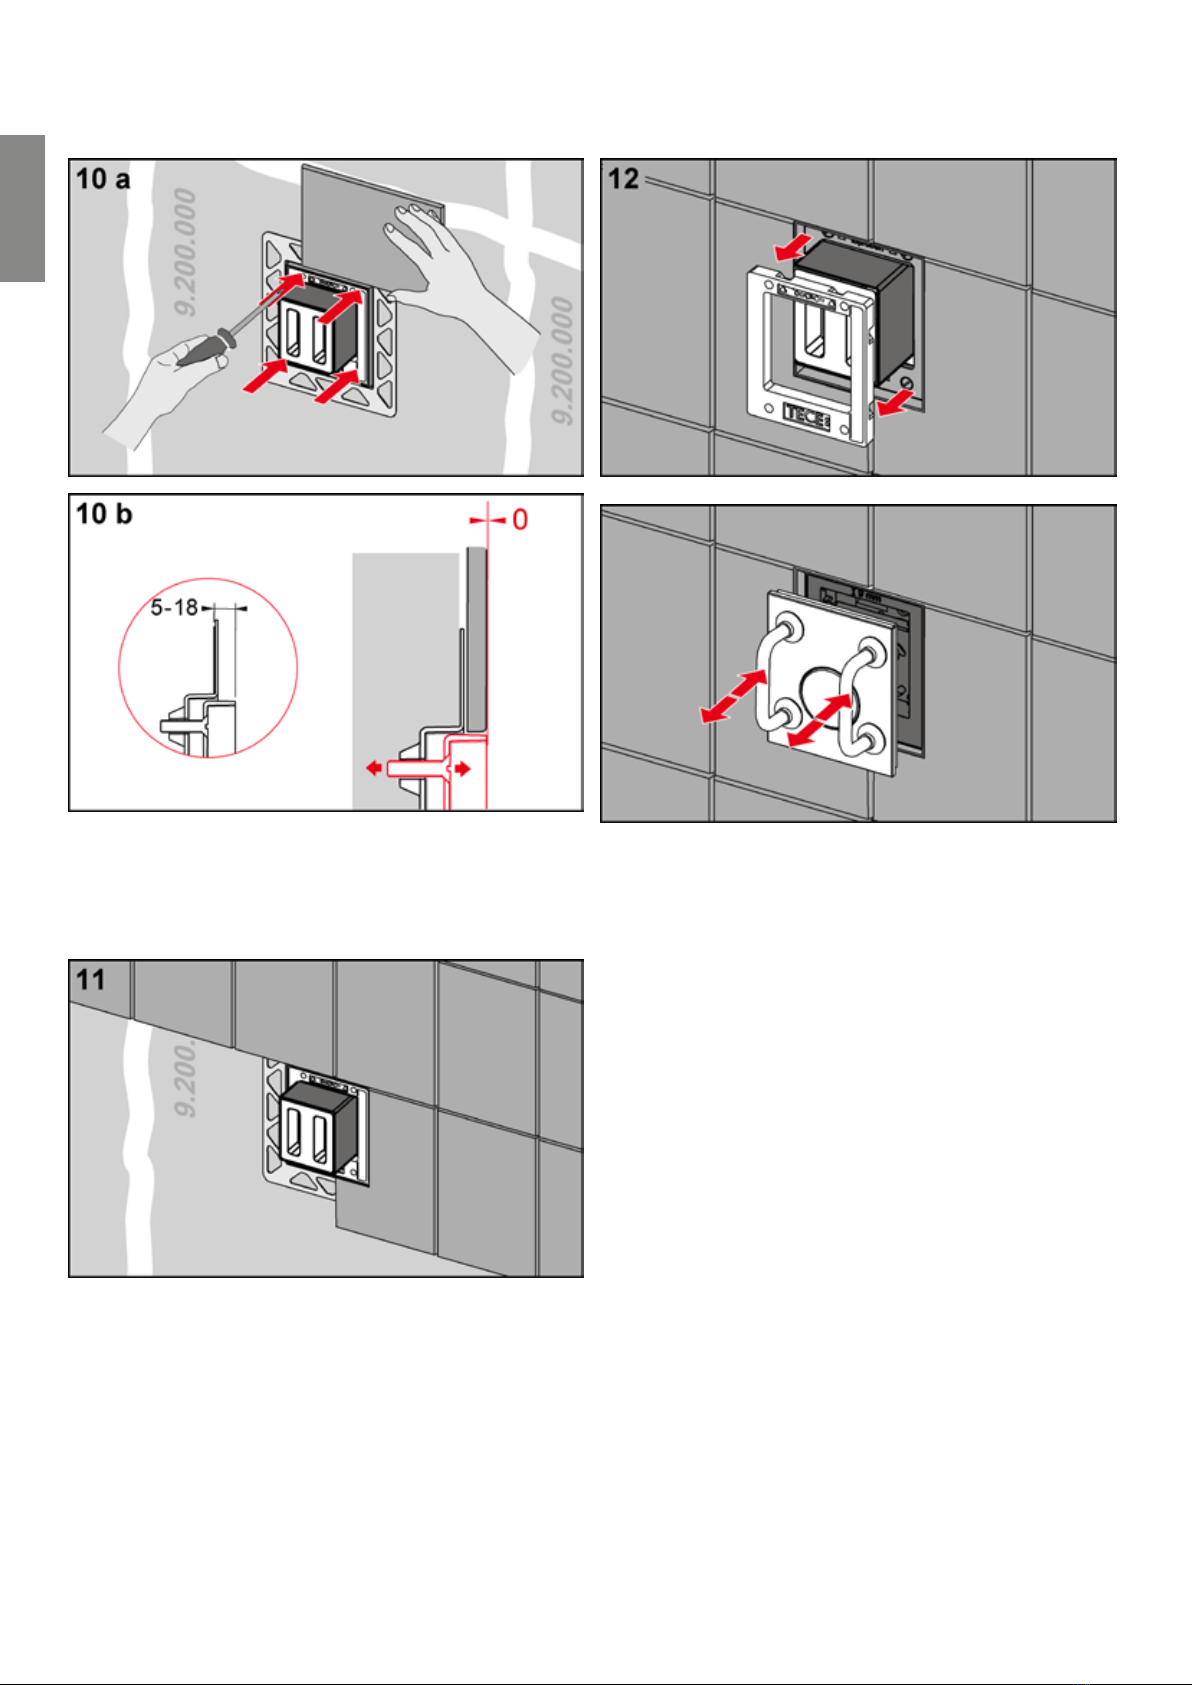
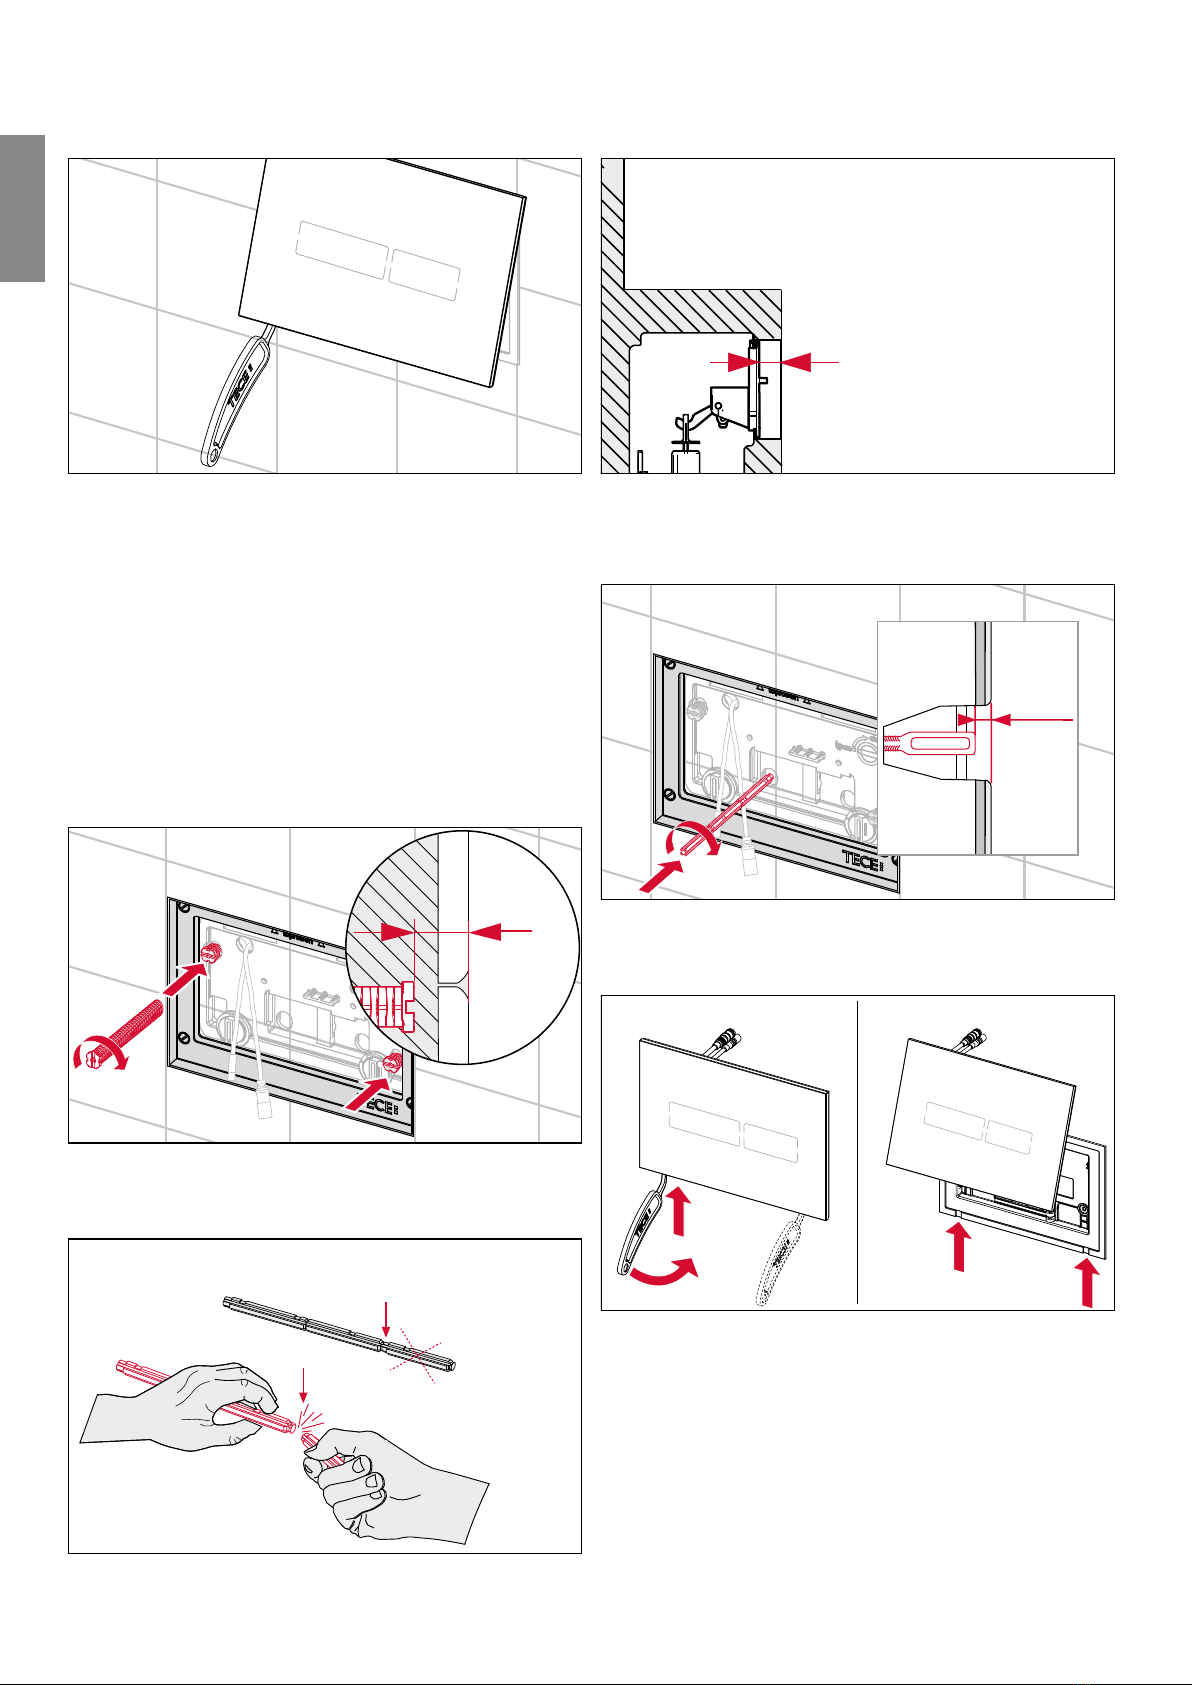
10
The cover can be detached from the flush plate using
the disassembly tool. To do this, insert the tool into the
recesses on the underside of the flush plate and carefully
remove the cover.
11
Screw the support frame onto the attachment rods.
12a
2.
1.
12b
Connect the plug to the actuation motor and the trans-
former.
13
Mount the glass cover of the TECElux Mini electronics
14
Check whether the touch pad lights up.
-
Flush plates
The cover can be detached from the flush plate using
the disassembly tool. To do this, insert the tool into the
recesses on the underside of the flush plate and carefully
remove the cover.
Flush-mounted installation of the toilet flush
plate
For the flush-mounted installation of the TECElux Mini
flush plate, follow the same first six steps for the wall-
mounted installation of the TECElux Mini.
7
18 mm
Screw in both attachment rods – distance of attachment
rods to wall surface = mm.
8a
A
8b
< 60 mm (A)
Break o the actuating rods according to the wall struc-
ture.
9
5 mm
Screw in both actuating rods – distance of actuating rods
to wall surface = mm.
10
The cover can be detached from the flush plate using
the disassembly tool. To do this, insert the tool into the
recesses on the underside of the flush plate and carefully
remove the cover.
TECE flush plates– TECElux Mini
-
Flush plates
11a
Stick the spacers onto the back of the TECElux Mini's sup-
port frame.
11b
Screw the support frame onto the attachment rods.
12a
2.
1.
12b
Connect the plug to the actuation motor and the trans-
former.
13
Mount the glass cover of the TECElux Mini electronics.
14
Check whether the touch pad lights up.
-
Flush plates

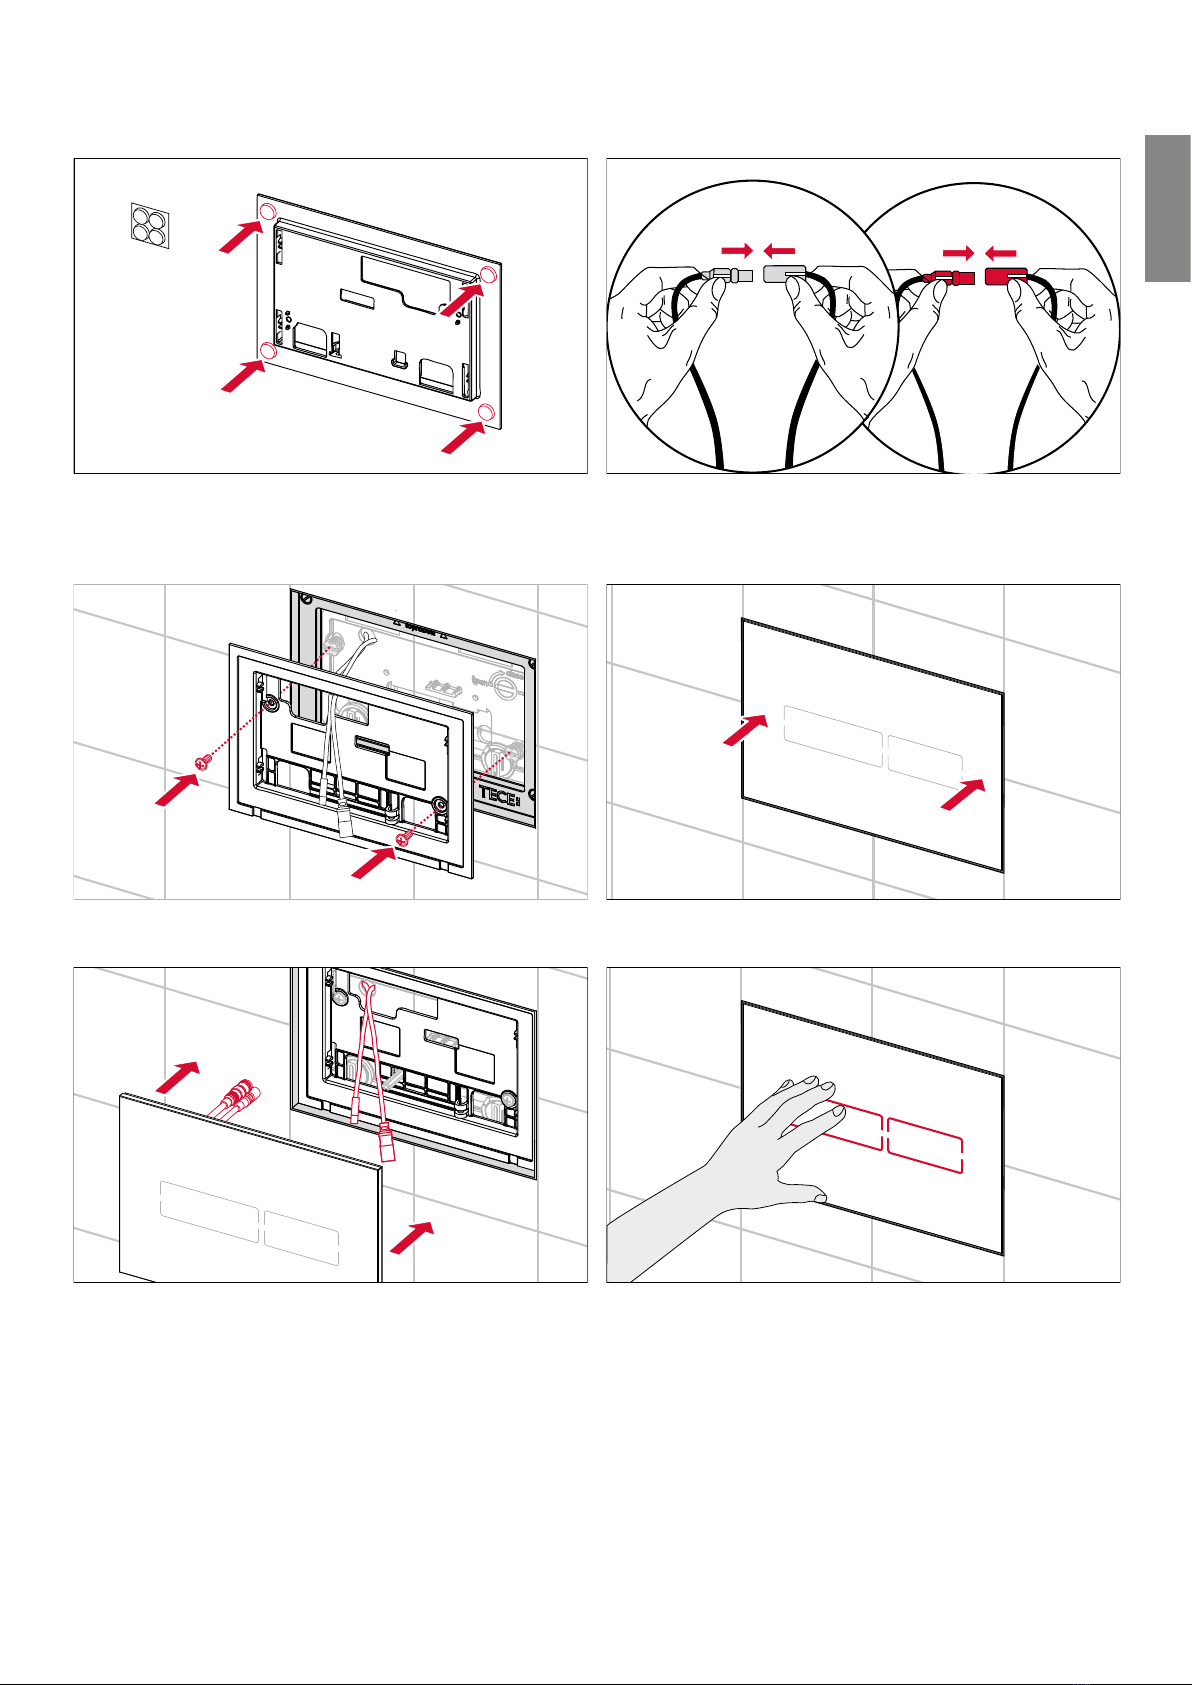
The installed cover can be removed from the flush plate
using the bow-type handles included in the installation
frame's scope of supply.
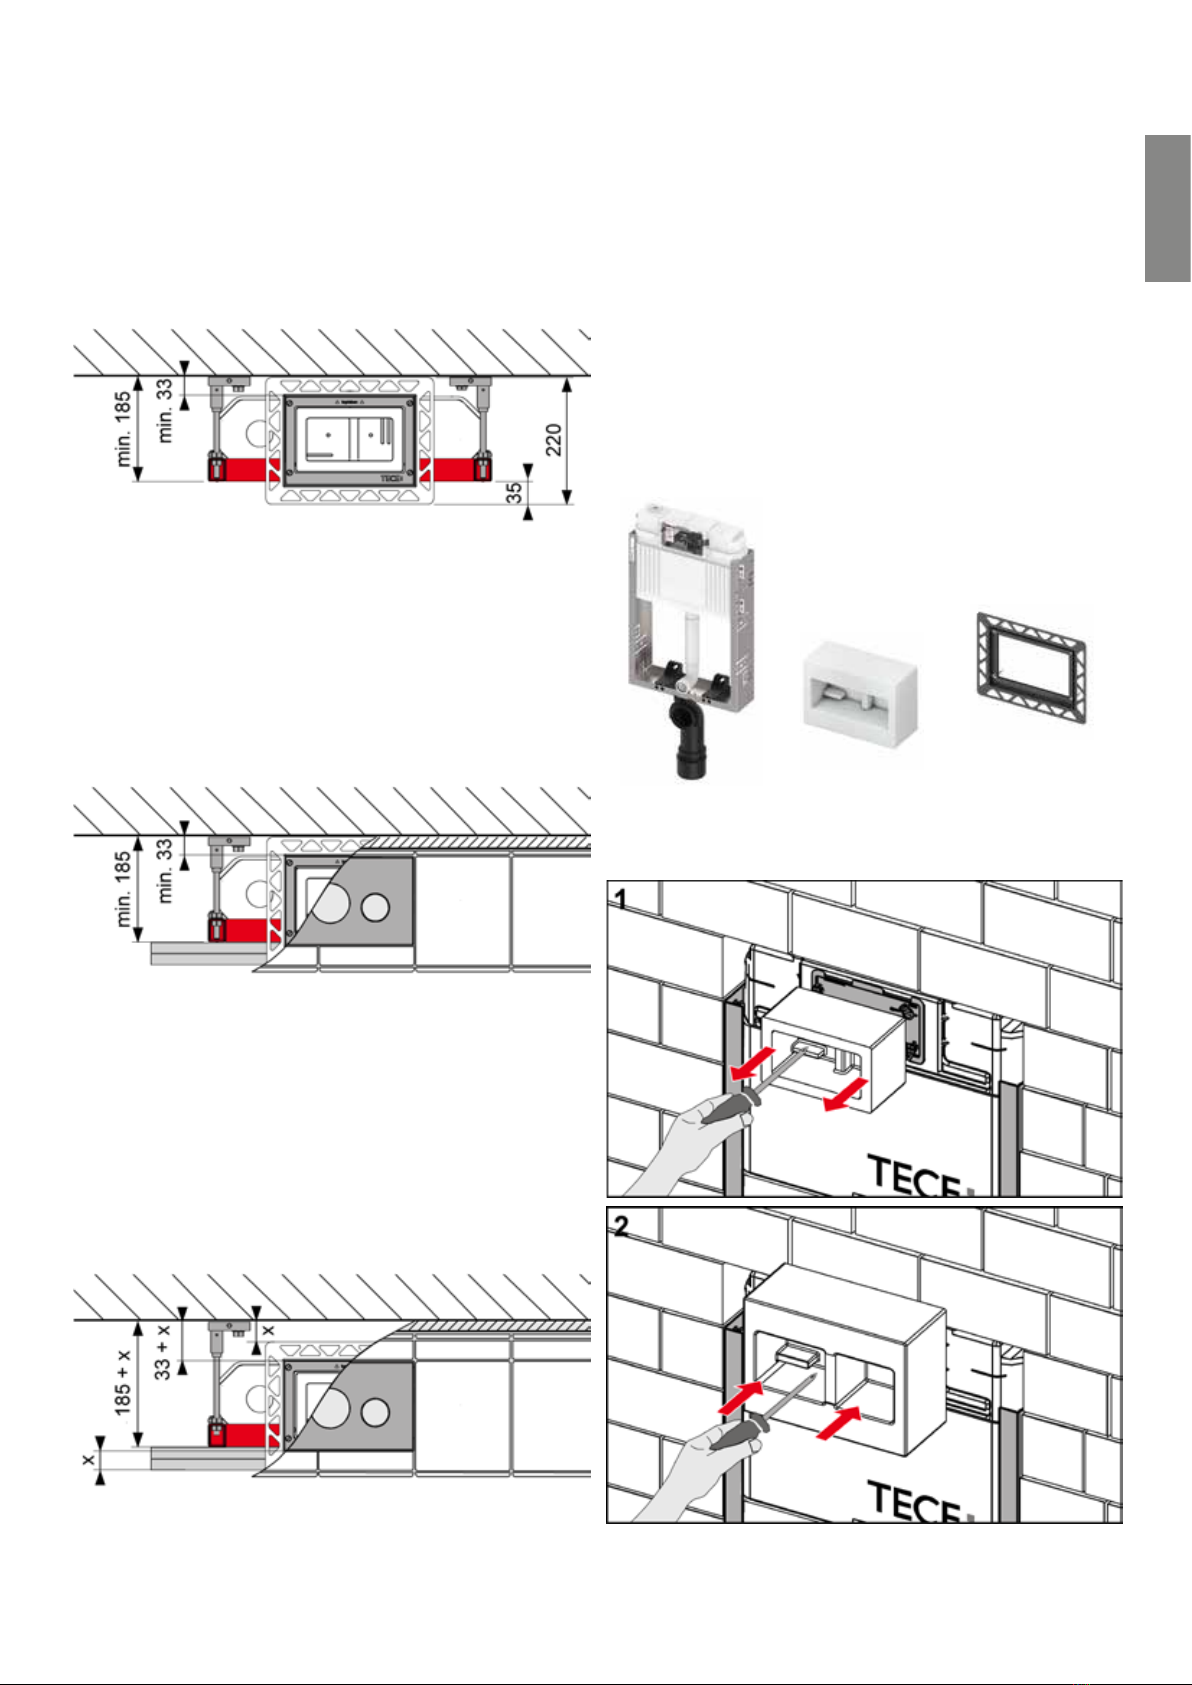
Installing the transformer with connection
cable
The transformer is required for the TECElux Mini's power
supply. A flush-mounted socket with a diameter of min.
60mm and a depth of 61 mm is suitable for installation in
dry-wall or brick-wall structures.
0–475 cm
0–475 cm
0–475 cm
230 V ~
OKFF
> 61
Ø 60
0–475 cm
TECE flush plates – TECElux Mini
Positioning the trans-
former: In the -cm
range around the cistern
(entire cable length: m).
-
Flush plates
This manual suits for next models
9
Table of contents
Other TECE Plumbing Product manuals


Popular Plumbing Product manuals by other brands

AWT
AWT 160 Series Installation and operation instruction

Blue Lagoon
Blue Lagoon UV-C Tech 15 WATT manual

Altair
Altair 51167-BAT-WH-FB manual

Sterling Plumbing
Sterling Plumbing Shower Receptor 72151100 Specification sheet

KEUCO
KEUCO Edition 90 59085 010901 Mounting instruction

Mora
Mora Rexx k5 Installation instruction


