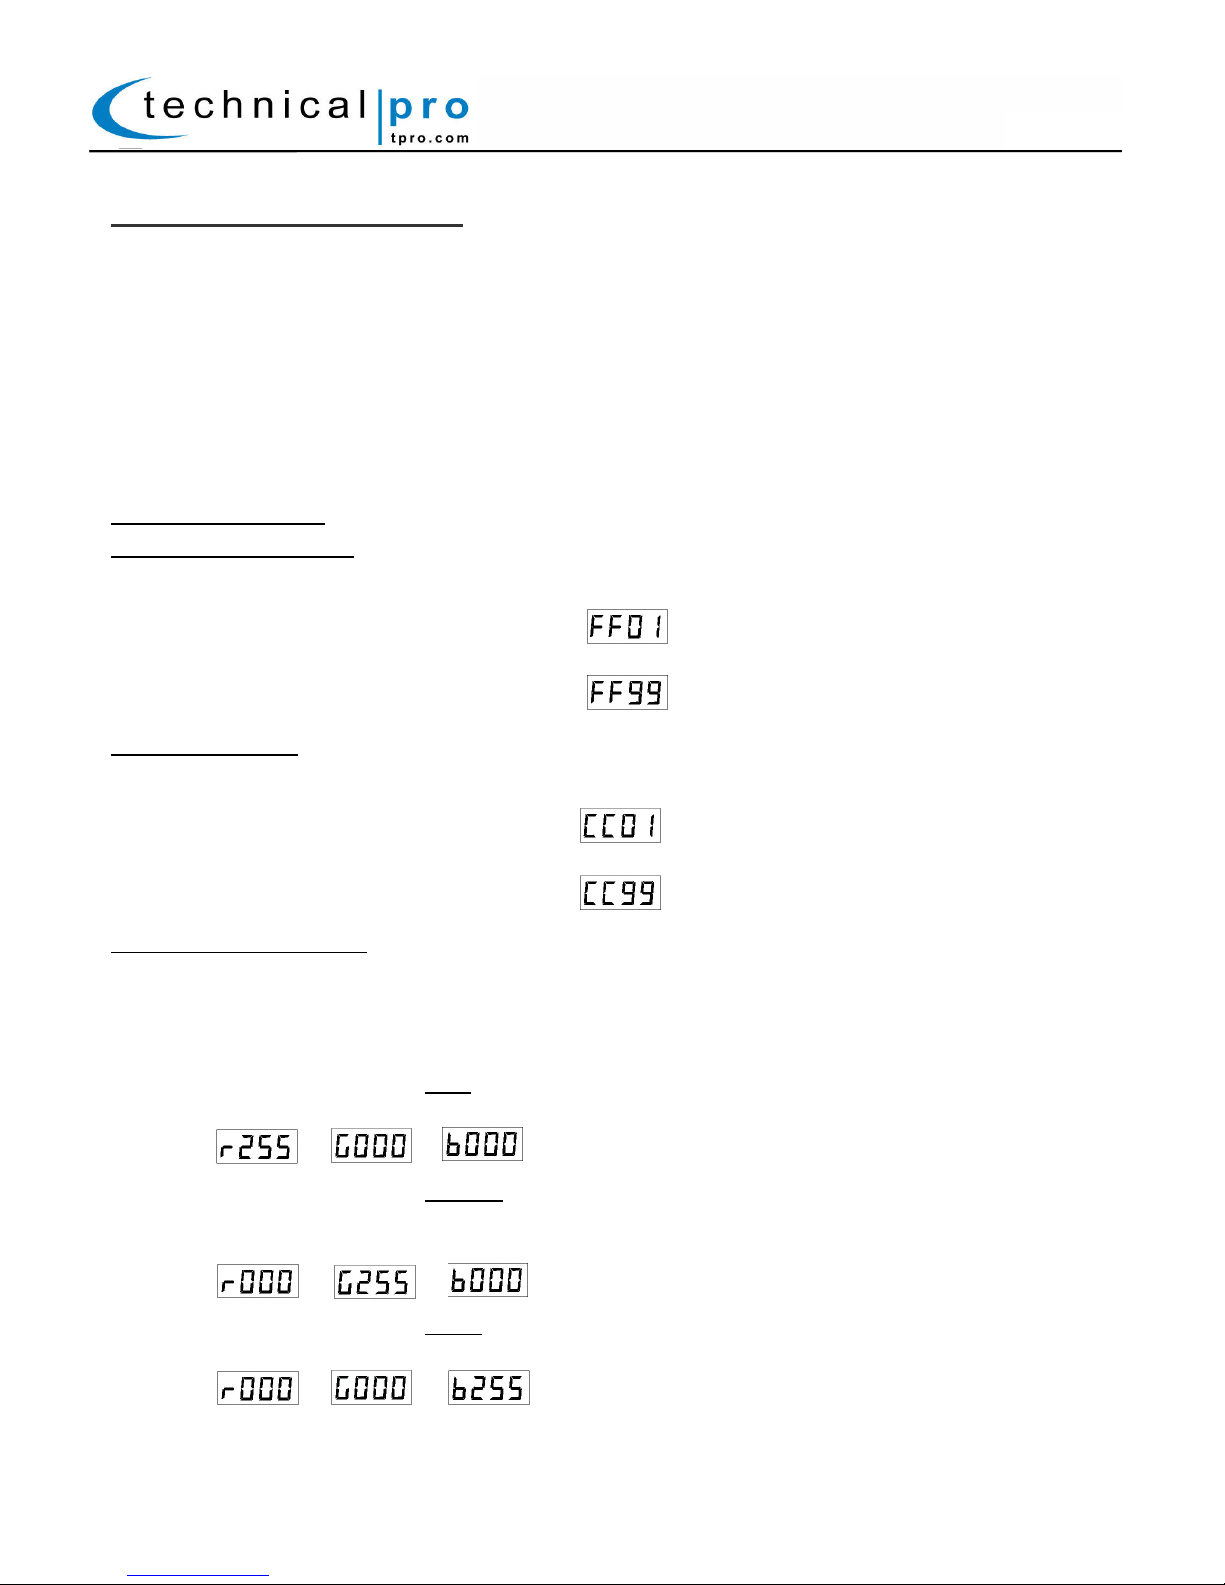
Technical Pro LGSPOT18 User manual

User Manual
Technical Pro LED Par Can with Power Linking
MODEL: LGSPOT18

P-1
WARNING!
CAUTION: TO REDUCE THE RISK OF ELECTRIC SHOCK, DO NOT REMOVE THE COVER ON THIS SPEAKER. THERE ARE NO USER-
SERVICEABLE PARTS INSIDE. REFER ALL SERVICING TO A QUALIFIED TECHNICIAN
The l ghtn ng flash w th arrowhead symbol w th n an equ lateral tr angle s ntended to alert the user to the presence of "dangerous"
voltage w th n the product's enclosure that may be of suff c ent magn tude to const tute a r sk of electr c shock to humans. Users
should exh b t extra safety when th s symbol appears n th s nstruct on manual and follow all precaut ons as they are stated.
The exclamat on po nt w th n an equ lateral tr angle s ntended to alert the user to the presence of mportant operat ng and
ma ntenance (serv c ng) nstruct ons n th s manual.
1- Read these nstruct ons thoroughly before us ng th s tem.
2- Keep these nstruct ons for future reference.
3- Heed all warn ngs.
4- Follow all nstruct ons.
5- WARNING: To prevent f re or electr c shock, do not expose th s equ pment to ra n or mo sture. Do not store or operate th s
product near any l qu ds.
6- Clean only w th a dry cloth.
7- Do not store or operate th s product near any heat sources such as rad ators, heat reg sters, stoves, or other apparatuses
( nclud ng ampl f ers) that produce heat.
8- Do not defeat the safety purpose of the polar zed or ground ng-type plug. A polar zed plug has two blades w th one w der than the
other. A ground ng plug has two blades and a round ground ng prong. The w de blade or th rd prong s prov ded for your safety. If
the prov ded plug does not f t your outlet, consult an electr c an for the replacement of the obsolete outlet.
9- Protect the all w res connected to th s un t from be ng walked on or p nched, part cularly plugs and the po nt where they ex t from
the un t. When remov ng the cord from the power outlet, remove t by hold ng the plug not by pull ng the cord.
10- Unplug the un t dur ng l ghtn ng storms or when unused for long per ods of t me.
11- When w r ng th s un t and all other equ pment used n connect on to th s un t make sure that all of your equ pment s turned OFF.
12- Once nstallat on and w r ng s complete power on all your equ pment w th the volume and level controls turned DOWN. Once all
the equ pment s ON slowly ra se the volume or level controls to the r proper pos t ons.
13- When ground ng th s un t, be sure to do so correctly, so as not to defeat the bu lt- n ground ng n th s un t.
14- Before plac ng, nstall ng, r gg ng, or suspend ng any product, nspect all hardware, suspens on, cab nets, transducers, brackets
and assoc ated equ pment for damage. Any m ss ng, corroded, deformed, or non-load rated component could s gn f cantly reduce
the strength of the nstallat on, placement or array. Any such cond t on severely reduces the safety of the nstallat on and should be
mmed ately corrected. Use only hardware wh ch s rated for the load ng cond t ons of the nstallat on and any poss ble short-term,
unexpected overload ng. Never exceed the rat ng of the hardware or equ pment.
15- Consult a l censed, Profess onal Eng neer regard ng phys cal equ pment nstallat on. Ensure that all local, state and nat onal
regulat ons regard ng the safety and operat on of equ pment are understood and adhered to.
16- Refer all serv c ng to qual f ed serv ce personnel. Serv c ng s requ red when the apparatus has been damaged n any way, such
as power supply cord or plug s damaged, l qu d has been sp lled or objects have fallen nto the apparatus, the apparatus has been
exposed to ra n or mo sture, does not operate normally, or has been dropped.
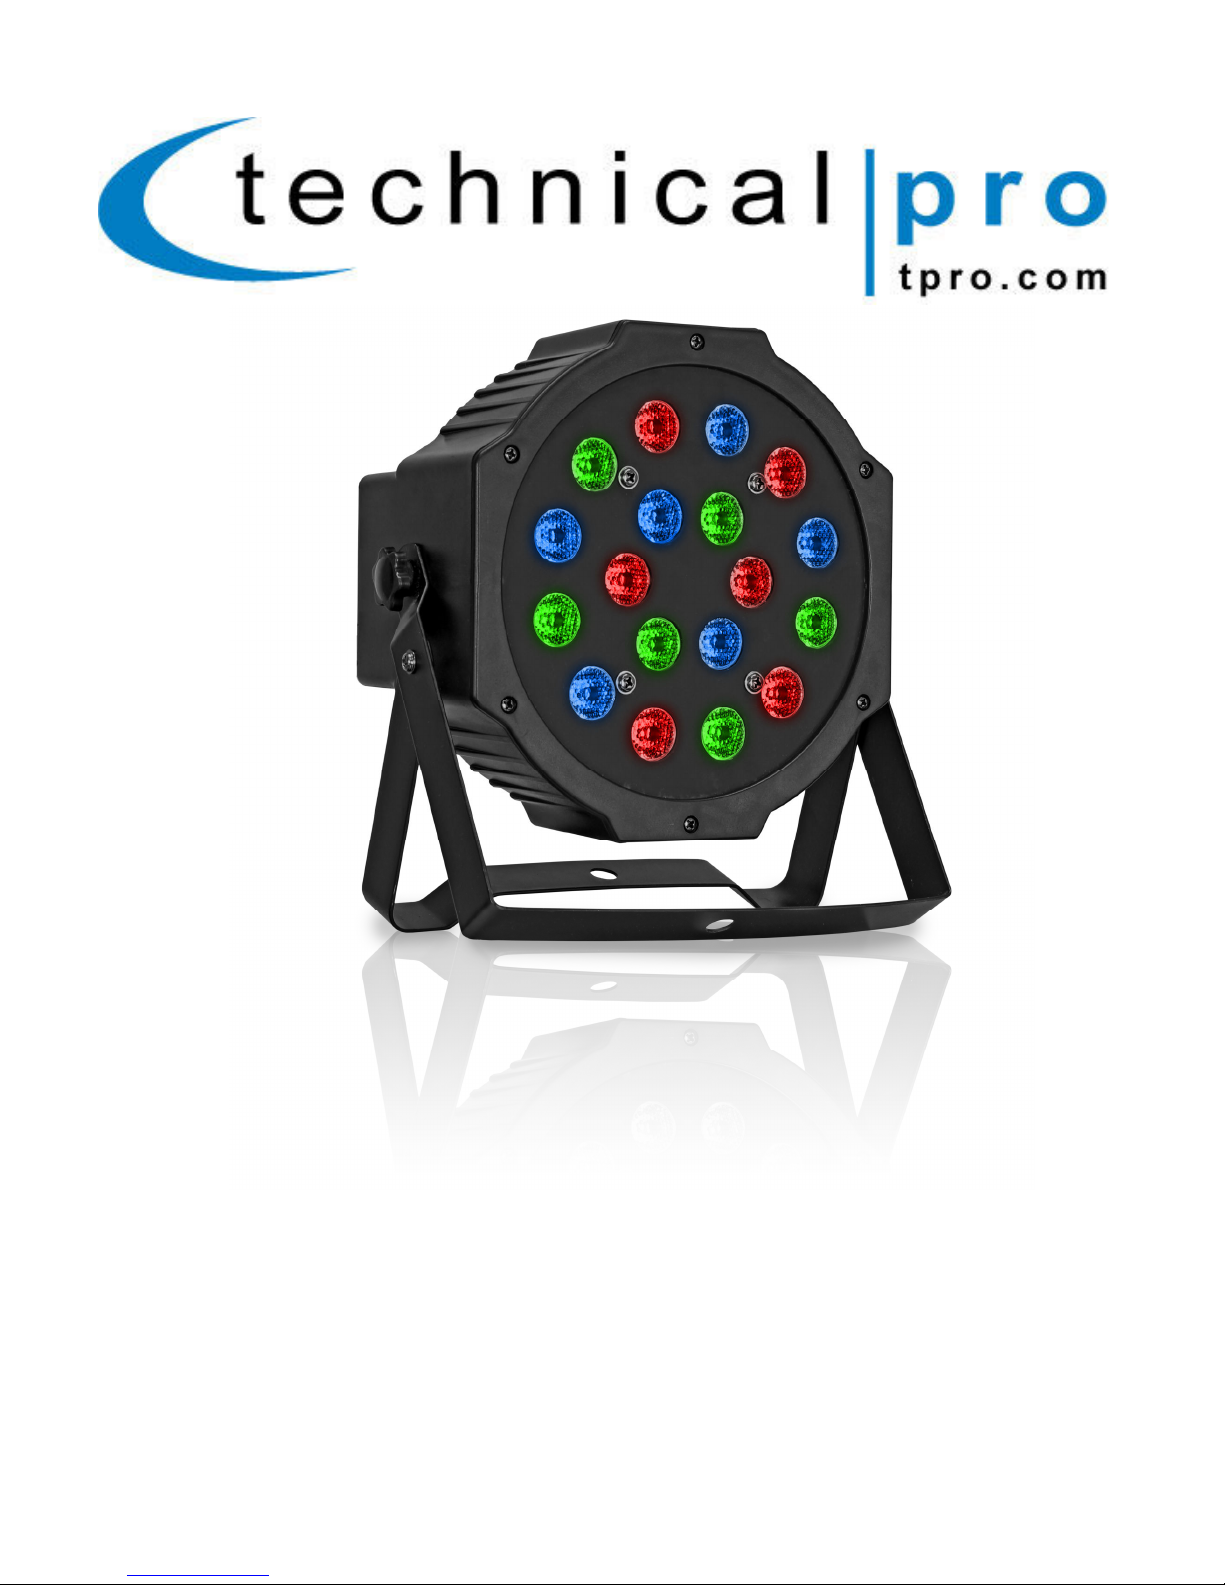
Introduction
Congratulat ons and thank you for your purchase of th s Techn cal Pro LED Par Can. To get the most from your un t t s
recommended that you rev ew all of the nformat on prov ded n th s nstruct on manual before operat ng th s equ pment.
LGSPOT18

P-2
LGSPOT18 Panel:
1. DMX Output (XLR): DMX (Digit l Multiplex) is the form of communic tion between controller nd fixtures.
When linking multiple LGSPOT18 units simply connect the DMX OUTPUT to the DMX INPUT on the next unit.
2. LED Displ y Screen: The LED displ y screen will show the settings inform tion.
3. UP Button: Press this button to incre se the number on the displ y screen. Press nd hold down this
button to r pidly incre se the number.
4. Menu Button: Press this button to switch between the multiple settings on the LGSPOT18. More det ils on
the settings c n be found below.
5. Cooling F n: Keep both vents cle r to llow for the unit to properly cool.
6 DMX Input (XLR): DMX (Digit l Multiplex) is the form of communic tion between controller nd fixtures.
Connect the DMX output from the controller to this input. When linking multiple LGSPOT18 units connect
the DMX OUTPUT to the DMX INPUT on the next unit.
7. Power Output: When linking multiple units connect the power output to the power input on the next unit.
8. DOWN Button: Press this button to decre se the number on the displ y screen. Press nd hold down this
button to r pidly decre se the number.
9. Enter Button: Press this button to s ve your settings to memory.
10. Power Input: Connect the power c ble to this input to power the unit on. When linking multiple units
connect the power output to the power input on the next unit.
LGSPOT18
q
w
e
r
t
y
u
i
o
1)

P-3
AC Power Cord Connect on:
To connect the power cord to the LGSPOT18 plug the female s de of the power cord nto the power cord nput
wh ch s on the rear of the un t. Then plug the male s de of the power cord to an electr c outlet. When l nk ng
LGSPOT18 un ts to each other connect the power output on the f rst un t to power nput on the next un t.
The AC power cords suppl ed purposefully have 2 blades and one ground ng prong. If your outlet s not equ pped
to handle th s type of plug, do not attempt to forcefully plug th s AC power cord nto the outlet, and do not alter
the plug so that t can f t n the outlet. The only course of act on you can take s to f nd another outlet wh ch s
properly equ pped to handle a grounded plug or have an electr c an upgrade your electr cal outlet. Be sure that
the plug s well connected so that t does not d sconnect n the m ddle of usage. If at any po nt n t me the
suppl ed AC power cord s punctured or damaged replace t w th a new power cord from a local electr c an.
Operat ng Modes
Gradual Color Chang ng:
Press the menu button unt l FF“XX” appears on the d splay screen. Press the up and down buttons to
adjust the speed at wh ch the colors change.
To have the colors change rap dly set the un t to
As the numbers ncrease the speed at wh ch the colors change w ll slow down.
To have the colors change slowly set the un t to
Strobe L ght Effect:
Press the menu button unt l CC“XX” appears on the d splay screen. Press the up and down buttons to
adjust the speed of the strobe effect.
To have a rap d strobe l ght effect set the un t to
As the numbers ncrease the speed at wh ch the strobe l ghts change w ll slow down.
To have a slow strobe l ght effect set the un t to
RGB Color D mmer Mode:
Press the menu button unt l r“XXX” (red), G”XXX” (green) or b”XXX” (blue) appears on the d splay
screen. You can use the steps below to adjust the ntens ty of the Red, Green and Blue LEDs
respect vely. Once the sett ngs are set the un t w ll d splay a color based on the ntens ty of each of the
colors.
To set the un t to d splay a sol d RED output, set each of the colors to the follow ng sett ngs, where Red
has been set to the max mum ntens ty and Green and Blue have been set to the m n mum ntens ty:
To set the un t to d splay a sol d GREEN output, set each of the colors to the follow ng sett ngs, where
the Red has been set to the m n mum ntens ty and Green has been set to the max mum ntens ty and
Blue have been set to the m n mum ntens ty:
To set the un t to d splay a sol d BLUE output, set each of the colors to the follow ng sett ngs, where
Red and Green has been set to the m n mum ntens ty Blue have been set to the max mum ntens ty:
LGSPOT18
Also, you can choose d fferent two color comb nat on from the LED d splay, l ke red&green; red&blue;
green&blue.

P-4
Wh te Color D mmer Mode:
When all three colors (Red, Green and Blue) are set to the same ntens ty the color w ll output WHITE.
Press the menu button unt l u”XXX” (wh te) appears on the screen. The u”XXX” sett ng s a new sett ng
creat ng a shortcut to have the un t d splay a wh te output. Instead of manually sett ng red, blue and
green to the same ntens ty, just set the u”XXX” to the des red sett ng and t w ll automat cally adjust the
red, blue and green sett ngs. For example, sett ng the un t to u255 w ll automat cally create the
follow ng sett ngs; r255, G255 & b255. Th s s d splay the max mum ntens ty wh te output.
To d splay the m n mum ntens ty wh te output, set the un t to u001.
Once the u”XXX” sett ng has been created you can manually adjust the red, green and blue sett ngs as
well. However, f the u”XXX” sett ng s adjusted t w ll once aga n reset the other three colors.
Demo Mode:
To set the un t to d splay n demo (demonstrat on) mode press the menu button to
Sound Act vated Mode:
To set the un t to output the LEDs based on the sound n the room, press the menu button to
Master / Slave Mode:
When l nk ng mult ple LGSPOT18 un ts w thout the use of a DMX controller use the Slave feature to
have one LGSPOT18 control the output of all the other LGSPOT18 un ts. Connect the LGSPOT18 un ts
to each other us ng the XLR nputs and outputs. Set all of the un ts that you want to be controlled to
the sett ng. Then program the controll ng un t to the sett ngs you would l ke to see d splayed.
The master / slave feature allows you to control mult ple un ts w thout hav ng to phys cally go to each
un t and alter the sett ngs allow ng you to qu ckly adjust the color output throughout the ent re venue n
seconds.
3 Channel Mode:
When us ng the LGSPOT18 together w th a DMX controller, set the LGSPOT18 to one of the sett ngs
as d000 – d512 to determ ne the address of the respect ve LGSPOT18. For example, sett ng a
LGSPOT18 to d001 w ll allow the DMX controller to set the Red, Green and Blue sett ngs by mak ng
adjustments on the CH1, CH2 and CH3 sett ngs of the DMX controller.
DMX
Channel Value Controls
CH1
0 Red off
1- 255 From dark to br ght
CH2
0 Green off
1- 255 From dark to br ght
CH3
0 Blue
1- 255 From dark to br ght
LGSPOT18

P-5
7 Channel Mode:
When us ng the LGSPOT18 together w th a DMX controller, set the LGSPOT18 to one of the sett ngs
as - to determ ne the address of the respect ve LGSPOT18. For example, sett ng a
LGSPOT18 to A001 w ll allow the DMX controller to set the D mm ng, Red, Green, Blue, flash, color
chang ng and speed by adjust ng the sett ngs of CH1, CH2, CH3, CH4, CH5, CH6 & CH7 of the DMX
controller.
DMX
Channel Value Controls
CH1 0 - 255 D mm ng
CH2 0 Red off
1 - 255 From dark to br ght
CH3 0 Green off
1 - 255 From dark to br ght
CH4 0 Blue off
1 - 255 From dark to br ght
CH5 1 - 255 Flash from slow to fast
CH6
1 - 63 Color gradual: Channel 7 control speed
64 - 127 Pulse change: Channel 7 control speed
128 - 191
Color jump: Channel 7 control speed
192 - 255
Sound-act vated funct on open
CH7 0 - 255 Speed
LGSPOT18
Table of contents
Other Technical Pro Dj Equipment manuals