Technika MP-408 User manual

MP-408
MP-508
MP3 Player withVideo Support
User Guide

2
Table of Contents
Safety Information Page 3
About Your Player Page 4
Getting Started Page 5
Connecting the Player to the PC Page 5
Uploading Files to the Player Page 6
Transferring DRM Files Page 7
Transferring Other Files Page 8
Converting and Transferring Video Files Page 11
Using the Video Convertor Page 13
Disconnecting the Player from the PC Page 15
Switching the Player On and O Page 16
Accessing Player Modes Page 17
Playing Music Page 18
A-B Repeat Page 19
Locking and Unlocking the Player Page 19
The Music Library Page 20
Navigating Music Menus Page 23
Playing SMV Video Files Page 24
The FM Radio Page 25
Recording FM Programmes Page 28
Replaying Voice Recordings Page 29
Selecting Voice and FM Recordings Page 30
Viewing Photo Images Page 31
Voice Recording Page 33
System Settings Page 34
Audio Settings Page 34
Setting User EQ Page 35
Altering the Display Page 36
Setting the Sleep Timer Page 37
Setting the System Lock Time Page 37
Play Mode Settings Page 38
The System menu Page 39
Accessing Player Information Page 39
Setting the Language Page 39
Setting the Date and Time Page 40
Restoring System Defaults Page 40
Deleting and Renaming Files Page 41
Warranty and Specications Page 42

3
Important Safety Information
Please follow all these guidelines to safely operate your player.
• Read these instructions before using the player
• Keep these instructions. If you are transferring this product to a third party include these instructions.
• Do not use earphones or watch videos while driving, cycling or walking near trac.
• Do not listen at extremely high volumes – doing so can damage your hearing.
• To avoid damaging the player, always insert the earphones prior to switching the player on.
• Do not use or store the player in excessively dry, dusty or dirty environments.
• This product must not be exposed to dripping and splashing water or other liquids.
• Keep the player away from heat, humidity, and magnetic elds.
• Do not leave the unit exposed to direct sunlight for long periods of time,
• Keep the player away from heat sources.
• Clean the player with a soft cloth dampened slightly with clean water. Never clean the player with solvents or abrasives.
• Do not press the screen or apply excessive pressure to the player keys.
• Never disconnect the player from the PC without following the correct procedure.
• WARNING: This product contains an integral Polymer Li-ion battery. There is a risk of re and burns if the player is
handled improperly. Do not disassemble, crush, puncture, or dispose of in re or water. Do not attempt to open the
player case or service the battery pack. Use a qualied service technician to replace the battery and replace only with a
battery designated for this product. Dispose of the product with the battery intact in accordance with recycling
regulations in your area.
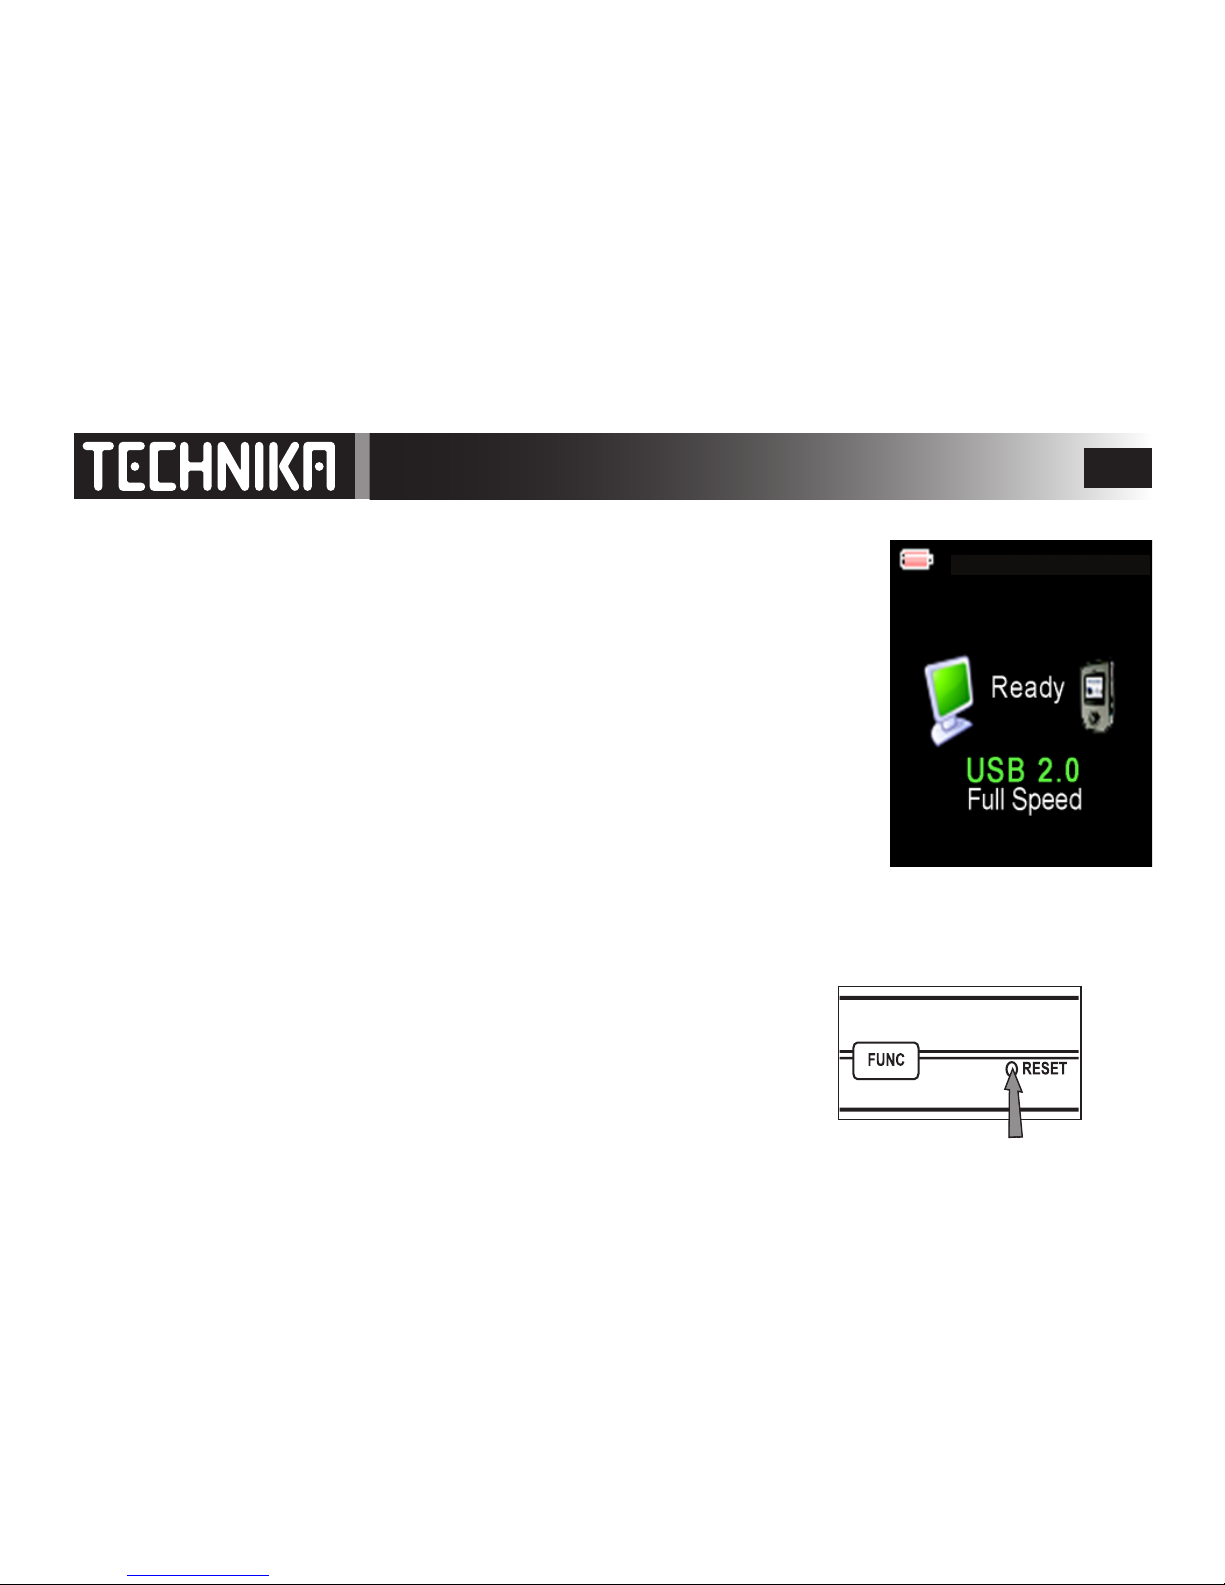
• WARNING: When the player is connected to a PC, there is a possibility that an electrostatic discharge may cause the
player to freeze and the screen to blank out. In the event of this happening it will be necessary to perform a reset
procedure. The player will then work normally. See Pages 5 and 15 for details.

4
About Your Player
Key to Symbols
1: MIC Microphone Input
2: FUNC Set A-B play in Music, Voice, FM Replay menus
Set “Favorite Songs”In music playlists.
3: RESET Reset the player.
4: V+ Increase Volume; Navigate Menu Items.
5:
I◄◄
Press to go to previous song/recording/ picture menu item.
Press and hold for fast reverse search during play.
When navigating menus, press to return to the previous screen
6:
►/II
Pause/Resume play.
Conrm/Enter an action in a menu.
7: USB Socket
8: 3.5mm Headphone Socket
9: V- Decrease Volume; Navigate Menu Items.
10:
►►I
Press to go to next song/recording/picture/menu item.
Press and hold for fast forward search during play
When naviagting menus, press to go to the next screen
11: MENU Change functions.
12: ON/OFF and STOP key. Also, press to UNLOCK the player.
MENU
V+
V_
RESET
MIC
FUNC
1
2
3
4
5
6 9
10
12
7 8
11

5
Getting Started
Before using the player you should charge the battery
Win2000/XP/Vista – The system will auto-recognise the player
Win 2000: ensure you have SP3 installed
Win XP: To use the latest Media Player (WMP11) you should have SP2 installed
• Make sure the player is switched o.
• Connect the supplied USB cable to the player
• Plug the cable into a free USB port on the PC.
• If connection is successful you will see the player screen on the right.
• You should leave the player battery to charge for at least six hours.
While the player is charging you can upload music and picture les directly to the
player. To view video les on the player you will need to convert them to a suitable
format. See Page 13-15 for details
You cannot operate the player controls when it is connected to the PC!!
RESETTING THE PLAYER
When the player is connected to a PC, there is a faint possibility that an electrostatic
discharge may cause the player to freeze and the screen to blank out. In the event of
this happening it will be necessary to perform this reset procedure.
• Disconnect the player from the PC (Refer to Page 15).
• Locate the RESET hole on the player
• Place a small piece of wire (the end of a paperclip) into the hole and press gently.
• This will reset the player which will now work normally.
Ver 2 .620.0 07

6
Uploading Files to the Player
When you connect the player to the PC it will appear as a removeable drive in
“My Computer”.
• To access “My Computer”: Click Start/My Computer - refer to the image on the right
• In the box that opens identify the player. It will be listed as a removeable disk.
Hint: To make it easy to identify the player on the PC, we suggest you
rename the disk. The PC will recognize the player by its new name
whenever you connect it.
You may now access and play les stored on the player, transfer data
between the PC and the player. You may also delete or rename les - see Page 41.
Tranferring Music Files
• Locate the les on your PC hard drive in one window.
• In a second window access the player via “ My
Computer”.
• Choose the les. Right click the les and select “Copy”
• Place the mouse on the player icon Right click the icon
and select and click “Paste” to copy the les across.
Note: If your les are stored in folders you can copy the
entire folder onto the player icon. You should ensure that
only music les (MP3 or WAV) are in the folders before you
transfer them.

7
DRM les are les with content protected by a license. DRM les should be transferred via Windows Media Player (WMP). Using
other methods may cause the les to be unplayable.
Windows 2000: DRM les should be transferred via Windows Media Player 9.
Windows XP: Transfer DRM les via Windows Media Player10 or 11.
Windows Vista: The current Media Player is Windows Media Player 11.
These instructions are for use with WMP 10. Other versions behave similarly.
First download the le from the website. Ensure you have downloaded the license according to the instructions on the sup-
plying website. If not, when you try to download the le to your player, WMP a message will appear in the operating window
asking you to download the license from the music publisher.
Transferring DRM Files
A. Connect the player to the PC.
B. Open Windows Media Player 10
C. Navigate to the folder where your
DRM les are stored
D. Select the desired WMA music
together with the DRM license

8
D. With the right button of the mouse, select “Add to Sync List”
E. A new window will open. In this window choose the “Sync”
option.
F. Select the desired WMA music together with the DRM license
E. In the “Sync” window, navigate to the
desired WMA music with DRM as step B
and select the player
F: Click “Start Sync” to start synchronising
the les to the player.

9
G. Allow the les to nish loading
completely.
H. You can now close Windows Media
Player

10
• In “My Computer”, navigate to the MP3
player
• Double Click on the player icon to open
the player folder
This is what the player structure looks like
before any music les are uploaded.
• Music les and folders are stored in the
player drive directly.
• Picture les should be uploaded to the
PHOTO folder
• Microphone recordings are stored in the
VOICE folder.
• Recordings of FM radio broadcasts are
stored in the VOICE folder.
• Video recordings are stored in the
MVIDEO folder.
When the player is connected to the PC these
folders and the three“hidden” les are created.
Use the correct folder when uploading les. If
you accidentally delete a folder, the player will
re-create it when you next connect it to the PC.
Transferring Other Files
If you store the wrong le types in the player there is a strong possibility
that the player will not recognise the le.
This is particularly the case with Video les which have to be specially
prepared and stored in the MVIDEO folder before the player will
recognise and play them.
MUSIC FILES GO HERE

11
Converting and TransferringVideo Files
• Insert the software CD into the CD Rom drive.
• In “My Computer”, navigate to the CD Drive.
• Double cick the CD icon to open the folder.
• Locate the Video2smv folder.
• Drag the folder to the desktop.
• Close the CD folder.
The folder contains the video conversion software
you need to convert video les so you can view
them on the player. We suggest that you create a
new folder to house the convertor and store your
converted les for easy retrieval.
NOTE: Only les that are supported by your installed
version of Windows Media Player can be converted.
If you cannot play the le in WMP you will not be
able to convert it. Some les may need special codecs
(DivX for example) to be viewed in WMP and con-
verted to the SMV format for use with your player.
• Double Click the Video2smv icon to open the
folder.
• In the screen that opens: Double click
the Video2smv icon to launch the program.

12
In the screen that opens:
1. Double cick Add.
2. Browse to the folder that contains the video le you
want to convert
3. Select the le
4. Press Open to add the le to the list in the convertor.
5. Repeat the process to add additional les

13
When you have selected the les you wish to convert
1. From the Tools menu, select a folder in which to save
the converted le
2. Adjust the parameters using the controls below
3. Click Convert.
You can alter the parameters of your video by using the
adjustments below. Bear in mind that the higher values
take up much more space on on the disc.
Using theVideo Convertor
Alter the Image Size: For full screen viewing select 160x128
Alter the Frame Rate
Alter the Image Quality
Alter the Audio and Video Bit Rates
Click ; set a folder to save the converted les

14
The le/s will now be converted to SMV format
1. Locate the folder where the converted le is stored
2. Connect the player to the PC as described. Navigate
to the MVIDEO folder in the Player. Open the folder and
copy the converted le into the folder
You are now ready to disconnect the player

15
Disconnecting the Player
After you have transferred the les and the player battery is charged:
1. Locate the“Safely Remove Hardware”icon on the taskbar at the bottom right of the screen.
2. Double click the icon
3. In the box that opens, click Stop
4. Another screen opens. Click OK
5. When you see this balloon over the taskbar you can
disconnect the player from the PC.
If the player screen goes blank or the PC fails to recognise the player:
Manually disconnect the USB cable from the PC and the player and
then perform the RESET procedure. See Page 5 for details

16
Operation
SWITCHING ON AND OFF
Allow the player to fully charge. Charging times will depend on the
amount of residual charge in the battery.
Connect the earphones to the HEADPHONE socket
To Switch the player on:
Press the button.
After a short delay of 4-5 seconds he welcome screen will display and
the player will update the music library and new uploads - then activate.
When you rst switch on: the player will go into Music Play mode.
In normal use: when you switch on the player will go to the mode it was
in when you switched it o.
To Switch the player o:
• Press and hold the button.
The player will display Good Bye and switch o
AUTO SWITCH-OFF
If there is a period of inactivity, the player automatically switches o to
save power. The time period can be altered in System settings.
• Press the button to switch on again.
HEADPHONE

17
Player Modes
Video mode FM Radio mode
Record mode
Voice/FM Radio
Replay mode
Photo mode
Your player has 7 Modes.
To access a mode from any player screen:
Press and hold the MENU key.
To move between modes: Press the
►►I
or
I◄◄
keys
To enter the selected mode: Press the
►/II
key
Music mode
Settings mode

18
Playing Music
Press to switch the player on
Press and hold the MENU key to access the MODES
Press the
►►I
or
I◄◄
keys to access MUSIC mode
Press the
►/II
key to enter MUSIC mode.
The Music Screen appears.
You can choose to play all tracks, one track, or groups of tracks
To play all the music tracks:
Press the VOL+ /– keys to highlight Play now
Press the
►/II
key. The rst track will display.
Press the
►/II
key to start play.
During Play you can:
Press the
►►I
or
I◄◄
keys to go forward or back a track
Hold down the
►►I
or
I◄◄
keys to fast forward or reverse
Press the
►/II
key to pause.
Press the
►/II
key
again to resume play
Press to stop play.
Press VOL+ /– to increase or decrease the volume level
When you have nished play:
Press and hold the key to switch the player o
The player signs o with “Goodbye”
Music
Play Now
Music Library
Z
Z
Z
Z
P
P
P
diana ross
feelings disc 1
experience.mp3
EQ Mode
Track No./Total Tracks
A-B Replay
Bit Rate
Format
Play Status
Normal
Repeat 1
Repeat All
Shue 1
Shue All
Progress Bar
Play
Pause
Stop
Clock Time
LOCK Mode ON Battery Status
Volume Level
Empty
Full
►
II
Time Elapsed
See ‘Play Mode’ on
P. 38 for details

19
diana ross
feelings disc 1
experience.mp3
Play Options
A-B REPEAT
During Play
when you reach the start of the passage
Press the FUNC key.
The “A” segment of the A-B indicator will indicate
when you reach the end of the passage
Press the FUNC key again
The “B” segment of the A-B indicator will turn yellow
The selected passage will now continuously repeat
To restore normal play
Press the FUNC key again
The default A-B display will restore
THE KEY LOCK FUNCTION
The purpose of Key Lock is to stop accidental operation of the keys during playback.
The Lock function is embedded in the system software. After a predetermined time the LOCK
function will automatically lock the player keys. The LOCK symbol will appear in the display.
When Keylock is on you cannot operate the player or switch it o.
To unlock the player: Press the key.
The LOCK symbol will disappear from the display and you can resume normal operation.
You can alter the time interval or even disable the LOCK function in the System Menu - see P37

20
The Music Library
The player sorts music into categories using ID3 tags.
ID3 tags are electronic tags embedded by the music producer in the recording and contain information such as song and
album title, artist, production date and much more. This is the information the player sorts when it boots up. As long as the
ID3 tags are present, you can rename a le or sort it into folders but the player will always be able to identify the music by the
original tag. If ID3 tags are not present, the player will group the music les into an “anonymous”section
Music
Play Now
Music Library
Z
Z
Z
Z
P
P
P
Press and hold the MENU key to access the MODES
Press the
►►I
or
I◄◄
keys to access MUSIC mode
Press the
►/II
key to enter MUSIC mode.
The Music Screen appears.
• Press the VOL+ /– keys to highlight Music Library
• Press the
►/II
key. The library will open.
• Press the VOL+ /– keys to select a submenu
• Press the
►/II
key to enter the submenu
• Press the VOL+ /– keys to tab through the list of items
• Press the
►/II
key to select and play the song
The basic submenus are:
b) Artists: Select music from any named Artist.
c) Albums: Select music from any named Album.
d) Tracks: Lists all the tracks in the player.
g) Genres: Select songs in the selected genre
h) Year: Select a song from any named year
Music Library
Play All
Artists
Albums
Tracks
Favorites List
New Music
Genres
Year
Exit
Music Library
Play All
Artists
Albums
Tracks
Favorites List
New Music
Genres
Year
Exit
Search the player by Artist Name
Search by Genre (Rock, Pop, etc.)
Search by track title
Search by album title
Search by year of production
A
B
C
D
E
F
G
HExit the menu and display the rst song on
the player.
This manual suits for next models
1
Table of contents
Other Technika MP3 Player manuals
Popular MP3 Player manuals by other brands

RCA
RCA Lyra2 RD 2209 user guide

Apacer Technology
Apacer Technology AUDIO STENO AU860 user manual

Sly Electronics
Sly Electronics MP3 Player user guide

LENCO
LENCO SCD-38 USB user manual

Electronic Sound Solutions
Electronic Sound Solutions M-Blaster2 user manual

Tascam
Tascam Pocketstudio 5 Frequently asked questions