Teesa AROMA TSA4010 User manual

CS
Bedienungsanleitung
Návod k obsluze
Owner’s manual
Manuel de l'Utilisateur
Εγχει ίδιο χ ήση
Használati utasítás
Handleiding
Instrukcja obsługi
TSA4010
RO
SK
Manual de utilizare
Návod na použitie

13
14
11
1
7
8
9
10
2 3 4 5 6
12

GR HU NL
Δίσκος προθέρμανσης
φλυτζανιών
Fűtőlap csés ékhe Kop-warmhoudplaat
Κουμπί για 1 φλυτζάνι
1 adag kávé gomb 1 koe-toets
Κουμπί για 2 φλυτζάνια
2 adag kávé gomb 2 koes-toets
Κουμπί ON/OFF
ON/OFF táp nyomógomb ON / OFF-toets
Χειροκίνητο κουμπί καφέ
Ké i mód gomb Toets handmatige modus
Κουμπί Ατμού
Gő ölő gomb Stoomtoets
Πόμολο ατμού
Gő ölő beállító Stoomknop
Ράβδος ατμού
Habosító fúvóka Opschuimpijpje
Φίλτρο
Filter Filter
Στήριγμα φίλτρου
Filter tartó Filterhouder
Δίσκος σταγόνων
Csepegtető tálca Lekbak
Μεζούρα με tamper
Mérőkanál döngölővel Koemaat met garde
Κάλυμμα δεξαμενής
νερού
Ví tartály fedele Deksel van het
waterreservoir
Δεξαμενή νερού
Ví tartály
Waterreservoir
CS DE EN FR
Ohřívací deska na
šálky
Tassen-
Wärmeplatte
Cup warming tray Plaque chauante
pour les tasses
Tlačítko kávy 1
Taste 1 Tasse
1 cup button Touche 1 café
Tlačítko kávy 2
Taste 2 Tassen
2 cups button Touche 2 cafés
Tlačítko apnutí
ON/OFF
Taste EIN/AUS [ON/
OFF]
ON/OFF button Touche ON/OFF
Tlačítko
manuálního
režimu
Taste Manuelle
Kaee ubereitung
Manual coee
button
Touche du mode
manuel
Tlačítko páry
Taste Dampf
Steam button Touche de vapeur
Knoík páry
Dampfregler
Steam knob Bouton rotatif de
vapeur
Tryska na pěnění
Dampfstab
Steam wand Buse du mousseur
Filtr
Filter
Filter Filtre
Držák ltru
Filterhalter
Filter holder Support du ltre
Odkapávací miska
Abtropfschale
Drip tray Égouttoir
Odměrka na kávu
se šlehačem
Messlöel mit
Stampfer
Measuring spoon
with tamper
Doseur de café
avec tasseur
Víko nádrže na
vodu
Wassertankdeckel
Water tank cover Couvercle du
réservoir d’eau
Zásobník na vodu
Wassertank
Water tank
Réservoir d’eau
1
2
3
4
5
6
7
8
9
10
11
12
13
14
1
2
3
4
5
6
7
8
9
10
11
12
13
14

6 7Návod k obsluze Návod k obsluze
CS CS
OTÁZKY BEZPEČNOSTI
Děkujeme, že jste si koupili aří eníTEESA. Před použitím si pečlivě přečtěte uživatelskou příručku
a uložte ji pro po dější použití. Výrobce neodpovídá a nesprávné používání a provo tohoto
aří ení.
Aby nedošlo k poškození nebo zranění, dodržujte základní bezpečnostní opatření používaná k
provozuelektrickýchzařízení,včetněnásledujících:
1. Před použitím si po orně přečtěte návod k použití, i když jste dříve podobné aří ení používali.
Návod uschovejte pro po dější použití.
2. Před připojením aří ení kontrolujte, da je napětí ásuvky a aří ení kompatibilní.
3. Zaří ení je určeno pou e pro domácí použití.
4. Zaří ení čistěte a skladujte podle pokynů uvedených v části "Čištění“.
5. Zaří ení vždy vypněte a odpojte od droje napájení:
• pokud aří ení nefunguje správně,
• pokud vuky při provo u aří ení nejsou běžné nebo svědčí o anomálii,
• před demontáží,
• před čištěním,
• pokud není používáno.
6. Při odpojování aří ení od droje napájení uchopte a táhněte a ástrčku, nikoliv a kabel / šňůru
7. Nedoporučuje se používat toto aří ení v případě, že ásobník na vodu je prá dný.
8. Nebe pečí popálení! Je aká áno směrovat proud horké vody a páry na sebe nebo na jiné osoby.
9. Proto vždy manipulujte se aří ením pomocí rukojetí a knoíků.
10.Nedotýkejte se aří ení, když je v provo u, hro í nebe pečí popálení.
11.Dávejte po or, abyste se neopařili párou a nepopálili horkým povrchem, když aří ení pracuje.
12.Během vaření kávy nevyjímejte držák ltru e aří ení. Filtr l e přístroje oddělit až po dokončení
přípravy nápoje.Buďte ob vláštěopatrní,protožekovové částimohoubýtstálehorké.Přiodpojování
od kávovaru držte držák ltru a rukojeť a ajistěte ltr páčkou, abyste se bavili bytků kávy.
13.Zaří ení uchovávejte mimo dosah děti.
14.Toto aří ení smí používat děti mladší 8 let a osoby s ome enými fy ickými, smyslovými nebo
duševními schopnostmi, stejně jako osoby, které nemají žádné kušenosti a nejsou se námeny se
aří ením,pokudje ajištěn dohlednebo školenítýkajícísepoužívání aří enítakovým působem,
aby ri ika s ním spojená byla sro umitelná. Děti by měly být poučeny, aby s přístrojem ne achá ely
jako s hračkou. Čištění a údržbu aří ení by neměly provádět děti be do oru.
15.Neodpojitelnýnapájecíkabelmůžebýtvyměněnvýrobcem,pracovníkemservisunebokvalikovanou
osobou.
16.Zaří ení a napájecí kabel by měly být chráněny před teplem, vodou, vlhkostí, ostrými hranami
a dalšími faktory, které by mohly aří ení nebo kabel poškodit.
17.Buďte ob vláště opatrní, aby se napájecí kabel nedotýkal horkých / ostrých hran.
18.Zaří ení nepoužívejte k jiným účelům, než je popsáno v níže uvedeném návodu.
19.Neponořujte aří ení do vody ani jej nepoužívejte mokrýma rukama.
20.Během provo u, nenechávejte aří ení be do oru.
21.Pokud aří ení nepoužíváte, vždy jej odpojte od droje napájení.
22.Pokud je napájecí kabel poško en nebo aří ení nefunguje správně, nel e je používat.
23.Zaří ení nesmíte opravovat sami. Zaří ení neobsahuje žádné součásti, které by uživatel mohl
sám opravit. Demontáž aří ení je aká ána.
24.Používejte pou e originální díly.
PL RO SK
Płyta gr ewc a na liżanki
Tava de încăl ire a cănilor Tácka na ohrev šálok
Pr ycisk 1 kawy
Buton 1 cană Tlačidlo prípravy 1 kávy
Pr ycisk 2 kaw
Buton 2 căni Tlačidlo prípravy 2 káv
Pr ycisk włąc ania ON/
OFF
Buton ON/OFF Tlačidlo apnutia ON/OFF
Pr ycisk trybu ręc nego
Buton manual pentru cafea Tlačidlo manuálneho
režimu
Pr ycisk pary
Buton pentru abur Tlačidlo pary
Pokrętło pary
Comutator abur Regulátor pary
Dys a spieniac a
Do ator pentru abur Napeňovacia dý a
Filtr
Filtru Filter
Uchwyt ltra
Suport ltru Páka s držiakom ltra
Tacka ociekowa
Tavă de picurare Odkvapkávacia tácka
Miarka do kawy
ubijakiem
Lingură de măsurat Odmerka na kávu s
tamperom
Pokrywka biornika na
wodę
Capac re ervor de apă Veko nádoby na vodu
Zbiornik na wodę
Re ervor de apă Nádoba na vodu
1
2
3
4
5
6
7
8
9
10
11
12
13
14

8 9Návod k obsluze Návod k obsluze
CS CS
MONTÁŽ FILTRU A DRŽÁKU FILTRU
Součástí balení jsou dva ltry. Pro přípravu dvou káv najednou použijte hlubší ltr.
1. Aby bylo možné vložit ltr do držáku, arovnejte ja ýček ve ltru se áře em v držáku. Poté
otáčejte ltrem, dokud ne apadne do držáku.
2. Připevněte rukojeť k aří ení tak, že ji umístíte v místě o načeném "INSERT" a poté otočte
doprava až k o načení "LOCK", dokud neucítíte odpor.
PŘED PRVNÍM POUŽITÍM
1. Otevřete víko a nalijte vodu do nádržky (hladina vody v nádrži by neměla překročit načku
"MAX"). Následně avřete víko.
Upozornění: Nádrž na vodu l e od stroje oddělit.
2. Vložte ltr do držáku (ve ltru by neměla být žádná káva).
Poté připevněte držák ltru k aří ení.
3. Umístěte šálek na odkapávací misku. Ujistěte se, že je
knoík páry v polo e OFF.
4. Připojte aří ení k napájení a stiskněte tlačítko ON/OFF.
Tlačítko se ro svítí bíle. Podsvícení tlačítka 1 kávy, 2 káv a
manuálního režimu bliká. Zaří ení spustí proces ohřevu.
Když všechny uka atele přestanou blikat, namená to, že
ohřev byl ukončen.
Upozornění: Před přípravou kávy je ne bytné provést
proces ahřívání.
5. Stiskněte tlačítko ručního režimu. Zaří ení ačne čerpat vodu po dobu přibližně 30 sekund.
Po uplynutí této doby vylijte vodu šálku. Zaří ení je připraveno k přípravě kávy.
Upozornění: Při prvním čerpání vody může být slyšet hluk. Asi po 20 sekundách by měl
hluk mi et.
POLOZE OFF
POLOZE ON
OHŘÍVÁNÍ
PŘÍPRAVA ESPRESA
Před vařením kávy se doporučuje zahřát ltr, držák ltru a šálek, ve kter m se bude káva vařit. Tím je
zajištěno, že chuť kávy nebude narušena chladnými součástmi.
1. Otevřete víko nádrže a naplňte ji vodou. Hladina vody by neměla překročit načku "MAX“
na nádrži.
2. Umístěte vybraný ltr do držáku. Poté připevněte držák ltru k aří ení.
3. Umístěte šálek na odkapávací misku.
4. Připojte aří ení k elektrické síti. Ujistěte se, že je knoík páry v polo e OFF.
5. Stiskněte tlačítko ON/ OFF. Tlačítko se ro svítí bíle. Podsvícení tlačítka 1 kávy, 2 káv a
manuálního režimu bliká. Zaří ení spustí proces ohřevu. Když všechny uka atele přestanou
blikat, namená to, že ohřev byl ukončen.
6. Stiskněte tlačítko ručního režimu; aří ení ačne čerpat vodu. Jakmile voda ačne vytékat,
opětovným stisknutím ručního tlačítka proces astavíte. Účelem výše uvedeného kroku je
čerpání vody nádrže do aří ení.
7. Když svítí tlačítko ručního režimu, namená to, že proces ohřevu byl dokončen.
1. Pomocí odměrky na kávu nasypte mletou kávu do voleného ltru ( jedné lžíce mleté kávy
připravíte šálek kvalitní kávy) a poté kávu našlehejte metličkou.
Upozornění:Ujistěte se, že káva není na okraji ltru!
2. Umístěte ltr do držáku a poté jej nainstalujte do aří ení.
3. Vylijte horkou vodu šálku. Poté položte horký šálek na odkapávací misku.
4. Po dokončení ohřevu stiskněte tlačítko 1 káva, 2 kávy nebo ručního režimu. Zaří ení ačne
vařit kávu.
Doba vaření pro funkci:
• 1 kávy je 15 sekund,
• 2 káv je 25 sekund,
• ručního režimu je 90 sekund ( aří ení automaticky astaví vaření kávy po 90 sekundách
nečinnosti).
5. Po uvaření požadovaného množství kávy nebo když barva kávy ačne výra ně blednout,
stiskněte novu příslušné tlačítko. Proces vaření bude astaven.
6. Když kontrolka tlačítka kávy hasne, počkejte několik sekund. Po chvíli by se mělo
podsvícení novu ro svítit, což namená, že je možné nápoj dále připravovat.
7. Nastavení doby vaření kávy:
• Stiskněte a podržte tlačítko 1 kávy po dobu přibližně 3 sekund. Kontrolka tlačítka 1 kávy
ačne blikat, což namená, že aří ení je v režimu nastavení.
• Když kontrolka abliká, stiskněte novu tlačítko 1 kávy a ačněte připravovat kávu.
• Po uplynutí požadovaného času stiskněte novu tlačítko 1 kávy pro potvr ení nastavení
času pro uvaření 1 kávy.
• Doba vaření pro funkci 1 kávy je maximálně 45 sekund. Pokud byla nastavena doba
vaření pro funkci 1 kávy, doba vaření pro funkci 2 káv se automaticky dvojnásobí. Doba
vaření pro funkci 2 káv je maximálně 90 sekund. Pokud byla doba spařování nastavena
pro funkci 2 káv, doba vaření pro funkci 1 kávy se automaticky nastaví na polovinu této
doby.

10 11Návod k obsluze Návod k obsluze
CS CS
UPOZORNĚNÍ: Během provo u nenechávejte aří ení be do oru!
8. Po dokončení přípravy kávy otočte držákem ltru doleva, abyste jej odpojili od aří ení,
poté ltr ajistěte páčkou v držáku a odstraňte bytek kávy.
9. Nechte díly vychladnout a poté vyjměte ltr držáku (k tomu vyrovnejte ja ýček ve ltru se
áře em v rukojeti) a opláchněte všechny části vodou.
NAPĚŇOVÁNÍ MLÉKA
1. Ujistěte se, že je knoík páry v polo e OFF.
2. Stiskněte tlačítko páry - kontrolka tlačítka kávy hasne. Počkejte, až se ro svítí podsvícení
tlačítka páry.
Upozornění: Podsvícení tlačítka páry se apíná a vypíná, což signali uje, že aří ení udržuje
konstantní teplotu.
3. Naplňte džbán mlékem. Doporučuje se používat pasteri ované mléko vytažené přímo
chladničky be prostředně před použitím (nepoužívejte teplé mléko).
Upozornění: Doporučuje se, aby průměr džbánu, ve kterém se mléko napěňuje, byl
alespoň 70±5 mm. Při výběru nádoby je třeba v ít v úvahu i to, že napěněné mléko dvakrát
větší svůj objem, proto by měla být vhodná i výška nádoby.
4. Ponořte napěňovací trysku do mléka do hloubky asi 2 cm.
5. Pomalu otáčejte knoíkem páry doleva, napěňovací trysky ačne vychá et pára. Pro
napěnění mléka pohybujte džbánem nahoru a dolů krouživými pohyby.
Upozornění: Neotáčejte knoíkem páry prudce, protože to může rychle vytvořit velké
množství páry, což může výšit ri iko výbuchu.
6. Po dokončení napěňování mléka otočte knoík páry do polohy OFF.
Upozornění: Ihned po každém použití očistěte napěňovací trysku vlhkou houbičkou.
Buďte vlášť opatrní, protože tryska napěňovače může být ještě horká. Ri iko popálení!
7. Stisknutím tlačítka ON/OFF aří ení vypnete. Všechny indikátory hasnou.
8. Pokud byla funkce páry aktivována na více než 180 sekund během jednoho napěnění,
kontrolka tlačítka páry rychle bliká. V takovém případě stiskněte libovolné tlačítko kávy, aby
aří ení vychladlo. Zaří ení se vrátí do pohotovostního režimu, jakmile je dosaženo vhodné
teploty.
Upozornění: Pokud má být káva uvařena ihned po napěnění mléka, kontrolka tlačítka kávy
bude blikat, což namená, že toto tlačítko je nutné stisknout. Otočením knoíku páry do
polohy ON aří ení ačne čerpat vodu a nechá se vychladnout.
AUTOMATICKÉ VYPNUTÍ
Zaří ení se automaticky vypne po 25 minutách nečinnosti.
ČIŠTĚNÍ A SKLADOVÁNÍ
Před čištěním odpojte přístroj od zdroje napájení a nechte jej vychladnout.
1. Kryt zařízení čistěte měkkým mírně vlhkým hadříkem. Neponořujte aří ení do vody.
2. Pravidelně oplachujte vnitřek nádrže na vodu. Před opětovnou instalací do aří ení se
ujistěte, že je nádrž suchá.
3. Vyčistěte odkapávací misku jemným čisticím prostředkem, poté ji opláchněte pod tekoucí
vodou a otřete do sucha.
4. Opláchněte držák ltru altry pod tekoucí vodou a otřete je do sucha.
Upozornění: Držák ltru nemyjte v myčce na nádobí!
5. Po každém použití vyčistěte napěňovací trysku vlhkou houbou, aby se abránilo ucpání
výstupu páry. Dávejte po or, abyste se nepopálili!
6. K čištění tohoto aří ení nepoužívejte chemikálie ani detergenty.
ODVÁPNĚNÍ
Když přístroj provede 500 operací (vaření kávy, napěnění a další funkce), po dokončení ohřevu
podsvícení všech tlačítek 5x rychle abliká, což vám připomene, že je třeba provést odvápnění.
Pokud odvápnění nebude provedeno, bude se výše popsané reakce opakovat při každém
spuštění aří ení.
Chcete-li deaktivovat připomínku odvápnění, v pohotovostním režimu současně
stiskněte a podržte tlačítko ručního režimu a 2 káv po dobu asi 3 sekund. Podsvícení
těchto tlačítek třikrát rychle zabliká. Čítač se vynuluje.
Pro zajištění správn funkce spotřebiče, udržení čistoty syst mu cirkulace vody a zachování co
nejlepší chuti a aroma kávy je třeba odstraňovat vodní kámen každ dva až tři měsíce.
1. Naplňte nádržku vodou a odvápňovacím prostředkem až po úroveň MAX (poměr vody a
odvápňovacího prostředku je 4:1; podrobnosti vi pokyny k odvápnění).
2. Připevněte držák ltru (be kávy) ke stroji a postavte konvici na odkapávací misku.
3. Stiskněte tlačítko ON/OFF, ro svítí se osvětlení tlačítka. Stiskněte tlačítko kávy a ujistěte se, že
je ovladač páry v polo e OFF. Když přístroj ačne čerpat vodu, opětovným stisknutím
libovolného tlačítka kávy proces astavíte, poté chvíli počkejte. Zaří ení spustí proces ohřevu.
4. Když se ro svítí podsvícení tlačítka pro přípravu kávy, namená to, že proces ohřevu je
dokončen. Stiskněte tlačítko kávy a nalijte asi 60 ml (dva šálky) vody. Poté stisknutím
libovolného tlačítka kávy astavíte čerpání vody.
5. Stiskněte tlačítko páry. Podsvícení tlačítka kávy hasne. Počkejte, až se ro svítí podsvícení
tlačítka páry. Páru vytvářejte přibližně 2 minuty, poté otočte knoíkem páry do polohy OFF,
abyste proces astavili. Stisknutím tlačítka ON/OFF aří ení vypnete. Nechte aří ení v tomto
stavu alespoň 15 minut.
6. Po uplynutí této doby přístroj restartujte stisknutím tlačítka ON/OFF. Počkejte, až se ro svítí
kontrolka tlačítka pro přípravu kávy, poté stiskněte libovolné tlačítko pro přípravu kávy a
nechte aří ení pracovat, dokud se ásobník cela nevyprá dní.
7. Naplňte nádrž čistou vodou až po načku MAX a propláchněte celý vodní okruh, poté
opakujte kroky 4-6 a nechte přístroj pracovat, dokud nebude nádrž cela prá dná.

12 13Návod k obsluze Návod k obsluze
CS CS
Čeština
Správná likvidace výrobku
(opotřebované elektrické a elektronické vybavení)
O načení umístěné na výrobku anebo v textech, které se ho týkají, pouka uje na skutečnost, že po vypršení doby
používání je aká áno likvidovat tento výrobek společně s ostatním domovním odpadem. Pro to, abyste se vyhnuli
škodlivému vlivu na přírodní prostředí a lidské draví v důsledku nekontrolované likvidace odpadů, oddělte tento výrobek
od odpadů jiného typu a odpovědně ho recyklujte a účelem propagace opětovného využití hmotných drojů coby stálé
praxe. Pro více informací ohledně místa a působu recyklace tohoto výrobku, která bude be pečná pro životní prostředí,
domácí uživatelé mohou kontaktovat maloobchodní prodejnu, v níž výrobek akoupili, nebo orgán místní samosprávy.
Firemní uživatelé mohou kontaktovat dodavatele a kontrolovat podmínky kupní smlouvy. Neodstraňujte výrobek
společně s ostatními komerčními odpady.
Vyrobeno v ČLR pro Lechpol Electronics Les ek Sp.k., ul. Garwolińska 1, 08-400 Miętne, Polsko.
SPECIFIKACEODSTRAŇOVÁNÍ ZÁVAD
Problém Možná příčina Možné řešení
Kovové části nádrže
re ivěly
Nevhodný odstraňovač vodního
kamene může vést k tvorbě r i
na kovových částech uvnitř
nádrže
Použijte vhodný odvápňovací
prostředek
Únik vody pod aří ením Odkapávací miska je plná Vyprá dněte odkapávací
misku
Zaří ení nefunguje Kontaktujte autori ované
servisní středisko
Voda vytéká ltru Na okraji ltru je káva Vyčistěte okraj ltru
Kyselá (octová) příchuť v
espressu
Cyklus oplachování po
odvápnění nebyl proveden
správně
Zaří ení několikrát
opláchněte podle pokynů v
kapitole„Před prvním
použitím“
Káva je skladována na teplém a
vlhkém místě po dlouhou dobu
Káva je nehodnocena
Použijte nové balení kávy
nebo jej uložte na chladném
a suchém místě Po otevření
nového balení kávy je třeba
jej novu u avřít a uložit do
chladničky, aby byla
achována čerstvost kávy
Zaří ení nefunguje Zaří ení je nesprávně připojeno k
napájení
Připojte aří ení správně ke
droji napájení; pokud
aří ení stále nefunguje,
kontaktujte autori ované
servisní středisko
Napěňovací tryska
nefunguje
Indikátor páry nesvítí Zaří ení vytváří páru pou e
tehdy, pokud svítí indikátor
páry
Nádoba je příliš velká nebo její
tvar je nevhodný
Použijte vysokou a ú kou
nádobu
Bylo použito odtučněné mléko Doporučuje se používat buď
plnotučné nebo polotučné
mléko
Funkce a nejdůležitější součástky
Nalévání do dvou šálků současně
Nahřívání šálků
Napěňovač mléka
Funkce páry
Odnímatelná odkapávací miska
Odnímatelný ásobník vody
Automatické vypnutí
Protisklu ové nožičky
Technické údaje
Druh kávy: mletá káva
Tlak čerpadla: 15 barů
Objem ásobníku vody: 1,5 l
Max. Výška šálku: 85 mm
Maximální výkon: 850 W
Délka kabelu: 95 cm
Napájení: 220-240 V~; 50/60 H
Váha: 3,5 kg
Ro měry: 27,4 x 22,7 x 30 cm
Součástí balení: 2x ltr, odměrka na kávu s metličkou

14 15Bedienungsanleitung Bedienungsanleitung
DEDE
14 15Bedienungsanleitung Bedienungsanleitung
DEDE
UmdieGefahrvonBeschädigungen,Feuer,StromschlagoderanderenVerletzungenzuvermeiden,
befolgenSiediegrundlegendenSicherheitsvorkehrungenbeiderVerwendungelektrischerGeräte,
einschließlichderfolgenden:
1. Lesen Sie diese Bedienungsanleitung sorgfältig, vor beginn der Installation und Montage.
Bewahren Sie die Bedienungsanleitung auf für späteres Nachschlagen
2. Vor dem Anschluss des Gerätes an Net steckdose, stellen Sie sicher, dass die auf dem Gerät
angegebene Spannung mit der Spannung der Steckdose übereinstimmt.
3. Gerät ist nur für den Hausgebrauch.
4. Reinigen und Lagern Sie das Gerät gemäß den Anweisungen im Kapitel„Reinigung“
5. Schalten Sie das Gerät IMMER aus und trennen es von der Stromversorgung:
• Wenn es nicht richtig funktioniert
• Wenn ein seltenes Geräusch bei der Verwendung gibt
• Vor dem Zerlegen
• Vor der Reinigung
• Bei Nichtgebrauch
6. Ziehen Sie beim Trennen des Net kabels von der Steckdose, am Stecker und nicht am Kabel.
7. Das Gerät niemals einschalten wenn der Wasserbehälter leer ist!
8. Verbrühungsgefahr! Niemals den heißen Dampf- oder Wasser-Strahl auf sich selbst oder
andere Leute richten!
9. Um die Kaeemaschine u bedienen, verwenden Sie immer Grie oder Knöpfe.
10.Berühren Sie die Kaeemaschine nicht, wenn diese funktioniert, da Verbrennungsgefahr besteht.
11.Wenn heißesWasser oder Dampf aus den Düsen er eugt wird, halten Sie Ihren Körper von der
Kaeemaschine entfernt, um Verbrennungen u vermeiden.
12.Entfernen Sie NICHT den Filterhalter, während Sie Kaee ubereiten. Bitte entfernen Sie
diesen, um nach dem Brühen usät lichen Kaee u ubereiten. Auch beim Entfernen des
Filterhalters ist Vorsicht geboten, da die Metallteile heiß sind. Bitte achten Sie darauf, ihn am
Gri u halten und den Filterhalteclip u verwenden, um den Kaeesat u entsorgen.
13.Halten Sie das Gerät außerhalb der Reichweite von Kindern.
14.Das Gerät kann von Kindern benut t werden, die älter als 8 Jahre alt sind und von Personen mit
eingeschränkten physischen, sensorischen oder geistigen Fähigkeiten oder Mangel an
Erfahrung und Wissen, wenn sie von einer Person beaufsichtigt und geleitet werden, die für ihre
Sicherheit uständig ist, in einer vorsichtigen Art und Weise und die alle Sicherheits-
Vorkehrungen verstanden hat und befolgen wird. Kinder sollten nicht mit diesem Gerät spielen.
Kinder sollten nicht die Reinigung und Wartung des Gerätes ohne Aufsicht durchführen.
15.Ein beschädigtes Net kabel kann nur in einem autorisierten Kundendienst erset t werden.
16.Halten Sie das Gerät und sein Kabel fern von Hit e,Wasser, Feuchtigkeit, sc harfen Kanten und
andere Faktoren, die das Gerät oder das Net kabel beschädigen könnten.
17.Stellen Sie sicher dass das Net kabel keine heißen oder scharfen Elemente berührt.
18.Das Produkt nicht für andere Zwecke verwenden, als in dieser Bedienungsanleitung angegeben.
19.Stellen Sie das Gerät nicht ins Wasser oder andere Flüssigkeiten; verwenden Sie es nicht mit
nassen oder feuchten Händen.
20.Lassen Sie das Gerät nicht unbeaufsichtigt, wenn es funktioniert.
21.IMMER das Gerät von der Stromversorgung trennen, wenn es nicht verwendet wird.
22.VERWENDEN SIE NICHT das Gerät wenn das Kabel oder der Net stecker beschädigt ist, oder
das Gerät defekt ist.
23.Versuchen Sie nicht, dieses Gerät selbst u reparieren, nur autorisiertes und quali iertes
Personal darf dieses Produkt reparieren. Das Gerät nie erlegen.
24.Verwenden Sie kein unautorisiertes Zubehör.
SICHERHEITSANLEITUNGEN
Danke für den Kauf des TEESA Gerätes. Bitte lesen Sie diese Bedienungsanleitung sorgfältig und
bewahren diese auf für späteres Nachschlagen. Der Hersteller übernimmt keine Verantwortung für
Schäden,diedurchunsachgemäßeHandhabungundVerwendungdes Produktes verursachtwurden.
EINSETZEN DES FILTERS UND DES FILTERHALTERS
Das Gerät verfügt über zwei Filter. Verwenden Sie einen tieferen Filter für die 2-Tassen-Funktion.
1. Achten Sie beim Einset en des Filters in den Filterhalter darauf, denVorsprung am Filter mit
der Nut im Inneren des Filterhalters aus urichten. Drehen Sie dann den Filter, um ihn sicher
in der Halterung u verriegeln.
2. Set en Sie den Filterhalter von der Position„INSERT [EINSETZEN]“ in das Gerät ein und
xieren diesen, indem Sie ihn gegen den Uhr eigersinn drehen, bis er sich in der Position
„LOCK [VERRIEGELT]“ bendet.
VOR DER ERSTEN BENUTZUNG
1. Önen Sie die Wassertankdeckel und füllen Wasser in den Wassertank (der Wasserstand
sollte die „MAX“ Markierung im Wassertank nicht überschreiten). Schließen Sie dann die
Wassertankdeckel.
Hinweis: Sie können den Wassertank auch uerst vom Gerät
abnehmen und dann mit Wasser füllen.
2. Set en Sie den Filter in den Filterhalter ein (kein Kaee im
Filter). Set en Sie dann den Filterhalter in das Gerät ein.
3. Stellen Sie eine Kanne auf die Abtropfschale. Stellen Sie sicher,
dass sich der Dampfregler in der Position AUS bendet.
4. Schließen Sie das Gerät an die Stromquelle an und drücken Sie die
Taste EIN/AUS. Betriebsan eige leuchtet weiß. Die An eigen der
Taste 1-Tasse, 2-Tassen und der Taste Manuelle Kaee ubereitung
blinken. Das Gerät beginnt mit dem Vorhei en. Nachdem alle
An eigen durchgehend leuchten,ist dasVorhei en abgeschlossen.
Hinweis: Das Vorhei en ist ein notwendiger Schritt vor der
Kaee ubereitung.
POSITION AUS
POSITION EIN

16 17Bedienungsanleitung Bedienungsanleitung
DEDE
5. Drücken Sie die Taste Manuelle Kaee ubereitung. Das Gerät pumpt etwa 30 Sekunden lang
Wasser.GießenSiedasWasserausderKanneaus.Jet tistdasGerätfürdieKaee ubereitungbereit.
Hinweis: Beim ersten Pumpen von Wasser kann es u Geräuschen kommen – das ist
normal. Nach etwa 20 Sekunden sollte das Geräusch verschwinden.
VORHEIZUNG
ESPRESSO ZUBEREITEN
Vor der Kaeezubereitung wird empfohlen, das Gerät einschließlich Filterhalter, Filter und Tasse
vorzuheizen, damit der Kaeegeschmack nicht durch kalte Teile beeinusst wird.
1. Önen Sie den Wassertankdeckel und füllen den Wassertank mit der gewünschten
Wassermenge. Der Wasserstand sollte die„MAX“ Markierung im Tank nicht überschreiten.
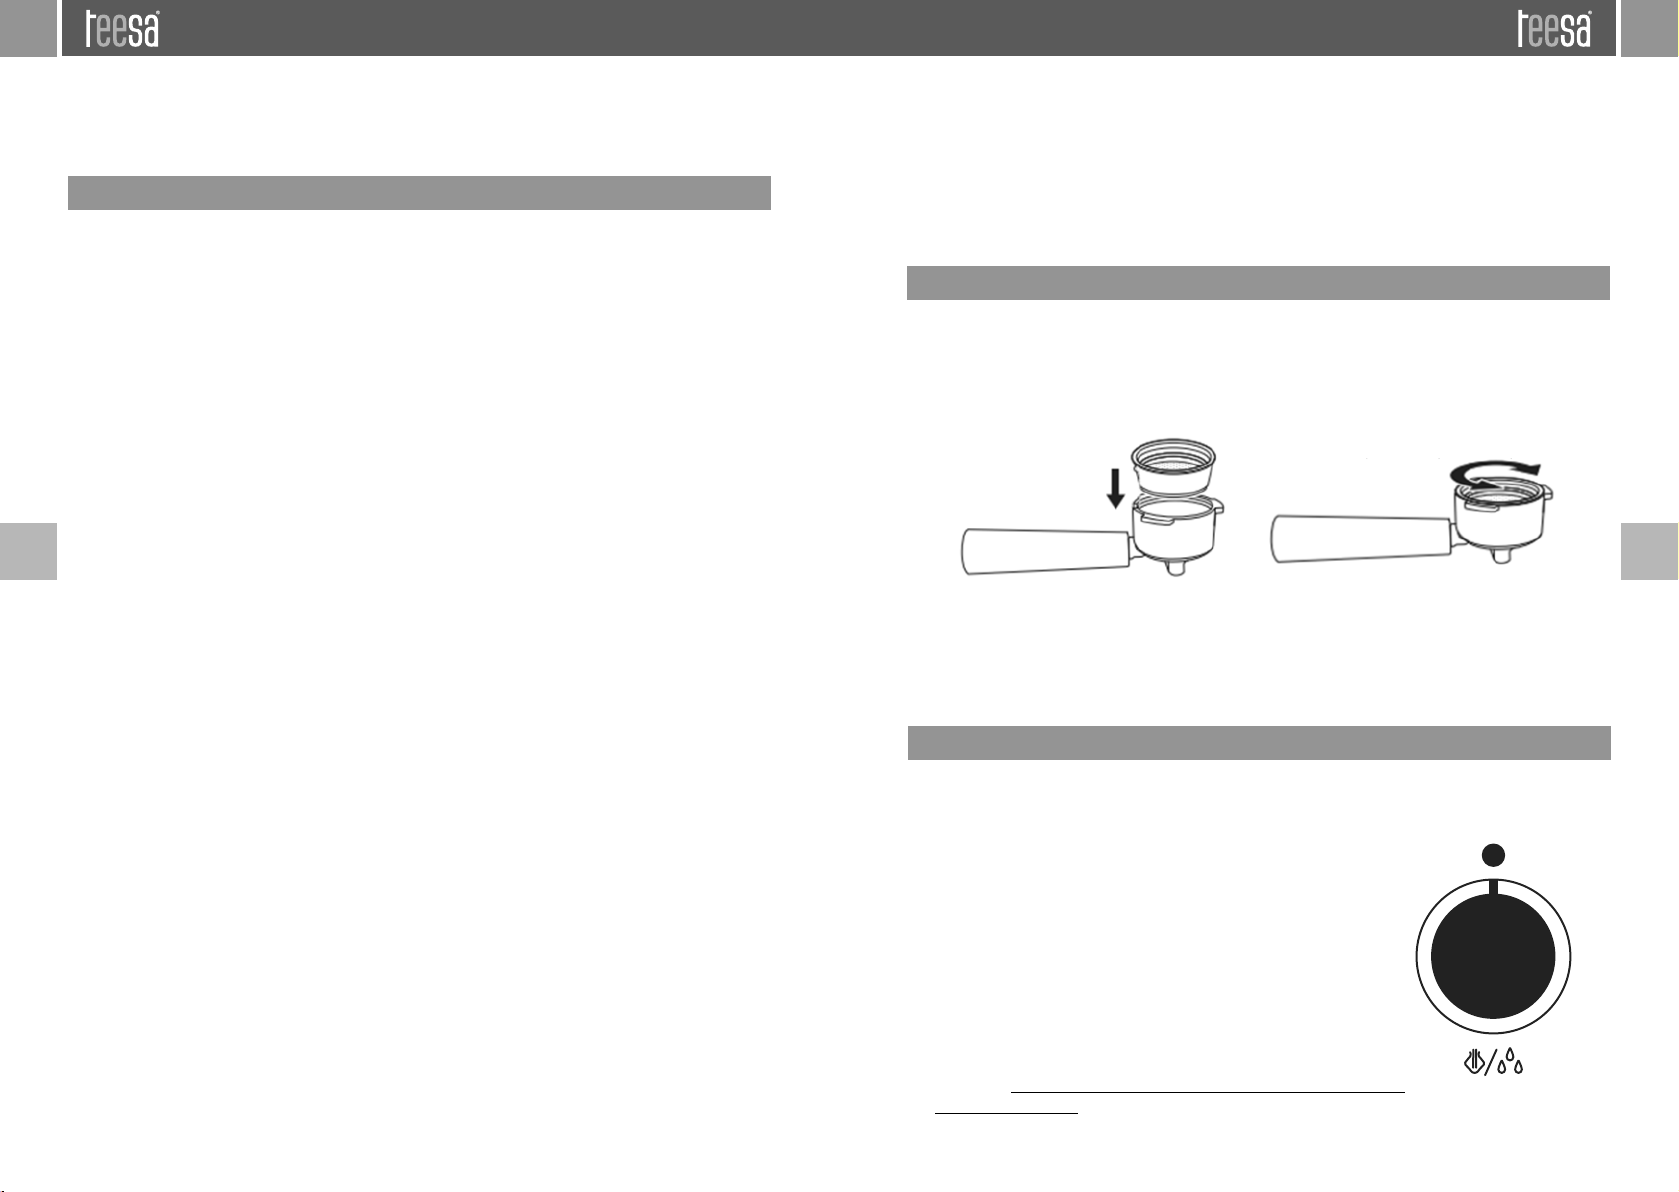
2. Set en Sie den ausgewählten Filter in den Filterhalter ein. Set en Sie dann den Filterhalter
in das Gerät ein.
3. Stellen Sie eine Tasse auf die Abtropfschale.
4. Schließen Sie das Gerät an die Stromversorgung an. Stellen Sie sicher, dass sich der
Dampfregler in der Position AUS bendet.
5. Drücken Sie die Taste EIN/AUS. Die Betriebsan eige leuchtet weiß. Die An eigen der Taste 1-
Tasse, 2-Tassen und der Taste Manuelle Kaee ubereitung blinken. Das Gerät beginnt mit
dem Vorhei en. Wenn alle An eigen dauerhaft leuchten, bedeutet dies, dass das Vorhei en
abgeschlossen ist.
6. Drücken Sie die Taste manuelle Kaee ubereitung, das Gerät beginnt, Wasser u pumpen.
Wenn Wasser ausießt, drücken Sie erneut die Taste Manuelle Kaee ubereitung, um das
Pumpen desWassers sofort u stoppen. Der Zweck dieses Schritts besteht darin, Wasser aus
dem Wassertank in den Boiler u pumpen.
7. Wenn die An eige der Taste Manuelle Kaee ubereitung leuchtet, eigt dies an, dass das
Vorhei en beendet ist.
1. Geben Sie gemahlenen Kaee mit einem Messlöel in den ausgewählten Filter (ein Löel
gemahlener Kaee kann ungefähr eine Tasse erstklassigen Kaee ergeben), drücken Sie
dann den gemahlenen Kaee mit dem Stamper fest.
Hinweis: Achten Sie darauf, dass sich kein Kaee am Rand des Filters bendet!
2. Set en Sie den Filter in den Filterhalter ein und set en dann den Filterhalter in das Gerät ein.
3. Gießen Sie das heiße Wasser aus derTasse. Stellen Sie dann die heißeTasse auf die Abtropfschale.
4. Nachdem das Vorhei en abgeschlossen ist, drücken Sie die Taste 1 Tasse, 2 Tassen oder die
Taste Manuelle Kaee ubereitung. Das Gerät beginnt mit der Kaee ubereitung.
Arbeits eit für:
• 1 Tasse dauert 15 Sekunden,
• 2 Tassen sind 25 Sekunden,
• Taste Manuelle Kaee ubereitung beträgt 90 Sekunden (das Gerät stellt automatisch
den Betrieb ein, wenn innerhalb von 90 Sekunden keine Bedienung erfolgt).
5. Wenn Ihre gewünschte Kaeemenge erreicht ist oder sich die Farbe des Kaees deutlich
verändert, drücken Sie erneut die entsprechende Taste. Das Gerät stoppt.
6. Wenn die An eige der Kaeetaste erloschen ist, warten Sie einen Moment.Wenn die An eige
der Kaeetaste wieder aueuchtet, können Sie mit der Kaee ubereitung fortfahren.
7. Brüh eit einstellen:
• Halten Sie die Taste 1 Tasse 3 Sekunden lang gedrückt. Die An eige der Taste 1 Tasse
blinkt und wechselt in den Einstellmodus.
• Wenn die An eige blinkt, drücken Sie erneut die Taste 1 Tasse, um die Kaeeausgabe u
starten.
• Wenn die angegebene Zeit erreicht ist, drücken Sie die Taste 1 Tasse, um die Einstellung
ab uschließen, die vom Gerät gespeichert werden kann.
• DieVerarbeitungsdauer für 1Tasse kann auf bis u 45 Sekunden eingestellt werden.Wenn
die Arbeits eit für 1 Tasse eingestellt ist, wird die Arbeits eit für 2 Tassen automatisch auf
das 2-fache der Arbeits eit für 1 Tasse aktualisiert. Die Verarbeitungsdauer für 2 Tassen
kann auf bis u 90 Sekunden eingestellt werden. Wenn die Arbeitsdauer für 2 Tassen
eingestellt ist, wird die Arbeitsdauer für 1 Tasse automatisch auf die Hälfte der
Arbeitsdauer für 2 Tassen aktualisiert.
WARNUNG: Lassen Sie das Gerät während der Kaee ubereitung nicht unbeaufsichtigt, da Sie
manchmal manuell arbeiten müssen!
8. Nachdem Sie mit der Kaee ubereitung fertig sind, nehmen Sie den Filterhalter heraus,
indem Sie ihn im Uhr eigersinn drehen, und gießen dann Kaeereste aus, während der
Filter durch die Filterhalteklammer gedrückt wird.
9. Lassen Sie diese vollständig abkühlen, nehmen dann den Filter aus dem Filterhalter (richten
Sie da u den Vorsprung am Filter mit der Nut im Inneren des Filterhalters aus) und spülen
alle Teile unter ießendem Wasser ab.
MILCH AUFSCH UMEN
1. Stellen Sie sicher, dass sich der Dampfregler in der Position AUS bendet.
2. Drücken Sie die Taste Dampf - die An eige der Kaeetaste erlischt. Warten Sie, bis die
An eige der Taste Dampf leuchtet.
Hinweis: Während des Betriebs schaltet sich die An eige der Taste Dampf ein und aus, um
die gewünschte Temperatur aufrecht uerhalten.
3. Füllen Sie eine Kanne mit Milch. Es wird empfohlen, Vollmilch mit Kühlschranktemperatur
(nicht heiß!) u verwenden.
Hinweis: Bei der Wahl der Größe einer Kanne wird empfohlen, dass der Durchmesser nicht
weniger als 70±5 mm beträgt, und bedenken Sie, dass das Volumen der Milch um das
Zweifache unimmt. Stellen Sie daher sicher, dass die Höhe der Kanne ausreichend ist.
4. Stecken Sie die Dampfdüse etwa wei Zentimeter in die Milch.
5. Drehen Sie den Dampfregler langsam gegen den Uhr eigersinn, Dampf tritt aus der
Dampfdüse aus. Milch aufschäumen, indem Sie die Kanne auf und ab bewegen.
Hinweis: Drehen Sie den Dampfregler niemals schnell, da sich der Dampf innerhalb kur er
Zeit schnell ansammelt, was ein poten ielles Explosionsrisiko erhöhen kann.
6. Wenn das gewünschte Ergebnis erreicht ist, drehen Sie den Dampfregler auf die Position AUS.
Hinweis: Reinigen Sie den Dampfstab sofort mit einem feuchten Schwamm, nachdem die
Dampfproduktion aufgehört hat, aber achten Sie darauf, sich nicht u verbrennen!
7. Drücken Sie die Taste EIN/AUS, um das Gerät aus uschalten. Alle An eigen erlöschen.
8. Wenn die Dampunktion länger als 180 Sekunden in einem ein igen kontinuierlichen
Betrieb benut t wird, blinkt die Dampfan eige ur Warnung schnell. Drücken Sie in diesem
Fall eine beliebige Kaeetaste, um das Gerät ab ukühlen. Nach dem Abkühlen auf normale

18 19Bedienungsanleitung Bedienungsanleitung
DEDE
AUTOMATISCHE AUSSCHALTFUNKTION
Wenn innerhalb von 25 Minuten kein Betrieb erfolgt, schaltet sich das Gerät automatisch aus.
REINIGUNG UND WARTUNG
Trennen Sie das Gerät von der Stromversorgung und lasen es vor der Reinigung komplett abkühlen.
1. Reinigen Sie das Gehäuse des Gerätes regelmäßig mit einem weichen, leicht
angefeuchteten Tuch. Tauchen Sie das Gehäuse um Reinigen niemals in Wasser.
2. Spülen Sie das Innere des Wassertanks regelmäßig aus. Achten Sie darauf, diesen u
trocknen, bevor Sie diesen wieder am Gerät anbringen.
3. Reinigen Sie die Abtropfschale mit einem milden Reinigungsmittel, spülen Sie diese unter
ießendem Wasser ab und wischen diese gut ab.
4. Spülen Sie den Filterhalter und die Filter unter ießendem Wasser ab und wischen diese
dann gut ab.
Hinweis: Waschen Sie den Filterhalter nicht in der Spülmaschine.
5. Wischen Sie die Dampfdüse nach jedem Gebrauch mit einem feuchten Schwamm ab, um
ein Verstopfen u verhindern. Achten Sie darauf, sich nicht u verbrennen!
6. Reinigen Sie das Gerät oder seine Teile nicht mit Alkohol oder Lösungsmitteln.
ENTKALKEN
Nachdem das Gerät 500 Zyklen lang gelaufen ist (einschließlich Kaee, Dampf und andere
Funktionen), blinken alle An eigen nach Abschluss des Vorhei ens 5 Mal schnell gleich eitig,
um Sie an das Entkalken u erinnern. Wenn Sie nicht entkalken, geschieht dies bei jedem
Gebrauch des Geräts.
Halten Sie im Bereitschafts-Zustand gleichzeitig die Taste Manuelle Kaeezubereitung
und die Taste 2 Tassen 3 Sekunden lang gedrückt. Die beiden Anzeigen blinken dreimal
schnell und erinnern Sie daran, das Entkalken abzubrechen. Die Anzahl der Arbeitszyklen
geht auf Null zurück.
Um sicherzustellen, dass Ihre Kaeemaschine ezient arbeitet, die internen Leitungen sauber sind
und der Kaeegeschmack optimal ist, sollten Sie alle 2-3 Monate die zurückgebliebenen Mineral-
Ablagerungen entfernen.
1. Füllen Sie den Wassertank mit Wasser und Entkalker bis um Füllstand MAX (das Verhältnis
vonWasser und Entkalker beträgt 4:1; Ein elheiten nden Sie in der Anleitung des Entkalkers).
2. Set en Sie den Filterhalter ein (kein gemahlener Kaee darin) und stellen eine Kanne auf die
Abtropfschale.
3. Drücken Sie die Taste EIN/AUS, die Betriebsan eige leuchtet auf. Drücken Sie eine beliebige
Taste Kaee und vergewissern Sie sich, dass sich der Dampfregler in der Position AUS
bendet. Wenn Wasser herausießt, drücken Sie die Taste Kaee, um das Pumpen u
stoppen, und warten einen Moment. Das Gerät beginnt mit dem Vorhei en.
4. Wenn die An eige der Kaeetaste leuchtet, eigt dies an, dass das Vorhei en beendet ist.
Drücken Sie die Taste Kaee und bereiten wei Tassen Kaee u (etwa 60 ml). Drücken Sie
die Taste Kaee, um das Pumpen u stoppen.
5. Drücken Sie dieTaste Dampf. Die An eige der Kaeetaste erlischt.Warten Sie, bis die An eige
derTaste Dampf leuchtet. Bereiten Sie 2 Minuten lang Dampf u, indem Sie den Dampfregler
drehen, und drehen dann den Dampfregler auf die Position AUS, um die Dampfer eugung
u stoppen. Drücken Sie die Taste EIN/AUS, um das Gerät sofort aus uschalten, lassen Sie
den Entkalker mindestens 15 Minuten im Gerät ablagern.
6. Drücken Sie die Taste EIN/AUS, um das Gerät neu u starten. Warten Sie, bis eine
Kaeetastenan eige aueuchtet, und drücken dann eine beliebige Kaeetaste, um u
brühen, bis kein Entkalker mehr vorhanden ist.
7. Brühen Sie mit Leitungswasser in der MAX-Stufe, wiederholen Sie die Schritte 4-6 dreimal
und brühen dann, bis kein Wasser mehr im Wassertank ist.
FEHLERBEHEBUNG
Symptom Mögliche Ursache Mögliche Lösung
Die Metallteile im Tank
sind verrostet
Entkalker ist nicht der
empfohlene Typ. Er kann die
Metallteile im Tank korrodieren
Benut en Sie den vom
Hersteller empfohlenen
Entkalker
Wasser tritt aus dem
Boden der
Kaeemaschine aus
Es bendet sich viel Wasser in der
Abtropfschale
Bitte Abtropfschale leeren
Die Kaeemaschine funktioniert
nicht richtig
Wenden Sie sich an einen
autorisierten Kundendienst
für Reparatur
Wasser tritt an der
Außenseite des Filters aus
Es bendet sich etwas
Kaeepulver am Filterrand
Kaeepulver entfernen
Im Espressokaee ist ein
saurer (Essig-)Geschmack
vorhanden
Das Gerät wurde nach dem
Entkalken nicht richtig gereinigt
Kaeemaschine mehrmals
wie im Abschnitt„Vor dem
ersten Gebrauch“
beschrieben reinigen
Das Kaeepulver wird lange an
einem heißen, nassen Ort
gelagert. Das Kaeepulver wird
schlecht
Bitte verwenden Sie frisches
Kaeepulver oder lagern
unbenut tes Kaeepulver an
einem kühlen, trockenen Ort.
Nachdem Sie eine Packung
Kaeepulver geönet haben,
verschließen Sie diese wieder
fest und bewahren diese im
Kühlschrank auf, um ihre
Frische u bewahren
Temperatur wird der Bereitschafts-Modus fortgeset t.
Hinweis: Wenn Sie direkt nach der Dampf ubereitung Kaee ubereiten möchten, blinkt
die Kaeean eige ur Warnung beim Drücken derTaste Kaee. Drehen Sie den Dampfregler
auf die Position EIN, um heißes Wasser u pumpen und das Gerät abkühlen u lassen.

20 21Bedienungsanleitung Bedienungsanleitung
DEDE
Deutsch
Korrekte Entsorgung dieses Produkts
(Elektromüll)
(An uwenden in den Ländern der Europäischen Union und anderen europäischen Ländern mit einem separaten Sammelsystem)
Die Kenn eichnung auf dem Produkt b w. auf der da ugehörigen Literatur gibt an, dass es nach seiner Lebensdauer nicht
usammen mit dam normalem Haushaltsmüll entsorgt werden darf. Entsorgen Sie dieses Gerät bitte getrennt von
anderen Abfällen, um der Umwelt b w. der menschlichen Gesundheit nicht durch unkontrollierte Müllbeseitigung u
schaden. Recyceln Sie das Gerät, um die nachhaltige Wiederverwertung von stoichen Ressourcen u fördern. Private
Nut er sollten den Händler, bei dem das Produkt gekauft wurde, oder die uständigen Behörden kontaktieren, um in
Erfahrung u bringen, wie sie das Gerät auf umweltfreundliche Weise recyceln können. Gewerbliche Nut er sollten sich an
Ihren Lieferanten wenden und die Bedingungen des Verkaufsvertrags konsultieren. Dieses Produkt darf nicht usammen
mit anderem Gewerbemüll entsorgt werden.
Hergestellt in China für Lechpol Electronics Les ek Sp.k., ul. Garwolińska 1, 08-400 Miętne.
TECHNISCHE DATEN
Funktionen
Vorbereiten von wei Tassen gleich eitig
Tassenwärmer
Milchschäumer
Dampunktion
Entfernbare Tropfschale
Entfernbarer Wasserbehälter
Automatisches ausschalten
Rutschfeste Gummibasis
Technische Daten
Kaeetyp: Gemahlener Kaee
Pumpendruck: 15 bar
Wasserbehälterkapa ität: 1,5 l
Maximale Tassenhöhe: 85 mm
Maximale Leistung: 850 W
Kabellänge: 95 cm
Stromversorgung: 220-240 V~; 50/60 H
Gewicht: 3,5 kg
Abmessungen: 27,4 x 22,7 x 30 cm
Im Set: 2x Filter, Messlöel mit Stampfer
Der Dampf kann nicht
aufschäumen
Die Dampfbereitschaftsan eige
leuchtet nicht
Erst wenn die An eige Dampf
leuchtet, kann der Dampf
um Aufschäumen
verwendet werden
Der Behälter ist u groß oder die
Form passt nicht
Verwenden Sie einen hohen
und schmalen Behälter
Sie haben Magermilch
verwendet
Verwenden Sie Vollmilch oder
teilentrahmte Milch
Die Kaeemaschine kann
nicht mehr funktionieren
Das Gerät ist nicht richtig an die
Stromversorgung angeschlossen
Stecken Sie das Net kabel
richtig in eine
Wandsteckdose, wenn das
Gerät immer noch nicht
funktioniert, wenden Sie sich
bitte an einen autorisierten
Kundendienst für Reparatur

22 23Owner’s manualOwner’s manual
ENEN
23.Do not attempt to repair this device yourself. Only authori ed and qualied personnel may
repair this device. Never disassemble this device.
24.Use only authori ed accessories.
INSERTING THE FILTER AND FILTER HOLDER
There are two lters provided within the appliance. Use deeper lter for 2 cups function.
1. To insert the lter in the lter holder, make sure to align the protrusion on the lter with the
groove inside the lter holder. Then rotate the lter to lock it securely in the holder.
2. Insert the lter holder into the appliance from the “INSERT” position and x it rmly by
turning it anticlockwise until it is at the“LOCK” position.
BEFORE THE FIRST USE
1. Open the water tank cover and ll water into the water tank (water level should not exceed
the“MAX”mark in the water tank). Then close the water tank cover.
Note: You can also detach the water tank from the appliance
rst and then ll it with water.
2. Set the lter into the lter holder (no coee in the lter). Then
insert the lter holder into the appliance.
3. Place a jug on the drip tray. Make sure the steam knob is at the
OFF position.
4. Connect the appliance into power source and press the ON/
OFF button. Power indicator is illuminated white.The indicators
of the 1 cup button, 2 cups button and the manual coee
button ash. The appliance begins preheating. After all
indicators are solidly on, the preheating is completed.
Note: Preheating is necessary before making coee.
5. Press the manual coee button. The appliance will pump water for about 30 seconds. Pour
out water from the jug. Now the appliance is ready for making coee.
Note: There may be noise when pumping water for the rst time- it is normal. After about
20 seconds, the noise should disappear.
OFF POSITION
ON POSITION
SAFETY INSTRUCTIONS
Thank you for purchasing TEESA appliance. Read this instruction manual and keep it for future
reference. Producer does not take responsibility for damages caused by inappropriate handling
and use of the product.
In order to reduce the risk of injuries or damages, follow basic safety precautions applied
when using any electrical device, including the following:
1. Read the entire instruction manual before you start installation and assembly and keep it for
future reference. Keep the manual for future reference.
2. Before connecting the device to power supply socket, make sure the voltage indicated on the
device corresponds to the voltage in the power supply socket.
3. Appliance for household use only.
4. Clean and store this appliance in accordance to instructions listed in“Cleaning”section.
5. ALWAYS turn o the device and disconnect it from the mains supply:
• if it’s not operating correctly
• if there’s an uncommon voice when using
• before disassembling the device
• before cleaning
• when not in use
6. When you disconnect the power cord of the device, grasp and pull the plug, not the cord/cable.
7. Do not turn on the device if the water tank is empty.
8. Danger of scalding! Never direct the jet of hot steam or water towards yourself or other people!
9. To operate the coee machine always use handles or knobs.
10.Do not touch the coee machine when it is working as this brings the risk of burning
11.When hot water is being generated from the no les keep your body at the distance from the
coee machine to prevent scorch.
12.DO NOT remove the lter holder while brewing coee. Please remove it to make additional
coee after nish brewing for more than 10 seconds. Caution should also be taken while
removing the lter holder since the metal parts will be hot. Please make sure to hold it by the
handle and to use the lter holding clip to dispose the grounds.
13.Keep the device out of the reach of children.
14.This appliance may be used by children who are above 8 years old and by persons with
reduced physical, sensory or mental capabilities, or lack of experience and knowledge, if they
are supervised and guided by a person who is responsible for their safety in a cautious
manner for all the safety precautions being understood and followed. Children should be
supervised to ensure that they do not play with the appliance. Children should not perform
cleaning and servicing of the device unsupervised.
15.Fixed power cable may only be replaced in an authori ed service point.
16.Keep the device and its cord/cable away from heat, water, moisture, sharp edges and any
other factor which may damage the appliance or its cord.
17.Make sure the power cord does not touch any hot or sharp elements.
18.Do not use the product for purposes dierent from displayed in this operating manual.
19.Do not place the appliance in water or any liquid; nor handle/use it with wet or moist hands.
20.Do not leave the appliance unattended when it’s working.
21.ALWAYS disconnect the product form the power mains when it is not in use.
22.DO NOT use this device if the cord or the plug is damaged, or the appliance is broken.

24 25Owner’s manualOwner’s manual
ENEN
WARNING: Do not leave the appliance unattended during making coee, as you need to
operate manually sometimes!
8. After nishing making coee, take the lter holder out by turning it clockwise, then pour
coee residue out with the lter pressed by the lter holding clip.
9. Let them cool down completely, then remove the lter from the lter holder (to do this,
align the protrusion on the lter with the groove inside the lter holder) and rinse all parts
under running water.
FROTHING MILK
1. Make sure that the steam knob is at the OFF position.
2. Press the steam button- coee button indicator will be extinguished. Wait until the steam
button indicator is illuminated.
Note: During operation, the steam button indicator will cycle on and o to maintain
desired temperature.
3. Fill a jug with milk. It is recommended to use whole milk at refrigerator temperature (not hot!).
Note: In choosing the si e of a jug, it is recommended the diameter is not less than 70±5
mm, and bear in mind that the milk increases in volume by 2 times therefore make sure the
height of jug is enough.
4. Insert the steam wand about two centimeters into the milk.
5. Turn the steam knob slowly anticlockwise, steam will come out from steam wand. Froth
milk in the way of moving the jug round up and down.
Note: Never turn the steam knob rapidly, as the steam will accumulate rapidly within short
time which may increase a potential risk of explosion.
6. When the required result is reached, turn the steam knob to the OFF position.
Note: Clean the steam outlet with wet sponge immediately after steam stops producing,
but be careful not to get burned!
7. Press the ON/OFF button to turn o the appliance. All indicators will be extinguished.
8. When the steam function is operated for more than 180 seconds in a single continuous
operation, the steam indicator ashes quickly for alarming. In this case, press any coee button
to cool down the appliance. It will resume standby after cooling down to normal temperature.
Note: If you want to make coee immediately after making steam, the coee indicator will
ash for alarming upon pressing the coee button. Turn the steam knob to the ON position
to pump hot water in order to let the appliance cool down.
AUTOMATIC POWER OFF FUNCTION
If there is no operation within 25 minutes, the appliance will power o automatically.
AUTOMATIC POWER OFF FUNCTION
PREHEATING
MAKING ESPRESSO
Before making coee, it is recommended to preheat the appliance, including the lter holder, lter
and cup, so that the coee avor will not be inuenced by cold parts.
1. Open the water tank cover and ll the water tank with desired amount of water. The water
level should not exceed the“MAX”mark in the tank.
2. Set the selected lter into the lter holder. Then insert the lter holder into the appliance.
3. Place a cup on the drip tray.
4. Connect the appliance to power supply. Make sure the steam knob is at the OFF position.
5. Press the ON/OFF button. The power indicator is illuminated white. The indicators of 1 cup
button, 2 cups button and manual coee button ash. The appliance begins preheating.
After all indicators are solidly on, it means that preheating is completed.
6. Press the manual coee button, the appliance starts to pump water. When there is water
owing out, press the manual coee button again to stop pumping water immediately. The
purpose of this step is to pump water from the water tank into boiler.
7. When the manual coee button indicator is illuminated, it indicates the preheating is
nished.
1. Add ground coee into the selected lter with a measuring spoon (a spoon of ground coee
can make about a cup of top-grade coee), then press ground coee tightly with the tamper.
Note:Make sure there is no coee on the edge of the lter!
2. Set the lter into the lter holder, then insert the lter holder into the appliance.
3. Pour out the hot water from the cup. Then place the hot cup on the drip tray.
4. After preheating is completed, press the 1 cup, 2 cups button or manual coee button. The
appliance will start brewing coee.
Working time for:
• 1 cup is 15 seconds,
• 2 cups is 25 seconds,
• manual coee button is 90 seconds (the appliance will automatically stop working if
there is no operation within 90 seconds).
5. When your desired quantity of coee is reached or the color of coee changes weak obviously,
press the corresponding button again.The appliance stops working.
6. If the coee button indicator is extinguished, wait for a moment. When the coee button
indicator illuminates again, you can continue to make coee.
7. Setting brewing time:
• Press and hold the 1 cup button for 3 seconds. 1 cup button ashes, entering setting mode.
• When the indicator ashes, press the 1 cup button again to start dispensing coee.
• When the specied time is reached, press the 1 cup button to complete setting which
can be memori ed by the appliance.
• Working duration for 1 cup can be set up to 45 seconds. If working duration for 1 cup is
set, working duration for 2 cups will be automatically updated to 2 times of that for 1 cup.
Working duration for 2 cups can be set up to 90 seconds. If working duration for 2 cups
is set, working duration for 1 cup will be automatically updated to half of that for 2 cups.

26 27Owner’s manualOwner’s manual
ENEN
TROUBLESHOOTING
Symptom Possible cause Possible solution
The metal parts in the tank
have rusted
Descaler is not
recommended type. It may
corrode the metal parts in
the tank
Use the descaler
recommended by
manufacturer
Water leaks from the bottom
of coee maker
There is much water in the
drip tray
Please empty the drip tray
The coee maker
malfunctions
Please contact with the
authori ed service facility for
repairing
Water leaks out of outer side
of lter
There is some coee powder
on lter edge
Get rid of them
Acid (vinegar) taste exists in
espresso coee
The unit wasn’t cleaned
correctly after descaling
Clean coee maker as
described in the“before the
rst use”section for several
times
The coee powder is stored
in a hot, wet place for a long
time. The coee powder
turns bad
Please use fresh coee
powder, or store unused
coee powder in a cool, dry
place. After opening a
package of coee powder,
reseal it tightly and store it in
a refrigerator to maintain its
freshness
The coee maker cannot
work any more
The power outlet is not
plugged well
Plug the power cord into a
wall outlet correctly, if the
appliance still does not work,
please contact with the
authori ed service facility for
repairing
The steam cannot froth The steam ready indicator is
not illuminated
Only after the steam ready
indicator is illuminated, the
steam can be used to froth
The container is too big or
the shape is not t
Use high and narrow cup
You have used skimmed milk Use whole milk or half-
skimmed milk
DESCALING
After the appliance works for 500 cycles (including coee, steam and other functions), all the
indicators ash quickly 5 times at the same time once preheating is completed, reminding you
of descaling. If you do not descale, this will happen every time when you use the appliance.
In standby state, at the same time press and hold the manual coee button and 2 cups
button for 3 seconds. The two indicators will ash quickly 3 times, reminding you of
canceling descaling. The number of working cycles returns to zero.
To make sure your coee maker operates eciently, internal piping is clean and the avor of coee
is optimal, you should clean away the mineral deposits left every 2-3 months.
1. Fill the water tank with water and descaler to the MAX level (the proportion of water and
descaler is 4:1; for details refer to the instruction of descaler).
2. Install the lter holder (no ground coee in it) and place a jug on the drip tray.
3. Press the ON/OFF button, the power indicator will be illuminated. Press any coee button
and make sure the steam knob is in the OFF position. When there is water owing out, press
the coee button to stop pumping, and wait for a moment.The appliance begins to preheat.
4. When the coee button indicator is illuminated, it shows preheating is nished. Press the coee
button and make two cups of coee (about 60 ml). Press the coee button to stop pumping.
5. Press the steam button.The coee button indicator will be extinguished. Wait until the steam
button indicator is illuminated. Make steam for 2 minutes by turning the steam knob, then turn
the steam knob to the OFF position to stop making steam. Press the ON/OFF button to turn
o the appliance immediately, make the descaler deposit inside the unit at least 15 minutes.
6. Press the ON/OFF button to restart the appliance.Wait until a coee button indicator will be
illuminated, then press any coee button to brew until no descaler is left.
7. Brew with tap water in the MAX level, repeat steps 4-6 for 3 times, then brew until no water
is left in the water tank.
CLEANING AND MAINTENANCE
Disconnect the appliance from power supply and let it cool down completely before cleaning.
1. Clean the housing of the appliance with a soft, slightly damp cloth regularly. Never immerse
the housing in water for cleaning.
2. Rinse the inside of the water tank regularly. Make sure to dry it before reattaching to the
appliance.
3. Clean the drip tray with mild detergent, rinse under running water then wipe it well.
4. Rinse the lter holder and lters under running water, then wipe them well.
Note: Do not wash the lter holder in a dishwasher!
5. Wipe the steam wand with a wet sponge after each use to prevent it from being blocked.
Be careful not to get burned!
6. Do not clean the appliance or its parts with alcohol or solvent cleanser.

28 29Manuel de l'Utilisateur Manuel de l'Utilisateur
FRFR
SÉCURITÉ
Merci d’avoir acheter l’appareil TEESA. Avant l’utilisation de l’appareil, lire attentivement le
mode d’emploi et le garder pour une consultation ultérieure. Le fabricant n’est pas responsable
d’une utilisation inappropriée du produit.
Pour éviter les dommages et les blessures, respecter les consignes de sécurité essentielles
appliquéespourl’utilisationdesappareilsélectriques,ycompriscellesdétailléesci-après:
1. Avant l’utilisation, lire attentivement le mode d’emploi, même si un appareil similaire a déjà
été utilisé. Garder le mode d’emploi pour le consulter ultérieurement.
2. Avant de brancher l’appareil, vérier la conformité de la tension de courant dans la prise
secteur avec la tension de l’appareil.
3. L’appareil est exclusivement destiné à une utilisation ménagère.
4. Nettoyer et entreposer l’appareil conformément aux consignes indiquées dans la
rubrique« Nettoyage ».
5. Toujours éteindre l’appareil et le débrancher de l’alimentation électrique :
• si l’appareil ne fonctionne pas correctement,
• si le bruit produit par l’appareil n’est pas typique pour son fonctionnement ou témoigne
d’une anomalie,
• avant le démontage,
• avant le nettoyage,
• si l’appareil n’est pas utilisé.
6. Pour débrancher l’appareil de l’alimentation, saisir et tirer par la che. Ne jamais tirer par le
câble.
7. Ne pas mettre en marche l’appareil si le réservoir d’eau est vide.
8. Danger de brûlures ! Il est interdit de diriger le jet d’eau chaude et de vapeur sur soi ou sur
d’autres personnes.
9. Toujours manipuler l’appareil à l’aide des poignées et des boutons.
10.Ne pas toucher l’appareil lors de son fonctionnement, car ceci entraîne un risque de brûlures.
11.Pour éviter les brûlures, faire particulièrement attention et rester à distance sûre de l’appareil,
lorsque de l’eau et de la vapeur chaudes s’en dégagent.
12.Ne pas débrancher le support du ltre de l’appareil lors de la préparation du café. Le ltre
peut être débranché de l’appareil une fois que la préparation de la boisson est terminée. Faire
très attention car les pièces en métal peuvent être toujours chaudes. Lors du débranchement
de l’appareil, tenir le support du ltre par la poignée et bloquer le ltre à l’aide du levier pour
se débarrasser des restes du café.
13.Entreposer l’appareil dans un endroit hors de portée des enfants.
14.Cet appareil peut être utilisé par des enfants âgés d’au moins 8 ans et par des personnes
ayant des capacités physiques, sensorielles ou mentales réduites ainsi que par des personnes
ne possédant pas d’expérience ni de connaissances, si ces personnes sont surveillées ou si
des instructions concernant l’utilisation de l’appareil en toute sécurité leur ont été fournies,de
manière à ce que tous les risques encourus soient compris. Informer les enfants que cet
appareil n’est pas un jouet. Le nettoyage et la maintenance de l’appareil ne doivent pas être
réalisés par des enfants sans surveillance.
15.Seul le fabricant, un service agréé ou une personne dûment qualiée peuvent remplacer le
câble d’alimentation non détachable.
28 29Owner’s manualOwner’s manual
ENEN
English
Correct Disposal of This Product
(Waste Electrical & Electronic Equipment)
(Applicable in the European Union and other European countries with separate collection systems)This marking shown on
the product or its literature, indicates that it should not be disposed with other household wastes at the end of its working
life. To prevent possible harm to the environment or human health from uncontrolled waste disposal, please separate this
from other types of wastes and recycle it responsibly to promote the sustainable reuse of material resources. Household
users should contact either the retailer where they purchased this product, or their local government oce, for details of
where and how they can take this item for environmentally safe recycling. Business users should contact their supplier and
check the terms and conditions of the purchase contract.This product should not be mixed with other commercial wastes
for disposal.
Made in China for Lechpol Electronics Les ek Sp.k., ul. Garwolińska 1, 08-400 Miętne.
SPECIFICATION
Functions
Preparing two cups simultaneously
Cup warming
Milk frother
Steam function
Removable drip tray
Removable water container
Automatic shut-o
Anti-slip feet
Technical data
Coee type: ground coee
Pump pressure: 15 bar
Water container capacity: 1,5 l
Max. cup height: 85 mm
Maximum power: 850 W
Cord length: 95 cm
Power supply: 220-240 V~; 50/60 H
Weight: 3,5 kg
Dimensions: 27,4 x 22,7 x 30 cm
In set: 2x lter, measuring spoon with tamper

30 31Manuel de l'Utilisateur Manuel de l'Utilisateur
FRFR
16.Garder l’appareil et le câble d’alimentation loin des sources de chaleur, d’eau, d’humidité, de
bords tranchants et d’autres facteurs qui pourraient endommager l’appareil ou le câble.
17.Veiller particulièrement à ce que le câble d’alimentation ne touche pas les bords tranchants /
les surfaces chaudes.
18.Ne pas utiliser l’appareil à d’autres ns que celles décrites dans le présent mode d’emploi.
19.Ne pas plonger l’appareil dans l’eau, ni l’utiliser avec les mains mouillées.
20.Ne pas laisser l’appareil sans surveillance lors de son fonctionnement.
21.Toujours débrancher l’appareil de l’alimentation électrique, s’il n’est pas utilisé.
22.Il est interdit d’utiliser l’appareil, si le câble d’alimentation est endommagé ou l’équipement
ne fonctionne pas correctement.
23.Il est interdit de réparer l’appareil par vous-même. Seules les personnes autorisées et dûment
qualiées peuvent réparer l’appareil. Il est interdit de démonter l’appareil.
24.Ne pas utiliser d’accessoires qui ne sont pas d’origine.
MONTAGE DU FILTRE ET DU SUPPORT
L’appareil est fourni avec deux ltres. Utiliser le ltre plus profond pour pr parer deux caf s à la fois.
1. Pour pouvoir placer le ltre dans son support, aligner la projection sur le ltre avec la fente
dans le support. Tourner ensuite le ltre et le verrouiller dans le support.
2. Fixer le support à l’appareil en l’appliquant à l’endroit indiqué par « INSERT » et ensuite, le
tourner à droite vers l’indication « LOCK » jusqu’au bout.
AVANT LA PREMIÈRE UTILISATION
1. Ouvrir le couvercle et verser l’eau dans le réservoir (le niveau d’eau dans le réservoir ne doit
pas dépasser l’indication « MAX »). Fermer ensuite le couvercle.
Attention : Le réservoir d’eau peut être débranché de
l’appareil.
2. Placer le ltre dans le support (le ltre doit être vide). Fixer
ensuite le support du ltre sur l’appareil.
3. Lacer une tasse sur l’égouttoir. S’assurer que le bouton
rotatif de vapeur se trouve sur la position OFF.
4. Brancher l’appareil à l’alimentation et appuyer sur la touche
ON/OFF. La touche s’allume en blanc. Les touches 1 café, 2
cafés et mode manuel clignotent. L’appareil commence le
processus de chaue. Quand tous les indicateurs arrêtent
de clignoter, ceci signie que l’appareil est chaué.
Attention : Le processus de chaue est indispensable
avant la préparation du café.
5. Appuyer sur la touche du mode manuel. L’appareil commence à pomper l’eau pendant
environ 30 secondes. Après ce temps, déverser l’eau de la tasse. L’appareil est prêt pour la
préparation de café.
Attention : Lors du premier pompage d’eau, un bruit peut se faire entendre. Après environ
20 secondes le bruit devrait s’arrêter.
POSITION OFF
POSITION ON

32 33Manuel de l'Utilisateur Manuel de l'Utilisateur
FRFR
RÉCHAUFFEMENT
PRÉPARATION DE L’EXPRESSO
Avant de commencer la pr paration de caf , il est recommand de chauer le ltre, le support du ltre
et la tasse où sera pr par le caf . Ainsi, le goût du caf ne sera pas d t rior par les pièces froides.
1. Ouvrir le couvercle du réservoir d’eau et remplir le réservoir. Le niveau d’eau ne doit pas
dépasser l’indication « MAX » dans le réservoir.
2. Placer le ltre choisi dans le support. Fixer ensuite le support du ltre sur l’appareil.
3. Lacer une tasse sur l’égouttoir.
4. Brancher l’appareil à l’alimentation. S’assurer que le bouton rotatif de vapeur se trouve sur
la position OFF.
5. Appuyer sur la touche ON/OFF. La touche s’allume en blanc. Les touches 1 café, 2 cafés et mode
manuel clignotent. L’appareil commence le processus de chaue. Quand tous les indicateurs
arrêtent de clignoter, ceci signie que l’appareil est chaué.
6. Appuyer sur la touche du mode manuel ; l’appareil commence à pomper l’eau. Quand l’eau
commenceàsortir,appuyerdenouveausur latouche dumodemanuelpourarrêterleprocessus.
L’objectif de l’opération mentionnée ci-dessus est de pomper l’eau du réservoir dans l’appareil.
7. Quand le bouton du mode manuel est allumé, ceci signie que le processus de réchauement
est terminé.
1. À l’aide du doseur à café, verser le café moulu dans le ltre choisi ( une cuillère de café moulu
permet d’avoir une tasse de café de bonne qualité), tasser ensuite le café à l’aide du tasseur.
Attention : S’assurer que le café ne se trouve pas sur le bord du ltre !
2. Placer le ltre dans le support et ensuite, l’installer dans l’appareil.
3. Déverser l’eau chaude de la tasse. Placer ensuite la tasse chaude sur l’égouttoir.
4. Après le réchauement, appuyer sur la touche 1 café, 2 cafés ou mode manuel. L’appareil
lance la préparation du café.
La durée de préparation pour la fonction :
• 1 café est de 15 secondes,
• 2 cafés est de 25 secondes,
• mode manuel est de 90 secondes (l’appareil arrête automatiquement la préparation du
café après 90 secondes d’inactivité).
5. Quand la quantité de café demandée est préparée ou quand la couleur du café devient de
moins en moins foncée, appuyer de nouveau sur la touche correspondante. Le processus de
préparation est arrêté.
6. Quand la touche de café s’éteint, attendre quelques secondes. Après un certain moment la
touche devrait de nouveau s’allumer, ce qui signie qu’il est possible de continuer à préparer
la boisson.
7. Réglage de la durée de préparation du café :
• Appuyer sur la touche 1 café et la maintenir pressée pendant environ 3 secondes. La
touche 1 café clignote, ceci signie que l’appareil est en mode de réglage.
• Quand la touche clignote, appuyer de nouveau sur la touche 1 café pour commencer la
préparation du café.
• Une fois la durée de préparation écoulée, appuyer de nouveau sur la touche 1 café pour
conrmer le réglage de la durée de préparation d’un café.
MOUSSER LE LAIT
1. S’assurer que le bouton rotatif de vapeur se trouve sur la position OFF.
2. Appuyer sur la touche de vapeur - la touche café s’éteint. Attendre que la touche de vapeur
s’allume.
Attention : La touche de vapeur s’allumera et s’éteindra, ce qui signie que l’appareil
maintient une température xe.
3. Remplir le récipient de lait. Il conseillé d’utiliser du lait pasteurisé, sorti directement du frigo
avant l’utilisation (ne pas utiliser de lait tiède).
Attention : Il est conseillé que le diamètre du récipient où le lait va être moussé soit d’au moins
70+5 mm. En choisissant le récipient, prendre également en compte le fait que le lait moussé
double son volume et pour cette raison, la hauteur du récipient doit être également adaptée.
4. Plonger la buse du mousseur dans le lait à une profondeur d’env. 2 cm.
5. Tourner lentement le bouton rotatif de vapeur à gauche, de la vapeur se dégage de la buse
du mousseur. Pour mousser le lait, faire tourner le récipient en le soulevant et baissant.
Attention : Ne pas tourner brusquement le bouton rotatif de vapeur, car ceci peut entrainer
une accumulation rapide d’une grande quantité de vapeur, ce qui peut accroitre le risque
d’explosion.
6. Après avoir moussé le lait, tourner le bouton rotatif de vapeur sur la position OFF.
Attention : Immédiatement après chaque utilisation, nettoyer la buse du mousseur à l’aide
d’une éponge humide. Faire très attention car la buse du mousseur peut être toujours
chaude. Risque de brûlures !
7. Appuyer sur la touche ON/ OFF, pour arrêter l’appareil. Tous les indicateurs s’éteignent.
8. Si la fonction de vapeur était en marche plus de 180 secondes pendant une seule opération,
la touche de vapeur clignote rapidement. Dans ce cas, appuyer sur une quelconque touche
café pour laisser l’appareil refroidir. L’appareil se remet en mode de veille au moment où il
atteindra la température correspondante.
Attention : Si le café doit être préparé directement après que le lait soit moussé, la touche café
clignotera, ce qui indiquera que la touche doit être pressée.Tourner le bouton rotatif de vapeur
sur la position ON pour commencer à pomper l’eau, ce qui permettra à l’appareil de refroidir.

34 35Manuel de l'Utilisateur Manuel de l'Utilisateur
FRFR
NETTOYAGE ET ENTREPOSAGE
ARRÊT AUTOMATIQUE
L’appareil s’éteint automatiquement après 25 minutes d’inactivité.
DÉTARTRAGE
Quand l’appareil eectuera 500 opérations (préparation de café, opération de mousser et autres
fonctions), toutes les touches clignoteront rapidement 5 fois après le processus de réchauement.
Ceci sera un rappel de la nécessité d’eectuer un détartrage. Si le détartrage n’est pas eectué, le
clignotement décrit au-dessus se répétera après chaque mise en marche de l’appareil.
Pour désactiver le rappel de détartrage, en mode de veille, appuyer simultanément sur
les touches du mode manuel et 2 cafés et les maintenir pressées pendant environ 3
secondes. Les touches clignoteront rapidement 3 fois. Le compteur sera mis à zéro.
Pour assurer le fonctionnement correct de l’appareil, la propret du circuit d’eau et le meilleur goût
et arôme du caf , d tartrer l’appareil tous les deux à trois mois.
1. Remplir le réservoir avec de l’eau et le produit détartrant jusqu’au niveau MAX (les proportions
d’eau et de produit détartrant sont de 4:1 ; les informations détaillées se trouvent dans le mode
d’emploi du produit détartrant).
2. Fixer le support du ltre (sans café) à l’appareil et poser un pot sur l’égouttoir.
3. Appuyer sur la touche ON/OFF, la touche café s’allume. Appuyer sur la touche café et s’assurer
que le bouton rotatif de vapeur se trouve sur la position OFF. Quand l’appareil commencera
à pomper l’eau, appuyer de nouveau sur l’une des touches café pour arrêter le processus et
attendre un instant. L’appareil commence le processus de chaue.
4. Quand le bouton café s’allume, ceci signie que le processus de réchauement est terminé.
Appuyer sur la touche café et verser environ 60 ml (deux tasses) d’eau. Ensuite, appuyer sur
l’une des touches café pour arrêter le pompage d’eau.
5. Appuyer sur le bouton de vapeur. Le bouton café s’éteint. Attendre que la touche de vapeur
s’allume. Former la vapeur pendant environ 2 minutes, tourner ensuite le bouton rotatif de
vapeur sur la position OFF pour arrêter le processus. Appuyer sur la touche ON/ OFF, pour
arrêter l’appareil. Laisser l’appareil dans cet état pour au moins 15 minutes.
6. Une fois ce temps écoulé, appuyer sur la touche ON/OFF pour remettre l’appareil en marche.
Attendre que la touche café s’allume, appuyer ensuite sur l’une des touches café et laisser
l’appareil fonctionner jusqu’à ce que le réservoir soit complètement vide.
7. Verser dans le réservoir de l’eau claire jusqu’à l’indication MAX et rincer le circuit d’eau,
répéter ensuite les étapes 4-6 et laisser l’appareil fonctionner jusqu’à ce que le réservoir soit
complètement vide.
Avant le nettoyage, d brancher l’appareil de l’alimentation et le laisser refroidir.
1. Nettoyer le boîtier de l’appareil uniquement à l’aide d’un chion doux humide. Ne pas
plonger l’appareil dans l’eau.
2. Rincer régulièrement l’intérieur du réservoir d’eau. S’assurer que le réservoir est sec avant
de l’installer de nouveau dans l’appareil.
3. Nettoyer l’égouttoir à l’aide d’un détergent doux, rincer ensuite à l’eau courante et sécher
soigneusement.
4. Rincer le support du ltre et les ltres à l’eau courante et les sécher soigneusement.
Attention : Ne pas laver le support du ltre dans un lave-vaisselle!
5. Nettoyer la buse du mousseur à l’aide d’une éponge humide après chaque utilisation pour
empêcher l’obturation de la sortie de vapeur. Faire attention pour éviter de se brûler !
6. Ne pas utiliser de produits chimiques ou de détergents pour nettoyer l’appareil.
RÉSOLUTION DES PROBLÈMES
Problème Cause possible Solution possible
Les pièces en métal dans
le réservoir ont rouillé
Produit détartrant inadapté Il
peut conduire à la formation de
rouille sur les pièces en métal à
l’intérieur du réservoir
Utiliser un produit détartrant
adapté
L’eau fuit sous l’appareil L’égouttoir est plein Vider l’égouttoir
L’appareil ne fonctionne pas Contacter un service technique
agréé
L’eau s’écoule du ltre Du café se trouve sur le bord du
ltre
Nettoyer le bord du ltre
Goût acide (vinaigre) de
l’expresso
Le cycle de rinçage après le
détartrage n’a pas été
correctement réalisé
Rincer plusieurs fois l’appareil
conformément aux consignes
indiquées dans le chapitre
« Avant la première utilisation »
Le café est conservé dans un
endroit chaud et humide
pendant une longue période de
temps Le café est périmé
Utiliser un nouveau café ou
conserver le café dans un
endroit frais et sec Après
l’ouverture du nouvel
emballage de café, bien le
refermer après et le conserver
au frigo pour maintenir la
fraicheur du café
L’appareil ne fonctionne
pas
L’appareil n’est pas branché
correctement à l’alimentation
Brancher correctement
l’appareil à l’alimentation ; si
malgré ceci l’appareil ne
fonctionne pas, contacter un
service technique agréé
La buse du mousseur ne
fonctionne pas
L’indicateur de la vapeur n’est
pas allumé
L’appareil produit de la vapeur
seulement si l’indicateur de la
vapeur est allumé
Le récipient est trop grand ou sa
forme n’est pas adaptée
Utiliser un récipient haut et n
Du lait écrémé a été utilisé Il est conseillé d’utiliser du lait
entier ou partiellement écrémé

36 37Manuel de l'Utilisateur Manuel de l'Utilisateur
FRFR
36 37Εγχει ίδιο χ ήση Εγχει ίδιο χ ήση
GRGR
ΟΔΗΓΙΕΣ ΑΣΦΑΛΕΙΑΣ
Σας ευχαριστούμε για την αγορά της συσκευής TEESA. Διαβάστε προσεκτικά αυτές τις οδηγίες
χρήσης πριν τη χρήση και φυλάξτε τες για μελλοντική χρήση.Ο παραγωγός δεν αναλαμβάνει
την ευθύνη για ζημιές που προκλήθηκαν από ακατάλληλο χειρισμό και χρήση του προϊόντος.
Γιαναειώσετετονκίνδυνοτ αυατισού,ακολουθήστετιβασικέπ οφυλάξειασφαλείαπου
εφα όζονται κατά τη χ ήση οποιασδήποτε ηλεκτ ική συσκευή, συπε ιλαβανοένων των
πα ακάτω:
1. Διαβάστε ολόκληρο το εγχειρίδιο οδηγιών πριν ξεκινήσετε την εγκατάσταση και τη
συναρμολόγηση και φυλάξτε το για μελλοντική αναφορά. Φυλάξτε το εγχειρίδιο για
μελλοντική αναφορά.
2. Πριν συνδέσετε τη συσκευή στην πρίζα, βεβαιωθείτε ότι η τάση που αναφέρεται στη συσκευή
αντιστοιχεί στην τάση στην πρίζα.
3. Συσκευή μόνο για οικιακή χρήση.
4. Καθαρίστε και αποθηκεύστε αυτήν τη συσκευή σύμφωνα με τις οδηγίες που αναφέρονται
στην ενότητα «Καθαρισμός».
5. ΚΛΕΙΣΤΕ ΠΑΝΤΑ τη συσκευή και αποσυνδέστε την από την παροχή ρεύματος:
• εάν δεν λειτουργεί σωστά
• εάν ακούγεται ασυνήθιστος ήχος κατά τη χρήση
• πριν από την αποσυναρμολόγηση της συσκευής
• πριν τον καθαρισμό
• όταν δεν χρησιμοποιείται
6. Όταν αποσυνδέετε το καλώδιο τροφοδοσίας της συσκευής, πιάστε και τραβήξτε το φις και όχι
το καλώδιο.
7. Μην ενεργοποιείτε τη συσκευή εάν το δοχείο νερού είναι άδειο.
8. Κίνδυνος εγκαυμάτων! Ποτέ μην κατευθύνετε την εκτόξευση ζεστού ατμού ή νερού προς τον
εαυτό σας ή άλλους ανθρώπους!
9. Για τη λειτουργία της καφετιέρας χρησιμοποιείτε πάντα λαβές ή κουμπιά.
10.Μην αγγίζετε τη μηχανή του καφέ όταν λειτουργεί, καθώς υπάρχει κίνδυνος εγκαύματος.
11.Όταν δημιουργείται ζεστό νερό ή ατμός από τα ακροφύσια, κρατήστε το σώμα σας σε
απόσταση από τη μηχανή του καφέ για να αποφύγετε τυχόν εγκαύματα.
12.ΜΗΝ αφαιρείτε τη βάση του φίλτρου κατά την παρασκευή καφέ. Αφαιρέστε τη για να
φτιάξετε επιπλέον καφέ μετά την ολοκλήρωση της παρασκευής. Θα πρέπει επίσης να δίνεται
προσοχή κατά την αφαίρεση της θήκης φίλτρου, καθώς τα μεταλλικά μέρη θα είναι ζεστά.
Φροντίστε να το κρατάτε από τη λαβή και να χρησιμοποιείτε το κλιπ συγκράτησης του
φίλτρου για να απορρίψετε τους κόκκους.
13.Κρατήστε τη συσκευή μακριά από παιδιά.
14.Αυτή η συσκευή μπορεί να χρησιμοποιηθεί από παιδιά άνω των 8 ετών και από άτομα με
μειωμένη σωματική, αισθητηριακή ή διανοητική ικανότητα ή έλλειψη εμπειρίας και γνώσης,
εάν εποπτεύεται και καθοδηγείται από άτομο που είναι υπεύθυνο για την ασφάλειά του με
προσοχή για να κατανοούνται και να τηρούνται όλες οι προφυλάξεις ασφαλείας. Τα παιδιά
πρέπει να επιβλέπονται για να διασφαλιστεί ότι δεν παίζουν με τη συσκευή. Τα παιδιά δεν
πρέπει να εκτελούν καθαρισμό και συντήρηση της συσκευής χωρίς επίβλεψη.
15.Το σταθερό καλώδιο τροφοδοσίας μπορεί να αντικατασταθεί μόνο σε εξουσιοδοτημένο
σημείο σέρβις.
France
Élimination appropriée du produit
(déchets d’équipements électriques et électroniques)
Les marquages apposés sur le produit ou dans les textes y correspondants indiquent que l’appareil, une fois le délai
d’usage passé, doit être éliminé avec les autres déchets ménagers. Pour éviter les eets néfastes sur l’environnement et la
santé humaine, suite à une élimination de déchets non contrôlée, veuille séparer le produit des autres déchets et recycler
de manière responsable, pour promouvoir la réutilisation des matériaux comme une pratique durable. Pour de plus
amples informations concernant le lieu et le recyclage en toute sécurité du produit, les utilisateurs dans les ménages
doivent contacter le distributeur che qui ils ont acheté le produit ou une autorité locale compétente dans le domaine. Les
utilisateurs dans les entreprises doivent contacter leur fournisseur et vérier les conditions du contrat d’achat. Ne pas
éliminer le produit avec d’autres déchets commerciaux.
Fabriqué en RPC pour Lechpol Electronics Les ek Sp.k., ul. Garwolińska 1, 08-400 Miętne.
SPÉCIFICATION
Fonctions
Versement de deux tasses à la fois
Chaue-tasses
Mousseur à lait
Fonction vapeur
Bac de récupération amovible
Réservoir d’eau amovible
Arrêt automatique
Pieds antidérapants
Données techniques
Type de café : café moulu
Pression de la pompe : 15 bars
Capacité du réservoir d’eau : 1,5 l
Max. Hauteur de la tasse : 85 mm
Puissance maximale : 850 W
Longueur du câble : 95 cm
Alimentation : 220-240 V~; 50/60 H
Poids : 3,5 kg
Dimensions : 27,4 x 22,7 x 30 cm
Fournis : 2x ltre, doseur de café avec tasseur

38 39Εγχει ίδιο χ ήση Εγχει ίδιο χ ήση
GRGR
16.Κρατήστε τη συσκευή και το καλώδιο μακριά από θερμότητα, νερό, υγρασία, αιχμηρές άκρες και
οποιονδήποτε άλλο παράγοντα που μπορεί να προκαλέσει ζημιά στη συσκευή ή το καλώδιο.
17.Βεβαιωθείτε ότι το καλώδιο τροφοδοσίας δεν αγγίζει ζεστά ή αιχμηρά στοιχεία.
18.Μη χρησιμοποιείτε το προϊόν για διαφορετικούς σκοπούς από αυτούς που εμφανίζονται σε
αυτό το εγχειρίδιο λειτουργίας.
19.Μην τοποθετείτε τη συσκευή σε νερό ή υγρό. ούτε χειριστείτε / χρησιμοποιήστε τη με βρεγμένα
ή υγρά χέρια.
20.Μην αφήνετε τη συσκευή χωρίς επίβλεψη όταν λειτουργεί.
21.Αποσυνδέετε ΠΑΝΤΑ το προϊόν από την πρίζα όταν δεν χρησιμοποιείται.
22.ΜΗΝ χρησιμοποιείτε αυτήν τη συσκευή εάν το καλώδιο ή το βύσμα είναι κατεστραμμένο ή η
συσκευή έχει σπάσει.
23.Μην επιχειρήσετε να επιδιορθώσετε μόνοι σας αυτήν τη συσκευή. Μόνο εξουσιοδοτημένο και
εξειδικευμένο προσωπικό μπορεί να επισκευάσει αυτήν τη συσκευή. Μην αποσυναρμολογείτε
ποτέ αυτήν τη συσκευή.
24.Χρησιμοποιείτε μόνο εξουσιοδοτημένα αξεσουάρ.
ΤΟΠΟΘΕΤΗΣΗ ΤΟΥ ΦΙΛΤΡΟΥ ΚΑΙ ΤΗΣ ΣΥΣΚΕΥΗΣ ΦΙΛΤΡΟΥ
Υπάρχουν δύο φίλτρα που παρέχονται μέσα στη συσκευή. Χρησιμοποιήστε βαθύτερο φίλτρο για
λειτουργία 2 φλ.
1. Για να τοποθετήσετε το φίλτρο στη θήκη φίλτρου, βεβαιωθείτε ότι έχετε ευθυγραμμίσει την
προεξοχή στο φίλτρο με την εγκοπή μέσα στη θήκη φίλτρου. Στη συνέχεια, περιστρέψτε το
φίλτρο για να ασφαλίσει καλά στη θήκη.
2. Τοποθετήστε το στήριγμα φίλτρου στη συσκευή από τη θέση «INSERT» και στερεώστε το
σταθερά περιστρέφοντάς το αριστερόστροφα μέχρι να βρεθεί στη θέση «LOCK».
ΠΡΙΝ ΤΗ ΠΡΩΤΗ ΧΡΗΣΗ
1. Ανοίξτε το κάλυμμα της δεξαμενής νερού και γεμίστε νερό στη δεξαμενή νερού (η στάθμη
του νερού δεν πρέπει να υπερβαίνει την ένδειξη «MAX» στη δεξαμενή νερού). Στη συνέχεια,
κλείστε το κάλυμμα της δεξαμενής νερού.
Σηείωση: Μπορείτε επίσης να αποσυνδέσετε πρώτα το
δοχείο νερού από τη συσκευή και μετά να το γεμίσετε με
νερό.
2. Τοποθετήστε το φίλτρο στη θήκη φίλτρου (χωρίς καφέ
στο φίλτρο). Στη συνέχεια, τοποθετήστε τη θήκη φίλτρου
στη συσκευή.
3. Τοποθετήστε μια κανάτα στο δίσκο συλλογής υγρών.
Βεβαιωθείτε ότι το κουμπί ατμού είναι στη θέση OFF.
4. Συνδέστε τη συσκευή στην πηγή ρεύματος και πατήστε το
κουμπί ON/OFF. Η ένδειξη τροφοδοσίας ανάβει λευκή. Οι
ενδείξεις του κουμπιού 1 φλιτζάνι, του κουμπιού 2
φλιτζανιών και του κουμπιού χειροκίνητου καφέ
αναβοσβήνουν. Η συσκευή αρχίζει να προθερμαίνεται. Αφού ανάψουν σταθερά όλες οι
ενδείξεις, η προθέρμανση έχει ολοκληρωθεί.
Σηείωση: Η προθέρμανση είναι ένα απαραίτητο βήμα πριν την παρασκευή καφέ.
5. Πατήστε το κουμπί χειροκίνητου καφέ. Η συσκευή θα αντλήσει νερό για περίπου 30
δευτερόλεπτα. Ρίξτε νερό από την κανάτα. Τώρα η συσκευή είναι έτοιμη για την παρασκευή
καφέ.
Σηείωση: Μπορεί να υπάρχει θόρυβος κατά την άντληση νερού για πρώτη φορά - είναι
φυσιολογικό. Μετά από περίπου 20 δευτερόλεπτα, ο θόρυβος πρέπει να εξαφανιστεί.
ΘΕΣΗ OFF
ΘΕΣΗ ON
ΠΡΟΘΕΡΜΑΝΣΗ
Πριν από την παρασκευή καφέ, συνιστάται να προθερμάνετε τη συσκευή, συμπεριλαμβανομένης της
θήκης φίλτρου, του φίλτρου και του φλυτζανιού, έτσι ώστε η γεύση του καφέ να μην επηρεάζεται από
τα κρύα μέρη.
1. Ανοίξτε το κάλυμμα του δοχείου νερού και γεμίστε το δοχείο νερού με την επιθυμητή ποσότητα
νερού. Η στάθμη του νερού δεν πρέπει να υπερβαίνει την ένδειξη «MAX» στη δεξαμενή.
2. Τοποθετήστε το επιλεγμένο φίλτρο στη θήκη φίλτρου. Στη συνέχεια, τοποθετήστε τη θήκη
φίλτρου στη συσκευή.
3. Τοποθετήστε ένα φλιτζάνι στο δίσκο συλλογής υγρών.
4. Συνδέστε τη συσκευή στο τροφοδοτικό. Βεβαιωθείτε ότι το κουμπί ατμού είναι στη θέση OFF.
5. Πατήστε το κουμπί ON/OFF. Η ένδειξη ισχύος ανάβει λευκό. Οι ενδείξεις του κουμπιού 1
φλιτζανιού, του κουμπιού 2 φλιτζανιών και του χειροκίνητου κουμπιού καφέ αναβοσβήνουν.
Η συσκευή αρχίζει να προθερμαίνεται. Αφού όλες οι ενδείξεις είναι σταθερά αναμμένες,
σημαίνει ότι η προθέρμανση έχει ολοκληρωθεί.
6. Πατήστε το κουμπί χειροκίνητου καφέ, η συσκευή αρχίζει να αντλεί νερό. Όταν βγαίνει νερό,
πατήστε ξανά το κουμπί χειροκίνητου καφέ για να σταματήσετε αμέσως την άντληση νερού.
Ο σκοπός αυτού του βήματος είναι η άντληση νερού από τη δεξαμενή νερού στον λέβητα.
7. Όταν ανάβει η ένδειξη χειροκίνητου κουμπιού καφέ, υποδεικνύει ότι η προθέρμανση έχει
ολοκληρωθεί.
Table of contents
Languages:
Other Teesa Coffee Maker manuals