TeichTip Sunsun Bio Pond Filter Set User manual

User’s manual
Indications for Installation of Bio Pond Filter Set
54001 and many more
Illustration similar, may vary depending on model
Please read and follow the operating instructions and safety information prior to initial operation.
Technical changes reserved!
Illustrations, functional steps, and technical data may deviate insignificantly due to continuous further
developments.

© by WilTec Wildanger Technik GmbH Item 54001 and more Page 2
http://www.WilTec.de
http://www.aoyue.eu 05 2022-1
http://www.teichtip.de
The information contained in this document may alter at any time without prior notice. No part of this
document may be copied or otherwise duplicated without prior written consent. All rights reserved.
WilTec Wildanger Technik GmbH cannot be held liable for any possible mistakes in this operating man-
ual, nor in the diagrams and illustrations shown.
Although WilTec Wildanger Technik GmbH has made every possible effort to ensure that this operating
manual is complete, accurate, and up-to-date, errors cannot be ruled out entirely.
If you have found an error or wish to suggest an improvement, we look forward to hearing from you.
Send us an e-mail to:
or use our contact form:
https://www.wiltec.de/contacts/
The most recent version of this manual in several languages can be found in our online shop:
https://www.wiltec.de/docsearch
Our postal address is:
WilTec Wildanger Technik GmbH
Königsbenden 12
52249 Eschweiler – Germany
To return your goods for exchange, repair, or other purposes, please use the following address. Atten-
tion! To allow for a trouble-free complaint or return, it is important to contact our customer service team
before returning your goods.
Retourenabteilung
WilTec Wildanger Technik GmbH
Königsbenden 28
52249 Eschweiler – Germany
E-mail: service@wiltec.info
Tel: +49 2403 55592–0
Fax: +49 2403 55592–15

© by WilTec Wildanger Technik GmbH Item 54001 and more Page 3
http://www.WilTec.de
http://www.aoyue.eu 05 2022-1
http://www.teichtip.de
Introduction
Thank you for choosing to purchase this quality product. To minimise the risk of injury, we ask you to
always take some basic safety precautions when using this product. Please read this operating manual
carefully and make sure that you understand it.
Keep these operation instructions in a safe place.
General remarks
Operating time
The correct moment to commission your filter system depends on the weather. In general, it should be
possible to operate the filter system between April and October.
Commissioning
•Do not change the entire water present in the pond. Faded and died off plants should be re-
moved and replaced by new ones. To achieve a biological balance, it is advisable to plant ap-
prox. 30 % of the pond. You should absolutely clean off the mud accumulated on the bottom of
the pond during winter.
•When installing your filter system for the first time, make sure that the system is suitable for the
size of your pond. We will be happy to advise you concerning the filter system suitable for your
individual pond.
•Just from the beginning, place the pond filter at the provided location in your garden. The relo-
cation of the filter is very difficult due to the weight of the filter materials and water. The filter
should be set in a balance, thus ensuring that no water flows over during operation. Moreover,
it is ensured by this means that, while cleaning, the coarsedirt can be removed completely
through the waste outlet and does not remain in the filter due to a sloping position.
•The pressure pond filters can be carved in the ground at the side of the pond, it is also possible
to place them beneath the water level; however, this is not possible when installing a bio pond
filter.
•We recommend the recirculation of the water via a course of stream, thus ensuring an additional
oxygen enrichment. In case you decide to use a stream, note that the pond filter is located
above said stream. In case of a recirculation via a tube, we recommend, if possible, not to
reduce the outlet. Otherwise, there is the danger of a backlog in the filter tank that may cause
an overflow of the system.
Assembly of the UVC-clarifier (optional)
•Remove the device from the package and check carefully if there is a damage due to transport.
A broken quartz glass or bulb caused by the shipping of the device prevents the proper com-
missioning of the clarifier.
•The assembly of the clarifier on the filter should be done by two persons.
•Slide the clarifier into the two openings of the filter provided therefor and fix it in this position.
Now a second person installs the screws of the clarifier on the inside of the filter. For details,
see our illustrated mounting instruction. When all screw fittings are fixed tightly, you can let go
of the clarifier.
•Consider the minimum distance of 2 m to the pond border when a clarifier is installed.
•The UVC clarifier can be operated for one or several hours. Here is a rule of thumb:
overy strongly clouded water (opaque) = 12 hours a day
ostrongly clouded water (several centimeters of limpid water only) = 8 hours a day
oslightly clouded water (50 cm of limpid water) = 4 hours a day

© by WilTec Wildanger Technik GmbH Item 54001 and more Page 4
http://www.WilTec.de
http://www.aoyue.eu 05 2022-1
http://www.teichtip.de
Installing the pond pump
•When installing your pond pump, you should always keep in mind the quality of the pond ground.
After making sure that the bottom of the pond is not covered with soil, gravel, etc., the pond
pump can be placed without any concern at the deepest location of the pond.
•In case the ground of the pond is covered with gravel, soil, etc., you should install the pump at
a point higher located to make sure that the pump does not get clogged. To heighten the place-
ment of the pump, you can make use of a large stone or a plant basket.
•Connect the pump to a suitable hose on the filter or clarifier (optional).
•Do not take the filter system out of operation for a longer period. Otherwise, the important mi-
croorganisms die from lack of oxygen. UVC-devices should be in continuous operation, thus
preventing large fluctuations of the bacterial level of the pond water. For fish and plants, it would
be difficult or impossible to adjust to fluctuations of the bacterial level.
•If your pond is only 80 cm deep, the pump must be taken out during winter. Thoroughly clean
the pump and store it in a suitable location. It is advisable to store it in a bucket filled with water
and protected from frost.
Maintenance
•Before cleaning or maintaining, ALWAYS pull out the power plug. ONLY clean the filter sponges
when they are obviously very dirty.
•To clean them, use pond water if possible; this will ensure that the useful microorganisms are
not removed from the filter media. Tip: Using a bucket, take water out of the pond and clean the
filter sponges in this bucket.
•The bioballs should not be cleaned at all.
•Depending on the level of dirt in the filter system, it is advisable to flush away the dirt accumu-
lated on the bottom of the filter once in a month. When using a bio pond filter, you only need to
open the closing cap at the bottom. When using a pressure pond filter system, it might be nec-
essary to remove the filter media. For cleaning, use a garden hose, e.g.
•Do not replace the entire water and do not clean the pond thoroughly, which would disturb its
biological balance. The filter media should be cleaned as cautiously as possible, too.
•Regularly check the function of the pump and pond clarifier. For a good biological balance,
approx. 30 % of the pond should be planted; also use underwater plants and swimming plants.
•Make sure that the number of fish is adapted to the quantity of water. Only feed the fish seldom
and frugally. We also recommend regular checks of the water quality (pH, carbon hardness,
and nitrite content).
•For storing the filter system during the winter, remove all filter media and store it in a location
protected from frost after cleaning. A filter box that has been entirely voided can be stored out-
side during the winter; however, you must make sure that there is no water inside and that no
water might penetrate it.
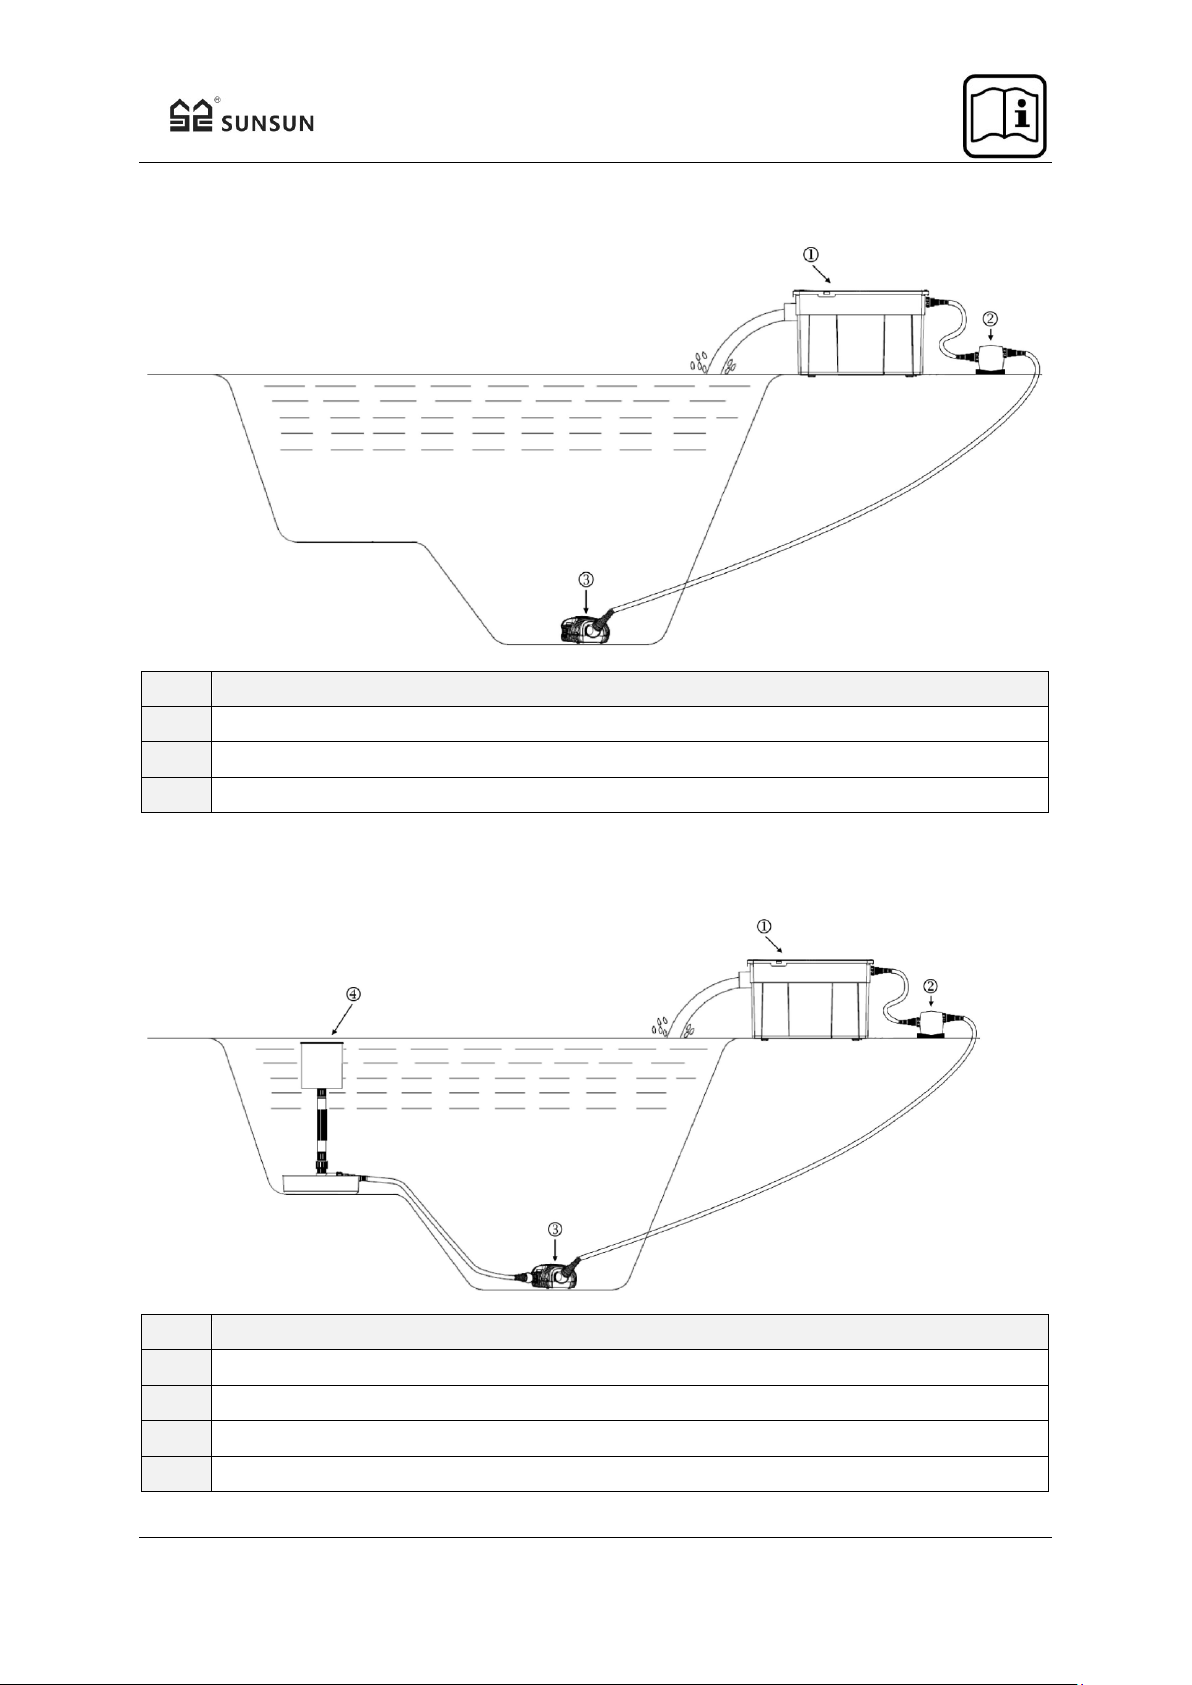
Installation examples
Note: Please find examples for the installation on the following pages. Note that this only refers to
a help for the installation, not being true to scale and not taking into consideration any required safety
distances according to VDE.

© by WilTec Wildanger Technik GmbH Item 54001 and more Page 5
http://www.WilTec.de
http://www.aoyue.eu 05 2022-1
http://www.teichtip.de
Construction scheme pond filter, pond clarifier (330 mm distance, suitable for attachment), and pump
№
Name
1
Pond filter
2
UV clarifier
3
Pond pump
Construction scheme pond filter, pond clarifier (330 mm distance, suitable for attachment), pump, and
skimmer
№
Name
1
Pond filter
2
UV clarifier
3
Pond pump
4
Floating or standing pond skimmer

© by WilTec Wildanger Technik GmbH Item 54001 and more Page 6
http://www.WilTec.de
http://www.aoyue.eu 05 2022-1
http://www.teichtip.de
Construction scheme pond filter, pond clarifier (330 mm distance, not suitable for attachment), and pump
№
Name
1
Pond filter
2
UV clarifier
3
Pond pump
Construction scheme pond filter, pond clarifier (330 mm distance, not suitable for attachment), pump,
and skimmer
№
Name
1
Pond filter
2
UV clarifier
3
Pond pump
4
Floating or standing pond skimmer

© by WilTec Wildanger Technik GmbH Item 54001 and more Page 7
http://www.WilTec.de
http://www.aoyue.eu 05 2022-1
http://www.teichtip.de
Assembly instructions
UVC clarifier – bio pond filter
Assembly of the UVC-clarifier
Assembly of the blind plug (inlet)
Assembly of the universal hose nozzle (outlet)

© by WilTec Wildanger Technik GmbH Item 54001 and more Page 8
http://www.WilTec.de
http://www.aoyue.eu 05 2022-1
http://www.teichtip.de
Notes on installing the pond clarifier (optional)
CUV-1xx and CUV-2xx
•The following pictures will help you to mount to your filter a clarifier belonging to the series 1 or
2. All you need is 2× Ox-Add and two matching sealings (included in the supply).
•With the help of the Ox-Adds, fix the attached clarifier to the inside of the filter.
•Make sure that the opening of the Ox-Adds is facing down to ensure the correct function of the
filter. Depending on the thread-cutting, it may be necessary to remove the inner-lying sealing.
CUV-3xx and CUV-6xx
•The following information will help you to mount to your CBF-filter a clarifier belonging to the
series 3 and series 6.
•Required parts from the range of accessories of the clarifier and pond filter:
o2× Ox-Add
o2× connector
o2× rubber ring sealing ⌀ 43 mm
o2× rubber ring sealing ⌀ 58 mm

© by WilTec Wildanger Technik GmbH Item 54001 and more Page 9
http://www.WilTec.de
http://www.aoyue.eu 05 2022-1
http://www.teichtip.de
Positioning the rubber ring sealings
Positioning the connectors
Depending on the thread-cutting, this may vary slightly. Turn the connectors so that they match to the
drillings of your pond filter. Only thereafter pull and fix them
completely tight.

© by WilTec Wildanger Technik GmbH Item 54001 and more Page 10
http://www.WilTec.de
http://www.aoyue.eu 05 2022-1
http://www.teichtip.de
•With the help of the Ox-Adds, fix the attached clarifier to the inside of the filter. Make sure that
the opening of the Ox-Adds is facing down to ensure the correct function of the filter. Depending
on the thread-cutting, it may be necessary to remove the inner-lying sealing.
•The Ox-Add supplies additional fresh air whose oxygen content evenly enriches the water. The
additional enrichment of oxygen has a positive effect on the filter bacteria required for cleaning.
Operation without clarifier
In case there is no clarifier connected to your filter, the additional inlet can be easily closed with the
blank plug included.
Important Note:
Reproduction and any commercial use (of parts) of this operating manual, requires a written permission
of WilTec Wildanger Technik GmbH.
Other TeichTip Pond Pump manuals

TeichTip
TeichTip SUNSUN SuperECO CET-26000 User manual

TeichTip
TeichTip Sunsun CT-402 User manual

TeichTip
TeichTip Sunsun CQP-8000 User manual

TeichTip
TeichTip CTF-2800 User manual

TeichTip
TeichTip SUNSUN Adjustable SuperECO CET-8000 User manual

TeichTip
TeichTip SunSun CHJ3003 User manual

TeichTip
TeichTip SUNSUN CQB-2003 User manual
Popular Pond Pump manuals by other brands

SunSun
SunSun SuperECO CET-15000 Operation manual

Oase
Oase AquaMax Eco Titanium 31000 operating instructions

Pond Technics
Pond Technics POND AIR 600 manual

1A Profi Handels
1A Profi Handels OASIS 501R-1 operating instructions

Profi-pumpe
Profi-pumpe JR-800LV operating instructions

Fiap
Fiap Air Active OxyFlow operating instructions