Pontec PondoPress 15000 User manual

DE
Gebrauchsanleitung
EN
Operating instructions
FR
Notice d'emploi
NL
Gebruiksaanwijzing
ES
Instrucciones de uso
PT
Instruções de uso
IT
Istruzioni d'uso
DA
Brugsanvisning
NO
Bruksanvisning
SV
Bruksanvisning
FI
Käyttöohje
HU
Használati útmutató
PL
Instrukcja użytkowania
CS
Návod k použití
SK
Návod na použitie
SL
Navodila za uporabo
HR
Uputa o upotrebi
RO
Instrucţiuni de folosinţă
BG
Упътване за употреба
UK
Посібник з експлуатації
RU
Руководство по эксплуатации
PondoPress
10000, 15000

--
2
PondoPress
10000
342 Ø x 450
mm
AC 230 V,
50 Hz/12W
9 W TC-S
(UV-C)
< 2 m 2500 l/h 3 m
10000 l
PondoPress
15000
342 Ø x 570
mm
AC 230 V,
50 Hz/14W
11 W TC-S
(UV-C)
15000 l
PondoVario 2500 180 x 125 x 85 mm
220-240 V, 50 Hz,
40 W
< 2.20 m 2500 l/h 10 m

--
3

--
4

-DE -
5
-DE -
Original Gebrauchsanleitung
WARNUNG
•Dieses Gerät kann von Kindern ab 8 Jahren und darüber sowie von
Personen mit verringerten physischen, sensorischen oder mentalen
Fähigkeiten oder Mangel an Erfahrung und Wissen benutzt werden,
wenn sie beaufsichtigt oder bezüglich des sicheren Gebrauchs des
Gerätes unterwiesen wurden und die daraus resultierenden Gefah-
ren verstehen.
•Kinder dürfen nicht mit dem Gerät spielen.
•Reinigung und Benutzerwartung dürfen nicht von Kindern ohne Be-
aufsichtigung durchgeführt werden.
•Das Gerät muss über eine Fehlerstrom-Schutzeinrichtung mit einem
Bemessungsfehlerstrom von maximal 30 mA abgesichert sein.
•Gerät nur anschließen, wenn die elektrischen Daten von Gerät und
Stromversorgung übereinstimmen. Die Gerätedaten befinden sich
auf dem Typenschild am Gerät, auf der Verpackung oder in dieser
Anleitung.
•Tod oder schwere Verletzungen durch Stromschlag sind möglich!
Bevor Sie ins Wasser greifen, Geräte im Wasser mit einer Spannung
>12 V AC oder >30 V DC vom Stromnetz trennen.
•Gerät nicht verwenden, wenn elektrische Leitungen oder Gehäuse
beschädigt sind.
•Eine beschädigte Anschlussleitung kann nicht ersetzt werden. Gerät
entsorgen.
•Gerät nur betreiben, wenn sich keine Personen im Wasser aufhalten.
Sicherheitshinweise
Elektrischer Anschluss
•Elektrische Installationen müssen den nationalen Errichterbestimmungen entsprechen und dürfen nur von einer Elek-
trofachkraft vorgenommen werden.
•Eine Person gilt als Elektrofachkraft, wenn sie auf Grund ihrer fachlichen Ausbildung, Kenntnisse und Erfahrungen
befähigt und berechtigt ist, die ihr übertragenen Arbeiten zu beurteilen und durchzuführen. Das Arbeiten als Fachkraft
umfasst auch das Erkennen möglicher Gefahren und das Beachten einschlägiger regionaler und nationaler Normen,
Vorschriften und Bestimmungen.
•Bei Fragen und Problemen wenden Sie sich an eine Elektrofachkraft.
•Verlängerungsleitungen und Stromverteiler (z. B. Steckdosenleisten) müssen für die Verwendung im Freien geeignet
sein (spritzwassergeschützt).
•Das Gerät, Anschlüsse und Stecker sind nicht wasserdicht und dürfen nicht im Wasser verlegt bzw. montiert werden.
•Steckerverbindungen vor Feuchtigkeit schützen.
•Gerät nur an einer vorschriftsmäßig installierten Steckdose anschließen.

-DE -
6
Sicherer Betrieb
•Der Sicherheitsabstand des Gerätes zum Wasser muss mindestens 2 m betragen.
•Gerät nicht an der elektrischen Leitung tragen oder ziehen.
•Leitungen geschützt vor Beschädigungen verlegen und darauf achten, dass niemand darüber fallen kann.
•Gehäuse des Gerätes oder zugehöriger Teile nur öffnen, wenn in dieser Anleitung ausdrücklich dazu aufgefordert
wird.
•Nur die Arbeiten am Gerät durchführen, die in dieser Anleitung beschrieben sind. Wenn sich Probleme nicht beheben
lassen, eine autorisierte Kundendienststelle oder im Zweifelsfall den Hersteller kontaktieren.
•Nur Original-Ersatzteile und –Zubehör für das Gerät verwenden.
•Niemals technische Änderungen am Gerät vornehmen.
•Der Filter darf in keinem Fall überlaufen. Es besteht die Gefahr der Teichentleerung.
Über diese Gebrauchsanleitung
Mit dem Kauf des Produkts PondoPress 10000/15000 haben Sie eine gute Wahl getroffen.
Lesen Sie vor der ersten Benutzung des Gerätes die Anleitung sorgfältig und machen Sie sich mit dem Gerät vertraut.
Alle Arbeiten an und mit diesem Gerät dürfen nur gemäß der vorliegenden Anleitung durchgeführt werden.
Beachten Sie unbedingt die Sicherheitshinweise für den richtigen und sicheren Gebrauch.
Bewahren Sie diese Anleitung sorgfältig auf. Bei Besitzerwechsel geben Sie bitte die Anleitung weiter.
Symbole in dieser Anleitung
Warnhinweise
Die Warnhinweise in dieser Anleitung sind durch Signalworte klassifiziert, die das Ausmaß der Gefährdung anzeigen.
WARNUNG
•Bezeichnet eine möglicherweise gefährliche Situation.
•Bei Nichtbeachtung kann Tod oder schwerste Verletzung die Folge sein.
VORSICHT
•Bezeichnet eine möglicherweise gefährliche Situation.
•Bei Nichtbeachtung kann leichte oder geringfügige Verletzung die Folge sein.
HINWEIS
Informationen, die zum besseren Verständnis oder der Vorbeugung möglicher Sach- oder Umweltschäden
dienen.
Weitere Hinweise
A Verweis auf eine Abbildung, z. B. Abbildung A.
→Verweis auf ein anderes Kapitel.

-DE -
7
Bestimmungsgemäße Verwendung
PondoPress 10000/15000, "Gerät" genannt, darf ausschließlich wie folgt verwendet werden:
•Zum Betrieb mit sauberem Wasser.
•Zur mechanischen und biologischen Reinigung von Gartenteichen
•Betrieb unter Einhaltung der technischen Daten.
Die in das Gerät eingebaute UVC-Lampe dient zum Abtöten von Algen und Bakterien im Teichwasser. Ihre Strahlung
ist auch in geringen Dosierungen gefährlich für die Augen und die Haut. Die UVC-Lampe darf niemals in einem defek-
ten Gehäuse oder ausserhalb ihres Gehäuses oder für andere Zwecke verwendet werden.
Zum Lieferumfang zählen eine externe Filterpumpe PondoVario 2500 sowie 5 m Schlauch. Der Betrieb des Druckfilters
ist nur mit der mitgelieferten Pumpe erlaubt.
Für das Gerät gelten folgende Einschränkungen:
•Niemals andere Flüssigkeiten als Wasser fördern.
•Niemals ohne Wasserdurchfluss betreiben.
•Nicht für gewerbliche oder industrielle Zwecke verwenden.
•Nicht in Verbindung mit Chemikalien, Lebensmitteln, leicht brennbaren oder explosiven Stoffen einsetzen.
Montage (A)
Stufenschlauchtüllen entsprechend dem verwendeten Schlauchdurchmesser absägen (A1). Am Filter die Überwurf-
muttern über die Stufenschlauchtüllen schieben, die Schläuche auf die Stufenschlauchtülle aufschieben bzw. aufdre-
hen und mit Schlauchklemmen sichern. Flachdichtungen in die Überwurfmuttern einlegen und auf Einlauf und Auslauf
des Druckfilters aufschrauben (A2). An der Filterpumpe Schlauch auf die Stufenschlauchtülle aufschieben bzw. aufdre-
hen, mit Schlauchklemmen sichern und auf das Anschlussgewinde der Filterpumpe aufschrauben (A3).
Aufstellen (B)
Stellen Sie den Druckfilter überflutungssicher mindestens 2 m vom Teichrand entfernt auf einen festen und ebenen
Untergrund. Alternativ kann der Filter auch bis ca. 5 cm unterhalb der Verschlussklammern in die Erde eingelassen
werden. Der Höhenunterschied zwischen Deckel und freier Auslaufstelle darf max. 2 m betragen. Das Gerät darf nicht
der direkten Sonneneinstrahlung ausgesetzt sein. Achten Sie auf einen ungehinderten Zugang zum Deckel, um Arbei-
ten am Gerät durchführen zu können.Stellen Sie die Filterpumpe im Teich möglichst waagerecht auf einen festen,
schlammfreien Untergrund, so dass sie komplett mit Wasser bedeckt maximal 2 m unter dem Wasserspiegel positio-
niert ist. Der Höhenunterschied zwischen Pumpenauslauf und Auslaufstelle darf maximal 2,40 m betragen.
Inbetriebnahme
WARNUNG
Tod oder schwere Verletzungen durch gefährliche elektrische Spannung!
•Bevor Sie ins Wasser greifen, Netzspannung aller im Wasser befindlichen Geräte abschalten.
•Vor Arbeiten am Gerät Netzspannung abschalten.
Achtung! Betreiben Sie das Gerät niemals mit mehr als 0,2 bar Wasserdruck!
Achtung! Das Gerät niemals ohne Wasserdurchfluss betreiben!
Sicherheitshinweise zuvor beachten! Netzstecker der Filterpumpe einstecken (C1) und warten bis der Druckfilter mit
Wasser gefüllt ist. Druckfilterbehälter und alle Anschlüsse auf Dichtigkeit prüfen. Netzstecker des UVC-Vorklärgerätes
einstecken, blaue Kontrolllampe leuchtet (C2). Abdeckkappe des UVC-Vorklärgerätes aufstecken. Hinweis: Bei Neuin-
stallation erreicht das Gerät seine vollständige biologische Reinigungswirkung erst nach einigen Wochen. Eine um-
fangreiche Bakterientätigkeit ergibt sich erst ab einer Wassertemperatur von + 10 °C. Hinweis: Der eingebaute Tempe-
raturwächter schaltet die UVC-Lampe bei Überhitzung automatisch aus, nach Abkühlung wird die UVC-Lampe auto-
matisch wieder eingeschaltet.
Geräte ausschalten
Zum Ausschalten der Geräte Netzstecker ziehen (C3, C4).

-DE -
8
Reinigung und Wartung
WARNUNG
Tod oder schwere Verletzungen durch gefährliche elektrische Spannung!
•Bevor Sie ins Wasser greifen, Netzspannung aller im Wasser befindlichen Geräte abschalten.
•Vor Arbeiten am Gerät Netzspannung abschalten.
Hinweis:
•Kontrollieren und reinigen Sie den Wasserablauf zum Teich regelmäßig.
•Die Filtermedien regelmäßig (z.B. alle vier Wochen) reinigen, spätestens, wenn aus dem Wasserauslass trübes oder
schmutziges Wasser in den Gartenteich zurückgeleitet wird.
•Zunächst eine Schnellreinigung durchführen. Falls dies nicht ausreicht, eine Komplettreinigung durchführen.
•Ein verstopfter Filter kann zu Undichtigkeiten führen.
•Verwenden Sie keine chemischen Reinigungsmittel.
Schnellreinigung (D)
Schlauch vom Filterauslauf durch Abdrehen der Überwurfmutter entfernen und einen Schmutzablaufschlauch befesti-
gen.
Filterpumpe wieder einschalten und kräftig am Reinigungsgriff ziehen und mehrmals „pumpen“. Die Filterschäume wer-
den so mechanisch gereinigt, bis das auslaufende Wasser klar wird.
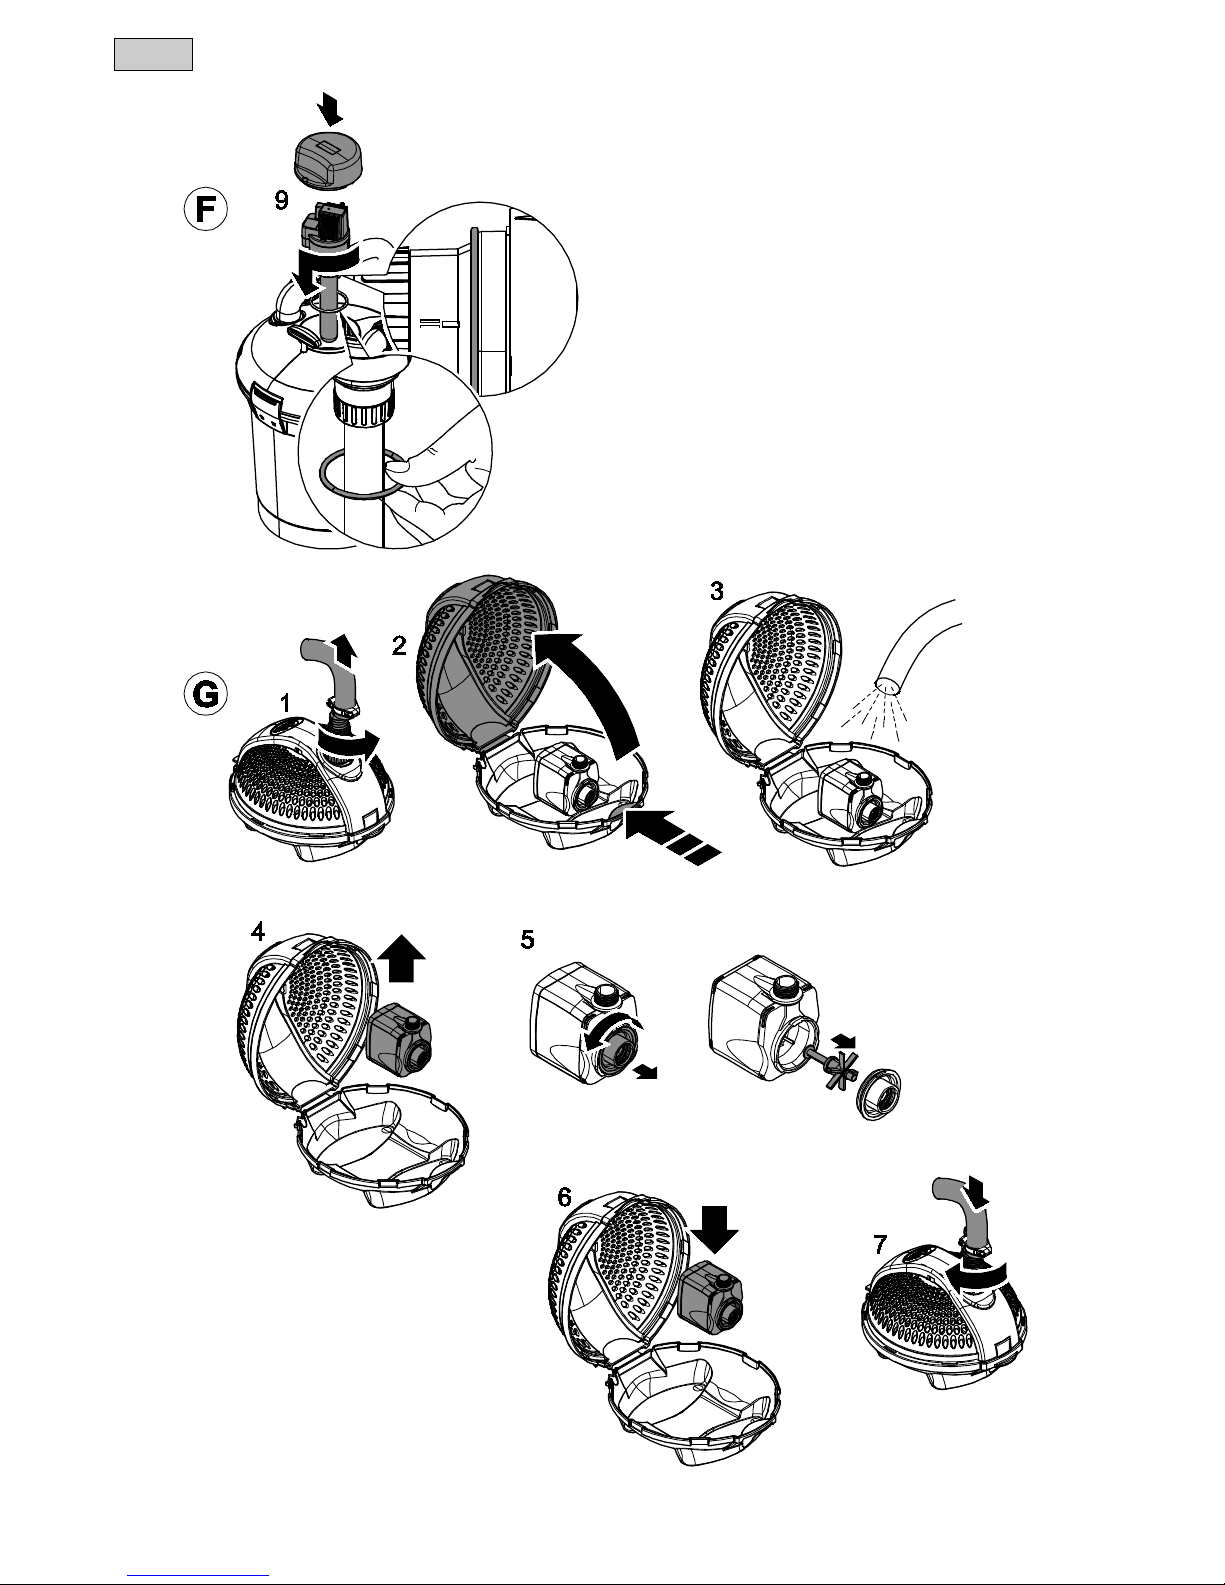
Komplettreinigung (E)
Falls nötig, Filtermedien auswaschen bzw. ersetzen. Verwenden Sie keine chemischen Reinigungsmittel. Filterpumpe
ausschalten (C4), alle Schläuche durch Abdrehen der Überwurfmuttern entfernen, die Verschlussklammern des Filter-
behälters öffnen (E1), Deckel mit Filterschaumpaket abheben (E2) und mit dem Kopf auf eine weiche saubere Unter-
lage legen, so dass die Filterschäume mit dem Pressring nach oben liegen. Pressring durch Lösen der Mutter von der
Zugstange abschrauben, Filterschäume abziehen und durch kräftiges Zusammendrücken unter fließendem Wasser
reinigen. Bioballs, Lavasteine, Behälter, Deckel mit Gitterrohr und Pressring sauber abspritzen (E3). Filterschäume
aufschieben, so dass die Zugstange in der Aussparung der Filterschäume liegt. Pressring mit der Stangenführung
nach unten aufsetzen und mit der Mutter an die Zugstange anschrauben. Das Gitterrohr muss komplett im Ringdurch-
messer liegen. Deckeldichtung vom Behälter abnehmen und auf Beschädigungen überprüfen, reinigen bzw. ersetzen
und auf den oberen Rand des Behälters auflegen, Deckel mit Filterschaumpaket auf den Behälter aufdrücken, Ver-
schlussklammern einrasten (E4). Schlauch am Filtereinlass montieren, Filterpumpe in Betrieb nehmen (C1), den
Druckfilter nachspülen, bis das auslaufende Wasser klar wird. Filterpumpe ausschalten (C4), Schmutzablaufschlauch
entfernen, Auslaufschlauch wieder aufschrauben, erst die Filterpumpe wieder in Betrieb nehmen (C1), dann den Netz-
stecker des UVC-Vorklärgerätes einstecken (C2).
Quarzglas reinigen / UVC-Lampe ersetzen
VORSICHT
Die ultraviolette Strahlung der UVC-Lampe kann Augen oder Haut verbrennen.
•UVC-Lampe niemals außerhalb des Gehäuses betreiben.
•UVC-Lampe niemals in einem defekten Gehäuse betreiben.
VORSICHT
Quarzglas und UVC-Lampe können zerbrechen und Schnittverletzungen verursachen.
•Vorsichtig mit Quarzglas und UVC-Lampe umgehen.
HINWEIS
Aus Sicherheitsgründen lässt sich die UVC-Lampe erst einschalten, wenn der Gerätekopf ordnungsgemäß in
das Gehäuse eingebaut ist.

-DE -
9
UVC-Vorklärgerät öffnen (F)
•Abdeckkappe vom UVC-Vorklärgerät abnehmen.
•UVC-Vorklärgerät gegen den Uhrzeigersinn bis zum Anschlag drehen (Bajonettverschluss) und mitsamt O-Ring vor-
sichtig aus dem Deckel des Filters ziehen (1).
•Die Blechschraube soweit lösen, bis die Schraubenspitze im Gehäuse der Klemmschraube versenkt ist (2).
•Klemmschraube gegen den Uhrzeigersinn abschrauben (3).
•Quarzglas mit O-Ring mit einer leichten Drehbewegung nach vorne abziehen (4).
•Quarzglas und O-Ring auf Beschädigungen prüfen und gegebenenfalls ersetzen.
•Quarzglas von außen mit einem feuchten Tuch reinigen.
UVC-Lampe austauschen (F)
Wichtig: Nur Lampen verwenden, deren Bezeichnung und Leistungsangabe mit den Angaben auf dem Typenschild
übereinstimmen.
Für eine optimale Filterleistung sollten Sie die UVC-Lampe nach ca. 8.000 Betriebsstunden wechseln.
•UVC-Lampe heraus ziehen und ersetzen.
UVC-Vorklärgerät zusammenbauen (F)
•Das Quarzglas mit O-Ring bis zum Anschlag in den Gerätekopf einsetzen (6).
•Der O-Ring muss in den Spalt zwischen Gerätekopf und Quarzglas gedrückt werden.
•Die Klemmschraube im Uhrzeigersinn bis zum Anschlag festdrehen (7).
•Die Blechschraube festziehen (8).
•O-Ring am Gerätekopf auf Beschädigungen prüfen und gegebenenfalls ersetzen (9).
•Gerätekopf vorsichtig und mit leichtem Druck in das Gehäuse schieben. Die Zapfen des Gehäuses müssen in die
Nuten des Bajonettverschlusses greifen.
•Gerätekopf unter leichtem Druck im Uhrzeigersinn bis zum Anschlag drehen.
•Die Abdeckkappe für das UVC-Vorklärgerät wieder aufstecken.
Reinigung der Filterpumpe (G)
Pumpe aus dem Wasser nehmen, die Stufenschlauchtülle mit O-Ring 12 x 4 mm vom Anschlussgewinde abschrau-
ben (G1), den Rasthaken des Filtergehäuses betätigen (G2), das Filtergehäuse öffnen und die Pumpe entneh-
men (G4). Das Pumpengehäuse abdrehen, das Laufrad entnehmen (G5). Pumpengehäuse, Laufrad und Filterge-
häuse (G3) mit klarem Wasser und einer Bürste reinigen. Montieren Sie das Gerät nach erfolgter Reinigung in umge-
kehrter Reihenfolge (G6-G7).
Lagern/Überwintern
Bei Wassertemperaturen unter 8 °C oder spätestens bei zu erwartendem Frost müssen Sie das Gerät außer Betrieb
nehmen. Den Druckfilter entleeren, eine gründliche Reinigung durchführen und auf Schäden überprüfen. Alle Filterme-
dien entfernen und reinigen, trocken und frostfrei lagern. Die Filterpumpe getaucht oder befüllt und frostfrei aufbewah-
ren. Die Stecker dürfen nicht überflutet werden! Der Aufbewahrungsort muss für Kinder unzugänglich sein. Decken Sie
den Filterbehälter so ab, dass kein Regenwasser eindringen kann. Entleeren Sie sämtliche Schläuche, Rohrleitungen
und Anschlüsse soweit wie möglich.
Verschleißteile
•Filtermedien
•UVC-Lampe, Quarzglas und O-Ring für Quarzglas
•Laufrad

-DE -
10
Entsorgung
HINWEIS
Dieses Gerät darf nicht als Hausmüll entsorgt werden.
•Gerät durch Abschneiden der Kabel unbrauchbar machen und über das dafür vorgesehene Rücknahmesy-
stem entsorgen.
Entsorgen Sie die UVC-Lampe über das dafür vorgesehene Rücknahmesystem.
Störungsbeseitigung
Störung
Ursache
Abhilfe
Das Gerät erbringt keine zufriedenstellende
Leistung
Gerät noch nicht lange in Betrieb
Die vollständige biologische Reinigungswir-
kung wird erst nach einigen Wochen erreicht
Wasser ist extrem verschmutzt
Algen und Blätter aus dem Teich entfernen,
Wasser tauschen
Fisch- und Tierbestand zu hoch
Richtwert: ca. 60 cm Fischlänge auf 1 m³
Teichwasser
Filtermedien sind verschmutzt
Filtermedien reinigen
Quarzglasrohr ist verschmutzt
UVC ausbauen und Quarzglas reinigen
UVC-Lampe hat keine Leistung mehr
Die Lampe muss nach 8.000 Betriebsstunden
erneuert werden
Anzeige UVC-Lampe leuchtet nicht
Netzstecker vom UVC nicht angeschlossen
Netzstecker vom UVC anschließen
UVC-Lampe defekt
UVC-Lampe austauschen
Anschluss defekt
Elektrischen Anschluss überprüfen
UVC überhitzt
Nach Abkühlung automatische Einschaltung
vom UVC
Kein Wasseraustritt aus Teicheinlauf
Netzstecker der Pumpe nicht angeschlossen
Netzstecker der Pumpe anschließen
Teicheinlauf verstopft
Teicheinlauf reinigen
Filterbehälter/Pumpengehäuse verstopft
Filterbehälter/Pumpengehäuse reinigen
Garantiebedingungen
PfG gewährt 2 Jahre Garantie ab Verkaufsdatum auf nachweisbare Material- und Fabrikationsfehler. Voraussetzung
für die Garantieleistung ist die Vorlage des Kaufbeleges. Der Garantieanspruch erlischt bei unsachgemäßer Handha-
bung, elektrischer oder mechanischer Beschädigung durch missbräuchliche Anwendung sowie bei unsachgemäßer
Reparatur durch nicht autorisierte Werkstätten. Reparaturen dürfen nur von PfG oder von PfG autorisierten Werkstät-
ten durchgeführt werden. Bei der Anmeldung von Garantieansprüchen senden Sie das beanstandete Gerät oder das
defekte Teil mit Fehlerbeschreibung und Kaufbeleg frei Haus an PfG. PfG behält sich vor Montagekosten in Rechnung
zu stellen. Für Transportschäden haftet PfG nicht. Diese müssen umgehend gegen den Transporteur geltend gemacht
werden. Weitergehende Ansprüche, gleich welcher Art, insbesondere für Folgeschäden, sind ausgeschlossen. Diese
Garantie berührt nicht die Ansprüche des Endkunden gegen den Händler.

-EN -
11
-EN -
Translation of the original Operating Instructions
WARNING
•This unit can be used by children aged 8 and above and by per-
sons with reduced physical, sensory or mental capabilities or lack
of experience and knowledge if they are supervised or have been
instructed on how to use the unit in a safe way and they understand
the hazards involved.
•Do not allow children to play with the unit.
•Only allow children to carry out cleaning and user maintenance un-
der supervision.
•Ensure that the unit is fused for a rated fault current of max. 30 mA
by means of a fault current protection device.
•Only connect the unit if the electrical data of the unit and the power
supply correspond. The unit data is to be found on the unit type plate,
on the packaging or in this manual.
•Possible death or severe injury from electrocution! Before reaching
into the water, always disconnect all units in the water that have a
voltage of >12 V AC or >30 V DC from the power supply.
•Do not use the unit if electrical cables or housings are damaged.
•A damaged connection cable cannot be replaced. Dispose of the
unit.
•Only operate the unit if no persons are in the water.
Safety information
Electrical connection
•Electrical installations must meet the national regulations and may only be carried out by a qualified electrician.
•A person is regarded as a qualified electrician if, due to his/her vocational education, knowledge and experience, he
or she is capable of and authorised to judge and carry out the work commissioned to him/her. This also includes the
recognition of possible hazards and the adherence to the pertinent regional and national standards, rules and regula-
tions.
•For your own safety, please consult a qualified electrician.
•Extension cables and power distributors (e.g. outlet strips) must be suitable for outdoor use (splash-proof).
•The unit, the connections and plugs are not water-proof and must not be routed or installed in water.
•Protect the plug connection from moisture.
•Only connect the unit to a correctly fitted socket.

-EN -
12
Safe operation
•Minimum safety distance between the unit and the water: 2 m.
•Never carry or pull the unit by the electrical cable.
•Route cables such that they are protected from damage and do not present a tripping hazard.
•Only open the unit housing or its attendant components if this is explicitly specified in the operating instructions.
•Only carry out work on the unit that is described in this manual. If problems cannot be overcome, please contact an
authorised customer service point or, if in doubt, the manufacturer.
•Only use original spare parts and accessories for the unit.
•Never carry out technical changes to the unit.
•Ensure that the filter will not overflow. Danger of emptying the pond.
Information about this operating manual
You made a good choice with the purchase of this product PondoPress 10000/15000.
Prior to commissioning the unit, please read the instructions of use carefully and fully familiarise yourself with the unit.
Ensure that all work on and with this unit is only carried out in accordance with these instructions.
Adhere to the safety information for the correct and safe use of the unit.
Keep these instructions in a safe place! Please also hand over the instructions when passing the unit on to a new
owner.
Symbols used in these instructions
Warnings
The warning information is categorised by signal words, which indicate the extent of the hazard.
WARNING
•Indicates a possibly hazardous situation.
•Non-observance may lead to death or serious injuries.
CAUTION
•Indicates a possibly hazardous situation.
•Non-observance may lead to slight or minor injuries.
NOTE
Information for the purpose of clarification or for preventing possible damage to assets or to the environment.
Additional information
A Reference to a figure, e.g. Fig. A.
→Reference to another section.

-EN -
13
Intended use
PondoPress 10000/15000, referred to as "unit", may only be used as specified in the following:
•For operation with clean water.
•For mechanical and biological cleaning of garden ponds
•Operate in accordance with instructions.
The UVC lamp installed in the unit is intended to kill algae and bacteria in the pond water. Even in small doses, its radi-
ation is harmful for eyes and skin. Never use the UVC lamp in a defective housing or outside the housing, or any other
purpose other than that intended.
The delivery includes an external filter pump, type PondoVario 2500 as well as a 5 m hose. The pressure filter may
only be operated with the supplied pump.
The following restrictions apply to the unit:
•Never use the unit to convey fluids other than water.
•Never run the unit without water.
•Do not use for commercial or industrial purposes.
•Do not use in conjunction with chemicals, foodstuff, easily flammable or explosive substances.
Installation (A)
Saw off the stepped hose connection in accordance with the hose diameter used (A1). At the filter, push the union nuts
over the stepped hose connections, push or turn on the stepped hose connection, and secure with the hose clips.
Place the flat sealing rings in the union nuts and screw onto the inlet and outlet of the pressure filter (A2). At the filter
pump, push or turn the hose onto the stepped hose connection, secure with hose clips and screw onto the filter pump
connection thread (A3).
Installation (B)
Place the pressure filter in a flood protected position at a distance from the pond edge of at least 2m on firm and level
ground. As an alternative, the filter can also be partly buried up to approx. 5 cm below the closing clamps. The height
difference between the lid and the free outlet point may be max. 2 m. Do not expose the unit to direct sun radiation.
Ensure direct access to the lid to be able to carry out work at the unit. Place the filter pump in the pond as horizontal as
possible on a firm, sludge free ground so that it is completely in the water, at a maximum depth of 2 m below the water
level. Max. height difference between pump outlet and outlet point: 2.40 m.
Commissioning/start-up
WARNING
Possible death or severe injury from hazardous electrical voltage!
•Prior to reaching into the water, isolate (switch off and disconnect) all units/devices used in the water.
•Isolate the device (disconnect from the power supply) before carrying out any work on it.
Attention!
Never operate the unit with a water pressure of more than 0.2 bar!
Attention! Never operate the unit without water flowing through!
Adhere to the safety information given above! Connect the filter pump power plug (C1) and wait until the pressure filter
is filled with water. Check the pressure filter container and all connections for leaks. Connect the power plug of the
UVC clarifying unit, the blue control lamp is lit (C2). Fit the cover of the UVC pre-clarifying unit. Note: After a new instal-
lation, the unit only reaches its full biological cleaning effect after a few weeks. The full effect on bacteria is only
reached as from a water temperature of + 10 °C. Note: In the event of overheating, the installed temperature monitor
switches the UVC lamp off automatically, the lamp automatically switches on again once cooled down.
Switching of the units
Disconnect the power plug to switch the units off (C3, C4).

-EN -
14
Maintenance and cleaning
WARNING
Possible death or severe injury from hazardous electrical voltage!
•Prior to reaching into the water, isolate (switch off and disconnect) all units/devices used in the water.
•Isolate the device (disconnect from the power supply) before carrying out any work on it.
Note:
•Check and clean the water outlet into the pond at regular intervals.
•Clean the filters at regular intervals (e.g. every four weeks), however, at the latest when cloudy or dirty water from the
water outlet returns to the garden pond.
•Carry out quick cleaning first. Should this prove insufficient, clean the entire unit.
•A blocked filter could lead to leakages.
•Never use chemical cleaning agents.
Quick cleaning (D)
Remove hose from the filter outlet by turning off the union nut and fit a dirt draining hose.
Switch filter pump on again, vigorously pull the cleaning handle and perform a pumping action several times. In this
manner, the foam filters are mechanically cleaned until the draining water is clear.
Full cleaning (E)
If necessary, wash out or replace the filters. Do not use chemical cleaning agents. Switch off the filter pump (C4), re-
move all hoses by turning off the union nuts, open the closing clamps of the filter container (E1), lift off the cover includ-
ing the foam filter package (E2) and place on a clean support head down, so that the foam filters including the press
ring point upward. Unscrew the pressure ring from the pulling rod by undoing the nut, remove foam filters, and clean
under running water by vigorously pressing together. Jet clean the bioballs, lava stones, container, cover with meshed
tube and press ring (E3). Push on foam filters such that the pulling rod rests in the recess of the foam filters. Fit the
pressing ring with the rod guidance pointing down, and screw fit to the pulling rod using the nut. Ensure that the
meshed tube fits completely in the ring diameter. Remove cover sealing ring from the container and check for damage,
clean or replace, and fit on the top container edge, press cover including the foam filter package onto the container,
engage closing clamps (E4). Fit the hose to the filter inlet, start up filter pump (C1), rinse the pressure filter, until the
emerging water is clear. Switch off filter pump (C4), remove dirt draining hose, screw on drain hose again, restart the
filter pump first (C1), then connect the power plug of the UVC pre-clarifying unit (C2).
Cleaning the quartz glass / Replacing the UVC lamp
CAUTION
The ultra-violet radiation of the UVC lamp can burn your eyes and skin.
•Never operate the UVC lamp outside its casing.
•Never operate the UVC lamp in a casing that is defective.
CAUTION
Quartz glass and UVC lamp can break and cause cut injuries.
•Handle the quartz glass and UVC lamp with care.
NOTE
For safety reasons, the UVC lamp can only be switched on when the unit head has been correctly fitted into
the casing.

-EN -
15
Opening the UCV clarifying unit (F)
•Remove the cover from the UVC clarifying unit.
•Turn the UVC clarifying unit counter-clockwise up against the stop (bayonet closure), then carefully pull out of the filter
cover including the O ring (1).
•Loosen the self-tapping screw (7) until the the screw tip is sunk in the housing of the clamping screw (2).
•Unscrew the clamping screw counter-clockwise (3).
•Remove the quartz glass including the O ring towards the front with a slight turning movement (4).
•Check the quartz glass and the O ring for damage and replace, if necessary.
•Clean the quartz glass outer face with a moist cloth.
Replacing the UVC lamp (F)
Important: Only use lamps the identification and capacity data of which correspond to the information on the type
plate.
For an optimum filter performance, we recommend to replace the UVC lamp after approx. 8,000 operating hours.
•Pull out and replace the UVC lamp.
Assembly of the UVC clarifying unit (F)
•Insert the quartz glass including the O ring against the stop in the unit head (6).
•Press the O ring into the gap between unit head and quartz glass.
•Tighten the clamping screw clockwise up to the stop (7).
•Tighten the self-tapping screw (8).
•Check the O-Ring at the unit head for damage and replace, if necessary (9).
•Carefully push the unit head into the housing while applying slight pressure. Ensure that the tenons at the housing
engage in the grooves of the bayonet closure.
•Turn the unit head clockwise against the stop while applying slight pressure.
•Refit the cover for the UVC pre-clarifying unit.
Cleaning the filter pump (G)
Take pump out of the water, unscrew the stepped hose connection including the 12 x 4 mm O ring from the connection
thread (G1), actuate the engagement hook of the filter housing (G2), open the filter housing and remove the pump
(G4). Turn off the pump housing, remove the impeller (G5). Clean the pump housing, the impeller and the filter housing
(G3) using clear water and a brush. After cleaning, fit the unit in the reverse order (G6-G7).
Storage/Over-wintering
Put the unit out of operation at water temperatures below 8 °C or, at the latest, when freezing temperatures are to be
expected. Drain and thoroughly clean the pressure filter, check for damage. Remove, clean, dry and store all filters in a
frost-free environment. Store the filter pump submerged or filled in a frost-free environment. Do not immerse the plugs!
Ensure that the storage place is inaccessible to children. Cover the filter container such that the ingress of rain water is
excluded. Drain all hoses, pipes and connections as far as possible.
Wear parts
•Filter media
•UVC lamp, quartz glass and O ring for quartz glass
•Impeller

-EN -
16
Disposal
NOTE
Do not dispose of this unit with domestic waste.
•Render the unit unusable beforehand by cutting the cables and dispose of the unit via the return system
provided for this purpose.
Only dispose of the UVC lamp by using the return system provided for this purpose.
Remedy of faults
Malfunction
Cause
Remedy
The unit performance is not satisfactory
Unit has been in operation only for a short time
The complete biological cleaning effect is only
achieved after several weeks
Water extremely soiled
Remove algae and leaves from the pond,
change the water
Excessive fish and animal population
Guide value: approx. 60 cm fish length in 1 m³3
pond water
Foam filters soiled
Clean filters
Quartz glass tube soiled
Remove UVC and clean quartz glass
UVC lamp capacity exhausted
Replace the lamp after approx. 8,000 operating
hours
UVC lamp display is not lit
Power supply of Filtoclear-UVC not connected
Connect UVC power plug
UVC lamp defective
Replace the UVC lamp
Connection defective
Check electrical connection
UVC overheated
UVC automatically switches on when cooled
down
No water outlet from the pond inlet
Pump power supply not connected
Connect pump power supply
Pond inlet blocked
Clean pond inlet
Filter container/pump housing clogged
Clean filter container/pump housing
Guarantee conditions
PfG grants a 2 year guarantee from the date of sale on proven material and manufacturing faults. Prerequisite for our
guarantee is the presentation of the purchase receipt. Our guarantee will become null and void if the unit is misused,
electrically or mechanically damaged by inappropriate use and improper repair by non-authorised workshops. Repairs
are reserved for workshops authorised by PfG or by PfG itself. In the case of warranty claims, please return the defec-
tive unit or part freight paid to PfG together with a description of the fault and the purchase receipt. PfG reserves the
right to invoice repair costs. PfG is not liable for transport damage. Any damage must be claimed against the carrier.
Further claims of whatever type, especially consequential damage, are excluded. This guarantee does not affect the
final customer’s claims against the dealer.

-FR -
17
-FR -
Traduction de la notice d'emploi originale
AVERTISSEMENT
•Attention :
Dans le cas où cet appareil serait utilisé par des mineurs de moins
de 8 ans ainsi que par des personnes souffrant d'un handicap men-
tal ou plus généralement par des personnes manquant d'expé-
rience, un adulte averti devra être présent, qui renseignera le mi-
neur ou la personne fragilisée concernée sur le bon emploi de ce
matériel. Les enfants ne doivent pas jouer avec cet appareil. Ne
pas laisser un enfant sans surveillance pour le nettoyage ou l'entre-
tien.
•Veiller à ce que l'appareil soit absolument protégé par fusible par le
biais d’une protection différentielle avec un courant assigné de
30 mA maximum.
•Ne brancher l'appareil que lorsque les caractéristiques électriques
de l'appareil et de l'alimentation électrique correspondent. Les carac-
téristiques de l'appareil sont indiquées sur la plaque signalétique de
l'appareil, sur l'emballage ou dans cette notice d'emploi.
•La mort ou des blessures graves par choc électrique sont possibles
! Avant de mettre les mains dans l'eau, débranchez les appareils
dans l'eau d'une tension >12 V CA ou >30 V CC.
•Ne pas utiliser l'appareil lorsque les câbles électriques ou les boîtiers
sont endommagés.
•Un câble de raccordement endommagé ne peut pas être remplacé.
Mettre l'appareil au rebut.
•Utiliser l'appareil uniquement lorsque personne ne se trouve dans
l'eau.
Consignes de sécurité
Raccordement électrique
•Les installations électriques doivent répondre aux règlements d'installation nationaux et leur exécution est exclusive-
ment réservée à un technicien électricien.
•Une personne est considérée comme technicien électricien lorsqu'elle est capable et habilitée à apprécier et réaliser
les travaux qui lui sont confiés en raison de sa formation technique, de ses connaissances et de son expérience.
Travailler en tant que technicien consiste également à identifier d'éventuels dangers et à respecter les normes régio-
nales et nationales, les règlements et les dispositions en vigueur qui se rapportent aux tâches à exécuter.
•En cas de questions et de problèmes, prière de vous adresser à un technicien électricien.
•Les câbles de rallonge et le distributeur de courant (p. ex. blocs multiprises) doivent être conçus pour une utilisation
en extérieur (protégé contre les projections d'eau).

-FR -
18
•L'appareil, les raccords et les fiches mâles ne sont pas étanches. Il est interdit de les poser voire de les monter dans
l’eau.
•Protéger les raccordements à fiche contre l'humidité.
•Raccorder l'appareil uniquement à une prise installée de manière réglementaire.
Exploitation sécurisée
•La distance de sécurité entre l'appareil et la pièce d'eau doit être d'au moins 2 m.
•Ne pas porter ou tirer l'appareil par les câbles électriques.
•Poser les câbles de manière à ce qu'ils soient protégés contre d'éventuels endommagements et veiller à ce que
personne ne puisse trébucher.
•N'ouvrir le boîtier de l'appareil ou des éléments s'y rapportant que si cela est expressément sollicité dans la notice
d'emploi.
•Exécuter des travaux sur l'appareil uniquement si ces derniers sont décrits dans la notice d'emploi. S'il est impossible
de remédier aux problèmes, contacter le SAV agréé ou en cas de doute le constructeur.
•N’utiliser que des pièces de rechange et des accessoires d’origine pour l’appareil.
•Ne jamais procéder à des modifications techniques sur l’appareil.
•Le filtre ne doit jamais déborder, en aucun cas. Risque de vidange de l'étang/bassin.
En ce qui concerne cette notice d'emploi
Avec l'acquisition du produit, PondoPress 10000/15000 vous avez fait le bon choix.
Avant la première utilisation de l'appareil, lire attentivement cette notice d'emploi et se familiariser avec l'appareil. Tous
les travaux effectués avec et sur cet appareil devront être exécutés conformément aux directives ci-jointes.
Respecter impérativement les consignes de sécurité relatives à une utilisation correcte et en toute sécurité.
Conserver soigneusement cette notice d'emploi. Lors d'un changement de propriétaire, prière de transmettre égale-
ment cette notice d'emploi.
Symboles dans cette notice d'emploi
Avertissements
Dans cette notice, les avertissements sont classés par mots de signalisation qui indiquent l'ampleur du risque.
AVERTISSEMENT
•signale une situation éventuellement dangereuse.
•Le non-respect risque d'entraîner la mort ou des blessures graves.
ATTENTION
•signale une situation éventuellement dangereuse.
•Le non-respect risque d'entraîner de légères blessures et futiles.
REMARQUE
Informations permettant d’assurer une meilleure compréhension et d’éviter des dommages matériels ou envi-
ronnementaux.
Autres remarques
A Renvoi à l'illustration, p. ex. Figure A.
→Renvoi à un autre chapitre.

-FR -
19
Utilisation conforme à la finalité
PondoPress 10000/15000, appelé par la suite «appareil», doit être utilisé exclusivement comme suit :
•Pour une exploitation avec de l'eau propre.
•Pour le nettoyage mécanique et biologique d'étangs/bassins de jardin
•Exploitation dans le respect des données techniques.
La lampe UVC intégrée dans l'appareil sert à détruire les algues et les bactéries se trouvant dans l'eau du bassin/de
l'étang. Son rayonnement est également dangereux pour les yeux et la peau même à faibles doses. La lampe UVC ne
doit jamais être utilisée dans un boîtier défectueux, ni en dehors de son boîtier, ni dans d'autres buts que ceux prévus
par sa finalité.
Une pompe de filtration externe PondoVario 2500 ainsi qu'un tuyau flexible de 5 m font également partie de la livrai-
son. Utilisation du filtre sous pression permise uniquement avec la pompe faisant partie des fournitures.
Les restrictions suivantes sont valables pour l'appareil :
•Ne jamais refouler des liquides autres que de l'eau.
•Ne jamais utiliser sans débit d'eau.
•Ne pas utiliser à des fins commerciales ou industrielles.
•Ne pas utiliser en relation avec des produits chimiques, des produits alimentaires, des matériaux facilement inflam-
mables ou explosifs.
Montage (A)
Scier les embouts à olive gradués conformément au diamètre de tuyau utilisé (A1). Sur le filtre, faire passer les
écrous-raccords par les embouts à olive gradués, enfoncer les tuyaux sur les embouts à olive gradués voire les visser
et les bloquer avec des colliers de serrage. Placer les joints d'étanchéité plats dans les écrous-raccords et les visser à
l'entrée et à la sortie du filtre sous pression (A2). Sur la pompe de filtration, enfoncer voire visser le tuyau sur l'embout
à olive gradué, le bloquer avec des colliers de serrage et le visser sur le filetage de raccordement de la pompe de fil-
tration (A3).
Mise en place (B)
Placer le filtre sous pression à l'abri de toute inondation à au moins 2 m de la berge de l'étang/bassin sur un support
stable et plat. Le filtre peut être également enterré jusqu'à env. 5 cm en-dessous des fixations de verrouillage. La diffé-
rence de hauteur entre le couvercle et le point de sortie ne doit pas dépasser 2 mètres. Ne pas soumettre l'appareil au
rayonnement solaire direct. Veiller à laisser un accès libre au couvercle afin de pouvoir effectuer des travaux sur l'ap-
pareil. Placer la pompe de filtration en position horizontale dans l'étang sur une surface stable et exempte de vase de
manière à ce qu'elle soit totalement immergée à une profondeur maximale de 2,0 m sous la surface de l'étang. La dif-
férence de hauteur entre la sortie de pompe et le point de sortie ne doit pas dépasser 2,40 mètres.
Mise en service
AVERTISSEMENT
La mort ou des blessures graves dues à une tension électrique dangereuse !
•Toujours couper l'alimentation électrique de tous les appareils se trouvant dans l'eau avant tout contact
avec l’eau.
•Couper la tension secteur avant toute exécution de travaux sur l'appareil.
Attention ! Ne jamais utiliser l'appareil sous une pression d'eau supérieure à 0,2 bar !
Attention ! Ne jamais utiliser l'appareil sans débit d'eau !
Respecter auparavant les informations de sécurité ! Brancher la prise de secteur de la pompe de filtration (C1) et at-
tendre que le filtre sous pression soit rempli d'eau. Vérifier l'étanchéité de tous les récipients de filtre sous pression et
des raccordements. Brancher la prise de l’appareil de préclarification à UVC, le voyant lumineux bleu s'allume (C2).
Mettre en place la chape de l'appareil de préclarification à UVC. Remarque : dans le cas d'une nouvelle installation,
l'appareil n'atteint sa pleine capacité d'épuration biologique qu'après quelques semaines. Les bactéries ne sont pleine-
ment efficaces qu'à partir d'une température de l'eau de + 10 °C. Remarque : le contrôleur de température intégré
coupe automatiquement la lampe UVC en cas de surchauffe et la rallume automatiquement après refroidissement.
Mise hors service des appareils
Retirer la prise de secteur (C3, C4) pour mettre les appareils hors service.

-FR -
20
Nettoyage et entretien
AVERTISSEMENT
La mort ou des blessures graves dues à une tension électrique dangereuse !
•Toujours couper l'alimentation électrique de tous les appareils se trouvant dans l'eau avant tout contact
avec l’eau.
•Couper la tension secteur avant toute exécution de travaux sur l'appareil.
Remarque :
•Contrôler et nettoyer régulièrement l'écoulement de l'eau dans l'étang/le bassin.
•Nettoyer les éléments filtrants régulièrement (par ex. toutes les quatre semaines), au plus tard lorsque de l'eau trouble
ou sale s'écoule de la sortie d'eau vers l'étang/bassin.
•Effectuer tout d'abord un nettoyage rapide. Si cela ne suffit pas, effectuer un nettoyage complet.
•Le système peut perdre son étanchéité si un filtre est colmaté.
•N'utiliser aucun produit chimique de nettoyage.
Nettoyage rapide (D)
Retirer le tuyau de sortie du filtre en tournant l'écrou de raccordement et fixer un tuyau d'écoulement d'impureté.
Remettre la pompe de filtration en circuit et tirer fortement la poignée de nettoyage et "pomper" plusieurs fois. Les
mousses filtrantes sont ainsi nettoyées mécaniquement jusqu'à ce que l'eau qui s'écoule soit claire.
Nettoyage complet (E)
Si nécessaire, rincer les éléments filtrants ou les remplacer. N'utiliser aucun produit chimique de nettoyage. Mettre la
pompe de filtration (C4) hors circuit, retirer tous les tuyaux en tournant les écrous de raccordement, ouvrir les fixations
de verrouillage du récipient de filtrage (E1), soulever le couvercle avec le paquet de mousses filtrantes (E2) et le poser
sur la tête sur un support souple et propre, de manière à ce que les mousses filtrantes avec l'anneau de pression
soient orientées vers le haut. Dévisser l'anneau de pression de filtration en dévissant l'écrou de la tige de traction, reti-
rer les mousses filtrantes et les rincer à l'eau courante en les pressant fermement. Rincer les billes bio, les pierres de
lave, le récipient, le couvercle avec le tube grillagé et l'anneau de pression (E3). Faire glisser les mousses filtrantes de
telle sorte que la tige de traction se trouve dans l'évidement des mousses filtrantes. Placer l'anneau de pression avec
le guidage de tige vers le bas et le visser avec l'écrou sur la tige de traction. Le tube grillagé doit être entièrement dans
le diamètre d'anneau. Retirer le joint du couvercle du récipient et contrôler la présence éventuelle de détériorations,
nettoyer voire remplacer et le poser sur le bord supérieur du récipient puis appuyer le couvercle avec le paquet de
mousses filtrantes sur le récipient, enclencher les fixations de verrouillage (E4). Monter le tuyau sur le filtre d'admis-
sion, mettre la pompe de filtration en circuit (C1), rincer le filtre sous pressionjusqu'à ce que l'eau qui s'écoule soit
claire. Mettre la pompe de filtration hors circuit (C4), retirer le tuyau d'écoulement d'impureté, revisser le tuyau d'éva-
cuation, remettre tout d'abord la pompe de filtration en circuit (C1) puis ensuite brancher la prise de secteur de l'appa-
reil de préclarification à UVC (C2).
Nettoyer le verre à quartz / remplacer la lampe UVC
ATTENTION
Le rayonnement ultraviolet de la lampe UVC risque de brûler les yeux et la peau.
•Ne jamais faire marcher la lampe UVC en dehors du boîtier.
•Ne jamais faire marcher la lampe UVC dans un boîtier défectueux.
ATTENTION
Le verre de quartz et la lampe UVC sont cassables et risquent de causer des blessures par coupure.
•Traiter le verre de quartz et la lampe UVC avec précaution.
REMARQUE
Pour des raisons de sécurité, la lampe UVC ne se laisse mettre sous tension que si la tête de l'appareil est
correctement montée dans le boîtier.
This manual suits for next models
1
Table of contents
Languages:
Other Pontec Pond Pump manuals

Pontec
Pontec PondoMax Eco 1500 User manual

Pontec
Pontec PondoTronic UVC 18 User manual

Pontec
Pontec PondoSolar 600 Control User manual

Pontec
Pontec PondoSolar 1600 User manual

Pontec
Pontec PondoMax Eco 5000 Quick guide

Pontec
Pontec PondoPress 5000 User manual

Pontec
Pontec PondoSolar Lily Island User manual

Pontec
Pontec PondoCompact 2000 User manual

Pontec
Pontec PondoMax Eco 2500 User manual

Pontec
Pontec PondoFog RGB User manual