TELCARE TCTM0001 User manual

TELCARE™Blood Glucose Monitoring System
TELCARE™Blood Glucose
Monitoring System
User Manual

TELCARE™Blood Glucose Monitoring System
e TELCARE™ Blood Glucose Monitoring system is intended
for the quantitative measurement of glucose in fresh capillary
whole blood samples drawn from the ngertips, forearm, or
palm. It is intended for lay use by persons with diabetes to
aid in diabetes management. It is indicated for use at home
(over the counter [OTC]) and should be used only by a single
patient and should not be shared. Test results are plasma-
calibrated for easy comparison to clinical laboratory methods.
Testing is done outside the body (in vitro diagnostic use).
e TELCARE™ Blood Glucose Monitoring System consists
of the Telcare BGM™ Blood Glucose Meter, TELCARE™
Blood Glucose Test Strips, and TELCARE™ Glucose Control
Solutions. e TELCARE™ Blood Glucose Monitoring system
is not indicated for the diagnosis or screening of diabetes or
for neonatal use. Palm and forearm testing should be done
only during steady-state times when glucose is not changing
rapidly. e Telcare BGM™ Blood Glucose Meter uses cellular
data transmission to send test results to TELCARE™’s remote
database, Telserve, and to receive messages from Telserve. e
TELCARE™ Blood Glucose Monitoring System is not intended
to provide automated treatment guidance or decisions, nor is it
to be used as a substitute for professional healthcare judgment.
Intended Use
(i)
TELCARE™Blood Glucose Monitoring System
e TELCARE™ Blood Glucose Monitoring System and
lancing device is for single patient use. Do not share it with
anyone, including family members! Do not use on multiple
patients!
Because all parts of the kit may come in contact with your
blood, all parts are considered biohazardous. Kit parts can
potentially transmit infectious diseases, even aer cleaning
and disinfection.
Users should wash hands thoroughly with soap and water
and dry thoroughly aer handling the meter, test strips, and
any lancing device.
For Cleaning and Disinfecting procedures to prevent the
spread of diseases such as Hepatitis B, see Cleaning and
Disinfecting Your Meter (pg. 31).
For Technical Support contact TELCARE™ at (888) 666-4530.
Hours of Operation: Monday - Friday, 9AM - 5PM EST
References
“FDA Public Health Notication: Use of Fingerstick Devices on More than One Person Poses Risk for Transmitting Blood-
borne Pathogens: Initial Communication” (2010)
http://www.fda.gov/MedicalDevices/Safety/AlertsandNotices/ucm224025.htm
“CDC Clinical Reminder: Use of Fingerstick Devices on More than One Person Poses Risk for Transmitting Bloodborne
Pathogens” (2010)
http://www.cdc.gov/injectionsafety/Fingerstick-DevicesBGM.html
“Protection of Laboratory Workers from Occupationally Acquired Infections; Approved Guideline–ird Edition. Clinical
and Laboratory Standards Institute (CLSI), document M29-A3, (ISBN 1-56238-567-4).
Important Safety Instructions
(ii)
TELCARE™Blood Glucose Monitoring System
(iii)
Your Telcare Blood Glucose Meter
The Telcare BGM™Device 2
Telcare Test Strips 3
The Display Screen 4
Setting Up Your Telcare BGM 5
Settings Options 6
Control Solution Modes
Step by Step Guide to Control Testing 8
Testing Your Blood Sugar
Preparation and Safety 14
Prepare Your Lancing Device 17
Understanding Your Blood Glucose Test Results 28
Viewing Your Meter’s Memory 29
Maintenance of Your Telcare BGM and Lancing Device
Cleaning and Disinfecting Your Meter 31
Cleaning and Disinfecting Your Lancing Device 33
Charging Your Telcare Blood Glucose Meter 35
Storing Your Meter and Test Strips 36
Troubleshooting 37
Terms of Warranty 40
Specifications 41
About Telcare 42
Contact Telcare 43
Table of Contents

TELCARE™Blood Glucose Monitoring System
1
Unboxing the Telcare BGM™for the first time
Before we begin, take a moment to go over the contents of your Telcare
BGM kit. Your kit should include:
nTelcare BGM™Blood Glucose Meter (battery included)
nAC Charger
nInstruction Manual
nTelcare Test Strips (10)
nTelcare Glucose Control Solution
nLancing Device
nLancets
Make sure you charge your glucose meter for at least 12 hours before first
use. To charge your glucose meter, use the AC Charger included in your kit.
You should use the Telcare BGM for:
nTesting blood glucose.
nTesting only with fresh capillary whole blood samples.
You should NOT use the Telcare BGM for:
nThe diagnosis of diabetes.
nTesting blood glucose on newborns.
nTesting of arterial blood.
nTesting of venous blood.
Your Telcare Blood Glucose Meter
TELCARE™Blood Glucose Monitoring System
2
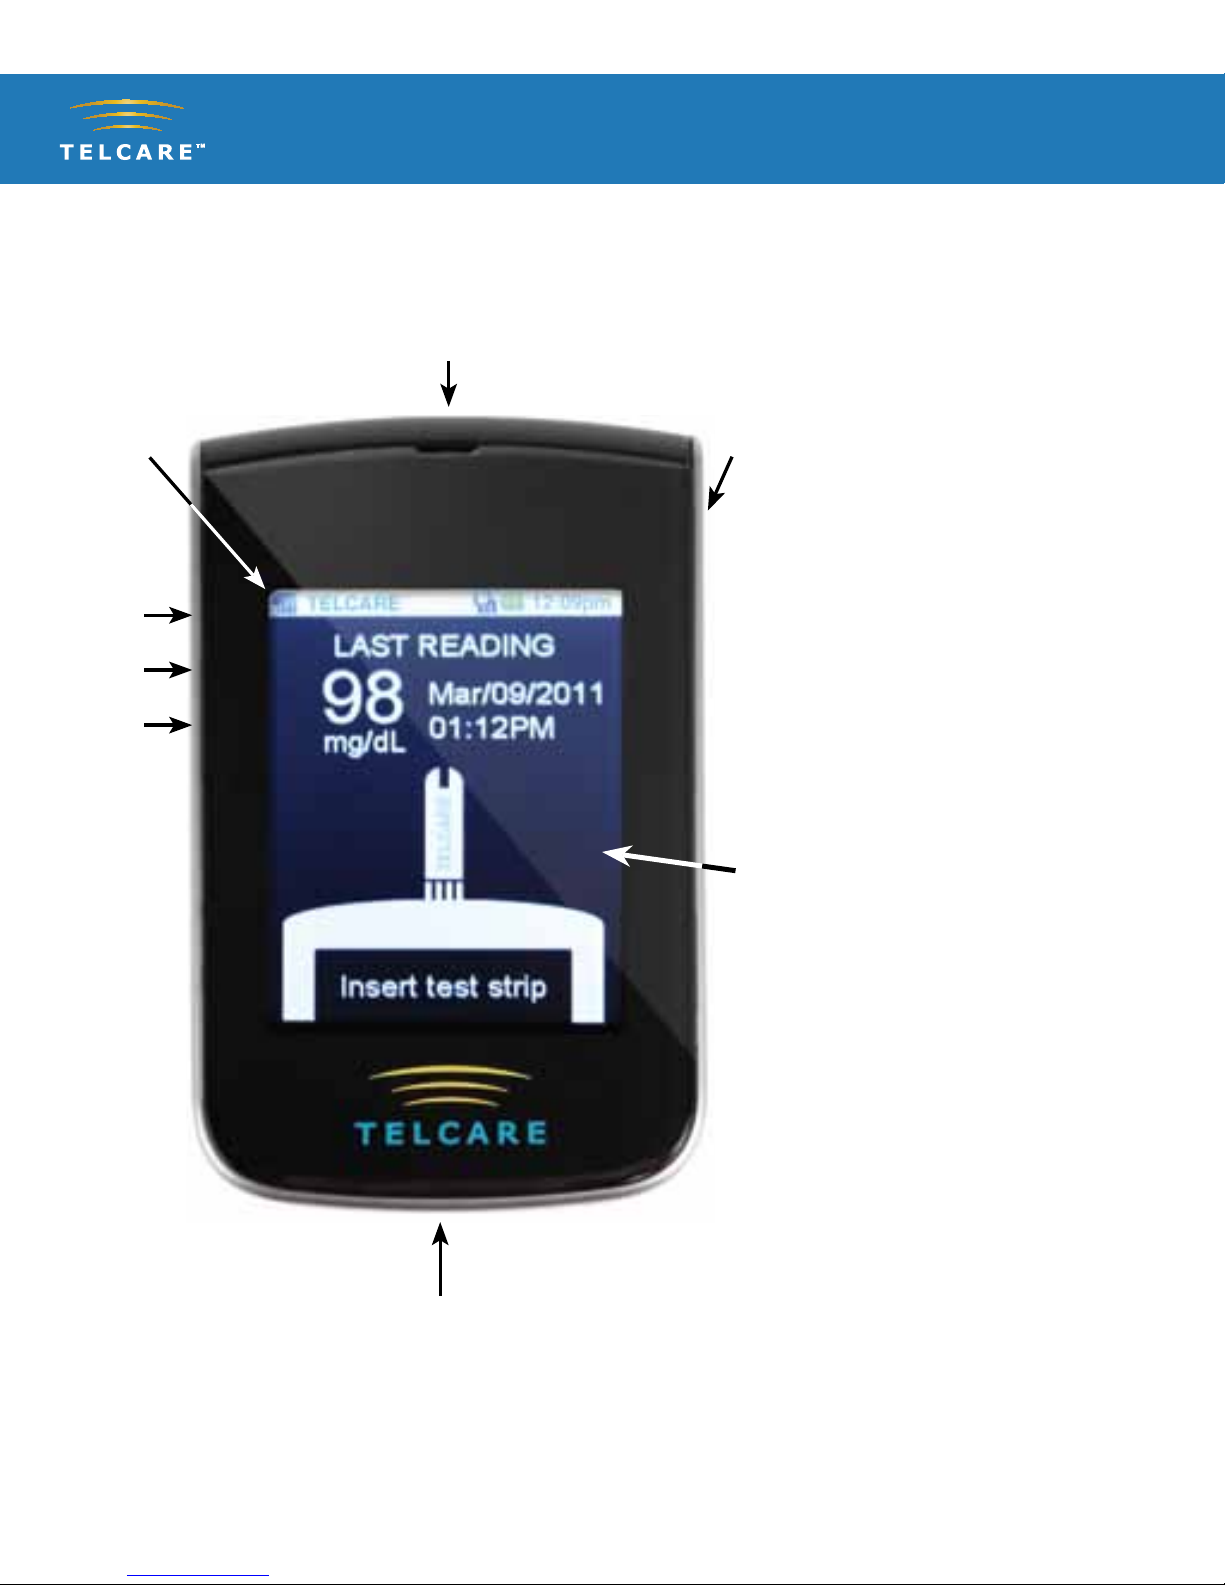
The Telcare BGM™Device
2
6
5
71
1Power Button
2UP / DOWN Keys
3Enter Button
4Display Screen
5Insert Test Strip
(white side up)
6Charging Port
(do not attempt to
insert strip here)
7Wireless Signal
Indicator
2
3
4
TELCARE™Blood Glucose Monitoring System
3
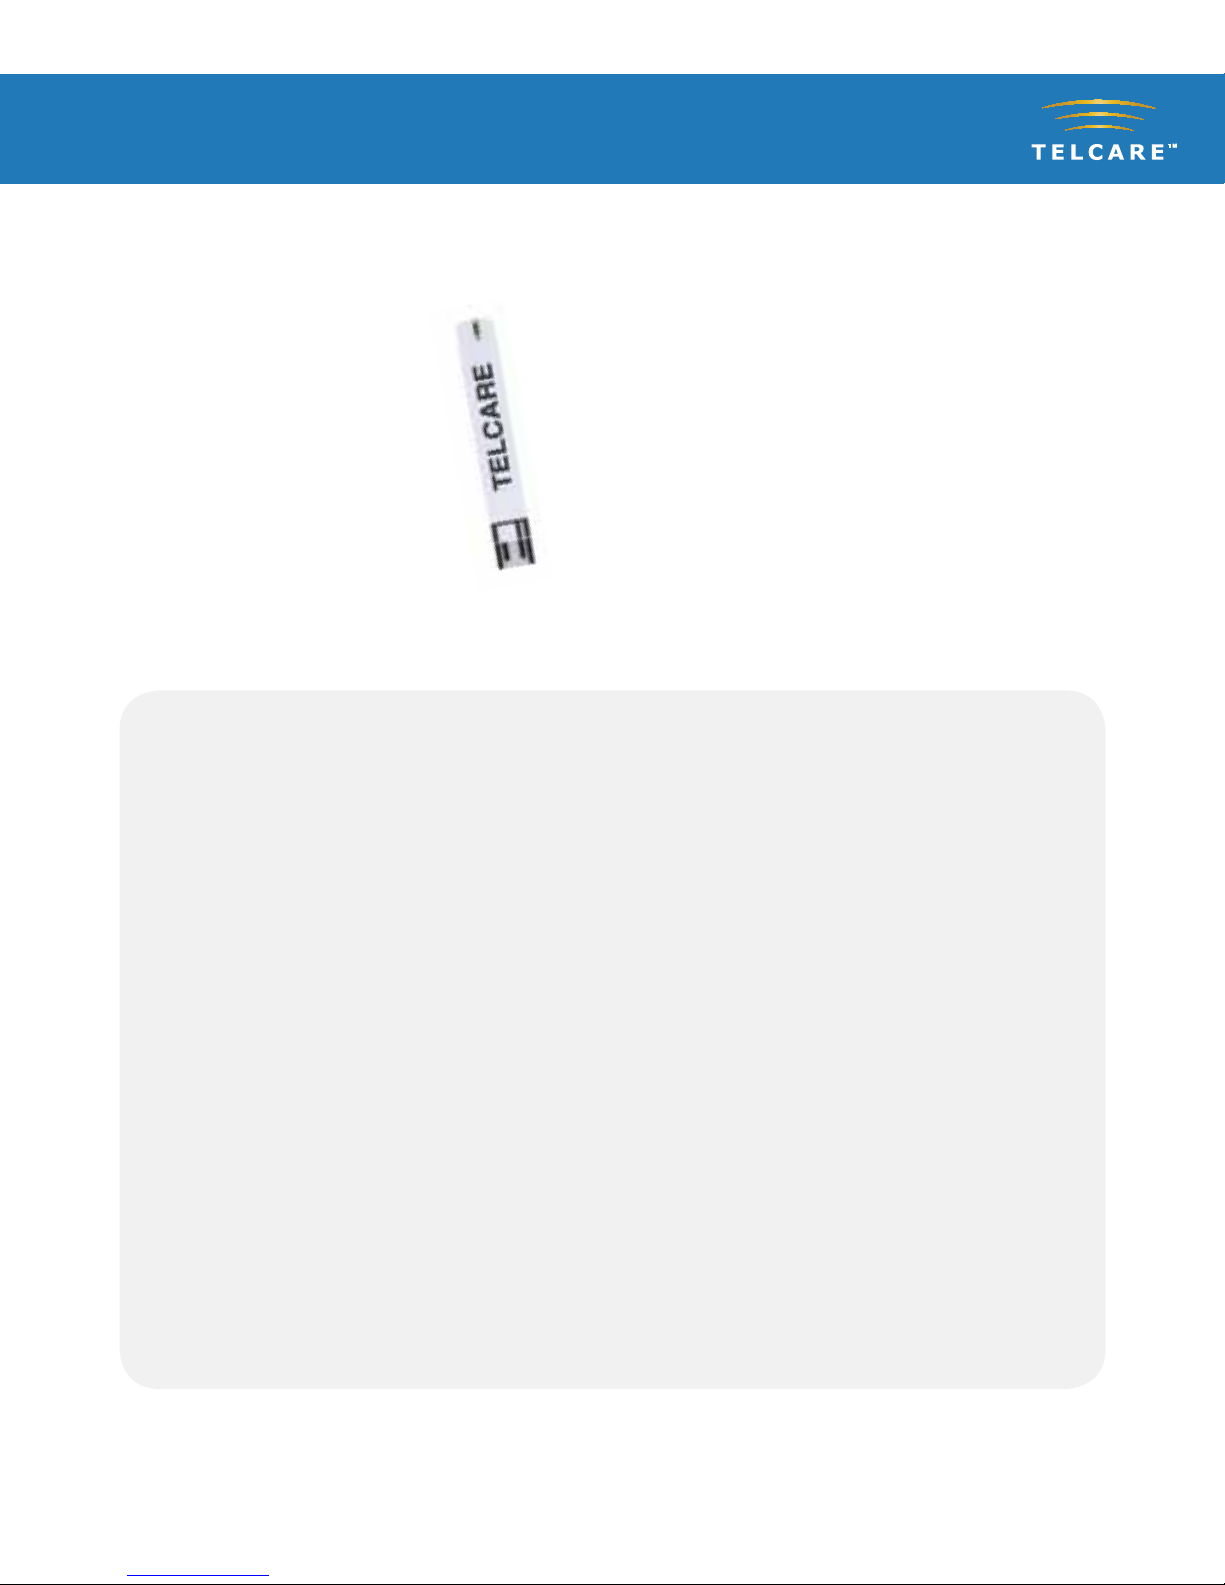
Telcare Test Strips
Blood Sample End
Contact End
(put into device)
IMPORTANT NOTES ON TEST STRIPS:
nBecause of the autocoding feature of this meter, the strip insertion will be
snug. This is to be expected and users find it easy after a few attempts.
nCheck the expiration date printed on the test strip bottle and its package.
Do Not use expired test strips.
nUse each test strip immediately after removing it from the bottle.
nDo not use wet or damaged test strips.
nKeep away from direct sunlight and heat. Store the test strip bottle in a dry,
cool place.
nRecord the “date opened” on the bottle label. Discard the bottle and any
remaining test strips 3 months after the date of opening.
nDo not operate the meter outside the temperature range of 50˚F to 104˚F.
TELCARE™Blood Glucose Monitoring System
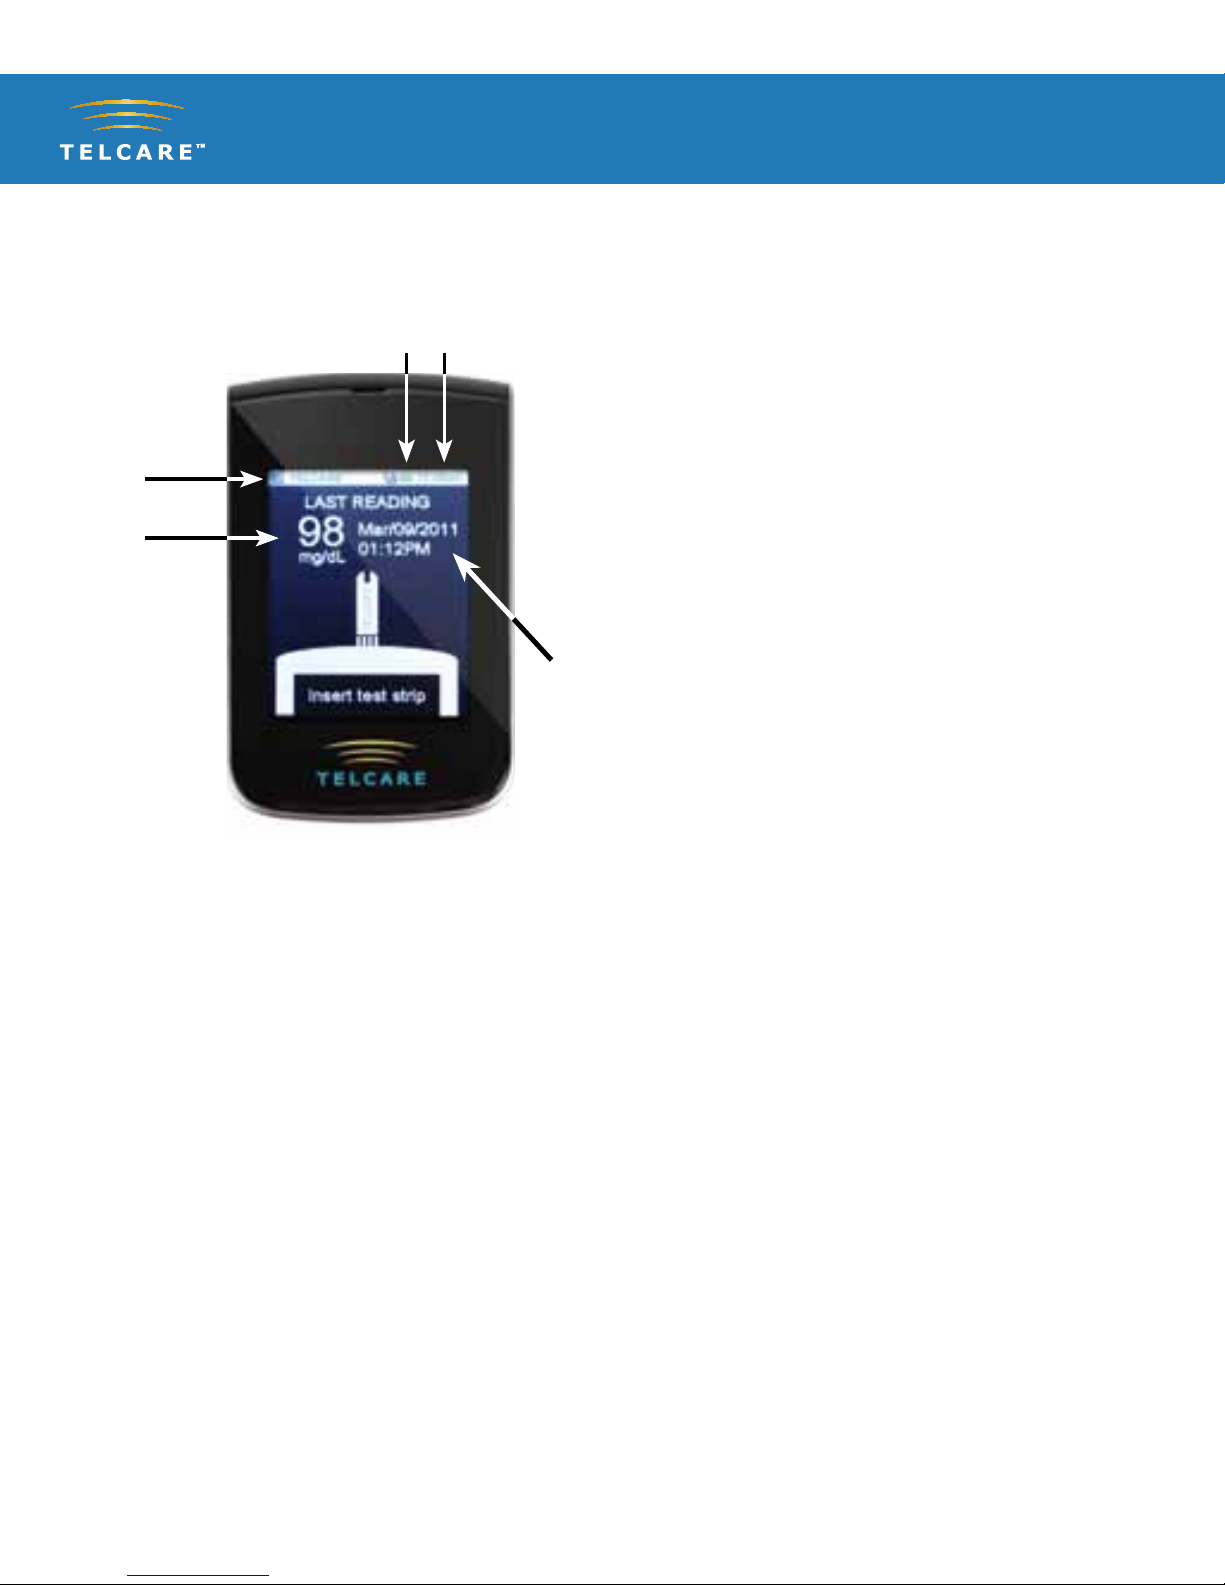
The Display Screen
4
From the Display screen, you can see the following things:
nWireless Signal Strength
nCurrent Time
nBattery Level
nLast Test Reading
nTime of Last Reading
In this Display screen, use the UP/DOWN buttons (located on the left of your
meter) to access the meter’s options:
nTest Mode
nL1 Control Solution Mode (Low)
nL2 Control Solution Mode (High)
nSettings Menu
The Display Screen
1Wireless Signal Strength
2Current Time
3Battery Level
4Last Test Reading
5Time of Last Reading
3 2
1
4
5
TELCARE™Blood Glucose Monitoring System
Setting Up Your Telcare BGM™
5
Your Telcare BGM is preset with your information, including your time zone.
During each cellular connection, Telserve will validate the time displayed is
accurate. Telserve will automatically update your BGM clock, if appropriate.
Also, if your physical location changes, Telserve will recognize your time zone
change and update your meter.
If you would like to view your meter’s preset settings, navigate to the
Settings screen.
Getting to the Settings Screen
1Power (PWR) your Telcare BGM device on.
2Use the UP/DOWN buttons to reach the “Settings” screen.
IMPORTANT: Slight delays occur when meter powers on. If delay is greater than
20 seconds, do not use meter. Contact technical support at (888) 666-4530.
TELCARE™Blood Glucose Monitoring System
6
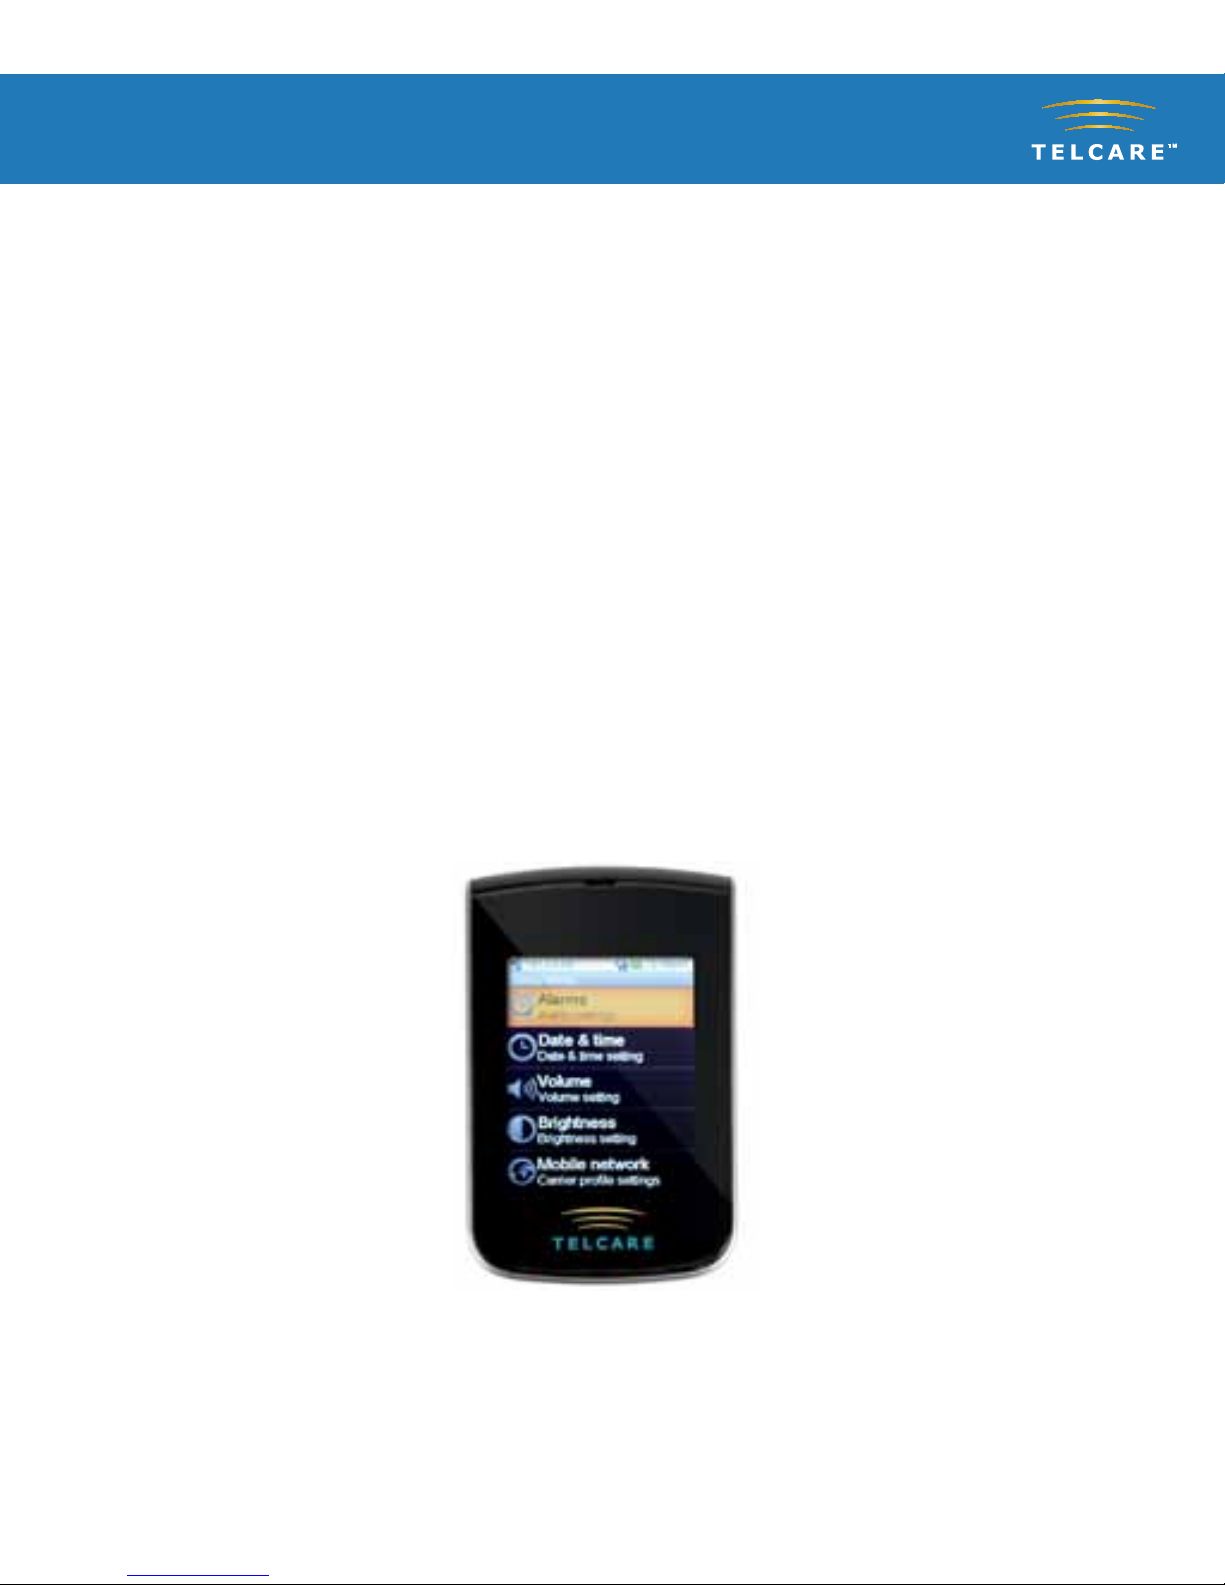
Settings Options
Alarms
Create up to 3 alarms to help remind yourself when to test next.
Date and Time
This page allows you to view the Date and Time settings of your device.
Volume
This page allows you to select the volume of your meter. Use the UP/DOWN
keys to select the appropriate volume. There are six possible volumes you
may select from.
Mobile Network
This is an advanced feature. This page allows you to view the details of the
mobile network your device uses for communication to the MyTelcare.com
Web Portal. We recommend you do not change the factory settings.
Auto-Sync
Disabling Auto-sync will prevent the meter from communicating with the
MyTelcare.com Web Portal (Not Recommended). Readings will still be stored
in the meter.

TELCARE™Blood Glucose Monitoring System
7
Memory Recall
Your last 300 glucose and control test readings are stored within the meter.
Please see “Viewing Your Meter’s Memory” (page 29) for further details. To
send a reading to MyTelcare.com, highlight it and push the Enter button. If a
reading has already been stored on MyTelcare.com and you attempt to send
it, an error will appear on screen.
Airplane Mode
Turning on Airplane Mode disables cellular network access. You will not
be able to transmit your readings while Airplane Mode is turned on. Your
meter’s clock will continue to work properly while in this mode.
If a time zone change occurs, your meter will not automatically update to
the new time until Airplane Mode has been disabled. The meter will reset the
time from the new network.
About
This screen provides a listing of current software and related information
about your meter. This is helpful if you need technical support.

TELCARE™Blood Glucose Monitoring System
Control Solution Modes
8
Control solution testing is to make sure your Telcare BGM™and Test Strips are
working properly. You should perform control solution testing when:
n Using the meter for the first time.
n Using a new bottle of Telcare Test Strips.
n You left the test strip bottle cap open.
n You dropped the meter.
n You suspect the meter and test strips are not working properly.
n The test results do not reflect how you feel.
n Practicing the testing.
n The test strips are exposed to extreme environmental conditions.
Purchase additional control solution by calling Telcare at (888) 666-4530
(9AM - 5PM EST, M-F).
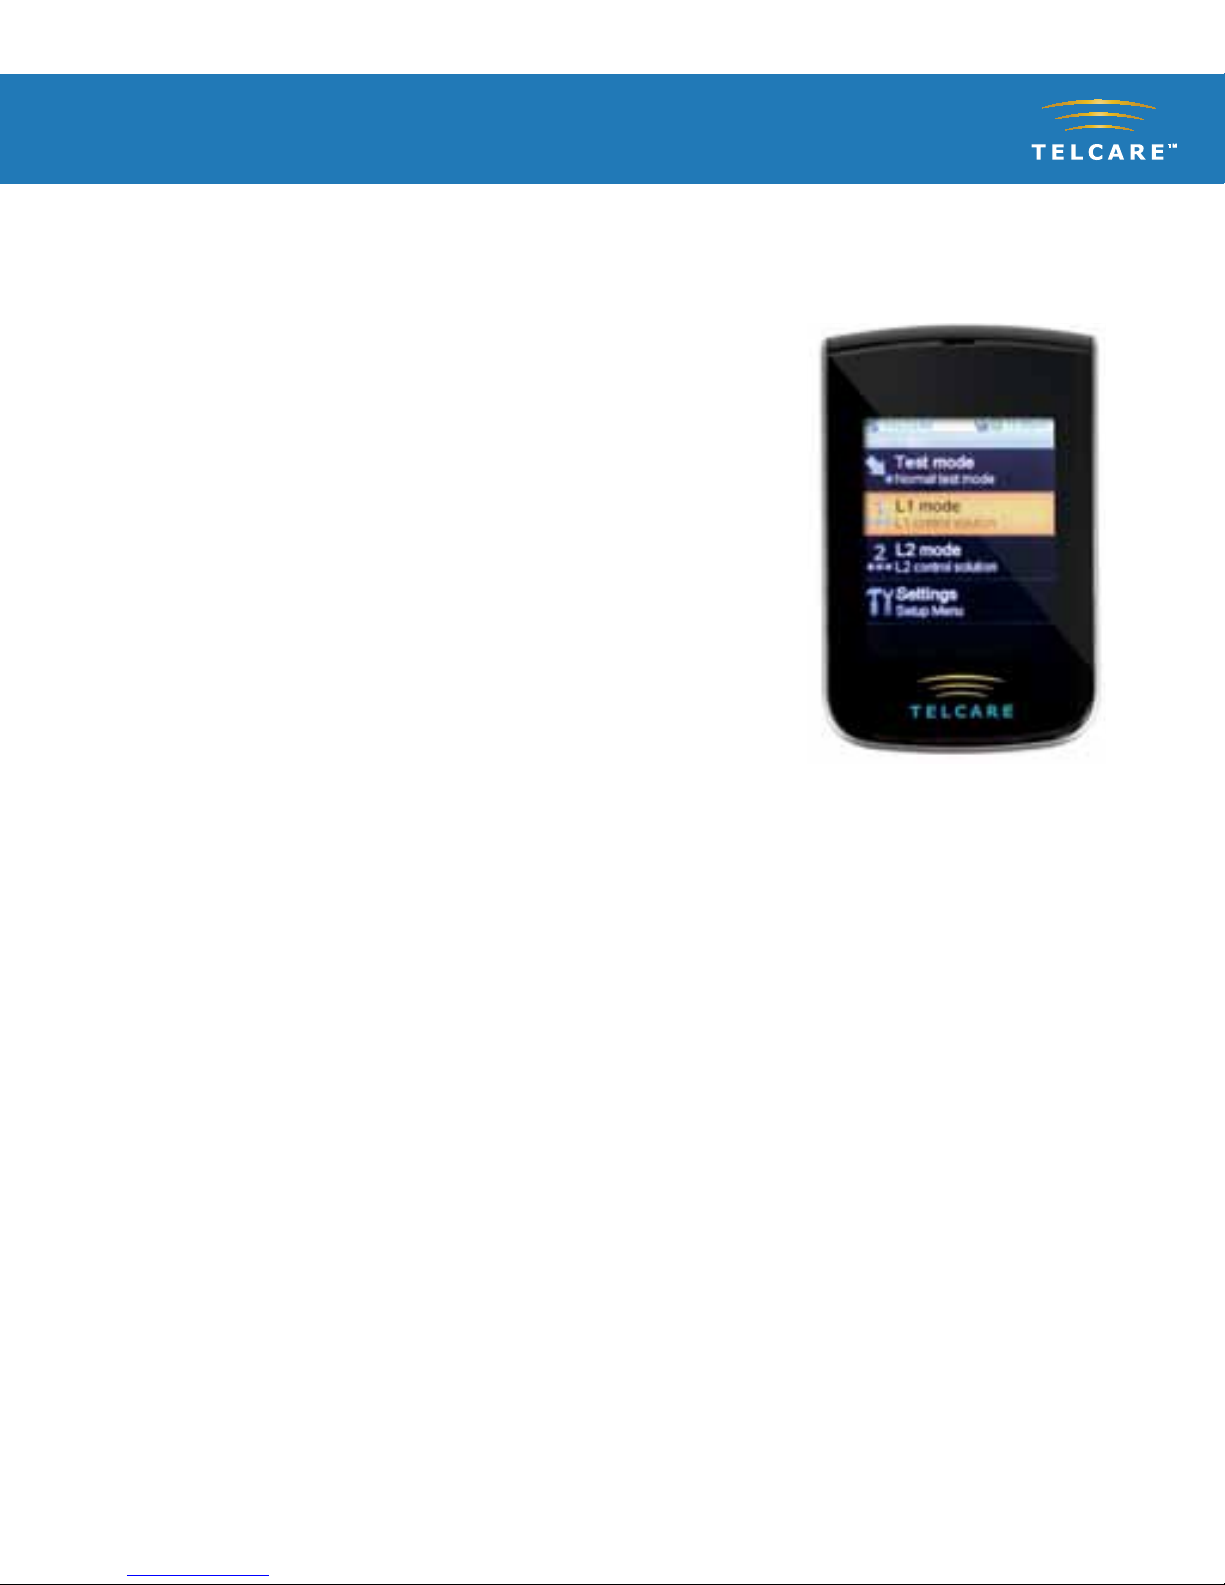
Step by Step Guide to Control Testing
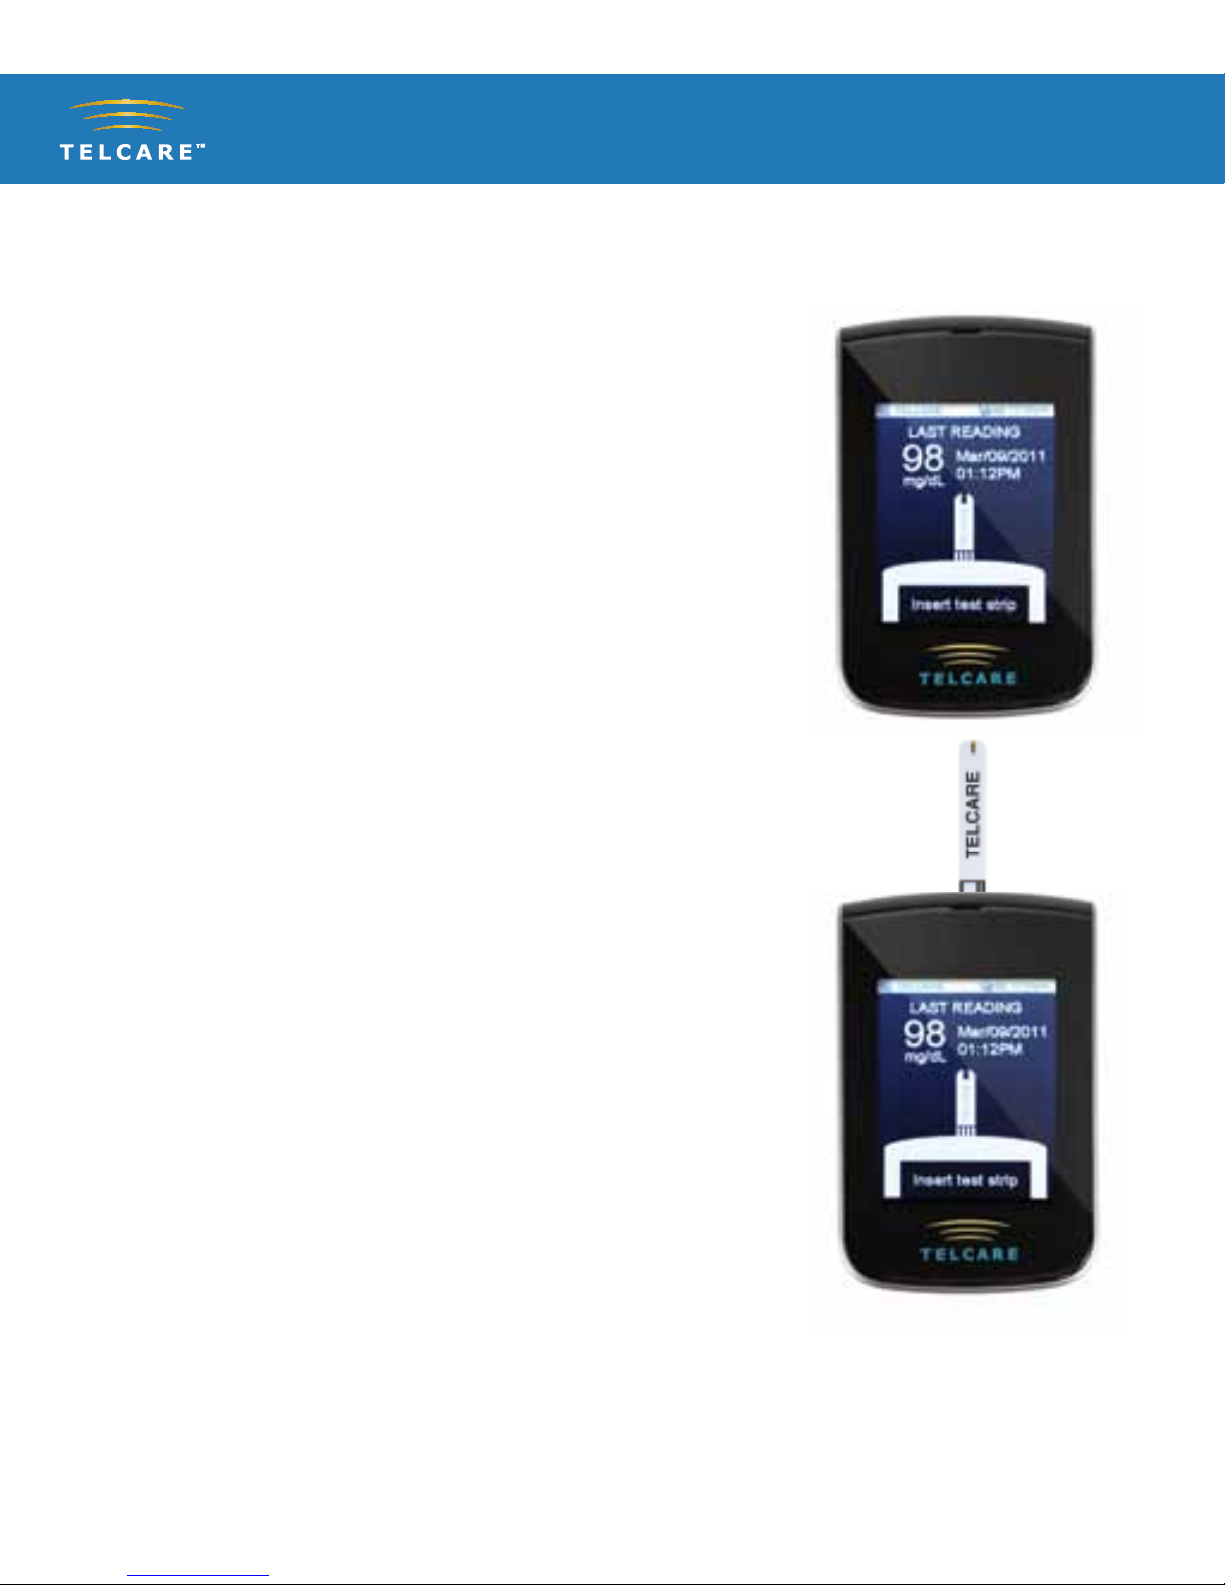
Power on the Telcare BGM device with the
PWR button on the right side of the BGM.
The device will automatically start in
“Normal Test Mode,” ready to check blood
glucose. You will see the “Insert test strip”
screen as shown.
1
2
TELCARE™Blood Glucose Monitoring System
9
3Use the UP / DOWN keys on the left side of
the BGM to access the main menu. Switch
modes from “Normal Test Mode” to
L1 Control Solution Mode.
To test Level 1 (L1) control solution, use the
UP/DOWN buttons to highlight L1 mode.
Press the middle (ENTER) button to select
L1 mode.
Upon successful completion of Level 1
(L1), test Level 2 (L2) control solution.
Use the UP / DOWN keys on the left side of
the BGM to access the main menu. Switch
modes from “Normal Test Mode” to
L2 Control Solution Mode.
To test Level 2 (L2) control solution, use the
UP/DOWN buttons to highlight L2 mode.
Press the middle (ENTER) button to select
L2 mode.
TELCARE™Blood Glucose Monitoring System
10
You can select any Mode you want by
pushing the ENTER button.
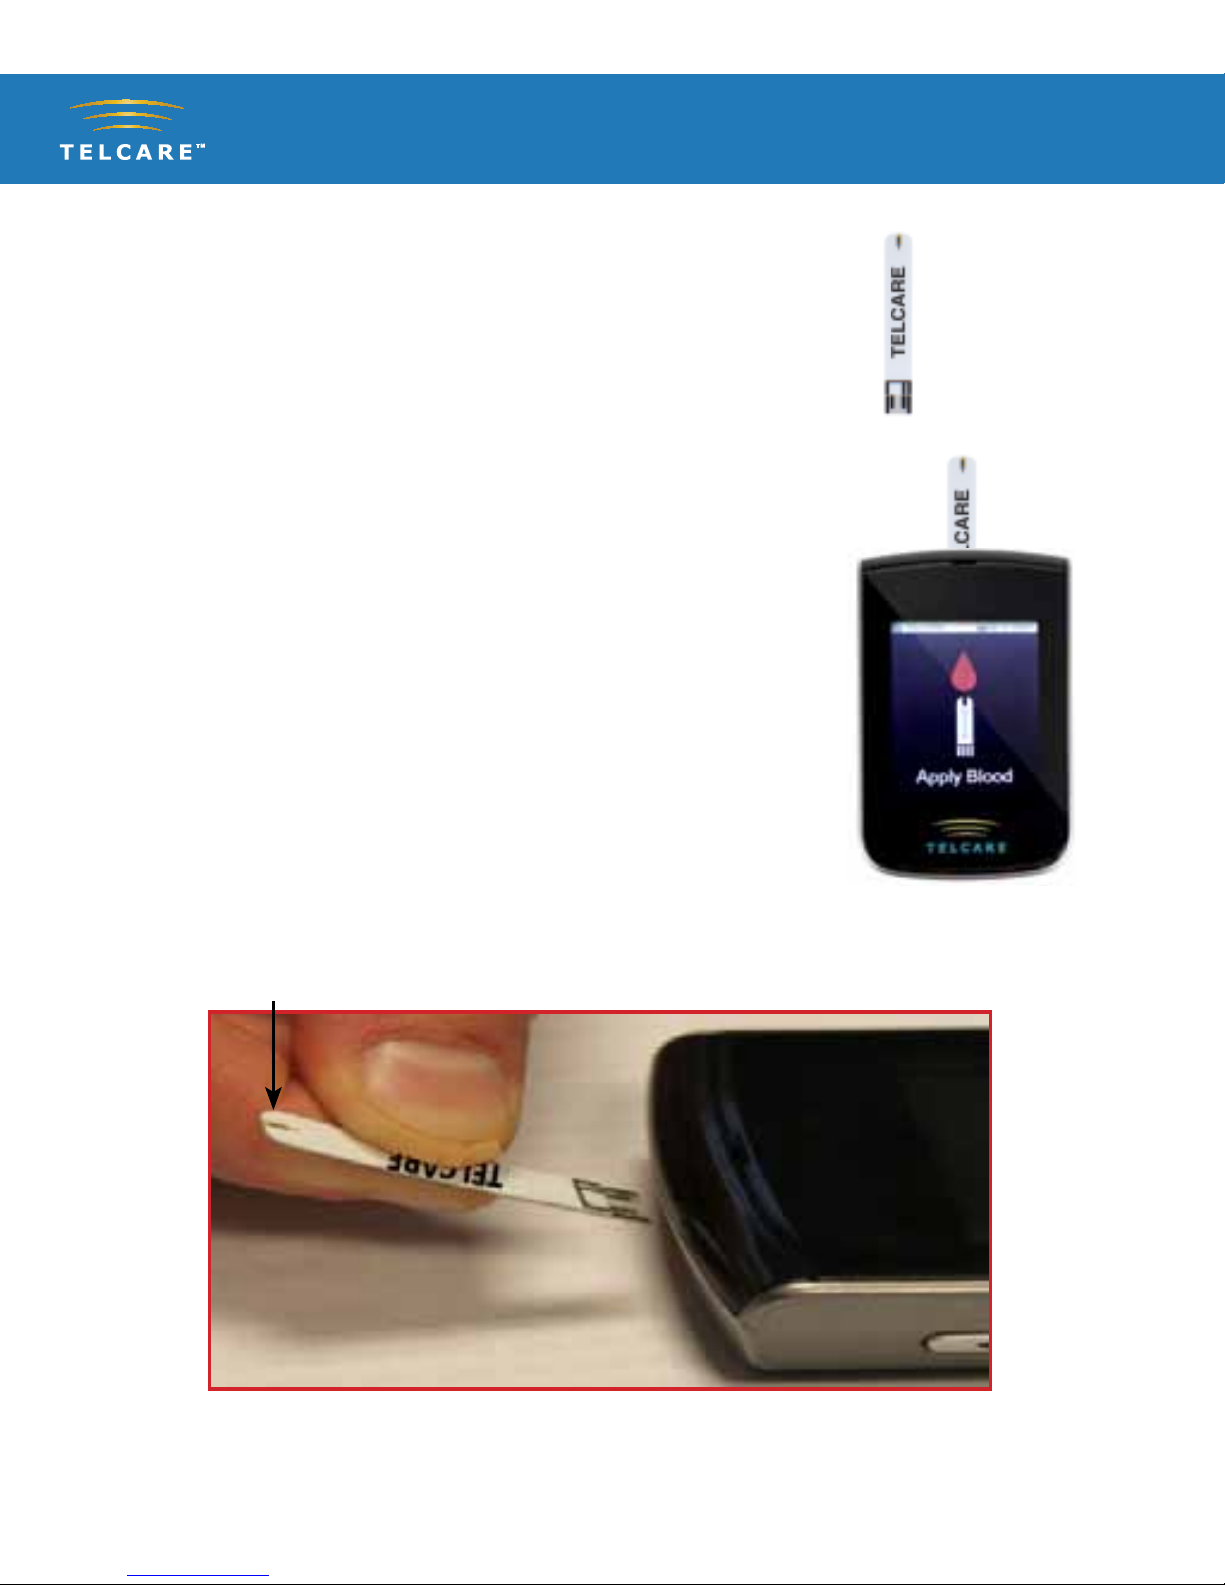
Take out a Telcare Test Strip from the test
strip bottle. Close the bottle immediately.
IMPORTANT:
- Insert the strip into the strip port at a
slight downward angle for it to properly
seat in the meter.
- The word “Telcare” should be facing up.
- The sample tip should be facing up.
- Continue to push the strip in until Apply
Blood appears.
Sample Tip
4
5
6
TELCARE™Blood Glucose Monitoring System
11
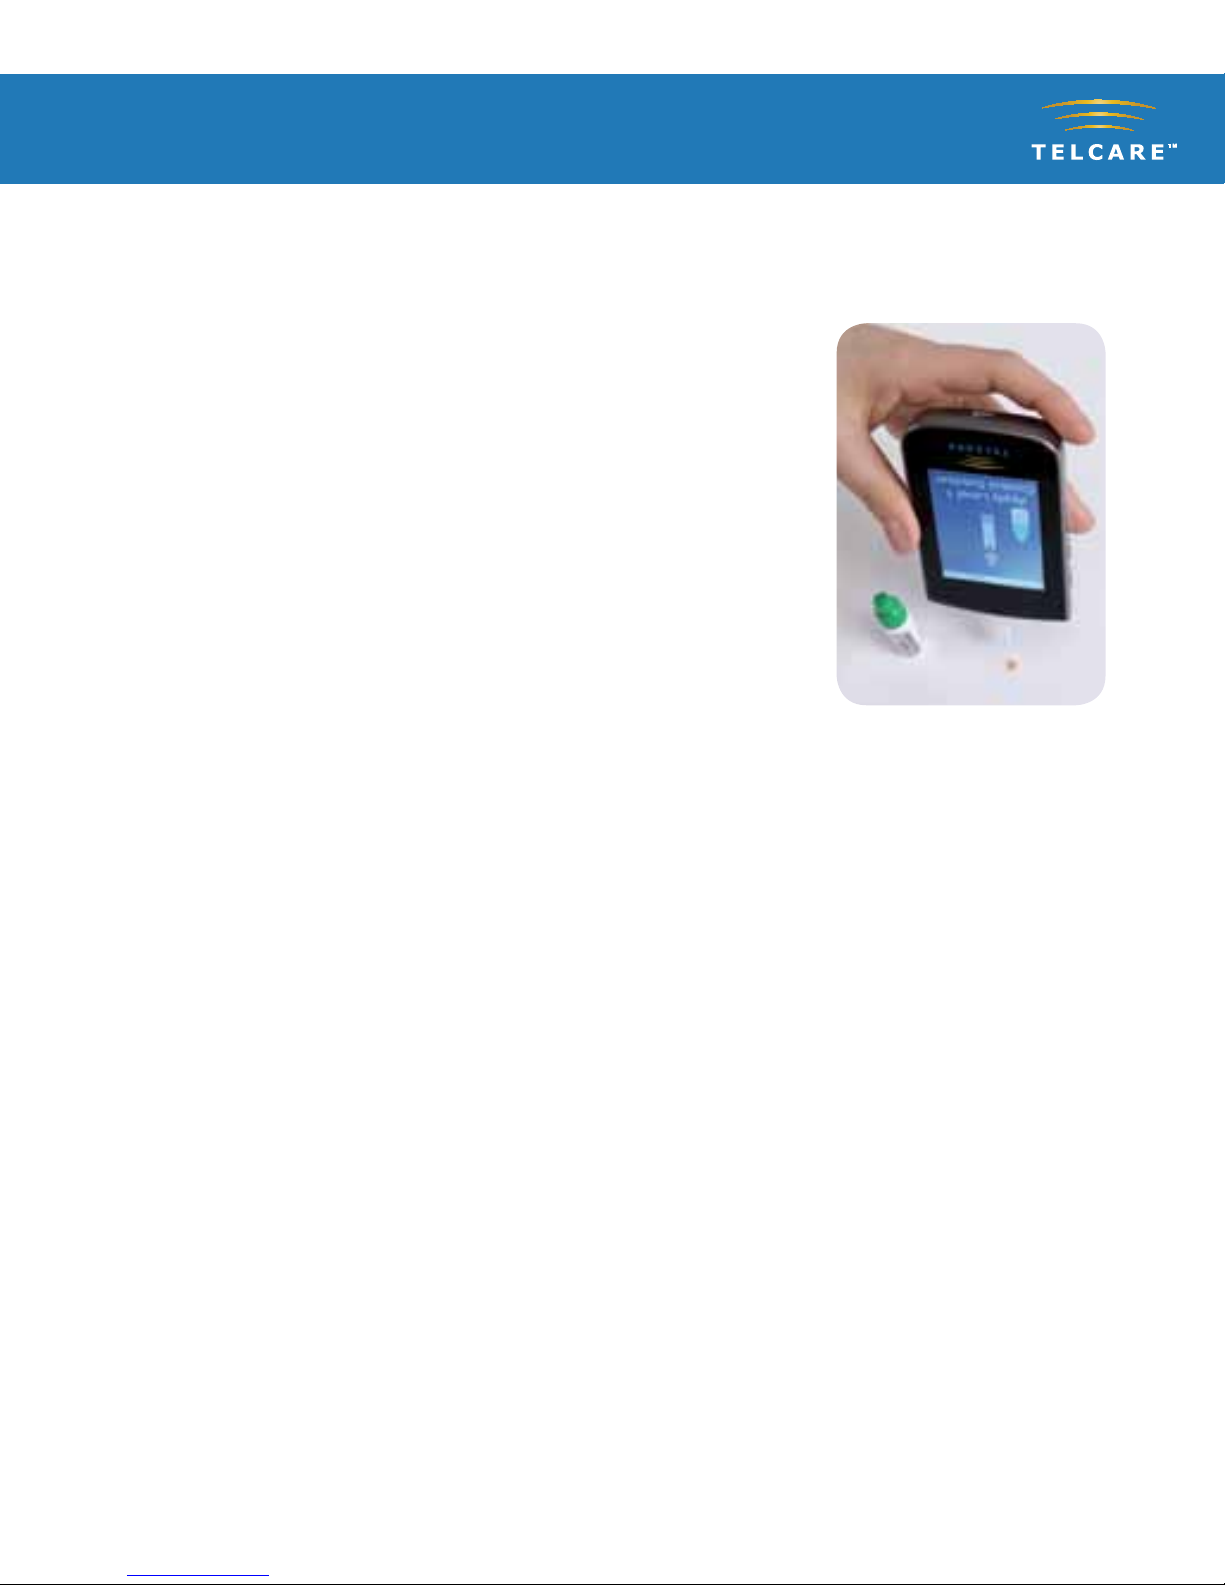
Squeeze a drop of control solution onto a
clean, dry, non-absorbing surface. Use Level
1 solution for L1 mode. Use Level 2 solution
for L2 mode. Do not apply control solution
to the test strip directly from the bottle.
Immediately replace the bottle cap on the
control solution bottle.
Gently touch the tip of the test strip to the
drop of control solution. You should see the
blood sample end of the test strip fill.
The screen will start to count down. After
6 seconds, the control test result will appear
on the meter’s display screen.
7
8
9
TELCARE™Blood Glucose Monitoring System
12
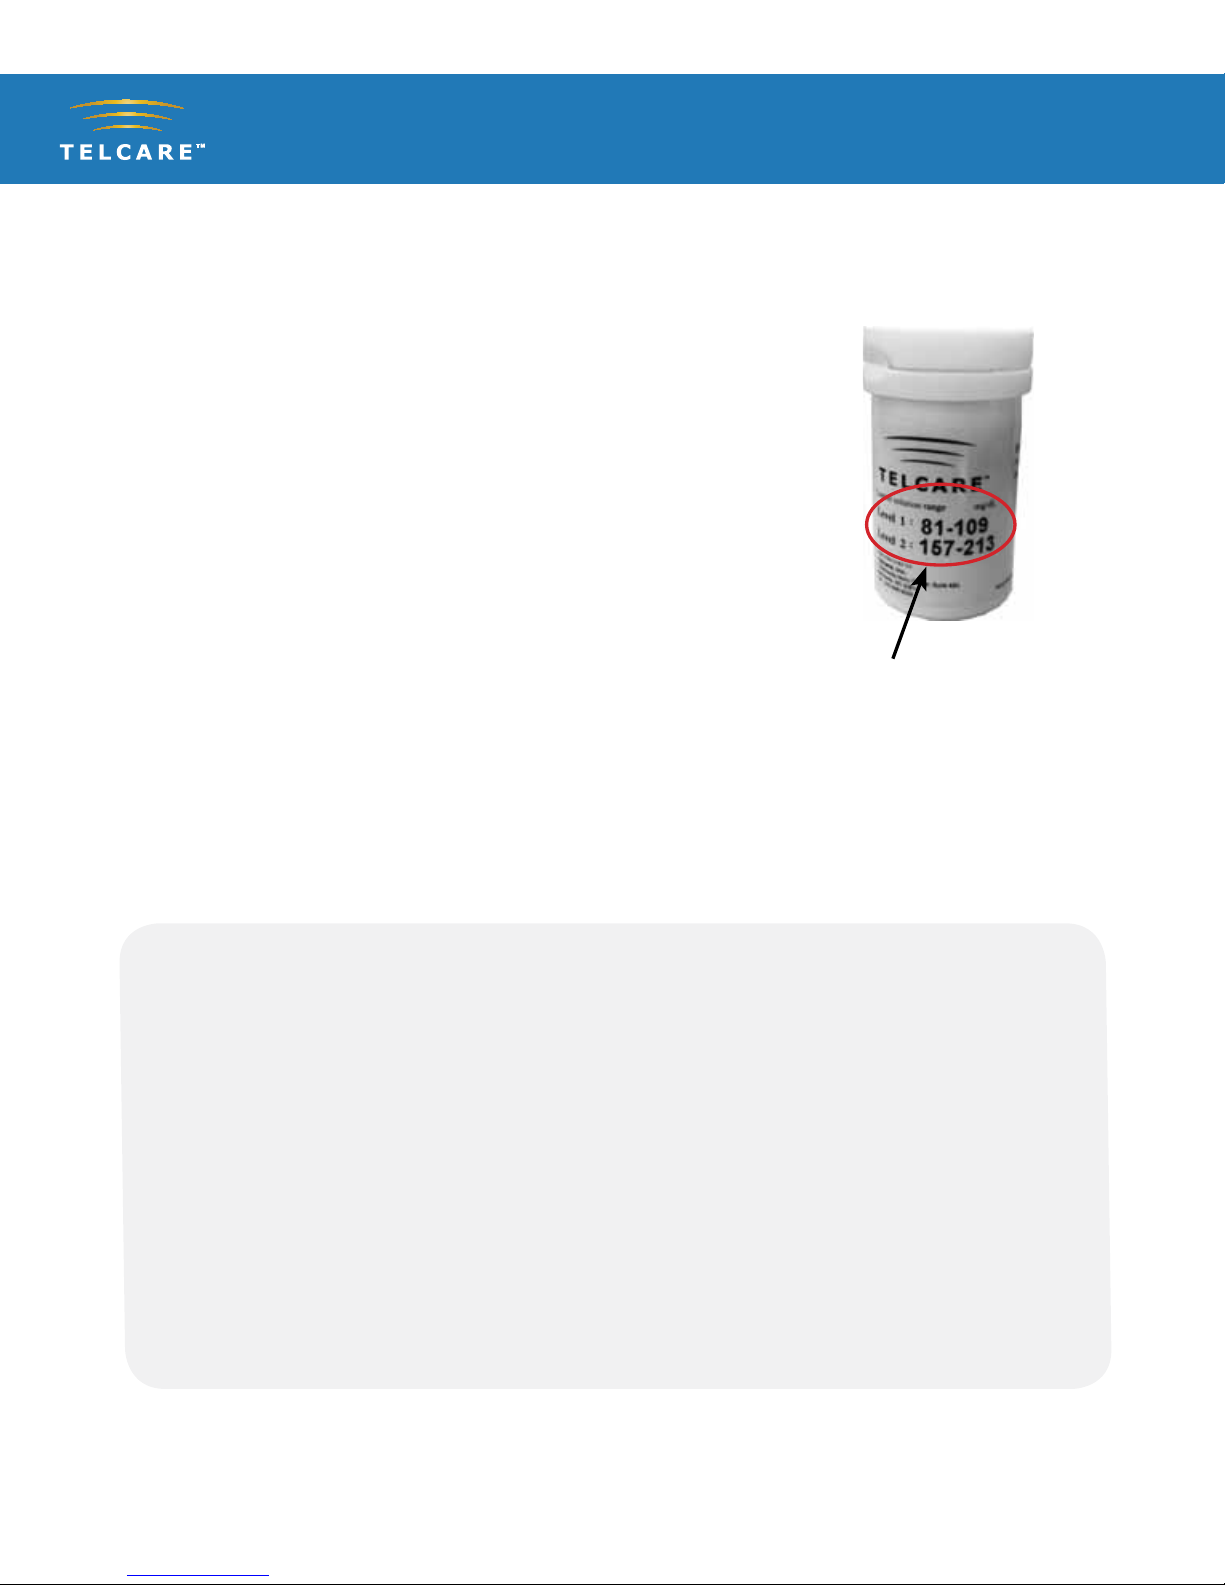
Compare the reading on the screen to
the “L1 Control Solution” or “L2 Control
Solution” range printed on the test strip
bottle or package. If the reading on the
meter falls within the appropriate range,
select the YES tag. If not, select the NO
tag. If the reading falls outside the level
printed on the bottle or package that
you used, please see Control Solution
Troubleshooting on page 13.
10
IMPORTANT TIPS:
1. Only use Telcare Glucose Control Solution with the Telcare Test Strips. Other
brands of control solution or test strips may produce inaccurate results.
2. Always check the expiration date. DO NOT use expired control solution.
3. DO NOT FREEZE. Store the control solution at room temperature.
4. Never touch the tip of the control solution bottle to the test strip.
It will damage all remaining solution in the bottle.
Control
Solution
Range

TELCARE™Blood Glucose Monitoring System
13
Control Solution Troubleshooting
If your control solution testing is out of range (too high or too low),
it may be caused by the following:
n Wrong brand of control solution.
n Control solution not at room temperature.
n Expired or contaminated control solution.
n Damaged test strip.
n Touched the tip of solution bottle to test strip.
n Meter malfunction.
n Wrong ambient temperature (should be between 50˚F and 104˚F).
n Check the expiration date and open bottle date on the control solution
and on the test strips. Repeat testing using a new test strip. If the result is
still out of range, use a new bottle of control solution and retest.
If the problem persists, turn your meter off and then call TELCARE™
at (888) 666-4530. Do not perform any blood glucose tests until you
resolve this issue.
TELCARE™Blood Glucose Monitoring System
Testing Your Blood Sugar
14
n Set up your Telcare BGM™Blood Glucose Meter properly. Run a control test
before first use. (See Step by Step Guide to Control Testing on page 8.)
n Wash your hands and testing site thoroughly with warm
water and soap. Dry your hands well.
n Test in a place where the temperature range is between
50˚F and 104˚F. (See Troubleshooting on page 37 for more information.)
You will need:
nYour Telcare BGM™Blood Glucose Meter
nA new Telcare Test Strip
n A lancing device with a clean, unused lancet (or safety lancets)
IMPORTANT:
Inaccurate results may occur in severely hypotensive individuals or patients
in shock. Inaccurate low results may occur for individuals experiencing a
hyperglycemic hyperosmolar state, with or without ketosis. Critically ill
patients should not be tested with blood glucose meters.
Before you begin, make sure to:

TELCARE™Blood Glucose Monitoring System
Important Safety Information Before Testing
15
n Please follow cleaning and disinfecting instructions for the meter
(page 31) and lancing device (page 33) to prevent the risk of
blood-borne pathogen transmission!
n Follow any cleaning/disinfection instructions that may come with
the lancing device you use.
n The meter and lancing device are intended for a single user and
should not be shared.
n Make sure you wash and dry hands thoroughly with soap and
water before and after handling the meter, lancing device, or test
strips.
TELCARE™Blood Glucose Monitoring System
16
Step by Step Blood Sugar Testing
Power on the Telcare BGM™device with
the PWR button on right side of meter.
The device will automatically start in
“Normal Test Mode.” When ready to
check blood, “Insert test strip” will be
displayed.
Take out a Telcare Test Strip from the
bottle, and close the bottle immediately.
(Some meters require the user to enter a
code from the vial. Telcare’s strips do not
require a code.)
Firmly insert the test strip into your Telcare
BGM device until it is fully seated.
1
2
3
Table of contents
Other TELCARE Blood Glucose Meter manuals


