Telectro MR511 User manual

l,f:)
iEI=
a-'
rl l-
et Lrl
LV?
o
4
l-
(J
llt
J
rll
l-
J
llt
a
o
=
=
o
E'
llt
F
=
-
Ut
d
{
m
F
m
11
{
F
o
GENERAL INFORMATION
The Telectro Model MRbll is a battery-operated, two-speed, tape recorder. This unit
is designed to record and play baek two tracks of material on standard width tape. The tape
speeds are L 7/ 8 and 3 3/ 4 Lps.
Recordings can be made from radio, phono, AM-FM tuner, or TV receiver, as.well ag
a microphone. Using both tracks of a 3-inch reel of tape, the recording times are as follows:
Reel Size
3tt i ?/8 ips
I hour 3 3/4 ips
l/2 hour
The power supply is self-contained, consisting of seven I L/2 voLt penlite batteries.
Manufactured By:
Tel ectroson ic Corporation
35 -18 3 7th Street,
Long lsland City l, New York
HOWARD W. SAIUS &
The lieting of any available replacement part herein does
not conetitute in any case a recommendation, warranty or
guarantyby Howard W. Sams & Co. , Inc. , as to the quality
and euitability of such replacement part. The numbers of
these parts have been compiled from lnformation.furnished
to Howard W. Sams & Co. , Inc. , by the manufacturers of
cQ49?
G |o., I t (E. lndianapolls €i, lndlana
the particular type of replacement part listed. Repro-
ductlon or use, without express permission, of editorial or
pictorial content, in any manner, is prohibited. No patent
liability is assumed with respect to the use of the informa-
tion contained herein. @ 1962 Howard W. Sams & Co. , Inc. ,
ct)
l-l
-l
cJr
et
+l
et
E
r-l
-,
CJI
Indianapolis 6, Indiana.
0AIE 3 - 62
Printed in U.S. of Amerlca
sET 570 tot DER 15
fI
j
#ii*." jq
ffinpl
%*l
i::"- {
g,"r:r-'f
':t 1
w
E&I
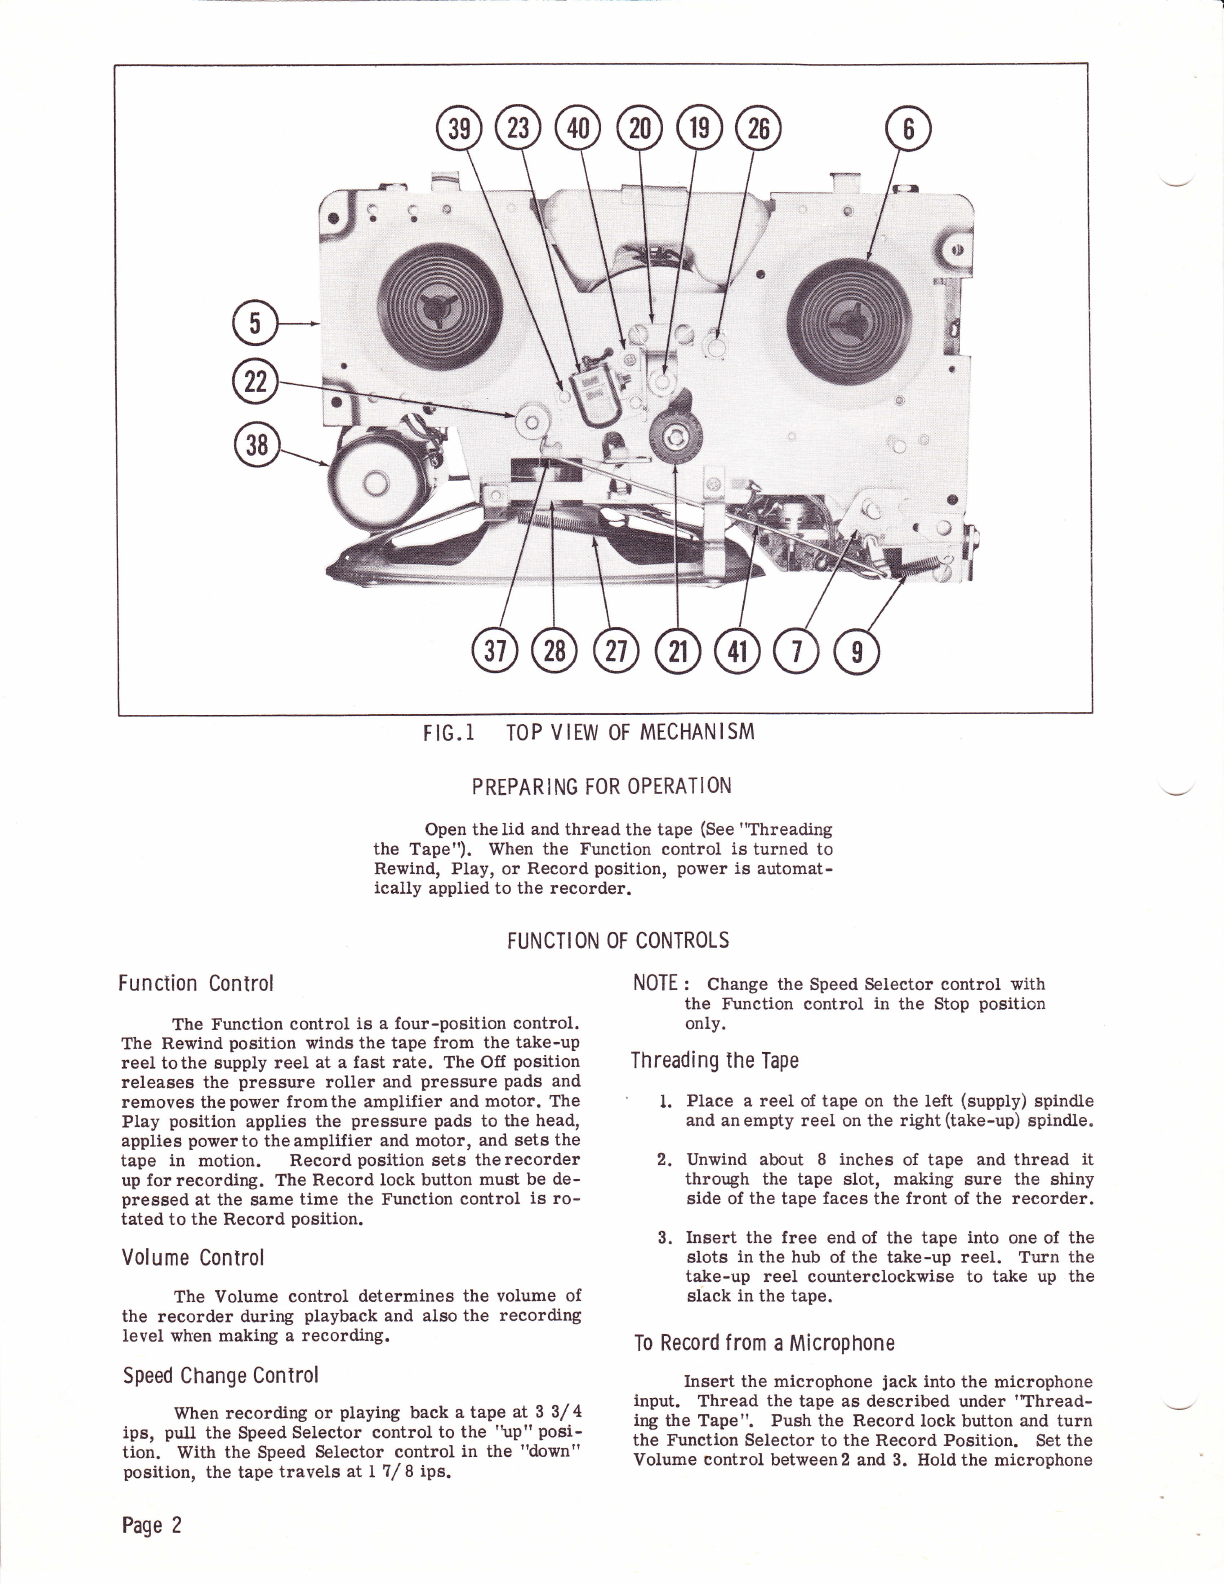
FIG.I TOP VIEW OF MECHANISM
PREPARI NG FOR OPERATION
Open the lid and thread the tape (See "Threading
the Tape"). When the Function control is turned to
Rewind, Play, or Record position, power is automat-
ically applied to the recorder.
FUNCTI ON OF
Function Control
The Funetion eontrol is a four-position control.
The Rewind position winds the tape from the take-up
reel tothe supply reel at a fast rate. The Off position
releases the pressure roller and pressure pads and
removes thepower fromthe amplifier and motor. The
Play position applies the pressure pads to the head,
applies power to the amplifier and motor, and sets the
tape in motion. Reeord position sets the recorder
up for reeording. The Record loek button must be de-
pressed at the same time the Function control is ro-
tated to the Record position.
Volume Control
The Volume control determines the volume of
the reeorder during playback and also the recording
Ievel when making a reeording.
Speed Change Control
When recording or playing back a tape at 3 3/ 4
ips, pull the Speed Seleetor control to the "up" posi-
tion. With the Speed Selector control in the "down"
position, the tape travels atLT/ 8 ips.
Page 2
CONTROLS
NOTE : Change the Speed Selector control with
the Function sontrol in the Stop position
only.
Threading the Tape
I. Place a reel of tape on the left (supply) spindle
and an empty reel on the right (take-up) spindle.
2. Unwind about 8 inches of tape and thread it
through the tape slot, making sure the shiny
side of the tape faces the front of the recorder.
3. Insert the free end of the tape into one of the
slots in the hub of the take-up reel. Turn the
take-up reel counterclockwise to take up the
slack in the tape.
To Record f rom a Microphone
Insert the microphone jack into the microphone
input. Thread the tape as described under 'nlhread-
ing the Tape". Push the Record lock button and turn
the Function Selector to the Record Position. Set the
Volume control between2 and 3. Holdthe microphone

6 to g inches away from your mouth. If the recording
is distortedr decrease the volume setting during re-
cording. trf the recording is weak, increase the vol-
ume setting.
To Rewind the Tape
To rewind the tape, move the Function selector
to the Rewind position. To stop the tape, return the
Function selector to the Off position.
To Play a Recording
l. Followinstructions under "Threadingthe Tape".
2. Move the Function selector to the Play position.
3. Adjust theVolume control to the desired listen-
ing level.
4. To stop the tape transport, move the Function
selector to the Off Position.
Erasing Recorded Material
Any recording on atape is automatically erased
before anew recording isput on thetape when the unit
is in Record position. To erase a tape without putting
a new recording on it, follow the normal recording
procedurebut leavethe Volume control setting at min-
imum.
To Remove the Recorder from the Case
D ISASSEMBLY
3.
l. Remove the Function control knob (l) and the
Volume eontrol knob.
2. Remove the rear escutcheon by pressing in on 5.
the front and lifting upward.
Dual Track Recording
These recorders are designed to record and
play back on one-half the tape width at a time. After
the recording is completed, and all the tape is wound
on the take-up reel, remove the reels from the re-
eorder. Turn the reels over and place full reel onthe
eupply spindle. Properly thread the tape and proceed
with recording. After the second track has been re-
corded, the first track canbe played back in the same
manner.
To Edit and Splice Tape
N0TE: Since one track cannot be edited and
spliced without affecting the other traek,
recordings to be edited should be limited
to one track only.
l. Tape may be edited by cutting out unwanted
portions ofthe tape or by joining selections into
another sequence. Announcements may be in-
serted between selections, etc. Unused sections
can be spliced for re-use.
2. For best results, cut tape at a slight diagonal,
join ends with splicing tape on the glossy side.
Trim off any excess width.
Remove 3 screws and lift the front escutcheon
up off the recorder.
Lift the recorder from the case.
To reassemble, reverse the above procedure.
3
O-t
str
trh
'6
3;
_Go
4.
Pressure roller (21), Capstan shaft (ll), Tape
guide (41), and Record-Playback head (23)may accum-
ulatetape oxide coating, worn offthe tape asit passes
these parts. This accumulation will cause poor per-
formance and should be removed with a soft lint-free
cloth dipped in alcohol.
CLEAN I NG
LU BRI CATION
ADJUSTMENT
Under normal use, this recorder needs no lub-
rlcation. When unit is disassembled, clean and lubri-
cate all bearing surfaces with a good grade of oil.
Lubricate the cams and levers with a non-hardening
grease. Make sureno oilor grease gets onthe rubber
surface of the drive wheels"
Record-Playback Head
The Record-Playback head (23) has been prop-
erly aligned at the factory, and should not need ad-
justment unless it is replaced. The top edge of the
Record-Playback head(23) must be set evenly withthe
topedge of thetape. Loosen nuts andadjuet theheight.
Using an alignmenttape, adjust head adjustment serew
(40) until highest frequency response is obtained.
Flywheel Bearing Adjustment
To adjust flywheel, loosen nut and adjust adjust-
ment screw (19) until a stight resistance is feltl back
off screw L/ 4 ilrtrn and tighten nut.
N0TE: Care must be taken when turning fly-
wheel adiusting acrew (19) to prevent
damage to flywheel bearing.
Brake Adjustment
To adjust brake (35) loosen screws and adjust
brake arm until proper brake action is obtained.
Braking should be smooth and immediate.
o
I
rn
n
\JI
Page 3
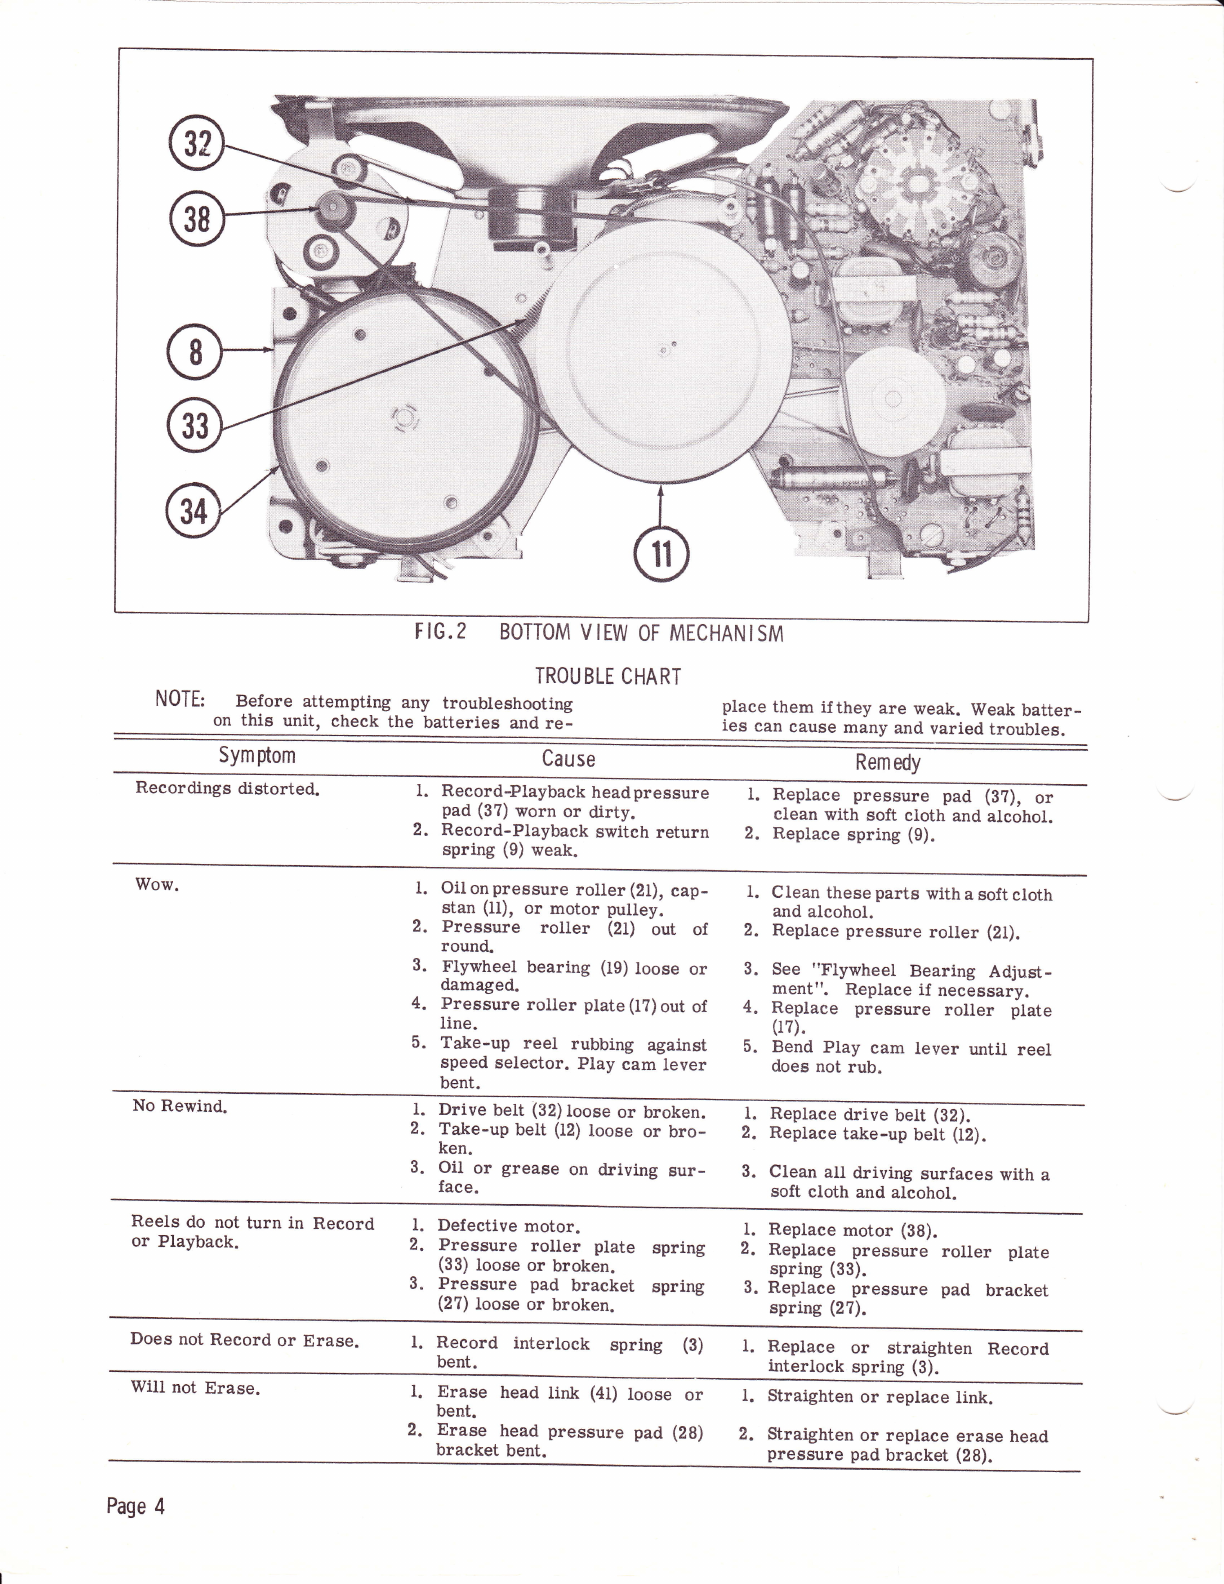
F IG.2 BOTTOM V IEW OF MECHAN I SM
TROIJ BLE CHART
NOTE: Before attempti.ng any troubteshooting
on this unit, check the batteries and re- place them if they are weak. Weak batter-
ies can cause many and varied troubles.
Symptom Cause Rem edy
Recordings distorted. 1. Record-Playback headpressure
pad (3?) worn or dirty.
2. Reeord-Playback switch return
spring (9) weak.
Replace pressure pad (3?), or
clean with soft cioth and alcohol.
Replace sprlng (9).
l.
2"
Wow. l.
t
3.
4.
l.
2.
3.
4.
5.
Oil on pressure roller (21), cap-
stan (11), or motor pulley.
Pressure roller (21) out of
round.
Flywheel bearing (19) loose or
damaged.
Pressure roller plate (lT) out of
line.
Take-up reel rubbing against
speed selector. Play cam lever
bent.
Clean these parts with a soft cloth
and alcohol.
Replace pressure roller (21).
See "Flywheel Bearing Adjust-
ment". Replace if neeessary.
Replace pressure roller plate
(17).
5. Bend Play cam lever until reel
does not rub.
No Rewind. 1.
2.
3.
l.
2.
3.
Drive bett (32) loose or broken.
Take-up belt (I2) loose or bro-
ken.
Oil or grease on driving sur-
face.
Replace drive belt (32).
Replace take-up belt (12).
Clean all
soft cloth fuiving surfaces with a
and alcohol.
Reels do not turn in Record
or Playback. Defective motor.
Pressure roller ptate
(33) loose or broken.
Pressure pad braeket
(2?) Ioose or broken.
Replace motor (38).
Replace pressure roller plate
spring (33).
Replace pressure pad bracket
spring (27).
1.
2.
3"
sprlng
spring
l.
2.
3.
Does not Record or Erase. l. Record interlock spring (g)
bent. l. Replace or straighten Record
interlock spring (3).
Will not Erase. l.
2.
Erase head link (41)
bent.
Erase head pressure
bracket bent.
1. Straighten or replace link.
2. Straighten or replace erase
pressure pad bracket (28).
loose or
pad (28)
Page 4
head
't'n.,,-@
H
t
* ',,..
f; ,t
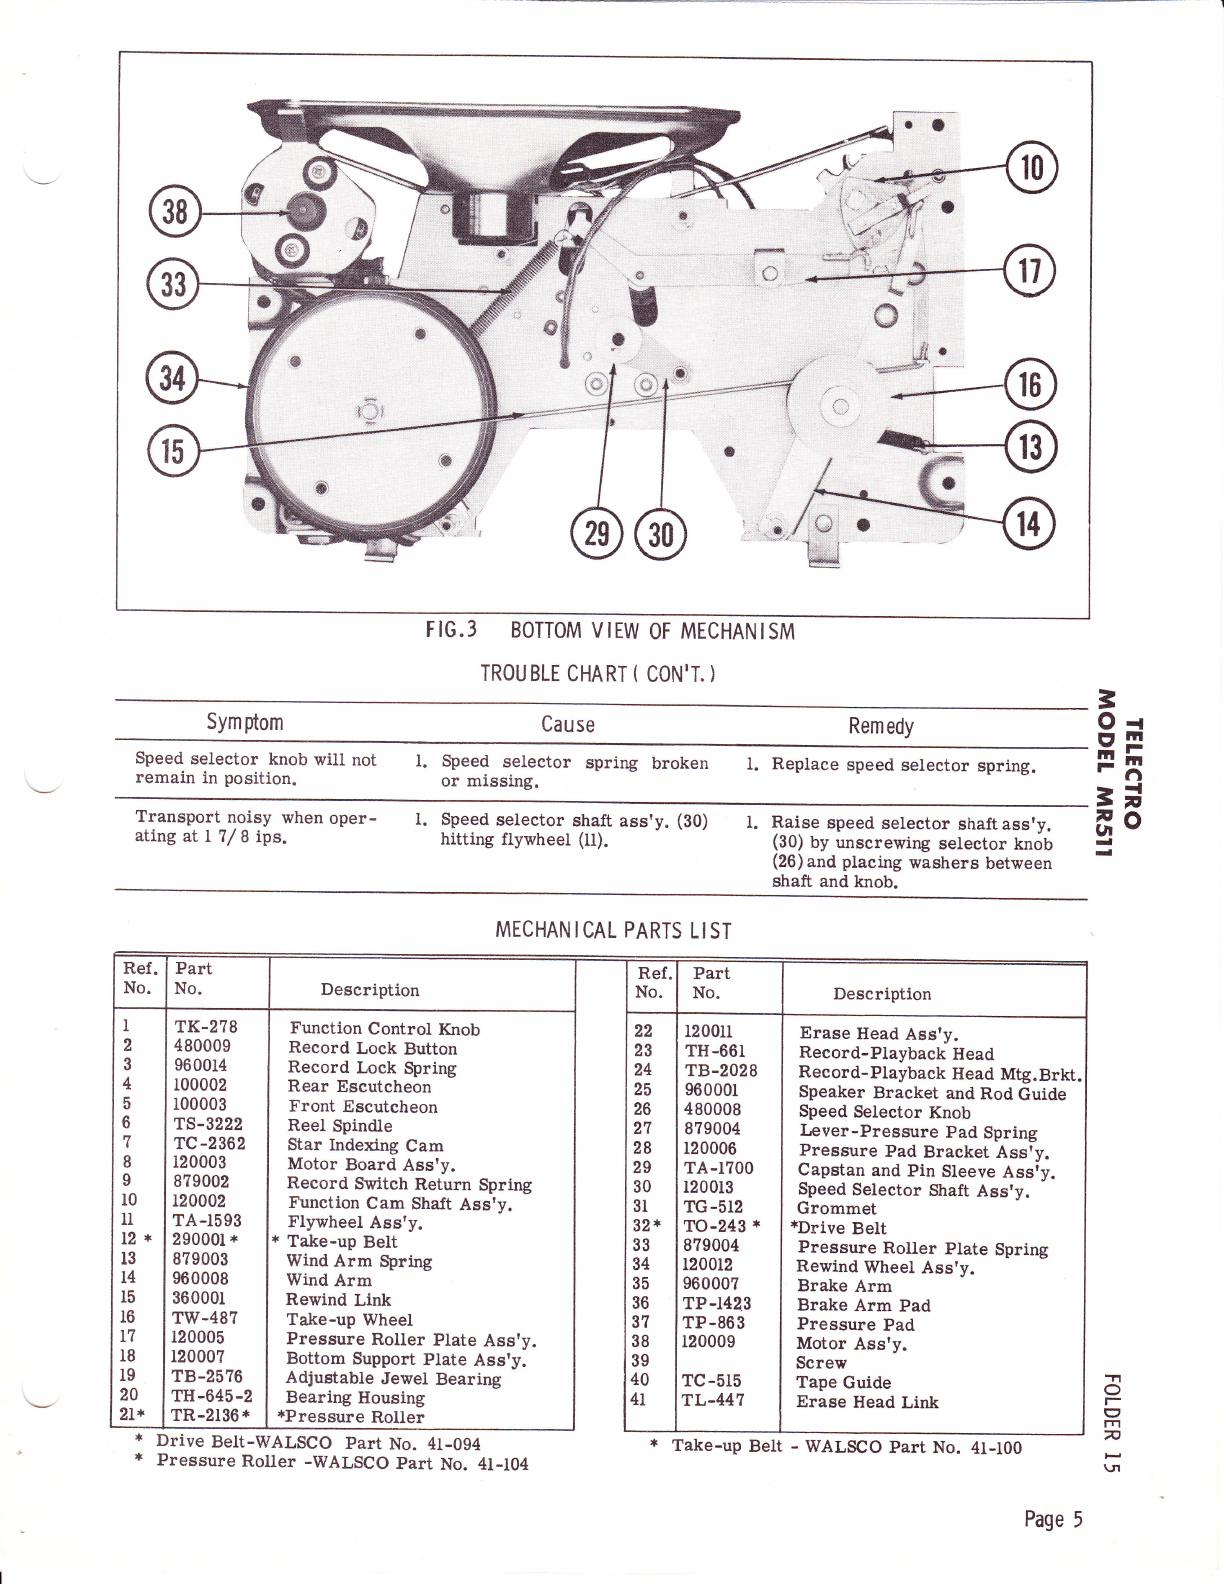
FIG.3 BOTTOM VIEW
TROU BLE CHART I
OF MECHAN ISM
coN'T. )
Sym fiom Cause Remedy
Speed selector knob will not
remain in position. t. Speed selector spring broken
or missing. l. Replace speed selector spring.
3
O{
etr
tr;il
'(.i
='
do
Transport noisy when oper-
ating at L 7/ 8 ips. l. Speed selector shaft ass'y. (30)
hitting fiywheet (It). 1. Raise speed selector shaft ass'y.
(30) bV unscrewing selector knob
(26) and placing washers between
shaft and knob.
MTCHANICAL PARTS LIST
Description Description
5
6
7
8
I
r0
1I
L2*
13
l4
l5
r6
L7
18
l9
20
2L*
TK-2?8
480009
960014
r00002
100003
TS-3222
TC-2362
120003
879002
120002
TA-r593
29000I *
879003
960008
360001
TW-48?
120005
120007
TB-2576
TH-645-2
TR-2136*
Function Control Knob
Record Lock Button
Record Loek Spring
Rear Escutcheon
Front Escutcheon
ReeI Spindle
Star Indexing Cam
Motor Board Ass'y.
Record Switeh Return Spring
Funetion Cam Shaft Ass'y.
Flywheel Ass'y.
* Take-up Belt
Wind Arm Spring
Wind Arm
Rewind Link
Take-up Wheel
Pressure Roller Ptate Ass'y.
Bottom Support Plate Ass'y.
Adjustable Jewel Bearing
Bearing Housing
*Pressure Roller
22
23
24
25
26
21
28
29
30
3l
32*
33
34
35
36
3?
38
39
4A
4L
1200u
TH-661
TB-2028
960001
480008
879004
120006
TA-r700
120013
TG-512
TO-243 *
8?9004
r200t2
960007
TP-1423
TP-863
120009
TC-515
TL-447
Erase Head Assty.
Record-Playbaek Head
Record-Playback Head Mtg.Brkt.
Speaker Bracket and Rod Guide
Speed Selector Knob
Lever-Pressure Pad Spring
Pressure Pad Bracket Ass?y.
Capstan and Pin Sleeve Assry.
Speed Selector Shaft Ass'y.
Grommet
*Drive BeIt
Pressure Roller Plate Spring
Rewind Whee1 Ass'y.
Brake Arm
Brake Arm Pad
Pressure Pad
Motor Assty.
Screw
Tape Guide
Erase Head Link
Drive BeII-WALSCO part
Pressure Roller -WALSCO No. 4l-094
Part No. 4l-104
-r1
O
c7
n
\.tt
Page 5
* Take-up Belt - WALSCO part No. 4t-100
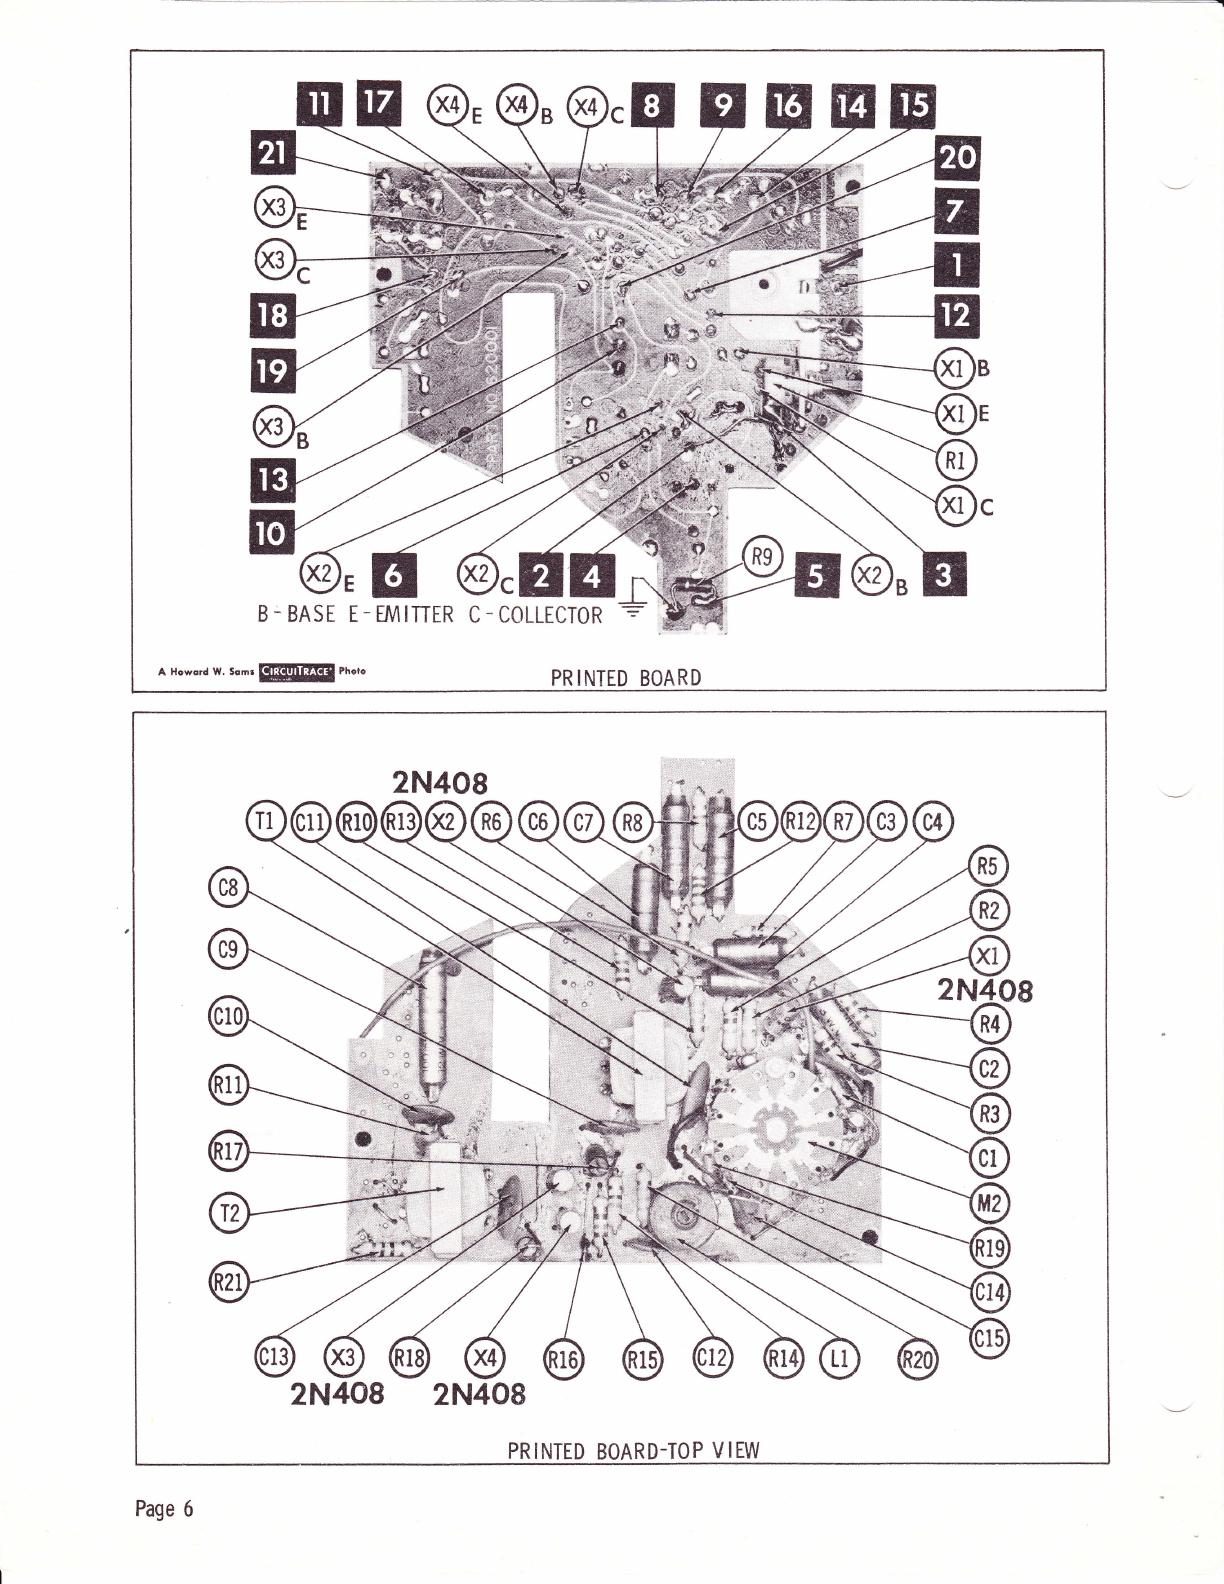
E EI K?C
B_ BASE E- IMINER C-COLLECTOR
A Howord w. somr EEM!!f, rnoro
2N40s
2N408 2N408
PRINTED BOARD.TOP VIEW
Page 6

3
O-l
etr
trh
'lll
3i
fro
oE
g=
E;
to
FO
=
i
=s *: :,g
,4< 9= ]?g- I
sr srEiE; *
<c eE 'E f;:A +
lf EE i EE; s $
a- tEiEci 6:
= =A ,E E EE=l
gE*ggEEgEEEE[=J
U- F
a ne .i6l <vi € ,'i 3
E
IJ
=
o
A-
J
{v
z.=
frX
Fa
6
+; i; i;
I
{
{
{
{
T
T
T
o-{r,
--J
-.2
.=o
OcE
.o
o-E
=F
.G
€E
Eo
t\ ca
J
F
o
F
r\
ci
@
atz.
z=o
i8e
? u.3
LdOO
v. t!
o(9u
Ozcn
.n6>-
a'S i
(9=d
3*#
fsH
otJl
:- trJ ()
=22
r/r F >-
s3s
o<o
c)qz
oo{
nuE
z<=
at rri
=(nc)
.tt E, <.
?g--,
.t =,& j
fr*E=
928=
=efr#
@
--1----T-d.--l
[oooj " i
_>l ol
---_-----99-_'
o
e.
O
or-
LrJ I
ri
>atr I
<<t
-.1 LrJ r
o-- L_
d.
U
5Z
lrl
o-
a
-J
<v
za)
E<.
El-
F
><
LrJ
"\
F at:
fi
at
co
't'
UJ
z
o
!
o-
o
e
9
E
@
-o
).rf
-2
-tL
la{
@
@
o
:rf
a2
-&
,sl
@
@
.E
E
O
o
)Q
lO
:rf
,z
;$l
;e)
O./
<)
(t)
O
ct)
co
I
=)
o-
=
O
c
tt\
(\l
\o
/o
o
O)
-lt''
c
N
>sl
c
oo
II
o
=t
e.
O
F
a/1
=
E/
ut
-t
F\
/6\
LE/
t!
a
o.=
Pd
vlJ
z-
s=
FU F
=
z
=
o
-
t/'t
i
=
:r
L)
F
=.
tt1 Z
2-O
-{-
o- !.,
AP
E,
o>-
(-)<
rJ
oaL
<)
t\
s
@
E
E
c)
ul
=-
J-
d='
:
\l
h
'/
l
E
ri
IJ\
@
15
E
efi -TI
O
l-
C7
m
n
H
\rl
Page 7
z
o
F
a.
o
g
a>ha!
o
zJe19"l<o
;tsr:hg
:
z
l!vpqEo
ts
o
z
B
.g
Ez
FF
od
H<
Fl 4
H
kF
z
GF
Et 5
o
o
z
c,
=
o
f
u
o6
I
r./l _.
e,n
<:
L
r-t
LUP
z';
6g
<^o
ulo
odf
,n3
i! oa
z+
lo.:
<t
(Je D
'=
o
T
o
o
I
3
at
f
o
trl
z
J
r'rl
L
vt
lll
&
t!
co
f
o-
3
o
9
o
D
d,
ttt
=
I
o
lJ-
r^
z
c
c,
ut
:
e
o
4
Iu
=
e,
o
02
zs
oF
tr
r
-
4
!t
I,l
EI
a
A
z
F
U!
I
J
ln
l-
4
a
rj
t\,
lr|
-l
ll|
I
4
(n
o
L)
vt
o
&
z
o
|J
ttl
e,
o
=I
4
I
o
tll
x
vl
e,
o
=
I
4
I
U
o
4
U
uJ
tll
V'
c,
o
!!
at
z
4
E
.2
-
vrE
4=
Y3
r/t -
l/t"
ul !-
EE
N
F
:!
=
o
z
o
z
:
I
o
=
a
3
o
o
-
!a
t_
l,
d;
?;
=<
o
F
o
{: E
o
z
:
o
z
o
F
z
:
o
nZ
6<
iL
;<
.iz
l.;
)a
ri
i3
l.
s lb
<t
dr
:l-
t"
d
F
o
!z F
o
z
F
o
z
:
5;
5<
5<
o
:?
)
1z
)(t ts
F
o
z
:d F
o
z
EF ts
.d
,i< o
Ei
d
rZ
t& o
o
tr
'lF
E< F
tsi
f.o
,3j JJ
o
F
z
:
E
EBBsbSSxv^
:Nr=4..X6X
-N<=ts++=d=
r!:99:99Rn
o
z
=
XXEFXXPqHH
e=-<F=+=oo
E
=
'=
c
g
o
o.
=F
o
j
ud
US
<.i
o,
U-
F
x
<;
e2
z< A
ilo
'aZ
ij! F
6z
E< x
fE
{; tr
o
z
{
u
d. EE:EHX3
ssl**'iJ
ot
i!
<:
{o :H5?90-
NN r:: r=:
aa<"i<'ii
o,
::
do TT .,. ii
NA O OA
oo u oo
oo o ou
i=;
]B;
oo-o.^oa
99A9499
<<F<R4<
llq-ilitl
o@!6!66
<c
=a
3o oorN6:=
eeQeega
9i
9l
<A aaoo
AAAA
EEOA
1
z
oo o60-
E: OOOOOOO
Pc;
oa Fq@oqmF6
a5a!3999
HHEH'4HF1H
FT{ETFFFTiF
od
=z
(r d^.^.6NN9:
\ r-- r-n I
io r {ollo
o===:66=
lJtiJlil
a9
oL
=5
o^^oooP
oo==o66=
4-XXJXXX
:ar!6999
ii.i.t i.i.t i.
<Yi
z?E 6966:999
i-l-!lll.t-g
FitsFFitsFFF
E5==5=E5
ae.
u22
XFE
6 ^.^666::
6 ! I* t -- r
io r roa10
;9999Hts9
}BBF}F3}
jjjiJlJJ
zzzzzzzz
5e
9t FFFFFFTF'TT
FFitrErtiErt4ti
AAAAPiAqe
o
c
6z
E<
Frd
<6@OOFFO
s$3<<$<<
ooooooou
HKtshHtsHts
oN..NN,.NNN
6o o^^o
6====66=
o
zdNA{@€FO
oooaoouo
o
z
AA&A
2ZZ2
AA0rA
F
o
z
=
o€
a.
r-i
3s zzzz
z
(* zzzz
rr o
EE
. .EE
<<oo
oF 2zz2
{: XXXX
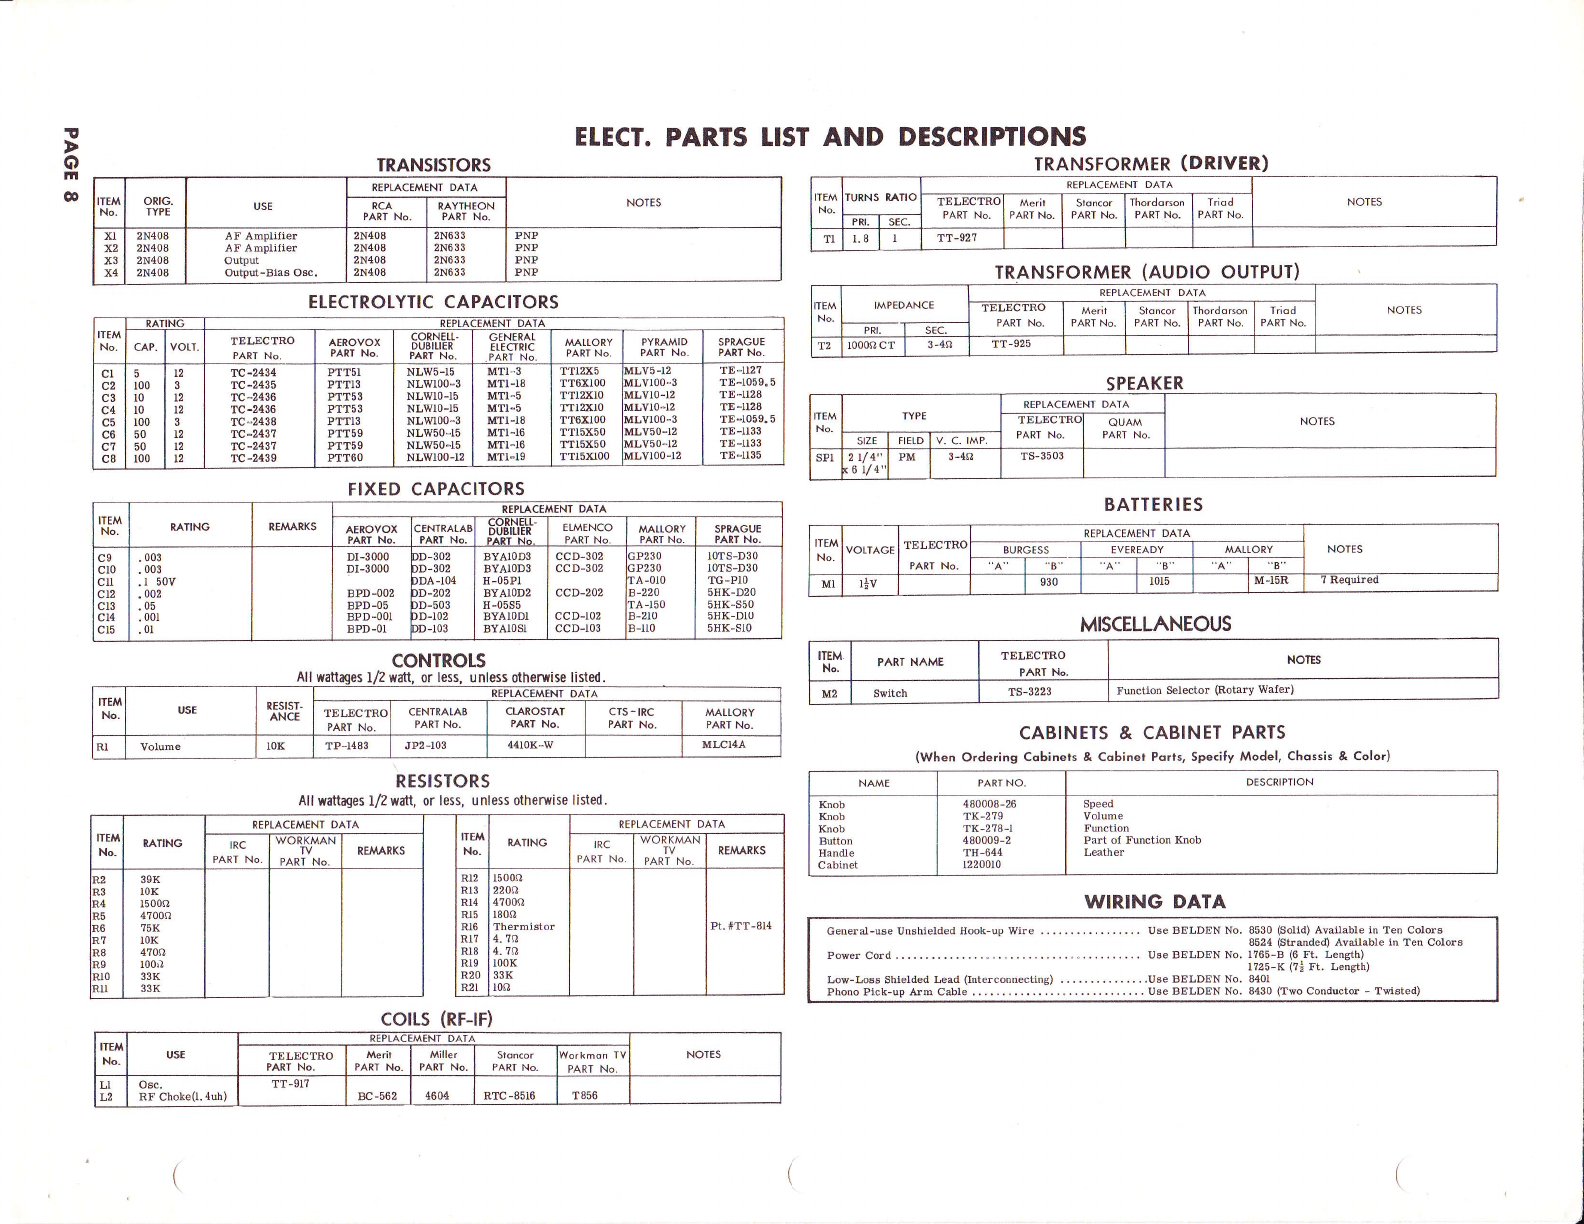
PAGE 8
Table of contents
Other Telectro Voice Recorder manuals


