Telefunken TNT UHDR10 AC4B User manual

USER MANUAL
TNT UHDR10 AC4B


English - 1 -
Contents
................................................. 2
................................................................. 3
............................................................ 3
............................................................ 4
.......................................................... 6
............................ 7
............................................. 8
.................................................... 8
......................................... 10
.......................................................... 12
............................... 12
...................................................... 13
..................................................... 13
............................... 14
................................................... 15
............................................ 15
.............................................. 15
................................................ 16
................................ 16
............................................. 16
....................................................... 17
.................................................. 18

English - 2 -
Safety Precautions
Power Source
WARNING:
Power Cord
CAUTION
WARNING
-
-
Markings on the Product
i
Caution, See Operating Instructions:
CLASS 1
LASER PRODUCT
Class 1 Laser Product:
-

English - 3 -
Features
-
Accessories

English - 4 -
Connections
Front View
TNT UHDR10 AC4B
1.
2.
Back View
1. Antenna In:
2. Digital Audio Out:
3. Analogue A/V Output:
4. HDMI Output:
5. Power Input:
Side View
1. USB Input:

English - 5 -
Connection to the TV
HDMI Connection (recommended):
Analogue A/V Connection:
Antenna Connection
Digital Audio Connection

English - 6 -
USB Connection
IMPORTANT !
USB Recording
USB Storage Device Connection
CAUTION !
Power Connection
IMPORTANT:
Note: If a car cigarette lighter socket power plug adaptor is
going to be used, it should be noted that if the output voltage
reduces to lower than 12V, a smartcard error can be caused.
to POWER INPUT
DC 12V Terminal
AC Adaptor
Power On-O
Auto Power Down
Auto Power Down Settings >
System > More4 Hours
-
O

English - 7 -
Overview of the Remote Control
(*) My Button 1
First Time Installation
1. Standby (*):
2. Numeric buttons:
3. Language: -
4. Volume +/-
5. Home:
6. Guide (Electronic programme guide):
7. OK:
8. Directional buttons:
9. Back/Return:
10. Rewind:
11. Record:
12. Coloured Buttons:-
13. Play:
14. Stop:
15. Fast Forward:
16. Pause:
17. Exit:
18. Info:
19. Programme +/-
20. Mute:
21. Text:
22. My Button 1 (*)

English - 8 -
About Selecting Broadcast Type
OK
OK
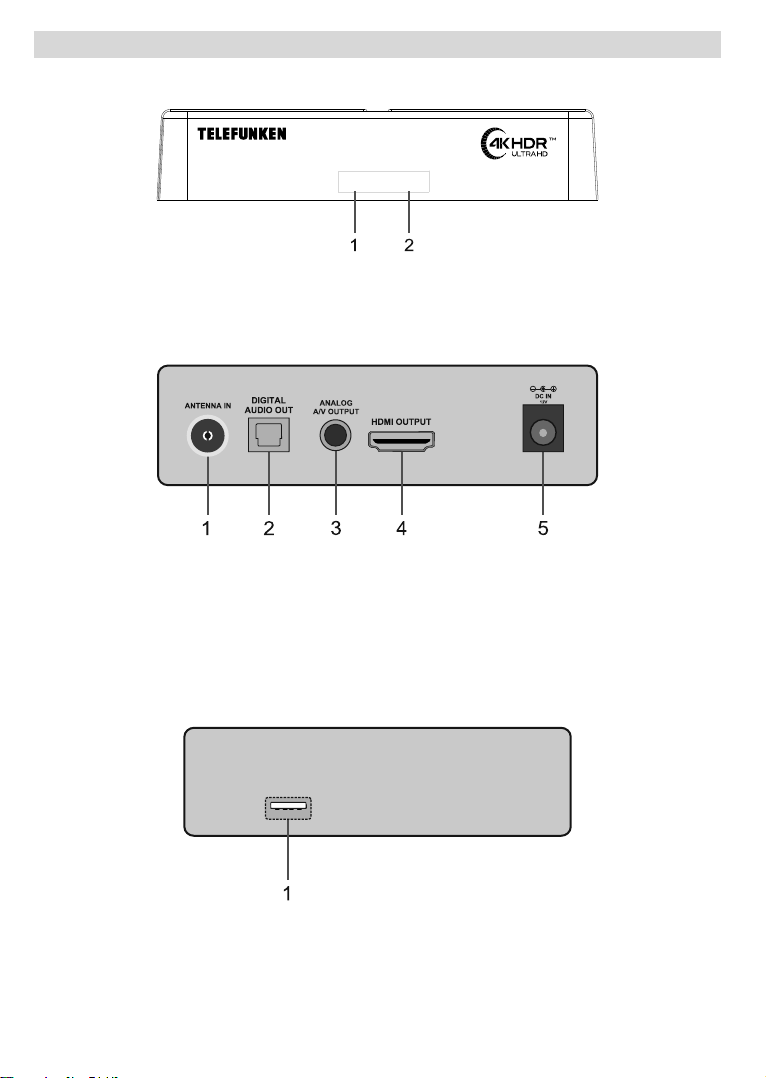
Digital Aerial:D. Aerial
Channels
Edit Filter
Menu
Channel List
(*)YesOK
(*) LCN is the Logical Channel Number system that organises
available broadcasts in accordance with a recognisable
channel number sequence (if available).
Note: Do not turn o the box while initialising rst time
installation. Note that, some options may not be available
depending on the country selection.
Using Main Menu
Menu
OK
OK
OKBack/Return
Exit
1. Home
Home
Home
Add to Home
Home
Home
Delete MoveOK.
Inserting the Batteries into the Remote
AAA
First Time Installation
OK
OK
Yes OK
System Menu Content
Time zone settingManual
Time Zone
NextOK
TV TypeDisplay FormatHDMI
Resolution
NextOK
Next
OK

English - 9 -
OK.
2. Search
OK
OK
OK
OK
3. Device
3.1. Guide
Electronic Programme
Guide
3.2. Channels
Channels
Channel List
3.3. Timers
Add Timer
OK
OK.A
Edit Selected TimerOK.
OK
Delete Selected TimerOK. A
Yes
OK
OK
Options
Set/CancelOK
OKSave Changes
OK
3.4. Recordings
OK
USB Recording
3.5. Accessibility
4. Settings
Settings Menu Content
5. Media Browser
OK
Media Browser

English - 10 -
Settings Menu Content
Devices Menu Content
Timer of No Signal
CEC
CEC Auto Power On
Picture Menu Content
TV Type 16:94:3
HDMI Resolution Auto576i/p720p1080i/p4Kp24
4Kp254Kp304Kp504Kp60
HDR10
Colour Depth
Sound Menu Content
Volume
Audio Delay
Digital Audio Output Auto
PCMPassthrough
Installation Menu Content
Automatic Channel
Scan (Retune)
Digital:
Manual Channel
Scan
Installation Settings
(optional)
Standby Mode Search (*):
Dynamic Channel Update (*):Enabled
(*) Availability depends on model.
Clear Service List Country
Select Active
Network
Signal Information
First time installation

English - 11 -
System Menu Content
Accessibility
High Contrast White
TextYellow TextO
Hard of Hearing
Audio
Description
OK
Audio Description
Note: Audio description sound feature is not available in recording or time shifting mode (availability depends
on the model of your TV and its features).
Spoken Subtitles
On
Magnication
OnO
On
5
2468
Minimap
Magnication
Highlight
programmes with
[S] Subtitle
[SL] Sign
Language
[AD] Audio
Description
Language
Parental
Menu Lock
Maturity LockSet PIN
Note: Some menu options may not be available depending on the country selection in the First Time
Installation. Default PIN could have been set to 0000 or 1234. If you have dened the PIN (is requested
depending on the country selection) during the First Time Installation use the PIN that you have dened.
Date/Time
More
Menu Timeout
Software
Upgrade
OKSoftware Update
Application
Version
Subtitle Mode
DVBTeletext
DVB.
ay.
Auto Power
Down
O.
Power Up Mode Last StateStandby Mode
OSS

English - 12 -
Channel List
Channels
OK
FilterEdit
Managing the Favourite Lists
Device>Channels
OKChannels
EditOK
Tag/Untag channel
OK
Tag/Untag all
Back/ReturnEdit
Add/Remove Favourites
OK
On
O.
Channel
Filter
Electronic Programme Guide
EPG
Guide
Device
Timeline Schedule Now/Next
OK.
Back/Return
Timeline Schedule
OK
Back/Return
FilterOK
Now/NextOKPrevious
DayNext Day
ExtrasOK
Highlight Genre: Highlight Genre
OK
Guide Search:
Now:
Zoom:OK
Now/Next Schedule
Back/Return
FilterOK
Timeline ScheduleOK.
Event Options
OKOptions
Select Channel:
More Info:
Set Timer on Event / Delete Timer on Event:
Set Timer on EventOK
OK
Delete Timer on Event
Record / Delete Rec. Timer: Record
OK
Timers

English - 13 -
OK
Delete Rec. Timer
IMPORTANT: Connect a USB disk to your box while the box
is switched o. You should then switch on the box to enable
the recording feature.
Notes: It is not possible to set timer or record timer for two or
more individual events at the same time interval.
Media Browser
Media Browser
OK
OK
Media Browser
SettingsSettings
Info
OK.
Picture SettingsSound SettingsMedia Browser
Settings Options
Loop/Shue Mode Operation
OK
OK
USB Recording
Programme Recording
-
Format DiskDevice>Recordings>
Settings
IMPORTANT !
feature.
/DVR/RECS
Media Browser

English - 14 -
Instant Recording
IMPORTANT: To record a programme, you should first
connect a USB hard disk or USB stick to your box. Otherwise,
recording feature will not be available. It is recommended
to use external hard disk drives instead of USB sticks for
programme recording and timeshifting.
Record
Stop
YesOKNo
OK
Timeshift Recording
Pause
Play
Rapid reverse/Rapid advance
Stop
Watching Recorded Programmes
RecordingsDevice
OK
Options
OK
Stop
Recordings
Note: Viewing main menu and menu items will not be
available during the playback.
Recording Settings
SettingsDevice>Recordings
SettingsOK.
Start early:
End late:
Max Timeshift:
Auto discard:
Discard
Unplayed
Included
Discard
Discard
None
Hard disk information:
OK
Back/Return
Format Disk:
Format
Disk
OKFormat Disk
(*)
Yes
OK
NoOK
(*) Default PIN could have been set to 0000 or 1234. If you
have dened the PIN (is requested depending on the country
selection) during the First Time Installation use the PIN that
you have dened.
Important !
Conguring Parental Settings
Parental
Settings>System>Parental

English - 15 -
Parental
Menu Lock:
Maturity Lock:
Set PIN:
Note: Default PIN could have been set to 0000 or 1234. If you
have dened the PIN (is requested depending on the country
selection) during the First Time Installation use the PIN that
you have dened.
Some options may not be available depending on the model
and/or on the country selection in the First Time Installation.
Software Update
Software upgrade search via user interface
Settings>System
MoreSoftware Upgrade
OKScan for upgrade
OK
OK
Note: Do not unplug the power adaptor cord while led is
blinking during the reboot process. If the box fails to come
on after the upgrade, unplug, wait for two minutes then plug
it back in.
Standby Notications
Timer
of No Signal Settings>Devices
Auto Power Down Settings>Sys-
tem>More
O
Device switched to
stand-by mode automatically because no oper-
ation was made for a long time
Yes
OK
No OK
Auto Power
DownDisable
OK
Auto Power Down
Settings>System>More
Channel Navigation
Channel Buttons: Programme +/-
Numeric Buttons:
Info
Info
Programme
+/-
Volume +/-
Mute
MuteVolume +

English - 16 -
Displaying Teletext
Text
Text
OK
Trademark Acknowledgment
***
Disposal Information
[European Union]
[Business users]
[Other Countries outside the European
Union]
Note: The sign Pb below the symbol for batteries indicates
that this battery contains lead.
1 2
1
2

English - 17 -
Specications
General
12V DC - 100-240
USB
Remote Control
Operating Distance :
Batteries :
DVB-T/T2 Compliant
Digital Capabilities
Video:
MPEG-1/2/4 Video Decoder
H.264 Decoder
H.265 (HEVC) Decoder
Audio:
Media Player
AC Adaptor

English - 18 -
Trouble Shooting
Trouble Possible Reasons What To Do
Table of contents
Other Telefunken Media Converter manuals