Telestar TD 2220 HD-L User manual
Operating Manual
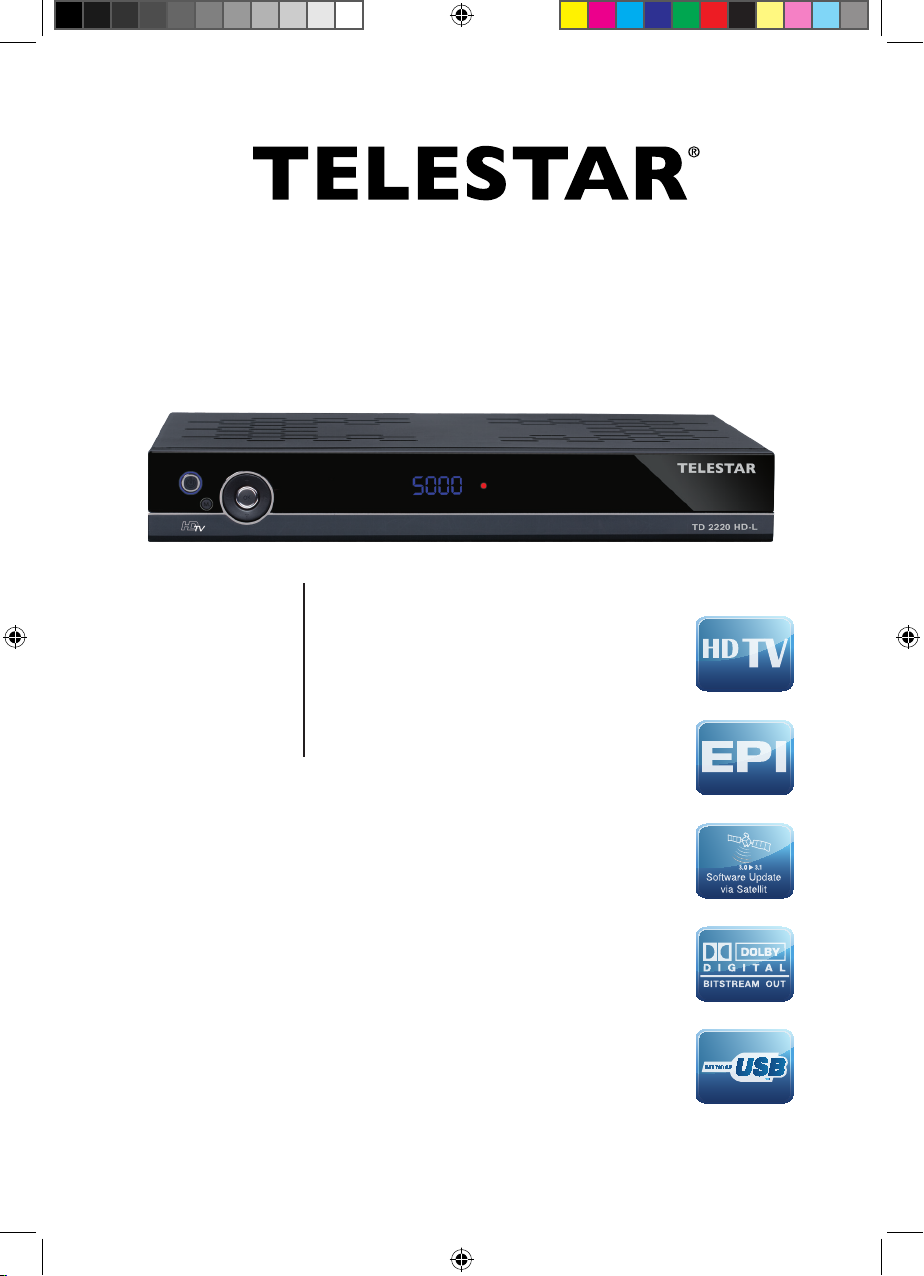
TELESTAR TD 2220 HD-L
Digital DVB-S/ DVB-T Set Top Box
BDA TD 2220 HD-Lengl_07_12.indd 1 20.07.12 13:50
2
Contents
2 Illustrations ......................................4
3. Please read this first ..............................6
Important advice on operation ..........................6
Disposal advice .....................................6
Note! Important safety advice ..........................7
When not in use ....................................7
Disposal of electrical and electronic equipment.............8
4. Connections ....................................10
4.1. External unit ...................................10
4.2.Loop through tuner...............................10
4.2.1. DVB-S ......................................10
4.2.2. DVB-T.......................................10
4.3. Connection with a hi-fi/ Dolby Digital system ..........10
4.4. Connection with a television set ...................10
4.5. Connecting an external USB storage medium .........11
5. Initial installation ................................11
5.1. Menu structure and operation .....................11
6. Installation .....................................13
6.1. Antenna Settings ................................14
6.1.1. Satellite......................................14
6.2. Satellite List....................................16
6.3. Transponder List ................................16
6.4. Setup Motor....................................17
6.6. Scanning for programmes ........................18
6.6.1. DVB-S Scan ..................................18
6.6.1.1 Scan option .................................19
6.6.1.2. Satellite Scan ...............................20
6.6.1.3. Transponder Scan............................21
6.6.2. DVB-T Scan ..................................22
6.6.2.1. Auto Scan ..................................22
6.6.2.2. Single Scan ................................23
6.6.2.3. Add channel ................................23
6.7. OTA Update....................................24
7. Channel Manager ................................25
7.1. Channel Edit ...................................25
7.1.1. Rename .....................................25
7.1.2. Skip channel..................................26
7.1.3. Lock channel .................................26
7.1.4. Delete .......................................27
7.2. Move channel ..................................27
7.3. Set FAV .......................................28
8. User Settings ...................................29
8.1. OSD setting....................................29
8.1.1. Menu Language ...............................29
8.1.2. Transparency .................................29
8.1.3. Information Bar Timeout.........................29
8.2. Parental Control ................................30
8.3. Factory Default .................................32
BDA TD 2220 HD-Lengl_07_12.indd 2 20.07.12 13:50
3
9. System .......................................33
9.1. AV Setting .....................................33
9.1.1. Vid Definition .................................34
9.1.2. Aspect Ratio..................................34
9.1.3. TV Set Screen ................................34
9.1.4.Video Outpur Mode .............................34
9.1.5. S/PDIF ......................................34
9.2. Privat Setting...................................34
9.3. Local Time Setting ..............................36
9.5.System information...............................37
10. USB Module ...................................38
10.1. Multimedia ....................................38
10.1.5.1. System ...................................41
10.1.5.2. Movie.....................................42
10.1.5.3. Photo .....................................42
10.1.6. Device .....................................42
10.2. Software Upgrade ..............................42
10.3. Database backup ..............................42
10.4. Database update...............................43
11. Local Games ...................................44
12. Operation .....................................45
12.1. Switching on and off ............................45
12.2. Programme selection ...........................45
12.2.1. Using the Programme up/down keys .............45
12.2.2. Using the numeric keys ........................45
12.2.3. Programme selection using the programme list .....46
12.2.5. Calling up programmes using the Favourites list ....47
12.3. Information box ...............................47
12.4. Additional programme information .................47
12.5. Transponder information ........................48
12.6. Volume control ................................48
12.7. TV/Radio switching .............................48
12.8. Dolby Digital (AC3 mode) .......................48
12.9. Return to last programme selected ................49
12.10. Video text ...................................49
12.11. Sub-titles ....................................50
12.12. Electronic Programme Information EPI ............50
12.16. Setting the screen format .......................51
12.13. Zoom function ...............................52
12.14. Sleep timer ..................................52
13. Technical specifications .........................54
14. For daily use ...................................55
Switching on and off ................................55
Selecting a programme ..............................55
15. Troubleshooting Guide ..........................56
Your receiver bears the CE symbol and complies
with all required EU standards.
Subject to change without notice,
not responsible for printing errors.
Correct as at 07/2012
Contents may be copied and reproduced
only with permission by the publisher.
© 2012
BDA TD 2220 HD-Lengl_07_12.indd 3 20.07.12 13:50
4
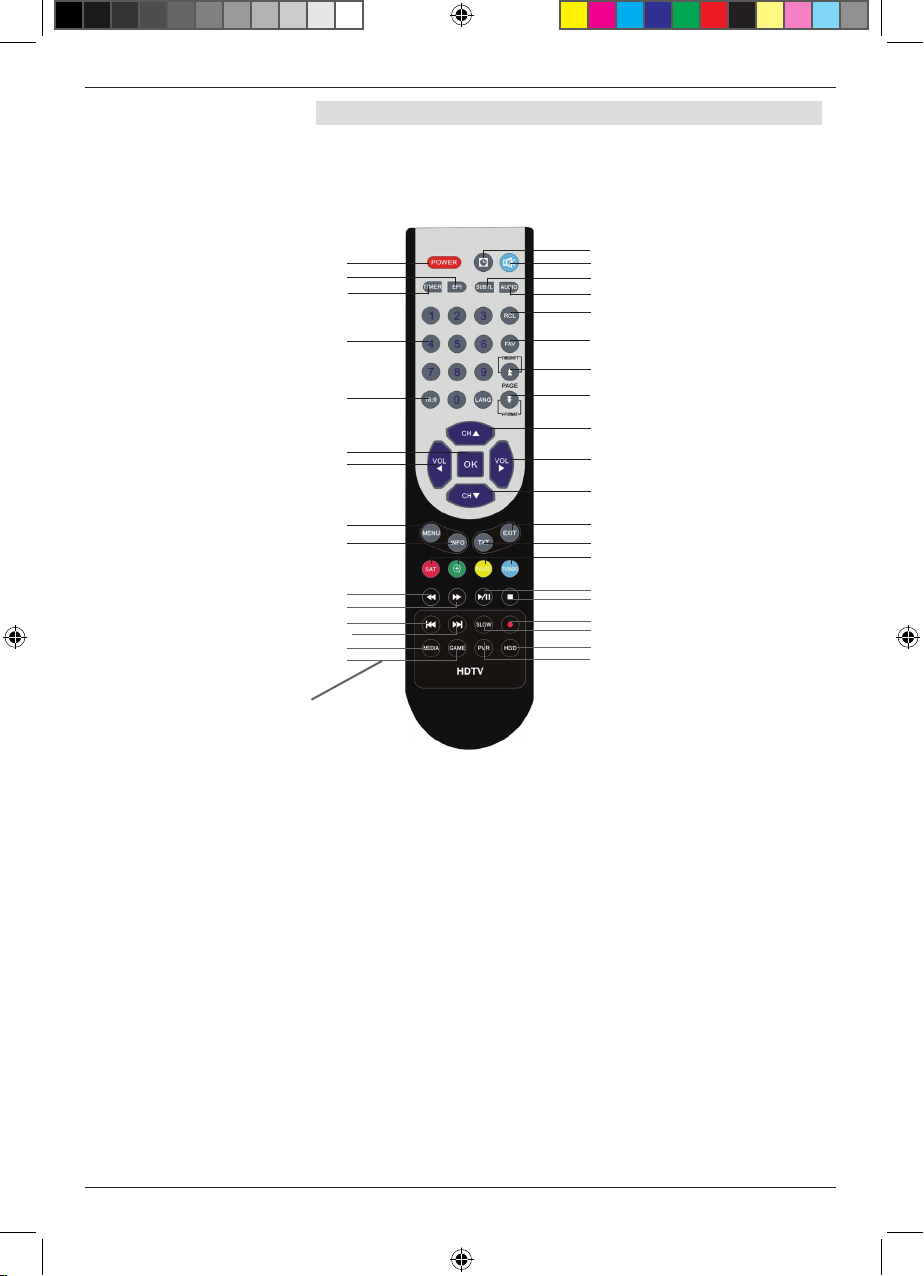
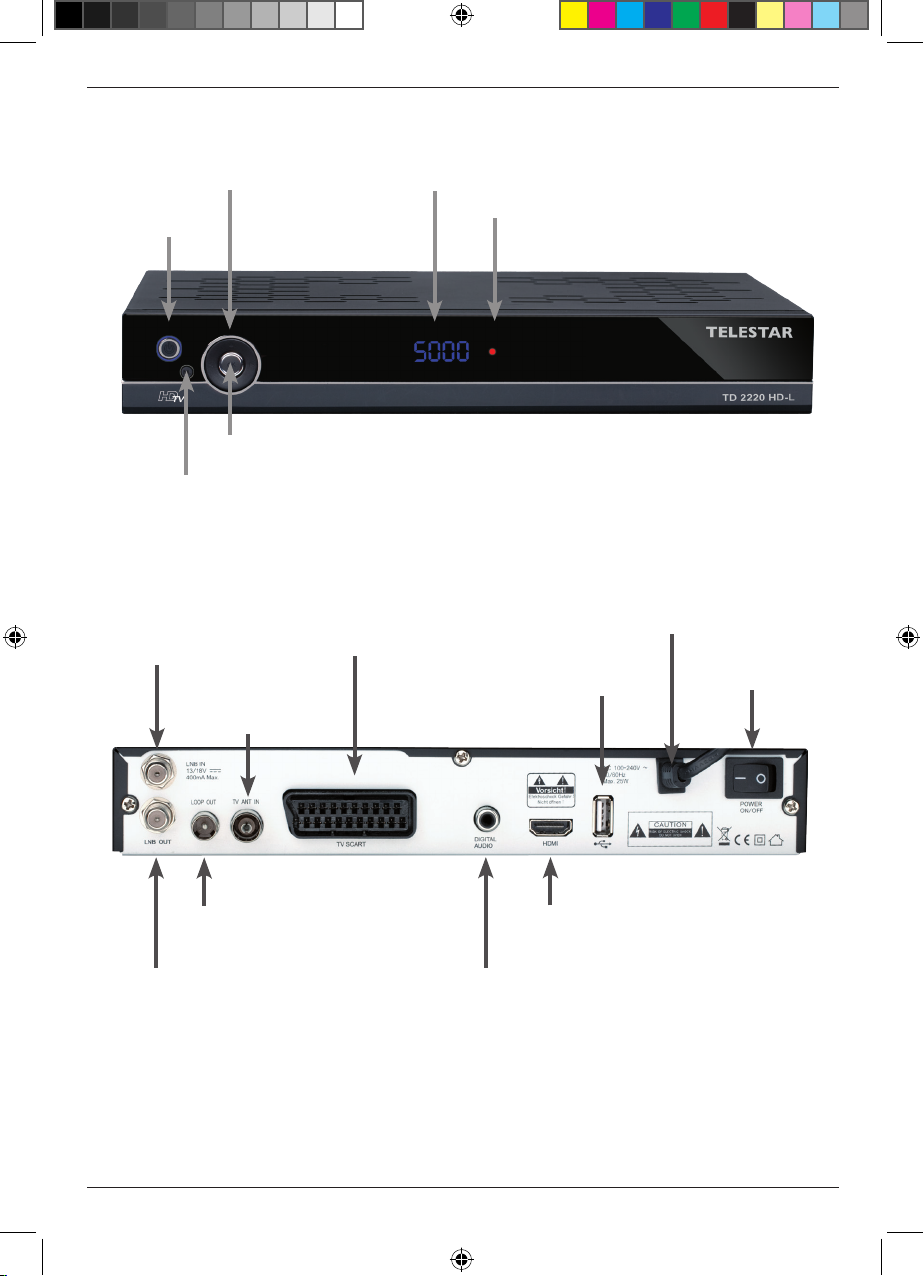
2 Illustrations
Remote control
Call up information table
Back to previous programme
Programme down/Navigation down
Programme up/Navigation up
Volume +/Navigation right
Volume -/Navigation left
Perform action/confirm
Page down/Video format
Page up
Sound On/Off
On/Off Standby
Numeric keys
16:9 key
Favourites list
Multifunction keys
Call up subtitles
Call up menu
Call up Videotext
Sleeptimer
Play/Pause
Slow motion
Recording
fast forward
reverse
Next title
Previous title
EPI
Audio settings
Timer menu
Exit menu
USB media menu
USB games menu PVR preview
Hard drive menu
Stop
Multimedia applications
PVR USB Record not
available on TD 2220 HD-L
BDA TD 2220 HD-Lengl_07_12.indd 4 20.07.12 13:50
5
Mains cable
Digitaler Audio-
ausgang Coaxial
Signal/Quality
LNB-Input socket
Mains switch
Navigation keys
SCART Socket
for television
HDMI
output
OK Key
Display
USB interface for connection of
an USB storage device
ON/Standby
LNB-LOOP Ausgang
Connection
terrestrial
antenna
Input terrestrial
antenna
Menu key
BDA TD 2220 HD-Lengl_07_12.indd 5 20.07.12 13:50

6
3. Please read this first
> Before commencing use of this product, first check you have received all the
parts you are intended to have when the product was supplied to you:
1 Receiver, 1 remote control, 1 operating manual, 1 guarantee card, 2 batteries
(1,5V AAA), 1 mains adapter, 1 12Vdc cigar lighter plug, 1 infrared sensor, 1
HDMI extension (50cm).
> Place the batteries supplied into the battery compartment of the remote control,
taking care to note the polarity as indicated.
> Before connecting the receiver, please first read the security advice in chapter 3
Important advice on operation
The implementation of an on screen display facilitates the operation of the
receiver, and the number of keys on the remote control is reduced. All functions
are displayed on screen, and can be adjusted with a small number of keys. Rela-
ted functions are combined in a “MENU“. The function selected will be indicated in
colour. On the lower line, the function keys red, yellow, green and blue are
represented by coloured bars.
In the individual menus, these coloured bars represent different functions, which
can be activated by pressing the correspondingly coloured key (multifunction key)
on the remote control. The function keys are only active when a brief description is
indicated in the appropriate field.
Names of keys and terms that appear in the OSD menu are printed in black in this
operating manual.
In addition, the programme slot of the programme selected will also be displayed in
the display.
Disposal advice
The packaging used for your product consists entirely of re-usable material. Please
ensure it is recycled in the system applicable in your country.
Please note that the discharged batteries from the remote control as well as
electronic waste should not be disposed of in your domestic waste, but should be
treated separately (special waste, return to retailer).
BDA TD 2220 HD-Lengl_07_12.indd 6 20.07.12 13:50

7
Note! Important safety advice
TAKE CARE: TO AVOID THE DANGER OF AN ELECTRICAL
SHOCK; YOU SHOULD NEVER OPEN THE HOUSING OF
THE PRODUCT. THE PRODUCT CONTAINS NO USER-
SERVICEABLE PARTS. IF NECESSARY, CONSULT
QUALIFIED SERVICE PERSONNEL.
SAFETY PRECAUTIONS:
This receiver was produced in compliance with international
safety standards. For your own protection, you should read the
safety precautions carefully before commencing operation of your
new product
The manufacturer is not responsible for damage caused by
inappropriate handling or by non-compliance with the safety
precautions
1. When setting up the receiver, ensure there is a free space of
around 5 cm (2 inches) all round to ensure air can circulate
freely, and to ensure the product does not overheat.
2. Do not place the unit in an enclosed space, such as in a
bookshelf or similar location. Ensure air circulation is not
affected, in particular you should never cover the air circulation
slits with newspapers, tablecloths, curtains, etc.
3. Do not place any burning items such as burning candles on
top of the unit.
4. Do not expose the receiver to liquids or water spray. Do not
place any item containing liquids, such as a vase, on top of
the receiver.
5. Do not pull out the plug of the unit in order to switch it off.
6. The electric cable must be connected correctly.
Never touch the electric cable or the plug with wet or damp
hands
7. The receiver should be operated at ambient temperatures of
5ºC to 40ºC. Use the receiver only in a temperate climate, not
under tropical conditions
8. Do not expose the batteries of the remote control to extreme
heat such as direct sunlight or fire.
When disposing of batteries, please note applicable
environmental regulations
CE symbol for European markets
The CE symbol on this unit gives you the reassurance that the
product complies with the regulations set out in EU directive
2004/108/EC, as well as with the directive for low-voltage
equipment 2006/95/EC
When not in use
During thunderstorms, or when the unit is not being used for an
extended period (e.g. vacation), it should be disconnected from
the electric mains
BDA TD 2220 HD-Lengl_07_12.indd 7 20.07.12 13:50
8
Disposal of electrical and electronic equipment
This symbol on a product or a package indicates that the product cannot
be disposed of in normal household waste. The product must be taken
to an appropriate collection point for the recovery and recycling of old
electrical and electronic equipment. By ensuring this product is disposed
of properly, you will help ensure that negative impacts are avoided on the
environment and on human health, which could occur if this device is not
properly disposed of. The recycling of raw materials helps to conserve
natural resources. For more details of disposal, contact your local authority
waste recycling in your area, or the dealer from whom you purchased this
device.
BDA TD 2220 HD-Lengl_07_12.indd 8 20.07.12 13:50
9
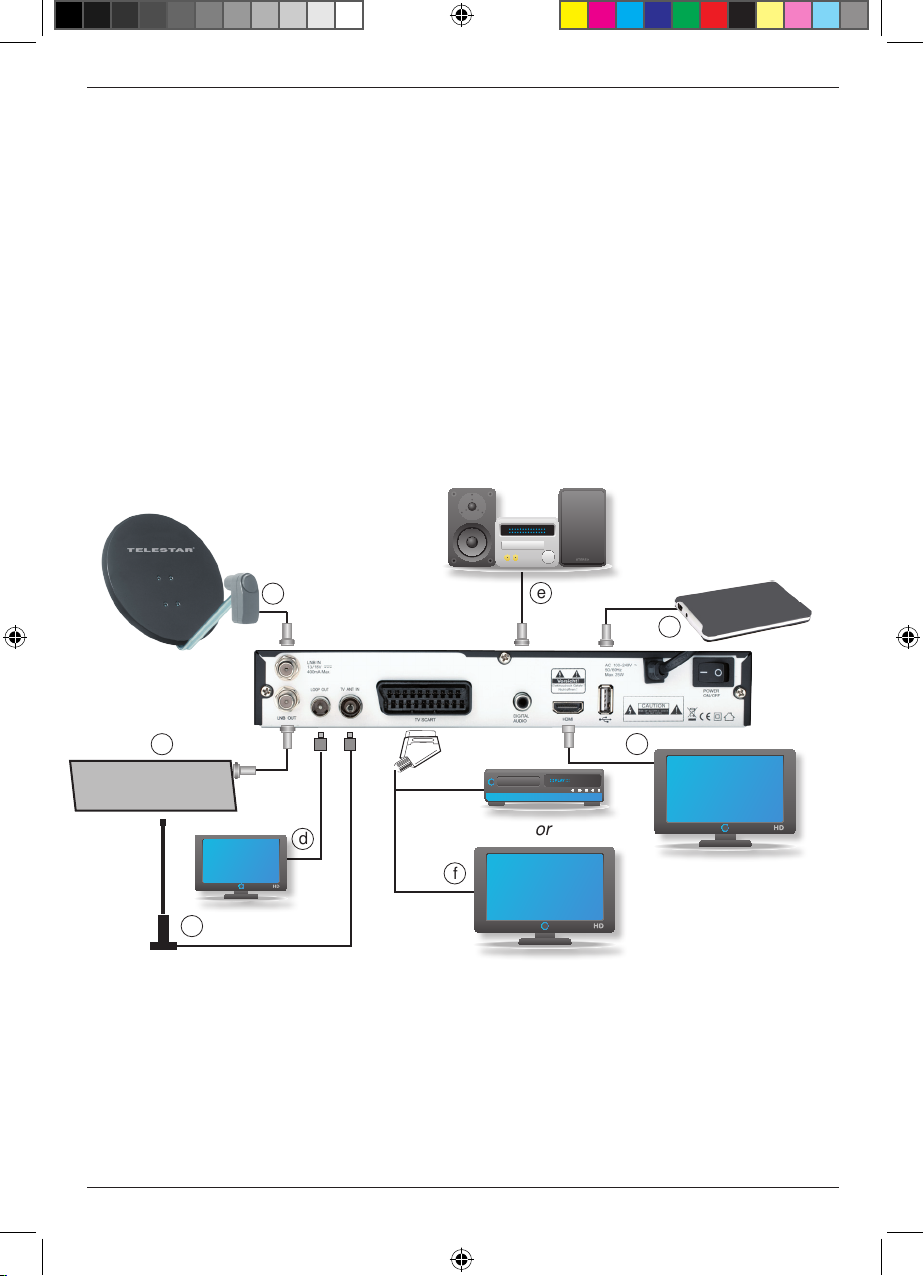
Connecting the DVB receiver to a satellite installation
a. Connection of the LNB with the LNB input socket (LNB IN) of the DVB
receiver.
b. Connection of the input for a terrestrial antenna on the receiver with the
DVB-T antenna.
c. Loop-through tuner for connection with an analogue satellite receiver.
d. Connection of the output of the terrestrial antenna of the DVB-T receiver
with the antenna input of the television set or the video recorder in order
to loop through an existing terrestrial signal.
e. Digital SPDIF audio connection with a surround system.
f. Scart connection of the DVB receiver with a video recorder or television
set.
g. HDMI connection to television set.
h. USB interface for external storage device
b
SAT-Receiver
analog
c
dor
e
f
a
g
h
BDA TD 2220 HD-Lengl_07_12.indd 9 20.07.12 13:50

10
4. Connections
The refernces to a b c etc. below refer to the illustration on page 9.
4.1. External unit
4.1.1. DVB-S
a Use a suitable coaxial cable to connect the LNB input of the digital receiver with
the LNB of your external unit. Please also note point 6 „Settings“.
4.1.2. DVB-T
b Connect the input for the terrestrial antenna on the digital receiver with the
DVB-T antenna. Please also note point 6 „Settings“.
4.2.Loop through tuner
4.2.1. DVB-S
c Here you can connect an analogue receiver. The signal available at the LNB
input is passed on to the analogue receiver via the loop-through tuner.
4.2.2. DVB-T
d Connect the output for the terrestrial antenna on the DVB-T receiver with
the antenna input socket of the television set or video recorder in order to
loop through an existing terrestrial signal. The output signal of your
receiver is not available via this output.
4.3. Connection with a hi-fi/ Dolby Digital system
e Digital
If your amplifier is equipped with an appropriate electrical input, connect the
AUDIO OUT DIGITAL electric socket of the receiver with the electric
SPDIF input socket of your amplifier.
Depending on the programme selected, sampling rates of 32, 44.1 and 48 kHz
will be available.
Also, where broadcast, the Dolby Digital signal (AC3) will be available at this out
put.
4.4. Connection with a television set
f Via Scart
Use a SCART cable to connect the receiver (SCART socket TV) with the tele
vision set (SCART socket. If your television set is appropriately equipped, the set
will be switched automatically to AV, and thus to satellite mode, when the digital
receiver is switched on.
g Via HDMI
If your television set comes equipped with an HDMI connection, we recommend
you use this connection. Connect the HDMI output of your receiver with
the HDMI input of your television set.
BDA TD 2220 HD-Lengl_07_12.indd 10 20.07.12 13:50
11
4.5. Connecting an external USB storage medium
h Connect an external USB storage device, e.g. an external hard drive, with the
USB interface of the receiver using a USB cable.
NOTE! Depending on the type of device used, the external USB storage device
may require a power supply via a separate power cable and mains
adapter..
Please consult the operating manual supplied with the USB storage device
to be used!!
Note: USB storage devices, and in particular USB sticks, may vary significantly
with regard to their reading and writing speed. This is dependent on their quality.
Please use only branded USB sticks from reputable manufacturers, providing a
correspondingly high speed as well as sufficient storage space, in order to avoid
recording and playback errors.
Please ensure the storage device is formatted in the FAT 32 data format.
Also, the storage device must first be initialised on the receiver. This procedure may take
around 20 seconds to complete.
5. Initial installation
If you have read the safety notes, and connected the receiver as described in Chapter 4,
you can proceed to switch the receiver on.
The factory default setting of the receiver includes pre-programming for the reception of
the satellites ASTRA 19.2 degrees East and HOTBIRD 13 degrees East.
Where available, the receiver will start with the programme „Das ERSTE HD“, which can
be received via Astra 19.2 degrees East.
For information on how to scan for programmes read Chapter 6.2.2.
The programmes included in the programme list correspond with the programmes that
can be received via the two satellites mentioned above, and the order in which they are
entered at the factory correspond with common German viewing habits.
Switch the receiver on by means of the mains switch on the rear panel. Then start the
receiver by pressing the power key either on the front panel of the receiver or the red
power key on the remote control .
5.1. Menu structure and operation
ll the settings can be made using the menu in the receiver.
> Press the Menu key on the remote control to go to the main menu.
> Use the arrow keys up/down/left/right to select the settings you wish to change.
> Use the OK key to confirm an entry, or to go to the next item in the menu.
> The Exit key will always take you one step back, or will end the menu display, or
will abort a setting procedure.
BDA TD 2220 HD-Lengl_07_12.indd 11 20.07.12 13:50
12
The main menu is divided into 6 points:
> Installation (6. Kapitel)
Here the receiver can be adjusted for the parameters of the
antenna installation, and you can scan for new programmes.
> Channel Manager (Chapter 7)
Here you can change the order of TV and radio programmes
saved in accordance with your preferences, and you
can create new Favourites lists.
> User Settings (Chapter 8)
User-defined settings can be made here, e.g. activate parental
control, change OSD display parameters, or activate factory
default setting.
> System (Chapter 9)
Here, individual settings of the receiver can be made, e.g.
picture format, time, managing timer or view system
information.
> USB Module (Chapter 10)
Here you can manage the data stored on the USB storage
device, and to execute software updates via USB.
>Games (Chapter 11)
In diesem Menüpunkt finden Sie 2 Spiele, die Sie mit Hilfe der
Zehnertastatur der Fernbedienung steuern können.
BDA TD 2220 HD-Lengl_07_12.indd 12 20.07.12 13:50
13
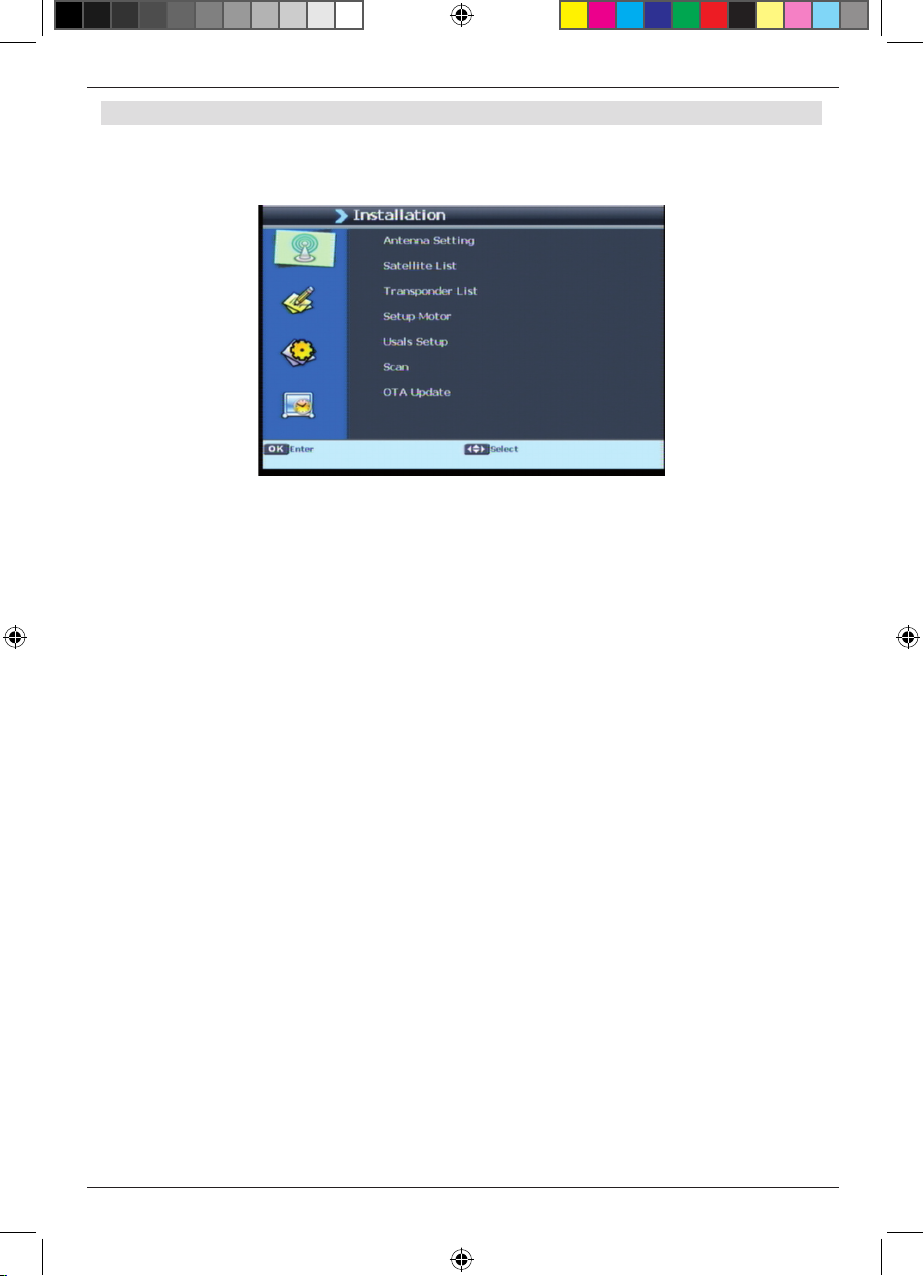
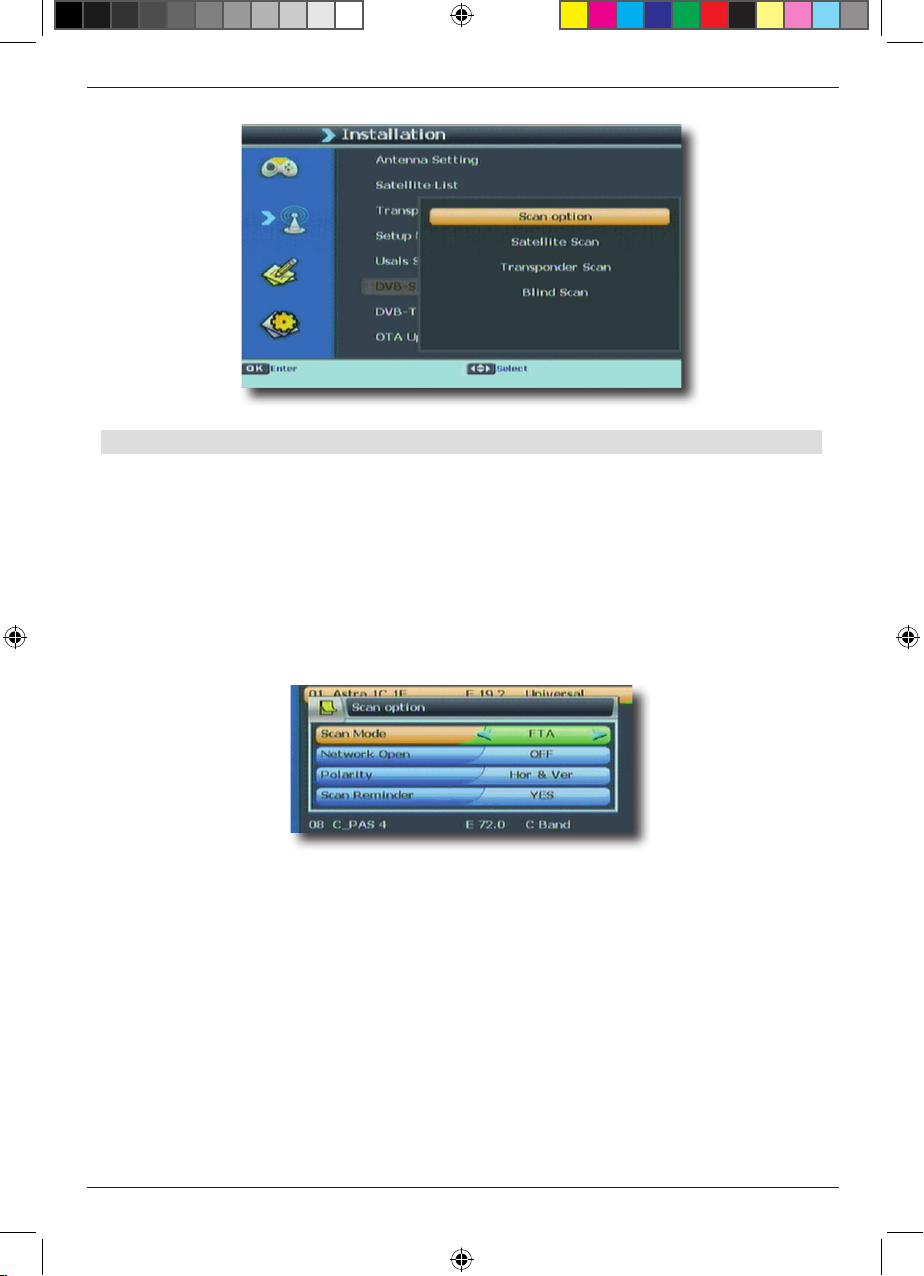
6. Installation
The installation menu allows you to make all the settings required for optimum DVB-S
reception. Press the Menu key, then use the arrow keys up/down to select the menu
item „Installation“ and confirm by pressing OK.
The menu item „Installation“ is divided into the following sub-points:
- 6.1. Antenna Settings
- 6.2. Satellit List
- 6.3. Transponder List
- 6.4. Setup Motor
- 6.5. USALS Setup
- 6.6. DVB-S Scan
- 6.7. DVB-T Scan
- 6.9. OTA Update
BDA TD 2220 HD-Lengl_07_12.indd 13 20.07.12 13:50

14
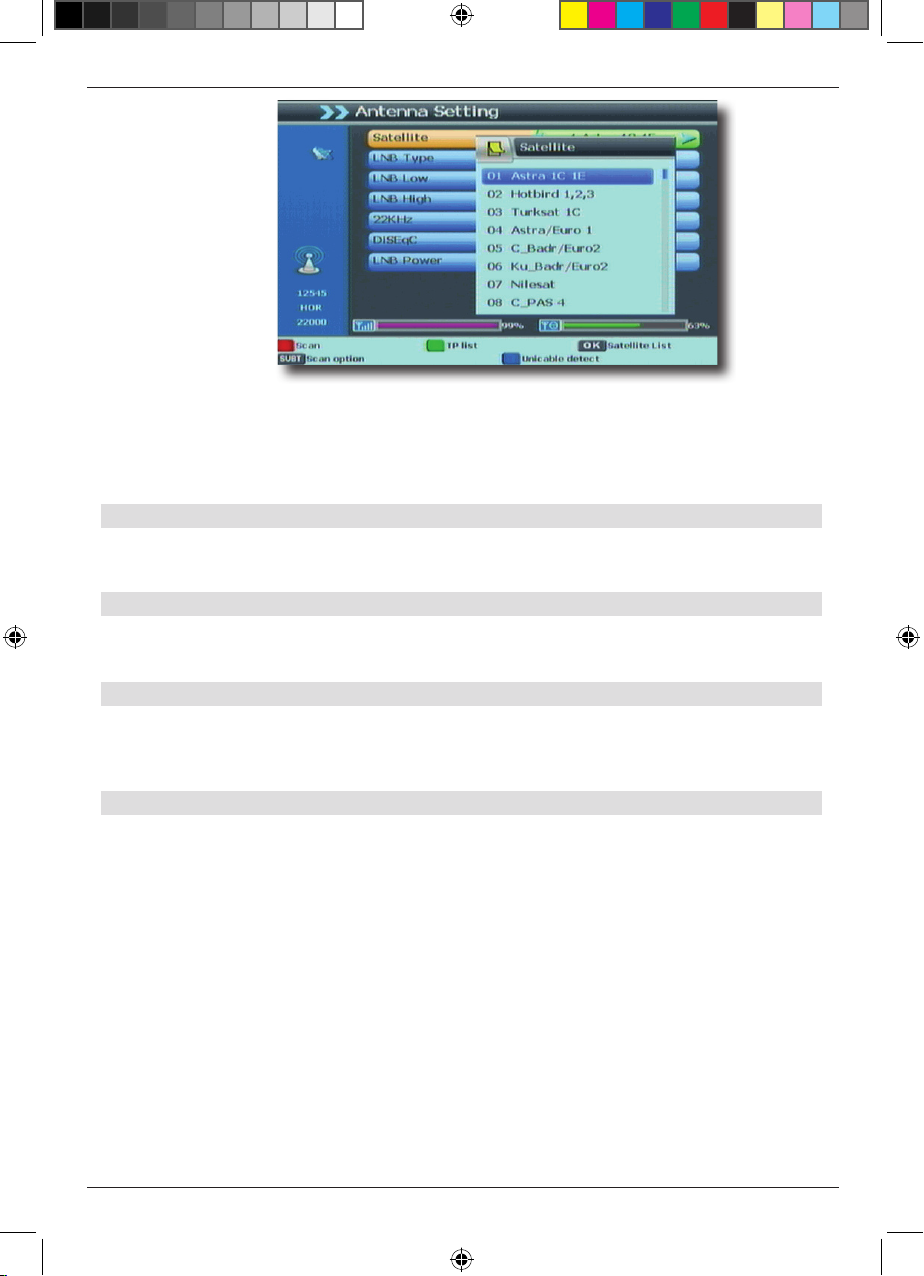
6.1. Antenna Settings
You can use the antenna setting function to adjust the satellite receiver in accordance
with the satellite antenna to which it is connected.
> Use the arrow keys up/down to select the option „Antenna settings“ and con-
firm by pressing OK, the antenna settings will be displayed.
Note: the receiver is pre-programmed with the parameters of the most important
satellite installations and satellite positions as part of the factory default setting.
You should therefore change these settings only if you wish to receive satellite
positions not yet pre-programmed in the receiver. Please also consult your retailer
or service specialist in this regard.
Procedure:
Several parameters will need to be entered for reception in the antenna configuration. The
following information is required:
Satellite: Satellite position in accordance with the positioning of the satellite an
tenna
LNB Type: LNB type of the previously set satellite position
LNB Low: LNB IF frequency for the Lowband
LNB High: LNB IF frequency for the Highband
22KHz: 22KHz signal
DiSEqC DiSEqC position setting
You can monitor the quality and strength of the signal received via an indicator in the lower
part of the menu.
6.1.1. Satellite
In this point you must set the satellite positions you are able to receive with your satellite
installation
> Select the item „Satellite“ using the arrow keys up/down
> Use the arrow keys left/right to select the satellites you are able to receive
or
> Press the OK key. A list will be displayed showing the satellites available, you
can then make your selection using the arrow keys up/down.
BDA TD 2220 HD-Lengl_07_12.indd 14 20.07.12 13:50
15
> Confirm by pressing OK.
Should one or more of the satellites that can be received by your installation not be in-
cluded in the list, new satellite positions can be added under the menu item „Satellite list“
(see Chapter 6.2) .
6.1.2. LNB Type
In this item, you can use the arrow keys left/right to select the type of LNB used to
receive the satellite position.
6.1.3. LNB LOW / LNB High
Here you can use the numeric keys to set the IF frequencies for the High and Low Band
specific to the LNB.
6.1.4. 22 KHz
The 22 KHz switch is used for controlling satellite installations, e.g. to switch between the
High and the Low Band. Use the arrow keys left/right to switch the 22 KHz signal on, off
or to the Auto setting.
6.1.5. DiSEqC
In this field, use the arrow keys left/right to set the satellite position the antenna is direc-
ted at via DiSEqC. This setting is dependent on the satellite reception installation and its
individual components .
BDA TD 2220 HD-Lengl_07_12.indd 15 20.07.12 13:50

16
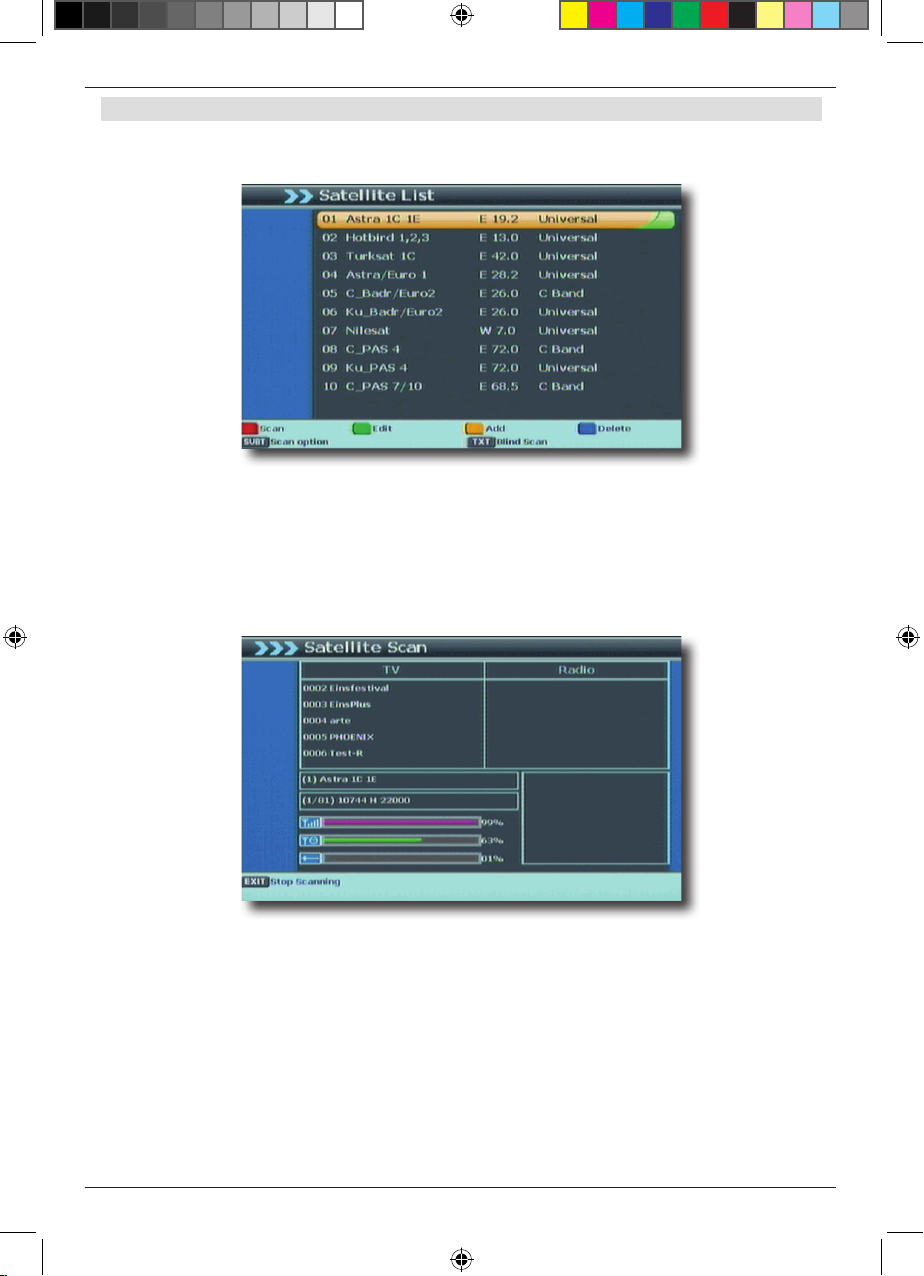
6.2. Satellite List
> Use the arrow keys up/down to select the option „Satellite list“ and confirm by
pressing OK, the satellite list will be displayed.
Under this item, you can view and edit the list of available satellites.
This is particularly relevant if you have a rotatable, motor-driven external installation, or
if you have a satellite installation designed to receive signals from various satellites by
means of a multifeed bracket. In the satellite list, you can look specifically for satellite
signals. In addition you can use the function keys to add satellites (yellow), delete (blue)
or change (green) them. Navigation is effected via a arrow keys up/down as well as the
OK key. The red function key is used for searching. Press the Exit key to go back to the
installation menu.
6.3. Transponder List
> Use the arrow keys up/down to select the item „Transponder list“.
> Confirm by pressing OK.
This menu item allows you to manage the transponders. You can add a transponder
using the yellow function key, change them using the green function key, and delete one
using the blue function key.
BDA TD 2220 HD-Lengl_07_12.indd 16 20.07.12 13:50
17
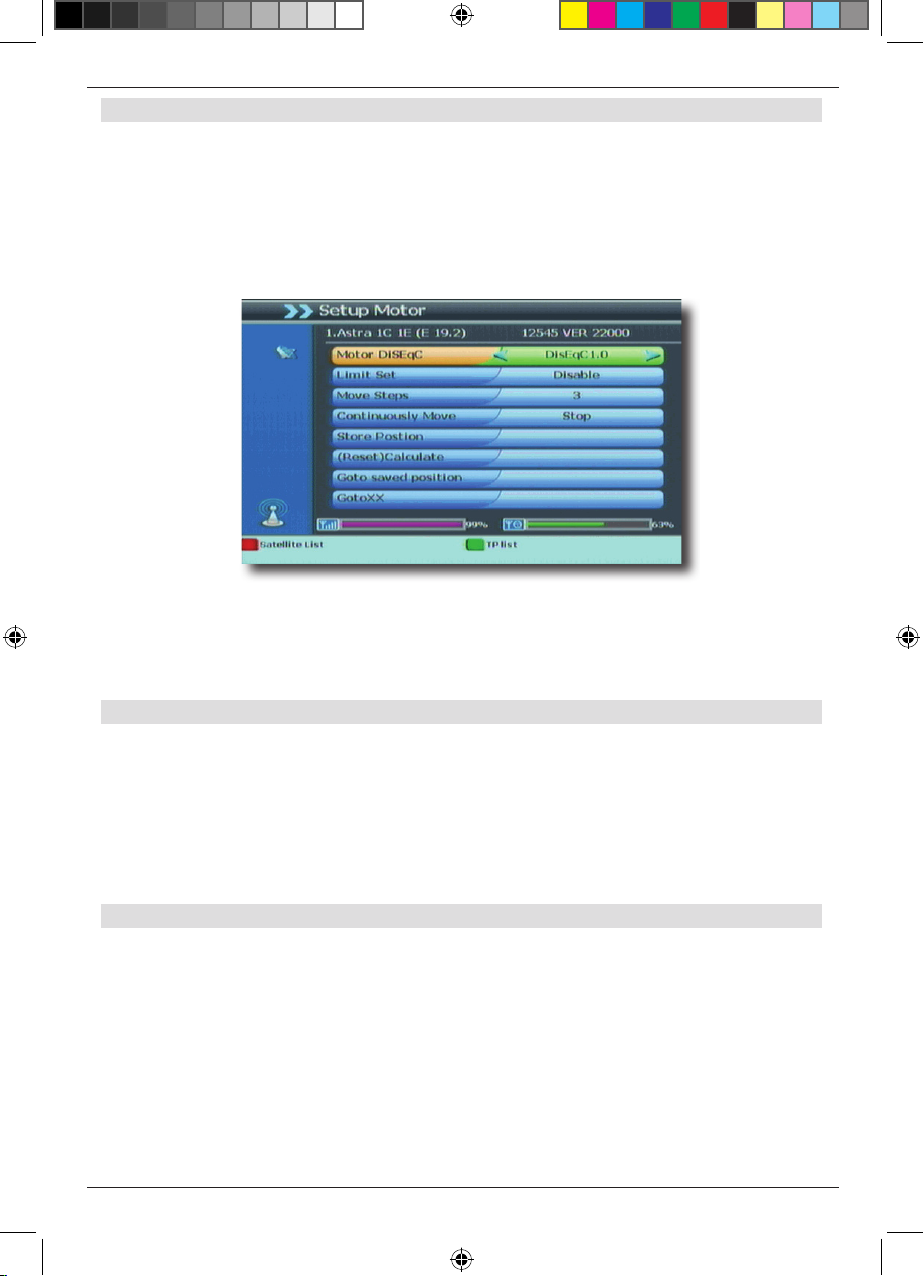
6.4. Setup Motor
Use this menu item to configure the automatic control system for a rotating antenna
motor, where used. The receiver is preconfigured for use with a non-rotating external
installation.
Note: to edit the motor settings, you must select the setting DiSEqC 1.2 under „Antenna
setting“ in the line „DiSEqC“ (Chapter 6.1).
> Use the arrow keys up/down to mark the item „Motor Configuration“ and confirm
by pressing OK.
A window will be displayed in which basic settings for the antenna motor can be entered.
NOTE!
To avoid damage to the external installation, you may not move the external instal-
lation beyond certain limits!! (please consult the operating instructions for the
external installation for more details).
6.4.1. Limit Set
> Use the arrow keys up/down to go to the line „Set Limit“
> Use the arrow keys left/right to set the Western limit
> Use the arrow keys up/down to go to the line Move, then direct the motor to the
Western limit using the arrow keys left/right
> Go back to the line „Set Limit“, and select the Eastern limit
> Use the arrow keys up/down to go to the line „Move“ and use the arrow keys
left/right to direct the motor to the Eastern limit
6.4.2. Move Steps
> 1 Press the red function key to call up the satellite list, or press the green function key
to call up the transponder list. Use the arrow keys up/down to select the satellite
resp. the transponder.
> 2 In the line „Move“ you can move the antenna to the position at which the satellite can
be received
> 3 Monitor the signal level and quality indicator to rotate the antenna to the optimum
position.
> 4 You can now set additional satellites as described above, beginning with Point 1.
BDA TD 2220 HD-Lengl_07_12.indd 17 20.07.12 13:50
18
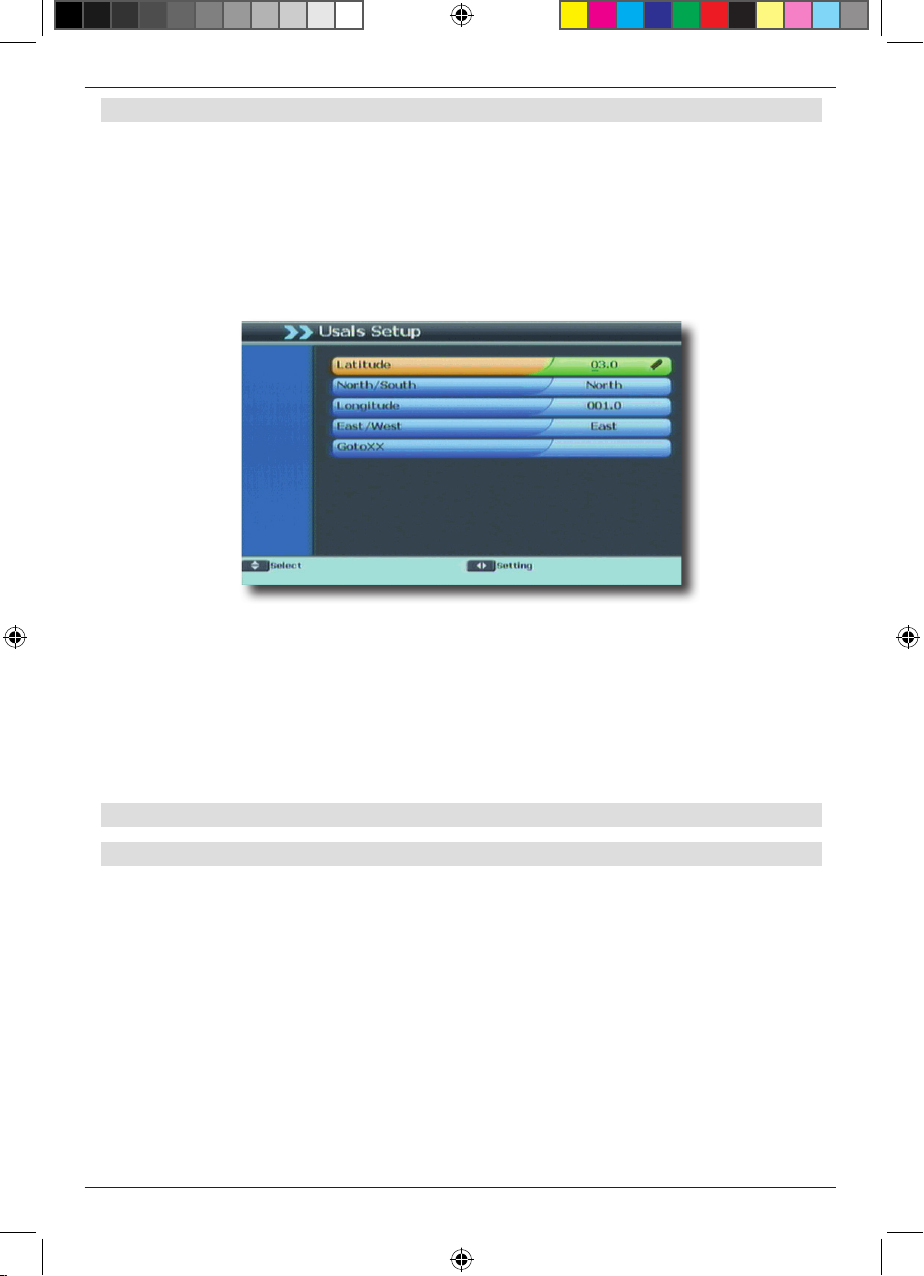
6.5. USALS Setup
If you are using this receiver in conjunction with an external installation that is equipped
with USALS (Universal Satellite Automatic Location System), you must make the appro-
priate settings under this point.
To ensure the USALS works correctly, you must enter the coordinates (degrees latitude
and longitude) of your location, so that the system can calculate all the motor positions for
the satellites receivable at that location (for more information consult the operating manu-
al of your external installation).
> Use the arrow keys up/down to select the item „USALS settings“ and confirm by
pressing OK
> Use the numeric keys on the remote control to enter the latitude and longitude of
your location, as well as the setting North or South for latitude and East or West
for longitude. Confirm your entry by pressing OK.
> Then select the line „GotoXX“ and confirm by pressing OK.
The positional values will then be saved in the receiver.
6.6. Scanning for programmes
6.6.1. DVB-S Scan
The receiver already has a list of satellite programmes save das part of the factory default
settings. In addition to the existing programmes, you can scan for and save new pro-
grammes. This is a useful feature when new programmes are transmitted via satellite, or
where the receiver is intended to receive programmes from satellites not set as part of the
factory default.
There are various ways of executing a programme scan.
> Press the Menu key to go to the main menu. Use the arrow keys up/down to
select the menu item „Installation“.
> Use the arrow keys up/down to mark the line „DVB-S Scan“, and confirm by
pressing OK.
The scan window will be displayed.
BDA TD 2220 HD-Lengl_07_12.indd 18 20.07.12 13:50
19
6.6.1.1 Scan option
Here you can specify whether the receiver should only scan for free to air programmes
(FTA -
Free To Air), only for encrypted programmes (Scrambled) or whether the receiver should
scan for both free and encrypted programmes (All).
> In the Scan menu, select the line „Scan option“ and confirm by pressing OK.
> Use the arrow keys left/right to specify under Scan Mode which programmes
the receiver should scan for (FTA, Scrambled or All)
The other parameters have been set as part of the factory default, and need not be
changed.
BDA TD 2220 HD-Lengl_07_12.indd 19 20.07.12 13:50
20
6.6.1.2. Satellite Scan
You have the facility to scan several satellites for programmes.
> To do this, select the item „Scan Satellite“ and confirm by pressing OK.
> Use the arrow keys up/down to select the satellites that can be received by
your installation
> Now press the red function key, the scan options will be called up
(for more details read Chapter 6.6.1).
> Confirm by pressing OK
The receiver will start the scan. If you wish to abort the scan prematurely, press the Exit
key.
When the scan has been completed, the programmes found will be displayed. A query
will be displayed, enquiring whether you wish to save the programmes.
> Use the arrow keys up/down to select OK in order to save the programmes, or
select Abort in order to discard them. Confirm by pressing OK.
All newly found programmes will be saved at the end of the Total Satellite list
BDA TD 2220 HD-Lengl_07_12.indd 20 20.07.12 13:50
Table of contents


