Telesystem TS 8.4 PND User manual

I

TELE System
2
Gentile cliente,
grazie per aver scelto un prodotto TELE System. Se volete essere sempre informati su ultimi aggiornamenti, news e
offerte speciali per il Vostro nuovo navigatore portatile TS 8.4 PND, registrateVi subito sul sito:
www.telesystem.it
ATTENZIONE!
TELE System Srl comunica, che a seguito di eventuali modifiche software e/o hardware aventi l’obiettivo di
migliorare il prodotto, si potrebbero evidenziare leggere incongruenze tra il contenuto di questo manuale ed il
prodotto in possesso. Si consiglia, inoltre, di utilizzare la Guida completa all’uso contenuta nel CD in dotazione
oppure utilizzare la Guida in linea (presente su ogni schermata)
ATTENZIONE!
CONTENT MANAGER: tra i contenuti del CD in dotazione troverete il Content Manager, questa applicazione
consentirà la piena gestione del Vostro navigatore tramite il Vostro PC. Si consiglia di installare l’applicazione
sul Vostro PC e collegare il navigatore allo stesso tramite cavo USB. Per ulteriori informazioni leggere
attentamente il manuale del Content Manager che troverete nel CD in dotazione
ATTENZIONE!
Il software di navigazione possiede una protezione anti pirateria “SD lock”, per la quale la licenza è legata alla SD
card sulla quale questa è caricata. Si consiglia di fare una copia della cartella License da conservare come back-
up, si ricorda nuovamente, che vista la struttura della SD lock, tale licenza potrà funzionare solo ed
esclusivamente con la SD card in dotazione al navigatore
Uso in Auto - Installazione del nuovo Air Mount Support
In dotazione al navigatore TS8.4 PND troverete un nuovo sistema di installazione in auto, tale supporto vi consentirà una
guida più comoda, dando completa visibilità sul parabrezza. Il supporto andrà applicato ad una bocchetta d’aerazione,
per l’installazione (dalla fig. A alla fig. G) e l’eventuale sgancio del supporto (dalla fig. H alla fig. M) si consiglia di far
riferimento a quanto riportato qui di seguito:
Fig.A) Fig.B) Fig.C)
Fig.D) Fig.E) Fig.F)
Continuare a premere finchè si
sente il click degli agganci
Staccare gli agganci mobili posteriori,
spostandoli verso l’interno. Poi
posizionarli a piacere. Consigliamo di
utilizzare l’ultima scalanatura
Procedere all’inserimento come da
figura, scegliendo la bocchetta a
destra o sinistra del guidatore
Premere delicamente sull’aletta
superiore della bocchetta prescelta
Spostare verticalmente i morsetti
mobili superiori per una migliore
stabilità
Posizionare adeguatamente la leva
mobile inferiore per una migliore
stabilità e ergonomia

Quick Start Guide - ITALIANO
3
Fig.G) Fig.H) Fig.I)
Dopo aver staccato il tuo TS8.4 PND,
spingere verso all’interno un
aggancio
Fig. L) Fig. M)
Staccare completamente la base del
supporto
ATTENZIONE!
Il dispositivo è stato testato in modo approfondito e ripetutamente in condizioni di guida normali. Si consiglia
comunque di spegnere o limitare l’afflusso di aria calda/fredda nella bocchetta d’aria prescelta. CONSIGLIAMO,
INOLTRE, DI SGANCIARE IL SUPPORTO SOLAMENTE IN CASO DI ASSOLUTA NECESSITÀ
Descrizione Navigatore
1. Schermo LCD (Touch Screen)
2. Tasto Stand by
3. SD card slot
4. Uscita cuffie
5. Ingresso Alimentazione DC 5V
6. LED
7. RESET
8. Connessione Modulo GPS esterno
9. Speaker
10. Pennino Touch screen
11. Porta USB
Agganciare il tuo navigatore TS8.4
PND con gli appositi attacchi della
mascherina in dotazione
Staccare l’aggancio dalla base del
supporto e ripetere l’operazione della
fig. H) per l’altro aggancio
Staccare entrambi gli agganci dalla
bocchetta dell’aria

TELE System
4
Varie
Il produttore declina ogni responsabilità per danni a cose e/o persone derivanti da un utilizzo improprio del prodotto TS8.4
PND o legati al mancato rispetto delle avvertenze e delle note inserite nella documentazione tecnica.
L’uso del navigatore implica l’accettazione e l’osservanza del contenuto del presente manuale.
Il produttore non risponde in caso di eventuali violazioni al codice stradale legate all’uso del prodotto.
I dati cartografici immagazzinati nel navigatore potrebbero presentare discrepanze rispetto agli itinerari reali. Ciò è dovuto
ai continui cambiamenti nella morfologia stradale. Alcune zone sono inoltre caratterizzate, per diversi motivi, da una
copertura cartografica maggiore rispetto ad altre.
Alimentazione e ricarica batteria
È possibile alimentare il navigatore collegandolo tramite l’adattatore da auto alla presa accendisigari dell’auto o tramite
cavo USB al PC. Utilizzare solo ed esclusivamente i cavi forniti in dotazione.
Prima di installare l’apparecchio controllare l’integrità del cavo. Inoltre controllare il connettore per la presa dell’auto e la
connessione al navigatore. In caso il cavo in qualche sua parte risultasse danneggiato, non collegare l’apparecchio e
sostituire il cavo.
Al momento dell’acquisto la batteria potrebbe essere scarica, si prega di ricaricare completamente il navigatore
prima dell’utilizzo, si ricorda inoltre che il batteria può essere ricaricata anche via USB con il cavo in dotazione
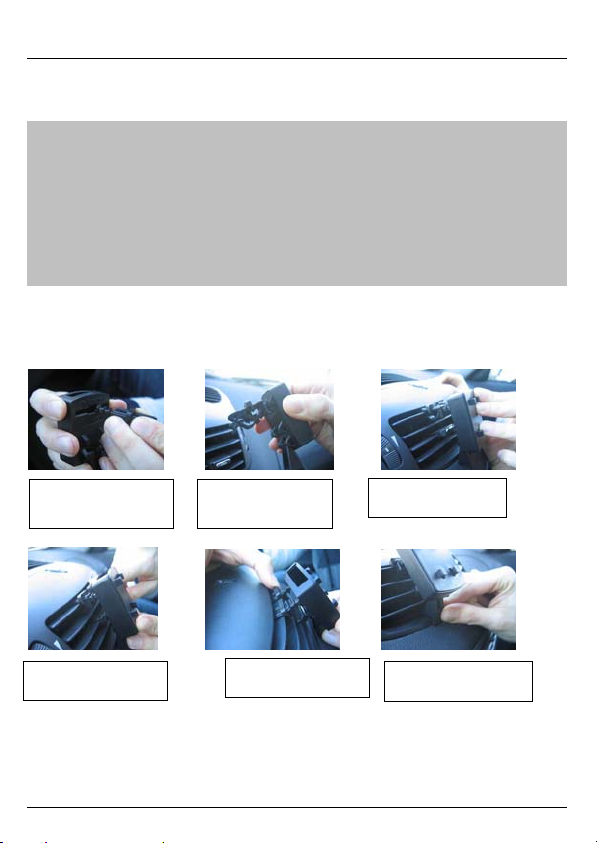
Installazione
xInstallare il dispositivo a veicolo fermo ed in condizioni di sicurezza.
xInstallare il dispositivo in modo da non ostruire la visibilità del guidatore e da non causare pericoli in caso di
incidente.
xControllare che il dispositivo non interferisca con gli airbag o altri dispositivi di sicurezza del veicolo.
xAssicurarsi che il dispositivo sia ben fissato al supporto prima di partire.
xTELESystem non risponde di nessun eventuale danno causato dall’utente nell’ installazione e disinstallazione del
TS8.4 PND sul veicolo
Durante la guida
xIl conducente del veicolo è responsabile dell’utilizzo del TS8.4 PND nelle corrette modalità di funzionamento.
xL’utente deve ignorare le indicazioni fornite dal TS8.4 PND nel caso queste risultino in contrasto con il codice
della strada.
xNon affidarsi esclusivamente alle indicazioni vocali. Queste potrebbero risultare non corrette o non tempestive.
Considerare sempre le informazioni fornite come indicative e rispettare la segnaletica stradale.
xI navigatori satellitari forniscono un semplice ausilio alla guida e all’orientamento. La corretta guida e la scelta
del percorso migliore spettano sempre al conducente del veicolo.
xDurante il viaggio è possibile ricevere informazioni vocali del tipo: ‘’Tenere la destra’’ oppure ‘’Tra 300 metri gira a
destra’’; queste indicazioni derivano da dati cartografici che a volte possono risultare poco pertinenti con la strada
che si sta percorrendo. Porre particolare attenzione in prossimità di rotonde o grandi incroci: le indicazioni vocali
potrebbero non essere semplici.
xNon distrarsi durante la guida per consultare il navigatore se questo comporta pericolo per voi o per gli altri.
xPer consultare il navigatore fermarsi non appena possibile e quindi agire sui comandi del navigatore.
xEffettuare le operazioni manuali sul navigatore esclusivamente a veicolo fermo.
xLa precisione della posizione GPS, in condizioni di ricezione ottimale del segnale, è garantita con uno scarto di
circa 15 metri.
Avviso di autovelox
La funzione di avviso di autovelox consente di individuare e visualizzare gli autovelox situati lungo il percorso.
Verrà visualizzato il Menù iniziale.
xIn questa schermata selezionare Impostazioni.
xScegliere Avvisi.
xScegliere Avvisi Autovelox per attivare la relativa funzione ed eventualmente settare la stessa secondo le
proprie preferenze.
Nel caso in cui siano presenti degli autovelox lungo il percorso verrà inviato un avviso. Tale avviso è rappresentato da un
"bip" sonoro e da un messaggio visualizzato a schermo, in cui viene indicato il tipo di autovelox e la distanza a cui è
collocato.
ATTENZIONE!
Il database è compilato con dati provenienti liberamente dalla rete e da segnalazioni di utenti. Di conseguenza TELE
System declina ogni responsabilità relativamente alla correttezza e completezza di tali dati, è a discrezione del cliente
l’attivazione/disattivazione di tale servizio.

Quick Start Guide - ITALIANO
5
Modalità di funzionamento
Al primo avvio del Navigatore Satellitare, è necessario selezionare se avviare il programma in modalità Semplice o in
modalità Avanzata.
Le due modalità operative del Navigatore Satellitare si differenziano principalmente per la struttura dei menu e per il
numero di funzioni disponibili, mentre i comandi e il layout delle schermate sono i medesimi.
xModalità Semplice: consente facile accesso solo alle funzioni di navigazione più importanti e alle impostazioni di
base. Le rimanenti impostazioni sono configurate su valori ottimali per l'utilizzo comune.
xModalità Avanzata: consente l'accesso a tutte le funzionalità del Navigatore Satellitare.
Questa Guida descrive le operazioni in modalità Semplice. Per istruzioni dettagliate su entrambe le modalità, consultare il
Manuale utente.
In un secondo momento si potrà passare tra le due modalità di funzionamento:
xPer passare da modalità Semplice a modalità Avanzata: nella schermata di avvio (menu di Navigazione), toccare
, .
xPer passare da modalità Avanzata a modalità Semplice: nella schermata di avvio (menu di Navigazione), toccare
, .
Schermata di avvio: menu di Navigazione
Dopo aver selezionato la modalità Semplice, viene visualizzato il menu di Navigazione. Da qui sono accessibili tutte le
parti del Navigatore Satellitare.
Il menu di Navigazione contiene le seguenti opzioni:
xToccare per specificare un indirizzo come destinazione.
xToccare per visualizzare l'elenco delle destinazioni recenti.

TELE System
6
xToccare per selezionare uno dei Punti di interesse (POI) memorizzati.
xToccare per visualizzare l'elenco delle destinazioni preferite recenti.
xToccare per navigare o consultare la mappa.
xToccare per personalizzare il funzionamento del Navigatore Satellitare.
Navigazione a un indirizzo
Nel menu di Navigazione toccare .
Per impostazione predefinita, il Navigatore Satellitare propone il Paese/Stato e la città in cui ci si trova. Se necessario,
toccare il pulsante con il nome del Paese/Stato e selezionarne un altro dall'elenco.
Se necessario, cambiare la città:
xPer selezionare la città dall'elenco di quelle usate di recente, toccare il pulsante .
xPer immettere una nuova città:
1. Toccare il pulsante con il nome della città, oppure, se è stato cambiato Paese/Stato, toccare
.
2. Iniziare a immettere il nome della città con la tastiera.
3. Passare all'elenco dei risultati della ricerca:
xDopo aver immesso un paio di caratteri, appare un elenco dei risultati che corrispondono con la
stringa immessa.
xToccare il pulsante per aprire l'elenco dei risultati prima che venga visualizzato
automaticamente.
4. Selezionare la città dall'elenco.

Quick Start Guide - ITALIANO
7
Immettere il nome della via:
1. Toccare .
2. Iniziare a immettere il nome della via con la tastiera.
3. Passare all'elenco dei risultati:
xDopo aver immesso un paio di caratteri, appare un elenco dei risultati che corrispondono con la stringa
immessa.
xToccare il pulsante per aprire l'elenco dei risultati prima che venga visualizzato
automaticamente.
4. Selezionare la via dall'elenco.
Immettere il numero civico:
1. Toccare .
2. Immettere il numero civico con la tastiera.
3. Toccare per completare l'immissione dell'indirizzo.
Viene visualizzata la mappa con il punto selezionato al centro. Toccare nel menu Cursore. Il percorso
viene calcolato automaticamente ed è possibile iniziare la navigazione.
Navigazione a un POI
Nella schermata Mappa, toccare per tornare al menu di Navigazione, quindi nel menu di Navigazione
toccare e selezionare la zona intorno a cui cercare il POI.

TELE System
8
x: La ricerca del POI verrà effettuata intorno a un dato indirizzo.
x: La ricerca del POI verrà effettuata intorno alla posizione del Cursore.
x: La ricerca del POI verrà effettuata intorno alla posizione GPS corrente.
x: La ricerca del POI verrà effettuata intorno alla destinazione del percorso attivo.
x: La ricerca del POI non verrà effettuata intorno a un dato punto, ma in base alla distanza dal
percorso attivo, ovvero in base alla lunghezza della deviazione dal percorso attivo richiesta per raggiungerlo
Questa funzionalità può risultare utile quando si cerca un luogo in cui sostare che richieda solo una deviazione minima,
come ad esempio un distributore o un ristorante.Verrà quindi visualizzato l'elenco delle categorie di POI.
La ricerca può essere ristretta procedendo come segue:
xSelezionare il gruppo di POI (p.es. Alloggio), e quindi, se necessario, selezionare il sottogruppo di POI (p.es. Hotel
o Motel).
xPer trovare un POI in base al nome, toccare , quindi usare la tastiera per immettere parte del
nome.
xPer elencare tutti i POI di un dato gruppo di POI , toccare , e quindi senza
immettere alcuna lettera del nome.
[opzionale] Quando infine viene visualizzato l'elenco dei risultati, è possibile modificare l'ordine dell'elenco con il pulsante
o .
Toccare il POI desiderato nell'elenco.
Viene visualizzata la mappa con il punto selezionato al centro. Toccare nel menu Cursore. Il percorso
viene calcolato automaticamente ed è possibile iniziare la navigazione.

Quick Start Guide - ITALIANO
9
Schermata Mappa
La schermata più importante e di uso più frequente del Navigatore Satellitare è la schermata Mappa. La mappa è simile a
una carta stradale convenzionale. La freccia di colore blue indica la posizione corrente, mentre la linea di colore green
mostra il percorso consigliato.
La schermata contiene diversi pulsanti e campi di dati che facilitano la navigazione. Le rispettive funzioni sono descritte in
dettaglio nel Manuale utente.
Durante la navigazione, questa schermata mostra informazioni di percorso e dati di viaggio (schermata a sinistra), ma
toccando la mappa, appaiono per alcuni secondi ulteriori pulsanti e comandi (schermata a destra). Molti degli elementi
delle schermate funzionano come pulsanti.
o: consente il passaggio tra le modalità della mappa 2D (normale vista dall'alto) e 3D (vista prospettica per
la navigazione).
apre il Menu di navigazione.
Se la mappa è stata spostata, appare il pulsante . Toccarlo per riportare la mappa alla posizione GPS corrente.
ATTENZIONE!
xTenere l’apparecchio fuori dalla portata dei bambini.
xI sacchetti di plastica degli imballaggi possono essere pericolosi. Per evitare soffocamenti, tenere i sacchetti
lontani dalla portata dei bambini.
xIn caso di utilizzo del dispositivo in presenza di temperature molto elevate potrebbe entrare in funzione un
meccanismo di protezione interna che provvede allo spegnimento automatico. Tale meccanismo è necessario
per la sicurezza dell’utente e per la salvaguardia della batteria del dispositivo.
xL’apparecchio non deve essere installato in luoghi in cui possa venire a contatto con spruzzi o schizzi di liquidi o
in ambienti con alto tasso di umidità dove possano formarsi condense.
xNel caso in cui il navigatore venga accidentalmente in contatto con liquidi, togliere immediatamente
l’alimentazione. NON TOCCARE il navigatore con le mani prima che sia stato scollegato.
xPrima di procedere ad operazioni di pulizia, staccate l’alimentazione.
xPer pulire l’esterno del navigatore, usare un panno morbido e asciutto. Evitare l’uso di prodotti chimici o solventi.
xNon disperdere il prodotto nell’ ambiente per evitare potenziali danni per l’ ambiente stesso e la salute umana e
per facilitare il riciclaggio dei componenti/materiali contenuti in esso. Chi disperde il prodotto nell’ambiente o lo
getta insieme ai rifiuti comuni è sanzionabile secondo le norme vigenti.
xIl produttore istituisce un sistema di recupero dei RAEE del prodotto oggetto di raccolta separata e sistemi di
trattamento avvalendosi di impianti conformi alle disposizioni vigenti in materia.
xPortare il prodotto non più utilizzabile presso un centro di raccolta autorizzato a gestire rifiuti di
apparecchiature elettriche ed elettroniche in quanto non può essere unito ai rifiuti comuni, oppure è
sempre possibile riconsegnare allo stesso distributore l’apparecchiatura usata o a fine vita all’atto
dell’acquisto di una nuova di tipo equivalente.

TELE System
10
Dear customer,
thank you for choosing this TELE System product. If you would like to be informed of the latest updates, news and special
offers available for your portable navigator TS8.4 PND, register now at:
www.telesystem.it
WARNING!
TELE System Srl comunicates, that eventual software or hardware modifies to improve the product, it should
highlight some slight differences between this own User manual and the own product. Besides, we recommend
to refer to the complete User manual contained into the CD or to the Help-On-line (present on each screenshot).
WARNING!
CONTENT MANAGER: among the contents of the CD you will find the Content Manager, this application will
allow the full management of Your PND through Your PC. We suggest you to install the application on Your PC
and to connect the navigator by USB slot. For further information read carefully the manual of the Content
Manager stored into the CD
WARNING!
The navigation software is protected by licensing method "SD lock", for which the license is tied up to the SD
card on which this is loaded. We suggest to back up the folder License. Please note that, in according to the “SD
lock” policy, the license can work only and exclusively in the supplied SD card.
Use of the PND in Auto Installation of the air mount vent support (NEW)
The new support allows you a safe and confortable drive, with full view on your windshield. Besides it can avoid damages
on your car, because isn’t so visible by thiefs. In succession, we will show you the easy procedure for mounting it (from
the fig. A to the fig. G) and the unmounting procedure (from fig. H to fig. M):
Fig.A) Fig.B) Fig.C)
Fig.D) Fig.E) Fig.F)
Continue to push until the click of
both hooks is heard
Remove the mobile rear hooks,
shifting inwards. Then position them
at will. We always advice to use the
last step
Proceed at the insertion as the
picture shows, choosing the air
vent on the left or on the right of
the driver.
Push carefully on the superior tab of
the chosen air vent
Shift properly the mobile superior
clamps for a better balance Position properly the mobile inferior
lever for a better balance and
ergonomics

Quick Start Guide - ENGLISH
11
Fig.G) Fig.H) Fig.I)
After have removed your TS8.4 PND,
push a hook inwards of the base
Fig. L) Fig. M)
Remove totally the base of the
support
WARNING!
The device had been deeply tested and again used in a normal drive. Anyway we advice to close or limit the
cold/hot air from the chosen air vent. We advice to perform the unmounting only when it is necessary.
Device description
1. LCD Panel (Touch Screen)
2. Stand by key
3. SD card slot
4. Earphone output
5. Power input DC 5V
6. LED
7. RESET
8. External GPS module connector
9. Speaker
10. Touch screen pen
11. USB Slot
Clasp your navigator TS8.4 PND with
the suitable holds of the cover
Remove the hook from the base of the
support and repeat the operation as fig.
H) for the other hook
Remove both the hooks from the air
vent of your vehicle

TELE System
12
Miscellaneous
The manufacturer can not be held responsible for any damages to property and/or people resulting from improper use of
the TS8.4 PND or from lack of attention paid to warnings and notes inserted in the technical documentation.
The use of the navigator implies that the content of this manual has been accepted and observed.
The manufacturer can not be held responsible for any violations of traffic regulations related to the use of the product.
The map making data contained in the navigator could lead to discrepancies with actual itineraries, due to constant
changes to the make up of streets. Some areas are characterised, for various reasons, by a larger map representation
than others.
Battery Charging
Please use only the supplied cables to connect the PND by AC car Adapter. Before installing the device check the
power car cable to make sure it is suitable for use, paying particular attention to the area where it enters the power
socket and to where it enters the device. If the cable is damaged do not connect the device and replace the cable.
At the first turning the device couldn’t be completely charged, it’s necessary, however, to recharge the battery
before the use of the PND.
Charge the battery to connect the navigator with the AC car Adapter or with the USB cable plugged into the
running PC.
Installation
xInstall the device when the vehicle is stopped and in safe conditions.
xInstall the device so that it does not obstruct the drivers’ vision and so that it can not cause any danger in the
case of an accident.
xCheck that the device does not interfere with airbags or other vehicle safety devices.
xMake sure that the device is firmly attached to the car support before starting the journey.
xTELESystem doesn’t answer to any damages in any vehicle coming from installation or uninstallation of the car
support.
While Driving
xThe driver of the vehicle is responsible for the correct use of the TS 8.4 PND.
xThe user must ignore the instructions given by the TS 8.4 PND if they are not compliant with traffic regulations.
xDo not listen solely to the vocal directions. These could be incorrect or badly timed. Always consider the
directions given as advice and respect the road signs.
xSatellite navigators provide a simple aid to driving and navigation. Correct driving and choice of the best route
are always the responsibility of the vehicle driver.
xWhile driving it is possible to receive vocal information such as: ‘’Keep to the right’’ or ‘’Turn right after 300
metres’’; these indications come from map data which at times may not be pertinent with the actual street on
which you are travelling. Pay particular attention to roundabouts or large intersections: vocal indications may not
always be simple.
xDo not distract yourself while driving to consult the navigator if this could put yourself or others in danger.
xPull over to a stop as soon as possible to consult the navigator.
xOnly carry out manual operations on the navigator when the vehicle is stopped.
xWith optimal signal reception the precision of the GPS position has a guaranteed range of around 15 metres.
Speed camera warning
The speed camera warning function allows the user to identify and view the speed cameras situated on the route.
The main menu will appear.
xOn the screen select Settings.
xChoose Warnings.
xPress Speed camera Warning to activate the function and to set it.
A warning will be issued if there are speed cameras on the route. Each warning is represented by a “beep” sound and a
message shown on the screen showing the type of speed camera and distance.
WARNING!
The database is compiled using data coming from the network and user indications. TELE System can therefore not be
held responsible for the accuracy and completeness of this data, the activation/deactivation of this service is the sole
responisbility of the client.

Quick Start Guide - ENGLISH
13
Operating modes
When Navigator is started the first time, you need to select whether to start the program in Simple mode or in Advanced
mode.
The two operating modes of Navigator mainly differ in the menu structure and the number of available features. The
controls and screen layouts are the same.
xSimple mode: you have easy access to the most important navigation functions and the basic settings only. The
rest of the settings are set to values that are optimal for typical use.
xAdvanced mode: you have access to the full functionality of Navigator.
This Guide covers actions in Simple mode. See the User Manual for detailed instructions on both modes.
Later you can switch between the two operating modes:
xTo switch from Simple mode to Advanced mode: on the startup screen (Navigation Menu), tap ,
.
xTo switch from Advanced mode to Simple mode: on the startup screen (Navigation Menu), tap ,
.
Startup screen: the Navigation menu
After selecting Simple mode, the Navigation menu appears. From here you can reach all parts of Navigation Software.
The Navigation menu contains the following options:
xTap to specify an address as your destination.
xTap for the list of recent destinations.
xTap to select one of the stored Points of Interest.

TELE System
14
xTap for the list of your favourite destinations.
xTap to navigate or to browse the map.
xTap to customise the way Navigator works.
Navigating to an address
In the Navigation menu, tap .
By default, Navigation Software proposes the country/state and settlement where you are. If needed, tap the button with
the name of the country/state, and select a different one from the list.
If needed, change the settlement:
xTo select the settlement from the list of recently used ones, tap the button.
xTo enter a new settlement:
1. Tap the button with the name of the settlement, or if you have changed the country/state,
tap .
2. Start entering the settlement name on the keyboard.
3. Get to the list of search results:
xAfter entering a couple of characters, the names that match the string appear in a list.
xTap to open the list of results before it appears automatically.
4. Pick the settlement from the list.
Enter the street name:
1. Tap .
2. Start entering the street name on the keyboard.
3. Get to the list of results:

Quick Start Guide - ENGLISH
15
xAfter entering a couple of characters, the names that match the string appear in a list.
xTap to open the list of results before it appears automatically.
4. Pick the street from the list.
Enter the house number:
1. Tap .
2. Enter the house number on the keyboard.
3. Tap to finish entering the address.
The map appears with the selected point in the middle. Tap from the Cursor menu. The route is then
automatically calculated, and you can start navigating.
Navigating to a POI
On the Map screen, tap to return to the Navigation menu.
In the Navigation menu, tap .
Select the area around which the POI should be searched:
x: The POI will be searched around a given address.
x: The POI will be searched around the Cursor.
x: The POI will be searched around the current GPS position.
x: The POI will be searched around the destination of the active route.

TELE System
16
x: The POI will be searched not around a given point but by the size of the detour it means
from the active route. This can be useful if you search for a later stopover that causes only a minimal detour. For
example upcoming petrol stations or restaurants. After this, the list of POI categories appear.
You can narrow the search with the following:
xSelect the POI group (e.g. Accomodation), and after that, if needed, select the POI subgroup (e.g. Hotel or Motel).
xTo find the POI by its name, tap , and use the keyboard to enter a part of the name.
xTo list all POIs in a given POI group, press , and then without entering any letters
of its name.
[optional] When finally the list of results appear, you can change the list order with the or
button.
Tap the desired POI in the list.
The map appears with the selected point in the middle. Tap from the Cursor menu. The route is then
automatically calculated, and you can start navigating.
Map screen
The most important and most often used screen of Navigator is the Map screen. The map looks similar to a conventional
road-map. The blue arrow represents your current position, and the green line shows the recommended route.
There are several screen buttons and data fields on the screen to help you navigate. Their functions are explained in
detail in the User Manual.
During navigation, the screen shows route information and trip data (left screenshot), but when you tap the map,
additional buttons and controls appear for a few seconds (right screenshot). Most parts of the screen behave as buttons.
or : Switches between 2D (classic top-down view) and 3D (perspective view for navigation) map modes.
: Opens the Navigation menu.

Quick Start Guide - ENGLISH
17
If you have moved the map, a button appears. Tap this button to move the map back to the current GPS
position.
WARNING!
xKeep the device out of the reach of children.
xPlastic bags can be dangerous. To avoid suffocation keep the bags out of reach of children.
xIf the device is used in very high temperatures an internal protection mechanism may activate causing the
navigator to automatically turn itself off. This mechanism is necessary for the users’ safety and to safeguard the
batteries contained in the device.
xDo not dispose of the product in unauthorised places as this could cause damage to the environment and to
human health. Proper disposal assists in the recycling of the components/materials contained in the product.
Disposal of the product in unauthorised places is punishable according to current Italian legislation.
xThe manufacturer has set up a WEEE recovery system for the product using separate collection and treatment
systems with production plants that meet all current regulations
xOnce the product can no longer be used it must be taken to a recycling centre which is authorised to
handle electrical waste, as this can not be mixed with general waste. It is also possible to return the
used product to its distributor or to return the no longer useable product when buying a new product
of the same type.

TELE System
18
Client gentil,
merci pour avoir choisi un produit TELE System. Si vous voulez être informé toujours sur derniers ajournements, news et
offres spéciales pour Votre nouveau navigateur portatif TS 8.4 PND, tout de suite vous vous enregistrées sur le site:
www.telesystem.it
ATTENTION!
TELE System Srl communique, qu'à les modifications éventuelles logiciel e/o hardware aventi l'objectif
d'améliorer le produit, ils pourraient souligner incohérences légères entre le contenu de ce manuel et le produit
en possession. Il demande conseil, en outre, d'utiliser le Guide complet à l'usage contenu dans le CD en dotation
ou utiliser le On-Line Aide(présent sur chaque blindée).
ATTENTION!
CONTENT MANAGER: entre les contenus du CD en dotation vous trouverez le Content Manager, cette
application permettra la crue gestion de Votre intermédiaire navigateur Votre PC. Il demande conseil d'installer
l'application sur Votre PC et réunir le navigateur au même intermédiaire creux USB. Pour d'autres
renseignements légers attentivement le manuel du Content Manager que vous trouverez dans le CD en dotation.
ATTENTION!
Le software de navigation possède une protection anti piraterie "SD lock" pour qui la permission est liée au SD
card sur qui est chargé. Il demande conseil de faire une copie du carton License à conserver comme back-up, il
se rappelle de nouveau, que voit la structure du SD lock, telle permission il pourra fonctionner seul et
exclusivement avec le SD card en dotation au navigateur
J'utilise en Auto - Installation du nouvel Air Mount Support
En dotation au navigateur TS8.4 PND vous trouvera un nouveau système d'installation en auto, tel support y permettra
un guide plus confortable en donnant complète visibilité sur le pare-brise. Le support sera appliqué à une embouchure
d'aérage, pour l'installation (du fig. À au fig. G) et l'éventuel je décroche du support (du fig. H au fig. M) demande conseil
de faire référence à tout ce qu'a de suite été reporté ici:
Fig.A) Fig.B) Fig.C)
Fig.D) Fig.E)
Fig. F)
Continuer à presser tant qu'il se
sent le click des liaisons
Détacher les liaisons mobiles
postérieures en les déplaçant vers
l'intérieur. Puis les positionner à
plaire. Nous conseillons d'utiliser le
dernier position
Démarche à l'insertion comme
d'illustration, en choisissant
l'embouchure à droite ou gauche
du conducteur
Presser delicamente sur l'ailette
supérieure de l'embouchure
désigné
Déplacer les bornes verticalement
supérieurs mobiles pour une
meilleure stabilité
Positionner le levier d'une manière
adéquate inférieur mobile pour une
meilleure stabilité et ergonomie

Quick Start Guide - FRANÇAIS
19
Fig.G) Fig.H) Fig.I)
Après avoir détaché ton TS8.4 PND,
pousser vers à l'intérieur une liaison
Fig. L) Fig. M)
Détacher complètement la base du
support
ATTENTION!
Le dispositif a été testé de manière approfondie et plusieurs fois en conditions de guide normal. Il demande
conseil d'éteindre de toute façon ou limiter l'afflux d'air chaud/froide dans l'embouchure d'air désigné. NOUS
CONSEILLONS, EN OUTRE, DE DÉCROCHER LE SUPPORT SEULEMENT EN CAS D'ABSOLUE NÉCESSITÉ
Description Navigateur
1. LCD Panneau (Touch Screen)
2. Stand by touche
3. SD card slot
4. Sortie coiffes
5. Alimentation DC 5V
6. LED
7. RESET
8. Connexion module GPS extérieur
9. Speaker
10. Touch screen pen
11. USB Slot
Accrocher ton navigateur TS8.4 PND
avec les spéciaux attaques
Détacher la liaison de la base du
support et répéter l'opération du fig. H,
pour l'autre liaison
Détacher les deux liaisons de
l'embouchure de l'air

TELE System
20
Miscellaneous
Le producteur décline chaque responsabilité pour les dommages provoqués aux choses e/o gens derivanti d'une
jouissance impropre du produit TS8.4 PND ou lié au manqué respect des instructions et des caractéristiques insérées
dans la documentation technique.
L'usage du navigateur implique l'acceptation et l'observance du contenu du manuel présent.
Le producteur ne répond pas en cas de violations éventuelles au code routier vous liez à l'usage du produit.
Les données cartographiques emmagasinées dans le navigateur pourraient présenter discordances je respecte aux
itinéraires réels. Ceci est dû aux changements continus dans la morphologie routière. Quelques zones sont caractérisées
en outre, pour différents motifs, d'une couverture grand respect cartographique à autres.
Alimentation et recharge batterie
Il est possible d'alimenter le navigateur en lui réunissant intermédiaire l'adaptateur d'auto à la prise allume-cigare de
l'auto ou par creux USB au PC. Utiliser seul et exclusivement les câbles achalandés en dotation.
Avant d'installer le poste contrôler l'intégrité du câble. En outre contrôler le connecteur pour la prise de l'auto et la
connexion au navigateur. En cas le câble dans sa partie résultât endommagé, ne pas réunir le poste et remplacer le
câble.
Au moment de l'acquisition la batterie pourrait être décharge, priez-les de recharger complètement le navigateur
premier de la jouissance se rappelle en outre que la batterie peut être rechargée rue aussi USB avec le câble en
dotation
Installation
xInstaller le dispositif au véhicule arrêté et en conditions de sûreté.
xInstaller le dispositif de façon à ne pas obstruer la visibilité du conducteur et à ne pas causer des dangers en cas
d'accident.
xContrôler que le dispositif n'interfère pas avec les airbags ou autres dispositifs de sûreté du véhicule.
xS'assurer que le dispositif soit bien fixé au support avant de partir.
xTELESystem ne répond de personne éventuel je donne causé par l'utilisateur nell' installation et disinstallazione
du TS8.4 PND sur le véhicule
Pendant le guide
xLe conducteur du véhicule est responsable de la jouissance du TS8.4 PND dans les modalités correctes de
fonctionnement.
xL'utilisateur doit ignorer les indications fournies par le TS8.4 PND dans le cas celles-ci ils résultent en contraste
avec le code de la rue.
xNe se pas confier aux indications vocales exclusivement. Celles-ci pourraient résulter ne corrigé pas ou pas
opportunes. Considérer toujours les renseignements achalandés comme indicatives et respecter la signalisation
routière.
xLes satellitari navigateur fournissent un secours simple au guide et à l'orientation. Le guide correct et le choix du
parcours meilleur appartiennent toujours au conducteur du véhicule.
xPendant le voyage il est possible de recevoir renseignements vocaux du type: '' Tenir la droite '' ou '' Entre 300
mètres il tourne à droite ''; ces indications dérivent de données cartographiques qui parfois peuvent résulter
pertinents peu avec la rue qui est en train de parcourir. Mettre attention spéciale en proximité de rond-point ou
grands croisements: les indications vocales pourraient ne pas être simples.
xNe se pas distraire pendant le guide pour consulter le navigateur si cela comporte danger pour vous ou pour les
autres.
xPour consulter le navigateur dès que possible s'arrêter et ensuite agir sur les commandements du navigateur.
xEffectuer les opérations manuelles exclusivement sur le navigateur au véhicule arrêté.
xLa précision de la position GPS, en conditions de réception optimale du signal, elle est garantie avec un déchet
d'environ 15 mètres.
Avertissements d'autovelox
La fonction d'avis d'autovelox permet de déterminer et visualiser les autovelox longueur située le parcours.
Le Menù initial sera visualisé.
xEn le blindée sélectionner Réglages.
xChoisir Avertissements.
xChoisir Avertisseur de radar fixe pour activer la fonction relative et éventuellement settare la même seconde les
propres préférences.
Dans le cas dans lequel ils soient présent des autovelox le long du parcours envoyé un avis il viendra. Tel avis est
représenté d'un "bip" sonore et visualisé par un message à l'écran dans lequel le type d'autovelox et la distance il est
indiqué auquel est placé.
Table of contents
Languages:
Other Telesystem GPS manuals