Telian Corporation FTD-8800 User manual

FTD-8800/CRX-1000
2005. 1. 28

CONTENTS
1. SAFETY INFORMATION
2. PREPARING YOUR PHONE FOR USE
2.1 Install the coiled cord
2.2 Plug AC/DC Adaptor
2.3 Back up Battery
3. FEATURE HIGHLIGHTS
4. ABOUT THE PHONE
4.1 Name and function
4.2 Key functions
4.2.1 Selection keys / Mute key (RSK)
4.2.2 Send key
4.2.3 End key
4.2.4 ~ Number keys
4.2.5 Scroll keys
4.2.6 Speaker button
4.2.7 Using the selection keys
4.2.8 Using the scroll keys
4.3 About display indicators and icons
4.3.1 Start Screen
4.3.2 Scroll Bar
4.4 Indicators and icons
5. BASIC OPERATIONS
5.1 Make a call
5.2 Answer a call
5.3 Speaker phone mode

5.4 Adjust the earpiece volume
5.5 Redial the last-dialed number
5.6 Use Caller ID
6. USE PHONE MENUS
6.1 Navigate menus
6.1.1 Scroll through menus
6.1.2 Use a shortcut
6.1.3 Exit menu levels
6.2 List of Menus
7. ENTER LETTERS AND NUMBERS
7.1 Enter Letters
7.1.1 Edit name
7.1.2 Change case of letters and numbers
8. USE THE PHONE BOOK
8.1 About the phone book
8.2 Use phone book menus
8.3 Create a phone book Entry
8.4 Edit a Phonebook Entry
8.5 Delete Phonebook Entry
8.6 Delete All phonebook Entries
8.7 Send Message
8.8 Monitor Phonebook Capacity
8.9 Sort Phonebook Entry
9. USE THE RECENT CALL
9.1 View Recent Calls
9.2 View Notepad
9.3 View Call Times
9.4 Delete All Call Log

10. SEND AND RECEIVE TEXT MESSAGES
10.1 Send a Text Message
10.2 Set a Quick Note
10.3 Receive a Text Message
10.4 Use Voicemail
10.4.1 Receive a Voicemail Message
10.4.2 Listen to a Voicemail Message
10.5 Use Outbox
10.6 Use Drafts
10.7 Cleanup Messages
10.8 Monitor Memory Meter
10.9 Set Up the Message
10.9.1 Set Inbox setup
10.9.2 Store your voicemail number
11. CUSTOMIZE YOUR PHONE
11.1 Personalize
11.1.1 Change Greeting Text
11.1.2 Change Shortcuts
11.2 In call Setup
11.2.1 SetInCallTimer
11.2.2 Set Answer Options
11.2.3 Set the Easy Prefix
11.2.3.1 Auto Change
11.2.3.2 Pref. Opr.(Preferred Operator)
11.2.3.3 Override
11.3 Initial Setup
11.3.1 Set Time and Data
11.3.1.1 Set Time
11.3.1.2 Set Data
11.3.1.3 Auto update
11.3.2 Set the Backlight
11.3.3 Set TTY Operation

11.3.4 Set Language
11.3.5 Set Contrast
11.3.6 Use DTMF Tone
11.3.7 Reset All Options
11.3.8 Clear All Stored Information
11.4 Phone Status
11.4.1 View Your Phone Number
11.4.2 View the phone Specifications
11.5 Network Setup
11.5.1 View Currently Registered Network
11.5.2 Set Service Tones
11.5.3 Set Call Drop Alert
11.5.4 Set Network Scan
11.5.5 Set Network Service
11.5.5.1 Store the Feature Code
11.5.5.2 Call Forwarding
11.5.5.3 Call Waiting
11.5.5.4 Caller ID
11.6 SECURITY
11.6.1 Talk Security (Voice Privacy)
11.6.2 Restrict Calls
11.6.3 Set Password
12. RING STYLES
12.1 Set Ring Styles
12.1.1 Change Style
12.1.2 Set Style Details
12.1.3 Set Reminders
13. ALARM
13.1 Set Alarm
13.2 Edit, Enable or Delete Alarm
13.3 Respond to Alarm

14. REFERENCE INFORMATION
14.1 Emergency Calls
14.1.1 Make an emergency call
14.2 Troubleshooting
14.2.1 No Service
14.2.2 What if the call does not go through?
15. TECHNICAL INFORMATION

1
SAFETY INFORMATION
SAFETY INFORMATION FOR FIXED PHONES
For the safe and efficient operation of your phone, observe the following guidelines:
EXPOSURE TO RADIO FREQUENCY SIGNALS
Your wireless handheld portable telephone is a low power radio transmitter and receiver.
When it is ON, it receives and also sends out radio frequency (RF) signals.
In August 1996, the Federal Communications Commissions (FCC) adopted RF exposure
guidelines with safety levels for handheld wireless phones. Those guidelines are consistent
with the safety standards previously set by both U.S. and international standards bodies:
ANSI C95.1 (1992)*
NCRP Report 86 (1986)*
ICNIRP (1996)*
★American National Standards Institute; National Council on Radiation Protection and
Measurements; International Commission on Non-Ionizing Radiation Protection
Those standards were based on comprehensive and periodic evaluations of the relevant
scientific literature. For example, over 120 scientists, engineers, and physicians from
universities, government health agencies, and industry reviewed the available body of
research to develop the ANSI Standard (C95.1)
The design of your phone complies with the FCC guidelines (and those standards).
Near-Body Operation
CAUTION! To comply with FCC radio-frequency exposure requirements, the antenna
for this device must be placed 2 inches(5cm) or more from the body while it is in
operation.
ANTENNA CARE
Use only the supplied or an approved replacement antenna. Unauthorized antennas,
modifications, or attachments could damage the phone and may violate FCC regulations.
PHONE OPERATION
This device complies with Part 15 of the FCC Rules. Operation is subject to the following
two conditions:
1) This device may not cause harmful interference.

2) This device must accept any interference received, including interference that may
cause undesired operation.
Note: Hold the phone as you would any other telephone with the antenna pointed up and
over your shoulder.
TIPS ON EFFICIENT OPERATION
For your phone to operate most efficiently:
zDo not touch the antenna unnecessarily when the phone is in use. Contact with the
antenna affects call quality and may cause the phone to operate at a higher power
level than otherwise needed.
ELECTRONIC DEVICES
Most modern electronic equipment is shielded from RF signals. However, certain electronic
equipment may not be shielded against the RF signals from your wireless phone.
Pacemakers
The Health Industry Manufacturers Association recommends that a minimum separation of
six inches (6”) be maintained between the bast and a pacemaker to avoid potential
interference with the pacemaker. These recommendations are consistent with the
independent research by and recommendations of Wireless Technology Research.
Persons with pacemakers:
zShould ALWAYS keep the phone more than six inches (6”) from their pacemaker.
zShould use the ear opposite the pacemaker to minimize the potential for
interference.
Other Medical Devices
If you use any other personal medical device, consult the manufacturer of your device to
determine if they are adequately shielded from external RF energy. Your physician may be
able to assist you in obtaining this information.
Turn your phone OFF in health care facilities when any regulations posted in these areas
instruct you to do so. Hospitals or health care facilities may be using equipment that could
be sensitive to external RF energy.
Posted Facilities
Turn your phone OFF in any facility where posted notices so require.

2
PREPARE YOUR PHONE FOR USE
Before using your phone, phone must be setup as the following instruction.
2.1 Install the coiled cord
zConnect the coiled cord to both the handset and the base.
2.2 Plug the AC/DC Adaptor
zConnect the adaptor to the AC Wall outlet.
2.3 Back up Battery
①Remove the battery door.
②Insert four AA batteries into battery comportment.
③Place the battery door on.
Note: Batteries are backup for emergency case of power failure, Do not operate unit
without the AC/DC Adaptor connected.
Note: Be sure to carefully match the positive and negative terminals as shown in the
battery.

3
FEATURE HIGHLIGHTS
zEasy to read graphical display
zPhone book (up to 500 names and 4 numbers per name)
zEasy to use keypad layout
z14 Ring tones and 3 Ring style selections
zAdjustable ring volume
zQuick access to the last 10 numbers dialed
zCaller ID
zAuto redial
zClock with alarm
zDialed, received, missed calls
zCall restriction
zKeypad lock
zCall timer
zText message service
zVoice mail capability
z2 different NAM
zMulti-languages (English, Spanish and Portuguese)
zSpeaker phone
4
ABOUT THE PHONE
This phone operates in digital mode within the 800 MHz frequency band and operates in
analog mode within the 800 MHz range.
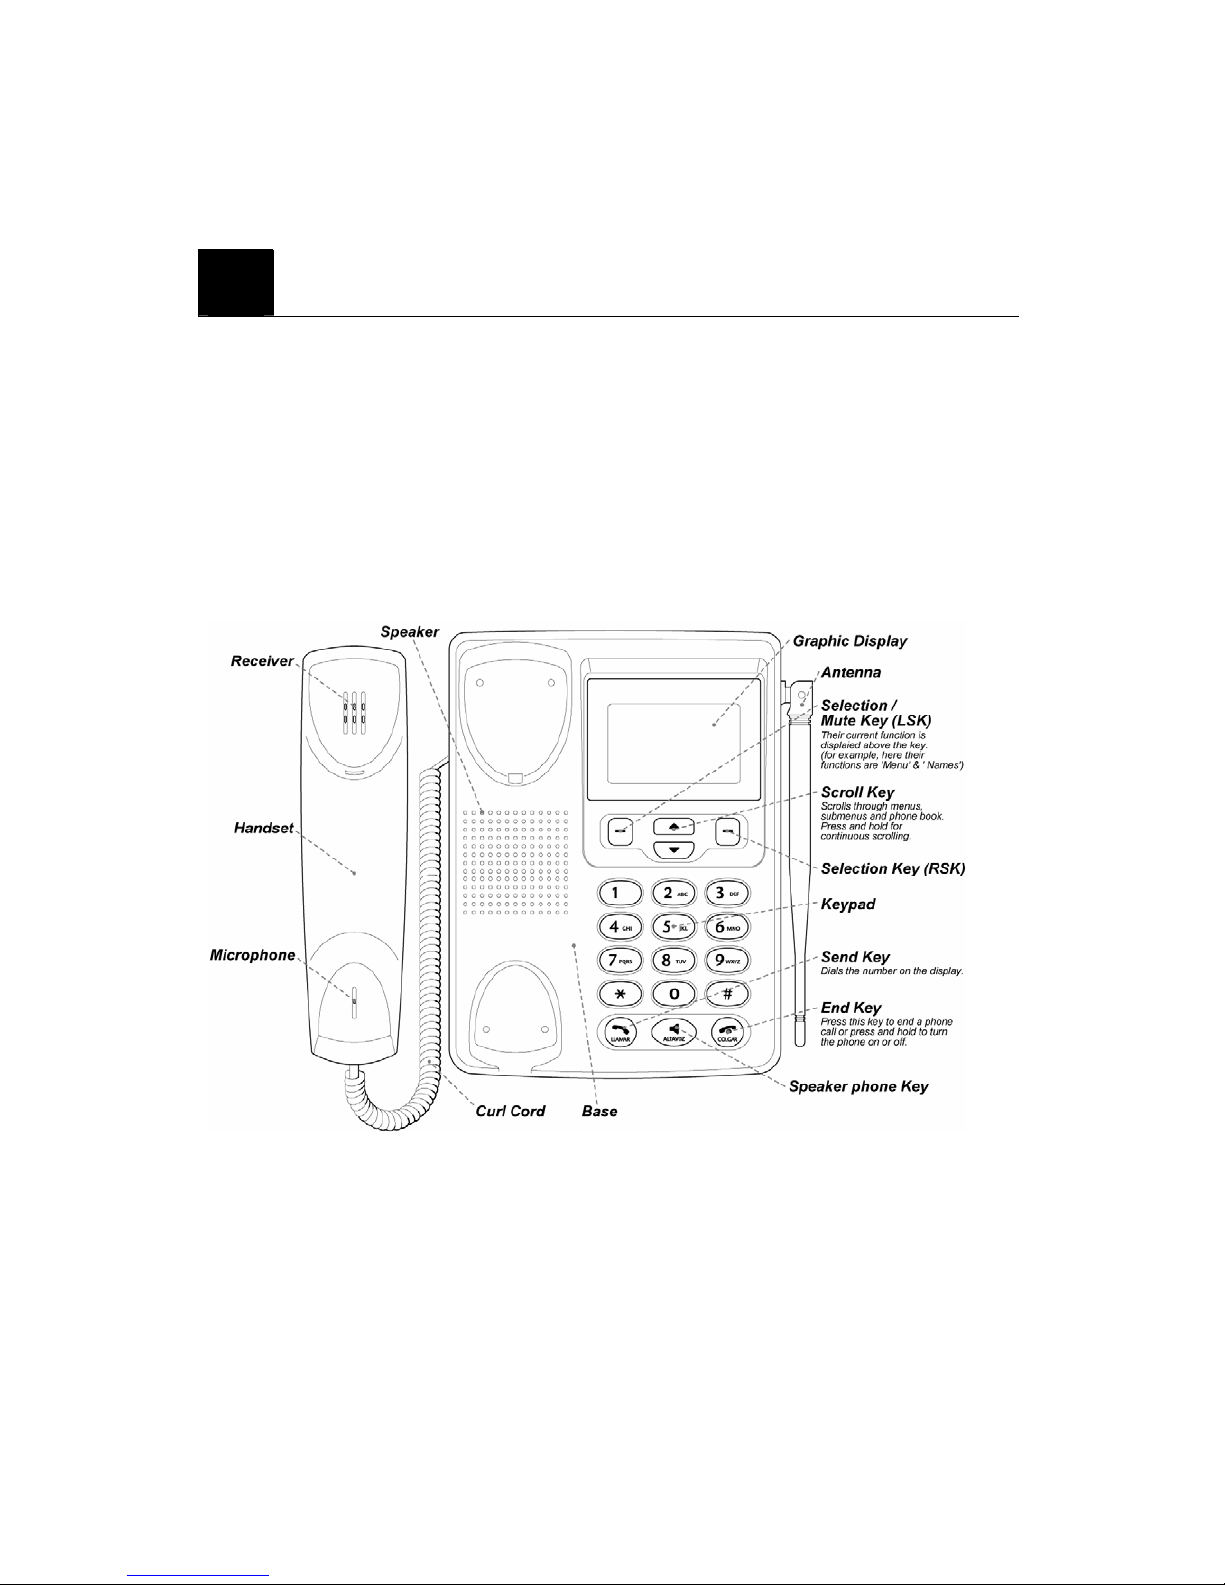
4.1 Name and function

4.2 Key functions
4.2.1 Selection keys / Mute key (RSK)
zPress to perform the function indicated by the text on the screen above the key.
zPress right selection key to temporarily mute a call.
4.2.2 Send key
zPress to make a call to name / number shown on the screen.
zPress to answer a call.
zPress once to enter the list of recently dialed numbers.
4.2.3 End key
zPress and hold the key to switch the phone on or off.
zPress to end a call.
zPress once to exit a function and to return to the start screen.
4.2.4 ~ , , ,
zUsed for entering numbers and letters.
zPress and hold to call the voice mailbox.
zPress to toggle between upper case, lower case and numeric modes.
4.2.5 Scroll keys
zPress to increase the earpiece volume.
zPress to decrease the earpiece volume.
4.2.6 Speaker button
zTurn on and off the speaker in conversation

4.2.7 Using the selection keys
The functions of the selection keys depend on the guiding texts shown above the keys.
For example, when the text MENU is above the left selection key, press this key
enters the menu functions.
Similarly, pressing the right selection key under the text NAMES accesses the phone
book functions.
4.2.8 Using the scroll keys
The phone has two scroll keys, and , located just below the screen.
The scroll keys have up and down arrows on them; press these to scroll through the phone’s
menus.
4.3 About display indicators and icons
The display indicators and icons inform about the operation of the phone.
4.3.1 Start screen
The start screen displays when the phone is turned on. Several features can be used only
when the phone is at the Start Screen.
4.3.2 Scroll bar
When you access the phone’s menu, there is a scroll bar at the far right of the screen. This
bar indicates user’s location in the menu: each “tab” on the bar represents a different menu
item.
4.4 Indicators and icons
On your phone, you have two types of identifiers: indicators and icons. Icons are graphical
representations of a specific item or situation. For example, an icon appears when you have
a voice message waiting to be heard.
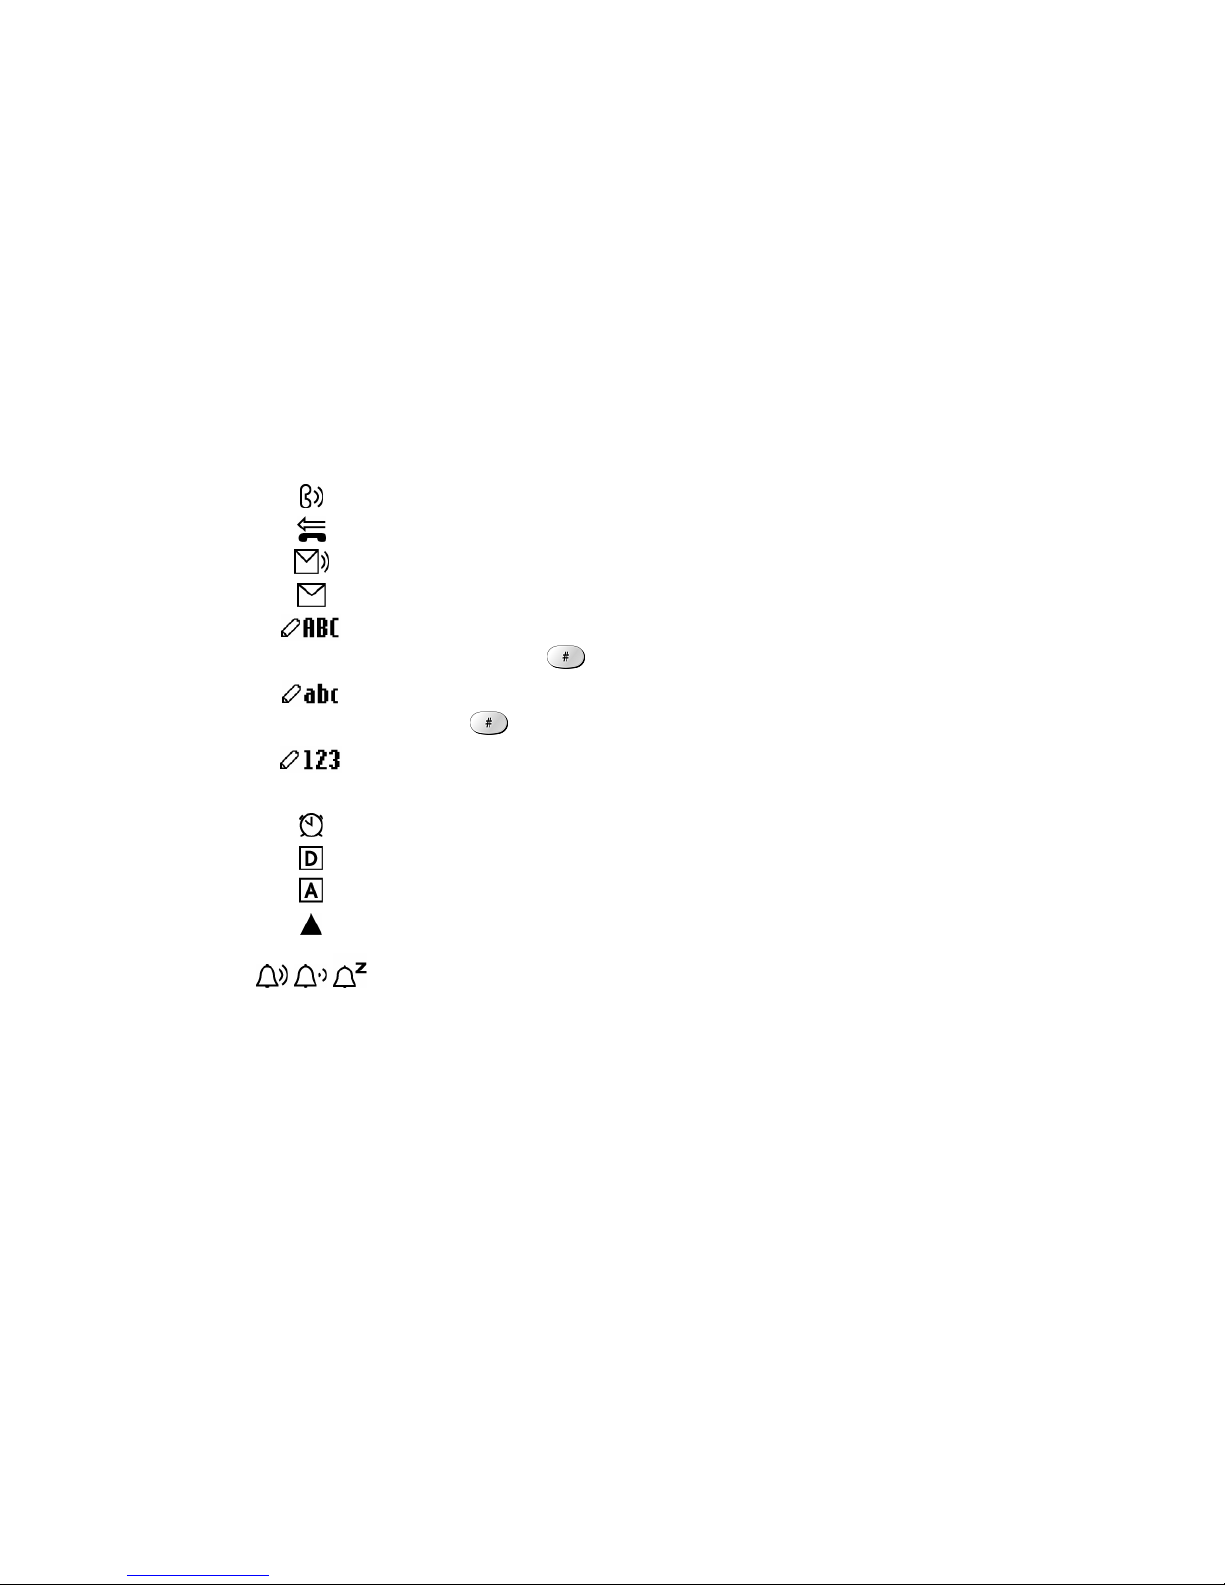
Indicators show the status of something. The phone uses three types of indicators:
zSignal strength indicator: This indicator shows the signal strength of the wireless
network at your current location. The higher the bar, the stronger signal. (그림)
zRinger volume indicator: When you scroll keys during stand by, you are able to
adjust ringer volume higher or lower
The list below shows what each icon means.
You have an active call.
You have a missed call.
You have one or more new voice messages waiting.
You have one or more unread text messages waiting.
Any alpha characters you enter will be uppercase (capital
letters). Press to switch to uppercase.
Any alpha characters you enter will be lowercase.
Press to switch to uppercase.
You are in numbers mode. After switching to this numbers mode,
you cannot enter any alpha characters. You can enter only numbers.
The alarm clock is set.
Digital mode.
Analog mode.
Roaming
/ /
Ring Style (Active/Current Ring Style)

5
BASIC OPERATIONS
5.1 Make a call
①Deactivate the Keyguard, if it is on.
②Hold up the handset to hear Dial Tone.
③Enter the phone number-including the area code-and press .
④Press to end the call or to cancel the call attempt.
Note: The phone may generate heat during longer calls.
5.2 Answer a call
To answer a phone call:
①When the handset is resting in its base, hold up the handset.
②The ringing will stop and talk icon will appear in the display.
Note: If you hold up the handset during a call in speaker phone mode, the speaker
phone mode is deactivated.
5.3 Speaker phone mode
You can make or answer a phone call by pressing when the handset is on the cradle.
To make a call:
①Press to turn on the speaker phone mode.
②If you hear the dial tone, press the number you want to connect to.
To answer a call:
①When the phone rings, press to turn on the speaker phone mode.
5.4 Adjust the earpiece volume
You can adjust the earpiece volume during a call by pressing the scroll keys on the phone.
zPress to increase the volume.

zPress to decrease the volume.
Note: When the speaker volume while the speaker is active with and keys.
5.5 Redial the last-dialed number
The phone stores up to 10 recently dialed numbers. Stored numbers may be up to 20 digits
long.
①Press once to find the most recently dialed numbers.
②Press or to scroll to the number you wish to dial.
③Press once.
Note: If no recently dialed numbers are stored, you are not able to use this function.
5.6 Caller ID
Caller ID is a network service that identifies incoming calls. Contact your service provider
to find out how to get this feature.
When Caller ID is active, your phone shows the caller’s phone number during an incoming
call, as long as this number is a part of your service provider’s wireless network.
The wireless network lets you know if it does not recognize the caller’s phone number. The
wireless network will also let you know if the calling party has blocked the Caller ID
feature.
If you have stored the name and number of the calling party in your phone book and that
number is supported by the wireless network, the caller’s name can also appear.
5.7 Keyguard Lock (Keypad Lock)
When the key guard is activated, you can prevent to press the key accidentally.
5.7.1 Activate Keyguard
①Press MENU and .
5.7.2 Deactivate Keyguard
①Press UNLOCK and .

Note: If you lift up the handset or press to answer a call when key guard is on, the
key pad is automatically unlocked. When you end the call, key guard automatically
becomes activated again.

6
USE PHONE MENUS
6.1 Navigate menus
A menu is a list of choices you can make. Your phone has 6 main menus. Each main menu
contains numerous submenus that allow you to use the phone book, change the ringing tone,
and so on. You can use menus and submenus two ways: by scrolling or by using shortcuts.
6.1.1 Scroll through menus
①From the Start screen, press MENU, and then scroll through the menus using the
and .
②Use the scroll and selection keys to navigate the submenus and to return to the Start
screen.
6.1.2 Use a shortcut
You can use a shortcut to get to options directly without scrolling through lists.
6.1.3 Exit menu levels
zTo return the previous menu level, press BACK or CANCEL.
zTo return to the Start screen, press . No menu setting changes are saved.
6.2 List of Menus
Your phone’s menu may differ from the following list, depending on the network services
to which you have subscribed and the accessories you are using. If you have any questions,
call your service provider.
1. Phone book
<…entry 1…>
1. New
2. Edit
3. Delete
4. Delete Name
5. Send Msg

6. Ph Book Capacity
7. Delete All
8. SortBy
<…entry 2…>
<…entry N…>
[New Entry]
[Delete All]
2. Recent Calls
1. Missed Calls
2. Received Calls
3. Dialed Calls
4. Notepad
5. Call times
1. Last Call
2. Dialed Calls
3. Received Calls
4. All Calls
6. LifeTime
7. Delete all call log
3. Messages
1. Create Message
2. Voice mail
3. Inbox
<…message 1…>
1. Create Message
2. Delete
3. Callback
4. Reply
5. Forward
6. Lock
7. Store Number
<…message 2…>
<…message N…>

[Create Message]
[Delete All]
4. Quick Notes
<…Quicknote 1…>
1. New
2. Edit
3. Delete
4. Send
<…Quicknote 2…>
<…Quicknote N…>
[New Quick Note]
[Delete All]
5. Outbox
<…message 1…>
1. Create Message
2. Delete
3. Re-send
4. Forward
5. Message Status
6. Cleanup Message
<…message 2…>
<…message N…>
[Create Message]
[Delete All]
6. Drafts
<…message 1…>
1. Create
2. Send
3. Cleanup Message
<…message 2…>
<…message N…>
[Create Message]
[Delete All]
This manual suits for next models
1
Table of contents
Popular Telephone manuals by other brands


Bell System Practices
Bell System Practices AT&T Plant Series Identification, Installation, Connections, and Maintenance

Lectrosonics
Lectrosonics TH3 operating instructions

Clarity
Clarity JV35 Specifications

AUDIOLINE
AUDIOLINE SENSOR 500 Initial setup guide

ESI
ESI IVX 128 Plus Upgrade guide

Steren
Steren TEL-008BL instruction manual