Telian FWT-8100 User manual

1/33
Telian Corporation
FWT-8100 and
FWT-8000
Fixed Wireless Terminal
Mar April229, 2001.

2/33
Congratulations
Your new cellular telephone is a carefully engineered, high
quality, durable product with natural sound quality, modern fea-
tures and elegant styling. It is designed to give you the quality
and convenience you expect in a cellular telephone.
To familiarize yourself with all the features of your new

3/33
phone, please read the following instructions carefully. Retain
this Guide for future reference.

4/33
nn INTRODUCTION..................................................................................554
uSAFETY INFORMATION..........................................................................554
uFEATURES...............................................................................................665
uDISPLAY INFORMATION........................................................................776
uKEY AND MISCELLANEOUS INFORMATION.........................................776
nn BASIC OPERATION.........................................................................10109
uTURNING THE PHONE ON................................................................10109
uMAKING AND RECEIVING CALLS ....................................................10109
uREVIEWING THE PRECEDING DIGITS............................................121211
uREDIALING FUNCTIONS..................................................................121211
uMIC MUTE ..................................................................................... 131312
nn ENHANCED OPERATION..........................................................141413
uLOCKING AND UNLOCKING THE PHONE...................................... 141413
uEARPIECE VOLUME ADJUSTMENT............................................... 141413
uLOUDSPEAKER VOLUME ADJUSTMENT....................................... 151513
uMEMORY FUNCTIONS .................................................................... 161614
uONE TOUCH DIALING.................................................................... 171716
uONE TOUCH EMERGENCY CALL.................................................. 181816
uSCRATCH PAD MEMORY................................................................ 181817
uEMERGENCY AND PRIORITY DIALING ......................................... 191918
nn EXTENDED FEATURES AND FUNCTIONS..........................202019
uKEYPAD (DTMF) TONES............................................................... 202019
uTIMER AND COUNTER FUNCTIONS............................................... 212120
uSYSTEM A/B INDICATION FOR AMPS......................................... 242322
uUSER PROGRAMMABLE CODES.................................................... 242422
uCHANNEL AND RSSI LEVEL DISPLAY .......................................... 242423
uELECTRONIC SERIAL NUMBER (ESN)......................................... 252524
nn INSTALLATION.............................................................................262625
uPARTS LIST...................................................................................... 272625
uINCLUDEDING IN THE GIFTBOX................................................... 272726
uGENERAL SPECIFICATIONS................................................. 282827
TABLE OF KEY OPERATION........................................................ 292928
5/33
nINTRODUCTION
uSafety Information
As with any product, precautions should he observed during it’s
handling and use. To becomeenlightened to safe and properprocedure
please read and adhere to all warnings, cautions, and safety
information.
lAvoid using the telephone during an electrical storm. There is
aremote risk of dangerous electrical shock from lightning.
lDo not attempt to disassemble the housing of your phone orany
of it’srelated parts. There are no user serviceable components.
lA minimum distance of 2feet inches should be kept between the
telephone antenna and any organic life forms (i.e. people,
small animals, etc.) during operations.
lDamage Requiring Service: Your telephone should he serviced
by qualified service personnel when:
a. Objects have fallen or liquid has spilled into the product; or
b. The product has been exposed to rain; or
c. The product does not appear to operate normally or
exhibits a marked change in performance; or
d. The product has been dropped, or the housing has been
damaged.
lNever touch uninsulated telephone wires or terminals.
!
CautionWARNING !
NEVER power the unit without an antenna, as it may
damage the radio transmitter.
!
WARNING Caution !
To satisfy FCC radio-frequency exposure requirements, the
antenna for this device must be placed 2 inches (5 cm) or
more from all persons, while it is in operation.NEVER
operate the unit when any person is within 2 inches ( 5
centimeters ) to the antenna.

6/33
uFeatures
vlEasy to read LCD display with numeric and status
lindicators
vlBack-lit LCD display
lMicrophone mute Control
lPriority/Emergency calling with automatic retry
lAutomatic call retry
vl89 memory locations
l7 Location Scratch Pad, with automatic scroll
lVacant memory location search
lAutomatic entry into vacant memory location
vlPhone number search
lOne Touch Dialing
lOne Touch Emergency Call
lLast 103number dialed memory
lSilent Incoming Calls
vlCall time warning tone
lDTMF tone dialing from memory
lDTMF keypad mute
lDTMF extended tone dialing
lRF Channel and RSSI Level display
lElectronic serial number display (own)
vlTelephone number display (own)
vlSystem ID display (own)
Øl7function call timer
Features to be implemented prior to production
Features to be implemented now
Features partially implemented now

7/33
uDisplay Information
1
2
3
4 5
•Current Time Display
‚,ƒFUNCTION Mode Indicator and NUMBER Display
Lights when the FUNCTION key FNC is pressed to do extended
functions and Displays the telephone number dialed.
„AM/PM Display
…Current Date Display
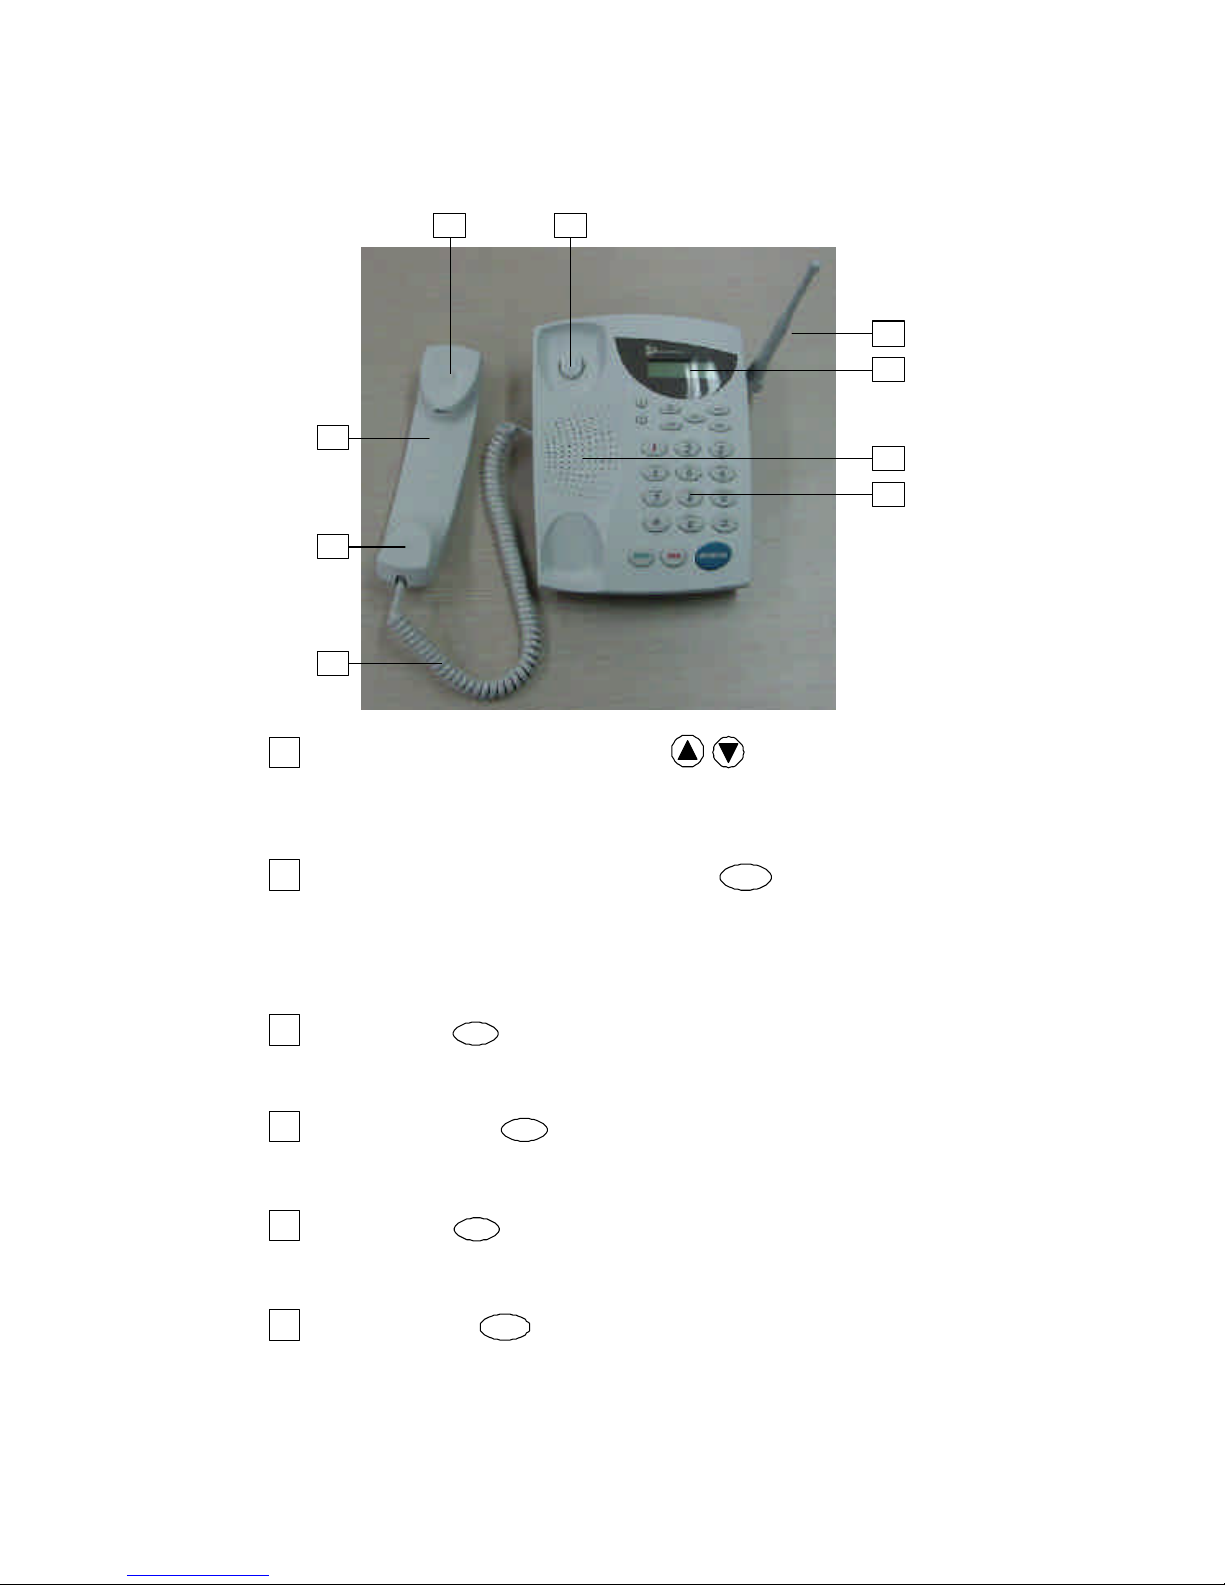
uKey and Miscellaneous Information
ABC
2
GHI
4
STO
CLR
PORS
7TUV
8WXYZ
9
#
OPER
0
FNC
1DEF
3
JKL
5MNO
6
SEND
RCL
M1
END MONITOR
1
2
3
4 5
6
7
8
910
11
8/33
12
13
14
15
1617
18
19
20
1VOLUME ADJUSTMENT keys /
Used to adjust the alert tone, earpiece, keypad tone and monitor volume
level
2ONE TOUCH DIAL and MUTE key M1
In idle mode. Allows you to place a call with a single keystroke. In conversation
mode, switches off the microphone so the other party on the line cannot hear your
private conversation off line.
3STORE Key STO
When used in conjunction with digit keys, enables the user to store number into
memory.
4FUNCTION Key FNC
When used in conjunction with digit keys, allows operation of extended functions
5CLEAR Key CLR
Clear the digit(s) from the display.
6RECALL Key RCL
Recalls telephone numbers from memory.

9/33
7ONE TOUCH EMERGENCY Key 1
Allows you to place a call to an emergency number by a single keystroke
8DIGIT Keys 1thru OPER
0, #and .
Enter telephone numbers, NAM information, etc,.
9SEND Key SEND
Initiates a call and allows the user to answer calls.
10 END Key END
Terminates a call.
11 MONITOR Key MONITOR
Turn on and off the loudspeaker for conversation monitoring.
12 Sleeve type Antenna
13 LCD Display Module
14 Loudspeaker
15 Keypad
16 Hook Switch
For signaling start and end of call.
17 Receiver Unit
Hear the voice signal from the another party.
18 Handset
19 Mic Unit
Transmit speaking signal to another party.
20 Coiled Cord

10/33
nBASIC OPERATION
uTurning the Phone ON
Each time the unit powers up it goes through certain “Wake Up”
routines. Upon power up, all indicators will light and your own
telephone number will be displayed momentarily. At this point
your phone is operational and ready for use.
!
LCD backlite turns off after 8secondsto save power.
Pressing any key relights theDisplay for another 8
seconds
!
If the NO SERVICE indicator NO Service remains
illuminated calls cannot be placed or received as the
“cellular System”is not available in the area you are
currently in.
Display Own Telephone Number and System ID
üü To display your Telephone Number, press “FNC”,”#”,”1”.
üü To display your System ID, press “FNC”,”#”,”3”.
üü To clear the display, just press “CLR”.
uMaking and Receiving Calls
Placing Calls
When entering telephone numbers manually, each digit entered
will appear in the display panel and will scroll from right to left
every time a new digit is entered.
üü To place a call, make sure the power is on (refer to the “Turning
the Phone ON ”on previous page), enter the desired telephone
number and press the SEND key. At this point the IN USE
indicator INUSE will light and the dialing sequence will be
executed.
üü To correct an error made while entering a telephone number,use
the following methods:
lPress the CLEAR key CLR to erase the last digit entered.
lPress and hold the CLEAR key CLR to erase all the
digits in the display.

11/33
lPress the END key
END
monentarily to erase all the digits in
the display.
üü To cause an on-hook condition after or during the dialing pro-
cedure just press the END key END .
!
The display panel has 15 digits capability, however
numbers containing up to 32 digits may be entered,
therefore only the last 15 digits dialed will remain in
the display.
Refer to the part in this section entitled “Reviewing the
Preceding Digits”
Receiving Calls
The cellular phone features both audio and visual signals to indicate an
incoming call.
The telephone will both ring and the word “CALL”will flash
repeatedly in the display panel.
üü To answer an incoming call when the handset is resting in it’s
cradle, simply lift the receiver. The ringing will stop and the
IN USE indicator IN USE will appear in the display panel.
üü To answer an incoming call when the handset is removed
fromIt’s cradle, press any key except the , or the END
key END . IN USE will light and you may proceed with the
call as usual.
üü To hang up the phone after or during a conversation, press
the END key END , or simply replace the handset in it’s
cradle.
!
If calls go unanswered the word “missed” and the number
of unanswered calls will appear and remain in the
display until a call is originated.Ifcalls go unanswered
the word “CALL”and the number of unanswered calls
will appear and remain in the display until the display
panel is cleared.
Silent Incoming Calls
If Silent Alert feature is set, a single beep and a flashing “CALL”
message on the display will alert you of an incoming call.
Once you have switched to silent alert, the phone stays in that
mode until you deactivate it.
üü To activate this mode, press “FNC”,”8”.

12/33
The “Silent Alert On” should light in the display indicating
that Silent Alert Feature has been set.
üü To deactivate this mode, press “FNC”,”8” again.
The “Silent Alrt Off” should go off
uReviewing the Preceding Digits
A condition may arise while entering numbers longer than 15 digits
when the leftmost part of the entered number scrolls off the
display and out of view. The entered number under this condition
exists within three possible segments of digits.
üü To view digit segments which have scrolled off of the display panel, press
the FUNCTIONkey “FNC”,”*”,”8”.
The digits/digit segments displayed depends on the length of the telephone
number and the number of times the “8”key is depressed within the above
procedure.
Use the chart below to correlate your action with the resulting display.
Correlation Chart
Press “8”Number Of Digits Entered
Key 1 ~ 15Digits 16 ~ 30 Digits 31 ~ 32 Digits
Once Segment 3 Segment 2 Segment 1
Twice --- Segment 3 Segment 2
3 Times --- --- Segment 3
!
Repeatedly pressing the “8”key will display the next
segment inline.
However once the entire number hasbeen displayed the
Function indicator will go off as the last segment is
displayed and the“8”key will resume its normal digit
entry mode of operation.
uRedialing Functions
Last Three Ten Numbers Dialed
This feature is used to display the numbers of thethree ten mostrecent
calls that have been made.
üü To display the number of the most recently made call, press “RCL”,
“#”, “0”Then, other recent numbers can bescrolled using “5” or
“6”, orviewed by entering a digit from 0 through 9. An index is
displayed above the phone number, which is 0 for the most recent
and 9 for the oldest.
To display the number of the second most recently made call press
“RCL”, ”#”, “1”.

13/33
To display the number of the third most recently made call press “RCL”,
“#”, “2”.
!If you wish to dial one of these numbers, press the SEND
key.
Automatic Redial
When a “Cellular System”busy signal occurs the Automatic Redial
function can be used to redial a telephone number automatically (up to
3 times) at regular intervals 30 seconds apart. The “Auto- Redial”will
light onthe display to indicate Automatic Redial has been initiated.
üü To change Automatic Redial Mode, press the FUNCTION key
“FNC”,”*”,”7”, the 3-digit unlock code, then up arrow or down arrow
to enable or disable auto redial, and the “STO” key
consecutively.To initiate Automatic Redial, press the FUNCTION
key “FNC”,”*”,”7”, and 3-digits code, then up arrow or down
arrow to enable or disable auto redial, and the “SEND” key
consecutively.
If want to save the automatic redial control status then press the
“STO”key to save the change.
üü To abort Automatic Redialing which is in progress,simply press the
“END” key.
!A distinction should made be between a “Line busy signal”
and a “Cellular System”busy signal. (Automatic Redial
will initiate only on a “Cellular System”busy signal.)
uMIC Mute
The MIC MUTE function deactivates the microphone located in the mouth
piece of your phone so you can converse at your locationand not be
overheard by the party on the line.
üü To toggle the MIC MUTE mode ON, press the “MUTE”key.
The MUTE indicator “MUTE” should now be lit.
üü To deactivate MIC MUTE mode just press the MUTE key once again.
“MUTE” should go dark and normal conversation can be resumed.
!The Mute mode will automatically be released when the
conversation is terminated.

14/33
!The”M1” key can be used as One Touch Dial Key when not
in conversation.
nENHANCED OPERATION
uLocking and Unlocking the Phone
The cellular telephone has a lock feature to restrict the origination
of outgoing calls except for One Touch Emergency Call,
Emergency (911, 000, 119), the 3 digit emergency number registered
in the NAM and those numbers stored in the emergency /priority dialing
area. (Refer to “Emergency and Priority Dialing”)
üü To Lock your phone, press the FUNCTION key “FNC”, “5” and
enter the 3digit registered unlock code. The word “Lock” should
now be displayed in the display panel.
üü To Unlock the unit just enter the same 3digit code you entered as
the Lock code.
!While the unit UNLOCK code has been factory set as 123 it
may be changed if so desired. Please refer to the section
entitled “User Programmable Codes”.
!The number you enter as a “Lock” code should be
written down and stored safely!
uEarpiece Volume Adjustment
The “Earpiece”volume level, controls the loudness of any sounds that
emanate from the speaker mounted in the earpiece of your cellular
telephone.
üü To adjust the Earpiece volume level while the IN USE indicator is lit
(in conversation), justpress the “5”or “6” buttons.
üü To adjust the Earpiece volume level while IN USE is not lit (not in
conversation), press the FUNCTION key “FNC”, “*”, “9”, “0”and

15/33
then press the “5” or “6” buttons to raise or lower the volume level
respectively.
ØNote : When the speaker is on in Monitor mode, the handset earpiece is
off.
uLoudspeaker Volume Adjustment
The “Loudspeaker” volume level settings control three different aspects
of audible tones generated in daily use. All three (keypad tones, alert
tones, volume levels may be individually manipulated for maximum
customization.
Keypad Volume
The telephone’s keypad generates sensory feedbacktones (as do
many touch-tone phones), the loudness of whichmay be altered to the
preferences of the individual user.
üü To alter the loudness of the Keypad tone while not ringing, in a
conversation, or displaying memory, simply press the “5”or “6”
buttons to raise or lower the volume level respectively.
üü To alter the loudness of the Keypad Tones while not in use, press
the FUNCTION key“FNC”, “*”, “9”, “2”and then press the “5”or
“6”buttons to raise or lower the volume level respectively.
Alert Volume
The telephone’sAlert volume (or Ring volume) may also he individually
set to a preferred level.
üü To alter the loudness of the Alert Volume while the telephone is
ringing simply press the “5”or “6”buttons to raise or lowerthe
volume level respectively.
üü To alter the loudness of the Alert Volume while not ringing, press
the FUNCTION keys “FNC”, “*”, “9”, “1”, and then press the “5”or
“6”buttons to raise or lower the volume level respectively.
Monitor Speaker Volume
The volume level of the speaker heard while in Monitor mode may be
adjusted to suit the environment in which the phone is being used.
üü To alter the volume used during Monitor Mode operations, while the
IN USE indicator is lit (during conversation) simply press the “5”or
“6”buttons to raise or lower the volume level respectively.
üü To alter the volume level of the Monitor speaker while not in use,
press the FUNCTION key “FNC”, “*”, “9”, “4”,and then press the

16/33
“5”or “6”buttons to raise orlower the volume level respectively.
ØNote : When the speaker is on in Monitor mode, the handset earpiece is
off.
uMemory Functions
Up to 89 numbers can be stored in the Memory Dialing System.
Each location can contain a number up to 32 digits in size.
Manual Storage
Telephone numbers may be stored manually into locations 01 through
89.
üü To use Manual Storage, enter the telephone number to be stored
and press the STORE key “STO”. The telephone number will blink
on and off until you enter a 2 digit location number 01 through 89 to
whichthe telephone number will be stored.
!If the memory location number selected contains a previ-
ously stored telephone number the newly entered telephone
number will replace the existing one.
Automatic Storage
This feature is used to store telephone numbers in memory locations
automatically.
üü To use the Automatic Storage feature, enter the telephone number
to bestored and press the STORE key “STO”twice. The 2 digit
location number 01 through 89 to which the telephone number was
stored will he displayed for approximately 1seconds.
!If there are no available locations the word “FULL”will be
displayed for seconds and the mode will be released.
Vacant Memory Location Search
This feature is used to search for unused memory locations to which
telephone numbers may be stored. The Vacant LocationSearch
function will try to place phone numbers in memory locations
automatically.
üü To use the Vacant Memory Location Search function, enter the
telephone number you wish to store and press the STORE key
“STO” At this point you may choose anascending ordescending
search order by pressing the “5”or “6”button respectively.
üü When the first vacant memory location is found,that memory
location’s number will appear briefly in the display panel,on the line
above the phone number. The telephone numberabout to be

17/33
stored will continue to flash on and off in the display panel until you
eitherstore the number by pressing the SEND key “SEND”or
searchfor another location by pressing one of the“5”or “6”
buttons.
üü To exit the Vacant Memory Location Search function without
storing the number, just press the END key “END”.
Number Search
This feature allows the user to scan , recall and dial numbers stored in
locations 1 through 97.
üü To use Number Search, press the MEMORY RECALL key “RCL”
and use the “5”or “6” buttons to scroll through the memory
locations. When occupied locations are found the memory location
number(01 through 97) will be displayed in the display panel along
with the telephone number assigned to that locationnumber.
üü To dial a number found in the search process just press the SEND
key “SEND”.
üü To exit from the search mode at any time, press the END key
“END”
!If there are no telephone numbers stored in memory, the
word “EMPTY”will be displayed.
Memory Redial
Telephone numbers can be recalled and dialed from any one of 97
different memory locations.
üü To dial a number stored in memory, press theMEMORY RECALL
key “RCL”and enter the 1 or 2 digit locationnumber 1 through 97,
you wish to dial. When the desired telephone number appears in
the display panel you may press the SEND key “SEND” to initiate
dialing.
!Locations 90 through 96 are reserved. (Refer to the “Scratch
Pad”)
Location 97 is reserved.(Refer to “Emergency and Priority
Dialing”)
uOne Touch Dialing
This feature permits you to place a call by a single keystroke.
Storing a Number into One Touch Memory
Press “CLR”,then enter a phone number.

18/33
Press “STO”, then the One Touch key “M1”.
Stored numbers can be reviewed by pressing “RCL”, “M1”.
Placing a Call to a Number in One Touch Memory
Press the One Touch key “M1”.
The telephone number will be displayed, and the IN USE indicatorwill
light as the call is placed.
!The “M1” key can be used as Mute key during conversation.
uOne Touch Emergency Call
This feature permits you to place a call to an emergency numberby a
single keystroke, even when the unit is in Lock mode.You can
deactivate this feature to prevent unintentional usage.
üü To place a call to the emergency number, press “1”key formore
than 2 seconds. The emergency number that is pre-programmed in
the NAM will be displayed, and the IN USE indicator will light as a
call is placed.
üü The number and on/off state is reviewed using the sequence“FNC”,
“*”, “4”,and the 3-digit unlockcode (default code is “1”,”2”,”3”).
If the feature is enabled, “E-on”is displayed. If the feature is
disabled, “E-oFF”is displayed. A new number can be entered by
pressing number keys. The feature can be enabled using the up
arrow or disabled using the down arrow.
To save any changes, press the“STO”key.
To exit without saving any changes, press the “END”key.
To activate this feature again, follow the same key sequence.
uScratch Pad Memory
While in Scratch Pad mode the display may be used as a sort of
numerical note pad during conversation and can hold up to 7 entries of
up to 32 digits. This “Scratch Pad”can be used to store any kind of
numerical data. For example a market quote while on-line with your
stock broker or a telephone number supplied by a recording, informing
you the number has been changed and “The new number is...”
Storing Numbers in the Scratch Pad
The note pad operates in a “First In First Out”(FIFO) fashion. Thefirst
number entered will be stored in memory location 90.When a second
number is entered into the note pad the firstnumber will be shifted to
location 91 and the newly entered number will occupy location 90. In the
same manner, when the seventh number is entered, the first number
will be shifted to location96, and when the eighth number is entered the
first entry will he erased.

19/33
üü To begin your entries into the Scratch Pad,enter the first digit
sequence you wish to store and press the FUNCTION key “FNC”,
“1”.Just repeat this procedure for any following entries.
!If a telephone number is present in the display panel prior
to your first entry, press the CLEAR key “CLR” to wipe the
display.
Dialing Numbers from the Scratch Pad
Although the Scratch Pad is primarily for use as a temporary Storage
device if one of the entries contains a telephone number (as in the
“recorded message”example given above) it is possible to recall and
dial that entry.
üü To dial a note pad entry containing a telephone number, press the
RECALL key “RCL” and enter the desired locationnumber 90
through 96. When the proper entry is displayed press the SEND
key “SEND” to initiate the dialing sequence.
uEmergency and Priority Dialing
The cellular phone enables you to store a single telephone numberup
to 32 digits in length for priority or emergency purposes.Memory
location 97 is reserved for this purpose. To enter an emergency
number, you would use the same procedures described in the section
entitled “Manual Storage”but using 97 as the location number.
üü To dial this special telephone number, press theMEMORY
RECALL key “RCL”, enter the digits “9”, “7”and press the SEND
key “SEND”within 10 seconds.
!The Emergency and Priority number will automatically be
redialed up to 3 times at 50 second intervals or until a
connection is made.

20/33
nEXTENDED FEATURES AND FUNCTIONS
uKeypad (DTMF) Tones
Dual Tone Multi-Frequency (DTMF), or “Keypad Tone”signals can be
transmitted during a call by entering digits on the keypad or recalling
numbers from memory By sending DTMF signals you can access
special services such as voice mail and answering machines that
require long duration tones.
Keypad (DTMF) Tone Duration
You may select the time duration of Keypad (DTMF) Tones eitherlong
tone (Long On) or short tone (Longoff)whenever you wish.
üü To toggle the Long Tone On or Off, press the FUNCTION key
“FNC”, “#”, “8”.
The letters “DTMF Long On”or “”DTMF Long Off”will appear in the
display to indicate the mode.
If you select the “DTMF Long On”mode, a continuous tone will
sound for up to 3 seconds when you press any key.
If you select the “DTMF Long Off”mode, a tone duration will be
fixed to 95 milli seconds.
Keypad (DTMF) Tone Mute
The “Keypad Tones”(DTMF) may be muted during conversation, for
example, to store a number into the Scratch Pad without interrupting
conversation.
üü To mute the keypad tones, press the FUNCTION key “FNC”, “3”.
This manual suits for next models
1
Table of contents


