Telkom EasiTouch 200 User manual

1. Important safety instructions ..............................
2. Maintenance ......................................................
3. Installation precautions ......................................
4. Caution ..............................................................
5. User controls ......................................................
6. Setting up ...........................................................
6.1 Important information .........................................
6.2 Contents of package ..........................................
6.3 Connecting the handset and line cord ...............
6.4 Mounting the phone ...........................................
7. Telephone Operations .......................................
7.1 Dialing a number ................................................
7.2 Receiving incoming calls ...................................
7.3 Handset receiver volume control .......................
7.4 Setting the ringer melody and melody volume ..
7.5 Using Redial ......................................................
7.6 Recall .................................................................
7.7 Using Mute .........................................................
7.8 Using Pause ......................................................
8. Storing a number ...............................................
8.1 M1-M2 and VIP memory buttons .......................
8.2 Quickdial memory buttons .................................
9. Batteries .............................................................
10. Troubleshooting .................................................
11. Service Enquiries ...............................................
2
2
2
2
3
4
4
4
4
4
5
5
5
6
6
6
7
7
7
8
8
8
9
10
11
Contents
1

1. Important safety instructions
Read the instruction manual carefully before connecting and
operating your telephone. The telephone has no user
serviceable components and service should therefore be
referred to authorized service centers only.
2. Maintenance
·Only use a damp cloth to clean the cabinet. A mild
soap will help to remove grease or oil. Never use
polish, solvents, abrasives or strong detergents since
these can damage the telephone.
·Your phone should be situated away from heat
sources such as radiators, heaters, stoves or any
other appliance that produces heat.
3. Installation precautions
·Never install telephone wiring during a lightning
storm.
·Never touch un-insulated telephone wires or terminals
unless the telephone line has been disconnected at
the network interface.
4. Caution
To reduce the risk of fire or injury read and follow
this instruction:
·Never push objects of any kind into this telephone as
they can touch dangerous voltage points or short out
parts that could result in a risk of fire or electric shock.
2
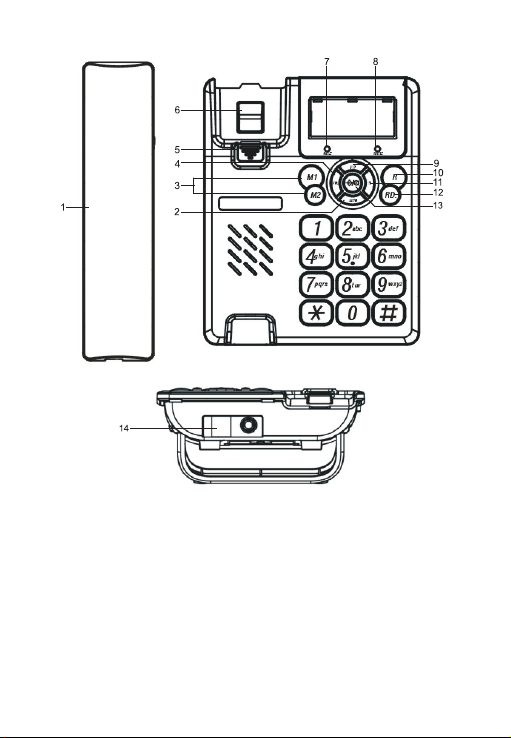
1. Handset 2. Auto Button
3. M1/M2 one-touch buttons 4. Receiver volume button
5. Handset hook 6. Hook switch
7. Mute indicator 8. In use indicator
9. VIP one-touch button 10. Recall button
11. Pause button 12. Redial button
13. Store / Mute button 14. Line jack
5. User controls
3

6. Setting up
6.1 Important information
NOTICE: Before connecting, please read the general
instructions at the beginning of this manual.
6.2 Contents of package
The package contains:
Telephone, one handset with handset cord, one telephone line
cord, one desktop bracket and this instruction manual.
6.3 Connecting the handset and line cord
1. Plug one end of the telephone line cord into the
socket at the back of the telephone. Plug the other
end of the telephone line cord into the wall outlet.
2. Plug one end of the coil cord into the socket on the
left side of the telephone. Plug the other end of the
coil cord into the handset socket.
6.4 Mounting the phone
You can mount your telephone directly against a wall, or place it
on a shelf, desk or table.
The unit can be mounted to any wall surface using two self-
tapping screws (not supplied).
1. Drill two holes in the wall 67mm horizontally apart.
4

7. Telephone Operations
7.1 Dialing a number
1. Lift the handset and wait for dial tone. The “In Use”
LED lights.
2. Press the keypad for the telephone number you wish
to dial.
3. When you complete your call, replace the handset.
7.2 Receiving incoming calls
When you receive a call, the phone rings.
To answer the call, proceed as follows:
1. Lift the handset.
2. To end the call, replace the handset.
2. Insert wall plugs into each hole.
3. Then thread a screw into each hole, letting the heads
extend about 5mm from the wall. Position the
telephone over the two screw heads and push
downward.
4. Slide out the handset hook on the telephone, rotate it
180 and replace it. The handset will rest on the hook
when wall mounted.
°
5
7.3 Handset receiver volume control
In the off-hook state, you can adjust the speaker volume by
using the VOL button. You can select between two volume
levels (HI or LOW).
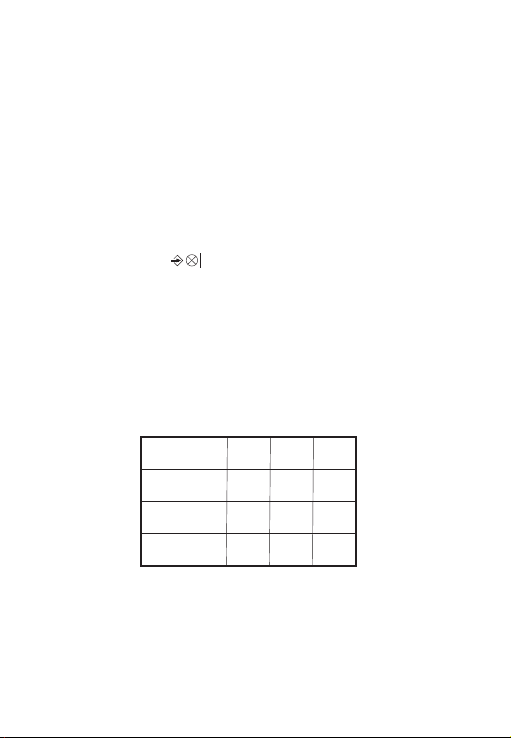
7.4 Setting the ringer melody and melody volume
You can select between 3 different ring melodies and 3 different
volume levels for each melody. See table below for details.
1. Lift the handset.
2. Press the button.
3. Press the #key.
4. Press the numeric key 0 to 9 to set the ringer type
and volume. (see table below)
5. Replace the handset.
If setting 0 is selected, the ring signal will be turned off until the
handset is lifted again. After that, the ring signal reverts to the
previous setting.
6
Melody 2
Melody 3 7
4
1 2
5
8 9
6
3
Low Mid High
Melody 1
/
7.5 Using Redial
To redial the last number dialed, proceed as follows:
1. Lift the handset.
2. Press the RD button.
7
7.6 Recall
Your telephone supports the CallWaiting service. If you
subscribe to this service you can use this feature to put a call on
hold and answer another call on the same line by pressing the R
button.
NOTICE: If you do not have CallWaiting, pressing the R button
might disconnect the current call.
NOTICE: A subscription is required to use the CallWaiting
services. Please call 10219 to subscribe to this service.
7.7 Using Mute
press the
To talk to someone on your end of the phone without the caller
hearing your conversation, button and the “Mute”
indicator will flash. Press the button again to resume your
conversation.
7.8 Using Pause
In some telephone systems, you must dial an access code (9,
for example) and wait for a second dial tone before dialing an
outside number. When you store a number in memory, you can
have your telephone pause anywhere during the dialing
sequence. Simply press the P button at the desired location to
insert a 3.6 second pause.
/
/

8
8. Storing a number
You can store up to 13 numbers in your phone’s memory for
quick and easy dialing. You can store 3 numbers in the one-
touch memory and 10 numbers in the quickdial memory. The
maximum stored number length is 32 digits.
8.1 M1-M2 and VIP memory buttons
1. Lift the handset and press the button.
2. Press the desired memory location (M1, M2 or VIP)
3. Enter the desired number from the keypad. Press the
button to store the number in the one-touch
memory. Replace the handset.
4. The number will automatically be stored.
To dial a number from the one-touch memory, proceed as
follows:
1. Lift the handset.
2.Press the relevant one-touch button (M1, M2 or VIP).
3. The number will then automatically be dialed.
8.2 Quickdial memory buttons
1. Lift the handset and press the button.
2. Press the AUTO button. Press the desired memory
location (0-9)
/
/
/

9
3. Enter the desired number from the keypad. Press the
button to store the number in the quickdial
memory. Replace the handset.
4. The number will automatically be stored.
To dial a number from the quickdial memory, proceed as follows:
1. Lift the handset.
2.Press the AUTO button followed by the relevant
location (0-9).
3. The number will then automatically be dialed.
/
9. Batteries
This product is powered by the telephone line and does not
need or require batteries.

TELEPHONE UNIT TROUBLESHOOTING TABLE
SYMPTOM
No dial tone
Will not ring
Static
SOLUTION
!The handset cord or telephone
line cord may have a bad
connection. Push in firmly at
both ends to establish good
contacts.
!Test the phone at a different
telephone wall socket and listen
for dial tone.
!Test a different phone in the wall
socket and listen for dial tone to
check if the line is in order.
!The phone or another phone
connected to the same line may
be in the off-hook (in-use)
position. Place the phone in the
on-hook position to receive
incoming calls.
!Try a different phone; if the
problem persists the fault is not
with your telephone.
!Some atmospheric conditions
such as very low humidity can
cause static build-up.
10. Troubleshooting
10

11
11. Service Enquiries
For any service or product information queries relating to this
telephone, please call our SharedCall number 0860 2C HELP
(0860 22 43 57) or visit our website on
www.telkomphones.co.za
NOTE: Your telephone is guaranteed for a period of 12 calendar
months from the date of purchase as indicated on your till slip.
Keep your till slip in a safe place as it will be required for
guarantee repairs. It is however not guaranteed against damage
caused by misuse, riot damage, lightning or power surge
damage, damage caused by using the unit for purposes other
than which it was intended or any damage that can be deemed
an act of God.
Table of contents
Other Telkom Telephone manuals


