InnoMedia BuddyTalk BT200 User manual

v0.5
October 2019
BuddyTalk BT200
Deploying BuddyTalk for
voice-enabled workplace
INNOMEDIA PROPRIETARY
This document contains proprietary information of InnoMedia Inc., and its receipt or
possession does not convey any rights to reproduce, disclose its contents, or to
manufacture, use or sell anything it may describe. It may not be reproduced,
disclosed or used without specific written authorization of InnoMedia Inc.

Deploying BT200 for Voice-Enabled Workplace
Page 2 of 35
TABLE OF CONTENTS
1DEPLOYING BT200 IN THE WORKPLACE ..................................................................................................4
2PREREQUISITES.......................................................................................................................................5
AWS ACCOUNT .....................................................................................................................................................5
VOIP SERVICE ........................................................................................................................................................5
SITE SURVEY ..........................................................................................................................................................5
ENTERPRISE FIREWALL .............................................................................................................................................5
REVIEWING ENTERPRISE NETWORK ARCHITECTURE .......................................................................................................6
3SETTING UP AVS AND ALEXA-FOR-BUSINESS PERMISSIONS....................................................................9
4SETUP BT200 DEVICES WITH ALEXA-FOR-BUSINESS SERVICES ..............................................................10
5SETTING UP BUDDYTALK TABLET CONTROLLER (OPTIONAL).................................................................15
6SETTING UP ENTERPRISE ALEXA-FOR-BUSINESS ENVIRONMENT ..........................................................16
Create room profiles.................................................................................................................................... 16
Create rooms............................................................................................................................................... 17
Configuring Conferencing............................................................................................................................ 18
Integrating Calendar ................................................................................................................................... 19
Managing Conferencing and Room Booking............................................................................................... 20
Managing Calling ........................................................................................................................................ 20
7CONFIGURING THE BT200 NETWORK INTERFACES................................................................................22
DUAL-HOMED MODE CONFIGURATION ....................................................................................................................22
THE ETHERNET INTERFACE......................................................................................................................................23
THE WI-FI INTERFACE............................................................................................................................................24
THE VPN CLIENT SETTING......................................................................................................................................24
8ENABLING VOIP SERVICE FOR BT200.....................................................................................................26
BT200 VOIP OPTIONS ..........................................................................................................................................26
BT200 as an IP Phone to Existing IP PBX ..................................................................................................... 26
BT200 with an External VoIP Subscription .................................................................................................. 26
Connecting the BT200 as an IP Phone to the Enterprise IPPBX ................................................................... 27
9TESTING AND VERIFICATION.................................................................................................................31
AVS TESTS ..........................................................................................................................................................31
Alexa for Business Tests .............................................................................................................................. 31
Phone Call Tests .......................................................................................................................................... 32
10 APPENDIX.............................................................................................................................................33
Digitmap Settings........................................................................................................................................ 33

Deploying BT200 for Voice-Enabled Workplace
Page 3 of 35
Digitmap syntax .......................................................................................................................................... 33
11 RESOURCES...........................................................................................................................................35

Deploying BT200 for Voice-Enabled Workplace
Page 4 of 35
1DEPLOYING BT200 IN THE WORKPLACE
The BT200 is Alexa Voice Service (AVS) and Alexa for Business certified. With AVS, the BT200
brings you a broad range of AVS smartspeaker features such as standard Alexa questions &
commands, timers, alarms, reminders, and voice-enabled control of AVS-supported IoT
devices. With Alexa for Business, the BT200 can be fully integrated into your workplace,
accessing various Alexa for Business supported enterprise applications and services. Some
examples include using voice commands to manage schedules, keep track of to-do lists,
manage meetings and meeting rooms, and dial into conference calls. Here are the steps to
deploy the BT200 into your workplace:
Figure 1. the BT200 and companion control tablet
Here are the steps to deploy BT200 into your workplace:
1. Prerequisites: An AWS account, a VoIP service subscription, configuration of firewall
settings, enterprise network architecture review completed (see below), and survey
completed for conferencing service, calendar requirements.
2. Setting up AVS and Alexa-for-Business permissions
3. Setting up BT200 devices with Alexa for Business service
4. Setting up BuddyTalk Tablet Controller (Optional)
5. Setting up enterprise Alexa for Business environment
6. Configuring BT200 network interfaces
7. Enabling the BT200 devices with a VoIP service
8. Testing and verification

Deploying BT200 for Voice-Enabled Workplace
Page 5 of 35
2PREREQUISITES
Please check the following prerequisites before proceeding to deploy BT200 devices in your
workplace:
AWS Account
Your enterprise needs to have an AWS account. If not, please follow the AWS instructions and
procedure to sign up for AWS and create IAM users and policies.
VoIP Service
Your enterprise needs to have a VoIP service subscription for the BT200 devices. The VoIP
service can be one of the two types:
Your enterprise is already using a VoIP service for your IPPBX system. In such a case,
the BT200 devices can be configured as IP phones connected to the existing IPPBX
system.
our enterprise does not have an IPPBX system, or you would like to setup the BT200
devices with a separate VoIP service even if your enterprise already has an IPPBX
system. In such a case, you will configure the BT200 devices with the external VoIP
service parameters.
With either one of the above approaches, prepare the following items:
Admin user ID and password of each BT200 device for accessing the BT200
management console.
SIP account of each BT200 device. This may include
oSIP account (or IPPBX extension number)
oSIP account password, and optionally authentication ID
SIP server (IPPBX) registration information
oServer IP address (or FQDN)
oSIP domain
oOther requirements for SIP registration depending on Server (or IPPBX)
settings
Site Survey
What is the calendar system used at your workplace?
What is the conference service used at your workplace?
Enterprise Firewall
The BT200 will be communicating with external services through the following ports. Please
configure your enterprise firewall accordingly.

Deploying BT200 for Voice-Enabled Workplace
Page 6 of 35
1. The firewall should be configured to allow outgoing traffic with the following destination
ports. The firewall needs to open the VoIP signaling and media destination ports if you
choose to have the BT200 devices subscribe to an external VoIP service.
Service
Protocol
Destination Port
Transport
VoIP Signaling
SIP
5060
UDP (or TCP/TLS)
VoIP Media
RTP/SRTP
10050-10061
UDP
AVS tunnel
HTTPS
50000
TCP
OTA Provisioning
HTTPS
18883
TCP
Table 1. BT200 Destination Ports
2. The following table summarizes the source ports used by the BT200. The firewall needs to
allow traffic coming into these ports for the BT200
Service
Protocol
Source Port
Transport
AVS tunnel
HTTPS
32768-61000
TCP
OTA (provisioning)
HTTPS
32768-61000
TCP
Table 2. BT200 Source Ports
Reviewing Enterprise Network Architecture
BT200 devices offer the following flexible network interface options to accommodate different
enterprise network architectures.
1. If voice and data services can be reached via the same network interface,
the Redundant Network Interface mode can be chosen
Figure 2. Enterprise deployment--Redundant network interface
2. If the voice network (either through the internal IPPBX or the external service provider) is
isolated from the data network, the Dual-Homed Network Interface mode can be
chosen.

Deploying BT200 for Voice-Enabled Workplace
Page 7 of 35
Figure 3. Enterprise deployment-- daul-homed network interface
3. If voice and data services can be reached via the same network interface, but the
enterprise firewall does not allow VoIP packets (either signaling or media or both) to go
through, the VPN Enterprise Network Traversal mode can be chosen with the routing
table set to have the blocked VoIP packets go through the VPN tunnel.
Figure 4. Enterprise deployment—VPN for enterprise network traversal
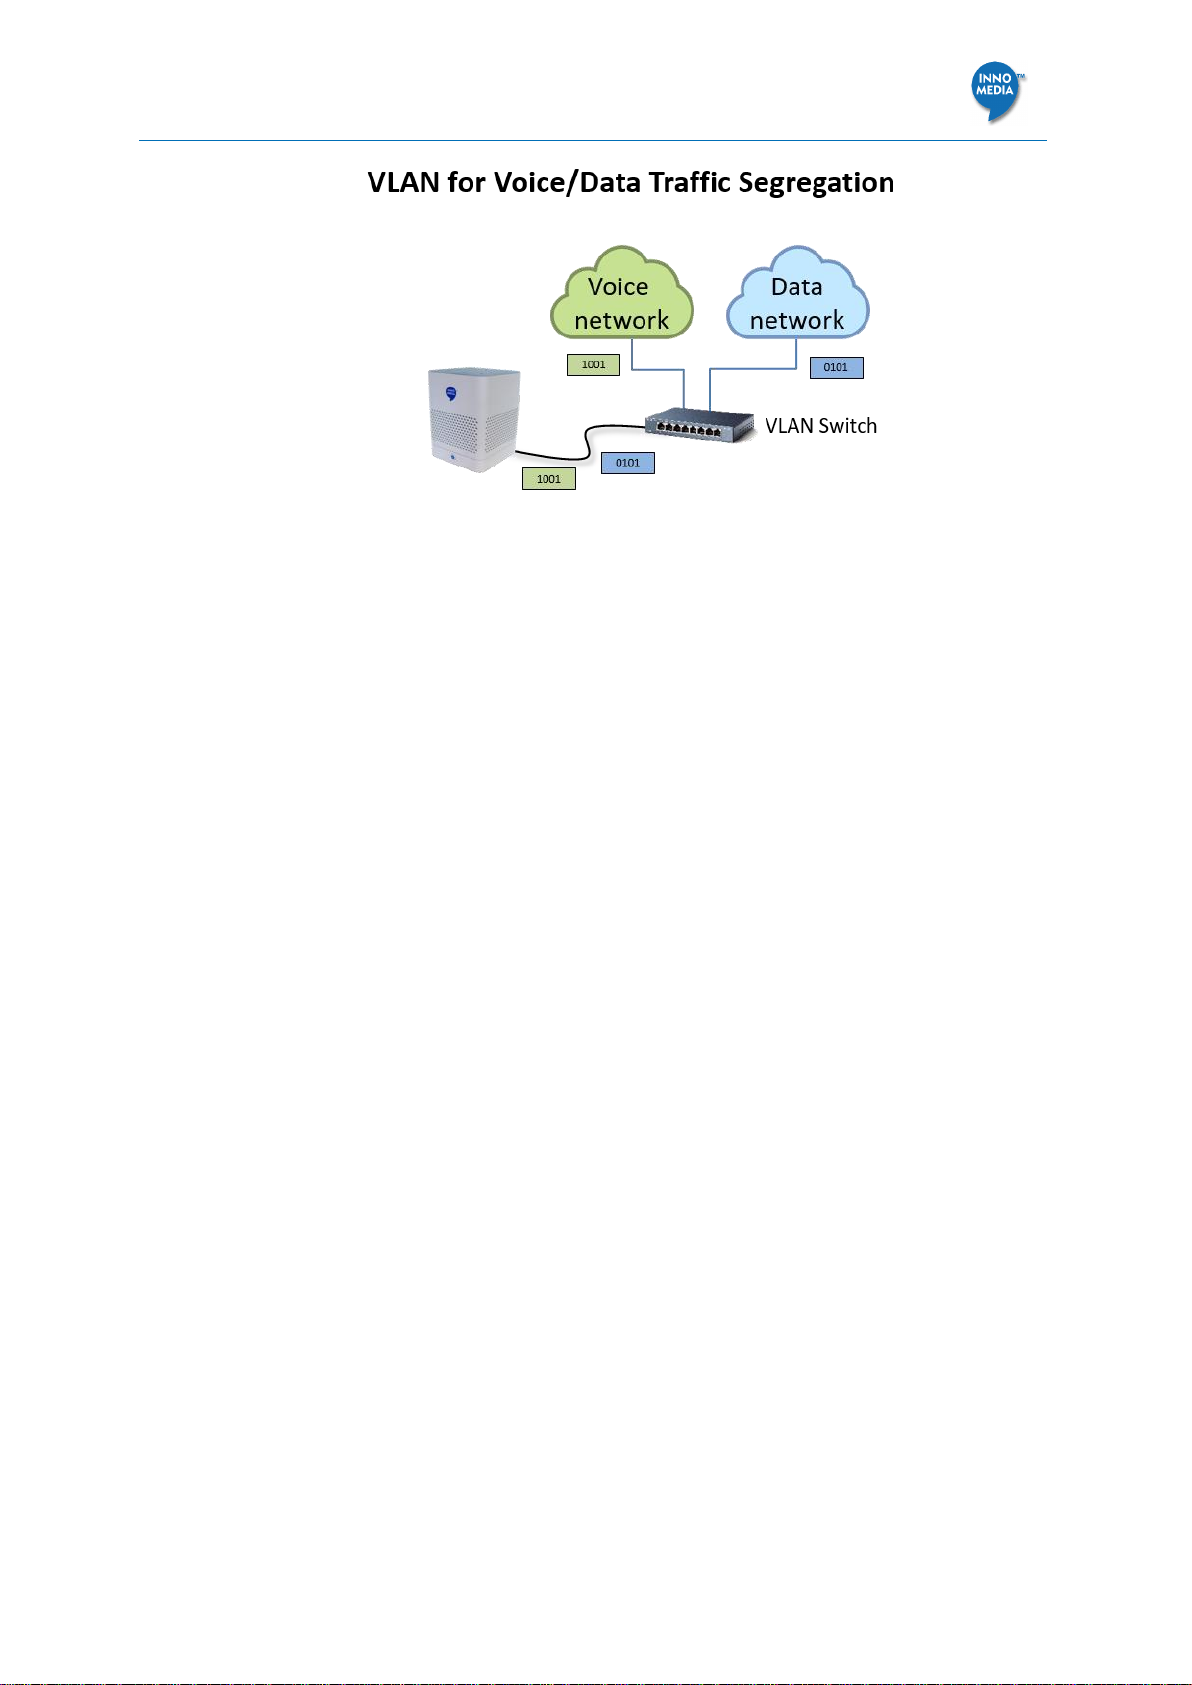
4. The enterprise internal LAN uses VLAN switches to segregate voice and data LAN traffic.
In such a case, the VLAN Tagging mode on the BT200 device can be enabled.
Deploying BT200 for Voice-Enabled Workplace
Page 8 of 35
Figure 5. Enterprise deployment—VLAN for voice/data traffic segregation

Deploying BT200 for Voice-Enabled Workplace
Page 9 of 35
3SETTING UP AVS AND ALEXA-FOR-BUSINESS
PERMISSIONS
To equip the BT200 devices with Alexa for Business services, you will first need to grant
InnoMedia, the device maker, permissions to register your BT200 devices with your AWS
account. To do this, use the following steps:
1. Login to Alexa for Business console at https://console.aws.amazon.com/a4b/
2. Choose Settings, AVS permissions.
3. From the AVS device maker drop-down menu, choose InnoMedia, then obtain
InnoMedia’s AWS account ID and Amazon ID.
AWS Acct ID –022758424176
Amazon ID -- A3R42AR9U0YO6LC
4. Choose Create IAM role.
5. Make note of the Role ARN and External ID that are displayed. Choose Download CSV.
The information must be entered in BT200 Setup Tool.
Figure 6. Grant AVS permissions to BT200 device maker, InnoMedia

Deploying BT200 for Voice-Enabled Workplace
Page 10 of 35
4SETUP BT200 DEVICES WITH ALEXA-FOR-BUSINESS
SERVICES
BT200 devices can be set up using the BuddyTalk Setup Tool, a Windows 10-based software
application. Note that the PC running the BuddyTalk Setup Tool must have a WiFi
connection. Follow the steps below:
1. Download the BuddyTalk Setup Tool –on your Windows 10 PC, go to Microsoft
Store. Search for the keyword BuddyTalk. Get the BuddyTalk Setup Tool.
Figure 7. BuddyTalk setup tool
2. Once the download process completes, click Launch. The BuddyTalk Setup welcome
screen displays the required settings and tasks to complete the process.
Input AWS credentials. They are the Role ARN and External ID obtained earlier.
Input WiFi network information. Provide the login credentials of the WiFi network to
which your BT200 devices will connect.
This setup tool will then Discover and setup BT200 devices.
Choose Get Started.
Figure 8. BT200 setup tool welcome screen
3. Input your AWS credentials using either of the following two approaches. The credentials
(or the csv file) are obtained during the process described in “Setting up AVS and Alexa-
for-Business Permissions“.
Choose Open CSV File, or
Input Alexa for Business Role ARN and Alexa for Business External ID.
Choose Next.

Deploying BT200 for Voice-Enabled Workplace
Page 11 of 35
Figure 9. Input your AWS credentials
4. Once the Role ARN and External ID parameters are validated, the setup tool continues
leads to the WiFi setup page. By default, the option to enable and configure WiFi is
checked. This will require a valid SSID and passphrase to be provided for the setup to
proceed. Alternatively, skip this step if the BuddyTalk devices are connected via Ethernet.
If the BT200 devices are to be configured to have WiFi enabled, then, enter the following
WiFi network information.
Choose the target Network SSID from the drop-down menu.
The associated Network security type is displayed according to the selected item.
Input the Passphrase of the selected Network SSID.
Make sure you enable the checkbox “Connect Automatically” for the SSID from your PC’s
WiFi selection menu.
Choose Next.
Figure 10. Choose Network SSID and input its Passphrase
5. If the BT200s need to be configured using Ethernet only without WiFi, this can be done
by having the checkbox unchecked. In this mode the units will be setup without any WiFi
information and any WiFi will be disabled.

Deploying BT200 for Voice-Enabled Workplace
Page 12 of 35
Choose Next.
Figure 11. Disable Wi-Fi Connection
6. After the WiFi setup screen, connect all BT200 devices to a power strip for ease of
configuration. Plug in Ethernet cables if the option to setup without WiFi was selected
previously, Power on all BT200 devices.
If the device is in factory default mode, it will show a rotating orange LED and is
ready for setup.
If the device was configured previously, long press the Setup button (the button
with a gear icon on at the lower part of the device) until it shows a rotating orange
LED and is ready for setup.
Choose Next when all the BT200 units display a rotating orange LED.
Figure 12. Setup devices with WiFi enabled

Deploying BT200 for Voice-Enabled Workplace
Page 13 of 35
Figure 13. Setup devices with Ethernet connection
7. The Setup Tool starts to discover device(s) in setup mode, and lists all connected
device(s).
Choose Rescan. If not all devices are listed.
Choose Configure Devices. The Setup Tool will then perform configuration and A4B
registration of each device individually.
Figure 14. Discover and list all connected BT200 devices
8. Units that have been setup successfully will have a green check mark icon.
Choose Done to finish the setup process. Once all devices complete the A4B
registration, the Setup Tool will activate this button.
If the device was registered but not online, a triangular warning icon will be shown. It
may take some time for devices to synchronize status with the Amazon Alexa for
Business server. Therefore, the administrator may login to Amazon Alexa for Business
management console periodically to check if the devices are online.

Deploying BT200 for Voice-Enabled Workplace
Page 14 of 35
Figure 15. Setup complete
9. Once done, do a quick check to confirm AVS service is available by asking Alexa a simple
question, such as saying “Alexa, what is the time?”, and you should get a valid response
from Alexa. See the example in “Testing and Verification“.

Deploying BT200 for Voice-Enabled Workplace
Page 15 of 35
5SETTING UP BUDDYTALK TABLET CONTROLLER (OPTIONAL)
To set up the BuddyTalk Tablet Controller for a specific BuddyTalk BT200 device, the Tablet
Controller’s WiFi interface needs to be configured to be in the same subnet as that of the
BT200 device it is communicating with, and the Tablet Controller’s WiFi interface needs to be
able to reach the external AVS server.
1. Setup the Tablet Controller WiFi interface. Click the WiFi Setup icon on the Main GUI
page to enter the WiFi setup. Select the WiFi SSID and enter the WiFi passphrase.
Figure 16. Tablet controller user interface
2. Bind the Tablet Controller to the BT200 device if required.
On the Main GUI page, click the Setting icon to enter the Tablet
Controller Setup page.
If the Tablet Controller is pre-bundled with the BT200 device, no MAC address needs
to be entered. If the Tablet Controller is not pre-bundled with the BT200 device, enter
the BT200 MAC address
3. Grant users with access to the BT200 device using the BuddyTalk App. Enter the user
account in the Granted User List slot.
4. Configure the Alexa Start of Request Sound and ALexa End of Request
Sound preference.
Once done (and after the BT200 device has been setup successfully), the two icons in the top
right corner will turn green, indicating that the Tablet Controller has successfully connected to
the cloud server (the cloud icon) and the BT200 device (the cube icon).
Figure 17. Paring tablet controller with a BT200 unit

Deploying BT200 for Voice-Enabled Workplace
Page 16 of 35
6SETTING UP ENTERPRISE ALEXA-FOR-BUSINESS
ENVIRONMENT
With the integration of Alexa for Business, enterprise users can deploy the BT200 and allow
business users to access a broad suite of enterprise applications and services. One such
application is conferencing and meeting room management including integration with
existing work calendars, setting up conference rooms and managing conference room
features, creating and automatically dialing into conference calls. The setup instructions below
cover:
1. Creating room profiles
2. Creating rooms
3. Configuring conferencing
4. Integrating the calendar of the room owner
5. Managing conferencing and the room booking
6. Managing address books and contacts
Create room profiles
Login to Alexa for Business console at https://console.aws.amazon.com/a4b/.
To simplify the process of creating and managing rooms, first define room profiles. A room
profile can be assigned to rooms containing the BT200 device, and contains settings for your
BT200 such as local time, and any location-based information. For example, create a room
profile that contains the Alexa settings that apply to all rooms in the same building.
1. Choose Configuration> Room profiles, and click on the Create room profile button.
2. Fill in the following fields:
Profile name –Enter a unique name for the room profile. (Required).
Location –Enter the physical address of the building. (Required).
Time zone –Select the time zone for the room profile. (Required).
Wake word –Select Alexa to be the voice command that turns on the device.
Temperature units –Choose Fahrenheit or Celsius.
Distance units –Choose Feet or Meters.
Max volume –Choose a value between 6–10 to limit the volume output of the
device to this value.
Device setup mode –Choose Enable to allow users to hold the action button for 7
seconds to put the device into setup mode. Otherwise, choose Disable.
Outbound calling –Choose Enable
Click Create.

Deploying BT200 for Voice-Enabled Workplace
Page 17 of 35
Figure 18. Create a room profile
Create rooms
A room is a physical location where you can put your BT200 devices. Examples of rooms
include conference rooms, lobbies, or users’ offices.
1. Choose Rooms, and click the Create room button.
2. Fill in the following fields:
Name, enter a unique room name.
Room Calendar email. Enter the email address associated with this conference
room. The calendar associated with this email address is used to manage the
conference schedules for BT200 devices of this room.
Room Profile. Select a room profile from the list.
Choose Next.

Deploying BT200 for Voice-Enabled Workplace
Page 18 of 35
Figure 19. Create room
3. (Optional) To add a skill group, select the check box next to the skill group to add and
choose Next.
4. (Optional) To add devices, select the check box next to the device.
5. Choose Create room.
Configuring Conferencing
1. Navigate to page Settings > Conferencing. Choose Add provider.
2. Choose one from the available list of conferencing providers supported by Alexa for
Business. If your conference provider isn’t on the list, choose Custom conference
provider and specify the details.
3. Review the following settings and edit them as necessary:
Meeting settings –Specify whether a meeting PIN is required to join the meeting.
(Required)
PSTN dial-in number –Specify the phone number of your conferencing provider.
When you use the BT200 as a speaker phone to dial into meetings, you must
configure the PSTN number. Alexa for Business uses the PSTN settings and the
meeting ID and PIN from the scheduled meeting, to create a dialing sequence.
PSTN dial-in delays –Specify the delays before the meeting ID and PIN are sent using
DTMF. These delays should be left at their default settings unless the user knows the
delay optimization process.
4. Choose Add.

Deploying BT200 for Voice-Enabled Workplace
Page 19 of 35
Figure 20. Configure A4B Conferencing
Integrating Calendar
You can connect Alexa for Business to users’ calendars. This allows users to join scheduled
meetings without knowing the dial-in details. When Alexa for Business is connected to your
calendar system and a user asks Alexa to join a meeting, Alexa for Business determines the
correct meeting on the associated room calendar and accesses the dial-in information.
Login to Alexa for Business console at https://console.aws.amazon.com/a4b/.
1. Create room profiles. This should have already been done previously.
2. Make sure outbound calling is enabled in your room profile.
3. Navigate to page Settings > Calendar. Link Alexa for Business to one of the following
calendaring systems.

Deploying BT200 for Voice-Enabled Workplace
Page 20 of 35
Link Alexa for Business to Office 365
Link Alexa for Business to Microsoft Exchange
Link Alexa for Business to Google G Suite
Once the integrated calendar is deployed in the conference room, Alexa can check whether
the room is available, book the room, and tell you who reserved the room.
4. Associate the email address of the calendar system to the target room.
Resources
Add your resource calendar to a room
If there are issues with one of the conferencing providers, send an email
to a4bconferencing@amazon.com and include an example of your meeting invite.
Note. Connecting Alexa for Business to your calendar system is required only when your
third-party Alexa skill doesn’t natively support joining scheduled meetings.
Managing Conferencing and Room Booking
After linking your calendar system to Alexa for Business, you can use Alexa to dial into
meetings with your voice. Use BT200 devices as speaker phones and check availability of the
conference room and reserve the room if it’s free. If it’s not available, Alexa can tell you who
made the reservation.
Login to Alexa for Business console at https://console.aws.amazon.com/a4b/.
Resources
Add your resource calendar to a room
Use Cisco TelePresence with Alexa for Business
If there are issues with one of the conference providers, send an email
to a4bconferencing@amazon.com and include an example of your meeting invite.
Note. Connecting Alexa for Business to your calendar system is required only when your
third-party Alexa skill doesn’t natively support joining scheduled meetings.
Managing Calling
You can make calls from the BT200 with Alexa for Business by voice. The person you are
calling can be the name of a contact that you defined in the A4B console, or their phone
number. For example, say “Alexa, call helpdesk” or “Alexa, call 206-555-0126.”
Login to Alexa for Business console at https://console.aws.amazon.com/a4b/.
Resources
Add your resource calendar to a room
To use Echo/BT200 as a controller with Cisco Telepresence
If there are issues with one of the conference providers, send an email
to a4bconferencing@amazon.com and include an example of your meeting invite.
Note. Connecting Alexa for Business to your calendar system is required only when your
third-party Alexa skill doesn’t natively support joining scheduled meetings
Table of contents
Other InnoMedia Telephone manuals


