Telonics TR-8 User manual

TR-8 RECEIVER MANUAL
PB-010101, REVISION A
Copyright © 2020 Telonics, Inc.
All Rights Reserved.
No part of this publication may be copied without the express written permission of Telonics, Inc., 932 E.
Impala Ave., Mesa, AZ 85204.
TELEMETRY-ELECTRONICS CONSULTANTS
932 E. IMPALA AVENUE
MESA, ARIZONA 85204-6699 U.S.A.
TEL (480) 892-4444 FAX (480) 892-9139
E-MAIL info@telonics.com
www.telonics.com

PB-010101 Rev A Page 2 of 22
TABLE OF CONTENTS
Basic Orientation and Identification ......................................................................................................................4
Power/Backlight Key ...........................................................................................................................4
Soft Keys ....................................................................................................................5
Numeric Keys .....................................................................................................................................................5
Enter Key ..................................................................................................................................................5
Gain Knob: RF Gain and Audio Volume ............................................................................................................5
Tune Knob: Fine Tune and Scroll Frequency List(s) .........................................................................................6
Backlit Display ....................................................................................................................................................6
USB-C Connector ...............................................................................................................................................6
LED Status Light .................................................................................................................................................6
Frequency Lists .......................................................................................................................................................7
Skip (Mark/Unmark) Frequency........................................................................................................................7
Scrolling through Lists .......................................................................................................................................7
Manual Scan.......................................................................................................................................................7
Auto Scan ...........................................................................................................................................................8
Labels..................................................................................................................................................................8
USB Features...........................................................................................................................................................9
Battery Charging ................................................................................................................................................9
Operation on USB Power ..................................................................................................................................9
Configuration .....................................................................................................................................................9
Firmware Updates .............................................................................................................................................9
Home Screen.........................................................................................................................................................10
No lists active...................................................................................................................................................10
List(s) active .....................................................................................................................................................10
List(s) active and auto-scanning......................................................................................................................11
User Preferences ..................................................................................................................................................12
Scanning Interval .............................................................................................................................................12
Backlight Brightness ........................................................................................................................................12
Audio Filter.......................................................................................................................................................12
Next/Prev Buttons ...........................................................................................................................................12
About this TR-8… ..................................................................................................................................................13

PB-010101 Rev A Page 3 of 22
Troubleshooting....................................................................................................................................................14
RF Over-Gain....................................................................................................................................................14
System Reset....................................................................................................................................................14
TR-8 Editor PC Software .......................................................................................................................................15
Keeping Software Up To Date.........................................................................................................................15
Configuring TR-8 Receivers .............................................................................................................................16
Entering Frequency Lists .................................................................................................................................16
Fixing List Errors...............................................................................................................................................18
Tracking Tips .........................................................................................................................................................19
Setting the Tune and Gain/Vol Controls.........................................................................................................19
Advanced Technique: Overgain direction finding..........................................................................................19
Specifications ........................................................................................................................................................20
Regulatory and Compliance Information ............................................................................................................22

PB-010101 Rev A Page 4 of 22
BASIC ORIENTATION AND IDENTIFICATION
POWER/BACKLIGHT KEY
Press and hold to turn the TR-8 on or off. If you try to turn on the TR-8 when the battery is dead, the
red LED comes on.
To turn on the backlight (for the display and all the keys) without impacting the current operation of the
TR-8, momentarily press . Be careful not to hold it down too long or the TR-8 will turn off.
To force the backlight to remain on continuously, press twice. A light-bulb icon appears in the display
to indicate the setting. To restore normal backlight operation, press twice again. The light-bulb icon
disappears, and the backlight automatically turns off after several seconds.
Ambient Light Sensor
LED Status Light
USB-C Connector
Headphone Jack
Built-in Speaker
Soft Keys
Backlit Display
Numeric Keys
Power/Backlight Key
Antenna Connector
(BNC, 50 Ω)
Gain/Vol Knob
Tune Knob
Enter Key

PB-010101 Rev A Page 5 of 22
SOFT KEYS
The top row of buttons on the TR-8 keypad are soft
keys. The lower portion of the screen indicates the
current functions of the left, middle, and right soft keys.
For example, in this screen shot, goes back to the
previous frequency in the list, opens a menu, and
pauses the scanner.
NUMERIC KEYS
From the Home screen, use the numeric keys to enter a frequency directly.
When editing a label for a list or frequency, use the numeric keys to type in a label (T9 entry).
On menu screens, the ‘1’ and ‘3’ buttons move the selection up, and the ‘4’ and 6’ buttons move the
selection down.
ENTER KEY
When entering a frequency with the numeric keys, lets you tune to the frequency immediately
without having to type in the trailing zeros. For example, you can tune to 151.0000 MHz by entering ‘1’, ‘5’,
‘1’, Enter.
If you’re on the screen for editing a label, the Enter button saves the label and exits the editing screen.
On menu screens, the Enter button selects the currently highlighted menu item.
GAIN KNOB: RF GAIN AND AUDIO VOLUME
The TR-8 has separate settings for RF gain and audio volume, but both are controlled by the gain knob.
Normally, the gain knob controls RF gain. However, if you click the gain knob, its function toggles between
RF gain control and volume control, as indicated by an underline marking on the display. In the screen shot
on the left, the gain knob controls RF gain. In the screenshot on the right, the gain knob controls the audio
volume.
Note that volume control is a temporary function, and the gain knob automatically reverts to RF gain
control a few seconds after you finish adjusting the volume.

PB-010101 Rev A Page 6 of 22
The TR-8 provides separate volume settings for headphones and for the internal speaker. When
headphones are attached, “H.Vol:” is displayed instead of “S.Vol:”.
On menu screens, turning a knob moves the selection marker up or down, and clicking a knob selects the
menu item.
TUNE KNOB: FINE TUNE AND SCROLL FREQUENCY LIST(S)
Normally, the tune knob allows small adjustments to the current frequency, known as fine tuning.
However, if you click the tune knob, its function toggles between fine tuning and scrolling through the
active frequency list(s), as indicated by an underline marking on the display. Note that scrolling is a
temporary function, and the tune knob automatically reverts to the fine-tune function a few seconds after
you settle on a frequency.
On menu screens, turning a knob moves the selection marker up or down, and clicking a knob selects the
menu item.
BACKLIT DISPLAY
The LCD display is sunlight readable and backlit. In low-light conditions, the TR-8 automatically turns on the
backlight whenever you press any button or turn any knob. The backlight is auto-dimming based on the
amount of ambient light. The backlight automatically turns off after several seconds, unless you activate
the continuous backlight. For more information, see the power/backlight key (above).
If you activate the continuous backlight, you may need to update the brightness occasionally to keep up
with any changes in ambient light. Pressing the backlight button once induces the automated brightness
adjustment.
USB-C CONNECTOR
The USB-C connector is used for powering the TR-8 and charging the TR-8 battery. The USB-C connector is
also used for communications with a Windows PC to allow simple configuration of frequency lists stored in
the TR-8. You don’t need a USB-C connector on your PC for this connection—any USB port will do.
The USB-C connector is more convenient than older USB connectors because there is no wrong orientation
for inserting the cable.
LED STATUS LIGHT
This multi-color LED indicates specific conditions. When the TR-8 is off and connected to USB power, the
LED indicates when charging is complete. When the TR-8 is on, the LED indicates when an RF pulse or an
over-gain condition is detected.

PB-010101 Rev A Page 7 of 22
FREQUENCY LISTS
The TR-8 stores 25 frequency lists, each containing up to 99 frequencies. Frequencies within each list are
always sorted in numeric order by frequency. Each frequency can be assigned its own unique label to help
you identify the corresponding transmitter. Each list also has its own label.
From the Menu, you can choose which lists are active at any given time, and multiple lists can be active at
the same time. When a list is active, you can easily tune the receiver to any of the list’s frequencies using
one of the following methods instead of entering in the frequency on the keypad:
•Scroll through the list(s) using the Tune knob
•Manually scan the list(s) using the “Next” and “Prev” soft keys
•Automatically scan the list(s) using TR-8 auto scanning
•Jump directly to a frequency by entering its position in the current list
(e.g., enter “3” for the option to jump directly to the third frequency in the current list)
Depending on how you navigate the list(s), the TR-8 may (or may not) skip frequencies marked for skipping,
as described in the remainder of this section.
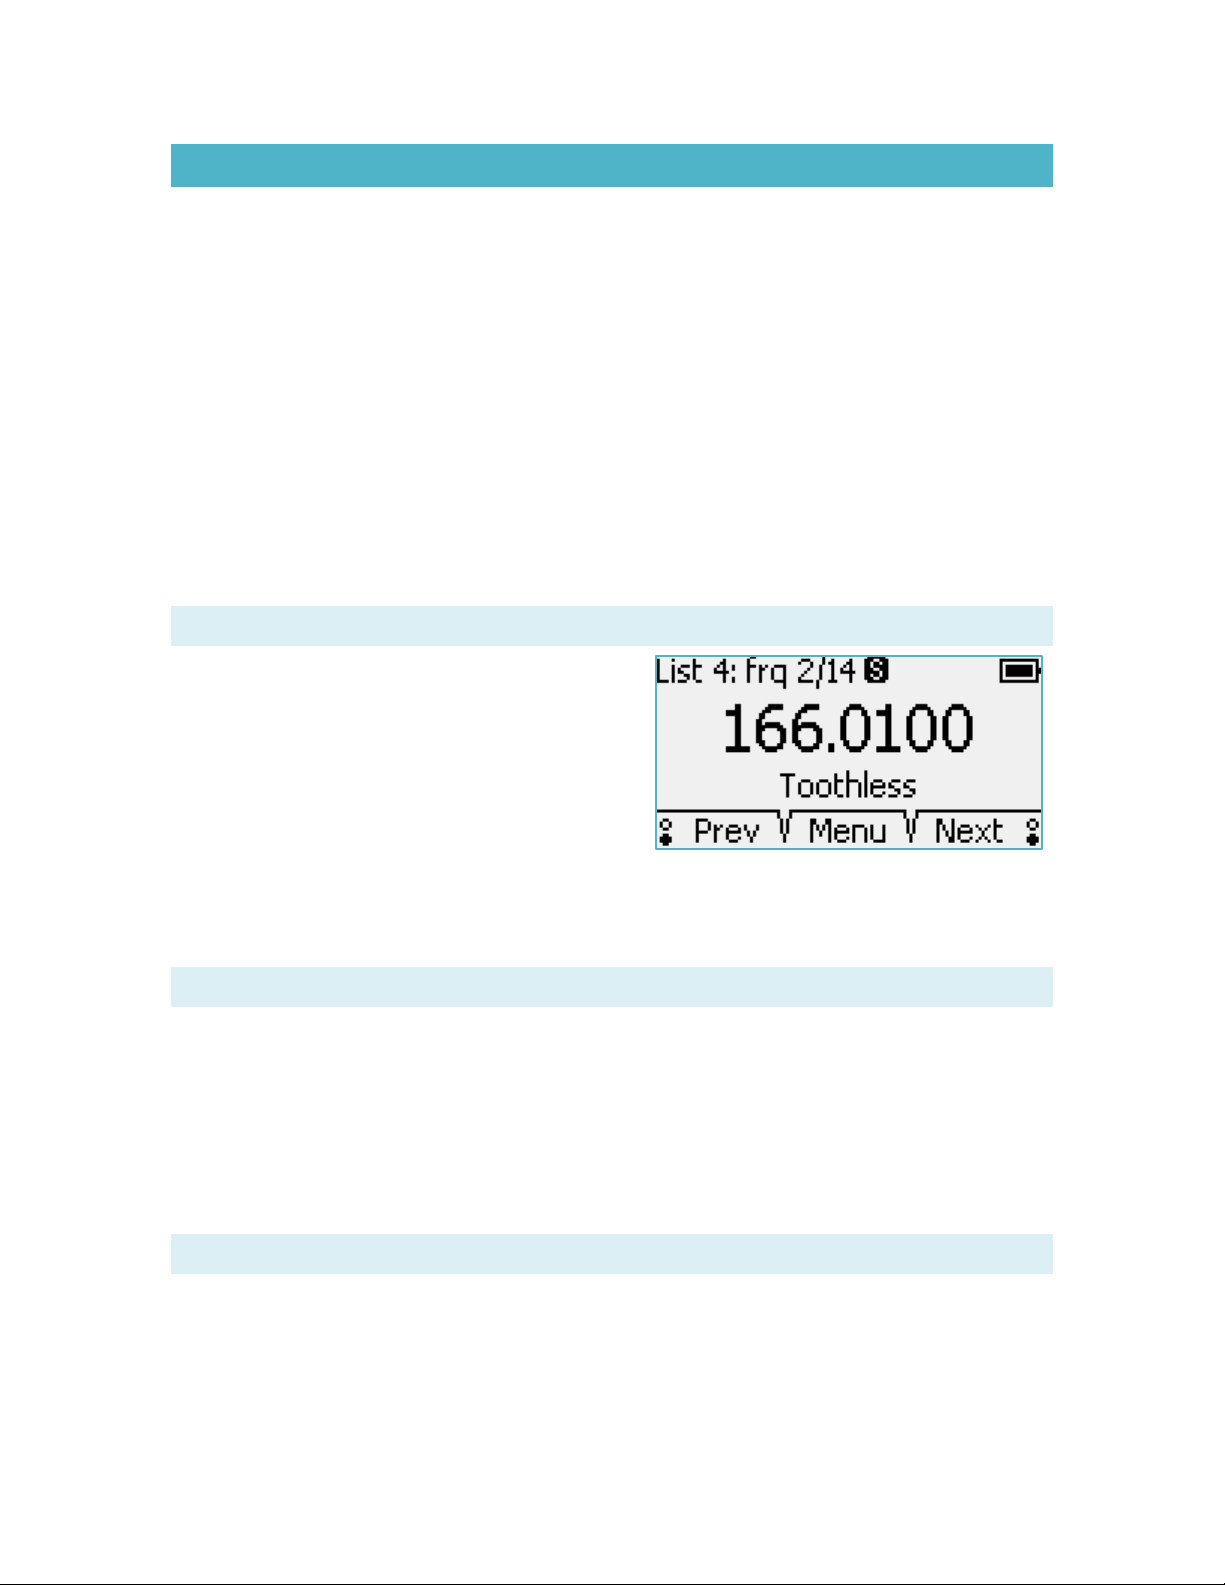
SKIP (MARK/UNMARK) FREQUENCY
To mark a frequency on a list for skipping, press the
“Skip” (zero) button. An “S” icon appears as shown here.
Press the button again to unmark and restore the
frequency to the scanning sequence.
Press and hold the “Skip” button to unmark all of the
frequencies on the active list(s). The “Skip” button also
works the same way in the List Maintenance menu, any
time the TR-8 is displaying the contents of a list.
During auto-scanning, the TR-8 skips frequencies marked for skipping. During manual scanning, the TR-8
optionally skips these frequencies.
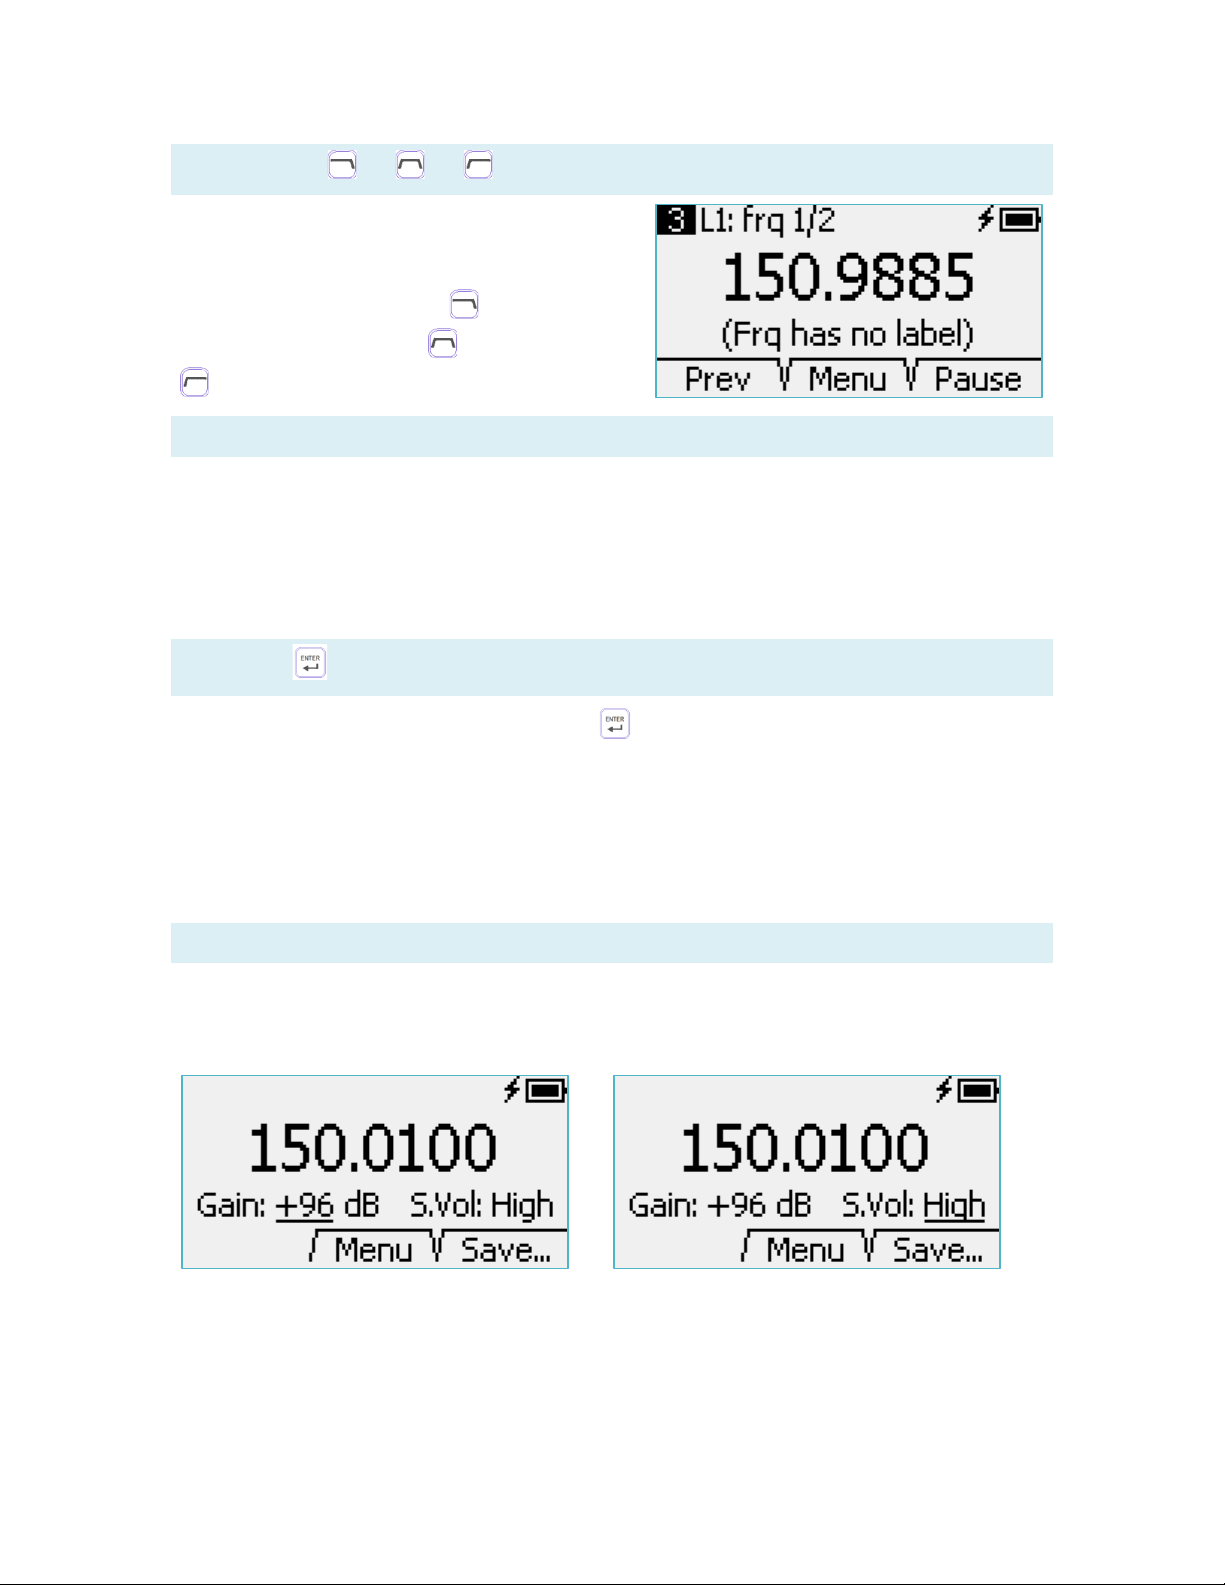
SCROLLING THROUGH LISTS
Normally, the tune knob allows small adjustments to the current frequency, known as fine tuning.
However, if you click the tune knob, its function toggles between fine tuning and scrolling through the
active frequency list(s), as shown by an underline marking on the display. Note that scrolling is a temporary
function, and the tune knob automatically reverts to the fine-tune function a few seconds after you settle
on a frequency. Scrolling never skips frequencies, even those marked for skipping.
Scrolling is available anytime at least one list is active and the TR-8 is on the home screen. Scrolling works
even when auto-scanning.
MANUAL SCAN
When at least one frequency list is active, use the “Next” and “Prev” buttons to step through the
frequencies on the list(s). These buttons can optionally skip frequencies marked for skipping. Press and
hold either button to change the function of both buttons to skip, or not to skip, those marked frequencies.
The behavior of the Next/Prev buttons can also be changed in the User Preferences menu.

PB-010101 Rev A Page 8 of 22
To jump directly to a specific frequency within the active list, use the numeric keys to enter the frequency’s
position number in the list (1-99) and then press the matching soft key. You may also simply enter the
frequency directly.
AUTO SCAN
During auto-scanning, the TR-8 uses a timer to advance automatically to the next frequency in the active
list(s). This method of scanning always skips frequencies marked for skipping.
Auto-scanning steps through all the active lists in order, and then repeats that process until you stop auto-
scanning. Typically, you would use the Skip button to mark a frequency for skipping once you have located
the transmitter and have collected any data required. The scanner will then skip that frequency until you
remove the mark for skipping.
The scanning interval is set in the menu, under User Preferences. Note that the TR-8 uses the same
Scanning Interval for all frequencies in the list. Use the pause button if you need to spend more time on a
particular frequency. Alternatively, you could store that frequency multiple times in the list to extend the
scan interval.
During auto-scanning, if you make adjustments to the gain (or volume) or tuning, the scanning interval
starts over.
Use the “Prev” soft key to go back to the previous frequency in the list. Use the “Pause”soft key if you
need to spend more time on a particular frequency. The “Pause”soft key then becomes “Resume”, and the
time remaining changes to 1 second. Press “Resume”when you are ready to move on to the next
frequency and resume auto scanning. Press the pause soft key twice (which is a Pause and Resume
operation) to skip to the next frequency quickly.
During auto-scanning, if you mark a frequency for skipping, the time remaining changes to 1 second and
the TR-8 moves quickly to the next frequency not marked for skipping. If you mistakenly mark a frequency
for skipping, use the “Prev” soft key to go back to the channel so you can remove the marking.
To stop auto-scanning, use the menu. Auto-scanning also stops if you use the numeric keys to tune to a
frequency not on any active list or if you use the menu to deactivate all active lists.
LABELS
Each list has a label, and each frequency on a list has its own label too. The easiest way to set and manage
the labels is using the TR-8 Editor software on a PC. But you can edit labels directly on the TR-8 if needed.
When editing a label on the TR-8, use the softkey “123” to switch to numeric entry mode. The same softkey
changes to “abc” which allows you to switch back to alphanumeric entry mode. In alphanumeric mode, the
‘1’ button includes punctuation marks, and the ‘0’ button includes symbols.

PB-010101 Rev A Page 9 of 22
USB FEATURES
The USB port can power the TR-8, charge the battery, and link to a PC. Any USB port on your PC will work,
even if it doesn’t use the new USB-C connector.
BATTERY CHARGING
When connected to any type of USB power (computer, power pack, wall charger, etc), the TR-8 attempts to
charge the battery automatically, whether the TR-8 is on or off. When the TR-8 is off, the screen displays
the charging status, and the LED turns from red to blue when the battery reaches full charge. When the
TR-8 is on, the charging icon (a lightning bolt) disappears when the battery is full.
OPERATION ON USB POWER
The TR-8 has an advanced battery circuit that allows the USB port to power the TR-8 and charge the
battery at the same time, with no reduction in charging time. This is especially useful if you forget to charge
the TR-8. You could connect a USB power pack for this purpose, which avoids the environmental impact of
disposable batteries. For extended field work, consider using widely available solar chargers along with a
USB power pack.
CONFIGURATION
The “TR-8 Editor” software is the easiest way to set up frequency lists. It can import TPFs for Telonics
transmitters, and it can even interpret lists you’ve made in Excel. Find it at
https://www.telonics.com/products/vhfReceivers/tr-8.php. Use any USB-C cable to connect the TR-8 to
your Windows PC, and be sure to turn on the TR-8 so it will communicate with the PC.
FIRMWARE UPDATES
There is a significant amount of software (“firmware”) inside the TR-8. From time to time, Telonics will
make updates available to your TR-8 to add features or fix bugs. The same TR-8 Editor software used for
configuring the TR-8 also automatically keeps the TR-8 firmware up-to-date. To check for updates, run the
TR-8 Editor software while the PC has internet access. Then attach the TR-8 to the PC so the TR-8 Editor
software can install any updates. Be sure to turn on the TR-8 so it will communicate with the PC.

PB-010101 Rev A Page 10 of 22
HOME SCREEN
The home screen is used for finding and tracking VHF transmitters, so you’ll spend a lot of time there. From
the home screen, you can always access the main menu by pressing the “Menu” soft key. You can also
always enter a frequency using the numeric keys to tune to that frequency.
The home screen changes appearance slightly depending on how you are using the TR-8.
NO LISTS ACTIVE
With no frequency lists active, the home screen contains only basic elements.
You can activate one or more list(s) from the menu. To save the current frequency, press the “Save”soft
key and choose a list. As a convenience that list then becomes active.
LIST(S) ACTIVE
With at least one frequency list active, the home screen adds a few additional elements as shown below.
As described in the Manual Scan section, “Next” and “Prev” can optionally skip frequencies marked for
skipping. The home screen indicates the selected behavior using a small symbol near “Prev” and “Next”. If
the upper bubble is filled in, the buttons do not skip frequencies marked for skipping. If the lower bubble is
filled in, the buttons do skip the frequencies marked for skipping.
Battery Gauge
Charging
Current frequency
Indication of Current
Soft Key Functions
Selected Prev/Next behavior
Frequency label for 150.9885
Current
List #
Current position in
the current list
Number of frequencies on
the current list
Continuous Backlight

PB-010101 Rev A Page 11 of 22
If you use the fine-tuning knob to modify a frequency on
a list, the home screen indicates the modification with
as asterisk next to the list position number, as shown
here. To update the list entry and save the change, use
the Menu and select “Quick Save”.
You can start auto-scanning by pressing the “Menu”soft
key and choosing Start auto-scanning.
LIST(S) ACTIVE AND AUTO-SCANNING
When auto-scanning is on, the home screen adds one more element.
If you pause the scanner, the time remaining changes immediately to 1 second left, and the home screen
indicates the pause condition in two ways. First, the “Pause” soft key changes to “Resume”. Second, a
pause symbol appears alongside the “1” in the time-remaining indicator.
See the Auto Scan section for more information about using the scanner.
Time remaining (in seconds) until scanner
advances to the next frequency.

PB-010101 Rev A Page 12 of 22
USER PREFERENCES
The User Preferences menu lets you customize some TR-8 features.
SCANNING INTERVAL
When auto-scanning is on, this setting determines how long the TR-8 stays on each frequency. Note that
the TR-8 uses the same scanning interval for every frequency in the list, and for every list.
BACKLIGHT BRIGHTNESS
This setting determines the brightness of the backlight. Brighter backlight settings deplete the battery
faster. The TR-8 has an ambient-light sensor, so the backlight only comes on when needed. All of the
brightness settings include the auto-dimming feature that adjusts brightness based on the amount of
ambient light.
AUDIO FILTER
This setting determines the range of audio frequencies the TR-8 delivers to the speaker/headphones.
500 –1300 Hz Default (Recommended) Setting
RF pulses will be heard best at a frequency of about 900 Hz. This filter reduces background noise and RF
signals that are outside of the 500-1300 Hz range. For most users, this setting sounds the best.
350 –1800 Hz Wide Band Setting
RF pulses will be heard well over a wider frequency range, which makes it easier to ‘find’ older crystal-
controlled transmitters that are more likely to be slightly off frequency. The received background noise
level will be significantly ‘louder’ in this setting, and may result in more ‘listening fatigue’ than other audio
bandwidth settings.
800 –1600 Hz
RF pulses will be heard best at a frequency of about 1200 Hz. This filter reduces background noise and RF
signals that are outside of the 800-1600 Hz range. This setting has the same audio bandwidth as the
500-1300 Hz setting, but you must tune the receiver to hear the transmitter at a slightly higher pitch.
NEXT/PREV BUTTONS
This setting determines whether the “Next”and “Prev”soft keys in Manual Scan mode skip frequencies
that have been marked for skipping.

PB-010101 Rev A Page 13 of 22
ABOUT THIS TR-8…
When you select ‘About this TR-8…’ from the main menu, the TR-8 displays the following important
information about your receiver:
•Firmware Version (“TR-8 vX.XX YYYY.MM.DD”)
•CTN (electronic serial number)
•FCC Regulatory Compliance Information (scroll up and down to see the entire statement)

PB-010101 Rev A Page 14 of 22
TROUBLESHOOTING
This section offers helpful tips when something isn’t going right with the TR-8.
RF OVER-GAIN
If an incoming radio signal is very strong, or if there is strong nearby interference, or if you set the RF gain
too high, the receiver may overload. While this condition will not damage the TR-8, audio quality may
suffer, and you may not be able to distinguish variations in signal level. The TR-8 automatically detects this
condition, and in response, the red LED blinks, and the display indicates an over-gain condition. Turn down
the gain until the red LED is no longer blinking. This will ensure that the receiver audio levels change
proportionally with the incoming RF signal strength and will generally facilitate direction finding.
Note: If you are hearing a weak signal, but the TR-8 still identifies an over-gain condition (blinking red LED)
it may indicate that the receiver is either not tuned properly for best reception of the incoming signal or
that there is a strong interfering signal on a nearby frequency. In this case, reduce the receiver gain until
the red LED is no longer blinking, then use the fine-tune adjustment to search for the strongest received
signal (or interference).
SYSTEM RESET
If the TR-8 ever becomes unresponsive, you may need to reset it. Press and hold the tune knob for about
10 seconds. If the TR-8 still won’t respond, connect to USB power and try again.
The TR-8 attempts to maintain all user settings and frequency lists during system reset.

PB-010101 Rev A Page 15 of 22
TR-8 EDITOR PC SOFTWARE
The “TR-8 Editor” software can be downloaded for free from the Telonics Website:
https://www.telonics.com/products/vhfReceivers/tr-8.php
Use any USB-C cable to connect the TR-8 to your Windows PC, and be sure to turn on the TR-8 so it will
communicate with the PC. The PC charges the TR-8 whether the TR-8 is on or off, but the TR-8 Editor can
communicate with the TR-8 only if the TR-8 is on. The menu bar of the TR-8 Editor says “TR-8 Off / Not
Connected” if the TR-8 is connected while off.
KEEPING SOFTWARE UP TO DATE
The “TR-8 Editor” automatically downloads and installs updates if you run the program while connected to
the Internet. If you plan to program a TR-8 in the field where an Internet connection might not be available,
consider first running the TR-8 Editor at a location with reliable Internet to ensure the TR-8 Editor is up-to-

PB-010101 Rev A Page 16 of 22
date. When you send a configuration to a TR-8, the TR-8 Editor updates the firmware onboard the TR-8
Receiver if a newer version is available.
CONFIGURING TR-8 RECEIVERS
The TR-8 Editor has just a few menu choices to communicate with the TR-8 and work with config files.
The Read From Receiver menu choice closes the config file you currently have open and loads the TR-8
Editor with the frequency lists that are currently on the connected TR-8 receiver.
The Send To Receiver menu choice sends the currently displayed frequency lists in the TR-8 Editor to the
connected TR-8, overwriting any lists currently onboard that TR-8 Receiver. If the TR-8 receiver is running
outdated firmware, the TR-8 Editor upgrades the firmware automatically.
The TR-8 Editor can save a config file (.tr8 extension) to your computer that holds the lists of frequencies,
list labels, frequency labels, and whether each frequency in a list is currently “Skipped”. There are menu
choices to create a new config file (empty lists), open an existing config file, or save the currently displayed
config file to your computer. The Window’s title indicates the name of the currently open config file
(screenshot config.tr8 in example). Using config files, you can easily configure multiple TR-8 receivers with
the same frequency lists. If you intend to loan your TR-8 to colleagues working on other projects, consider
saving your config file to your computer in case they decide to change the frequency lists on your receiver.
ENTERING FREQUENCY LISTS
To add or edit frequencies within the TR-8 Editor, first select the list that you would like to modify. This
section covers the different ways to enter frequencies within the selected list.
Entering Frequencies and Labels Manually
The TR-8 Editor displays the list of frequencies as a table. The first column is the frequency’s position within
the list. This column is not editable since frequencies are always sorted on the TR-8 receiver. The TR-8
Editor displays frequencies within this table in whatever order you enter them, and then sorts the
frequencies if you click Sort or Send to Receiver.
•To edit a frequency or label, click the corresponding cell and type the new value or label.
•To add a frequency, click the frequency or label cell of the very last row and start typing.
•To delete a frequency, select the whole row by clicking in the first column. You can select a range
of rows by holding the Shift key and clicking another row. You can select multiple individual rows
by holding the Ctrl key and clicking each row. After selecting the row (or rows), press the Delete
key on your keyboard or right-click the row and choose Delete from the context menu.
•The Skip column of the table indicates whether this frequency is currently marked for skipping
during scanning. To mark or unmark a frequency for skipping, simply click that cell within the
table. To mark or unmark all frequencies within the list, click the Skip All or Skip None links.
Import From TPF File
If you are adding transmitters manufactured by Telonics, you can use the transmitters’ programming file
(.tpf extension) to import the frequencies. Click the Import From TPF File link, browse to the TPF file, and
click Open. The TR-8 Editor then adds all frequencies from that TPF file and labels each frequency with the
transmitter’s CTN (Telonics Serial Number).

PB-010101 Rev A Page 17 of 22
Add a Range of Frequencies
Transmitters are often evenly spaced out over a range of frequencies. To add a block of evenly spaced
frequencies, click the Add Range link. Type in the starting frequency, channel spacing, and number of
channels you would like to add and click Add. For example, adding 10 frequencies with a starting frequency
of 150 MHz, and a channel spacing of 100 kHz would add the following frequencies:
150.0, 150.1, 150.2, 150.3, 150.4, 150.5, 150.6, 150.7, 150.8, and 150.9 MHz.
No label is set for these newly added frequencies, so if you would like to assign frequency labels you would
do that manually.
Copy and Paste
The TR-8 Editor supports copying and pasting frequencies (and labels) within the TR-8 Editor and with
Microsoft Excel. To copy all frequencies within the selected list, click the Copy All link. To copy a specific
frequency, select the row by clicking in the first column in that row. You can select a range of rows by
holding the Shift key and clicking another row. You can select multiple individual rows by holding the Ctrl
key and clicking each row. After selecting the row (or rows), click the Copy Selected link, type Ctrl+C, or
right-click the row and choose Copy from the context menu to copy the rows.
After copying the desired frequencies from one list, select the frequency list where you would like to add
those frequencies. Then click the Paste link, click inside the frequency table and type Ctrl+V, or right-click
the frequency table and choose Paste from the context menu to paste the rows. Note that Pasting
frequencies (from another list or from Microsoft Excel) always adds frequencies to the selected list, even if
some (or all) of the pasted frequencies already appear in the list. If you are pasting into a list that already
had some frequencies, you may want to remove duplicate entries before or after pasting.
After copying frequencies in the TR-8 Editor, you can optionally paste those frequencies into Microsoft
Excel if you would like to use that program to add or edit your frequencies and labels. Enter the frequency
in MHz, followed by the label and skip columns. A value of 1 in the skip column is marked for skipping, 0 is
unmarked. After making your list changes in Excel, select the desired rows in Excel and copy them (Ctrl+C
or Copy from Ribbon/Context menu). Then follow the Paste instructions in the previous paragraph to add
those frequencies to the currently selected list within the TR-8 Editor.

PB-010101 Rev A Page 18 of 22
FIXING LIST ERRORS
The TR-8 Editor doesn’t allow you to send a config to the TR-8 if you have entered frequencies outside the
supported range (137.99 –235.01 MHz) or if a list or frequency label is too long for the TR-8 to display.
The TR-8 Editor displays error icons to help you find and fix errors within your frequency lists.
Icon indicating the list
has at least one error
Description of the first
error in the selected list
Invalid frequency
(out of range)
Invalid label
(too long)

PB-010101 Rev A Page 19 of 22
TRACKING TIPS
The TR-8 is intuitive and user friendly, but VHF tracking can be tricky. Here are some pointers.
SETTING THE TUNE AND GAIN/VOL CONTROLS
RF gain and audio volume are different. VHF telemetry is all about adjusting RF gain. So why is there a
separate volume setting? The volume setting allows you to adjust the listening level to match your style of
headphones, or your listening distance from the speaker, and to compensate for sounds nearby (vehicle
engine, conversation, moving water, etc). Once you set the volume for these conditions, you typically won’t
need to change it again.
To receive a transmitter’s signal, enter the desired frequency via the keypad or from a stored frequency
list. Then, turn up the RF gain until noise is audible (but not uncomfortable) on the speaker or headphones.
This ensures that your receiver gain is sufficient to detect the weakest signals. The gain setting you choose
depends on environmental RF noise levels, receiving antenna, and other factors. To start, set the gain at
about +120dB and adjust as needed for a comfortable listening level.
When you hear transmitter pulses, adjust the ‘tune’ knob for the strongest (loudest) signal and then adjust
the gain/vol control until the pulses are again at a comfortable listening level. To assist in proper gain
setting, the TR-8 monitors incoming signal strength and flashes the LED red and adds some audio distortion
when the incoming signal is too high for proper signal detection. If this happens, simply turn down the gain
until the red LED quits flashing.
As you get closer to the transmitter the received signal will generally get stronger. Keep turning the gain
down as needed to maintain a comfortable listening level.
Always remember that listening to any audio at high levels for long periods of time can cause permanent
damage to your hearing. Be safe!
ADVANCED TECHNIQUE: OVERGAIN DIRECTION FINDING
If used carefully, the overgain LED and audio distortion indicator may be used to assist in direction finding
with a directional antenna. When listening to a transmitter, you may choose to adjust the gain control until
the overgain indication is just barely activated on each received transmitter pulse. When the gain level is
set carefully, the red LED and audio distortion will be activated when the directional antenna is pointed in
the direction of the strongest signal. This technique may take some practice to use effectively.

PB-010101 Rev A Page 20 of 22
SPECIFICATIONS
General
Synthesized direct-conversion receiver
Frequency coverage
138 to 235 MHz continuous coverage
Frequency selection
Direct entry via keypad or rotary knob
Frequency resolution
100 Hz
Center frequency accuracy
± 1 ppm at 20 °C
Frequency stability
± 2 ppm from -20 to +70 °C (referenced to frequency at 20 °C)
Long term frequency drift
(after one-minute stabilization) ±100 Hz
Audio Bandwidth (-3dB)
Three user-selectable ranges:
[500-1300 Hz]
[350-1800 Hz]
[800-1600 Hz]
Acceptable modes of operation
pulse amplitude modulation (PAM), pulse period modulation (PPM),
continuous wave (CW), and single side band (SSB)
Low battery indication
Battery gauge on display
Power supply
Internal: 4.2V/3300mAh rechargeable Li-Ion cell
External (battery charger input): 5V via USB-C jack
Typical operating lifetime (@ 20°C)
15 hours with automatic LCD backlight usage
12 hours with LCD backlight ‘locked on’ (medium level)
RF input impedance
50 Ohms
Noise figure
<4 dB typ with 50Ω source impedance
Sensitivity for 10 dB S+N+D/N
Better than -130 dBm typical (500-1300 Hz audio bandwidth setting)
Typical minimum discernible input level
-150 dBm (0.007 microvolt)
Opposite Sideband Suppression
40 dB typ
Audio gain control range
18 dB typ
RF gain control range
177 dB typ
Total gain control range
195 dB typ
Audio output impedance
16Ω (headphone jack)
Internal speaker cut out
Internal speaker is muted when plug is inserted in headphone jack
Audio output jack
1/8 inch (3.5mm) stereo or monaural phone plug
Programming / Charging connector
USB-C jack
RF input connector
BNC jack
Display
3 x 5 cm 128 x 64 pixel LCD display with auto-dimming backlight
Other manuals for TR-8
2
Table of contents
Other Telonics Receiver manuals