Telrad Connegy AdvanceIP Avanti 3015ip Quick start guide

IP-based Telephony Platform
AVANTI 3015ip TELEPHONE
INSTALLATION NOTES
CONTENTS
1. General ............................................................................................................. 2
2. Typographic conventions .................................................................................. 2
3. Avanti 3015ip installation architecture .............................................................. 3
3.1 Connecting the Avanti 3015ip through the WAN ................................................................ 3
3.2 PC connection ....................................................................................................................... 3
4. Installing the Avanti 3015ip .............................................................................. 4
5. Initial setup ....................................................................................................... 5
5.1 Setup controls ....................................................................................................................... 5
5.2 DHCP configuration principles .............................................................................................. 5
5.3 Automatic error detection ..................................................................................................... 7
5.4 The Setup Procedure ............................................................................................................. 8
The information in this publication refers to the Telrad UNITeIP family of telephone systems, including the UNITe IP I-100,
UNITe IP C-128, UNITe IP C-400 and UNITe IP C-1000 systems, Release e2e-1, as of January 2004. Telrad Connegy, Inc.,
reserves the right to make changes in the equipment described in this manual without notification. However, changes
in the equipment do not necessarily render this manual invalid.
Additional copies of this manual may be obtained from Telrad Connegy, Inc. Reproduction of this manual or parts thereof
without written permission from Telrad Connegy, Ltd., is strictly prohibited.
Cat. No. 76-110-0867/0, Issue 2 © 2004 Telrad Connegy Inc., Farmingdale, New York
FCC Regulations - Warning for Installations in the USA
This equipment generates, uses and can radiate radio frequency energy and if not installed and used in accordance with
the instruction manual, may cause interference to radio communications. Operation of this equipment in a residential
area is likely to cause harmful interference, in which case the user should contact the Telrad Connegy Field Service De-
partment, at the telephone number listed below, to correct the interference problem. It has been tested and found to
comply with the limits for a Class A computing device pursuant to Subpart J of Part 15 of the FCC Rules which are de-
signed to provide reasonable protection against such interference when operated in a commercial environment.

Avanti 3015ip Installation Notes
2
1. GENERAL This document describes the procedures necessary for the installa-
tion and initial setup of the Telrad Connegy Avanti 305ip telephone.
2. TYPOGRAPHIC
CONVENTIONS
Bolded text in brackets indicates a fixed button on the Avanti 3015ip
telephone, as in [SPEED DIAL/PROGRAM].
Bolded italic text in curly brackets indicates a softkey on the tele-
phone, as in
{YES}
.
The Courier font indicates text displayed on the Avanti 3015ip screen,
as in TVS Menu.
3. AVANTI 3015ip
INSTALLATION
ARCHITECTURE
The Avanti 3015ip requires a link to a power source and one to the
data network. If Power-over-Ethernet is not enabled in the organiza-
tion, it is necessary to use a power adaptor.
Optionally, a PC can be connected to the network through the
Avanti 3015ip. Both the telephone and the PC are connected to the
network through a full-line-speed Ethernet switch. This ensures
audio quality and priority regardless of network activity.
Figure 1 Avanti 3015ip basic external connection schematics
The Avanti 3015ip connects directly to an Ethernet network. If con-
nected to an office local area network (LAN), the Avanti 3015ip
requires a category 5 10/100 BaseT UTP cable with an RJ-45 connec-
tor. Figure 1, above, shows the basic external connection architecture
of the Avanti 3015ip.
3.1 CONNECTING THE AVANTI 3015IP THROUGH THE WAN
The Avanti 3015ip can be connected at a remote location through
Public Internet Wide Area Network (WAN). Connection to the WAN
requires a broadband internet link, such as a DSL or cable modem.

Avanti 3015ip Installation Notes
3
Figure 2 Connection to the WAN
3.2 PC CONNECTION
A PC can be connected to the network through the Avanti 3015ip. In
this case, the Avanti 3015ip is transparent to the PC operation. Calls
arriving or made by the Avanti 3015ip do not affect PC operation, nor
does this operation interfere with the Avanti 3015ip’s.
When connecting a PC through the Avanti 3015ip, the data cable
from the Avanti 3015ip (see Figure 4, below) connects to an Ethernet
network card in the PC.
Figure 3 PC connection through Avanti 3015ip
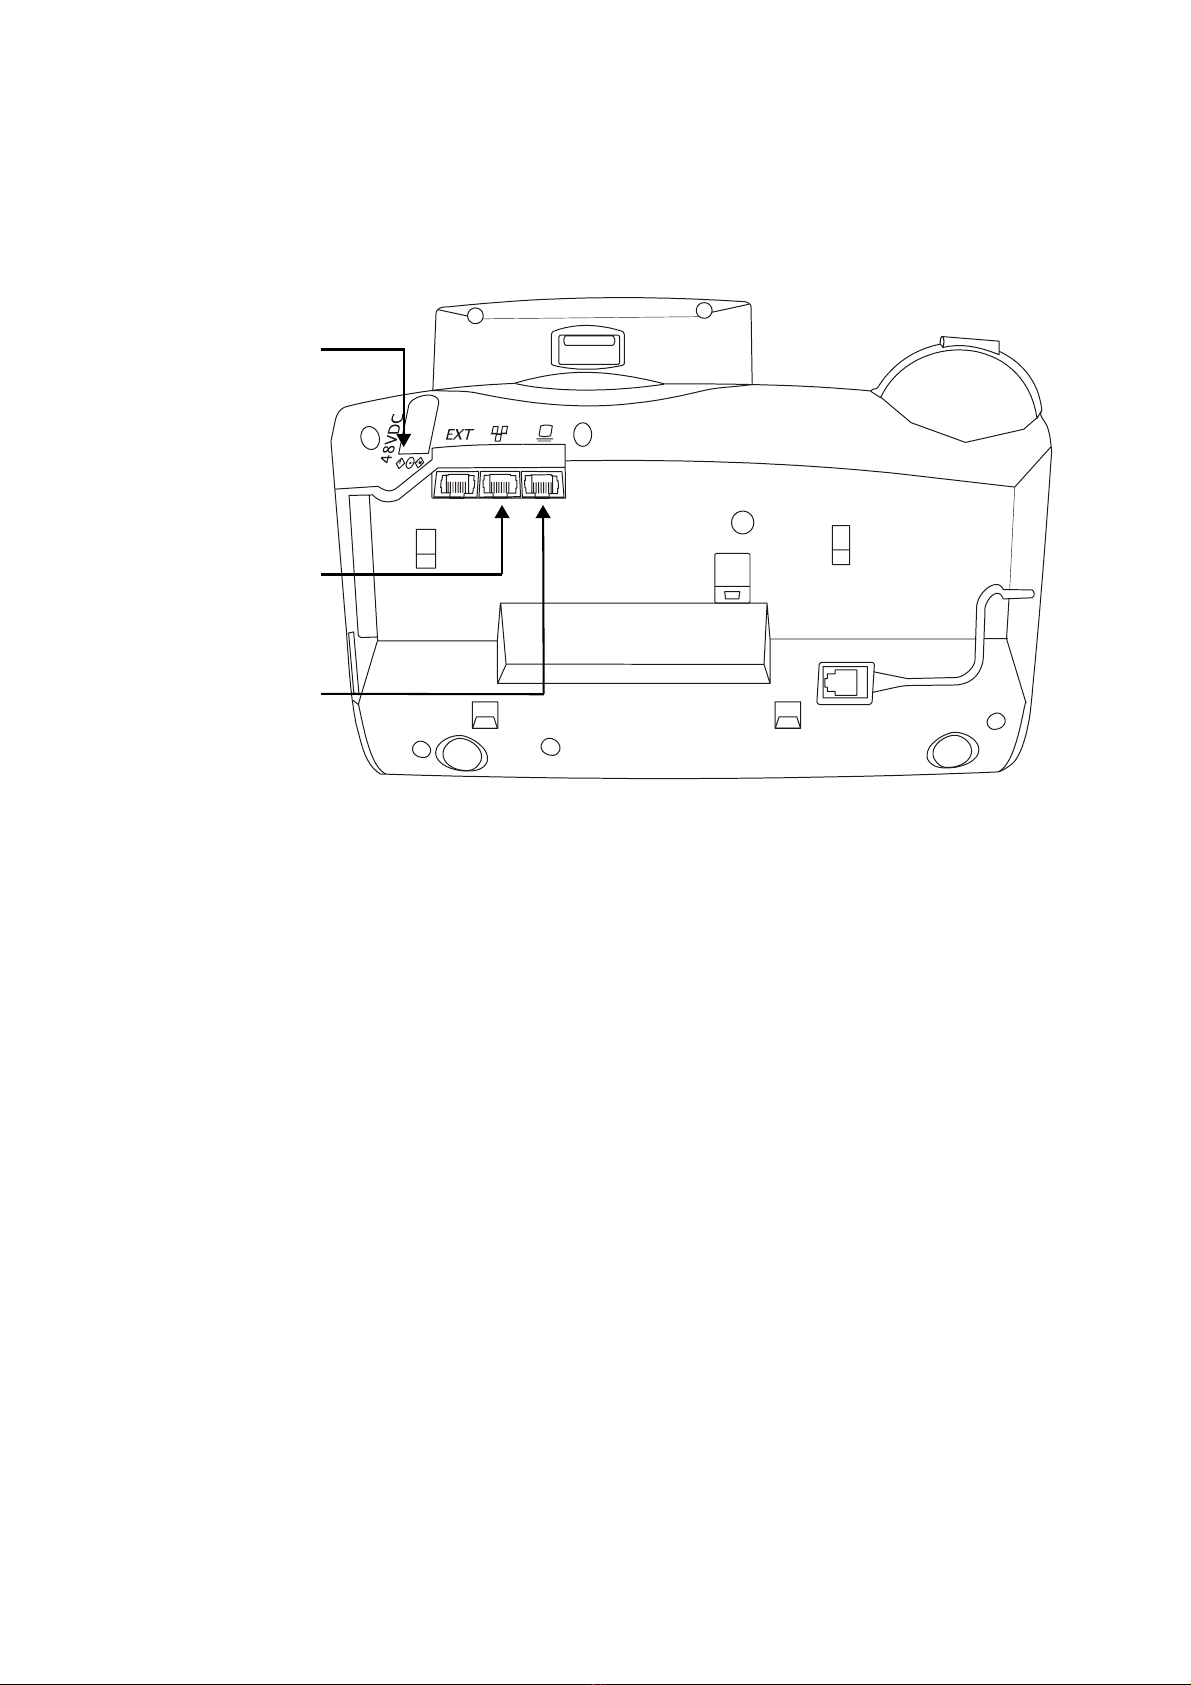
4. INSTALLING
THE AVANTI 3015ip
Before beginning the installation and setup process, make sure you
have a list of all the IP addresses of the new extensions, as well as the
address of the IP Server, the FTP Server, etc. The source for all these
addresses is the customer’s IT manager.
After unpacking and visually inspecting the Avanti 3015ip and its
accessories, connect the Avanti 3015ip to the network (see Figure 4).
If using a power adaptor, connect the data line first, then connect
the power adaptor following the instructions in Section 5.3 (See Fig-
ure 4, below).
Avanti 3015ip Installation Notes
4
If Power-over-EtherNet is enabled, follow the instructions in Section
5.3 before inserting the data connector on the rear side jack of the
Avanti 3015ip (see Figure 4).
Figure 4 Avanti 3015ip external connection sockets
If this is the first time the Avanti 3015 ip is connected, perform the ini-
tial setup procedure.
5. INITIAL SETUP 5.1 SETUP CONTROLS
During the setup process you are required to enter data, confirm
your choices, etc. In addition to the softkeys appearing on the
screen, you may use the following buttons:
Keys Meaning
[LO HI] Use for navigating along an address line, same as
with the arrow keys on a computer keyboard.
Dialpad buttons Use for digit input
[#] Saves the data entered and continues the setup pro-
cess. Same as <Enter> on a computer keyboard.
[*]Dot (“.”)
[0], [1] For boolean parameters (i.e. parameters whose possi-
ble values are Yes or No), pressing [0] changes the
value to No, [1] changes to Yes. This can be used
instead of pressing the
{YES}
and
{NO}
softkeys
displayed after pressing
{EDIT}
.
Power
adaptor
To
network
To PC

Avanti 3015ip Installation Notes
5
5.2 DHCP CONFIGURATION PRINCIPLES
Section 4.11, “Working with DHCP” in the UNITe IP TVSe Server Sys-
tem Manual, contains a detailed explanation of the principles of con-
figuration for DHCP support.
The configuration options for the Avanti 3015ip telephone are orga-
nized in three menus: the IP Menu, the TVS Menu and the User
Menu. Following is a description of these menus and the navigation
possibilities between them.
If a DHCP Server is enabled in the system, it may be configured in
one of two modes:
•A
ddressing only mode:
The DHCP server provides an IP address
for the IP extension, as well as the subnet and router addresses,
but the FTP Server address needs to be entered manually.
•
Full info mode:
The DHCP server provides IP addresses and addi-
tional pre-defined data, such as the FTP Server address.
The Avanti 3015ip Setup procedure is performed by means of three
menus:
•
IP Menu:
Enables you to configure DHCP support.
•
TVS Menu:
Enables definition of the telephone’s IP address and
network submask, as well as of the FTP Server’s IP address, in
case it was not defined on the DHCP Server.
•
User Menu:
Enables you to define the Avanti 3015ip extension
number and password. The password must be the
5.3 AUTOMATIC ERROR DETECTION
If you enter a value greater than 255 in one of the fields of an IP
address, the Avanti 3015ip Setup software will automatically detect it
and reject your input.
The network fields of the Phone IP address and Router IP address
must be the same, as yielded by a logical AND operation between
each of these addresses and the Subnet Mask. Otherwise, at the end
of the IP Menu the display will show:
IP CONFIG. ERROR
<BACK> <EXIT>
Pressing
{EXIT}
forces the Setup program to store the address you
entered. If you press
{BACK}
, the menu is displayed again from the
beginning, so that you can correct the wrong entry.
Keys Meaning
Softkeys When required to enter a value manually, remember
that the leftmost softkey under the display accepts
the present value and moves on to the next option,
while the middle softkey returns you to the previous
screen.
TIP
You can press [LO HI]
upon entry to a screen to
place the cursor directly on
an IP address line. Pressing
LO will place the cursor in
the first field, while pressing
HI will locate it on the last
field. You can navigate
through the fields of an input
field using [LO HI] as
required. The digits you type
will overwrite existing values.
To jump to the next field
after entering less than
three digits on an IP address,
press [*].

Avanti 3015ip Installation Notes
6
5.4 THE SETUP PROCEDURE
1. To begin the Setup procedure, connect the Avanti 3015ip to the
power source while at the same time holding down the
[SPEED DIAL/PROGRAM] button. After a few seconds the dis-
play shows:
Phone Configuration
<Boot> <Edit> <Info>
{Info}
displays general phone information like the MAC address.
{Boot}
initiates the startup process.
2. Press
{Edit}
to enter the Setup procedure,
The display shows
IP Menu?
The softkeys change to
{YES}
and
{NO}
. From this point on,
unless indicated otherwise, the left softkey will display the next
choice in the menu, and the middle softkey the previous one.
3. Press
{YES}
The display shows
DHCP - Y
The value of the DHCP (Dynamic Host Configuration Protocol)
parameter should be Yes, unless you know there is no DHCP
Server.
After pressing the
{NEXT}
softkey, you are asked whether you
want to proceed
4. Exit this menu?
5. Press
{NEXT}
to proceed, or
{BACK}
to return to the DHCP
parameter.
If DHCP = Yes (otherwise proceed to step 11.) you are asked:
Use DHCP FTP - Yes
6. The FTP server is were the application software resides. If no FTP
Server IP address was programmed on the DHCP Server (ask the
organization’s IT manager for details on the DHCP Server config-
uration), you should change this parameter’s value to No. Other-
wise, press
{NEXT}
to continue to step 9.
7. If you changed the value of the DHCP FTP option to No, you will
be asked to enter the IP address of the TVSe FTP Server:
FTP Server IP Addr.
8. Enter the address of the TVSe FTP Server and press
{NEXT}
.
9. The TVS Menu prompt appears:
TVS Menu
10. Press
{YES}
to enter the TVS Menu, or
{NO}
to proceed to the
User Menu.
11. If the DHCP value was No, you will be asked for the extension’s
IP address:
Phone IP Address
[192.333.22.123]
or other address previously modified.
12. Enter the extension’s IP address
TIP
You can navigate along
the DN line by pressing
[LO HI] when the TVS User
DN screen is displayed.
If the currently stored DN
has four digits and you wish
to enter a shorter number,
move the cursor leftward by
pressing the LO side of the
[LO HI] button until it
reaches the beginning of the
line and the unwanted digits
disappear.

Avanti 3015ip Installation Notes
7
NOTE
If you attempt to type in a value greater than 255, the dig-
its you entered will be displayed briefly then disappear. See
above, Section 5.3.
Once you enter the IP address, the display shows
Network Subnet Mask
[255.255. 0. 0]
The subnet mask must always represent a sequence whose left
(most significant) side consists of consecutive 1s, and its right
(less significant) side of consecutive 0s. No mixing of 1s and 0s
can occur. The following table shows examples of legal and illegal
binary subnet masks and their decimal equivalents:
13. Enter the required Subnet Mask and press [#].
The display shows now:
Router IP address
[192.333.22.123].
14. Enter the required router IP address and press [#].
The display shows now:
FTP server IP addr.
[192.333.22.123]
15. Enter the required FTP server IP address and press [#].
Finally, the display shows
Exit this menu?
<YES> <NO>
Pressing
{NO}
will return you to the beginning of the menu.
16. Press
{YES}
to continue.
The display shows
TVS Menu?
<YES> <NO>
After you press
{YES}
, the display shows
File Config - Yes
17. The File Config. value should be Yes always. Press
{NEXT}
to
leave it unchanged. The display shows now:
Binary Decimal Legal
11111111 11111111 00000000 00000000 255 255 0 0 ☺
11111111 11111111 11100000 00000000 255 255 224 0 ☺
11111111 00000000 11111111 00000000 255 0 255 0
11110000 00000000 00000000 00000000 240 0 0 0 ☺
11111111 11111010 00000000 00000000 255 250 0 0
00000000 01010101 10101010 11111111 0 85 170 255

Avanti 3015ip Installation Notes
8
TVS Serv. IP Address
[141.226.213. 65].
18. Enter the required TVS Server IP address and press [#].
The next option displayed is
Web Serv. IP Address
[192.333.22.123].
19. Enter the required Web Server IP address and press
{NEXT}
.
20. You are asked
Exit this menu?
21. Press
{YES}
to enter the User Menu, or
{NO}
to go back to step
16.
The display shows now
TVS User DN
[786]
This is the extension number for this station. You can enter up to
four digits.
22. Enter the station DN and press [#].
The display now shows:
TVS User Password
[****]
The display shows asterisks instead of the password digits. When
you start typing in the password, the length of the line displayed
reverts to one.
23. Enter the UNITeIP user password and press [#].
The display shows:
Exit this menu?
The softkeys change to
{YES}
and
{NO}
. Pressing
{NO}
will
return you to the beginning of the menu.
24. Press
{YES}
to exit the menu. If you entered new data the dis-
play shows
Exit?
<YES> <NO>
Otherwise if no data was entered, you will only be asked
whether you want to exit.
25. Press
{YES}
.
The setup procedure is now complete. The display shows, after a few
seconds:
Phone Configuration
<Boot> <Edit> <Info>
To start up the telephone press
{Boot}
. The display shows:
Saving Setup
and shortly afterwards
Saving Setup - Done!
Then
ST3015IP -> Welcome!
Initializing info...

Avanti 3015ip Installation Notes
9
And, after a short delay:
FTP Loading -> Done!
Then:
ST3015ip -> TVS App
Built: Dec 10 2003
Then:
Starting Data Link
Connecting to System
The Avanti 3015ip is now up and running.
Table of contents
Other Telrad Connegy IP Phone manuals


Popular IP Phone manuals by other brands


Cisco
Cisco Small Business Pro SPA 504G Quick user guide

Yealink
Yealink SIP-T23G quick start guide

Denwa Communications
Denwa Communications DW-610P Configuration guide

Altigen
Altigen Alti-IP 600 Administration manual

Cisco
Cisco 7925G - Unified Wireless IP Phone VoIP Administration guide

Polycom
Polycom SoundPoint IP 550 Quick user guide


