Telstar TFA028110MD User manual

MANUAL DE INSTRUCCIONES
FREIDORA DE AIRE
TFA028110MD

2
AIR FRYER
TFA028110MD
When using electrical appliances, basic safety precautions should always be followed including the following:
1. Read all instructions.
2. DO NOT touch hot surfaces. Use handles or knobs. Use oven mitts or potholders.
3. To protect against electrical shock DO NOT immerse cord, plugs, or main body in water or other liquid.
4. Close supervision is necessary when any appliance is used by or near children.
5. Unplug from outlet when not in use and before cleaning. Allow to cool before putting on or taking off parts.
6. DO NOT operate any appliance with a damaged cord or plug or after the appliance malfunctions or has
been damaged in any manner. Return appliance to the nearest authorized service facility for examination,
repair, or adjustment.
7. The use of accessory attachments not recommended by the appliance manufacturer may cause injuries.
8. DO NOT use outdoors. HOUSEHOLD USE ONLY
9. DO NOT let cord hang over edge of table or counter, or touch hot surfaces.
10. DO NOT place on or near a hot gas or electric burner, or in a heated oven.
11. Extreme caution must be used when moving an appliance containing hot oil or other hot liquids.
12. To disconnect, turn any control to “off”, then remove plug from wall outlet.
13. DO NOT use appliance for other than intended use.
14. Avoid contacting moving parts.
15. Extreme caution must be used when moving an appliance containing hot oil or other hot liquids.
16. Extreme caution must be used when moving an appliance containing hot oil or other hot liquids. Then
remove plug form wall outlet.
17. Make sure the frying basket is locked into the front of the drawer - both frying basket handle tabs must be
fully inserted into the notches on the top of the basket drawer.
18. Always make sure frying basket drawer is fully closed, with frying basket handle locked securely in the
drawer, while Air Fryer is in operation.
19. WARNING: Air Fryer will not operate unless frying basket drawer is fully closed.
20. CAUTION: After hot air frying, the frying basket and frying basket drawer and the cooked foods are hot.
Extreme caution must be used when handling the hot Air Fryer basket/drawer.
21. WARNING: After air frying, make sure to place the frying basket drawer on aat,heat-resistant surface
before pressing the basket release button.
IMPORTANT SAFEGUARDS

3
AIR FRYER
TFA028110MD
22. This appliance has a polarized plug (one blade is wider than the other). To reduce the risk of electric shock,
this plug is intended to t into a polarized outlet only one way. If the plug does not t fully into the outlet, reverse
the plug. If it still does not t, contact a qualied electrician. DO NOT attempt to modify the plug in anyway.
23. a) A short power-supply cord should be used to reduce the risk resulting from becoming entangled in or
tripping over a longer cord.
b) Extension cords are available and may be used if care is exercised in their use.
c) If a extension cord is used:
( 1) The marked electrical rating of the cord set or extension cord should be at least as great as the electri-
cal rating of the appliance; and
(2) The cord should be arranged so that it will not drape over the countertop
or tabletop where it can be pulled on by children or tripped over unintentionally.
(3)If the appliance is of the grounded type, the cord set or extension cord should be a grounding-type
3-wire cord
Overheating Protection
The appliance has overheating protection system, if the inner temperature control system fails, the overheating
protection is automatically turned on, and the appliance is shut off. Unplug the mains cord, let the appliance
cool down, then send to the authorized service center for repairing.
Automatic switch-off
This appliance is equipped with a timer. When the timer has counted down to 0, the appliance produces a bell
sound and switches off automatically. To switch off the appliance manually, turn the timer knob anticlockwise
to 0.
Introduction
Your new air fryer allows you to prepare your favorite ingredients and snacks in a healthier way. The air fryer
uses hot air in combination with high-speed air circulation (rapid hot air) and a top grill to prepare a variety of
tasty dishes in a healthy, fast and easy way. Your ingredients are heated from all sides at once and there is no
need to add oil to most of the ingredients.
4
AIR FRYER
TFA028110MD
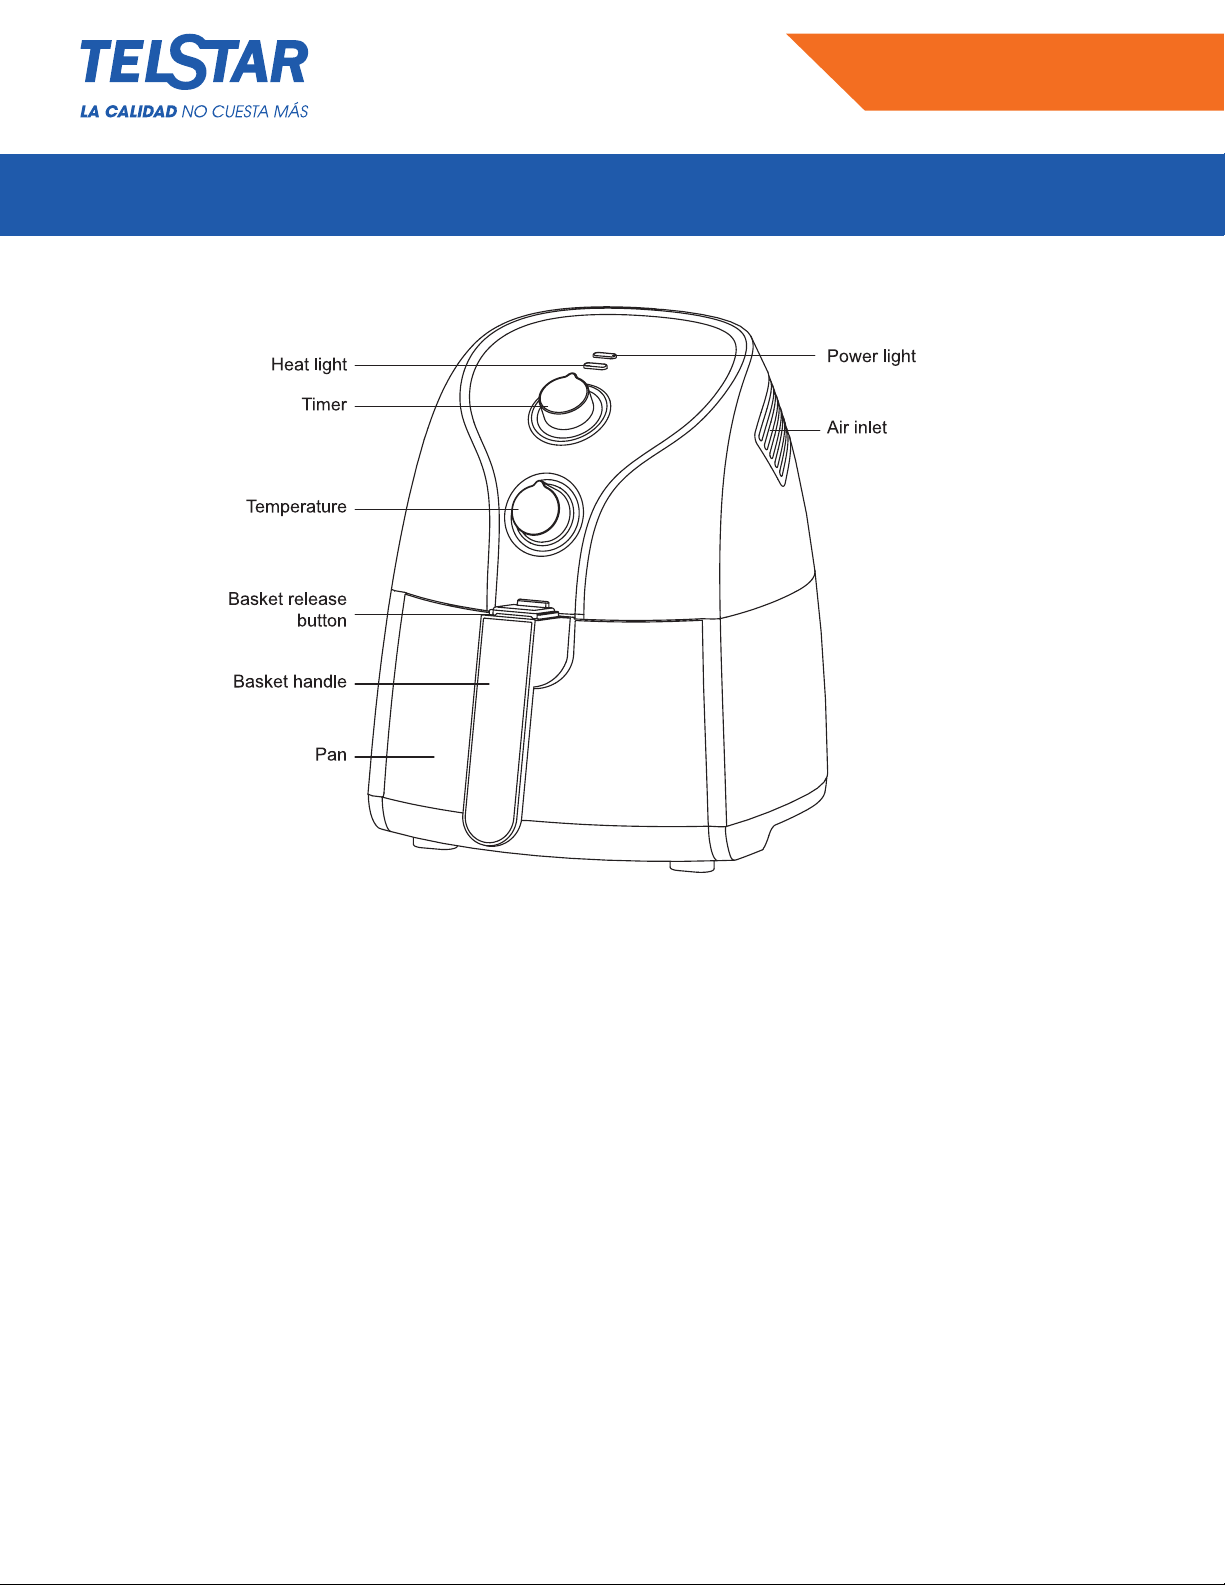
GENERAL DESCRIPTION OF MAIN PARTS
Note: If the pan is pulled out during cooking, the appliance will be switched off automatically, too.
(Timer still incounting down)
Electromagnetic elds (EMF)
This appliance complies with all standards regarding electromagnetic elds (EMF). If handled properly and
according to the instructions in this user manual, the appliances is safe to use based on scientic evidence
available today.
Before First Use
1. Remove all packaging material.
2. Remove any stickers or labels from the appliance.
3. Thoroughly clean the basket and pan with hot water, some washing liquid and a non-abrasive sponge.
Note: You can also clean these parts in the dishwasher.
4. Wipe the inside and outside of the appliance with a moist cloth.
This is an air fryer that works on hot air. DO NOT ll the pan with oil or frying fat.

5
AIR FRYER
TFA028110MD
Preparing for Use
1. Place the appliance on a stable, horizontal and level surface.
DO NOT place the appliance on non-heat-resistant surfaces.
2. Place the basket in the pan properly
3. Put the pan into the machine.
Note: the pan MUST be put into the appliance properly, otherwise the appliance doesn’t work!
4. 4. Pull the mains cord and plug into the earthed wall socket.
DO NOT ll the pan with oil or any other liquid.
DO NOT put anything on top of the appliance.
DO NOT put anything on the air-inlet on the two sides of the appliance, this disrupts the airow and affects the
hot air frying result.
Using the A liances
The air fryer can prepare a large range of ingredients. Pis refer to the section “Settings” table hereinafter.
Hot air frying
1. Put the mains plug into an earthed wall socket.
2. Carefully pull the pan out of the air fryer.
3. Put the ingredients in the basket.
Note: Never ll the basket in full or exceed the recommended amount (see section ‘Settings’ in this chapter).
as this could affect the quality of the end result.
4. Slide the pan back into the air fryer properly.
Never use the pan without the basket in it.
If the pan is not xed into the air fryer properly, the appliance won’t work!
Caution: DO NOT touch the pan during and some time after use, as it gets very hot. Only hold the pan by the
handle.
5. Turn the temperature control knob to Lhe required Lemperalure. See section’ Sallings’ in this chapter to
determine the right temperature
6. Determine the required preparation time for the ingredient (see section ‘Settings’ in this chapter).
7. To switch on the appliance, turn the timer knob to the required preparation time

6
AIR FRYER
TFA028110MD
Add 3 minutes to the preparation time when the appliance is cold.
Note: If you want you can also let the appliance preheat without any ingredients inside. in that case , turn the
timer knob to more than 3 minutes and wait until the heating-up light goes out (after approx. 3 minutes) Then
ll the basket and turn the timer knob to the required preparation time.
a. The power-on light and the heating-up light will go on.
b. Tho timer starts counting down tho sot preparation timo.
c. During the hot air frying process, the heeling -up light comes on and goes out from time to time. This indi-
cates that the heating element is switched on and off to maintain the set temperature.
d. Excess oil from the ingredients is collected on the bottom of the pan.
8. Some ingredients require shaking halfway through the preparation time (see section ‘Settings’ in this chapter).
To shake the ingredients, pull the pan out of the appliance by the handle and shake it. Thon slide tho pan back
into tho air fryer and continue to cook.
Caution: DO NOT press the button of the handle during shaking,
Tips:
1. To reduce the weight, you can remove the basket from the pan and shake the basket only. To do so,
pull the pan out of the appliance, place it on a heat-resistant surface and press the button of the handle.
2. If you set the timer to half the preparation time, you hear the timer bell when you have lo shake the
ingredients. However, this means that you have to set the timer again to the remaining preparation time
after shaking.
3. If you set the timer to full preparation time, there is no timer bell during cooking before nishing, you can
pull out the pan at any time to check the ingredients cooking condition, the power will shut down automat-
ically and resume after slide lhe pan back into the appliance(timer always counts down in this situation).
9. When you hear the timer bell, the set preparation time has elapsed. Pull the pan out of the appliance and
place it on a heat-resistant surface.
Note: You can also switch off the appliance manually. To do this, turn lhe temperature control knob to 0, or
pull out the pan directly.

7
AIR FRYER
TFA028110MD
10. Chock if tho ingredients aro ready.
If the ingredients are not ready yet, simply slide the pan back into the appliance and set the timer to a few
extra minutes.
11. To remove small ingredients (e.g. fries), press the basket release button and lift the basket out of the pan.
DO NOT turn the basket upside down with the pan still attached to it, as any excess oil that has collected on
the bottom of the pan will leak onto the ingredients.
After hot air frying. the pan and the ingredients are hot. Depending on the type of the ingredients in the air
fryer, steam may escape from the pan.
After hot air frying, the pan and the inside metal cover are hot, avoid touching them.
12. Empty the basket into a bowl or onto a plate.
Tip: To remove large or fragile ingredients, use a pair of tongs to lift the ingredients out of the basket
13. When a batch of ingredients is ready, the air fryer is instantly ready for preparing another batch.
Settings
This table below helps you to select the basic settings for the ingredients you want to prepare.
Note: Keep in mind that these settings are indications. As ingredients differ in origin. size. shape as well as
brand. we cannot guarantee the best setting for your ingredients.
Because the rapid hot air technology instantly reheats the air inside the appliance, pulling the pan briey out
of the appliance during hot air frying barely disturbs the process.
Tips
- Smaller ingredients usually require a slightly shorter preparation time than larger ingredients.
- Shaking smaller ingredients halfway through the preparation time optimizes the end result and can help
prevent unevenly fried ingredients.
- Add some oil to fresh potatoes for a crispy result. Fry your ingredients in the air fryer within a few minutes after
you added the oil.
- DO NOT prepare extremely greasy ingredients such as sausages in the air fryer.
- Snacks that can be prepared in a oven can also be prepared in the air fryer.
- The optimal amount for preparing crispy fries is 500 grams.
- Use pre-made dough to prepare lled snacks quickly and easily. Pre-made dough also requires a shorter
preparation time than home-made dough.

8
AIR FRYER
TFA028110MD
- Place a baking tin or oven dish in the air fryer basket if you want to bake a cake or quiche or if you want to
fry fragile ingredients or lled ingredients.
- You can also use the air fryer to reheat ingredients. To reheat ingredients, set the temperature to 320°F for
up to 10 minutes.

9
AIR FRYER
TFA028110MD
Note: Add 3 minutes to the preparation time when you start frying while the air fryer is still cold.
Making home-made fries
To make home-made fries, follow the steps below.
1. Peel the potatoes and cut them into sticks.
2. Wash the potato sticks thoroughly and dry them with kitchen paper.
3. Pour 1/2 tablespoon of olive oil in a bowl, put the sticks on top and mix until the sticks are coated with oil.
4. Remove the sticks from the bowl and put them in the basket.
Note: DO NOT tilt the bowl to put all the sticks in the basket in one go, to prevent excess oil from ending up on
the bottom of the pan.
5. Fry the potato sticks according to the instructions in this chapter.
Cleaning
Clean the appliance after every use.
DO NOT touch the hot metal inside before cleaning while just after
frying. Let the appliance cool down before cleaning!
DO NOT ot use metal kitchen utensils or abrasive cleaning materials to clean the pan or the basket as this may
damage the non-stick coating.
1. Remove the mains plug from the wall socket and let the appliance cool down.
Note: Remove the pan to let the air fryer cool down more quickly.
2. Wipe the outside of the appliance with a moist cloth.
3. Clean the pan and the basket with hot water, some washing-up liquid and a non-abrasive sponge. You can
use a degreasing liquid to remove any remaining dirt.
Note: The basket is dishwasher-safe.
Tip: If dirt is stuck to the basket or the bottom of the pan, ll the pan with hot water with some washing-up liquid.
Put the basket in the pan and let the pan and the basket soak for approximately 10 minutes.
4. Clean the inside of the appliance with hot water and non-abrasive sponge.
5. Clean the heating element with a cleaning brush to remove any food residues.

10
AIR FRYER
TFA028110MD
Storage
1. Unplug the appliance and let it cool down.
2. Make sure all parts are clean and dry.
3. Put the air fryer in a clean and dry place.
Environment
DO NOT throw away the appliance with the normal household waste at the end of its life, but hand it in at an
ofcial collection point for recycling. By doing this, you help to preserve the environment.
11
AIR FRYER
TFA028110MD

AIR FRYER
TFA028110MD
Table of contents
Other Telstar Fryer manuals


Popular Fryer manuals by other brands


Bestron
Bestron ASF1304Z/W instruction manual

Buccan
Buccan BCN-5190-1 user manual

Pitco
Pitco W14S-S WF Installation, operation and maintenance manual

Lotus cooker
Lotus cooker BR-50-78G Instructions for installation and use

emerio
emerio AF-124802.1 instruction manual

Proficook
Proficook PC-FR 1177 H instruction manual