TEMPERED 75 Series User manual

Page 1
Airwall Gateway 75 Series
Installation Guide
A Tempered Airwall Gateway allows your organization to create an identity-based,
secure and private global connected network. It creates a zero-trust Software Defined
Perimeter (SDP), using the Airwall gateway to establish the perimeter of your logical
airgap. This perimeter could be deep in your network, closer to the data source,
providing security for your IoT/ IIoT devices. It provides security for those devices that
can’t protect themselves.
Table of Contents
Before you begin .................................................................................................................... 2
Step 1 – Unbox the Airwall Gateway ....................................................................................... 2
Step 2 – Connect the Airwall Gateway to the network and the Conductor ............................... 3
Option 1 – Manually Provision the Airwall-75 .................................................................................. 3
Option 2 – Provision the Airwall-75 using a DHCP Server .................................................................. 4
Step 3 – License and Manage the Airwall Gateway in the Conductor ...................................... 5
LED Status Codes .................................................................................................................... 6
Specifications ......................................................................................................................... 6
Airwall Gateway Airshell Common Command Reference ........................................................ 7
Get Started with Airshell .................................................................................................................. 7
No Default Password in v2.2.8 and later .......................................................................................... 7
Common Airshell Commands ........................................................................................................... 7

Page 2
This is a step-by-step guide for setting up basic network connectivity for an Airwall
Gateway 75, and provisioning the gateway on the Airwall Conductor. The Conductor is
the central configuration and management point for your Airwall secure network, and
manages trust between devices and Airwall Gateways on your network.
Here are the basic steps, explained in more detail below:
1. Unbox the Airwall Gateway and get familiar with the parts
2. Connect the Airwall Gateway to your network and to the Conductor
3. Manage the Airwall Gateway in the Conductor
Before you begin
To prepare for bringing the Airwall Gateway online, you need to:
q Get the Conductor IP address or URL that the Airwall Gateway will connect to
q Have network cables to connect the Airwall Gateway to your network
q Have a micro USB cable to connect a computer to the Airwall Gateway
Step 1 – Unbox the Airwall Gateway
The first step is to unbox the Airwall Gateway and become familiar with the parts. At
the end of this step, you’ll be ready to connect the Airwall Gateway.
1. Open the box and carefully remove the Airwall Gateway.
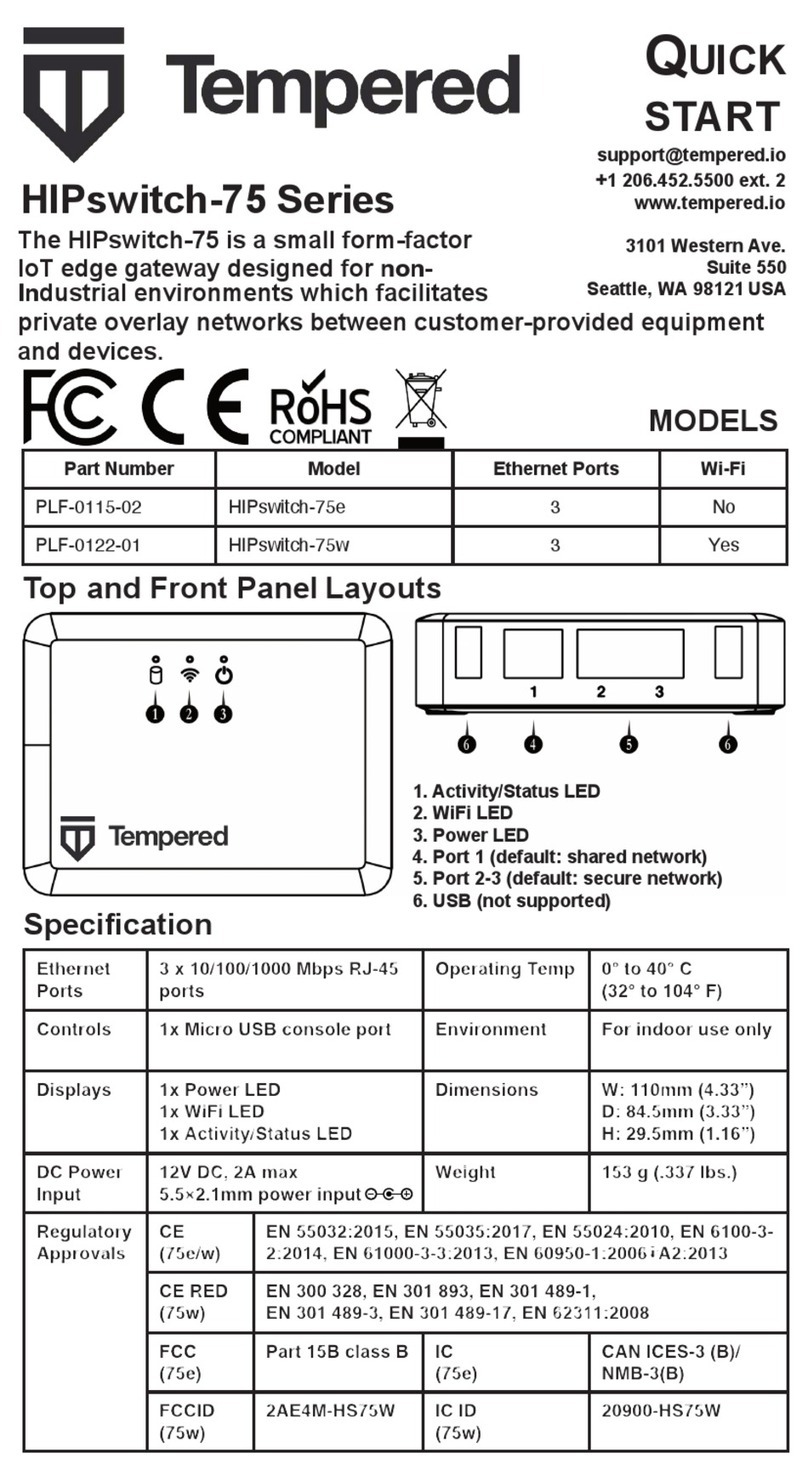
2. Get familiar with the top and front panel of the Airwall Gateway:
Top panel:
1. Activity/Status LED
2. WiFi LED (for future functionality)
3. Power LED
Front panel:
4. Port 1 (shared network)
5. Port 2-3 (secure network)
6. USB (future expansion).
3. Check the specifications on the labels and platform guide included in the box
to determine where to locate the Airwall Gateway.

Page 3
Step 2 – Connect the Airwall Gateway to the network and the
Conductor
The next step is to connect the Airwall Gateway to your network and to the Conductor,
called provisioning. At the end of this step, your Airwall Gateway will be powered on
and connected to the Conductor.
You can connect and configure the Airwall in one of two ways:
• Manually Connect – Faster for a few Airwall Gateways
• Use a DHCP Server – Faster if you are configuring more than a few.
Option 1 – Manually Connect
For provisioning, place the Airwall where it can reach the Conductor on your shared
network. The fastest way to provision the Airwall is to connect a computer to the
Airwall using the console port.
1. Plug in the Airwall – Locate the Airwall in an area that complies with the
safe operating guidelines, and then plug it in with the supplied power cord.
2. Connect to your network – Connect the Airwall to a network shared with
the Conductor using Port 1.
3. Connect a computer to the Airwall – Connect your computer to the micro
USB console port located on the back of the Airwall. (Wide side and/or USB
logo facing up)
a. Using a terminal (macOS or Linux) or terminal emulator (Windows),
connect to the Airwall using baud rate 115200.
b. At the login prompt, log in with: name: airsh and no password. For Airwall
Gateways with v2.2.5 and earlier, use password: airsh
c. Set the Conductor IP address or URL, and optionally, the port. For
example, enter:
conductor set my-conductor.tempered.com
4. Reboot – Turn the power off and back on again.
5. Ping the Conductor URL – Check that you can reach the Conductor by
pinging it. Enter:
ping my-conductor.tempered.com

Page 4
6. Connect to devices – Connect the devices you want to protect to the
Airwall on Port 2.
The Airwall should now be recognized in the Conductor, showing up on the Licensing
tab, or on the Airwalls page as ready to manage. Once the Airwall is connected to the
Conductor, you can manage and configure it there (including serial ports). For more
command line options, see the Airwall Gateway Airshell Console Command Reference.
Option 2 – Use a DHCP Server
For provisioning, place the Airwall where it can reach the Conductor on your shared
network. Once you set up DHCP on your network, you can skip steps 2 and 3 when
setting up any additional Airwalls.
1. Plug in the Airwall – Locate the Airwall in an area that complies with the
safe operating guidelines, and then plug it in or apply power.
2. Check DHCP – Ensure there is a DHCP server and a DNS resolver or DNS
server for the local domain that is accessible on the shared network.
3. Create a DNS SRV record – On the DNS server, add a SRV record pointing
to the Conductor URL:
_service._proto.name TTL class SRV priority weight port target
For example, if your shared network domain is me.com and the Conductor
hostname is cond-01, then the SRV record should be:
_ifmap._tcp.example.com. 3600 IN SRV 10 0 8096 cond-01.me.com
*Use the TTL, priority and weight for your DNS environment. Port 8096 is the
default, but you can change it in the Conductor and set it to an alternate
port.
4. Connect to your network – Connect the Airwall to a network shared with
the Conductor using Port 1. The DHCP server assigns an IP address,
netmask, and a default gateway to the Airwall. The Airwall then does an DNS
lookup and configures itself using the Conductor address.
5. Connect to devices – Connect the devices you want to protect to the
Airwall on Port 2.
The Airwall should now be recognized in the Conductor, showing up on the Licensing
tab, or on the Airwalls page as ready to manage. Once the Airwall is connected to the
Conductor, you can manage and configure it there (including serial ports).

Page 5
Step 3 – License and Manage the Airwall Gateway in the Conductor
See https://webhelp.tempered.io/webhelp/content/topics/lic_airwall.html for the latest
instructions.
You need to Add Airwall Edge Service Licenses to the Conductor before you can
provision and license Airwall Gateways. Airwall Edge Services include Airwall Gateways
as well as Airwall Agents and Servers that allow people to connect their devices to your
Airwall secure network.
1. In Conductor, open Settings, and go to the Licensing page.
2. If you have a license voucher, Add Airwall Edge Service Licenses to the
Conductor. If you don’t have a license voucher, contact [email protected] to
get one before continuing.
3. Under Provisioning Requests, select the check boxes for the Airwall
Gateway you want to provision, and under the Actions dropdown, click Grant
Request to provision your Airwall Gateway. The Airwall Gateway should
reconnect to the Conductor and appear in your Airwall Edge Services list as
unmanaged.
Note: You can also grant provisioning requests from the Provisioning tab on
the Dashboard.
4. On pre 2.2x Conductors, click Sync.
5. On the Conductor dashboard, click the Show all Airwalls box and filter
the Airwall Edge Services by unmanaged.
6. In the row for the Airwall Gateway you want to license, in the far right column,
click the arrow to open the drop down menu, and select Manage Airwalls.
You or your Conductor administrator can now configure the Airwalls in the Conductor.

Page 6
Additional Resources
LED Status Codes
Use the following table to interpret the LED status light pattern. O is blink, and =is off.
So O O = = means it blinks twice, is off for the same amount of time, then blinks twice
again, then off again, and so on.
Normal
Operation
On Steady
No Conductor
Connection
O O O O = = O O =
=
Conductor Blink
O O = =
System Error
O O O O = = O O O
= =
Missing Identity
O O O = = O = =
Secure Network Error
O O O O = = =
Factory Reset
O O = = O = =
No Shared Network
O O O O = = O = =
Diagnostic Mode
O = O = (fast blink)
Downloading
Firmware
O O O = = O O = =
Updating Firmware
O O O = = =
Specifications
Ethernet Ports
3 x 10/100/1000 Mbps
RJ-45 ports
Operating Temp
0° to 40° C
(32° to 104° F)
Controls
1x Micro USB console
port
1x Reset button
Environment
For indoor use only
Displays
1x Power LED
1x WiFi LED
1x Activity/Status LED
Dimensions
W: 110mm (4.33”)
D: 84.5mm (3.33”)
H: 29.5mm (1.16”)
DC Power Input
12V DC, 2A max
5.5×2.1mm barrel jack
Center positive
Weight
153 g (.337 lbs.)
Regulatory
Approvals
CE
(75e/w)
EN 55032:2015, EN
55035:2017, EN
55024:2010, EN
6100-3-2:2014, EN
61000-3-3:2013, EN
60950-
1:2006+A2:2013, IEC
60950-
1:2005+A1:2009+A2:
2013
FCC
(75w)
EN 300 328, EN 301
893, EN 301 489-1,
EN 301 489-3, EN
301 489-17, EN
62311:2008
FCC
FCC, part 15
IC
CAN ICES-3
(B)/NMB-3(B)

Page 7
Airwall Gateway Airshell Common Command Reference
For Airwall Gateways that have a console port, you can deploy and configure the Airwall Edge
Service with the Airshell (airsh) command-line interface. You can deploy & configure an Airwall
Gateway directly without going into diagnostic mode.
Get Started with Airshell
Connect a computer to the console port on the back of the Airwall™ or Conductor hardware, and
use a terminal (macOS, Linux) or terminal emulator (Windows) to open the console. See the
platform guide for your Airwall for specific connection instructions.
At the console:
• v2.2.8 and later: log in with name: airsh, and no password
• v2.2.5 and earlier: log in with name: airsh, and password: airsh.
You can then enter commands at the airsh» prompt.
No Default Password in v2.2.8 and later
Starting with v2.2.8, the Airshell console default login has no default password. If you are
concerned about securing physical access to Airshell, set a password by entering conf password
and following the prompts to set and confirm a new password. Keep this password in a secure
location, as it cannot be recovered. This password is only for Airshell physical console access and
is not used when you access Airshell remotely.
CAUTION: If this password is lost, you will need to do a factory reset to clear the password.
Common Airshell Commands
Command
Description
help
List available commands. Use help tree to see commands and options.
setup-ui
Open the setup wizard to set up an Airwall Gateway. See Configure an
Airwall Gateway with the airsh Setup Wizard.
conf network
v2.2.10 and later – Configure port groups, see Configure Port Groups
with Airshell in Airwall help.
v2.2.8 and earlier – Set up static IP addresses.
ping
Test network connectivity
status
See Airwall status:
• Hostname – Shows the Airwall Gateway’s identity used when it
connects to the Conductor. You use this name to confirm the
provisioning request from the Airwall Gateway.
• HIT – The Host Identity Tag is a hash of the Airwall Gateway's
Host Identity, the public key identifier. This IPv6-like identifier is
used for secure communication.
• LSI –The Local Scoped Identifier is a shortened IPv4 version of
the HIT, used for secure communication.
• Device cert. – Present indicates the presence of a device
certificate, which means the Airwall Gateway has been
provisioned by the Conductor.
• Device key – Present indicates the presence of the device
identity private key.

Page 8
• Keystore – Indicates where the device identity private key is
stored: TPM, Operating System, or file-based keystore.
• Annunciator – Displays the status of the annunciator. On some
models this affects LEDs and/or LCD display.
• Run mode – Indicates the mode the Airwall Gateway is running
in:
• Protected – Normal operation mode.
• Transparent – Running withnon-encrypted bridging.
• Diagnostic – In diagnostic mode.
• Factory reset – In factory reset mode.
• HA primary/secondary/active – Indicates the High Availability
role of the Airwall Gateway.
• Conductor – Shows the status of the Airwall Gateway's
connection to the Conductor. Disconnected indicates the Airwall
Gateway is not connected to the Conductor.
• IP address – Shows the active IP addresses for this Airwall
Gateway. An IP address displayed in green indicates it has been
selected as active.
status conductor
See status of connection to the Conductor
conductor set
Set or remove a Conductor IP address or URL and port (optional). For
example: conductor set my-conductor.tempered or just conductor
setto remove.
diag
Put the Airwall Gateway in diagnostic mode
factory-reset
Reset Airwall Gateway back to factory default settings. If you want to
preserve the network configuration, use the keep-networking option:
airsh>> factory-reset keep-networking
reboot
Restart the Airwall Gateway
shutdown
Shut down the Airwall Gateway
exit or quit
Exit Airshell
For the full reference of command-line commands, see Airwall help.
For the latest info, see Airwall help:
Tempered
+1 206.452.5500 ext. 2
www.tempered.io
19410 HWY 99 STE A #119
Lynnwood, WA 98036
Table of contents
Other TEMPERED Gateway manuals
Popular Gateway manuals by other brands
Technicolor
Technicolor MediaAccess TC8715 Setup and user guide
Comtrend Corporation
Comtrend Corporation VR-3063 user manual
Agilent Technologies
Agilent Technologies E5810 manual

Banner
Banner SureCross DX80 manual
Comnet
Comnet NetWave NW7 Installation and operation manual
4IPNET
4IPNET HSG100 Quick installation guide
