Tentandtable.com Premium Pole Tent 20' x 20' User manual

Assembly
Instructions
PREMIUM
POLE TENTS
20´x20´
20´x30´
20´x40´
30´x30´
30´x40´

1
STEP 1. CHECK ITEM LIST
Item Illustration (all parts available for replacement) Tent Size Quantity
20 x 20 8
20 x 30 10
20 x 40 12
30 x 30 12
30 x 40 14
20 x 20 1
20 x 30 2
20 x 40 3
30 x 30 1
30 x 40 1
20 x 20 12
20 x 30 14
20 x 40 16
30 x 30 16
30 x 40 18
20 x 20 12
20 x 30 14
20 x 40 16
30 x 30 16
30 x 40 18
All sizes 1
Side Poles- 7´
Center Pole
(assembly)
Single Head Stakes
(3/4˝x 30˝)
Guy Ropes
(attached)
Tent Top
(one piece)
16´- SKU: BT-PTW-16CENTER-2A14´- SKU: BT-BT-PTW-CENTERS
SKU: BT-PTW-7SIDEPOLE-1A
WARNING
Tent products are manufactured for use as temporary structure and do not meet structural code, unless
specified. Since weather is unpredictable, the customer must incorporate their own good judgment,
common sense & knowledge of local conditions with the installation instruction guidelines.
The customer is responsible to anticipate weather severity for proper time and method of construction.
‘BEFORE YOU DIG’ (hammer stakes)
By Law you are required to contact your local “Call before you dig” number before you plan to dig.
After calling, your local utility company will mark the location of underground utility lines. Laws
from state to state vary on how far in advance you must call.
Planning ahead and checking with your state’s program is always a smart idea. Failure to obtain a line
location before digging can result in a substantial fine. Please find your local “call before your dig
number” by going to call811.com.
(see
appendix A
for more info)
SKU: BT-SH-30-34STK-4
SKU: BT-38ROPE-12L
716 832-TENT (8368)

• When building or assembling anything
above shoulder height, wear a hard hat
• Steel toe boots are recommended
• Inspect the site, look for overhead and
underground obstructions—such as
utilities
• Call your local utility to have utility
lines marked (call 3–5 days ahead)—
call811.com is a good resource—
‘click’ 811 in Your State
• Inspect all ropes and tie lines
• Inspect poles, making sure there are
no bends or breaks
• Replace or repair any items in poor
condition
• Spread tarps (sold separately)—
approximately same size as tent so,
they won’t get in the way of stakes
• Unload poles and tent canopy
• Lay canopy over tarp
• Remove slack
• Square the canopy, measure from
corner to corner— measurement should
be the same for second set of corners
• Pull the perimeter of the tent as tight
as possible, the center of the tent top
will not be tight or lay flat due to the
peaks of the tent
• All guy ropes—should be pulled to the
ground, away from canopy
STEP 3. LAY OUT TENT
Position tarp and tent in the exact position desired
Lay tarp down first
Lay canopy on top of tarp
Stretch guy ropes away from canopy
STEP 2. SAFETY CHECK LIST
• Measuring for stake position is an
important step—here’s a quick way to go
about this, without an actual string line
• Place leg poles on canopy, perpendicular
to the edge of top—align with grommets
• Using the pole as a guide measure 4 feet
out—have another person hammer a
stake at that spot
• Move on to the next grommet
• Corners get two stakes each see (figure A)
Tip: Place a small object, such as a piece
of ply wood, on the ground, under the
grommet—this will help position the
legs when it is time to do so
STEP 4. MEASURING FOR STAKES
Grommet openings
4 ft.
2
716 832-TENT (8368)

• Drive all anchoring stakes vertically into
the ground
• Leave 6 inches of the stake exposed
• Loop the guy rope around the stake
while the tent top is laying on the ground
—use a clove-hitch knot see (figure B)
• Leave slack in the rope and tighten
later
Tip: Stake drivers are available for rent
or purchase, for larger tents
(Sold on TentandTable.com)
• A commonly used knot for securing
a rope to stake is the clove-hitch
1.) Make two loops
2.) Cross loops by placing second loop
over the first
3.) Place the combined loops over stake
Option: loops can be form directly
on stake
4.) Pull on both ends to tighten rope
Note: outward force tightens and
inward force loosens the knot—when
making adjustments
5.) Excess line should be pulled half-
way up the rope and tied off— or use
a tensioner
Sold on TentandTable.com
FIGURE B. CLOVE-HITCH KNOT
• Arrange side poles around canopy—
lay them next to the grommets
• Poles should be perpendicular to
tent (except corner poles)
• Double check that poles are next to
edge of grommet— see (appendix) for
pole locations
• Using poles as a guide, measure 4 feet
in from canopy grommets—
(notice corner stakes are lined up with
edge of tent top and are 90 degrees apart
• Hammer the stakes, leaving 6˝showing
above the ground, see (step 5)
(sledge hammer required)
If you prefer, stringing two lines (tent size
and stake line) is the other method used
FIGURE A. STAKE LINE
Stake Line
Poles
Grommets
Approx. 4 ft.
from grommet
(corners)
2 stakes,
as shown
STEP 5. HAMMERING STAKES
3.) 4.)
1.)
2.)
3
Correct Incorrect
6˝
716 832-TENT (8368)

A slight angle, inward,
might be needed until all
side leg poles are installed
• Locate metal grommet holes, at corner
on the underside of the canopy
• Insert the pole pin through the metal
double D-ring and the brass grommet
(very important that the pin goes
through both holes
• Start with corner poles on same side
• All four corner poles should be
installed FIRST, before next step
• Stand pole up—this is accomplished
with two people—one holds the leg pole
vertical and the other tightens the guy
ropes
• Raise all four corner leg poles
STEP 6. RAISING CORNER POLES
4
• For a single center pole or multiple poles;
Insert first pole, keep at an angle to
allow more stability, as you work on the
other pole(s)
• Poles will be sitting on top of tarp, at
this point
• Install next center pole the same way
• Tie off each center pole with jump rope
as you go, see (step 8.)
• After last center pole is angled in,
remove tarp, as the canopy is off the
ground
• Now, go back, lift and adjust other
center poles to their vertical position
Angle the all center
pole, about 45º angle
Corner Poles
(cutaway view— showing inside of canopy)
If your tent has multiple center poles start with one
at either end— continue down the line
FIGURE C. MULTIPLE CENTER POLES
• Center pole(s) next, before side poles
• Assmebly center pole, if your tent size
requires this
• With two people holding the pole, one
near the middle and other at bottom
of pole
• Carry pole under the canopy from a short
side (start with left or right grommet
opening when 3 center poles are involved)
• Raise pole towards grommet opening, at
the center of canopy— place pin in metal
“O” plate and grommet, see (figure C.)
• make sure center poles go clean through
grommet holes
STEP 7. INSTALLING CENTER POLE(S)
716 832-TENT (8368)

5
• After center poles are installed, go
around the tent and insert all side poles
• Place pole pin through side grommet—
let pole lay at a natural angle inward
• Tightening the guy rope will pull the
pole vertical
• Install all side poles and tighten each
guy rope
• Make sure all poles form a squared up
rectangle
• Adjust corner poles (exactly vertical)
and tighten ropes before finishing the
side poles
• 3 people needed for this next step:
have one person stand at the outside,
center of tent—
Visually check center pole alignment,
as it relates to horizontal center
• Two others should be adjusting and
straightening center poles
• Next, readjust side poles— tighten ropes
• Tighten guy ropes accordingly, to correct
any lean at top of tent
STEP 10. STRAIGHTENING POLES
STEP 9. INSTALLING SIDE POLES
Guy Rope
• Secure center poles with jump ropes, to
help keep poles from falling during setup
—also, prevents strong winds from
detaching canopy from the pole pins—
If this occurs the tent would collapse
• A.) Pull tie rope down about 6 ft.
begin first loop
• B.) Then, pull it back taut, to create
a locked tension
• C.) Wrap the rope around the pole
4x, to create a tight coil
• D.) Lastly, pull the end of the rope
through the top loop
STEP 8. SECURE CENTER POLES
A. B. C. D.
With one eye closed,
visually align center poles
Stand in center
of tent, outside
of canopy
(cutaway view— showing all center poles)
716 832-TENT (8368)

6
1.) Loosen side pole ropes, remove
side poles
2.) Untie jump ropes, remove
extra center pole(s)— leave one
3.) Roll out tarp, part way under tent
4.) Remove side poles
5.) Remove last center pole
6.) Completely roll out tarp
7.) Remove corner poles
8.) Flatten canopy and stretch
it out
9.) Fold canopy top,
see (figure D)
10.) Bag the canopy top
• Fold to center • Fold those halves to
center—for a 40´tent,
fold to center once more
• Fold one side over
• Roll tightly
FIGURE D.
STRIKE PROCEDURE (basically, reverse of assembly)
7´
10´
10´
10´
10´
10´
FINISHED TENT
(2) Guy ropes
per corner pole
(1) per side pole
20 x 30 example
12´-9˝
716 832-TENT (8368)

E. F. G.
7
WIND AND RAIN – IMPORTANT INFORMATION:
WIND!
Wind can cause the ratchet assemblies and stakes to loosen, or cause the poles to sink or shift through
constant movement and vibration — the tension of the tent will be negatively altered.
Follow these steps to provide extra security and safety during windy conditions:
• Very important, do routine maintenance checks — be sure to check proper tension regarding the
ratchet assemblies, throughout the day/event. This is critical, if your tent must stay up, in moderate
windy conditions.
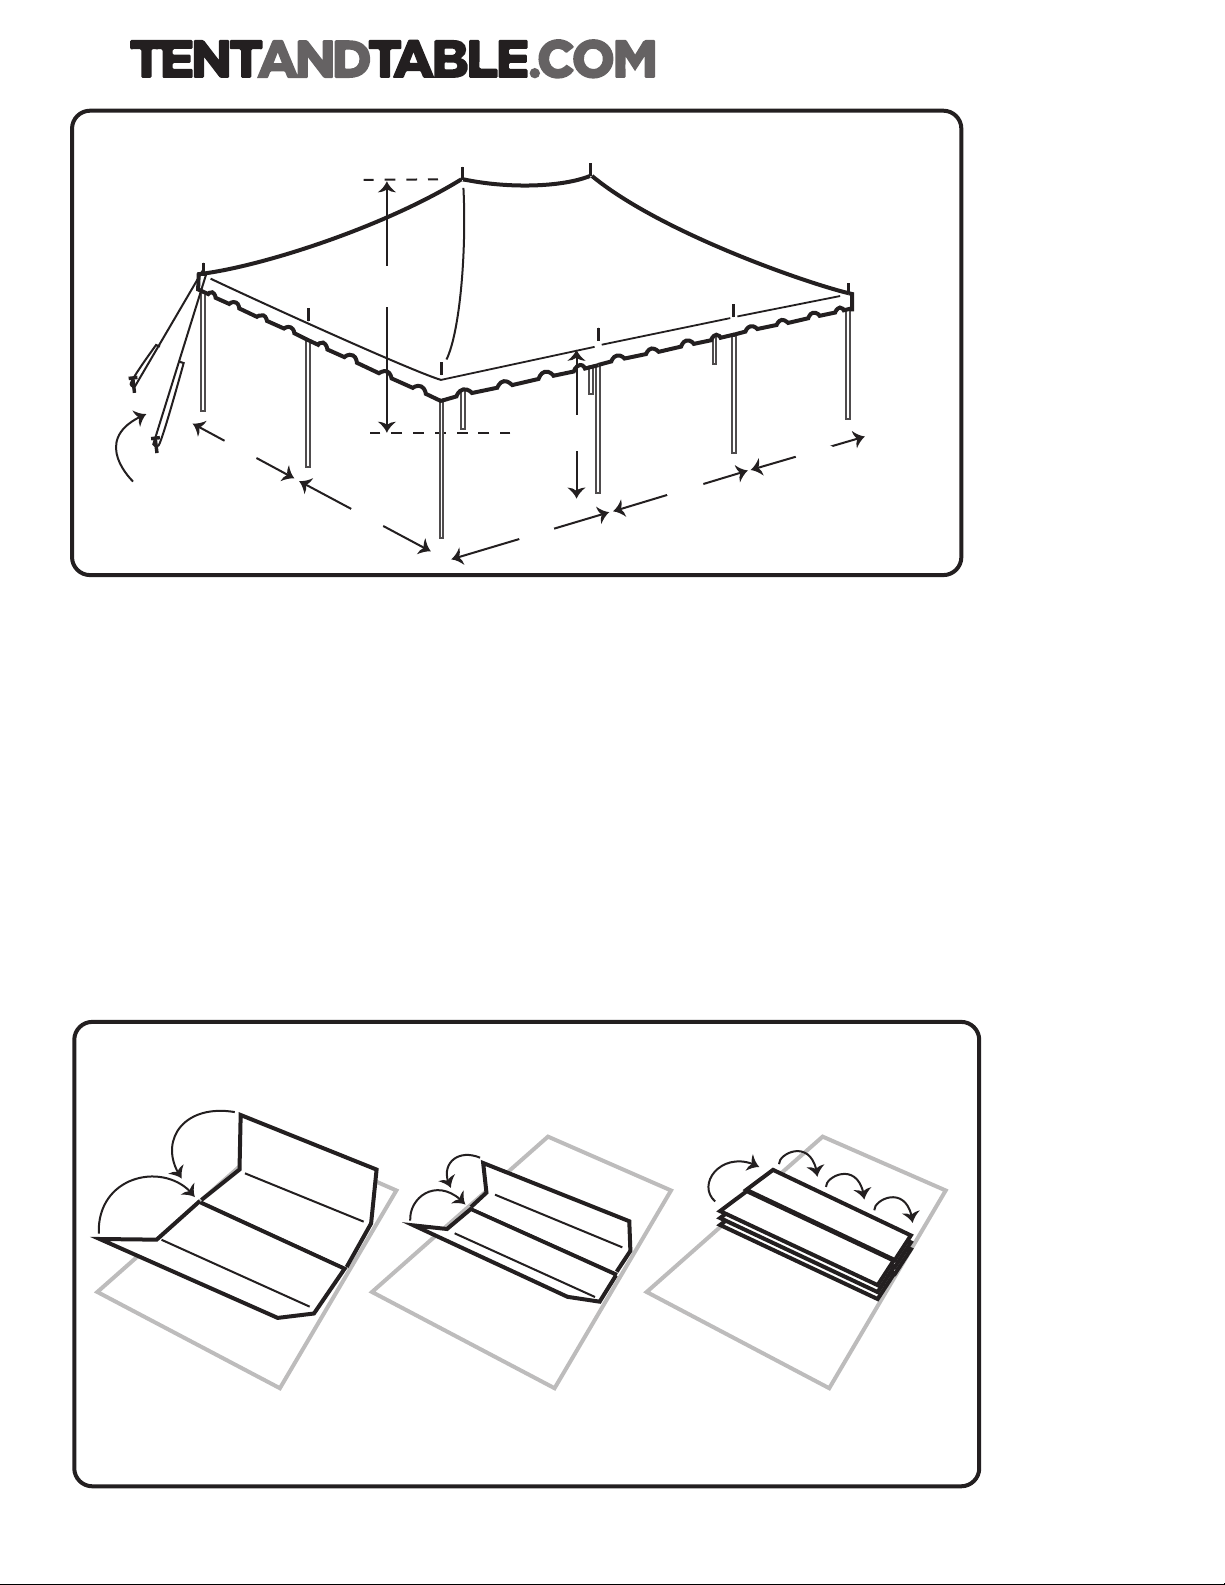
• Blocking plates must be placed under ALL poles, to prevent the poles from sinking into the ground.
This will help insure proper tension is maintained between the tent top and the ratchet straps.
6 in. x 6 in. x 3/4 in. plywood is recommended—(use 12 in. x 12 in. x 3/4 in. for larger tents, see figure E).
• In the case of strong winds, remove any sidewalls. This will allow the wind to pass through the tent,
diminishing major upward pressure on the tent top.
• Additional security can be achieved by adding additional stakes and ropes/straps to corners—
and to the ‘wind side’ of the tent.
• When anticipating windy conditions, perform a soil test to determine proper staking:
1.) drive a large steel stake approx. 20 in. into soil, vertically
2.) measure the distance from the ground to the top of stake
3.) with a 16lb. sledge hammer, strike stake with an average blow (don’t over hit)
4.) measure the movement/hold strength: (0.2in./2500lbs) (0.3–.5in./1600lbs) (0.6–1.5in./800lbs)
(1.6–3in./400lbs) (3–6in./200lbs) (> 6in./100lbs) Double or triple staking might be necessary,
10in. behind primary stake (see figure F). [search web for: tent.IFAI tent staking handbook for detailed information]
• When SEVERE WEATHER is approaching, the TENT SHOULD BE EVACUATED— and TAKEN DOWN!
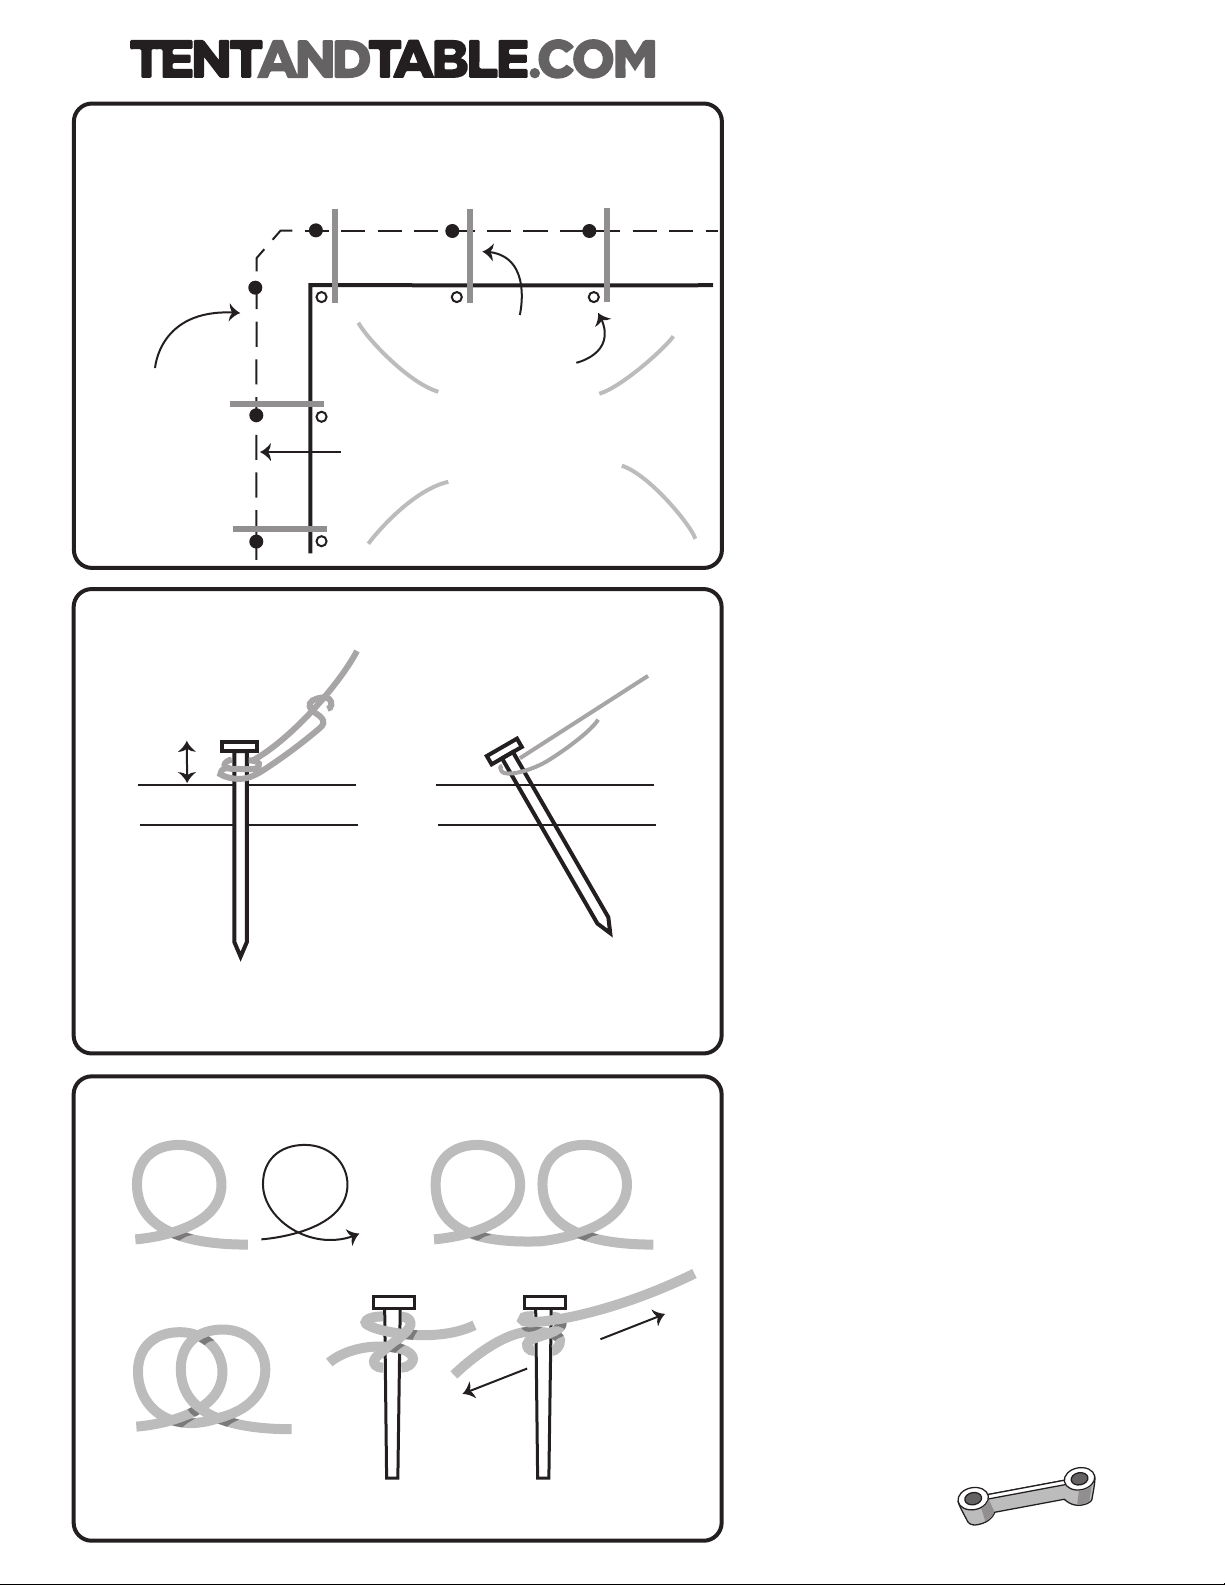
• Proper Setup Note:
Make sure all poles are vertical and form a ‘squared up’ rectangle.
30 wide and larger: use a Mason’s string — attach at the base of one corner pole, go around all
4 corners to form a box. Tighten the string — then align all side poles by having them touch the string.
Proceed by bringing these poles vertical and applying proper tension to each strap — start at the
middle of one of the short sides (2 people, same speed) and work around the tent, ending with
the middle of the other short side (see figure G). The person on the ‘wind side’ goes first.
Lastly, re-check the corner poles.
RAIN!
When rainwater collects on the tent canopy it causes 'ponding'— occurring in heavy weather conditions.
If the tent is not tensioned correctly, this issue will be made worse. Additional weight from the water
will cause the tent to sag — this may cause the poles and base plates to sink into the soil. In addition,
water saturated soil will cause the stakes to lose their holding power. When you combine loosened
stakes, added weight on the canopy and reduced tension on ratchet assemblies, the structure becomes a
safety hazard. IT IS THE TENT OWNERS RESPONSIBILITY TO ASSURE THE SAFETY OF ALL INVOLVED.
716 832-TENT (8368)
Place all
poles on
plywood
blocks
6in. x 6in or 12in. x 12in.
secondary
stake
primary
stake
person 1
person 2
start
string line
(20 x 40 tent)

8
TENT CARE, CLEANING AND STORAGE
For maximum life of Tent and Table fabrics, Tent and Table recommends regular cleaning with the
use of a soft brush with neutral soaps or cleaners, such as a Tent and Table approved cleaner, Ivory
dish soap, or warm water. Thorough rinsing and drying is required before storing them.
Things that will cause premature degradation and reduced life expectancy
of your tents:
• Multiple uses of the tent without cleaning
• Accumulation of dirt on the vinyl surface will promote the growth of mold and mildew and
premature wear.
• Storage of vinyl that has not been dried thoroughly!
• Even a slightly damp product can promote the growth of mildew when folded and stored. Mold
and/or mildew may require harsh cleaners to remove, which may cause premature wear. The best
solution is to take every precaution to keep mold and mildew from growing in the first place.
• Harsh Detergents and Cleaners, which contain a Solvent or Bleach
• The longer the exposure of PVC vinyl to these products, the more it will reduce the life of the PVC
vinyl. If you or your customer decides to use a product containing a solvent or bleach, it is very
important to remove it as quickly as possible, rinsing thoroughly and drying.
• High Abrasive Cleaners, including Wire Brushes, Power Washers and/or Commercial Washing
Machines will result in premature wear and deterioration of tent fabrics.
• During installation/dismantling tents or canopies improper handling such as on a rough surface can
create pinholes and abrasions.
• Strong winds will also damage the tent.
VINYL CLEANER
First impressions are important; therefore, make your tents shine with vinyl cleaning products.
Many rental companies rely on referrals to increase their business so make sure your tent is clean
and mildew free for your next event.
VINYL REPAIR
Avoid an embarrassing situation by being prepared for small accidents that can happen in the field
during tent installations. Tent and Table's repair products provide a quick and easy applicable solution
to small tears and puncture holes when there is no time to spare. Our repair kits are equipped with
multiple colors for versatility in the field.
Please visit www.tentandtable.com for more information on our vinyl repair products.
716 832-TENT (8368)

Appendix A.
• Plans— showing tent sizes and
pole location
20 X 20
TENT
30 X 40
TENT
30 X 30
TENT
20 X 30
TENT
20 X 40
TENT
Pole positions
Center Poles
10 ft.
10 ft.
10 ft.
10 ft.
10 ft.
center pole: 2pc
3˝diameter/16ft tall
center pole: 4pc
3˝diameter/14ft tall
sku: BT-2030-PTW-CENTERS
center pole: 4pc
3˝diameter/14ft tall
sku: BT-2040-PTW-CENTERS
center pole: 2pc
3˝diameter/16ft tall
center pole: 4pc
3˝diameter/14ft tall
This manual suits for next models
4
Other Tentandtable.com Tent manuals

Tentandtable.com
Tentandtable.com 716 832-TENT User manual

Tentandtable.com
Tentandtable.com WEST COAST FRAME TENT 20x40 User manual

Tentandtable.com
Tentandtable.com BT-PP48WT4P User manual

Tentandtable.com
Tentandtable.com HIGH PEAK FRAME TENT 20 x 20 User manual

Tentandtable.com
Tentandtable.com 40 Hex User manual