PNH Super Dome User manual

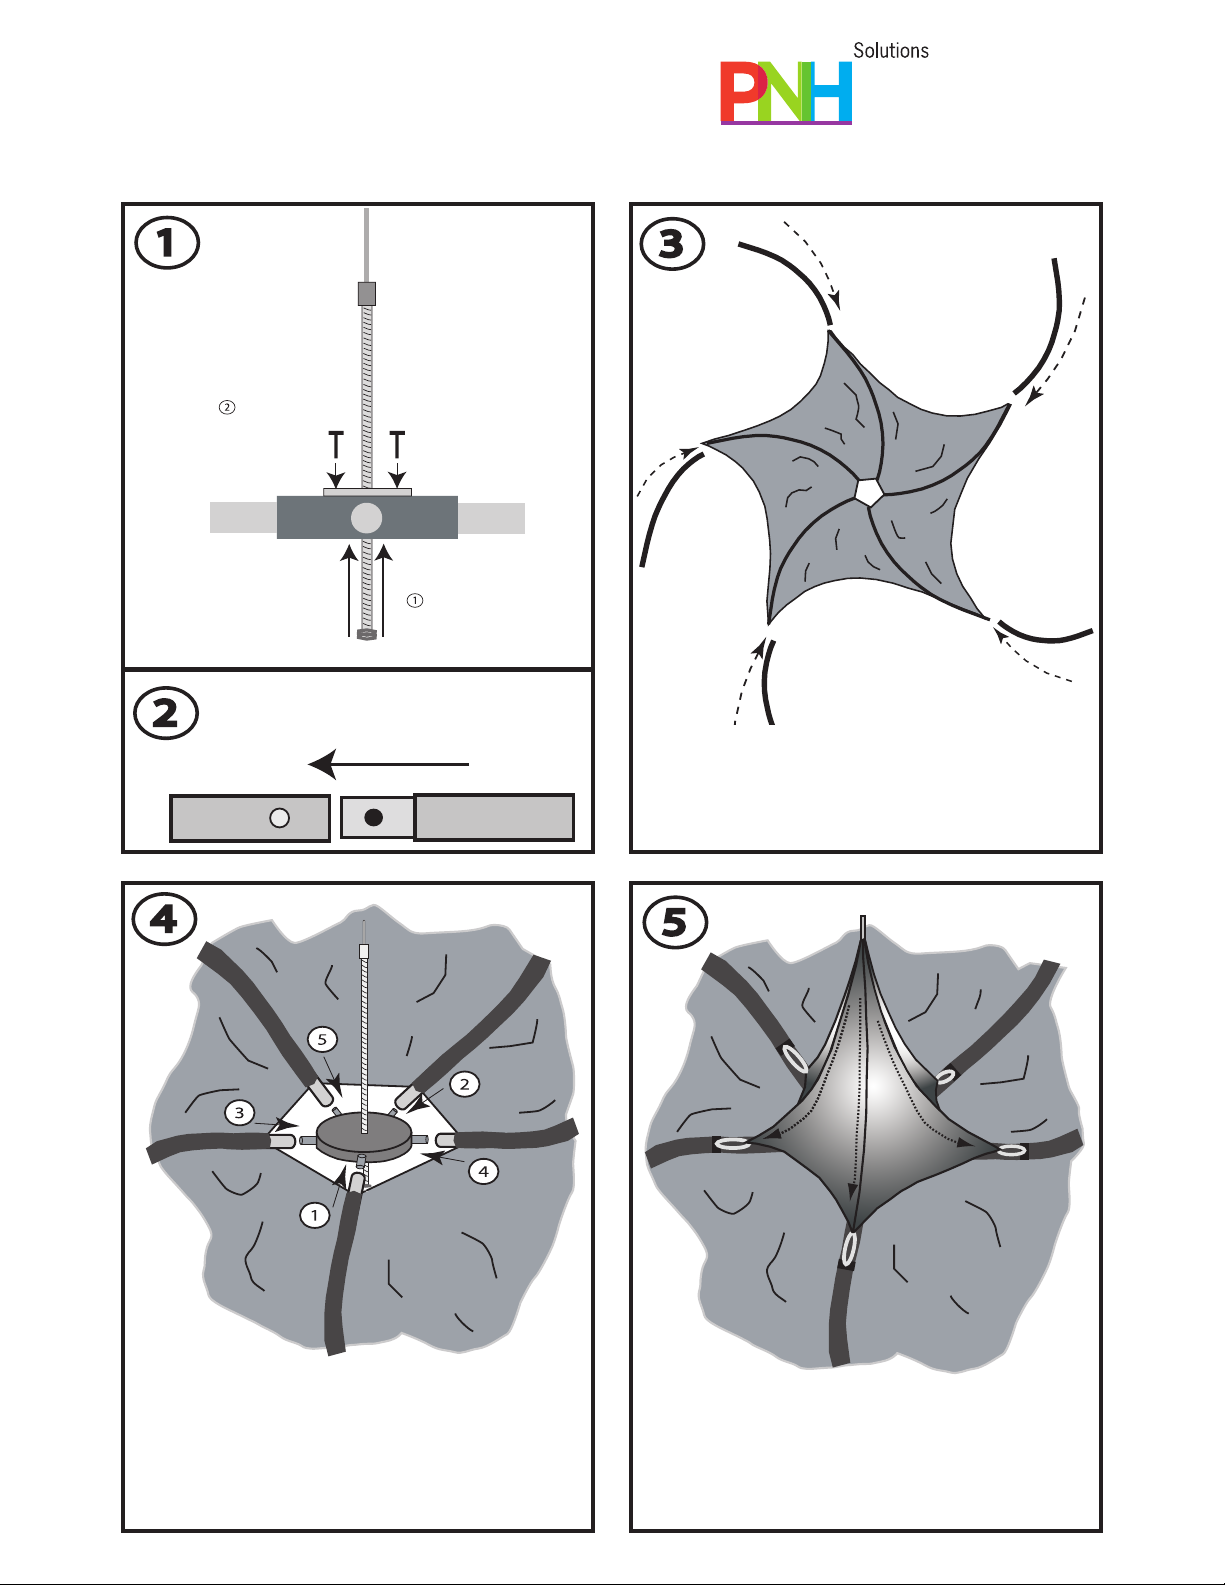
Congratulations on purchasing this high quality super dome tent. The set up of the 4.8m and 6m domes
requires 2 people and typically takes 20 minutes, while the 9m dome requires 3 people and takes approxi-
mately 30 minutes.
Tout d’abord, nous tenons à vous féliciter pour l’acquisition de votre tente Super Dôme qui a été fabriqué
selon les plus hautes normes de qualité. Le temps d’installation habituel d’une tente Super Dôme de 4,8m et
6m est d’approximativement 20 minutes et il faudra deux personnes pour y parvenir. Quant au Super Dôme
9m, le temps d’installation habituel est d’approximativement 30 minutes et trois personnes sont requises.
Caution: At all times use tie downs, stakes or weights to secure your dome. The dome is designed for
temporary use and should not be left unattended: do not use this structure in severe weather; take down in
severe weather; do not set up in severe weather; do not allow rainwater or snow to collect on the top.
Doing so may result in damage to the product and/or injury to you or others. Do not leave the dome unat-
tended. In high but not severe winds open the walls (if any) and make sure that the cupola is unobstructed
since this serves as a vent reducing wind pressure.
Attention: En tout temps, assurez-vous d’utiliser des arrimages, des pieux ou des poids afin de sécuriser
votre dôme. Le Dôme a été conçu pour un usage temporaire et ne devrait jamais être laissé sans surveil-
lance. De plus, ce produit ne devrait pas être utilisé lors de conditions météorologiques extrêmes. Lors de
conditions météorologiques extrêmes, désinstaller le Dôme et assurez-vous qu’il n’y a aucune accumulation
d’eau ou de neige sur celui-ci. Prenez note que de ne pas tenir compte de ces instructions pourrait engen-
drer des dommages à votre Super Dôme, vous blesser ou blesser autrui. Lors de conditions météorologiques
impliquant de forts vents, mais non extrêmes, ouvrez les murs (s’il y en a) et assurez-vous que la coupole
n’est pas obstruée, car cette pièce a pour fonction de réduire la pression du vent.
PNH warrants this product for a period of one year against defects in materials and workmanship. Warranty
is void if the product is used for other than its intended purpose, if the product is modified or altered, if
product damage is accidental or deliberate or damage is caused by rain, snow, heavy wind and other forces
of nature.
PNH garantit ce produit pour une période d’une année contre les défauts de fabrication relatifs aux matéri-
aux et à la main d’œuvre. La garantie devient nulle si le dôme a été utilisé pour une utilisation autre que
celles qui lui sont attribuées, si le dôme a été modifié ou retouché, si le dôme a été endommagé accidentel-
lement ou intentionnellement ou si les dommages ont été causé par la pluie, la neige ou de fort vents et
autres conditions météorologiques rigoureuses.
Allow the top and any fabric accessories to dry completely before storing away.
Assurez-vous que le toit et les différents accessoires en tissus (s’il y en a) soient asséchés complètement avant
d’entreposer le super dôme.
Instruction Manual / Manuel d’instructions
Super Dome
pnh.ca
Large Format Printing
Event Marketing Products
Retail & Exhibit Solutions

Insérez la tige de la coupole
à l’intérieur du trou dans le
moyeu de la coupole.
Vissez la tige de la coupole
dans le moyeu de la coupole.
Chacun des supports tubulaires de la structure est composé
de deux morceaux. Connectez les deux morceaux ensemble
jusqu’à ce que le bouton-pression soit en place. Répétez
cette action pour chacun des supports.
Placez le moyeu de la coupole assemblé avec la tige de
la coupole dans l’ouverture au centre du toit (la longue
partie de la tige vers le haut et la partie courte de la tige
vers le bas. Insérez chacune des extrémités des supports
tubulaires par-dessus les embouts de la coupole.
Afin de prévenir le salissage du toit lors de l’installation, placez
la bâche fournie sur le sol et déployez le toit sur celle-ci avec
les manchons dirigés vers le haut. Insérez complètement les
supports tubulaires de la structure à l’intérieur des manchons.
Chacun des supports doit être inséré de façon à ce que la
courbe des supports soit orientée vers la même direction.
Placez la toile servant à recouvrir la coupôle
par-dessus la longue tige et attachez les boucles
sur les manchons du toit. S’il y a lieu, posez un
drapeau sur la tige de la coupole.
Instruction Manual / Manuel d’instructions
Super Dome
pnh.ca
Large Format Printing
Event Marketing Products
Retail & Exhibit Solutions

insert the cupola shaft
through the hole in the
cupola hub
bolt the cupola shaft
to the cupola hub
Each of the tubular frame supports consist of two parts.
For each support connect these two parts together
until the “snap button” snaps into place.
Place the cupola hub with the cupola shaft assembled
to it in the centre opening of the top (the long part of
the shaft on top and the shorter part of the shaft on
the bottom). Insert the end of each of the tubular
supports into the housings on the cupola hub.
To prevent the top from becoming dirty when installing it,
place the tarp supplied on the ground and spread the top
onto the tarp with the seams (sleeves) of the top facing
upwards. Insert the frame support into the sleeve completely.
Each support must be inserted with the “curve” of the
support facing the same direction.
Place the cupola fabric supplied over the long
shaft and attach to loops on the sleeves of the
top. If applicable place a flag on the cupola shaft.
Instruction Manual / Manuel d’instructions
Super Dome
pnh.ca
Large Format Printing
Event Marketing Products
Retail & Exhibit Solutions

Insérez la clé de serrage de la coupole à l’intérieur
du bas de la tige et tournez celle-ci afin d’élever
la coupole jusqu’à ce que la toile devienne
tendue. Ne pas trop serrer. Par la suite, enlevez
la clé de serrage et vérifiez si la tension est égale
sur tous les supports.
Afin d’ériger la structure, une personne doit être
placée sous le toit pour insérer la clé de serrage
dans la tige de la coupole et ensuite pousser vers le
haut. Pendant ce temps, la deuxième personne doit
soulever et faire pivoter les supports de la structure
à la verticale tout en tirant le tissu vers le bas. Une
fois les pattes en position, on peut enlever le clef de
serrage et la structure tiendra debout.
Insérez les plaques allant
sur le sol dans les
supports tubulaires en
vous assurant que la
double poulie de chaque
support est enlignée vers
l’intérieur du dôme.
Le long des cinq supports, tirez vers le bas la
toile du toit et faites passer la corde de l’extrémité
de la toile au travers le côté gauche ou droit (un ou
l’autre) de la poulie. Par la suite, tirez la corde vers
le haut en la faisant passer dans l’anneau de métal
et ensuite tirez celle-ci vers le bas au travers du
deuxième côté de la poulie. Afin d’ajuster le tout,
tirez la corde vers le bas et insérez celle-ci dans le
taquet sur le support. Répétez la même opération
sur chacun des supports et assurez-vous que la
tension est égale sur chacun des supports.
Attachez les cordes du dôme aux anneaux sur les manchons
et attachez-les aux piquets enfoués dans le sol. Sécurisez
aussi la structure en insérant des piquets dans les trous des
plaques au sol.
Remplissez les sacs de poids avec du sable ou avec de
l’eau. Placez ceux-ci sur les plaques au sol en les enroulant
autour du support. Attachez ceux-ci avec le velcro qui se
trouve sur le sac. Nous vous recommandons d’utiliser
deux sacs de poids par patte.
Sécurisez votre dôme
avec les cordes d’ancrage.
Sécurisez votre Super Dôme avec
des sacs de poids ou d’eau.
Instruction Manual / Manuel d’instructions
Super Dome
pnh.ca
Large Format Printing
Event Marketing Products
Retail & Exhibit Solutions

Insert the cupola wrench into the bottom of the
cupola shaft and turn the wrench to elevate the
cupola until the fabric becomes taut. Do not over
tighten. Then remove the wrench and check
tension at all legs.
To erect the structure, with one person standing
under the top, insert the cupola wrench into the
shaft and push up. As this is happening have your
partner(s) lift and twist the frame supports into an
upright and straight position to the centre hub,
pulling down the top fabric at the same time. Once
the frame supports are straight the wrench can be
removed and the structure will stand on it’s own.
Insert the round foot
pads into the tubular
frame supports. Before
doing so, ensure the
double pulley on each
support faces the interior
of the Dome.
Along each of the five supports pull down the top
fabric and thread the corner rope through either
the left of right side of the pulley and then thread
the rope upwards through the metal ring and again
downwards through the second side of the pulley.
To tighten pull downwards on the rope and affix to
the cleat on the support. Repeat on all supports
and ensure tension is equal on all.
Attach the guy ropes to the rings on the sleeves and attach
to the ground stakes. Also secure the structure by inserting
the stakes into the holes of the foot pads.
Fill the weight bags with sand. Place the weight bag on
the foot pad and wrap around the leg, securing it with
the Velcro on the bag.
We recommend the use of two weight bags per leg.
Securing with anchor lines
Securing with weight or water bags
Instruction Manual / Manuel d’instructions
Super Dome
pnh.ca
Large Format Printing
Event Marketing Products
Retail & Exhibit Solutions

Instruction Manual / Manuel d’instructions
Super Dome
pnh.ca
Large Format Printing
Event Marketing Products
Retail & Exhibit Solutions
4.8m & 6m Super Dome parts

Instruction Manual / Manuel d’instructions
Super Dome
pnh.ca
Large Format Printing
Event Marketing Products
Retail & Exhibit Solutions
9m Super Dome parts
Table of contents
Languages:
Other PNH Tent manuals
Popular Tent manuals by other brands

ShelterLogic
ShelterLogic 70443 instructions

Palram
Palram Feria Patio Cover 5400 Assembly instructions

Dancover
Dancover Vitoria 5000 Assembly instructions

toolport
toolport Wikinger Carport Assembly instruction

ShadeTree
ShadeTree The Greenbriar Assembly instructions

ShelterLogic
ShelterLogic 23531 installation instructions