Tentandtable.com HIGH PEAK FRAME TENT 20 x 20 User manual

our
,·y
SPECTl
16'-9"
HIGH
PEAK
FRAME
TENT
20
'x
20'
ASSEMBLY
INSTRUCTIONS
!h,eseplans must
be
on
the
jobsite atall
times.
Do
not
deviate
from
plans without
written
approval
from
LUGM.
Approval
of
plans
does
not
relieve
you
from
complying
with all local, state
and
federal laws and rer,nfatim,~.
TENTAND
TABLE
.COM
TENT
AND
TABLE
.COM
716
832-TENT (8368)
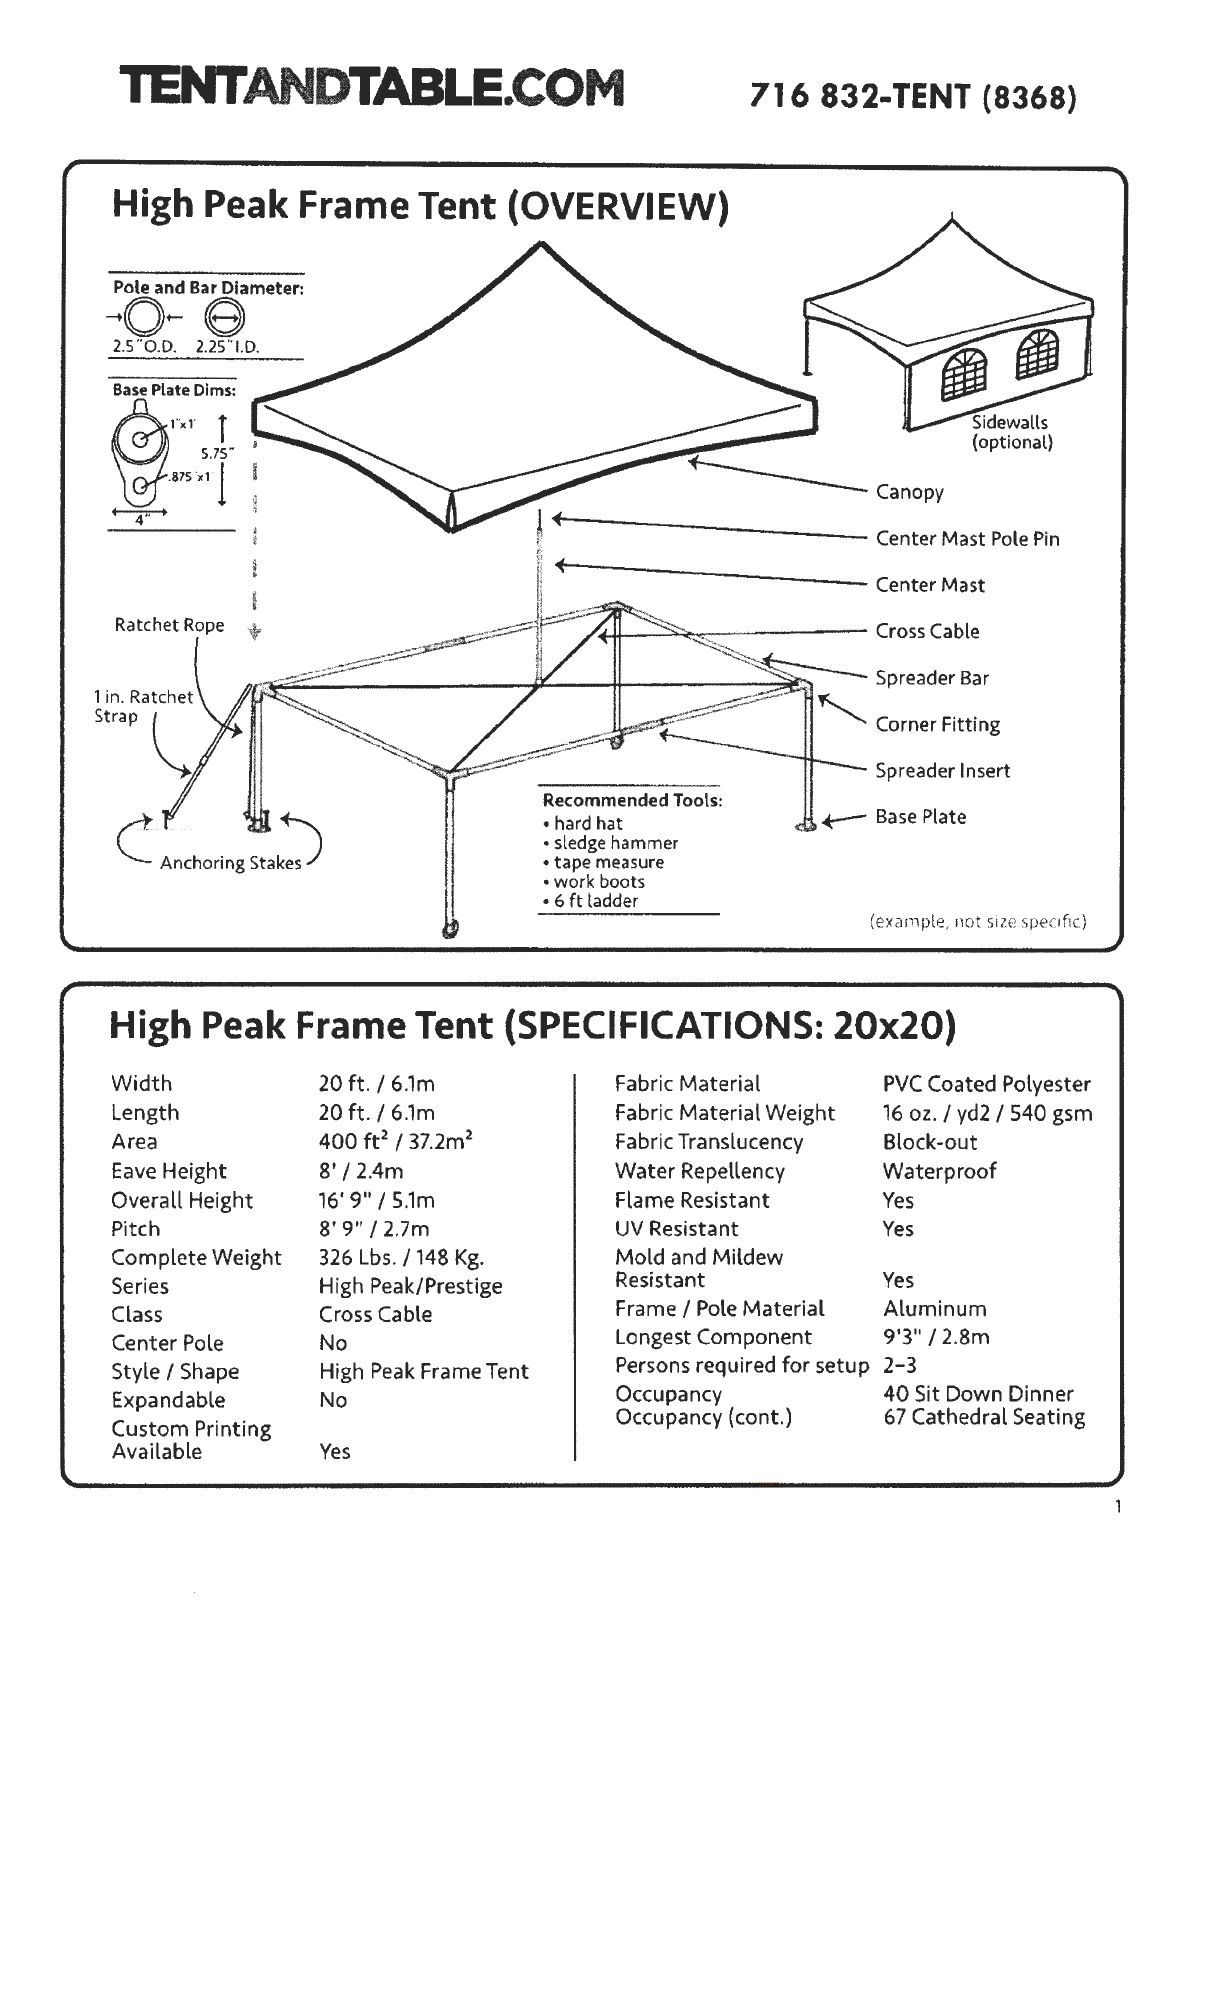
High Peak Frame Tent (OVERVIEW)
Pole and Bar Diameter:
~o+-
a
2.5"0
.D. 2.
25
"1.
D.
Base
Plate
Dims
:
r·
xr
T
S.75 "
.875 •• , . l
~
Ratchet
Rope
't
1in. Ratch
St
rap
~Canopy
Recommended Tools:
•hardhat
•sledgehammer
•
tape
measure
•
work
boots
• 6 ft ladder
Spreader
Bar
Corner
Fitting
Spreader
Insert
.
~
Base Plate
(example,
not
size
specific)
High Peak Frame Tent {SPECIFICATIONS:
20x20)
Width 20
ft./
6.
1m Fabric Material
PVC
Coated Polyester
Length 20
ft./
6.1m
Fabric Material Weight
16
oz.
/
yd2
/ 540 gsm
Area 400 ft2 /
37.2m
2 FabricTranslucency Block-out
Eave
Height 8' / 2.4m Water Repellency Waterproof
Overall Height
16'
9" / 5.
1m
Flame
Res
i
stant
Yes
Pitch 8'
9"
/ 2.
7m
UV
Resistant
Yes
Complete Weight
326
Lbs.
/
148
Kg.
Mold
and Mildew
Series Hi
gh
Peak/Prestige Resistant
Yes
Class Cross Cable Frame /
Pole
Material Aluminum
Center Pole
No
Longest Component 9'3" / 2.8m
Style / Shape
High
Peak
Frame Tent Persons required for setup 2-3
Expandable
No
Occupancy
40
Sit
Down
Dinner
Custom
Pr
inting Occupancy (cont.)
67
Cathedral Seati
ng
Available
Yes
1
D
TABLE
.COM
716
832-TENT (8368)
r ~
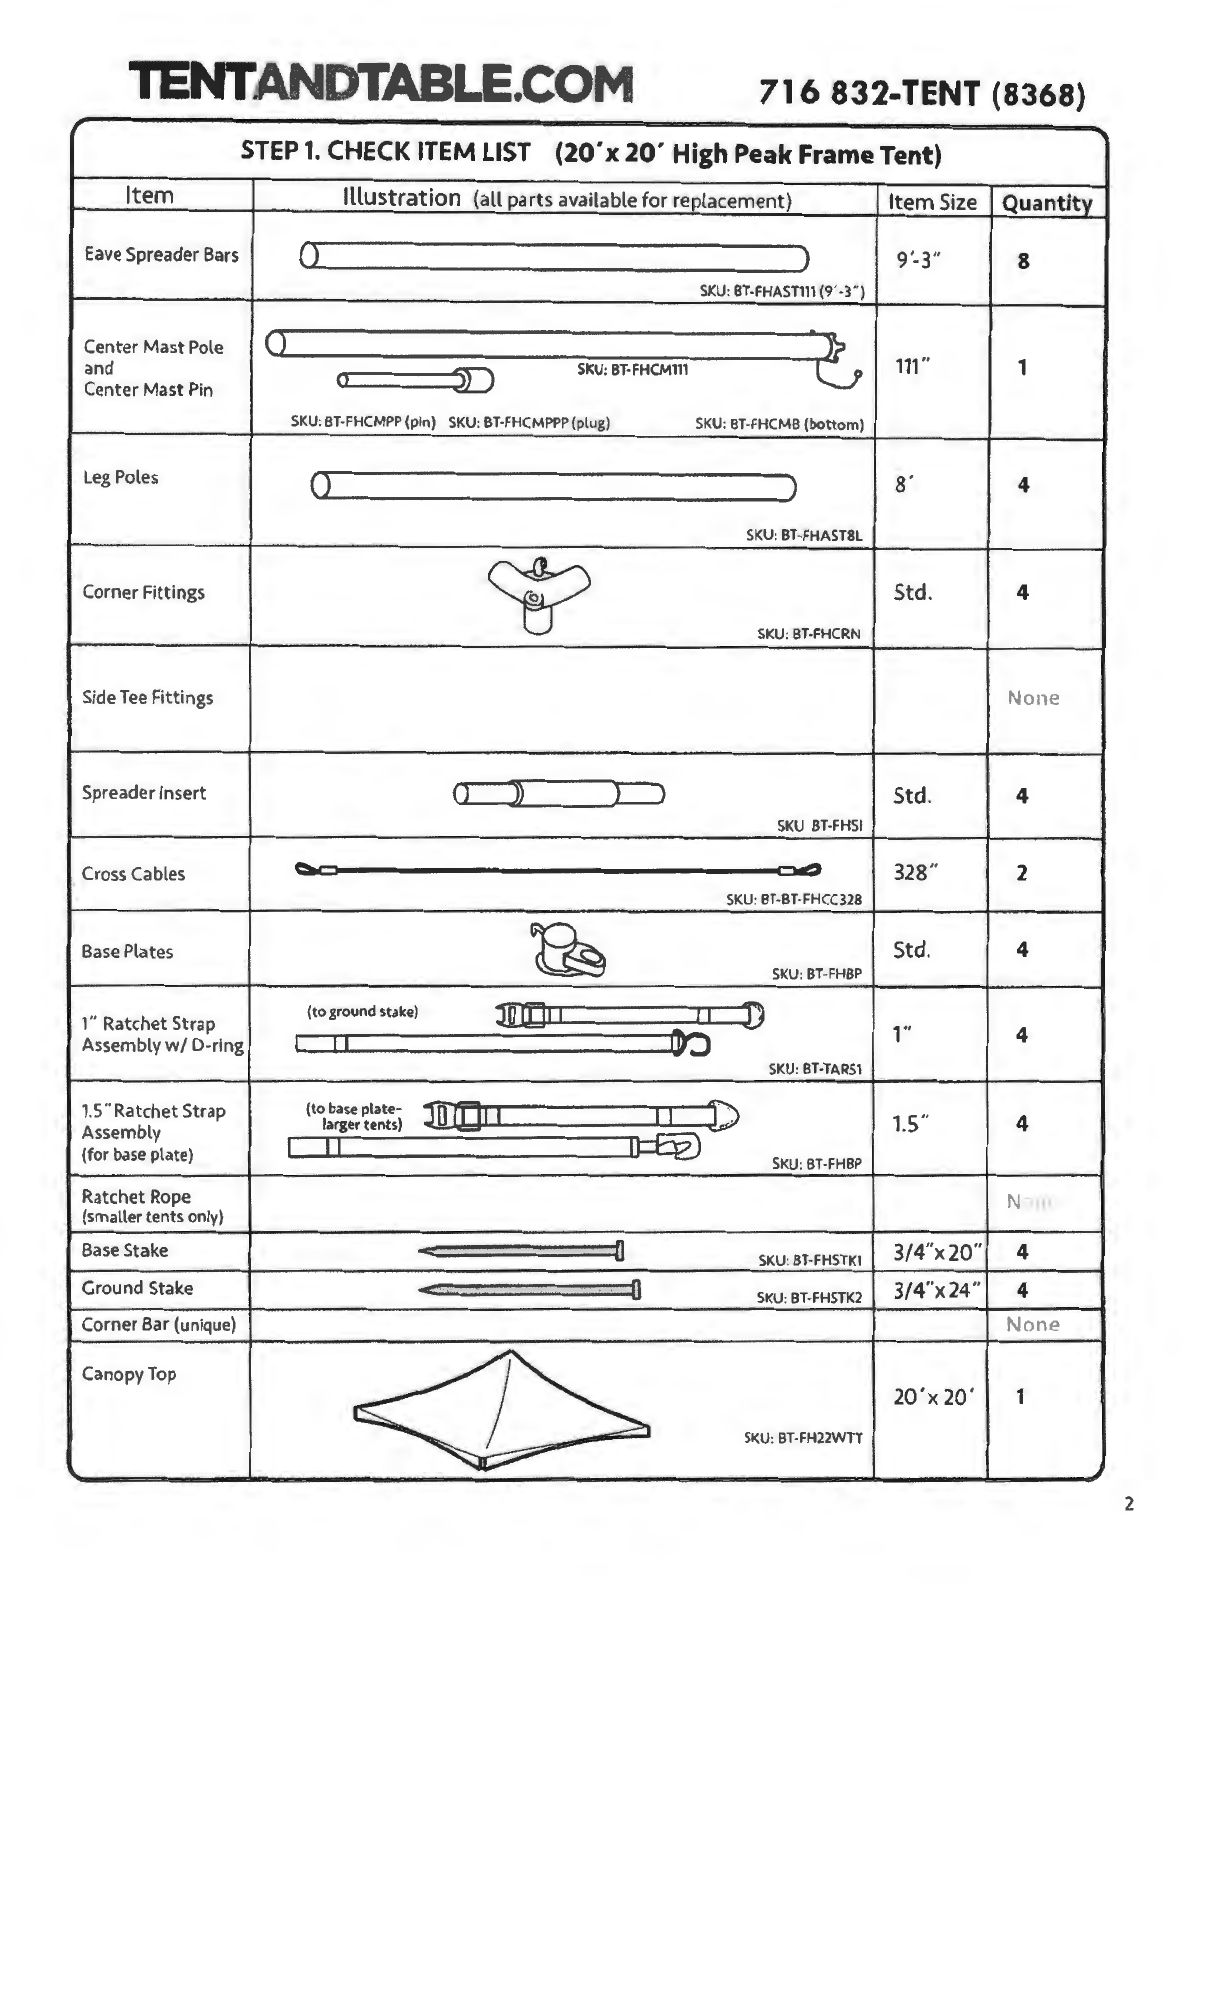
STEP
1.
CHECK ITEM LIST (2o·x
20·
High
Peak
Frame
Tent)
Item Illustration
(all
parts
available
for
replacement)
Item
Size
Quantity
Eave
Spreader
Bars
()
) 9'-3" 8
SKU
:
8T
•
FHAST111
(9' ·3")
•
~
Center
Mast
Pole 0
111"
1
and
D
SKU
: BHHCM111
(}
Center
Mast
Pin
SKU
:
BT-
F
HCMPP
(pin)
SKU
:BHHCMPPP(plu
g)
SKU:
BT
-
FHCMB
(bottom)
Leg
Poles ( )
8'
4
SKU
:
BT
-
FHAST8L
Corner Fittings
~
Std.
4
SKU
:
BT-FHCRN
Si
de Tee Fittings
None
Spr
eader
Insert 0
~
l )
Std
. 4
SKU
BHHS
I
Cross Cables
Cr
=<"
328" 2
SKU
:
BT-BT
-
FHCC328
Base Plates
~
Std.
4
SKU
:
BT
-
FHBP
J_O]dl
I
11
D1"
Ratchet
Strap
(toground stake)
~
1" 4
Assemblyw/
O-ring l
11
SKU
:
BT
-
TARSl
(to
base
plate-
JD]Jdl
I D
1.5
..
Ratchet
Strap
11
1.5,,
4
larger tents)
Assembly I
11
I~
(for base plate)
SKU
:
BT
-
FHBP
Ratchet
Rope
(smaller
tents
onl
y)
Base Stake < a
SKU
:
BT-FHSTKl
3/4
"x20" 4
Ground Stake < D
SKU
:
BT
-
FHSTK2
3/4"x24" 4
Corner Bar (unique)
Canopy
Top
)_
20'x20'
1
SKU
: BT
-FH22WTT
"-
~
2

TENT
AND
TABLE
.COM
STEP
2.
SAFETY
CHECK
LIST
STEP
3.
CONNECT
EAVE
BARS
(20x20)
Position
tarp
in
the
exact
tent
location desired
(use
small
objects
as
weights
on a
windy
day)
Cross cables
(FIGURE
A.)
Lay
tarp down first
(protects canopy step
4)
Lift
last
corner
716
832-TENT
(8368)
•
When
building
or
assembling
anything
above
shoulder
height,
wear
a hard
hat
•
Steel
toe
boots
are
recommended
•
Inspect
the
site, look for
overhead
and
underground
obstructions-
such
as
utilities
• Call
your
local utility
to
have utility
lines
marked
(call
3-5
days
ahead)-
call811.com
is
a
good
resource-
'click'
811
in
Your
State
•
Inspect
all ropes
and
tie
lines
•
Inspect
poles, making
sure
there
are
no
bends
or
breaks
• Replace
or
repair any
items
in
poor
condition
•
Spread
tarp
(sold separately)
in
the
tent
location,
to
protect
canopy-
tarp/tarps
should be as large as
canopy
• Place
eave
bars,
corner
fittings, side
fittings
and
connectors
on
tarp
•
Connect
all fittings
• See (appendix
A)
for your
tent
plan,
eave
bars
layout
and
more
information
• The
last
cable
is
attached
differently
see
(figure A)
• Because
of
the
tension
build-up,
the
last
cable
is
connected
easier
in
this
manner
• Lift
the
last
corner, 3
feet
or
higher
to
connect
the
last
cable
end
to
the
corner
hook-
Lifting
corner
actually
reduces
the
distance
between
the
two
corners
3

TENT
AND
TABLE
.COM
STEP
4.
CANOPY
TOP
Canopy
top
(example,
11ot
size specific)
(FIGURE
B.)
Outcrop-ring
Last
corner
loop
(pull back
on
stake/tool)
STEP
5.
POSITIONING
STAKES
/ - - - - - -
---e-:
-- - - - -
fr-
lstt
Ground I
►
-....;.-----e----.---
Stakes
I 5
ft
.
I~
Legs
(
l----1
Approx. 5ft.
---
Stake Line I from
frame
I
(example,
not
me
specific)
716
832-TENT (8368)
• Unfold
canopy
top,
place
over
cross
cables
and
tarp
•
DO
NOT
walk on
canopy
•
Center
the
top
and
stretch
to
edges
(flap
as
you go,
to
create
'lift')
Note
: Locate
the
0-ring
pull
strap
attached
to
one
of
the
corner
loops,
that
should
be
the
last loop
to
be
put
in
place-the
strap
can
be
used
to
pull
the
loop
in
place
•
Connect
three
corners first,
to
the
corner
fittings
• See (figure
B.)
• The
last
corner
requires
the
use
of
an
anchoring
stake
• Pull
the
first
three
corner
loops over
the
corresponding
outcrop
-ring
• For
the
last
loop, place an
anchoring
stake
through
loop and
against
outcrop
• Pull
corner
loop
and
pry
at
the
same
time-
(pull
stake
back,
away
from
tent)
-
the
overall
canopy
position should be
straighten,
this
will help
with
final loop
• Finally, push loop
in
place
and
slide
out
anchoring
stake
• Use
0-ring
pull
strap
to
pull
the
loop
into
place
•
With
the
canopy
on and
the
frame
in
place,
measure
for
ground
stake
location
•
Lay
leg poles
around
frame
to
help
guide
your
measurement
• Measure 5
feet
straight
out
from
frame,
at
each
leg
connector
• Slide
stakes
through
D-ring
of
1''
ratchet
strap,
before
you
continue
• Remember,
one
ground
stake
per leg
pole
at
the
stake
line,
see
(figure
C,
next
page) for
proper
staking
4
TENTAND
TABLE
.COM
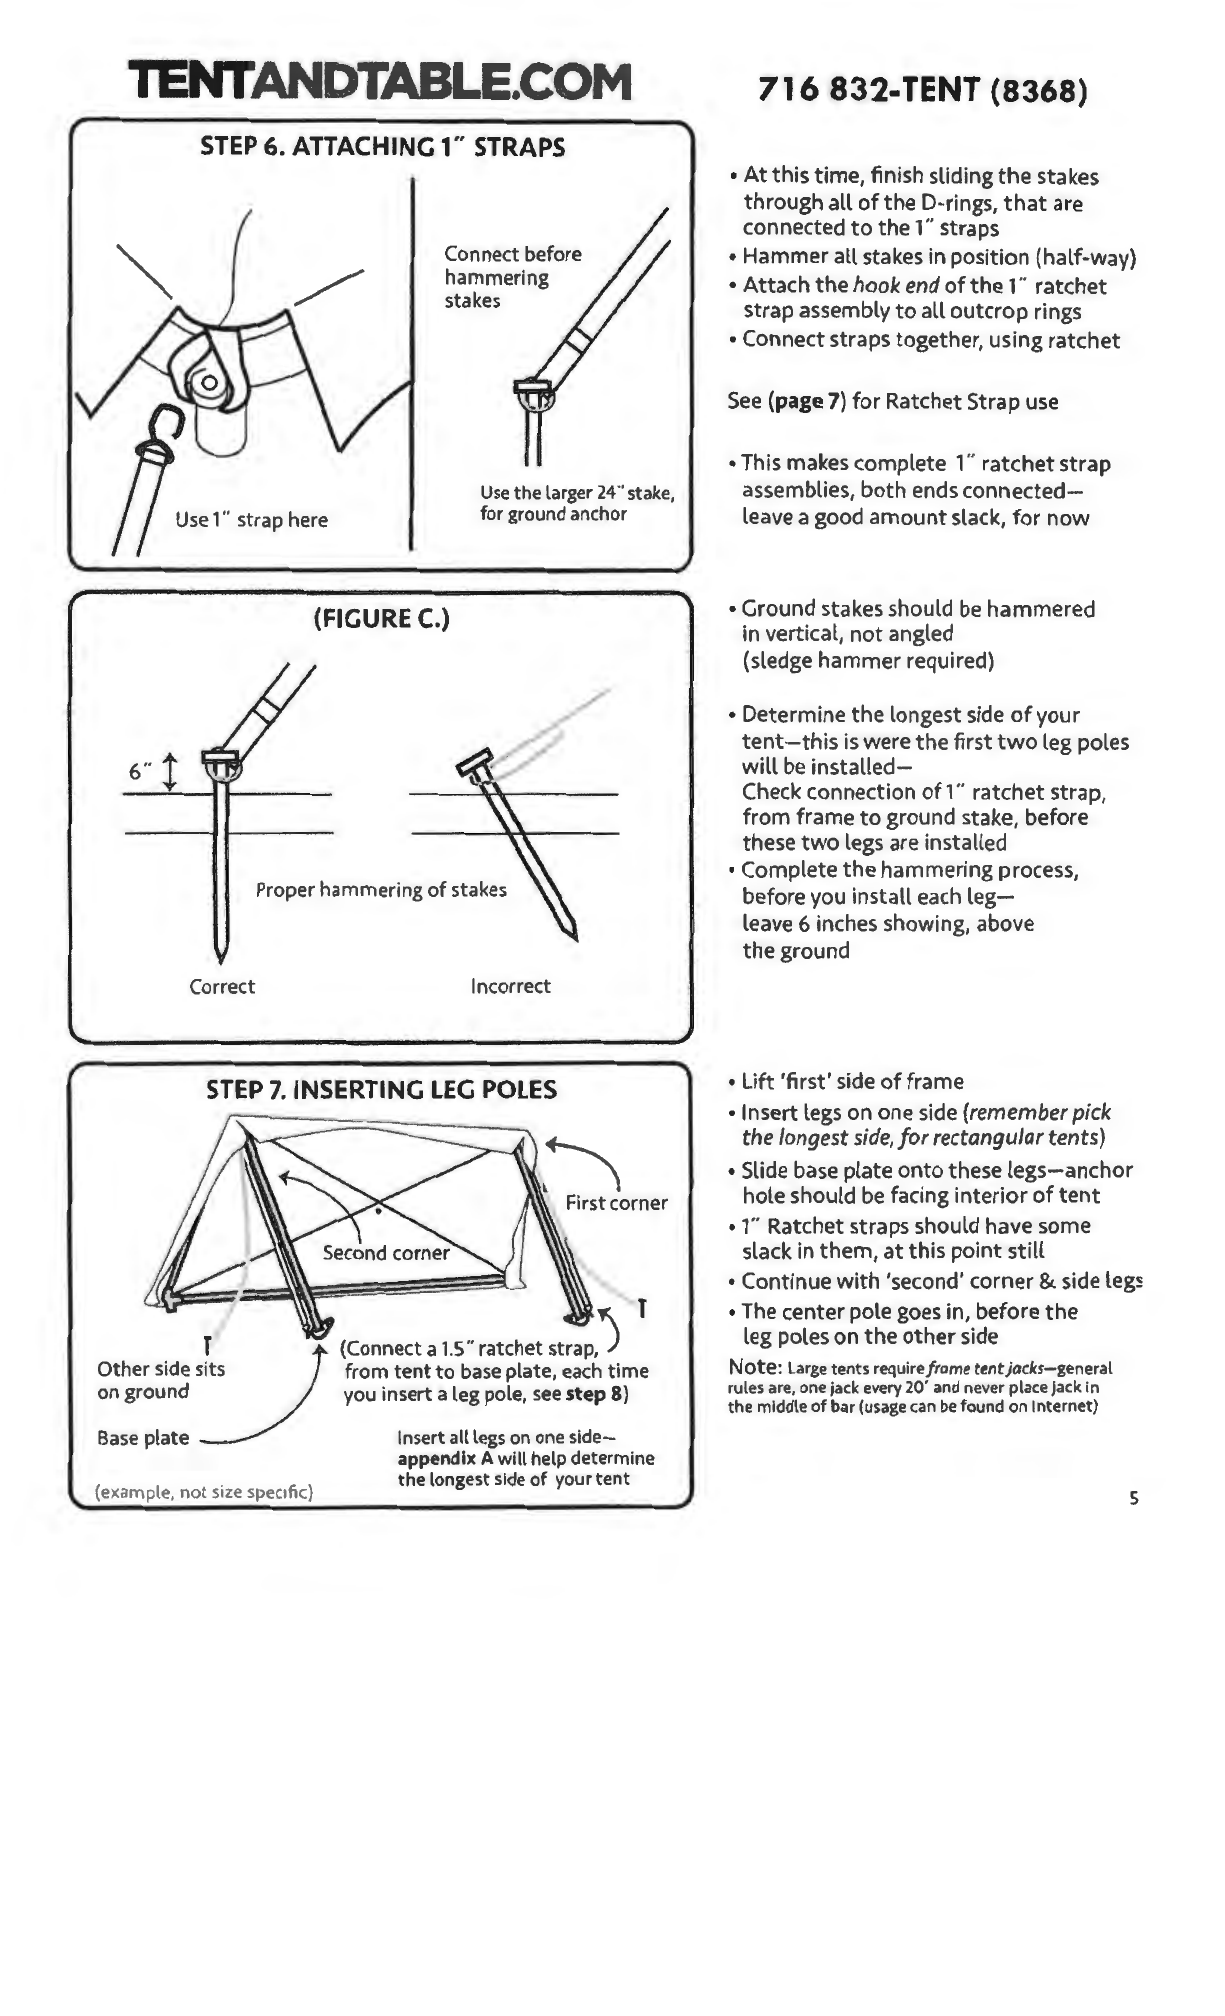
STEP
6.
ATTACHING
1"
STRAPS
Use 1"
strap
here
Connect before
hammering
stakes
Use
the
larger 24··stake,
for
ground anchor
(FIGURE
C.)
Proper hammering
of
stakes
Correct Incorrect
STEP
7.
INSERTING
LEG
POLES
Other
side
s~its
on ground
Base plate
(example,
not
size specific)
First corner
(Connect a 1.5"
ratchet
strap,)
T
from
tent
to
base plate, each time
you insert a leg pole, see step
8)
Insert all legs
on
one
side-
appendix A will help
determine
the
longest
side
of
your
tent
716
832-TENT
(8368)
• At
this
time, finish sliding
the
stakes
through
all
of
the
D-rings,
that
are
connected
to
the
1"
straps
• Hammer all stakes
in
position (half-way)
• Attach
the
hook end
of
the
1"
ratchet
strap
assembly
to
all
outcrop
rings
• Connect
straps
together, using
ratchet
See
(page
7)
for Ratchet Strap use
•This makes
complete
1··
ratchet
strap
assemblies,
both
ends
connected-
leave a good
amount
slack, for now
• Ground stakes should
be
hammered
in
vertical,
not
angled
(sledge
hammer
required)
• Determine
the
longest side
of
your
tent-this
is
were
the
first
two
leg poles
will be installed-
Check connection
of
r·
ratchet
strap,
from
frame
to
ground stake, before
these
two
legs are installed
• Complete
the
hammering process,
before you install each
leg-
leave 6 inches showing, above
the
ground
• Lift 'first' side
of
frame
• Insert legs on one side (remember
pick
the longest
side,
for rectangular tents)
• Slide base plate
onto
these
legs-anchor
hole should be facing interior
of
tent
•
1"
Ratchet
straps
should have
some
slack
in
them,
at
this point still
• Continue with 'second'
corner
& side legs
• The
center
pole goes in, before
the
leg poles on
the
other
side
Note: Large
tents
requireframe
tentjacks-general
rules are,
one
jack every
20'
and never place jack
in
the
middle
of
bar (usage can be found
on
Internet)
s

TENT
AND
TABLE
.COM
STEP
8.
BASE
PLATE
STRAPS
Attach a
1.5"strap with ring end
(each base plate)
Base
plate
)
facing i
nt~
Canopy
corner opening
~quick
link
Attach
1.5
..
strap,
hook
end
to
quick
link
Important: make sure canopy
ropes aren't tangled!
STEP
9. POSITIONING
CENTER
POLE
Height
of
cente
r
• pole can be adjusted
o
to
obtain
proper
tensio
n with canopy
(example,
not
size specific)
Center Mast
Pole
and
Bottom
(unlock hitch
.-.--......_pin)
STEP
10.
INSTALL
REMAINING
LEGS
(example,
not
size specific)
716
832-TENT (8368)
• For every leg pole,
there
is
a
base
plate
and
a
1.5
"
ratchet
strap
assembly
-connect
the
straps
as
each
leg
is
Installed
•
Connect
hook
end
to
quick link
and
ring
end
to
base
plate
hook
(check
that
canopy
ropes
are
not
tangled
:
• Tighten
strap,
before
moving
to
the
next
leg
(not
at
100%-secure
fully
at
the
end
of
assembly)
See (page
7)
for
Ratchet
Strap
use
• One side
of
canopy still
rema
ins
on
tarp
• Lift
center
mast
(two
people
will
get
this
step
don
e
quicker)-walk
under
canopy, keeping
the
pole
angled
• Ins
ert
mast
pin i
nto
grommet
at
center
of
canopy
(make sure
entire
pin
is
through
and
visible
from
outside)
• With
th
e pole
at
an
angle
(not
vertical),
lay no
tc
hed
bottom
near
the
outer
end
of
the
top
cable-then
slide
the
bottom
of
pole
towards
the
center
• Make sure
mast
pin
stays
in place
• At center,
where
cables cross, posi
tion
notched
bottom
over all
the
cable
s
• Lock hitch pin
around
cables
to
the
other
side
of
center
pole
bottom
• Under
canopy
you
will
see
several
short
'side release buckle
straps'
-
connect
these
to
frame
(eave bars}
• Raise
other
side
of
tent
(2
people
required)-start
at
a
corner
• Insert leg poles-
the
leg poles should
be vertical atthis step
• Slide
base
plate
onto
these
legs-
secure
canopy
to
rema
ining
base
plates,
with
corresponding
1.5"
strap,
at
each
leg
•
TIGHTEN
ALL
l"and
1.S"RATCHET
STRAPS
• Fully
tighten
short
straps,
under
canopy
• Lastly,
secure
base
plates
to
ground
by
hammering
in
the
'base
stakes'
6
TENT
AND
TABLE
.COM
716
832-TENT (8368)
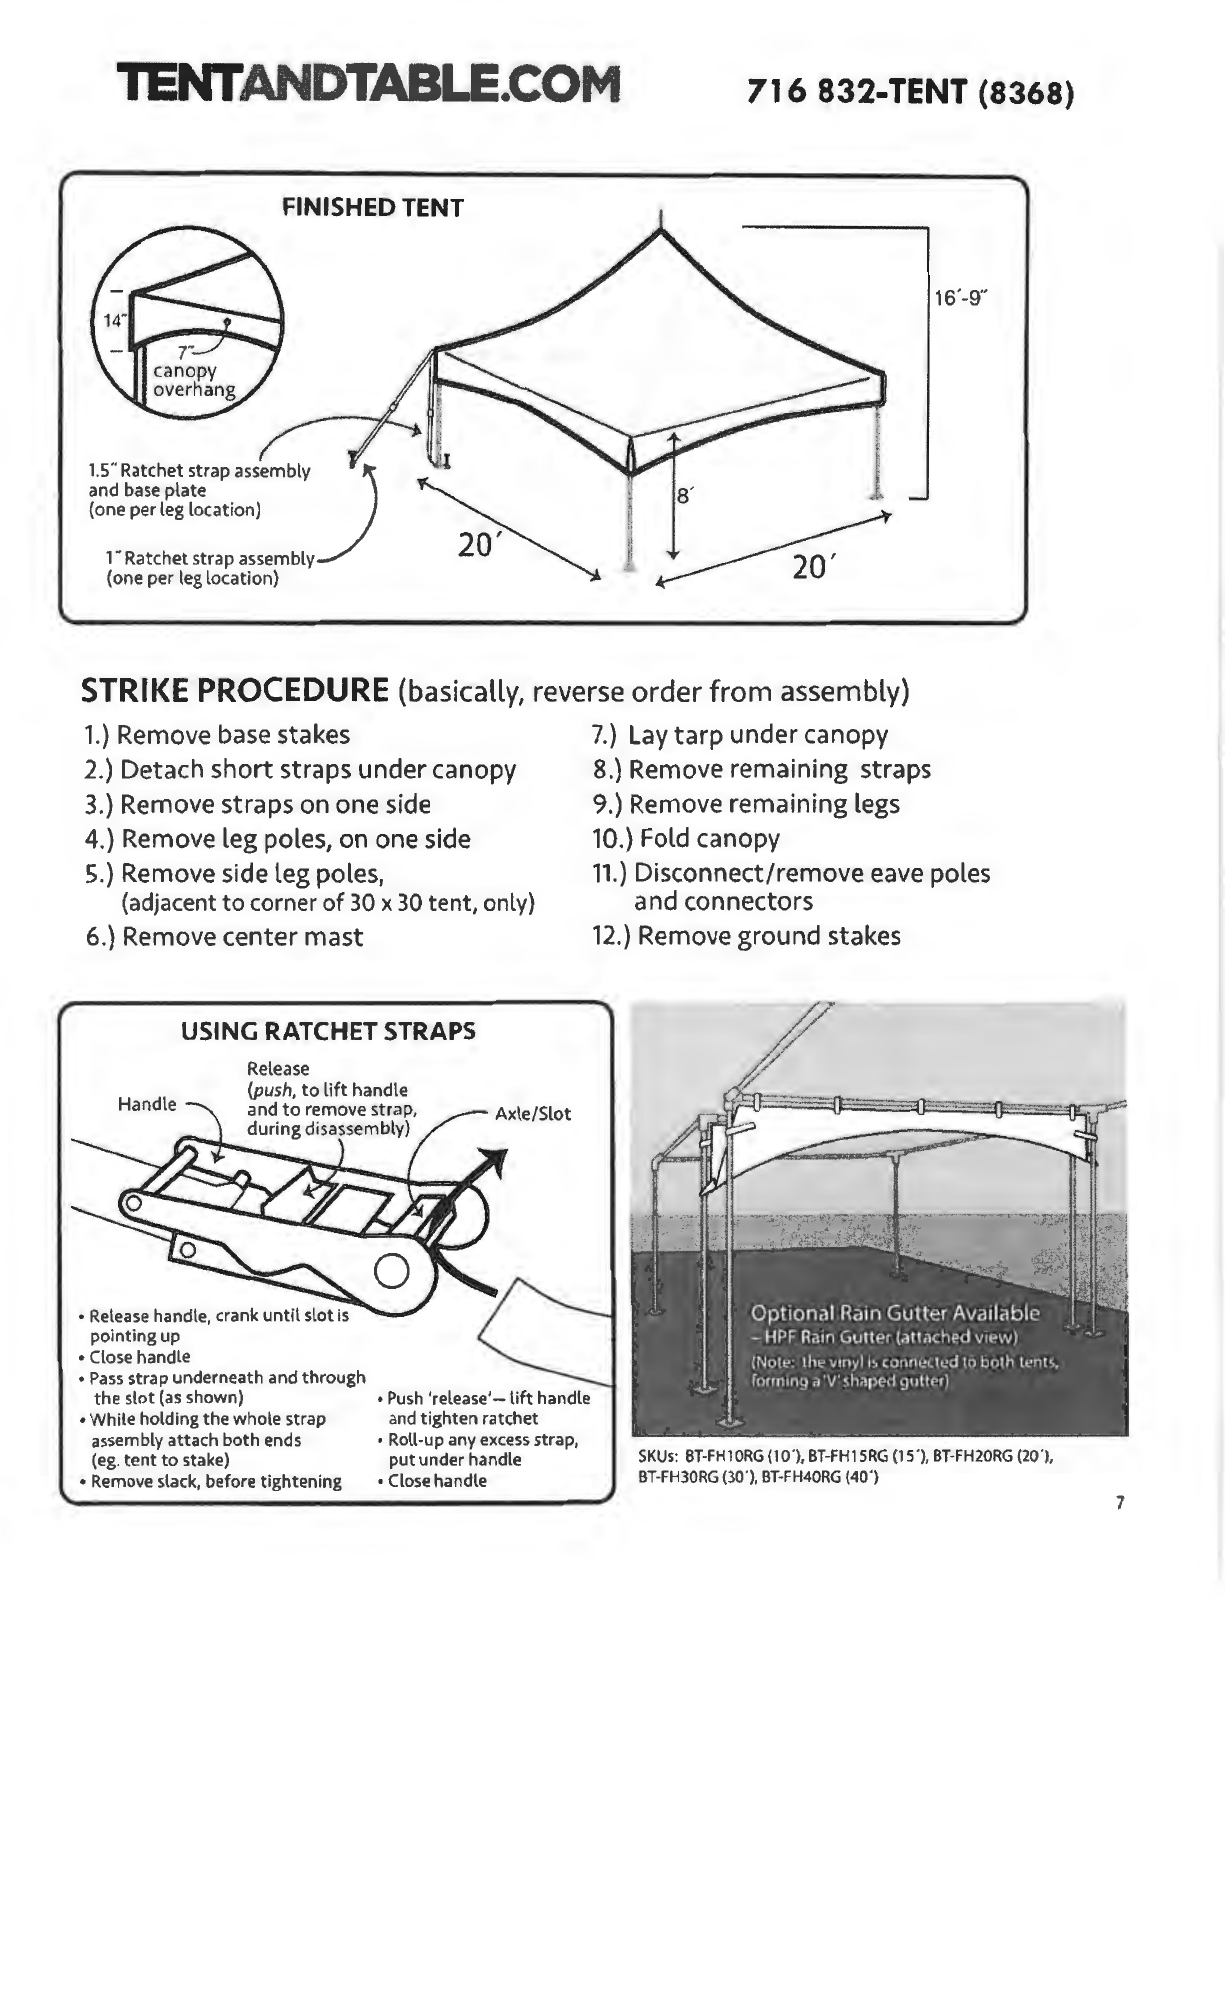
FINISHED TENT
1.5''
Ratchet
strap
assembly
J
and
base
plate
(one
per
leg location)
1"
Ratchet
strap
assembly
(one
per
leg
locat
ion)
STRIKE
PROCEDURE
(basically, reverse
order
from assembly)
1.)
Remove base stakes
2.)
Detach short straps under canopy
3.)
Remove straps on one side
4.)
Remove leg poles, on one side
S.)
Remove side leg poles,
(adjacent
to
corner
of
30
x 30
tent,
only)
6.)
Remove center mast
USING
RATCHET
STRAPS
Release
(pL1sh,
to
lift
handle
and
to
remove
strap,
during
disassembly)
• Release handle, crank until slot
is
pointing up
• Close handle
• Pass strap
underneath
and
through
the
slot (as shown) • Push
'release'-
lift handle
• While holding
the
whole
strap
and tighten ratchet
assembly
attach
both
ends • Roll-up any excess strap,
(eg.
tent
to
stake) put under handle
• Remove slack, before tightening • Close handle
7.)
Lay
tarp under canopy
8.)
Remove remaining straps
9.)
Remove remaining legs
10.)
Fold
canopy
11.}
Disconnect/remove eave poles
and connectors
12.)
Remove ground stakes
SKUs
: 8T-FH10RG (10'),
BHHl
SRG
(15').
BHH20RG
(20'),
BHH30RG
(30'),
BT-FH40RG
(40') 7
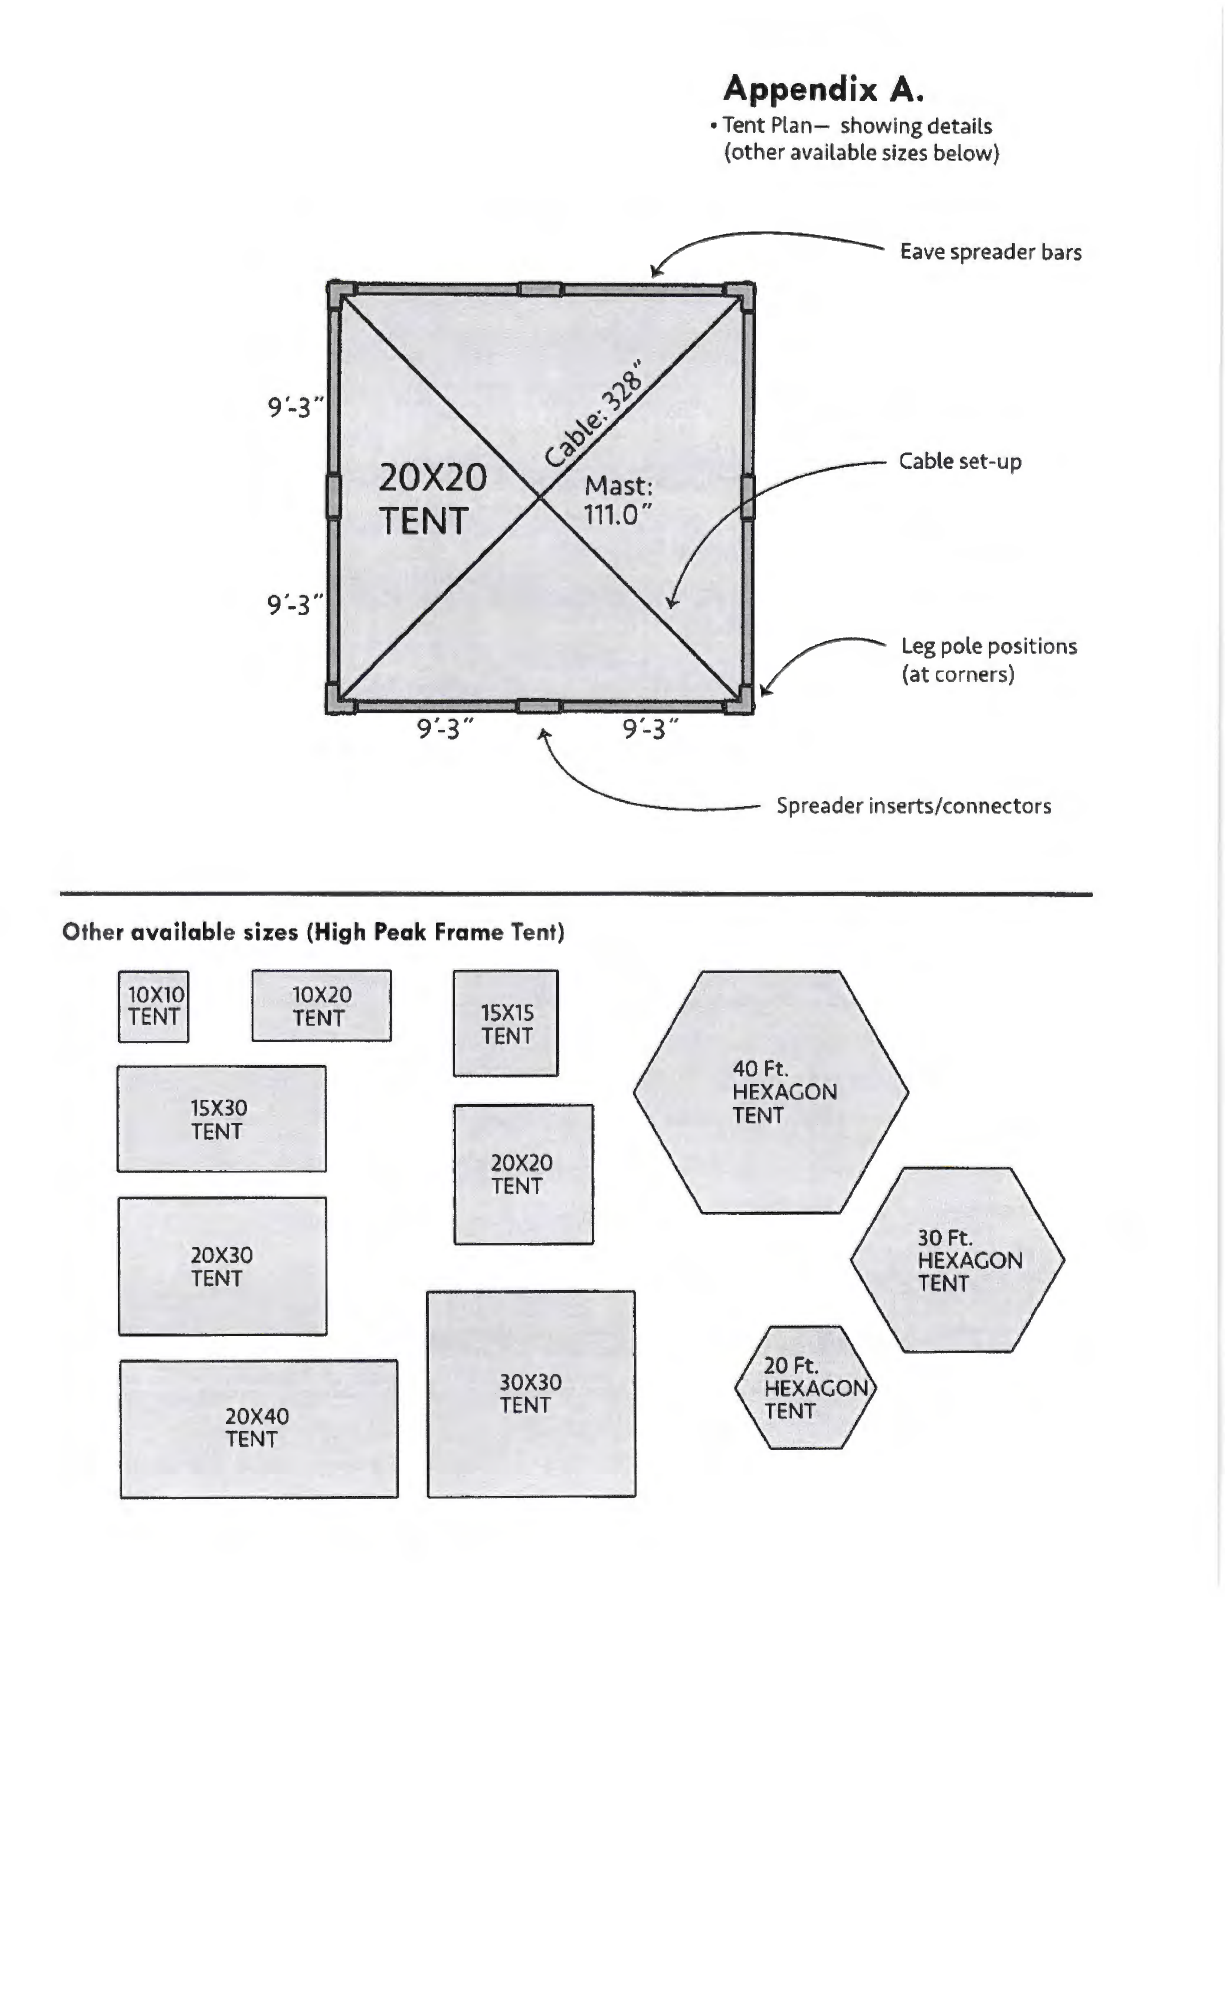
Appendix
A.
•Tent
Plan-
showing details
(other
available sizes below)
~
Eave
spreader
bars
r.;x::===C:=Jc:::::===:::c:;.i
9
'-3,,
9'-3"
20X2
TEN
9'-3"
Other available sizes (High Peak Frame Tent)
10X10 10X20
TENT TENT
1SX1
5
TENT
1SX30
TENT
20X20
TENT
20X30
TENT
I
30X30
20X40
TENT
TENT
'
9'-3.,
Cable
set-up
Leg
pole positions
(at
corners)
Spreader i
nserts/connectors
40
Ft.
HEXAGON
TENT
30
Ft.
HEXAGON
TENT
Table of contents
Other Tentandtable.com Tent manuals

Tentandtable.com
Tentandtable.com 40 Hex User manual

Tentandtable.com
Tentandtable.com Premium Pole Tent 20' x 20' User manual

Tentandtable.com
Tentandtable.com WEST COAST FRAME TENT 20x40 User manual

Tentandtable.com
Tentandtable.com BT-PP48WT4P User manual

Tentandtable.com
Tentandtable.com 716 832-TENT User manual


