Teradek VidiU User manual

pantone 1795 pantone 355 pantone 307
VIDIU AND VIDIU PRO
REFERENCE GUIDE
© 2017 Teradek, LLC. All Rights Reserved.

Page 2
1. Introduction ................................................................................ 3
Support Resources ............................................................... 3
Disclaimer ................................................................................. 3
Warning ...................................................................................... 3
Physical Properties .............................................................. 4
2. Getting Started ......................................................................... 6
Power Your Device ................................................................ 6
Connect to a Network .......................................................... 7
Choose a Platform .............................................................. 10
Internet Streaming from VidiU with Live:Air .......... 11
3. Settings Overview ……….……………………..……………….............. 12
Settings Diagrams .............................................................. 13
Broadcast: Platform Settings ........................................ 16
Broadcast: Quality Settings ........................................... 21
Video/Audio ........................................................................... 22
System ………….……………………………………………........................... 23
Network .................................................................................... 24
Wired ……………………....................................................... 24
Wireless …….…............................................................. 24
USB 3G/4G Modem ................................................. 25
Mobile …………................................................................ 25
Recording …………………….…...…………………………........................ 26
Sharelink ……………………….…………………………….......................... 26
4. Troubleshooting ..................................................................... 27
5. Technical Specifications .................................................. 29
Table of Contents

Page 3© Teradek, LLC 2017. All rights reserved.
Thank you for purchasing Teradek’s VidiU, the ultimate entry-level streaming solution for HDMI video sources. This
reference guide is for both VidiU and VidiU Pro encoders; save where otherwise noted, operations are identical. VidiU and
VidiU Pro deliver high definition live streaming video with the quality and reliability expected in traditional HD broadcast.
VidiU features native integration with some of the most popular video platforms, offering a seamless streaming experience.
Use this reference guide to enhance your usage and knowledge of VidiU or VidiU Pro.
Support Resources
In addition to this reference guide, there are a number of resources available for more information on the VidiU’s features
and operation. For tips, information, and all the latest available firmware and software updates, visit Teradek’s support
forum at https://support.teradek.com. If you are unable to find what you are looking for online, please contact Teradek’s
Disclaimer
This manual is intended for user information only. Every effort has been made to ensure that the contents within are
accurate at the time of printing, and that updates are made in a timely manner. Teradek cannot be held responsible for
inaccuracies, typographical errors, or out-of-date information contained within this manual.
Warning
Teradek VidiU products contain no user serviceable parts. Disassembly, modification, or removal of any of the device’s
components may void your warranty. Please visit http://store.teradek.com/pages/warranty-information for up-to-date
warranty terms and conditions.

Page 4
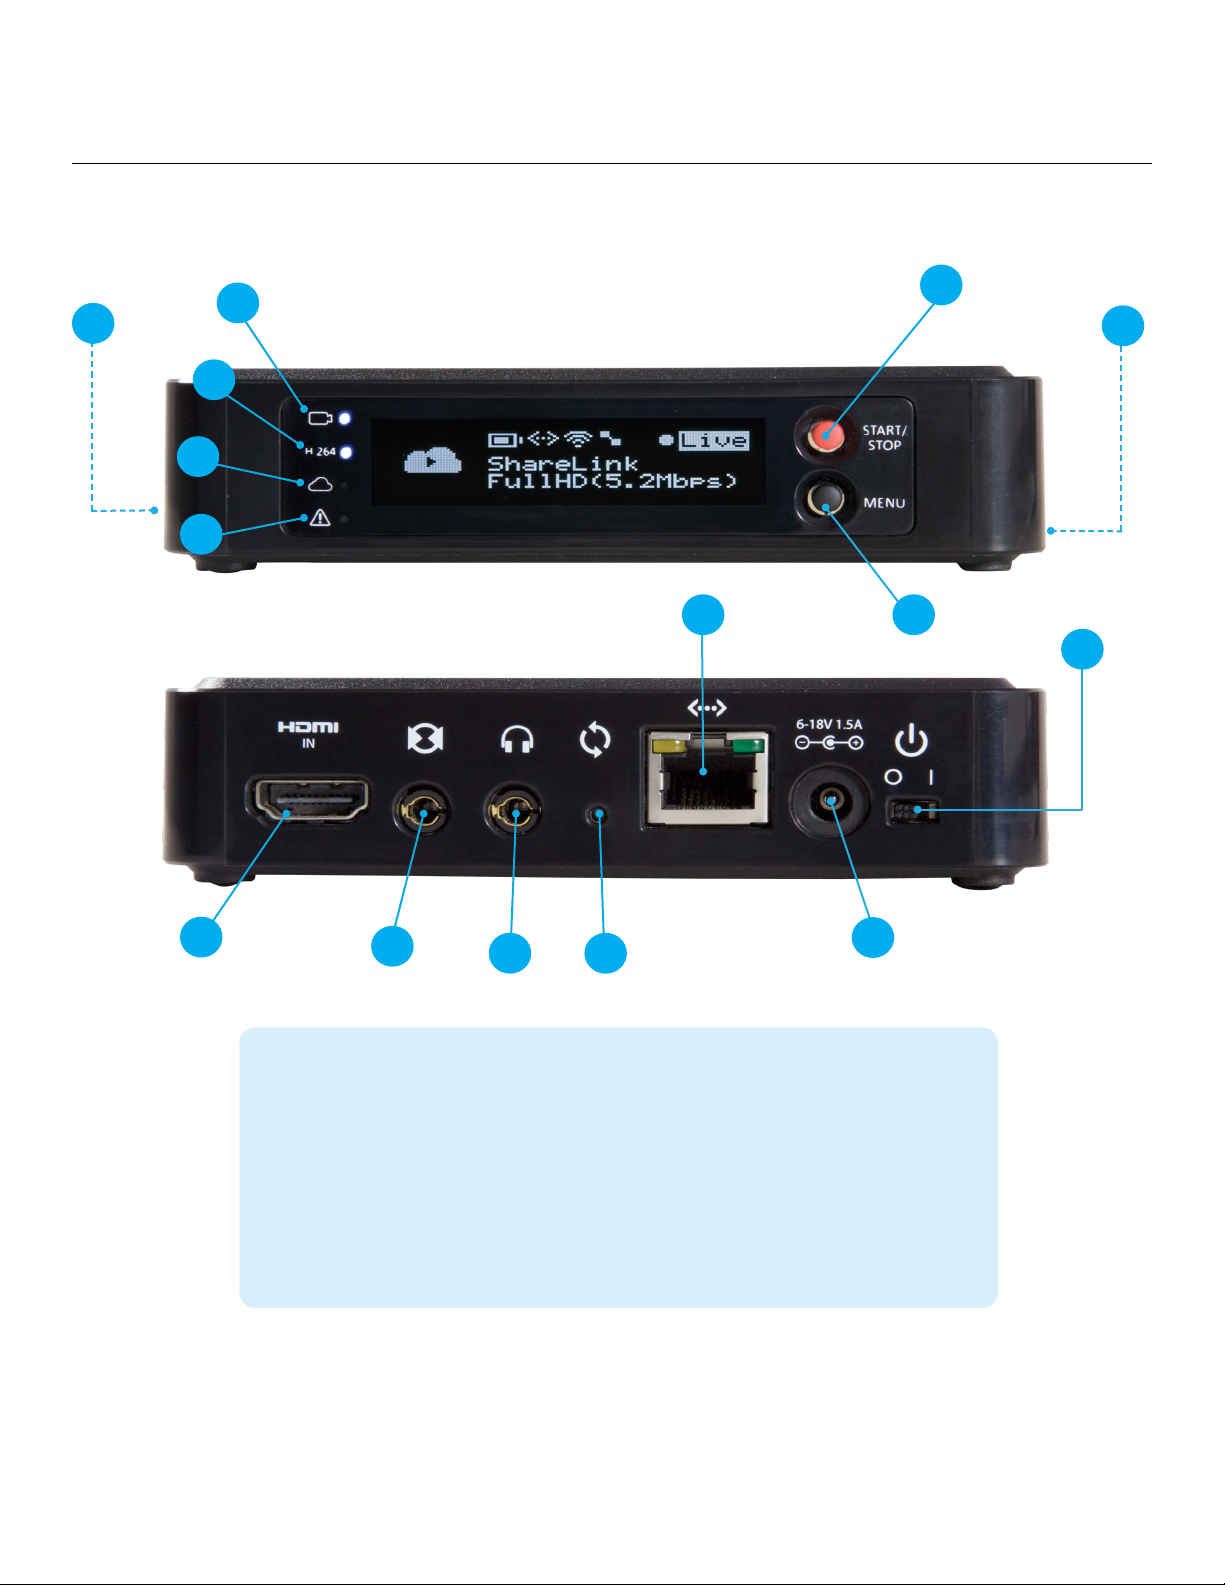
Physical Properties (VidiU)
H
A. Power Switch (Side)
B. USB Port (Side)
C. Headphone Output (Side)
D. Video Input Status
E. Encoder Status
F. Broadcast Status
G. Warning Indicator
H. Start/Stop Joystick
I. Menu Joystick
J. HDMI Input
K. Mic/Line Input
L. Reset Button
M. Ethernet
N. Power Input
D
A
JK L
N
M
B
C
E
F
G
I
Page 5© Teradek, LLC 2017. All rights reserved.
Physical Properties (VidiU Pro)
F
A. SD Card Slot (side)
B. Video Input Status
C. Encoder Status
D. Broadcast Status
E. Warning Indicator
F. Start/Stop
G. USB Port (side)
H. Menu Joystick
I. HDMI Input
J. MIC/Line Input
K. Headphone Output
L. Reset Button
M. Ethernet
N. DC Input
O. Power Switch
H
C
B
E
D
A
IJK L
M
O
N
G

Page 6
POWER YOUR DEVICE
1. To power your VidiU or VidiU Pro, connect the AC adapter
to the DC input (Fig. 2-1) located on the back of the
device, then turn the power switch to the On position.
VidiU begins to boot as soon as the power is activated.
2. Turn on your video source, then connect it to VidiU
using the HDMI input, also located on the back of the
device (Fig. 2-2).
3. Use the enclosed hot shoe mount and a 1/4”-20 screw to
mount the VidiU to your camera, tripod mount, or other
accessory mount, if desired.
Use the Start/Stop and Menu Joysticks (Fig. 2-4) to navigate
the Front Panel Interface.
Start/Stop:
●(button press): Start/Stop broadcasts, exit menu screens
Menu:
, ●(button press): Confirm selection, open selected menu
▲,▼, , : Select menu items, change status screen
on main display, select characters.
▼
▼
▼
Fig. 2-1
Fig.3
Fig. 2-2
Fig. 2-3
4. Once the VidiU has booted, verify that the Video Input
Status and Encoder (H.264) LEDs are blue (Fig. 2-3).
This indicates a video source has been successfully
detected and the encoder is running.
Fig. 2-4
Start/Stop and Menu Joysticks
GETTING STARTED
1. Power your device
2. Connect VidiU to a network
3. Choose your streaming platform
There are three key steps to going live with VidiU:
Page 7© Teradek, LLC 2017. All rights reserved.
The VidiU iOS application allows you to remotely monitor and configure
VidiU. Download the VidiU iOS app from the App Store, then choose one
of the following methods to get VidiU online.
Using the VidiU App
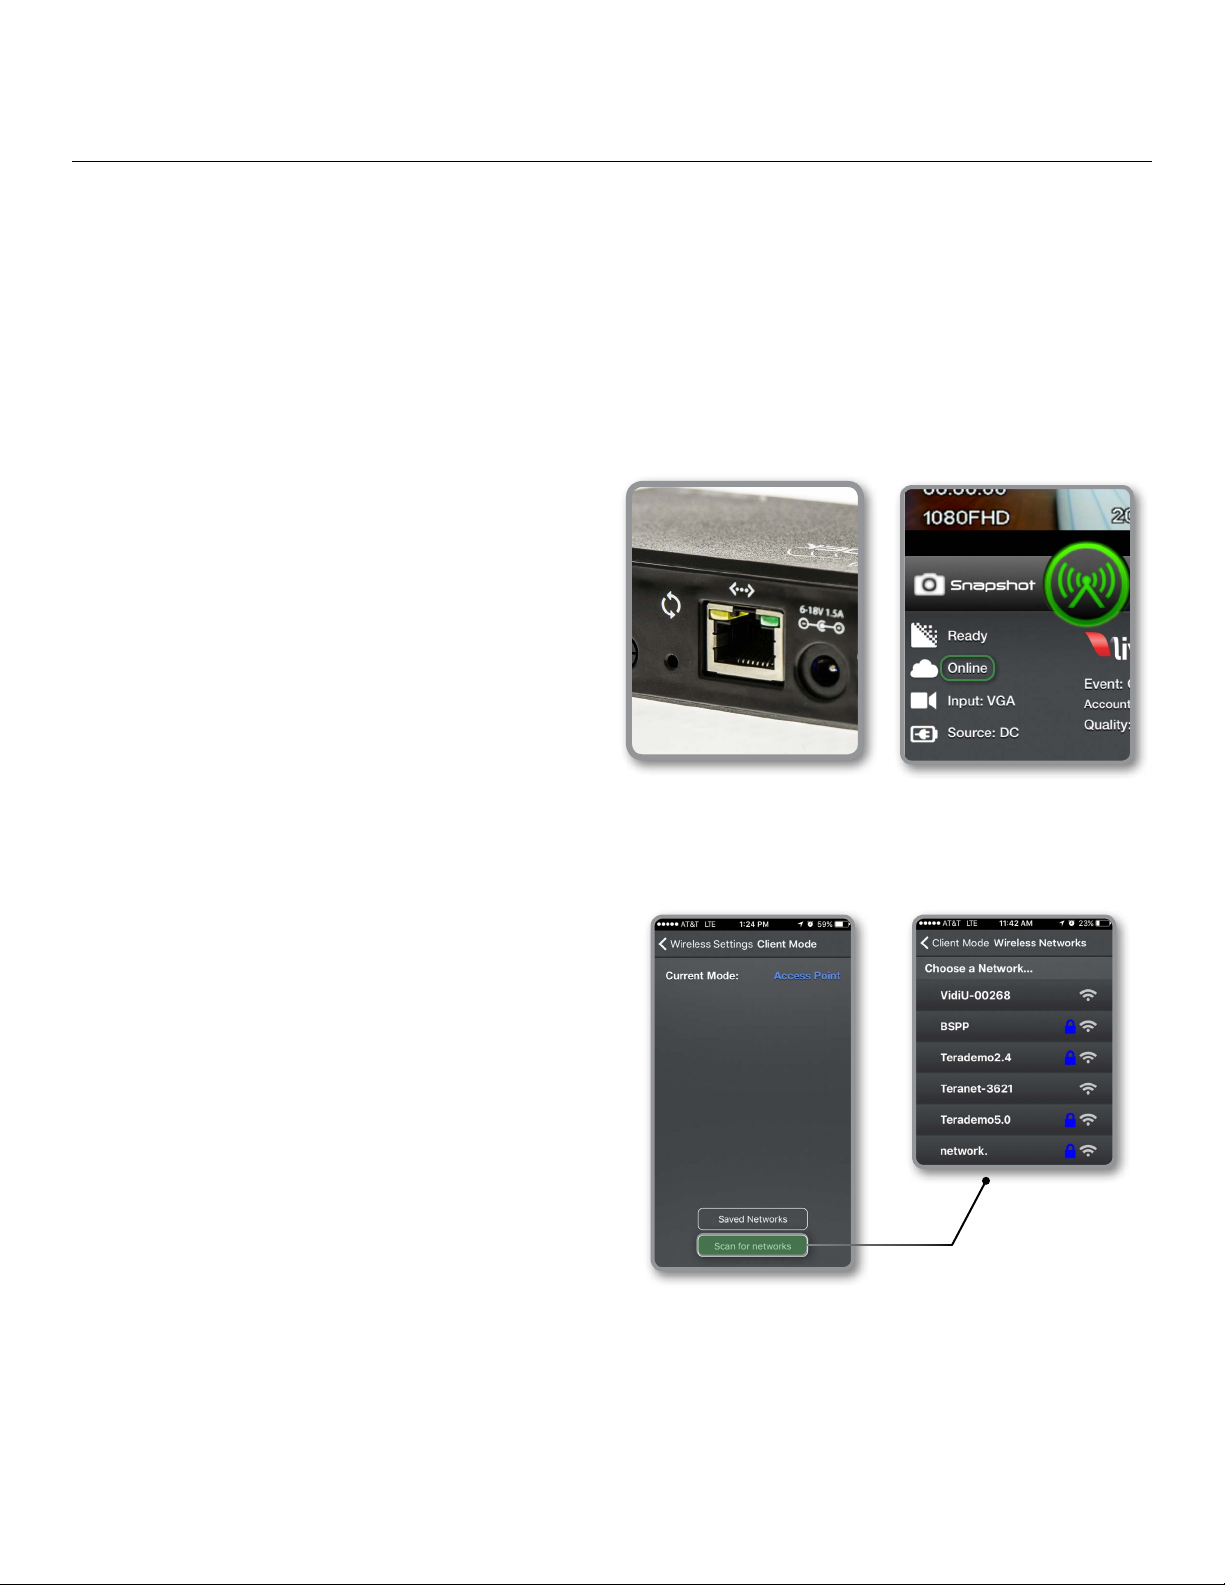
Connect VidiU to a Wi-Fi Network:
1. Connect your iOS device to VidiU’s Access Point
network, then select the VidiU.
2. Navigate to the Settings menu, select Network, then
select Wireless.
3. Select Client Mode, then tap Scan for Networks
(Fig. 2-7).
4. Select a network, then connect your iOS device to that
network.
Fig. 2-7
Connect VidiU to an Ethernet Network:
1. Plug an Ethernet cable into VidiU’s Ethernet port
(Fig. 2-5) and attach it to an Internet−connected
Ethernet switch or router.
2. Connect your iOS device to VidiU’s Access Point network
(pg. 24): VidiU−XXXXX (serial number of the device).
3. Open the app and select VidiU, then verify that the
connection status shows Online (Fig. 2-6). Fig. 2-5 Fig. 2-6
You can use the VidiU app, the Web User Interface (Web UI), or the front panel interface to connect VidiU to a network.
Select one of the following options.
CONNECT TO A NETWORK

Page 8
Connect to a Wired Network:
1. Plug an Ethernet cable into VidiU’s Ethernet port
(Fig. 2-9) and attach it to an Internet−connected
Ethernet switch or router.
2. Once the device is connected to the network, VidiU’s
front panel interface will indicate that it’s ‘Ready.’
3. Using the Menu Joystick, navigate to the Network menu,
then select Wired.
4. Once the device is configured and connected to the
network, VidiU’s IP address is displayed.
To access the Web UI:
5. Open a web browser and enter VidiU’s IP address in the
navigation bar (Fig. 2-12).
Fig. 2-9
Connect using your phone’s data plan:
1. Connect your iOS device to VidiU’s Access Point network (pg. 24):
VidiU−XXXXX (serial number of the device).
2. Open the VidiU app and select VidiU with the corresponding serial
number under the list of Wi-Fi devices.
3. When prompted, click Yes to use your cellular data plan
(Fig. 2-8).
Fig. 2-8
Using the Front Panel Interface

Page 9© Teradek, LLC 2017. All rights reserved.
Connect to a Wi-Fi Network:
1. Using the Menu Joystick, navigate to the Network menu,
then select WiFi.
2. Activate Client Mode, then select Scan for Networks.
Select a Wi-Fi Network, then enter your credentials.
3. Once the device is configured, select[INFO to view the
IP address (Fig. 2-10).
To access the Web UI:
4. Open a web browser and enter VidiU’s IP address in the
navigation bar (Fig. 2-12).
Fig. 2-10
Connect using a 3G/4G USB Modem:
1. Insert a compatible 3G/4G USB modem into the
USB port (Fig. 2-11) and wait for the cellular reception
icon (4 bars) to appear.
2. To confirm the modem is connected, navigate to the
Network Settings menu and select USB Modem.*
To access the Web UI:
3. Connect your computer to VidiU’s AP network.
4. Open a web browser and enter VidiU’s IP address
in the navigation bar (Fig. 2-12).
Fig. 2-7
Fig. 2-11
Fig. 2-12

Page 10
CHOOSE YOUR PLATFORM
VidiU and VidiU Pro are capable of broadcasting to any compatible online video platform. VidiU offers integration with
many popular video streaming platforms, simply enter your credentials using the VidiU app, Web UI, or the front panel
interface.
Connect to a Streaming Platform:
1. Go to Settings, select Broadcast (Fig. 2-13) then
select Platform (Fig. 2-14).
2. Select a streaming platform (Fig. 2-15) and enter your
credentials, or follow the on-screen prompts to
authorize VidiU with YouTube or Facebook.
(For more detailed set up instructions, go to the Platform
Settings section on pg.16.)
3. Select a channel or event to stream to.
4. After configuring your device, you will be redirected
to the Settings menu. Select Done on the upper right
corner.
5. Tap the ‘Broadcast’ button to go live (Fig. 2-16).
Fig. 2-13 Fig. 2-14
Fig. 2-15 Fig. 2-16
Broadcast button:
VidiU is ready to broadcast
Broadcast is in session
VidiU is not ready to broadcast

Page 11© Teradek, LLC 2017. All rights reserved.
Live:Air or Live:Air Solo
Live:Air is compatible with iPad Air 1
and newer. Live:Air Solo is compatible
with both iPad and iPhone. Both apps are
available in the iTunes App Store.
Connect using Live:Air
1. Install Live:Air.
Internet Streaming from VidiU with Live:Air
Fig. 2-17
Fig. 2-18
Fig. 2-19
Live:Air allows you to preview, monitor, and edit multiple video sources
before broadcasting your video to one of the integrated platforms. Download
the Live:Air iOS app from the App Store, then use Live:Air to navigate the
controls.
2. Connect your iOS device to the same network as VidiU.
3. Activate the Live:Air app.
4. From the Live:Air app, select the +button on the lower,
left-hand corner, then select Add a Device (Fig. 2-17).
Choose your device, then select Done.
5. To configure a streaming destination, tap the icon
on the upper right-hand corner, choose Broadcasting,
then select or add a destination (Fig. 2-18). Enter your
credentials (if applicable).
6. To begin live streaming, tap the ‘Go Live’ button on the
upper right-hand corner (Fig. 2-19).
Page 12
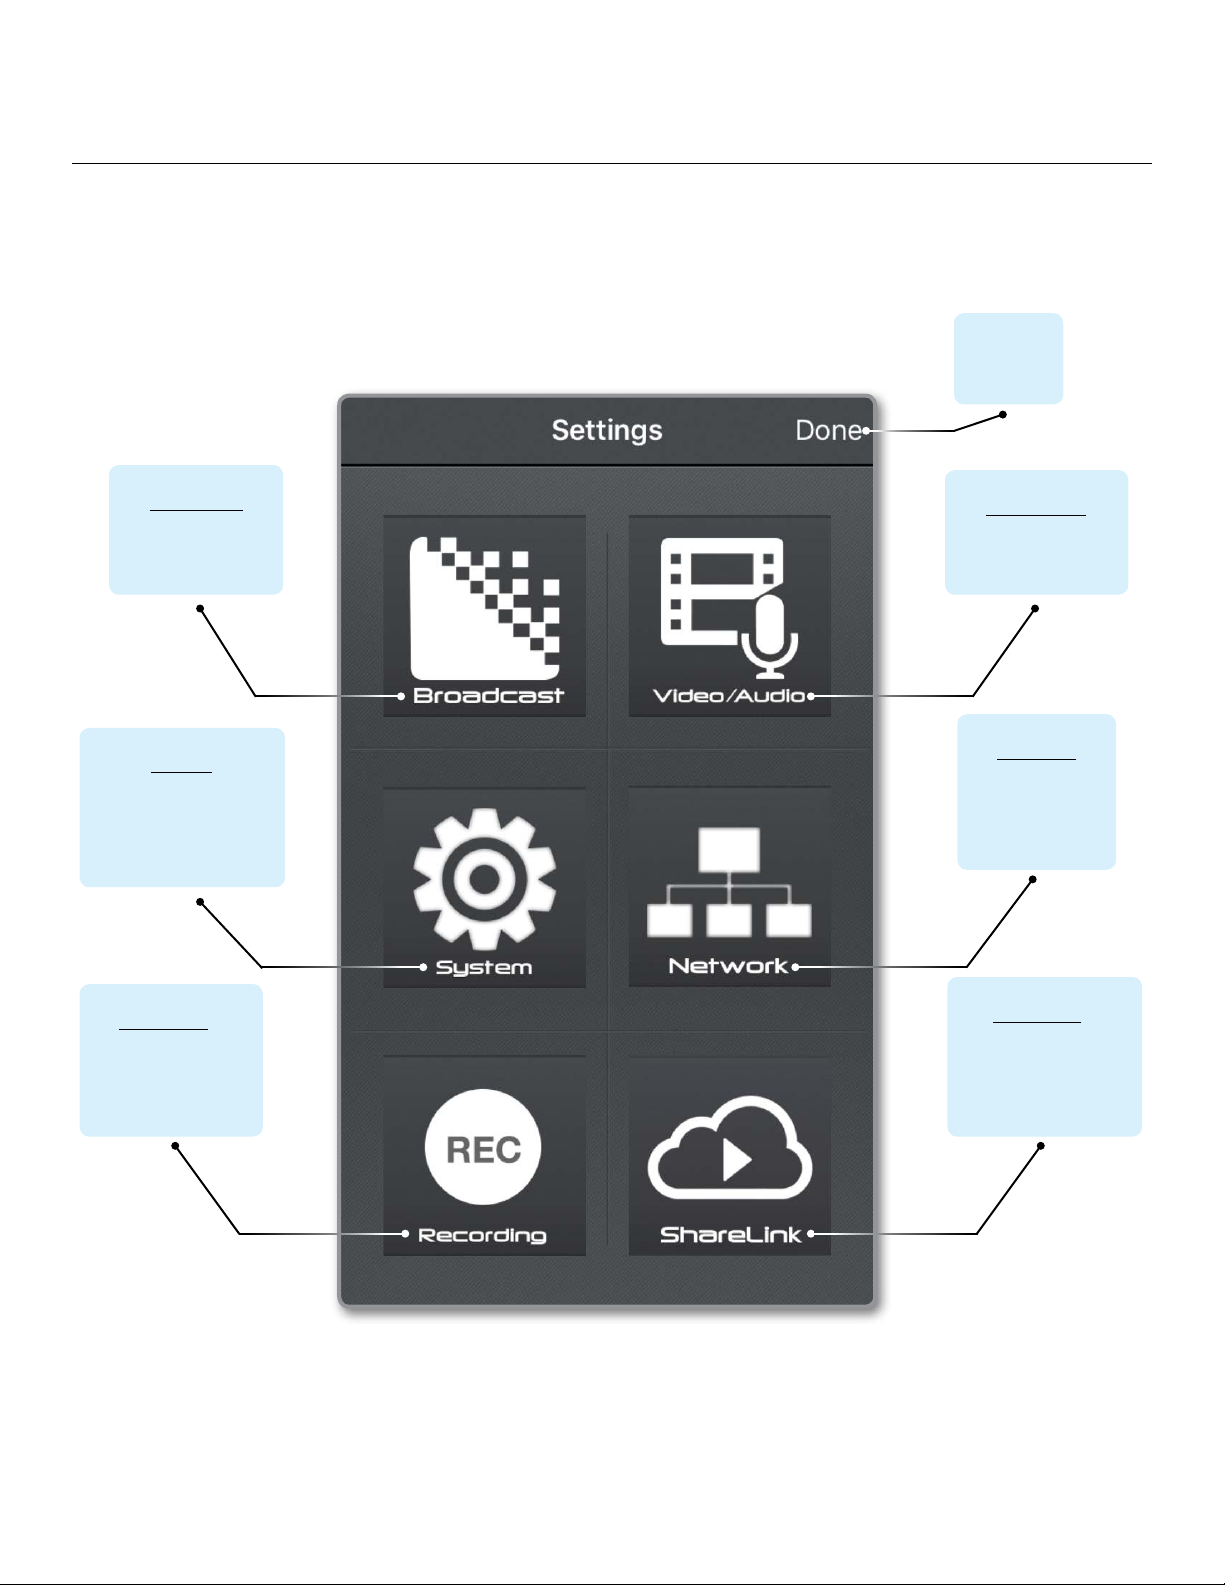
SETTINGS OVERVIEW
Navigating the Settings Menu
The Settings menu allows you to customize and control VidiU or VidiU Pro’s broadcast, audio/video, and network settings.
Use the VidiU app, Web UI, or the front panel interface to access the Settings menu, then select a setting to modify.
BROADCAST
Modify Platform and
Quality settings
SYSTEM
Perform factory reset,
firmware upgrade,*and
system diagnostics**
*Options available only while using the Web UI
RECORDING**
Enable recording and
select a media storage
option
VIDEO/AUDIO
Adjust the Video and
Audio input settings
NETWORK
Choose a method of
connecting to the
Internet
SHARELINK**
Log in to your ShareLink
account to increase
bandwidth
Return to
the Home
screen
** Features available only on VidiU Pro

Page 13© Teradek, LLC 2017. All rights reserved.
BROADCAST
VIDEO/AUDIO
NETWORK
SHARELINK
RECORDING
Quality
Platform*
Video
Audio
Frame Rate
Full HD
HD+
HD
High
Medium
Low
Mobile
High
Full
Half
Quarter
HD
High
Medium
Low
Mobile
Auto
Audio Source
Audio Channel
Auto
Yes
No
HDMI
Analog
Disabled
Stereo
Mono Left
Mono Right
SYSTEM All
Broadcast
Network
Cancel
USB Modem
Wired
Wireless
Speed Test
Mobile
Access Point
Client
Off
Widescreen
Factory Reset
Enable/Disable
Recording
Purchase Plan
Login
Auto
Preset
Custom
Dynamic
Static
*Settings options will vary, depending on the platform
Livestream
UStream
YouTube
Twitch
Facebook
Manual
Live:Air
Wowza
VIDIU IOS APP SETTINGS DIAGRAM
Access Point
Client
Off

Page 14
BROADCAST
VIDEO/AUDIO
NETWORK
SHARELINK
RECORDING
Quality
Platform*
Video
Audio
Frame
Rate
Full HD
HD+
HD
High
Medium
Low
Mobile
High
Full
Half
Quarter
HD
High
Medium
Low
Mobile
Auto
Livestream
UStream
YouTube
Twitch
Facebook
Manual
Live:Air
Wowza
Audio Settings
Overlay Settings
Auto
Yes
No
HDMI
Analog
Disabled
Stereo
Mono Left
Mono Right
SYSTEM
General
Wi-Fi
USB Modem
Video Settings
Enable
Recording/
Disable
Recording
Purchase Plan/
Sign In
Custom
Bitrate
256000
192000
128000
96000
48000
32000
16000
Overlay Mode
Show Title
Title Text
Show Time
Font
Location
WEB USER INTERFACE (WEB UI) SETTINGS DIAGRAM
*Settings options will vary, depending on the platform
Firmware Upgrade
Password
System Time
Reboot
Factory Reset
System Diagnostics
Dynamic
Static
Speed Test
Wired
Auto
Preset
Custom
Off
Access Point
Client
Audio Source
Channel
Widescreen
Overlay Mode
Page 15© Teradek, LLC 2017. All rights reserved.
BROADCAST
VIDEO
NETWORK
SHARELINK
RECORDING
SYSTEM
AUDIO
Quality
Platform*
Video
Audio
Frame
Rate
Full HD
HD+
HD
High
Medium
Low
Mobile
High
Full
Half
Quarter
HD
High
Medium
Low
Mobile
Auto
Livestream
UStream
YouTube
Twitch
Facebook
Manual
Live:Air
Wowza
Adaptive
Bitrate
On/Off
Input
Overlay
Widescreen
*Settings options will vary, depending on the platform
Media
Format
Eject
Enable/
Disable
HDMI
Analog
Disabled
Stereo
Mono Left
Mono Right
Auto
Yes
No
Overlay
Text
Title
Time Stamp
Font
Location
Source
Channel
Wired
USB Modem
Wi-Fi
Enable/
Disable
Tools
VIDIU FRONT PANEL INTERFACE SETTINGS DIAGRAM
About VidiU
Firmware Updates
Factory Reset
Display Settings
Connections
Speed Test
Priority
Mode
[Info]
[Info]
Mode
[Setup]
[Info]

Page 16
Broadcast: Platform Settings
Select one of several integrated streaming platforms, then enter your credentials or destination information. From the
VidiU app, Web UI, or the front panel interface, go to your Settings menu, select Broadcast (Broadcast Settings on the
front panel interface), Platform, then select a platform to stream to.
Livestream:
1. Select Livestream and enter your credentials
(Fig. 3-1).
2. Select the event you wish to stream to (Fig. 3-2), or
create a new event at https://livestream.com.
3. After selecting an event, you will be redirected to the
Settings menu. Select Done on the upper right corner.
4. Tap the ‘Broadcast’ button to go live, then choose
whether or not to notify your followers.
5. When ending the broadcast, choose whether to Post,
Save, or Delete the video from the event.
Notify Followers
a. If broadcasting from VidiU’s Web UI, you can notify your
account’s followers by toggling the ‘Notify Followers’
switch to On before tapping the broadcast button.
b. If broadcasting from the VidiU app (Fig. 3-3), you will be
prompted to select whether or not to notify your
followers after tapping the broadcast button.
Post, Save, or Delete
From the Web UI: During your broadcast, you can select
whether to Post the recorded video immediately, Save it
for posting later, or Delete it from the event.
From the VidiU app (Fig. 3-4): When ending your
broadcast, you will be prompted to select whether to
Post the recorded video immediately, Save it for posting
later, or Delete it from the event.
Fig. 3-1 Fig. 3-2
Fig. 3-3 Fig. 3-4
Integrated Platforms
● Livestream (pg. 16)
● UStream (pg. 17)
● YouTube Live (pg. 18)
● Twitch (pg. 19)
● Facebook (pg. 19)
● RTMP/Manual (pg. 20)
● Wowza (pg. 20)

Page 17© Teradek, LLC 2017. All rights reserved.
UStream:
1. Select UStream and enter your credentials (Fig. 3-5).
2. Select a channel to stream to (Fig. 3-6), or create a
new channel at https://www.ustream.tv.
3. After selecting a channel, you will be redirected to
the Settings menu. Select Done on the upper right
corner.
4. Tap the “Broadcast” button to go live (Fig. 3-7).
Auto Record and recorded files
Depending on your UStream account level, broadcasts to
your channel may be automatically recorded for viewing
later. Enabling the ‘Auto-Record’ setting triggers these
recordings. Access permissions for the recorded files
can be configured on your UStream account.
Channel List
The UStream Channels list (Fig. 3-6) indicates which
channels are available to stream to. Once you have entered
your credentials, you will be prompted to select one
of the available channels.
Fig. 3-5
Fig. 3-6 Fig. 3-7

Page 18
YouTube Live:
1. Select YouTube Live.
2. Copy the authentication code generated for your
device, go to http://www.google.com/device, then
enter your credentials (Fig. 3-8). Enter the code, then
allow VidiU to access your account.
3. Select an event, create a new event, or select
‘Stream Now’ (Fig. 3-9).
4. After selecting an event, you will be redirected to
the Settings menu. Select Done on the upper right
corner.
5. Tap the ‘Broadcast’ button (Fig. 3-10), then select
whether to Preview the broadcast or to Go Live.
6. When ending the broadcast, choose either Stop
or Complete Event.
Two types of Broadcast destinations
a. The ‘Stream Now’ destination is a continuously
accessible public channel with a permanent URL.
Streaming to the ‘Stream Now’ page is as simple as
start and stop.
b. Event destinations can be created, scheduled,
started, and stopped. Every event comes with its own
page URL, and once an event is finished it cannot be
started again. After finishing an event, it is saved on
its own page.
Four key stages in the life cycle of a broadcast
Once you start Broadcast:
Preview - Preview the video you intend to broadcast. Videos in preview state are visible on the event’s Live Control Room page.
Go Live - Makes your event visible on its own channel page. An event can not return to preview once it has gone live.
Once you stop Broadcast:
Stopped - Broadcasts can be stopped and restarted at any time while the event is in the preview or Live state.
Complete Event - You will no longer be able to broadcast to the event, but it will be saved on the event page for viewing.
Fig. 3-8
Fig. 3-9 Fig. 3-10

Page 19© Teradek, LLC 2017. All rights reserved.
Twitch:
1. Select Twitch, enter your credentials (Fig. 3-11), then
select Done on the following screen.
2. To begin live streaming, tap the “Broadcast” button
(Fig. 3-12).
Facebook:
1. Select Facebook.
2. Copy the authentication code generated for your
device, go to https://www.facebook.com/device, then
enter your credentials (Fig. 3-13). Enter the code, then
allow VidiU to access your account.
3. Choose whether to stream to your timeline or to a
specific page (Fig. 3-14), then tap Done on the upper
left corner. You can also create a page to stream to
from your Facebook account.
4. Tap the ‘Broadcast’ button to go live (Fig. 3-15).
Timeline vs Page Streaming
Timeline - Broadcast the video to your personal
timeline or “wall.”
Page - Broadcast the video to a page you manage.
To create a page:
a. Go to https://www.facebook.com/pages/create.
b. Select a Page category.
c. Select a more specific category from the drop
down menu and fill out the required
information.
d. Click Get Started and follow the on-screen
instructions.
Privacy Settings
● Your Timeline privacy setting will be used if a less restrictive
privacy option is chosen. (e.g. your timeline is set to Friends, but
you set the VidiU to ‘All.’ The post will be visible to friends).
● Posts to Facebook pages are always public.
Fig. 3-11 Fig. 3-12
Fig. 3-13 Fig. 3-14
Fig. 3-15

Page 20
Wowza:
1. Select Wowza.
Server Mode (Fig. 3-18):
a. Enter the host server URL and stream name
provided by the streaming service.
b. Enter your credentials, select Apply, then
return to the Home screen.
Cloud Mode (Fig. 3-19):
a. Enter the connection code
b. Enter your credentials, select Apply, then
return to the Home screen.
2. Tap the ‘Broadcast’ button to go live.
1. Select RTMP (Manual if using the Web UI).
2. Enter the URL and stream key/name (Fig. 3-16)
information provided by the streaming service.
3. Enter your credentials (if applicable).
4. Select Apply, then return to the Home screen.
5. Tap the ‘Broadcast’ button to go live (Fig. 3-17).
RTMP (Manual):
VidiU can stream to other video platforms, CDNs, and streaming servers using the manual RTMP mode. RTMP is supported
by most video streaming platforms.
URL and Stream Name/Key
In order to stream to a broadcast platform other than a
platform already integrated into VidiU, you must obtain a
URL and stream key/name. Log into your account’s
settings and retrieve the URL and stream key/name.
Fig. 3-16 Fig. 3-17
Fig. 3-18 Fig. 3-19
Other manuals for VidiU
2
This manual suits for next models
1
Table of contents


