Tern Vektron S10 User manual

USER MANUAL E-BIKE (PEDELEC)
Original Instructions
MANUAL DEL USUARIO E-BIKE (PEDELEC)
Traducción de Instrucciones Originales
MANUEL D’UTILISATEUR VAE (PEDELEC)
Traduction des Instructions Orginales
MANUALE D’USO – BICICLETTE A PEDALATA
ASSISTITA (PEDELEC) Traduzione delle Istruzioni Originali
전기 자전거 사용자 설명서 (PAS 시스템)
원문 설명서의 번역
EN
ES
FR
IT
KO

23
EN
ES
FR
IT
KO
EN
ES
FR
IT
KO
Contents
Dear Customer,
Thank you for choosing Tern, a leader in urban mobility and transportation!
We design bikes that bring together all the things people need to drive less and ride more.
We are dedicated to the goal of sustainable transportation, and design and manufacture bicycles for urban transport with a focus on
portability and utility. Tern donates at least 1% of net profits every year to social and environmental causes.
General Safety Notes
Turn the page
Your bicycle has specially designed components so please read this manual carefully before riding. Before hitting the road, spend some
time to understand how to operate your new bicycle in a safe environment such as a parking lot.
Respect others on the road
Please obey traffic laws and respect motor vehicles. You and your bike will always lose in a vehicle collision and you can also injure
pedestrians. Stay alert and show consideration to other road users.
Head protection
A good, authorized bike helmet may prevent injury in an accident. Wear one, it’s a no-brainer.
Servicing precautions
Do not proceed with servicing or adjustments without proper knowledge or tools.
Hit the books
This manual is only to be used in conjunction with other manuals included with your pedelec such as motor, control system, component,
and folding manuals.
Where to Go for Additional Help
If you are unsure about anything, please talk to your local Tern dealer. Tern dealers are specialists in Tern products and servicing.
1. Introduction
1. Introduction ................................................. 3
2. General Information ................................... 4
3. Legal Details .............................................. 5
4. Local Regulations ....................................... 5
5. Intended Use ............................................... 7
6. Unfolding and Folding your Tern ............. 7
7. Before the First Ride .................................. 8
8. Before Every Ride ....................................... 13
9. Safe Riding ..................................................16
10. Passenger and Cargo Transport .............. 18
11. Transporting your Tern .............................. 22
12. ABCs of Pedelec ......................................... 23
13. Tips for Riding a Pedelec .......................... 26
14. Service .........................................................29
15. Torque Settings .......................................... 33
16. Service and Maintenance Schedule ........ 35
17. Warranty ...................................................... 38
18. Declaration of Conformity ........................ 41
45
EN
ES
FR
IT
KO
EN
ES
FR
IT
KO
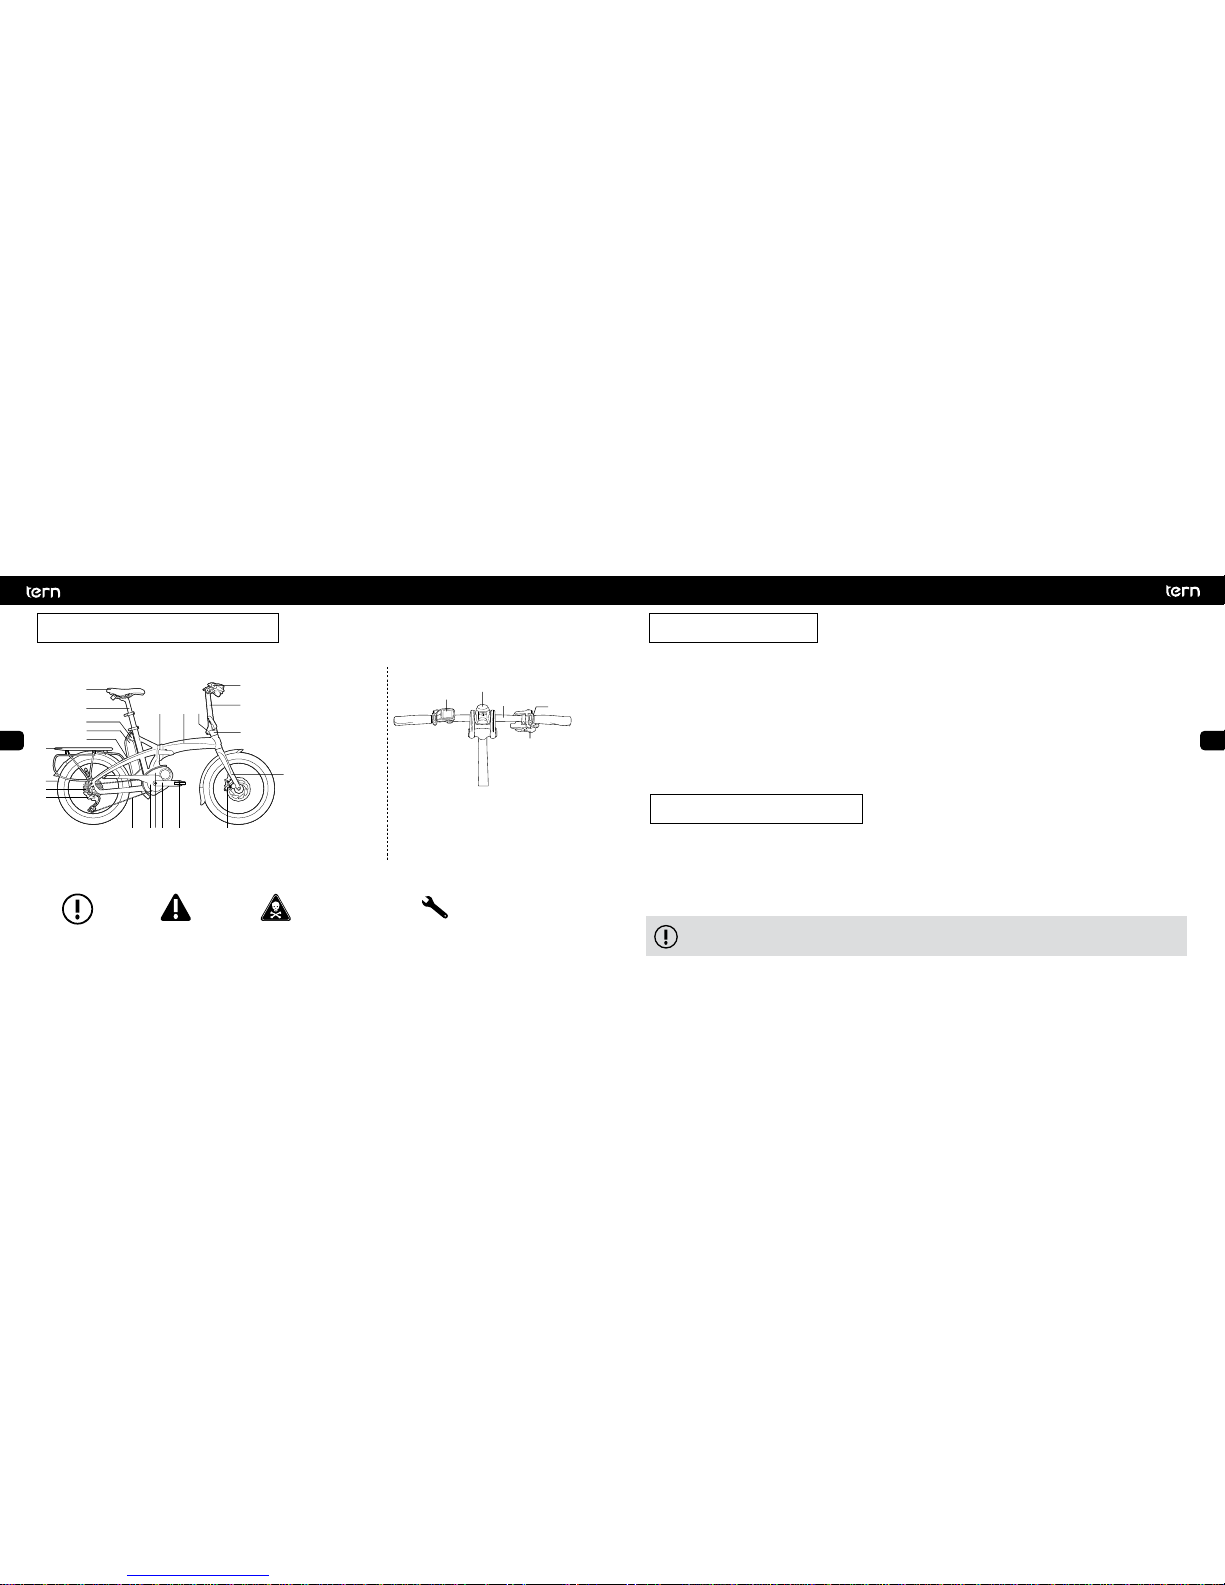
Bike Parts
Meaning of Icons
1. Wheel
2. Cassette
3. Rear Derailleur
4. Chain/Belt
5. Chainring
6. Motor
7. Crankset
8. Pedal
9. Brakes
10. Fork
11. Carrier/Rack
12. CE Frame Sticker
13. Battery
14. Battery Lock
15. Seat Post
16. Saddle
17. Frame Joint
18. Frame
19. Handlepost Joint
20. Handlebar
21. Handlepost
22. Headset
3
1
2
5
4
Handlebar
1. Controller/Display
2. Light
3. Handlebar
4. Brake Lever
5. Shifter
Indicates how to use the
product or items that
require special attention.
Incorrect action could
result in damage to the
equipment.
Life-threatening danger if
instructions are not
followed or preventive
measures are not taken.
You must have the proper tool, such as a torque wrench
for items that require a specific torque. A torque that is too
high or too low can cause parts to fall off or break and can
lead to serious accidents and injuries.
Manufacturer
Mobility Holdings Limited (Hong Kong), Taiwan Branch
8F-8, Lane 609, Chongxin Road, Section 5, Sanchong District, New Taipei City, Taiwan
Contact: [email protected] / Website: www.ternbicycles.com
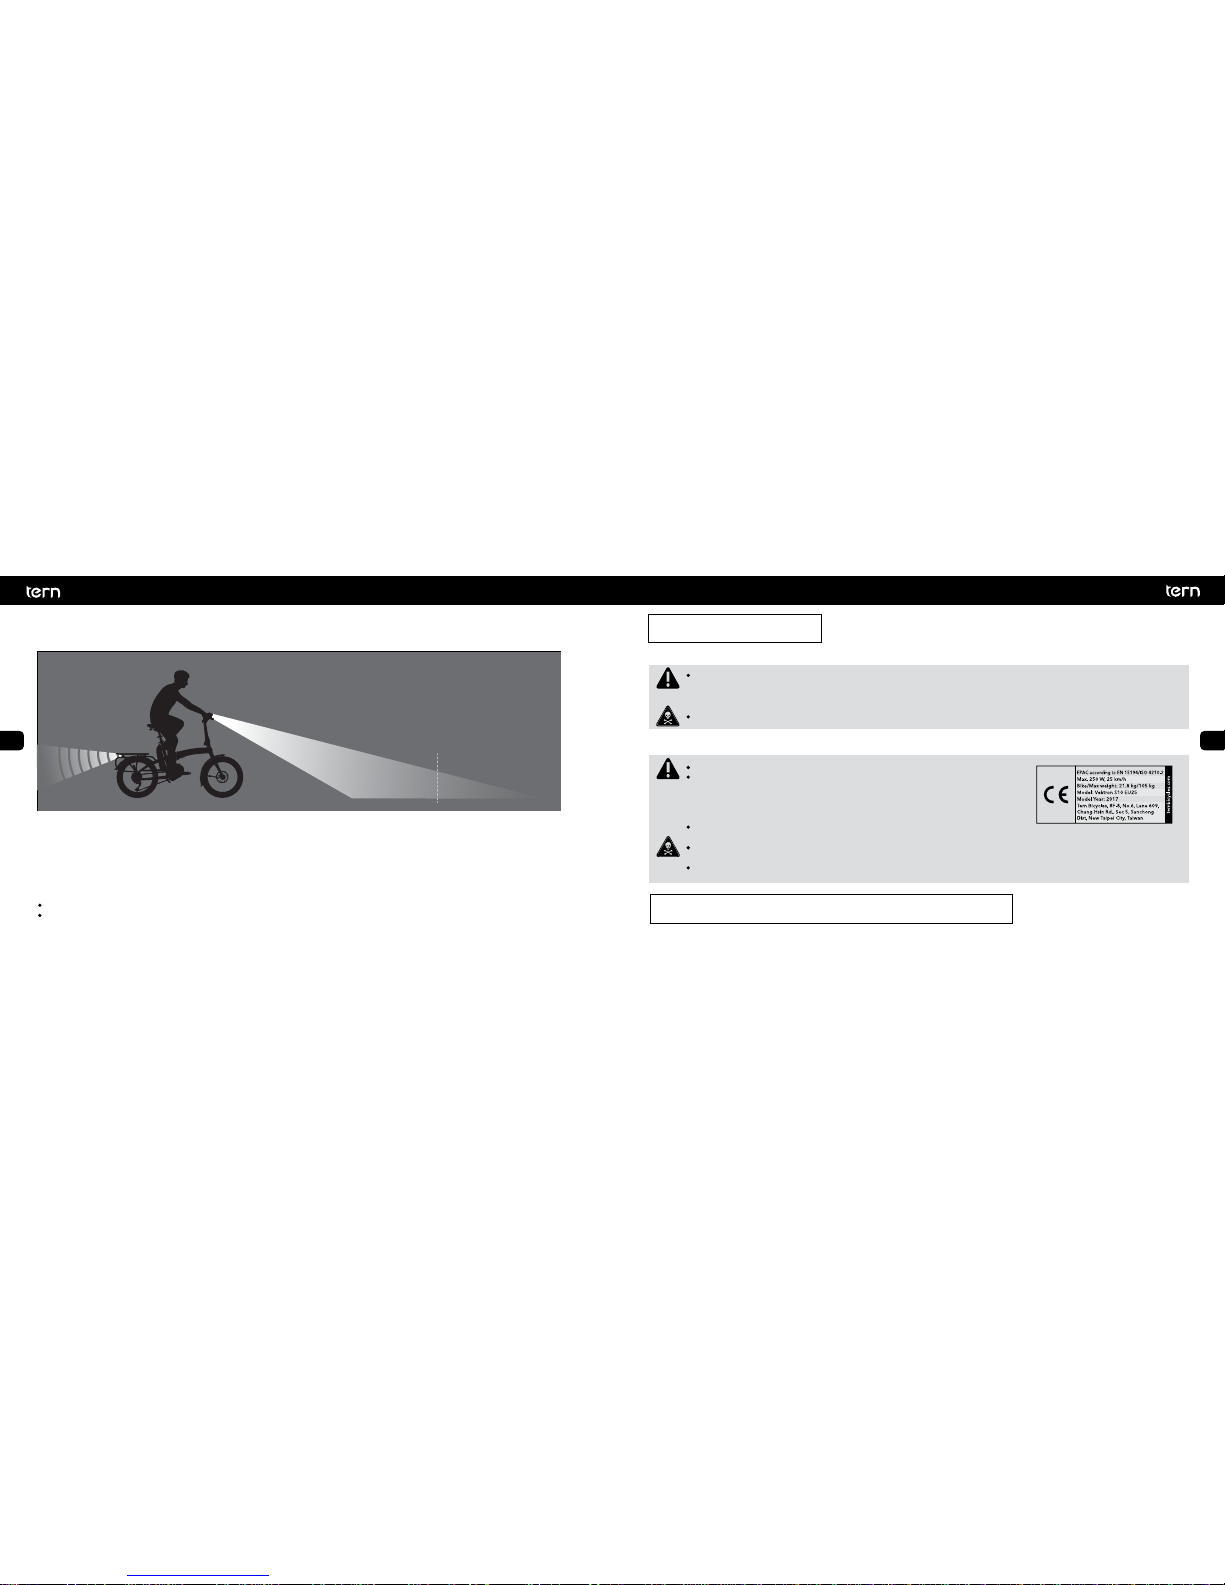
Marking on Bike
If your Tern is a pedelec, it will have a CE frame sticker which confirms that it has passed all tests outlined in EN 15194.
Declaration of Conformity
This user manual complies with the requirements of EN 15194 and Machinery Directive EC/2006/42.
See the separate Declaration of Conformity insert.
Edition 1 Rev 1, October 2017
Pedelec stands for pedal electrical cycles. They are also known as EPACs which stands for Electrically Power Assisted Cycles. Pedelecs are
bicycles with a motor that provides assistance when a rider starts to pedal. When a rider stops pedaling, the assistance stops. Some bikes
will also have a push assistance mode with a max speed of 6 km/hr.
In general, electric bikes are viewed by law as more similar to a conventional bicycle than a motorized scooter or motorcycle. In most
cases, an electric bike can be ridden in bike lanes, on bike paths, and can be locked to bike racks like a regular bicycle. Riders are not
required to have a driver’s license to operate an electric bike and are not required to obtain any special licensing or registration for their
pedelecs.
It’s important to note that the specific laws, rules, and guidelines governing electric bike use may vary from country to country.
If you are not using your bicycle in Germany, it’s important to familiarize yourself with the laws in your specific location before
you begin riding your pedelec. Take time to learn local bike laws before hitting the road.
To use public roads with your pedelec in Germany, your bike must be equipped in accordance with Road Licensing Regulations (StVZO)
and the Road Traffic Act (StVO). Please note there may be different regulations that apply in your country.
2. General Information 3. Legal Details
4. Local Regulations
1
3
478
15
16
18
17 21
19
20
22
10
13
6
11
5
2
14
9
12
67
EN
ES
FR
IT
KO
EN
ES
FR
IT
KO
StVZO
The lighting system needs to have the K-number mark to be legal on public roads. The front and rear lights must be powered by the
same power source.
The front light projection center must be no more than 10 meters from the front of the bike on the road. The rear light must be mounted
at least 25 cm above the road surface.
Reflectors are required, in addition, to lights. In the front, a white reflector is required. In the rear, at least two red reflectors are required.
Two yellow reflectors must be attached to each pedal.
Each wheel must meet at least one of the below requirements:
Two yellow reflectors
White reflective rings on both sidewalls of the tires
The braking system must have independent functioning front and rear brakes.
You must maintain the bike in good condition.
Built for Urban Warriors, not Stuntmen
Watch the Weight
Tern bicycles are only designed for one person riding with both wheels in contact with the ground on paved roads only. They
are not intended for racing, jumps, hops, wheelies or anything of the kind. The manufacturer and dealer are not liable for any
direct or consequential damages. The warranty will be void if your pedelec is not used in accordance with the intended usage.
Using the bike for off-road riding, jumps or stunts may cause damage to the frame and risk injury or death to the rider.
Maximum carrying capacity = Rider weight + Cargo weight
If you have a folding Tern Pedelec, the standard carrying capacity is 105 kg (230 lbs).
If the capacity stated here differs from your pedelec’s CE Frame Sticker’s, follow the
CE Frame Sticker. If you have a non-folding Tern Utility Pedelec, refer to the CE frame
sticker for maximum allowable weight and read the Utility Pedelec Supplemental
Manual for balancing the load.
If carrying cargo or extra weight, make sure the bike is stable and is within the
maximum load capacity.
Practice handling the bike in a safe area before riding on public roads.
If not properly handled, sudden shifts in load while riding can affect your balance and lead to serious injury or death.
Please see the separate enclosed folding instructions.
5. Intended Use
6. Unfolding and Folding your Tern
CE Frame Sticker example
10 m
89
EN
ES
FR
IT
KO
EN
ES
FR
IT
KO
Hit the Books before You Ride
Spend some time to understand how to operate and use your new bike before hitting the road. Operating manuals for individual
components and folding instructions for your specific bike are supplied together with this manual. Please read all the manuals.
If anything is unclear, ask your dealer.
Please Check
Electrical system
Make sure you are familiar with the function of all the controller buttons and meaning of the displays.
Please consult the information in the relevant section from the manual of the motorized system manufacturer.
Wheels
Check the Tire pressure and make sure it is within the minimum and maximum values indicated on the sidewalls of the Tires.
Spin both Wheels to make sure they rotate smoothly, are true (not wobbling) and do not rub against the Brakes. If the Wheel wobbles
side to side or rubs against the Brake Pads, take the bike to a qualified bike shop to have the Wheel trued or replaced.
Wheels that do not run true may indicate problems with the Spokes or Tires.
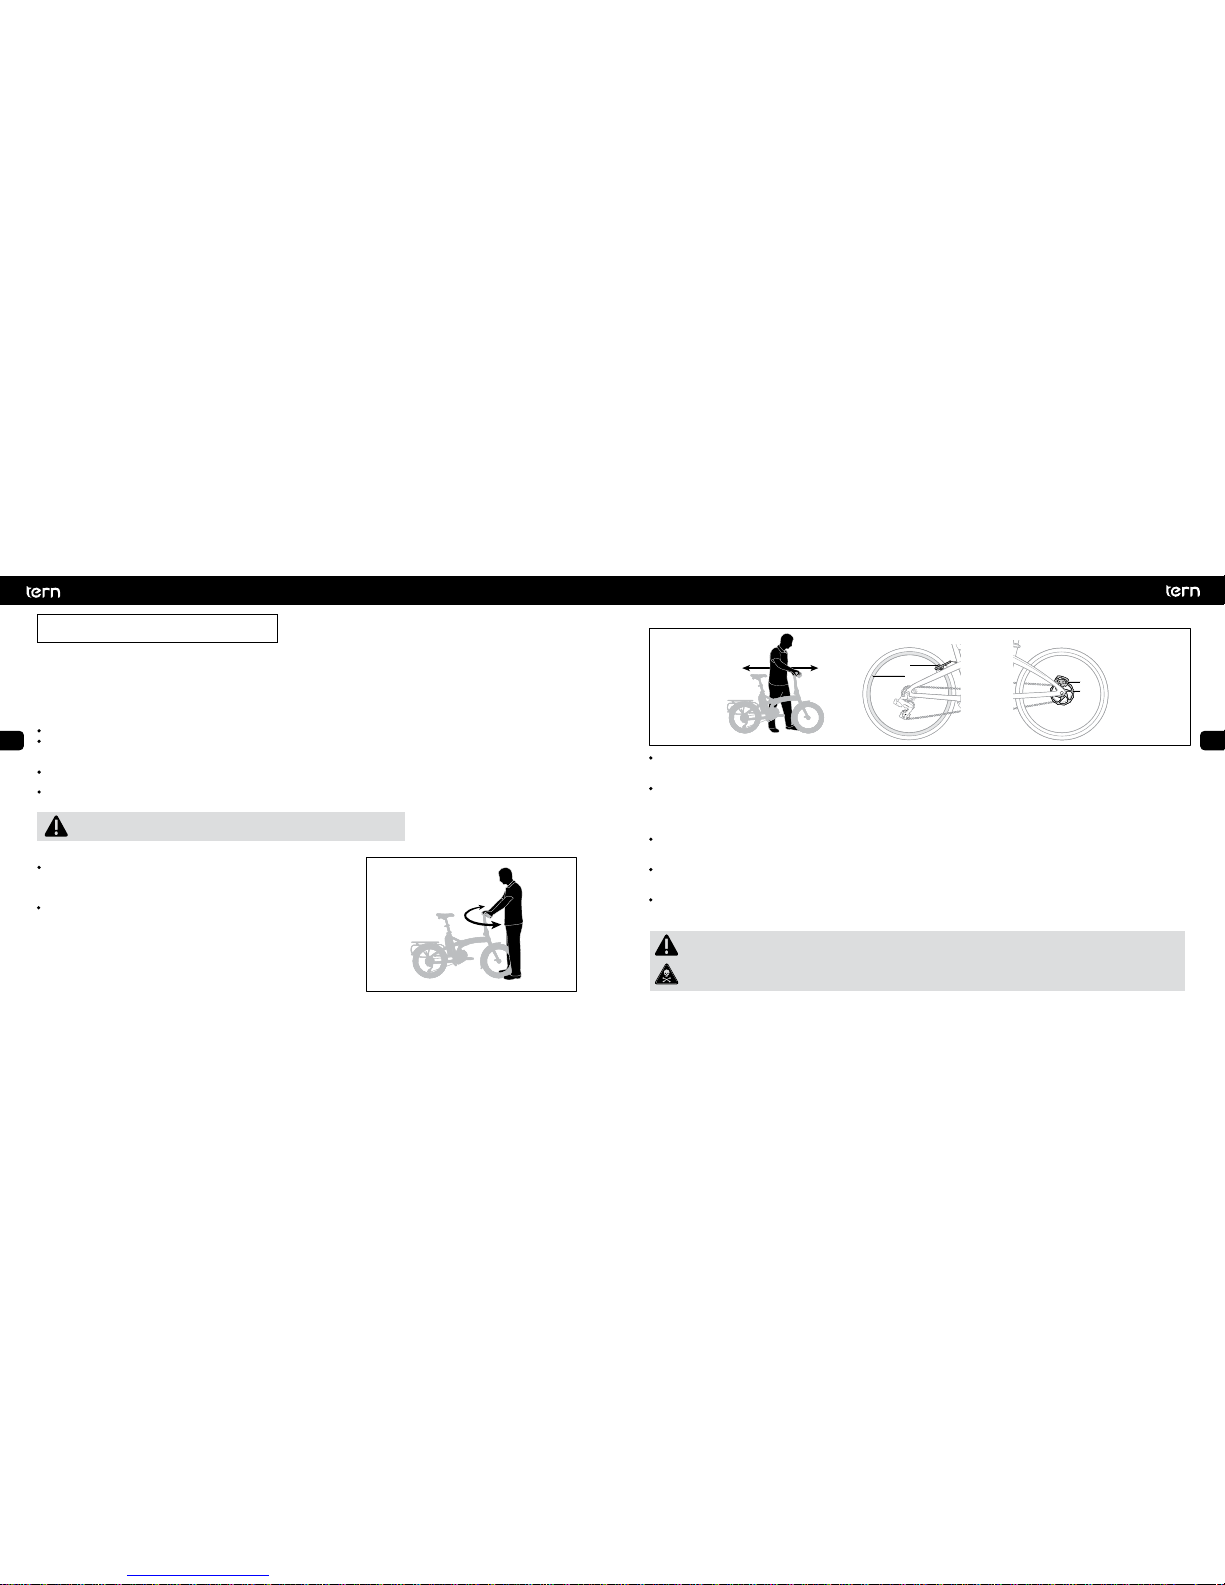
Headset
Stand with the Front Wheel pressed firmly between your legs and try to twist
the Handlebar. If movement occurs, realign your Handlebar and tighten the
Headset and handpost base or service it at your dealer.
Lift the Front Wheel off the ground and swing it from side to side. Does it feel
smooth? If you feel any binding or roughness in the steering, you may have an
overly tight Headset. Have your dealer check it.
Brakes
CBA
3
4
2
1
Test your Brakes by standing next to your bike, pull both Brakes, and rock the Bike back and forth. (A) The Bike should not roll and the
Brake Pads should remain firmly in place.
Does your Tern feel solid? If you feel a clunk with each forward or backward movement of the bike, you probably have a loose
Headset. Have your dealer check it. Note that for certain Disc Brakes you may feel a bit of play when attempting to rock the bike back
and forth. These are caused by the built-in clearances between the Brake Pads and the Brake Caliper to allow for thermal expansion and
is considered normal. In these cases, it’s not a loose Headset.
Rim-Actuated Brakes (B) have Brake Pads (1) that align with the Rim (2). The Brake Pads press against the Rim to slow the Wheel so
make sure the Brake Pads align with the Rim. Check Rim and Pads for wear.
Disc Brakes (C) have a Disc Rotor (3) and a Disc Caliper (4). Pads inside the Disc Caliper squeeze the Disc Rotor to slow the Wheel but
can get very hot under use. Do not touch them immediately after riding.
Which Lever operates the Front Brake and which Lever operates the Rear Brake varies depending on the country. For countries such as
United Kingdom and Japan, the left lever operates the rear brake and the right lever operates the front brake. For USA, Germany and
most other countries the right lever operates the rear brake and the left lever operates the front brake.
Be careful not to damage the Disc Rotor or Disc Caliper when changing wheels or by pulling the Brake Levers when the Disc
Rotor is not aligned.
Make sure to test the braking power before heading into traffic. It can be much more powerful than what you are used to.
Squeezing the Lever too fast can lead to unintended sudden stopping and cause you to crash or get rear ended.
7. Before the First Ride
Do the twist
10 11
EN
ES
FR
IT
KO
EN
ES
FR
IT
KO
Gears
Test ride in a safe area away from traffic to familiarize yourself with the function of the Gear Shifters and how to upshift and downshift.
Check that indexing (shifting from gear to gear) is crisp and that you are able to shift into the lowest and highest gears without the
Chain skipping.
If your Tern uses an Internal Gear Hub (IGH), avoid shifting and pedaling hard at the same time. Unlike derailleurs, most conventional
IGH’s are designed in such a way that it shifts optimally when coasting or not pedaling / coasting / stationary. This mean Internal Gear
Hubs can shift when you are stopped, a very nice feature in stop-and-go urban traffic.
Check for tight links in the Chain and that the Chain turns freely through the Gears.
With a pedelec, drive assistance begins immediately when you step on the pedal. Squeeze the brakes before mounting your
bike to avoid any unintentional movement.
For any noise
Lift the bike up about 10 cm and drop it to the ground. If you hear any unusual noise or notice issues with Frame stability (especially Frame
and Handlepost Joints), book it for a service appointment at your dealer.
How the bike fits
The best riding position is the one that you are most comfortable in, but a
badly adjusted bicycle may lead to back or joint pain and reduce your
control. Check that your Saddle and Handlebar are at the correct height
and that you can reach Brake and Gear Levers comfortably.
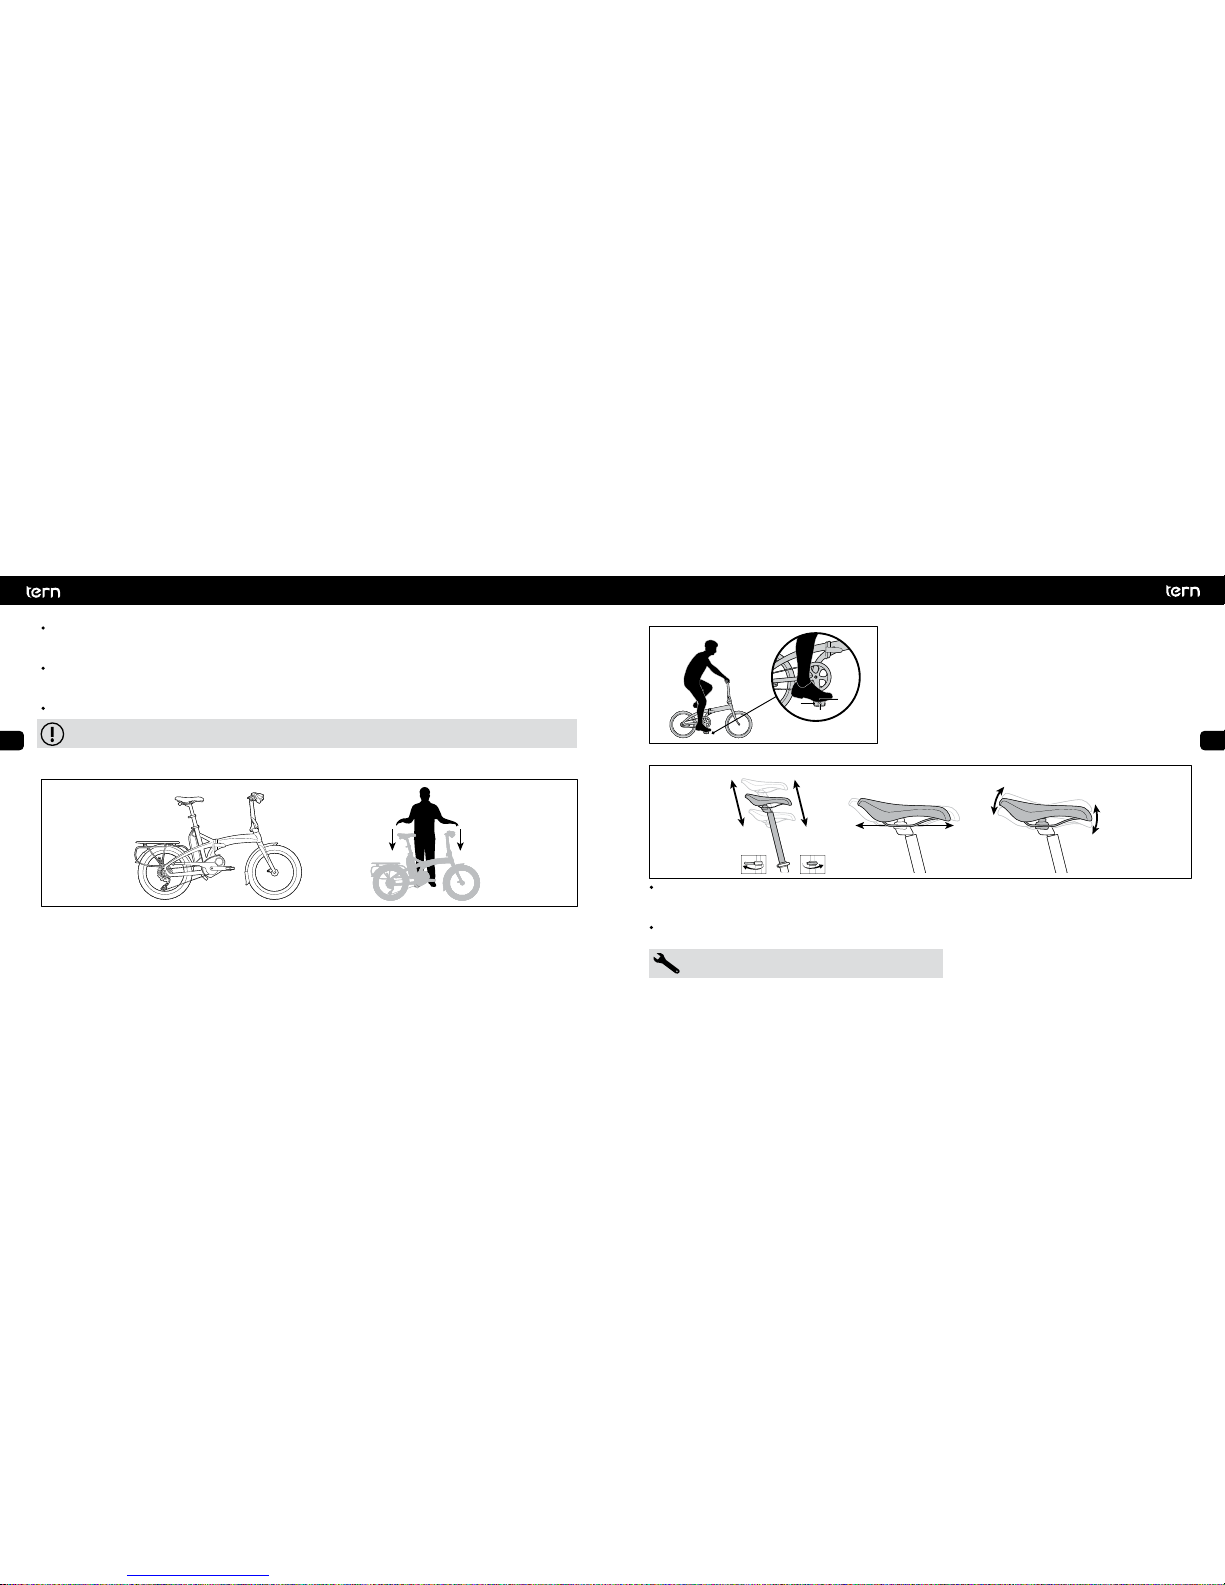
For most people, the ball of the foot (1) should be placed on the Pedal (2)
directly above the Pedal Spindle (3).
Saddle
The saddle height is an important component of the overall riding position. While seated, you should have a slight bend in your knee
when the Pedal is pushed down all the way. The leg should not be fully extended so make sure the Saddle is not too high. If the seat is
too low, repetitive strain on the knee may lead to pain.
The Saddle can be moved up and down, forward and back and angled up and down. Play around with it to get the best fit. A badly
fitted Saddle can injure nerves, joints, and blood vessels.
1
2
3
Refer to section 15 for appropriate saddle rail torque values

12 13
EN
ES
FR
IT
KO
EN
ES
FR
IT
KO
When riding, your hips should remain stationary and your knee should only bend about 20-25° when the pedal is all the way down.
The Saddle should be roughly parallel to the ground, but if it’s not comfortable, tip the Nose down to relieve pressure on the crotch or
up to distribute your weight over a greater area of the Saddle. The seat should be tilted no more than 5° up or down.
Moving the Saddle backward works your glutes harder and forward works your quads harder. Generally, the front of the knee should
not pass the Pedal Spindle. Once comfortable, check your saddle height again and adjust as necessary.
Do not raise the Seatpost above the minimum insertion line etched on the post. Doing so may result in post/frame failure
and serious injury. If proper saddle height cannot be achieved without raising the post above this line, you need a longer
Seatpost. Similarly, do not lower the Seatpost below the maximum insert mark when riding. The lower exposed portion
may hit objects on the pavement and cause a riding hazard.
Stem
Models fitted with Andros Stems are adjustable in angle and height without tools. Please refer to the included manual for information on
how to adjust the Stem positions.
Handlebar orientation
Rotate your Handlebar so that your palms are supported and that your fingers can easily reach the Brake and Gear Levers. For Handlebar
adjustment procedures, refer to the Stem manual included with your Tern.
Be sure to check the following before every ride:
Electrical System
Check that the battery is seated properly in the carrier on the frame and fully plugged in.
Check the controller display for any warnings or error messages. Resolve the error before riding.
Check that the battery is adequately charged for the length of ride you are planning to do.
Make sure the front and rear lights are illuminated when they are actuated and remain on when the bike is at a standstill.
Mechanical
As with all mechanical components, the bicycle is subjected to wear and high stresses. Different materials and components
might react to wear or stress fatigue in different ways. If the design life of a component has been exceeded, it may suddenly
fail, possibly causing injuries to the rider. Any form of crack, scratches, or change of coloring in highly stressed areas indicate
that the life of the component has been reached and it should be replaced.
8. Before Every Ride

14 15
EN
ES
FR
IT
KO
EN
ES
FR
IT
KO
Check the Welds
In addition to this test, please check the weld area around the Frame Joint.
Your Pedelec will experience stress and wear during riding. Check
Frame welds for deformation and changes in color which may indicate
cracking. This is especially important if the bike has fallen over or has
been involved in a crash. Note that aluminum parts, once bent, cannot
be safely bent back into place and will require replacement.
Rim
The Rim should be clean and undamaged. Look out for discolorations, scratches or wear. If you have Rim Brakes, the contact surface should
be checked for pits or grooves. Some Rims have a wear indicator on the brake contact surface; once the Rim wears down to the wear
indicator it should be replaced.
A worn or damaged Rim may fail without warning and cause the rider to crash.
Wheels
Check that the Wheels are fixed inside the Fork by pushing from each side. They shouldn’t slide along the Hub Axle.
Use your hands to squeeze the neighboring pair of Spokes. If Spoke tension difference is pronounced, have your Wheel trued.
Make sure your Wheels are securely seated by lifting each end of the bike and knocking the Wheel toward the opening of the Dropout;
the Hub Axle should stay in position.
Saddle
Try to turn the Saddle by hand to make sure the Seatpost and Saddle are securely clamped; there should be no movement in either the
Seatpost or Saddle.
A
AIR
Check the air pressure on
your Tires. Use your thumb
to press the Tires. They
should feel nice and firm but
avoid over-inflating.
B
BRAKES AND BARS
Check the Brakes by squeezing
the Levers and making sure the
bike stops. Check that the Brake
Cables are undamaged and
untangled.
Check that Bars (Handlebar,
Handlepost, Handlebar
Extensions) are tightly in place
and undamaged by turning the
Handlebar left and right with the
Front Wheel in
between your legs.
C
CHAIN AND CABLES
Check that Chain turns freely
through Gears by rotating the
Crank backwards, and make
sure Cables are undamaged.
QUICK
QUICK RELEASES
Check that Quick Releases
(Wheels, Seat Tube,
Handlepost) and Joints
(Frame, Handlepost) are
closed securely.
DROP
DROP THE BIKE
Lift the bicycle a few
inches and drop it to the
ground. If anything shakes
or rattles, make
adjustments before
riding.
ABC Quick Drop Test
We design our bikes so that they can be everyday companions. For safety, however, we recommend this test before each ride:

16 17
EN
ES
FR
IT
KO
EN
ES
FR
IT
KO
Keep Your Eyes on the Road
Check for potholes and other dangers, like car doors opening and kids
playing. Also, think about your own visibility and avoid entering vehicle
blind spots.
Wake Up!
You need to stay alert when riding. Don’t wear earphones or headphones that affect your hearing or sunglasses if they hinder your vision.
Don’t ride if you have consumed alcohol or are on medication that affects your motor skills.
Stand out from the Crowd
Riding in low light or poor visibility, such as at night, dawn, dusk, in rain or in fog is much more dangerous than in daytime lighting
conditions. Wear bright colors and reflective gear.
Stay Clean – Shine Bright
Reflectors should be clean, unbroken and mounted correctly. Don’t cover reflectors with loose clothing or bags. Also, they only reflect light
in some directions, so you need lights to make sure you are seen with all around visibility. Make sure your lights are working properly.
Using Brakes
Go with the flow
Braking distances increase in wet weather or under heavy load, so brake
more gently and earlier under those circumstances.
Easy tiger
To prevent skidding when slowing or stopping your bike, pull Brakes
gradually. Skidding does not slow you down faster and means you can’t steer
well so it should be avoided.
9. Safe Riding Lean back
If you slam on your Front Brake, you may fly over the Handlebar or your Rear Wheel may slide out behind you. If the Rear Wheel rises, lean
back and ease off your Front Brake.
Be a Straight Shooter
Ride cautiously and defensively when visibility is reduced. Your movement may be obscured so ride predictably. (Heck, you should
always ride this way regardless of the conditions!)
Use a bell, horn or your voice to indicate your intention to pass and do so in advance so as not to startle the rider you are passing.
Travel in a straight line unless you are avoiding hazards or passing and always indicate your intention to turn or pass.
18 19
EN
ES
FR
IT
KO
EN
ES
FR
IT
KO
10. Passenger and Cargo Transport
Riding with passenger(s), cargo, or both affect the pedelec’s
weight, balance, center of gravity, and handling. For your safety,
please read the below guidelines.
Changes in Handling
A combination of factors – including the structural rigidity of the
frame, individual component strength, steering behavior, and
weight distribution – affect the bike’s handling. When riding with
a heavy load, the pedelec will require more effort to balance and
more time to brake.
There is a strong relationship between the weight of the rider and
the amount of cargo the rider can comfortably balance and ride
with. In practice, cargo weight should be no more than 80% of
the rider’s weight.
Get familiar with riding a loaded pedelec in a safe area before
riding on public roads.
If you have a utility pedelec, refer to the included Utility Pedelec Supplement for specific rider-to-cargo weight and cargo
positioning guidelines.
Do not to exceed the maximum carrying capacity, which includes rider weight, passenger weight, rear rack, child seat(s) and
any other accessories. Check the CE frame sticker on the pedelec frame for the maximum weight limit.
Do not use trailers to transport children.
Riding With Children
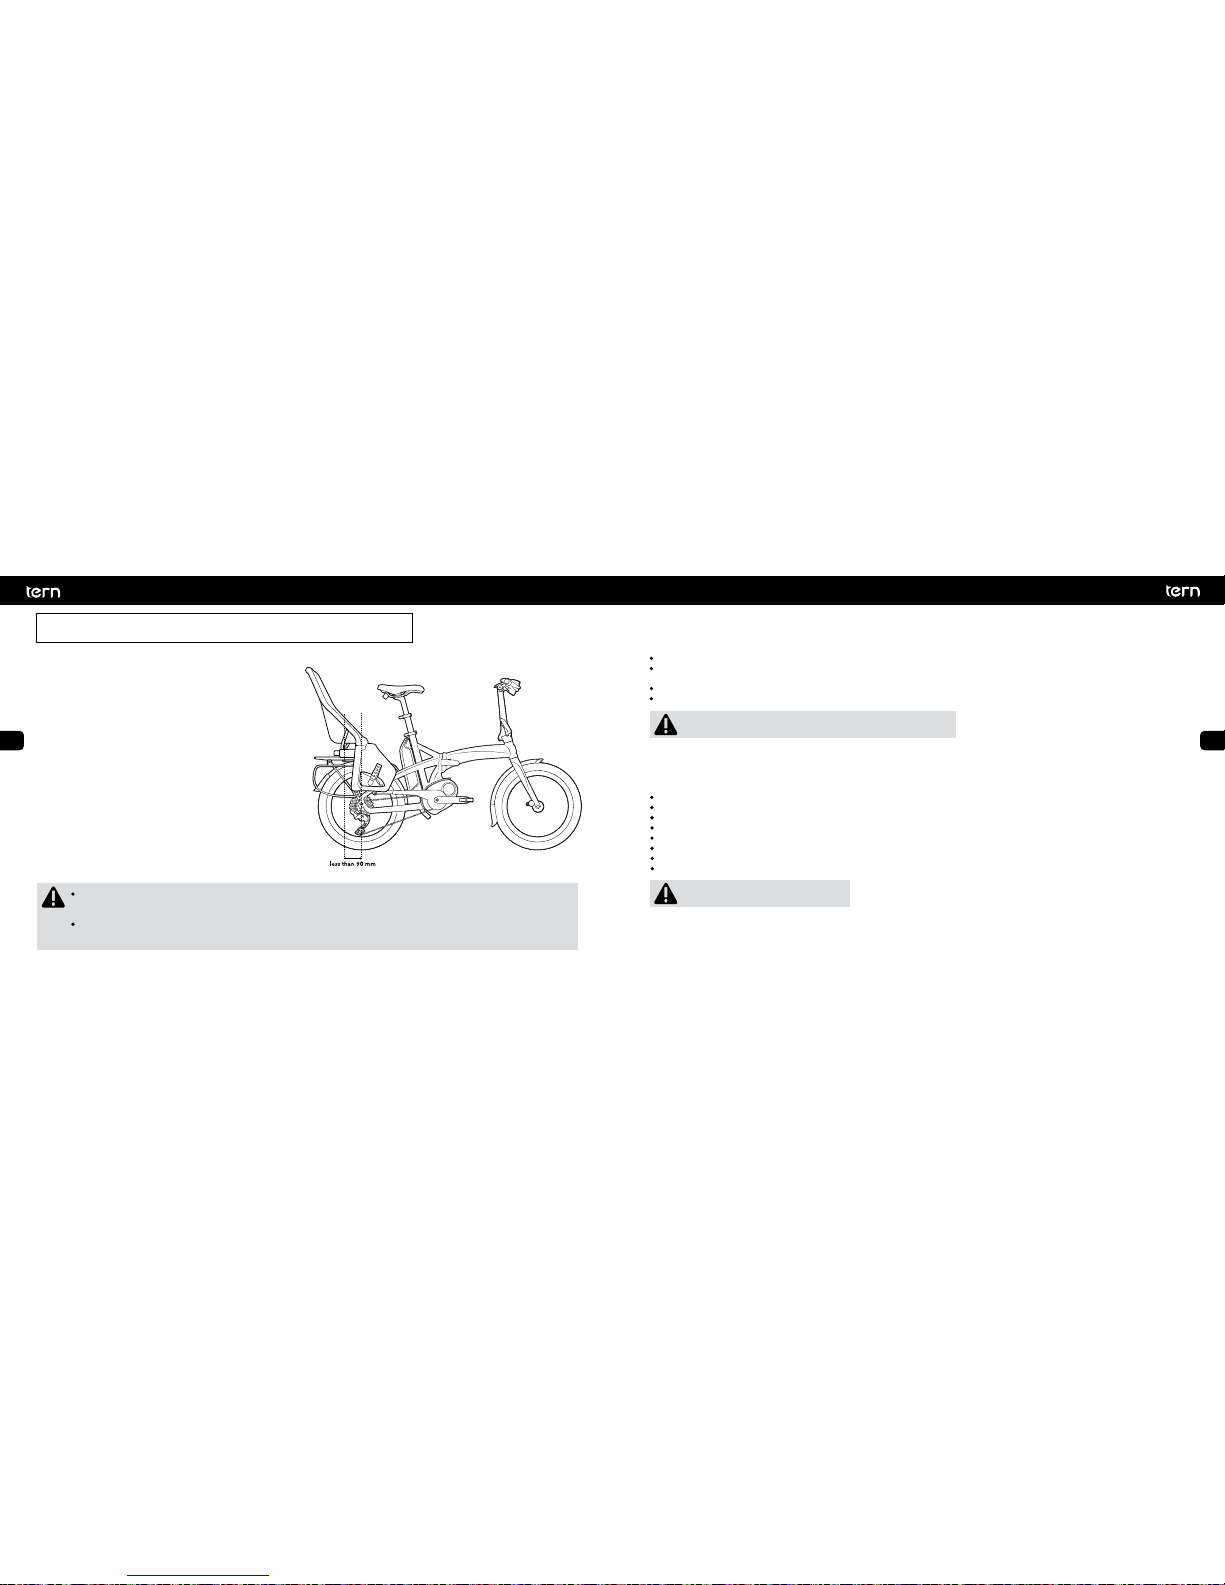
You may install and use a child seat provided that your seat and setup meet the following requirements (Based on EN 14344, European
Standard for Child’s Seats for Bicycles):
The seat is designed so that any contact between the child’s feet and the wheel is impossible.
The distance from the center of the Wheel and the seat’s center of gravity (as indicated by the center of gravity mark on the child’s seat)
should be no less than 90 mm and no more than 100 mm. This will avoid the bike and Front Wheel from swinging upwards.
The child’s fingers are protected against being caught in any part of the Saddle (such as the springs of suspension saddles).
The carrier (rack) is approved for mounting child seats.
The child seat should NOT be mounted or attached to the seatpost.
Approved Child Seat
The Thule Yepp Maxi Easyfit has been tested to work with Tern pedelecs with built-in racks or Tern Cargo Racks.
Safety and Precautions
Children – regardless of age – should be strong enough to hold up their head and withstand the bouncing that comes with riding.
Check for sufficient heel clearance. Heel clearance varies with the rider’s foot size and the child’s leg length.
Make sure the seat is properly mounted in accordance with the manufacturer’s instructions.
Make sure the maximum gross weight is not exceeded.
Make sure that nothing can get caught in the Wheel Spokes, Saddle Rails, and Springs.
Make sure the child is wearing a helmet and the straps are adjusted for a snug fit.
Always hold onto your pedelec when a child is in the child seat to prevent the pedelec and child from falling over.
Periodically check on your child while riding as they may fall asleep. Don’t let their head strain excessively to one side.
20 21
EN
ES
FR
IT
KO
EN
ES
FR
IT
KO
When loading cargo onto your pedelec with the kickstand down, do not exceed the maximum weight limit of the kickstand.
For a list of kickstand maximum weight capacities, go to: https://www.ternbicycles.com/support/techtips/maximum-weight-capacity
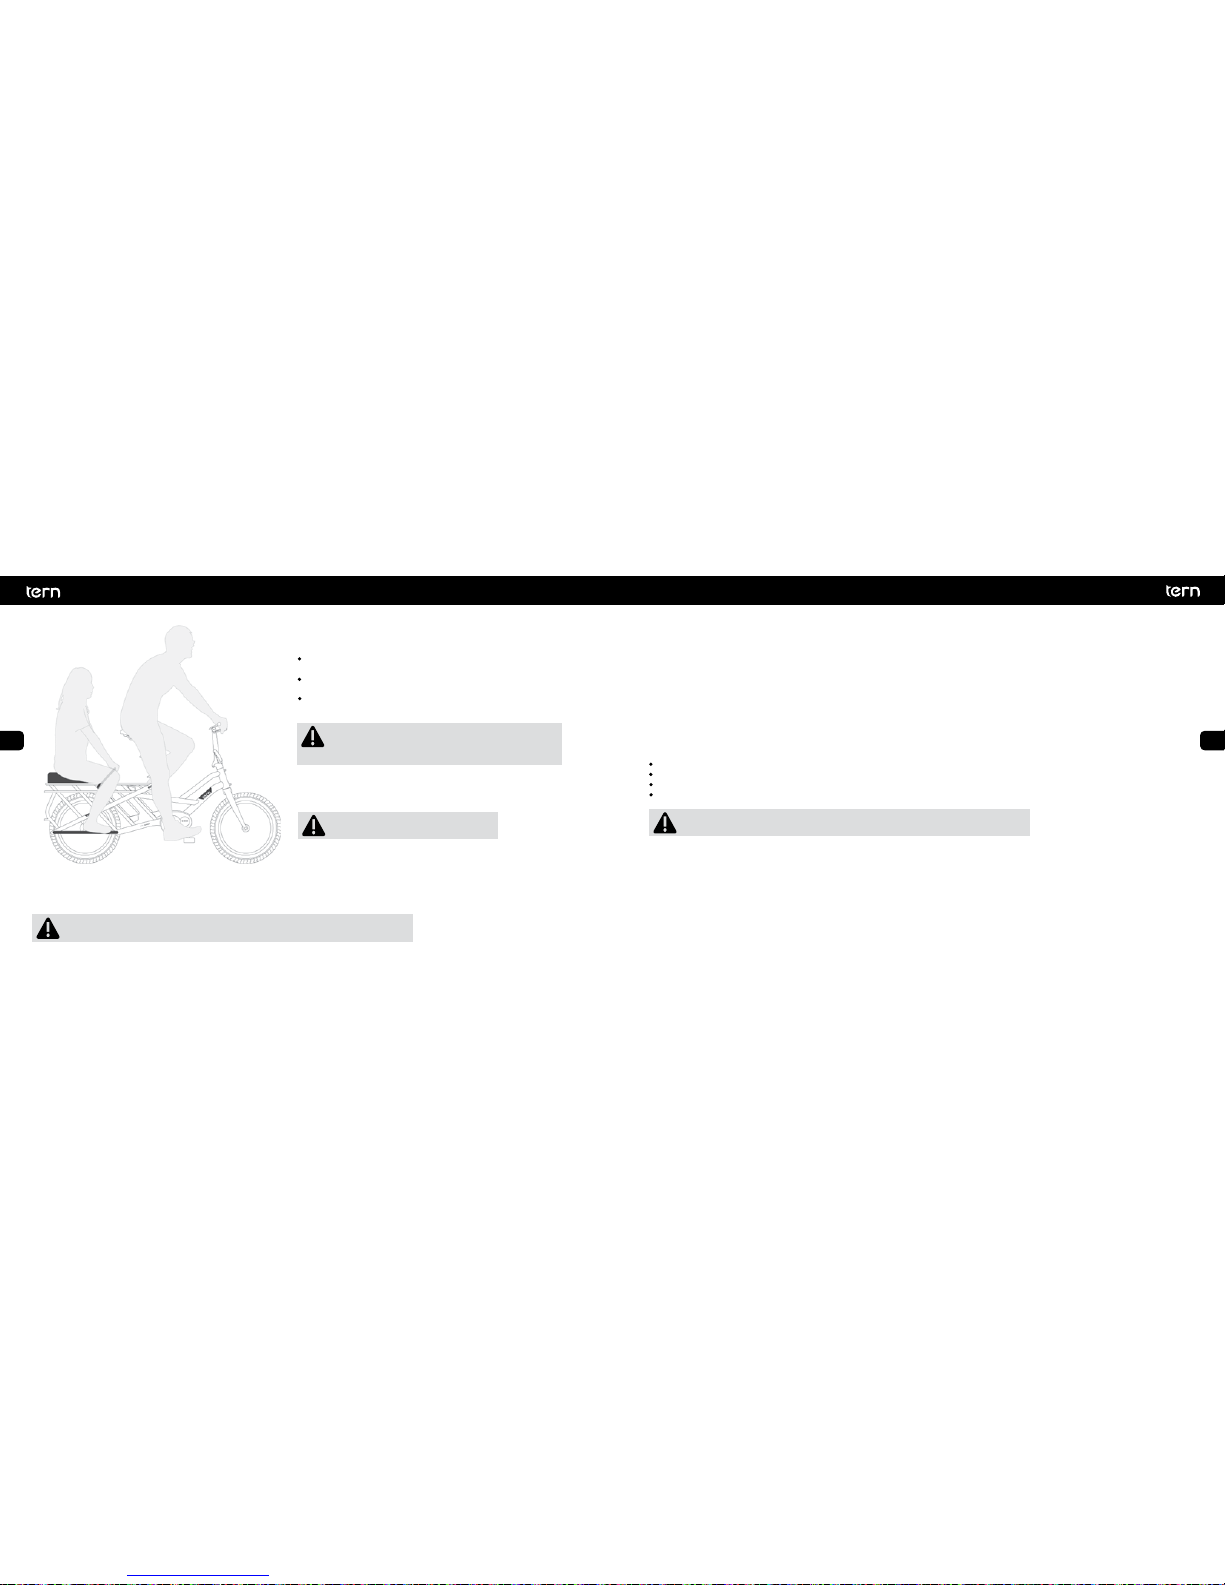
Riding With a Passenger
If you have a Tern utility pedelec, it is designed to carry
an adult passenger if:
The passenger can straddle the pedelec and properly rest his/her feet
on the foot pegs or foot platforms.
It has a seat securely attached to the pedelec frame (the Tern
Sidekick™ Seat Pad fulfills this requirement).
There is a place for the passenger to rest his or her feet (the Tern
Sidekick™ Lower Deck and Sidekick™ Foot Pegs fulfill this requirement).
Footrest
Footrests such as Tern Sidekick™ Lower Deck and Sidekick™ Foot Pegs
are designed for passengers to rest their feet when seated on the rack.
Kickstand and Parked Weight
If your pedelec is equipped with a kickstand, it can make loading and
unloading easier. However, please note the kickstand’s
maximum weight limit.
Do not sit on the pedelec with the kickstand down. This can damage the kickstand and
the kickstand mount on the pedelec frame.
It may be illegal to carry passengers on a pedelec in your
area even if it has been designed or adapted to do so.
Check your local regulations before carrying passengers.
Do not stand on the foot rests.
Riding With Cargo
If the rear of the pedelec is fully loaded, test that the front wheel does not lift off and make the pedelec tip over.
Cargo Positioning
Position cargo so that the center of gravity is as close to the centerline of the pedelec as possible. Secure the cargo as close to the front of
the rack as possible.
Balance the load. For example, when carrying a box, you should try to carry two if possible (one on either side). Lopsided loads can pull the
pedelec to one side.
Securing Cargo
Make sure your cargo is secured by straps rated for the weight of your cargo.
Checking for Interference
Make sure that you have enough space to sit properly, pedal, and steer the bike without any interference.
Cargo should not interfere with normal operations of the brakes and derailleur(s).
Long or large objects should be positioned far enough from the pedals to avoid heel strikes.
Tall or large objects in the front of the bike should not block your vision.
If you cannot position cargo to fulfill ALL of the above requirements, do not attempt to
ride with cargo!
22 23
EN
ES
FR
IT
KO
EN
ES
FR
IT
KO
Public Transportation
Pedelecs can generally be transported on trains and public transportation, like conventional bicycles.
Please check with the rail or public transport operator for specific requirements:
Some operators require you to pre-book a space and buy a separate ticket for the pedelec.
Some allow travel with your pedelec only during off-peak hours.
Some require a cover to be placed on the pedelec.
Airplane
Batteries used on pedelecs are considered potentially hazardous and cannot be transported on airplanes.
Inquire with your local forwarder to see if you can ship the battery separately.
Car
Your Tern can be transported with a standard roof or rear-mounted bicycle carrier provided it is under the maximum load capacity of
the bike carrier. To reduce the weight, remove the battery from your Tern and place it inside the vehicle.
We suggest transporting your Tern inside your vehicle if you drive a hatchback or have sufficient trunk space. Be careful not to damage
the Derailleur.
When entering into a parking structure or garage, be mindful of the pedelec on the roof of the car and make sure it is lower than the
maximum height clearance.
11. Transporting your Tern
Concept
Pedal assist electric bikes or pedelecs are equipped with an electric motor that provides assistance when the bike is being pedaled. The
assist is activated by a pedal action sensor designed to detect when the pedal is being turned. In Europe, pedelecs are limited to 25 km/h (15
mph). In the United States, the limit is 32 km/h (20 mph). Assistance is cut off above those designated speeds.
The controller allows you to select the degree of power assist provided by the motor from economy to sport mode, enabling you to tailor the
performance of the bike to fit your specific style and road topographies.
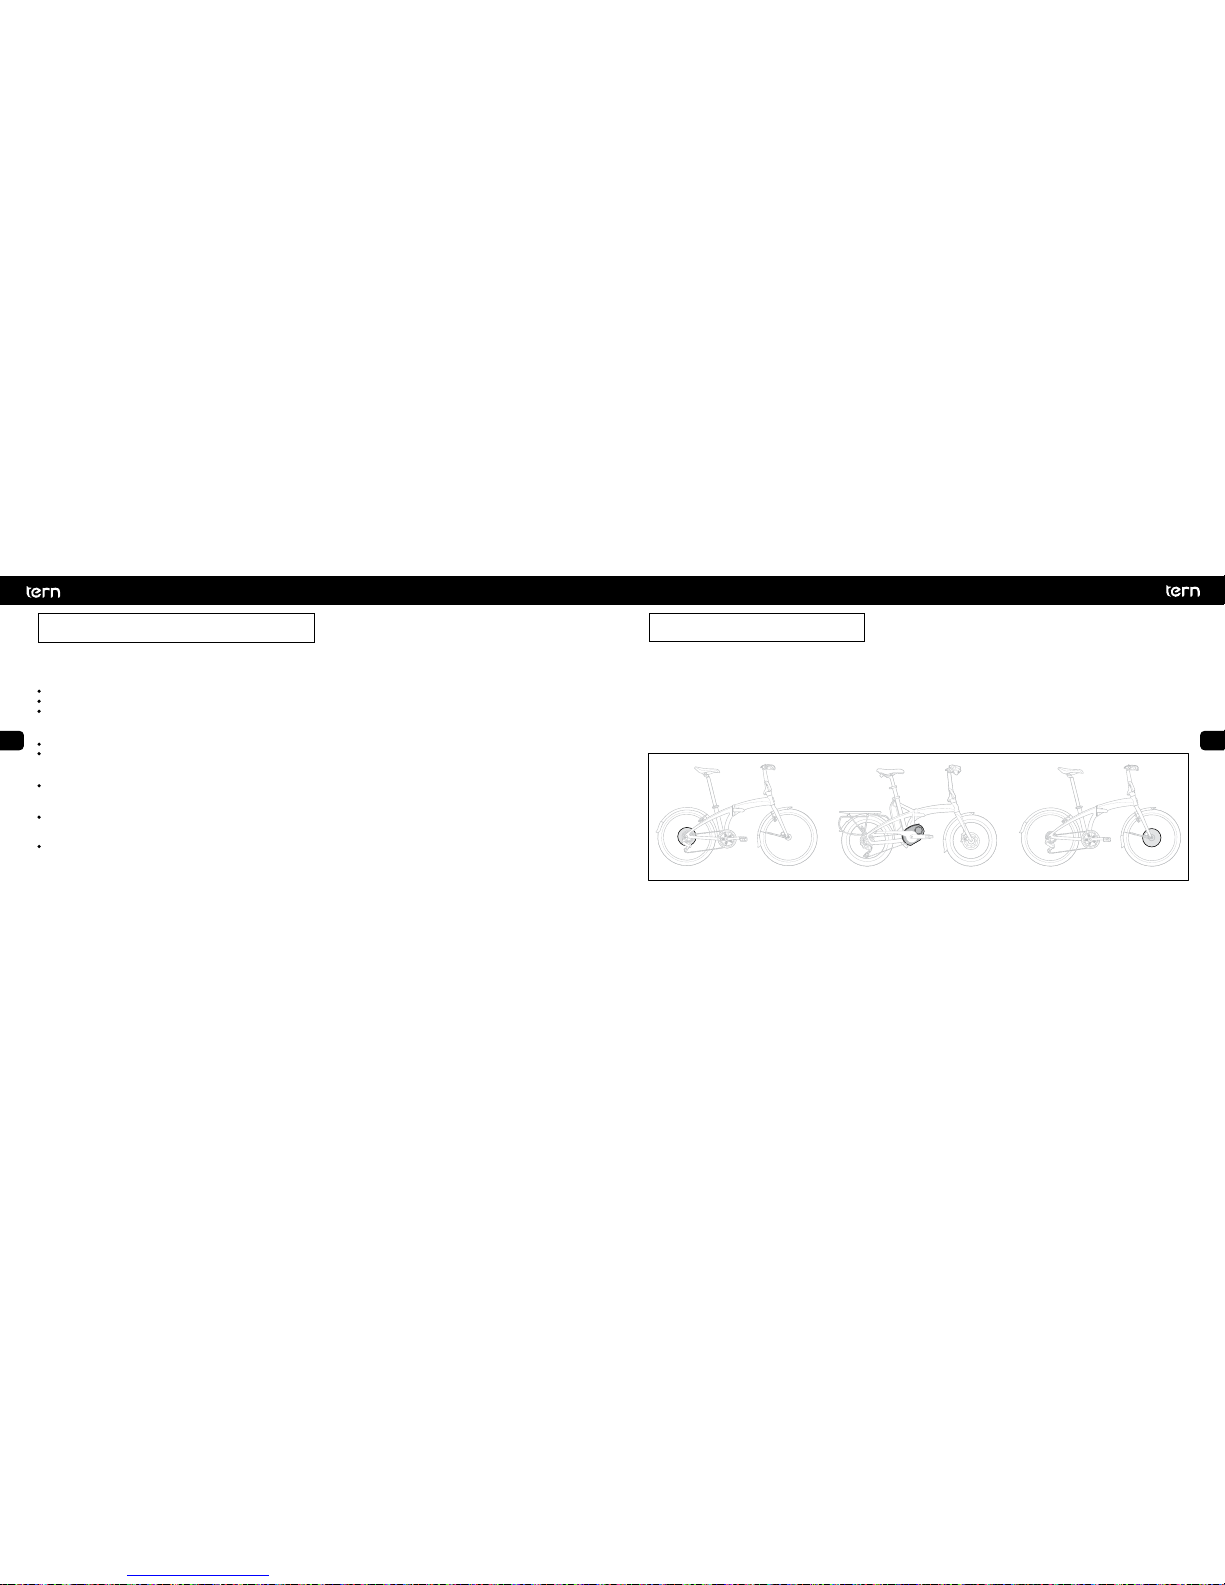
Your Tern may use a Mid-Drive Motor or Hub Motor. See the diagram below:
Other Pedelec Features
Walk-assist
Selected Tern pedelecs come with a walk-assist function. It allows the rider to push or trolley the bike with less effort. This is beneficial for
certain road conditions, such as going uphill. The assist is limited to walking speed. Please refer to the motor manufacturer’s instruction for
more detail.
Battery lock
Your Tern pedelec may be equipped with a battery lock. Always lock the battery in place before you ride and store the keys in a safe place.
If you lose your keys, contact your local Tern dealer for key recovery service.
12. ABCs of Pedelec
Rear Hub Mid Motor Front Hub

24 25
EN
ES
FR
IT
KO
EN
ES
FR
IT
KO
Battery
Your Tern pedelec is equipped with a lithium-ion battery. Modern lithium-ion batteries have more than 500 full discharge cycles before
the capacity decreases. The battery does not have a memory effect so you may charge the battery at any time and do not have to wait
until the battery is completely depleted before charging again. If you’re going to stop using the bike for more than a month, charge the
battery to about 80% full before storage. Never fully drain the battery and leave it uncharged for a prolonged period of time as this may
damage the battery permanently.
Only use the original charger from the battery manufacturer. Do not use another charger, even if the plug fits.
When your Tern’s battery has reached the end of its service life, it should be treated as hazardous waste material and should not be
disposed of in normal household trash. Ask your dealer for advice on proper disposal.
Tampering with the motor system
It is forbidden to tamper with the motor system, in any way. Aftermarket devices or software that alters the speed limit and/or
an addition of throttle and/or other devices will void the warranty of your bike. It will potentially create a severe safety hazard
and might be considered unlawful.
Additional Info
Please read the separate enclosed manuals from the drive manufacturer for information on:
• Drive and controller operations
• Proper handling of charger and battery
• Troubleshooting
• Maintenance
• Cleaning
Batteries must not be disposed of in landfills or by incineration
Lighting
Your Tern pedelec comes with front and rear lighting directly powered by the battery onboard. Use the lights according to your
local road regulations.
Charging
Your Tern pedelec comes with battery charger compatible with your
country’s voltage. For more usage and safety information, please refer to
the motor manufacturer’s instruction.
Multi-Battery Configuration
If your pedelec allows use of more than one battery pack, read the
below instructions.
On-Bike Charging
If both batteries are installed, charge using only one charger. The
batteries will charge simultaneously.
Connect the charger to the charging port adjacent to the motor. The rear
port is sealed to prevent using both ports simultaneously.
Off-Bike Charging
Each battery can be charged individually if removed from the pedelec.
Terminal Lid
When riding the bike in single battery configuration, make sure to cover
the exposed terminal with the supplied socket terminal lid to protect the
circuits.

26 27
EN
ES
FR
IT
KO
EN
ES
FR
IT
KO
Riding without Power Assistance
Your Tern is designed to be ridden normally like a conventional bike if the power assist is turned off. If you are going downhill or want to
extend your range you can turn off the assistance but keep the display on to watch your speed. However, if the battery runs empty during
your ride, the lights will not function since they are connected to the motor battery.
If your Tern is fitted with a Valo Direct light, you may purchase a Tern spade to USB cable and connect an USB power bank to turn on the
light so you don’t ride in the dark. The power bank should indicate how much power remains and provide you a visual alarm (such as
blinking) when the power level is low (less than 20%). Verify empirically that there is enough power to last your ride after the low indicator
has turned on.
Range of Battery
Range varies depending on factors such as:
Average riding speed
The faster you go the more energy is required and the quicker the battery will be depleted. However, if you ride faster than the maximum
assist speed, the motor assist will completely shut off and the motor will not drain the battery.
Assistance level used
The best way to conserve battery power is pedaling effort! Using less assistance and exerting more effort into pedaling will decrease
battery power consumption and result in a longer range.
General maintenance
Keep Tire pressure correctly inflated. Maintain and lubricate moving parts.
Stop-and-go traffic
Starting from a standstill will always require more energy. To extend your range, start in Eco mode.
Rider’s weight and cadence
The motor will use up more energy for heavier riders. Keeping a cadence of at least 60 rpm will be more efficient.
Road conditions (road surface, terrain, wind)
Unpaved (dirt, gravel) roads, headwinds, and going uphill will reduce your range.
Starting Off
When the controller is on, the power assist will be applied immediately when you step on the Pedal. It is, therefore, recommended to mount
your Tern with the controller off. After you are seated, make sure no weight is on the pedals to prevent accidental movement, then turn on
the controller. Start off at the lowest level of assistance.
Certain motor systems ask you not to put any weight on the Pedals before powering on so it can reset itself correctly.
Selecting the Correct Level of Assistance
Do not only ride in high gear with power assist. Change gears as you would on a conventional bicycle to maintain an efficient cadence for
your riding style. This will maximize the efficiency of the assistance to your power input.
For example, with a Bosch Mid-Drive Motor system, keeping your cadence constantly at approximately 90 rpm, regardless of speed, will
ensure the motor is assisting you most efficiently.
Riding with Power Assistance
How much you pedal determines how much assistance the motor provides. All pedelecs have an internal control algorithm to stop assisting
as soon as you stop pedaling. This is an inbuilt safety feature conforming to EN 15194 (EPAC – Electrically Power Assisted Cycles).
When cornering on a pedelec, stop pedaling sooner than you are used to, otherwise, you may have too much speed through the turn.
As you are likely to be traveling at an average above speed, look further up the road and be ready to brake whenever a possible situation
appears before you.
Due to the near silent nature of an electric motor, pedestrians and other cyclists may not hear you approaching.
Ride defensively, wear bright clothing, signal your intentions, and use your bell when necessary.
13. Tips for Riding a Pedelec

28 29
EN
ES
FR
IT
KO
EN
ES
FR
IT
KO
Your Tern has many advanced parts and components. Many bicycle service and repair tasks require special knowledge and tools.
Do not begin any adjustments or service on your bicycle unless you are able to properly complete them. Improper adjustment or
service may result in damage to the bicycle or cause serious injury. Consult your dealer if you need any help.
Keeping It Real
When replacing components such as the Frame, Fork, Tires, Rims, Brakes, Front and Rear Lights, Kickstand, Handlebar, Handlepost, Stem,
Drive Unit, Battery, or Control Unit/Display, etc., use the original spare parts or Tern-approved replacements. They are tested to ensure they
work safely with your Tern pedelec. We recommend you visit a Tern dealer for parts and repairs.
Service actions that you can (and should) perform do not require special tools or knowledge beyond what is presented in this
manual. They are listed below:
Stay Slick
Remember to maintain and lubricate your bike using appropriate lubricants. Ask your dealer when and where to lubricate on your bike.
Air
The Wheel consists of a Hub (1), Spokes (2), Rim (3), Tire (4), Valve (5) and
Axle (6).
The Valve may be a Schrader (7) or a Presta (8) type. Presta Valves have a
Valve Cap (9) that must be loosened before inflating.
Check the air pressure is within bounds as indicated on the sidewall of the
Tire.
Check your Tires to see if they have adequate tread depth and no
punctures.
14. Service
Battery capacity
Batteries, measured in watt-hours, have different energy capacities. In general, the more watt-hours,
the longer the range, the more expensive battery, and the heavier your pedelec is.
Ambient temperature can have a significant impact on battery capacity. Battery capacity is tested at a reference temperature of 23°C
(73F). Large deviations from the reference temperature will drain the battery faster due to changes in internal resistance and will shorten
the range.
As the battery ages, the original capacity diminishes. This is true of all batteries but some chemistries last longer than others.
You can always check the amount of charge remaining in the battery from the control display.
30 31
EN
ES
FR
IT
KO
EN
ES
FR
IT
KO
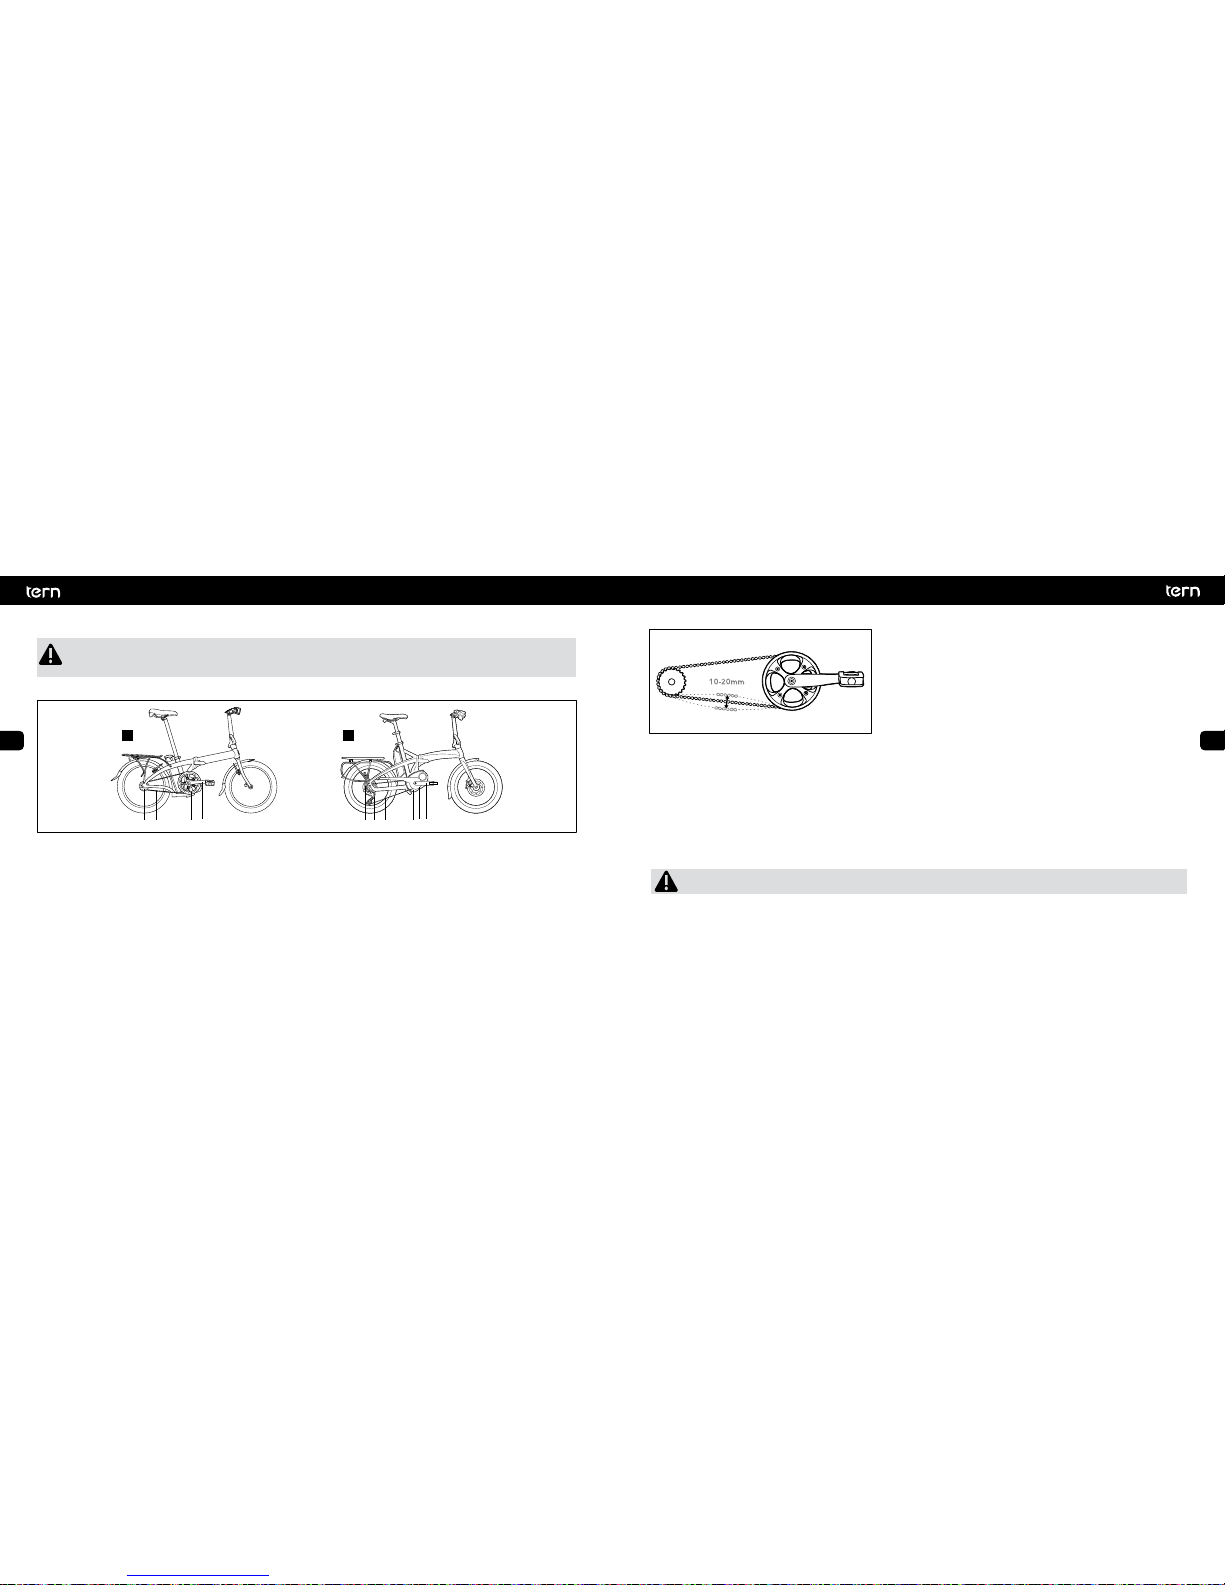
Chain Tension
The chain endures huge tension forces from pedaling. For optimal shifting
and efficiency, the Chain must connect with the teeth properly.
To check for excessive slack, shift to the smallest gear on the Cassette (if
applicable) to create the greatest amount of slack in the Chain. Chain slack
should be within 10-20 mm per span. This amount of slack is equally
applicable to all internal hub gear chain drives.
Note: Belt drive tension is more complicated and should be serviced by
dealers.
Excessive slack can be caused by a Chain that is worn and stretched. A stretched Chain will not sit properly in the teeth. Over time, gaps
between the teeth of the Sprockets becomes greater, mirroring the shape of the Chain. Replacing a Chain when it is worn will help extend
the life of the most expensive Cassette and Chainring.
For internal gear hubs, excessive slack can also be due to misadjustment of the rear wheel position relative to the dropout.
If you are not sure if the chain slack is from chain wear or wheel misadjustment, take your bike to the dealer for servicing.
Cleaning
When your Tern needs cleaning, use a bucket of water and gently sponge off any accumulated dirt and salt from your bike. Dry your Tern
after cleaning to prevent rusting.
Do not clean your Tern using a pressurized spray or steam because water can be forced into sealed areas and damage your bike.
Brakes
Make sure the Brakes are working with proper stopping power. The Levers should stop short of touching the Handlebar.
Riding with improperly adjusted or worn Brakes is dangerous and can result in injury or death. Check the Brake manufacturer’s
instructions for care and operation of your Brakes. Keep Brake surfaces clean and free from oil or lubricants. Replace worn
Brakes with authorized replacements.
Chain, Cranks, and Cables
A bicycle drivetrain has an Internal (A) or External (B) hub. The drivetrain consists of the Cranks (1), Chainring (2), Rear Sprocket (3) or
Cassette (4), Chain (5), Front Derailleur (6) and Rear Derailleur (7). Bicycle gears are numbered from 1 upwards, with 1 being the lowest and
easiest gear.
The lower gears are used for climbing and the higher ones are for descending. We recommend you practice shifting gears in a safe
location.
To check that your Chain is fully connected with the Chainring, rotate the Cranks and ensure no gaps or kinks are visible.
Before riding, shift through all Gears and make sure the Chain and Derailleurs are fully functional. If your Gears are not shifting smoothly, we
recommend consulting your dealer. If the Rear Derailleur is malfunctioning, do not use the highest and lowest gears of the Rear Cassette
since the Chain or Wheel may get jammed which can cause bicycle damage or rider injury.
Check all control Cables and Housings for rust, kinks, and fraying. They should be replaced if damaged.
12
351
2
45 67
AB
32 33
EN
ES
FR
IT
KO
EN
ES
FR
IT
KO
Quick Release and Fasteners
Check that quick releases and important nuts and bolts that keep your wheels, handlebar and seatpost in place are properly
closed and adequately tightened. Correct tightening force is vital. Too little force and the fastener may not hold securely. Too
much force and the fastener can strip threads, stretch, deform or break. Either way, incorrect tightening can result in
component failure and cause loss of control and accidents. See section 15 for correct torque values. If you’re unsure, visit your
dealer and ask them to show you the proper way.
All other repair or maintenance which is not specifically described in this manual should be performed by your dealer.
It’s all Torque to Me
Torque Values are standard measures of how much you must tighten a bolt and are listed below. When a torque value is given,
a torque wrench should be used to ensure that the correct torque is applied.
Recommended Tightening Values - Torque Values
Frame and Forkand Fork
Component lbf.in Newton Meters (Nm) kgf.cm
Kickstand Mounting Bolt 53-60 6-8 61-69
Water Cage Mounting Bolt 25-35 2.8-4 29-40
Rack Bolts 25-35 2.8-4 29-40
Fender Bolts 50-60 5.6-6.8 58-69
15. Torque Settings
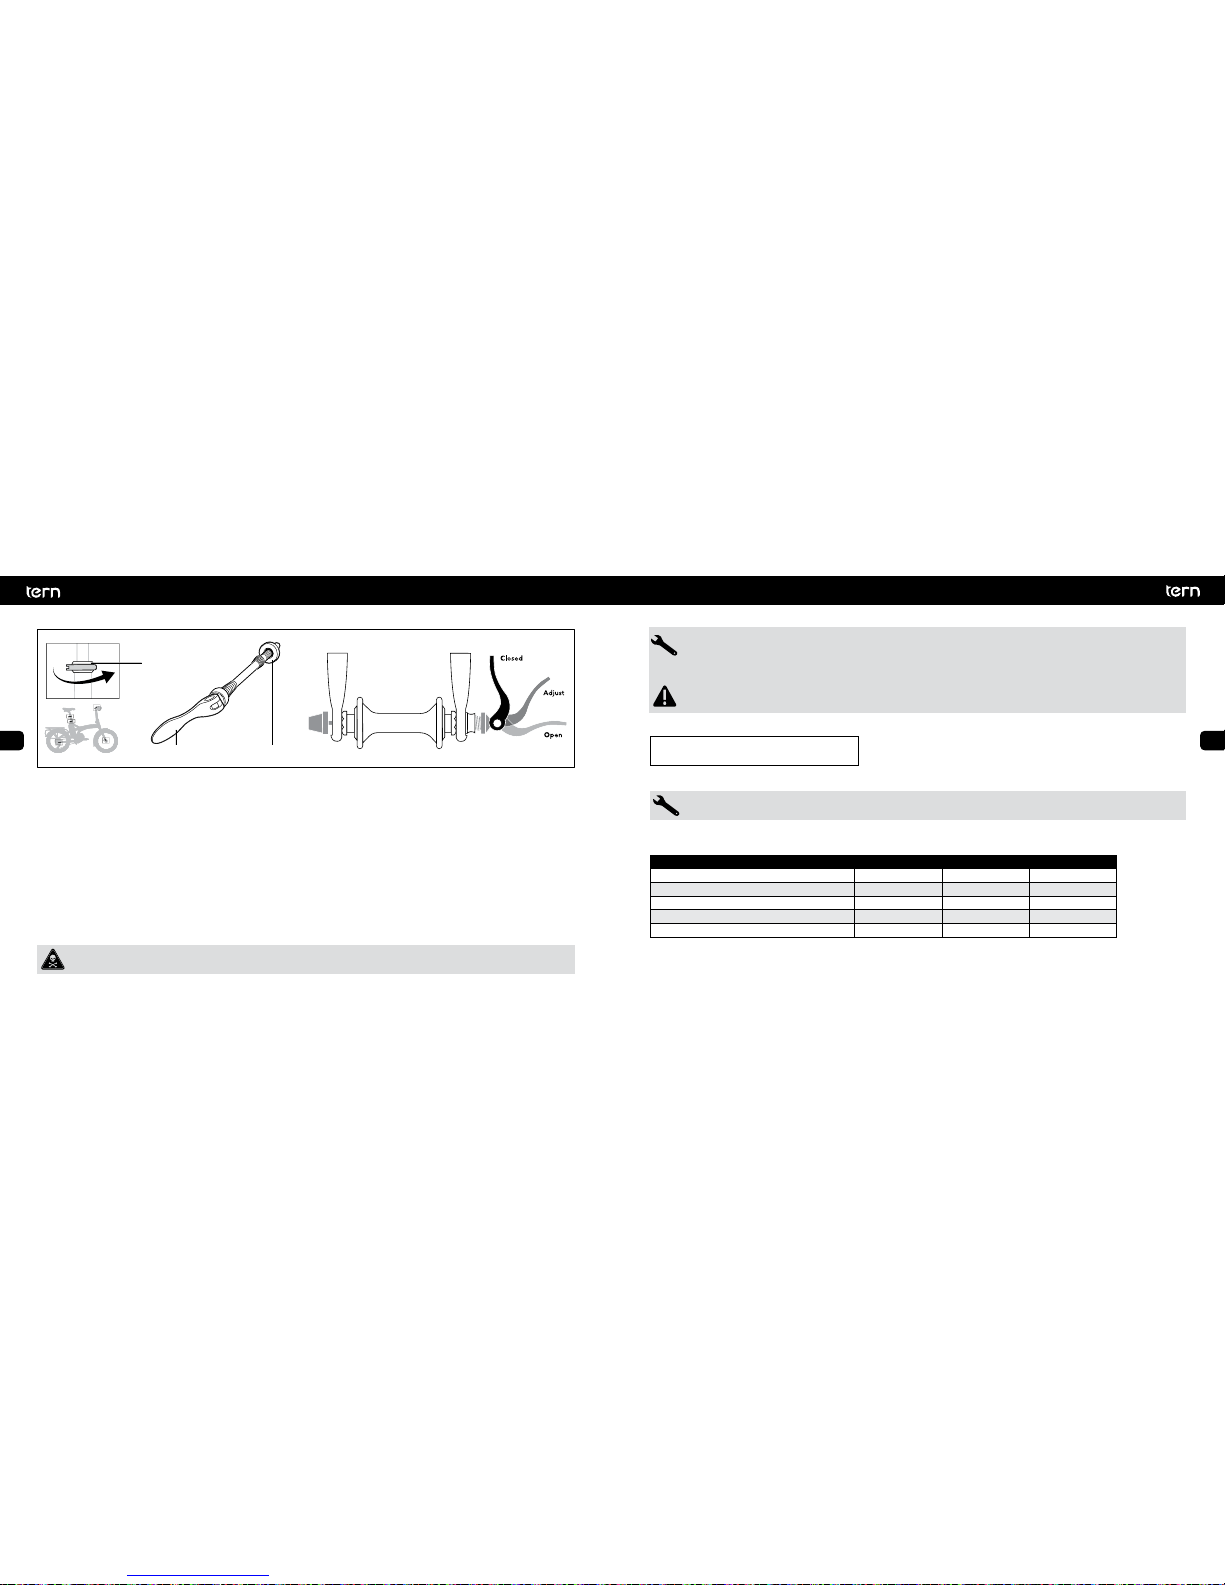
Quick Releases
The Quick Release uses over-center cam action to clamp the component in place and allows for easy, tool-less removal.
A Quick Release has a Clamp (1), an Acorn (2) and a Lever (3). The concave side closes inward.
The Acorn allows you to adjust the clamping force. Closing the Lever as it passes the over-center point requires increasing force. This force
should require you to use the palm of your hand.
Quick Releases hold the Wheels, Seatpost, and Handlebar in place.
When tightened on Wheels, the Quick Release should emboss the Fork Dropouts.
When tightened on the Seatpost, the Seatpost should not rotate.
When tightened on the Handlebar, the Handlebar should not rotate.
When the Lever is closed, position it in a way so that it cannot accidentally open through contact during riding.
Quick Releases are very convenient but many accidents occur because of misuse. Improper adjustment may result in damage to
the bicycle or in an accident which can cause serious injury or death.
23
1

34 35
EN
ES
FR
IT
KO
EN
ES
FR
IT
KO
Service Intervals
Break-in
All bikes go through a normal break-in period. Your bike will last longer and work better if you break it in before riding it hard.
We recommend all riders get a quick tune-up one month after purchase so that the dealer can adjust cables and other key parts.
Maintenance schedule
Your bike needs a regular tune-up by an Authorized Tern Dealer. Below is our recommended tune-up frequency based on how often you
ride, and under what conditions.
Types of Riding
HEAVY RIDER
Tune-Up Frequency
Monthly
Rides 25 km (15 mi) or more
daily
Rides in all weather conditions
Rides on roads with bumps
and/or potholes
Carries 105 kg (230 lb) or less
on the bike, including rider’s
weight
FREQUENT RIDER
Tune-Up Frequency
Bi-Monthly
Rides 3 or 4 times a week or
an average of 100 km (62 mi)
per week
Sometimes rides in wet
weather
Rides on roads with bumps
and/or potholes
Carries 105 kg (230 lb) or less
on the bike, including rider’s
weight
RECREATIONAL RIDER
Tune-Up Frequency
Quarterly
Rides once or twice a week
Rides in dry weather or
occasional light rain
Always rides on smooth
bicycle paths or paved roads
Carries 105 kg (230 lb) or less
on the bike, including rider’s
weight
LIGHT RIDER
Tune-Up Frequency
Annually
Rides once or twice a month
Only rides in dry weather
Always rides on smooth
bicycle paths or paved roads
Carries 105 kg (230 lb) or less
on the bike, including rider’s
weight
16. Service and Maintenance Schedule
Brakes and Fork
Component lbf.in Newton Meters (Nm) kgf.cm
Brake Lever (Flat Bar) 53-60 6-6.8 61-69
Brake Lever (Drop Bar) 55-80 6.2-9 63-92
Disc Rotor to Hub (M5 bolts) 18-35 2-4 21-40
Caliper Mount 55-70 6.2-7.9 63-81
Wheels and Fork
Component lbf.in Newton Meters (Nm) kgf.cm
Free Hub Body 305-434 34.5-49 352-499
Cassette Sprocket Lockring 260-434 29.4-49 299-499
Front Axel Nuts 180 20.3 207
Rear Axel Nuts 260-390 29.4-44.1 299-449
Drivetrain and Fork
Component lbf.in Newton Meters (Nm) kgf.cm
Pedal into Crank 307 34.7 353
Crank Bolt (Spline and Square Spindles) 300-395 33.9-44.6 345-454
Bottom Bracket (External Shell) 610-700 40-50 702-805
Bottom Bracket (Cartridge and Cup-and-Cone) 435-610 49.1-68.9 500-702
Others and Fork
Component lbf.in Newton Meters (Nm) kgf.cm
Steerer Clamp Bolt (Stem) 70-89 8-10 80-102
Top Cap Bolt 35-53 4-6 41-62
Handlebar Clamp Bolts (4 Clamp Bolts) 36-53 4-6 41-62
Saddle Rail Clamp 70-89 8-10 80-102
Relationship : 1 Nm = 8.9 lbf.in = 10.2 kgf.cm

36 37
EN
ES
FR
IT
KO
EN
ES
FR
IT
KO Stamp/Signature of dealer
Inspection 4
Date
Work Done
Replaced or Repaired Parts
Stamp/Signature of dealer
Inspection 5
Date
Work Done
Replaced or Repaired Parts
Stamp/Signature of dealer
Inspection 6
Date
Work Done
Replaced or Repaired Parts
Service Record
Stamp/Signature of dealer
Inspection 1
Date
Work Done
Replaced or Repaired Parts
Stamp/Signature of dealer
Inspection 2
Date
Work Done
Replaced or Repaired Parts
Stamp/Signature of dealer
Inspection 3
Date
Work Done
Replaced or Repaired Parts
Within 1 month of purchase or
200 km

38 39
EN
ES
FR
IT
KO
EN
ES
FR
IT
KO
In addition, the Owner must confirm that they have received the Owner Briefing from their dealer or that they have watched the Owner
Briefing video on ternbicycles.com/support.
Exclusions
This warranty does not cover damage and/or defects that occur under the following conditions:
If a bike has been used, ridden, handled, maintained or overloaded in a manner that does not abide by the product specifications,
intended use or guidelines in the Owner’s Manual. This includes, but is not limited to, off-road riding.
Normal wear and tear. Parts are subject to varying wear depending on use, load, weather, road conditions, etc.
Paint finish is considered consumable and is not part of the warranty.
If a bike or part has been re-assembled, repaired or maintained by personnel not authorized by Tern.
If a bike has been subjected to fire, flood, accidental breakage, improper actions by third parties, and/or any event outside Tern’s control.
Modification of the Frame, Fork, Handlepost, or Components.
Installation of Parts, Accessories, Motor Units or Batteries not originally intended or compatible with the bicycle as sold.
If the frame number and/or service tag on the bike have been defaced, modified, manipulated or is otherwise not clearly identifiable.
Tern Warranty Support
Tern will repair or replace any parts that manifest a defect in materials and/or workmanship during the warranty period. Any part that is
replaced pursuant to this warranty will be replaced by parts of the same or similar design. However, Tern reserves the right to replace
defective parts with other parts of different design or color manufactured by or on behalf of Tern, provided that such replacement will not
reduce the function of the original part.
Due to product evolution and obsolescence, some components may not be available for older models. In these cases, sourcing and
payment for components are the responsibility of the Owner.
Tern may, at its discretion, repair or replace defective parts falling outside the warranty period, but such work shall not be deemed to be any
admission of liability.
Any Frame, Handlepost, or Fork replaced under the warranty terms will be covered for the remaining period of the warranty of the bike.
This is the only warranty made by Tern and no employee, agent, or reseller of Tern is authorized to make any other warranty on behalf of
Tern.
Tern Limited Warranty
Tern bicycles are sold on behalf of our company (“Tern”) by selected Authorized Tern Dealers who understand the assembly and service
needs of our products. Tern provides a warranty against defects in materials and workmanship to the original retail purchaser (“Owner”) of a
Tern bicycle from the date of purchase according to the following terms:
Five Years: Frame, Handlepost, and Fork
One Year: All Tern or BioLogic branded parts and components, except as noted below.
Any other parts or components are covered by the stated warranty of the original manufacturer of that part or component.
Extended 10-Year Warranty
Owners who sign up for Tern Care on ternbicycles.com will be covered by an extended 10-year warranty for the Frame, Handlepost, and
Fork, as long as they sign up within 30 days of purchase and are the original purchasers. In addition, the bike must have been assembled by
an Authorized Tern Dealer at the time of purchase—regardless of whether the bike was purchased from a physical or online store.
The following items are excluded from the extended 10-year warranty:
Frame and Handlepost Latches
Paint finish
Bikes for commercial use
The warranty does not mean that the Frame, Handlepost, and Fork are indestructible. All materials can fail if pushed beyond design and
manufacturing limits. It simply means that these items are covered under the specific terms of this limited warranty.
Owner’s Responsibility
The Owner shall demonstrate reasonable care and use, and follow preventive maintenance, storage, and lubrication schedules as required
by use, climate and other pertinent factors. Should a product defect become known, the Owner should stop riding the bicycle and transport
the bike or part(s) to an Authorized Tern Dealer for warranty repair (within the applicable warranty period). The transport of the bike or any
bike part to and from the dealer shop is the Owner’s responsibility and at the owner’s expense.
All claims to this warranty must be made through a Tern Authorized Dealer or exclusive distributor. Proof of purchase, either digital or
physical copy, must be supplied with any warranty request. All Tern bicycles must be registered via Tern Care before a warranty claim may
be processed.
17. Warranty
Table of contents
Languages:
Other Tern Scooter manuals


