TerraTec Phono PreAmp iVinyl User manual

quick setup guide
D
Bitte kontrollieren Sie zunächst den Lieferumfang:
1. PhonoPreAmp iVinyl Hardware
2. USB Anschlusskabel
3. Audio-Cinchkabel
4. Software CD für PC
5. Servicebegleitschein
1
Sobald Sie die Box mit dem PC verbunden haben, meldet
Windows in Form einer Sprechblase in der Symbolleiste, dass
eine neue Hardware PhonoPreAmp iVinyl - gefunden wurde. Es
werden nun die nötigen Systemtreiber installiert. Erscheint die
Sprechblase „die Hardware wurde erfolgreich installiert und
kann nun verwendet werden“ verlief die Installation erfolgreich.
3
6
Schalten Sie Ihren PC an und warten Sie bis Windows
vollständig geladen ist.
Schließen Sie nun den PhonoPreAmp iVinyl über das
USB-Kabel an einen freien USB Port ihres Computers und den
Plattenspieler an die Cinch-Eingänge und die Erdungsschraube
des iVinyls an.
2
Legen Sie nun bitte die CD in Ihr Laufwerk und warten Sie bis
der Autostarter gestartet wird. Wählen Sie ihre Sprache aus und
installieren Sie unter dem Punkt Software die Aufnahme- und
Nachbearbeitungssoftware „Sound Rescue“ Folgen Sie den
Anweisungen auf dem Bildschirm und schließen Sie die
Installation mit „Fertigstellen“ ab.
4
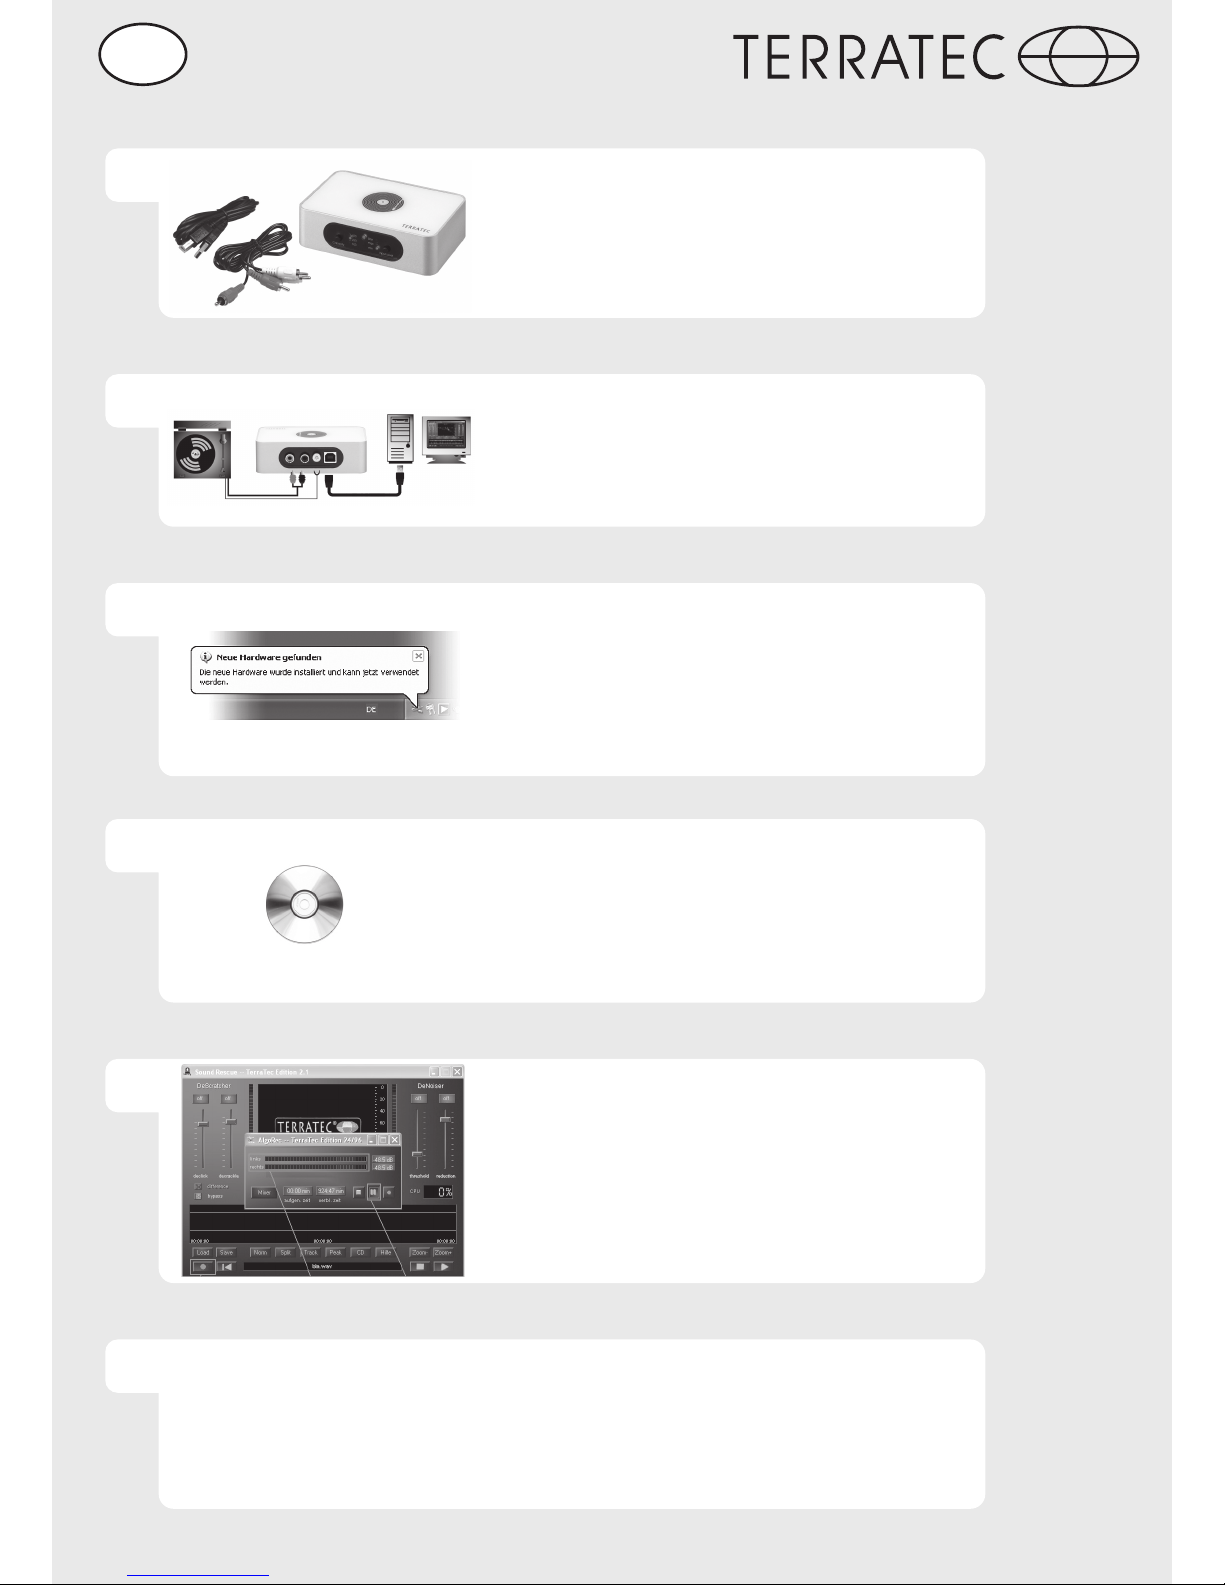
Starten Sie nun Sound Rescue TerraTec Edition 2.1 durch
einen Doppelklick auf das dazugehörige Desktop-Symbol.
Wählen Sie den Aufnahme-Button und geben Sie den
Dateinamen der zu speichernden Datei an.
Starten sie im nächsten Schritt das Playback ihrer Schallplatte
und beginnen Sie mit der Aufnahme durch drücken des roten
Pause-Button.
5
1
2
3
Kontakt TERRATEC Deutschland:
www.terratec.de
Support Hotline
02157-817914
Montag - Freitag 10:00 - 18:00 Uhr
http://www.terratec.net/de/treiber-und-support.html
CE Declaration:
We, TERRATEC Electronic GmbH, Herrenpfad 38, 41334 Nettetal, Germany
declare in ourown responsibility, that the product corresponds with the
following norms and normative documents : En55024, En55022.
According to this document, the utilisation of the CE label is confirmed.
Guideline 89/336/EWG.

quick setup guide
EN
6
Please check the scope of delivery first:
1. PhonoPreAmp iVinyl Hardware
2. USB connector cable
3. Audio cinch cable
4. Driver CD
5. Printed quick setup guide
6. Service card
1
Once you have connected the box with your PC, a message
bubble over the system tray will tell you that Windows has found
new hardware PhonoPreAmp iVinyl. The required system
drivers are now being installed. If the message "The hardware
has been successfully installed and is now ready for use"
appears, the installation was successful.
3
Boot your PC and wait until Windows has loaded completely.
Next, connect the PhonoPreAmp iVinyl via the USB cable to an
open USB port of your computer and the record-player to the
cinch inputs of the iVinyl.
2
Insert the CD in your drive and wait for autoplay to start. Select
your language and install the recording and editing software
"Sound Rescue" under the Software item. Follow the
instructions in the screen and complete the installation with
"Finish".
4
Next, start Sound Rescue TerraTec Edition 2.1 by
double-clicking the corresponding desktop symbol. Select the
Record button and enter the name to the file to be saved. In the
next step, start the playback of your record and start the
recording by pressing the red Pause button.
5
1
2
3
Contact TERRATEC International:
www.terratec.com
Support Hotline:
+49 (0)2157-817914
Monday-Friday 10am-6pm
http://www.terratec.net/en/drivers-and-support.html

quick setup guide
6
F
Pour commencer, vérifiez si le coffret est complet :
1. PhonoPreAmp iVinyl Hardware
2. Câble de connexion USB
3. Câble audio cinch
4. CD contenant les pilotes
5. Manuel en version imprimée
6. Carte de service
1
Dès vous avez raccordé l'appareil à votre ordinateur, Windows
vous annonce par une infobulle dans la barre d'outils qu'il a
détecté un nouveau matériel PhonoPreAmp iVinyl. Windows
installe les pilotes requis. L'installation est terminée quand
l'infobulle « Votre nouveau matériel est installé et prêt à l'emploi
» est affichée dans le coin inférieur droit de l'écran.
3
Allumez votre PC et attendez que Windows soit entièrement
chargé. Connectez le boîtier PhonoPreAmp iVinyl à un port USB
libre de votre ordinateur en utilisant le câble USB fourni, et le
tourne-disque aux entrées cinch du boîtier.
2
Insérez le CD-ROM dans le lecteur de CD et attendez que le
logiciel démarre automatiquement. Sélectionnez votre langue et
installez le logiciel d'enregistrement et d'édition Sound Rescue
que vous trouvez dans la liste Software. Suivez les instructions
affichées et terminez l'installation en cliquant sur Terminer.
4
Exécutez Sound Rescue TerraTec Edition 2.1 en double-cliquant
sur l'icône correspondante se trouvant sur le bureau.
Sélectionnez le bouton d'enregistrement et entrez le nom du
fichier à créer. Commencez ensuite le playback de votre disque
vinyle et commencez l'enregistrement en appuyant sur le
bouton pause rouge.
5
1
2
3
Contact TERRATEC International:
www.terratec.com
Support Hotline:
+49 (0)2157-817914
Monday-Friday 10am-6pm
http://www.terratec.net/en/drivers-and-support.html

quick setup guide
6
I
Controllate prima il contenuto della confezione:
1. PhonoPreAmp iVinyl Hardware
2. Cavo di collegamento USB
3. Cavo audio Cinch
4. CD driver
5. Manuale stampato
6. l'assistenza e documentazione di registrazione
1
Non appena il box è collegato al PC, Windows comunica che è
stato rilevato un nuovo hardware PhonoPreAmp iVinyl mediante
un fumetto visualizzato sulla barra degli strumenti. A questo
punto vengono installati i driver di sistema necessari. Se appare
il fumetto con il messaggio "l'installazione dell'hardware è
avvenuta con successo ed ora è possibile utilizzarlo", ciò
significa che l'installazione si è conclusa con esito positivo.
3
Accendere il PC e attendere che Windows sia stato
completamente caricato. Quindi collegare il PhonoPreAmp
iVinyl ad una porta USB libera del computer mediante il cavo
USB e collegare il giradischi agli ingressi Cinch di iVinyl.
2
Inserire quindi il CD nel lettore e attendere che venga avviato
l'autostarter. Selezionare la lingua e installare il software di
registrazione ed elaborazione "Sound Rescue" alla voce
Software. Seguire le istruzioni visualizzate sullo schermo e
concludere l'installazione con "Termina".
4
Avviare il Sound Rescue TerraTec Edition 2.1 mediante un
doppio clic sul relativo simbolo visualizzato sul desktop.
Selezionare il pulsante di registrazione e inserire un percorso
per il file da memorizzare. Nello step successivo avviare il
playback del proprio disco ed iniziare la registrazione premendo
il pulsante rosso pause.
5
1
2
3
Contact TERRATEC International:
www.terratec.com
Support Hotline:
+49 (0)2157-817914
Monday-Friday 10am-6pm
http://www.terratec.net/en/drivers-and-support.html

quick setup guide
E
6
A continuación, compruebe el volumen de suministro:
1. PhonoPreAmp iVinyl Hardware
2. Cable de conexión USB
3. Cable Cinch para audio
4. CD con controladores
5. Manual impreso
6. y documentación de registro
1
En cuanto conecte la caja al PC, Windows le informará,
mediante un globo de diálogo que aparecerá en la lista de
símbolos, de que se ha encontrado un nuevo hardware:
PhonoPreAmp iVinyl. A continuación, se instalarán los
controladores del sistema necesarios. Si aparece el globo de
diálogo "el hardware se ha instalado correctamente y ya puede
utilizarse", la instalación se ha llevado a cabo correctamente.
3
Conecte su ordenador y espere hasta que Windows se haya
cargado por completo. A continuación, conecte el
PhonoPreAmp iVinyl a un puerto USB libre de su ordenador
mediante el cable USB y el tocadiscos a las entradas Cinch del
iVinyl.
2
Inserte el CD en la unidad y espere hasta que arranque
automáticamente. Seleccione un idioma y en la opción Software
instale el software de procesamiento y grabación "Sound
Rescue". Siga las instrucciones de la pantalla y termine la
instalación pulsando el botón "Finalizar".
4
Inicie Sound Rescue TerraTec Edition 2.1 haciendo doble clic en
el icono correspondiente del escritorio. Pulse el botón de
grabación e introduzca la ruta de acceso del archivo que desea
grabar. En el siguiente paso, inicie la reproducción de su disco
de vinilo e inicie la grabación pulsando el botón de grabación
rojo.
5
1
2
3
Contact TERRATEC International:
www.terratec.com
Support Hotline:
+49 (0)2157-817914
Monday-Friday 10am-6pm
http://www.terratec.net/en/drivers-and-support.html

quick setup guide
NL
6
Gelieve eerst de leveromvang te controleren:
1. PhonoPreAmp iVinyl Hardware
2. USB-aansluitkabel
3. Audio-cinchkabel
4. Driver-cd
5. Gedrukte handleiding
6. Service documenten
1
Zodra u de box met de pc verbonden hebt, meldt Windows in de
vorm van een tekstballon in de werkbalk dat er nieuwe hardware
PhonoPreAmp iVinyl gevonden werd. Nu worden de nodige
systeemdrivers geïnstalleerd. Verschijnt het tekstballonnetje "De
hardware werd met succes geïnstalleerd en kan nu gebruikt
worden", den was de installatie succesvol.
3
Schakel uw pc in en wacht tot Windows volledig geladen is. Sluit
nu de PhonoPreAmp iVinyl via de USB-kabel op een vrije
USB-poort van uw computer en de platenspeler op de
cinch-ingangen van de iVinyl aan.
2
Gelieve nu de cd in uw station te plaatsen en wacht tot de
autostarter gestart wordt. Kies uw taal en installeer onder het
punt software de opname- en nabewerkingssoftware "Sound
Rescue". Volg de aanwijzingen op het beeldscherm en sluit de
installatie met "Voltooien" af.
4
Start nu Sound Rescue TerraTec Edition 2.1 met een dubbelklik
op het bijbehorende desktopsymbool. Kies de opnameknop en
geef het pad van het op te slane bestand op. Start daarna de
playback van uw grammofoonplaat. En begin met de opname
door de rode pause-knop in te drukken.
5
1
2
3
Contact TERRATEC International:
www.terratec.com
Support Hotline:
+49 (0)2157-817914
Monday-Friday 10am-6pm
http://www.terratec.net/en/drivers-and-support.html

quick setup guide
P
6
Antes de utilizar o seu equipamento, por favor verifique
se a embalagem contém:
1. PhonoPreAmp iVinyl Hardware
2. Cabo de ligação USB
3. Cabo Áudio Cinch
4. CD com Drivers, Guia de Instalação Rápida, Documento
5. de serviço pós venda
1
Quando a caixa estiver ligada ao computador, o Windows irá
informá-lo através de uma caixa de diálogo, que aparecerá na
barra de ferramentas, que foi encontrado um novo dispositivo.
De seguida, o Windows instalará os drivers necessários. A
instalação será dada por concluída quando aparecer a caixa de
diálogo com a seguinte informação: “O seu equipamento está
instalado e pronto a usar”.
3
Ligue o seu computador e espere que o Windows carregue por
completo.
Em seguida, ligue com o cabo USB o PhonoPreAmp iVinyl a
uma porta USB disponível do seu computador e o gira-discos
às entradas Cinch.
2
Insira o CD na drive óptica e aguarde que esta arranque.
Seleccione um idioma e instale o software de gravação e edição
Sound Rescue através da opção Software.
Siga as instruções que vão aparecendo no ecrã e termine a
instalação fazendo um click no botão “Concluir”.
4
Inicie o Sound Rescue Terratec Edition 2.1 fazendo duplo click
no ícone correspondente do ambiente de trabalho.
Seleccione o botão de gravação e atribua o acesso e nome do
arquivo que deseja gravar.
A seguir, ponha o seu disco de vinil a tocar e comece a gravar
carregando no botão de gravação (vermelho).
5
1
2
3
Contact TERRATEC International:
www.terratec.com
Support Hotline:
+49 (0)2157-817914
Monday-Friday 10am-6pm
http://www.terratec.net/en/drivers-and-support.html
Other manuals for Phono PreAmp iVinyl
3
Table of contents
Languages:
Other TerraTec Amplifier manuals