TerraView RangePro X8 User manual

RangePro® X8
Using the Ultimate Duo 400W Charger with a
RangePro X8 RP6S24KHDA Battery Pack
Toll Free: +1 (800) 628-3119
Phone: +1 (301) 263-7321
Support: https://terraview.com/contact/
Web: www.terraview.com
Part Number: TSN0001, Rev. A
Revised: January 17, 2020

Using the D400 Charger with a RangePro X8 Battery
© 2020 Terraview 360, Inc. 2 Part Number: TSN0001, Rev A
Contents
1. Introduction .......................................................................................................................................... 3
2. Modify and Verify System Settings ....................................................................................................... 4
3. Program Battery Memory Charge Settings ........................................................................................... 5
4. Balance Charge the Battery using Battery Memory #1 ........................................................................ 6
5. Troubleshooting Common Charging Errors .......................................................................................... 7

Using the D400 Charger with a RangePro X8 Battery
© 2020 Terraview 360, Inc. 3 Part Number: TSN0001, Rev A
1. Introduction
The Range Pro X8 RP6S24KHDA is a dual 6S2P, 24,000 mAh, high density, battery pack consisting of two
independent 6S2P Lithium Ion Polymer battery packs installed in a single battery cage. The battery
packs are impedance matched at the factory, placed in a common cage, and wired independently to a
single connector.
On the aircraft the unit provides a blind mating power solution with easy insertion and extraction from
the system using a dovetail rail system and latching mechanism. The power pins from both battery
packs, though housed in the same connector, are independently routed to the aircraft power
distribution board.
For charging, power and balance port connectors are separately wired for each battery pack and broken
out for connection to a charger using a custom cable. To connect the RP6S24KHDA to the SKYRC
Ultimate Duo 400W (D400) Balance Charger, use the RPBCCA400-12 twelve-inch cable that includes a
battery mating connector on one end and two sets of power and balance ports on the other. Custom
cable lengths are available upon request.
This document provides instructions on how to customize the D400 charger for use with the
RP6S24KHDA battery as well as some common troubleshooting steps for addressing issues that may
arise when the unit is not set up correctly. For additional details on how to use the D400, refer to the
Ultimate Duo Instruction Manual provided with the charger.
Using the D400 Charger with a RangePro X8 Battery
© 2020 Terraview 360, Inc. 4 Part Number: TSN0001, Rev A
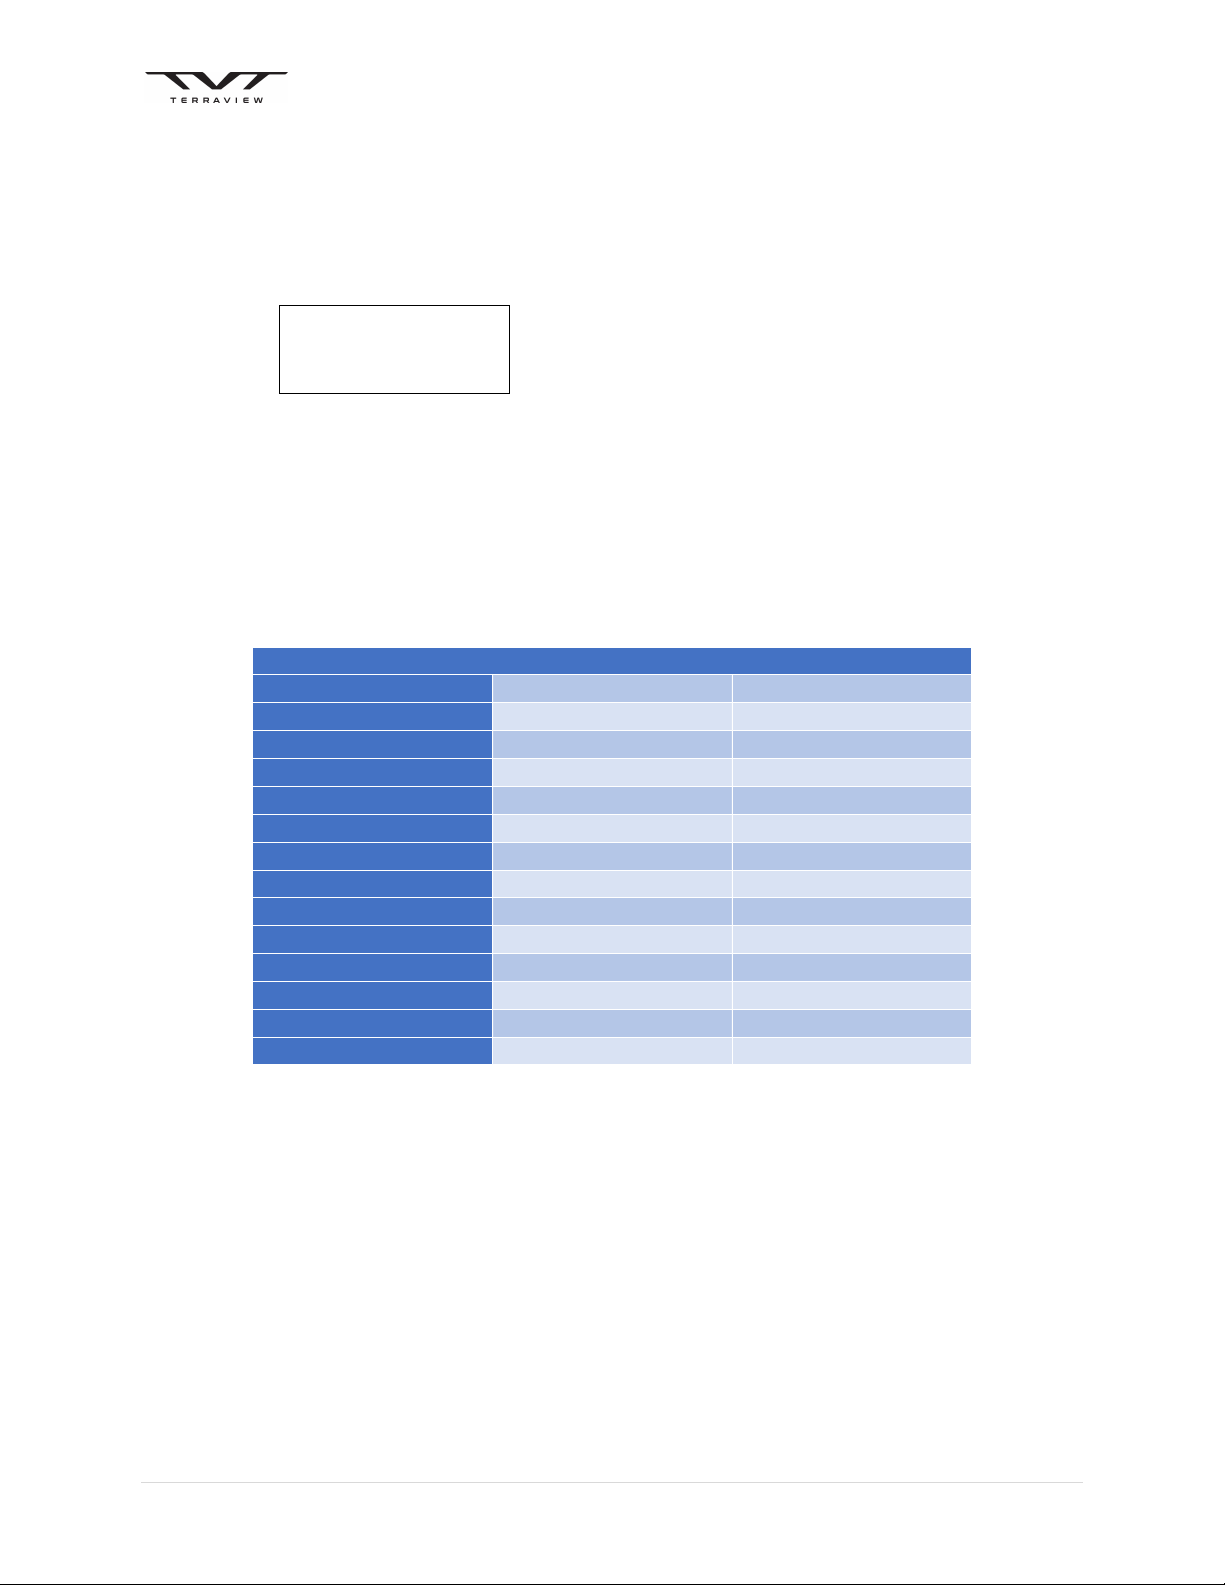
2. Modify and Verify System Settings
Verify the correct system settings for BOTH charging channels using the following steps.
a. Power on the Ultimate Duo 400W Charger (D400).
b. Press the STATUS “+” or “–“ button for the channel until the display screen reads:
BATT/PROGRAM
SYSTEM SETTING->
c. Press ENTER “” to review the system settings.
d. To scroll from one parameter to another, use the STATUS “+” or “–“ buttons.
e. To change the value of a parameter enter into editing mode by pressing ENTER “”.
f. In editing mode, the value of the selected parameter will blink slowly. Press the STATUS “+” or
“–“ button to adjust the parameter value. When the value is set correctly exit the editing mode
by pressing the Enter “” button. Some screens contain two parameters. In this case, pressing
the Enter “” button will close editing for the first parameter and open editing for the second
parameter. Pressing Enter “” a second time will close editing on the second parameter.
Parameter
Channel 1 Value(s)
Channel 2 Value(s)
Max Power Set
200W
200W
Synchronization
*
OFF
N/A
Safety Timer
ON 1
5
0Min
ON 1
5
0Min
Capacity Cut
-
Off
ON 12
6
00mAh
ON 12
6
00mAh
Temp Cut
-
Off
ON 50C 122F
ON 50C 122F
Temperature Unit
Celsius
Celsius
Rest Time CHG
\
DCHG
10Min
10Min
NiMH Sensitivity
N/A
N/A
NiCd
Sensitivity
N/A
N/A
Key Beep
ON
ON
Buzzer
ON
ON
DC Input Low Cut
-
Off
11.0 V
11.0 V
Balance Port
Enable
Enable
Load Factory Set
(See Manual)
(See Manual)
g. When all system settings for the channel have been properly set and verified, press the
BATT/PROG “” button to return to the main menu.
h. If not already completed, repeat steps 2.b through 2.g for the other charging channel.
*In most cases Synchronization can be set to ON but it is important to note that in rare cases
Synchronization may prevent one side or another from charging properly if there is a significant
mismatch between battery states. Also note that while Synchronization will ensure the same program is
being used by both sides of the charger, in the case of custom Battery Memory programs it does not
ensure that the programs for each channel are identical. Battery Memory programs must be
independently set on each side of the charger.

Using the D400 Charger with a RangePro X8 Battery
© 2020 Terraview 360, Inc. 5 Part Number: TSN0001, Rev A
3. Program Battery Memory Charge Settings
Verify the correct Battery Memory settings for BOTH charging channels using the following steps.
a. Power on the Ultimate Duo 400W Charger (D400).
b. Press the STATUS “+” or “–“ button for the channel until the screen reads:
BATT/PROGRAM
BATT MEMORY
c. Press ENTER “” to gain access to the ten (10) battery memory locations.
d. Use the STATUS “+” or “–“ buttons to scroll through the locations until the screen reads:
[ BATT MEMORY 1]
ENTER SET->
e. Press ENTER “” to verify the correct setting for Battery Memory 1.
f. To scroll from one parameter to another, use the STATUS “+” or “–“ buttons
g. To change the value of a parameter enter into editing mode by pressing ENTER “”
h. In editing mode, the value of the selected parameter will blink slowly. Press the STATUS “+” or
“–“ button to adjust the parameter value. When the value is set correctly exit the editing mode
by pressing the Enter “” button.
Parameter
Channel 1 Value(s)
Channel 2 Value(s)
BATT TYPE
LiHV
LiHV
BATT
VOLTAGE
22.8V(6S)
22.8V(6S)
CHARGE CURRENT
6.0A
6.0A
DSCHG CURRENT
3.0A
3.0A
DSCHG VOLTAGE
3.2V/CELL
3.2V/CELL
TVC=YOUR RISK!
4.30V
4.30V
SAVE PROGRAM
(see below)
(see below)
i. When all system settings for the channel have been properly set and verified it is necessary to
save the programmed values. The last option in the parameter list is “SAVE PROGRAM”. To
save the program press the Enter “” button. On the screen the word “ENTER” will disappear
and be replaced with the word “SAVE….” When these memory settings have been saved the
display screen will return to the Battery Memory screen and alternate between the following:
[ BATT MEMORY 1]
LiHV 22.8V(6S)
[ BATT MEMORY 1]
C:6.0A D:3.0A
j. Press the BATT/PROG “” button to return to the main menu.
k. If not already completed, repeat steps 3.b through 0 for the other charging channel.
CRITICAL NOT
E:
Anytime the BATT TYPE is changed and the program saved, the TVC (Terminal Voltage Charge) is reset
to the default voltage for that battery type and will remain at the default value until manually
changed by the user. Prior to saving the program always confirm the TVC is set to the correct value!
Using the D400 Charger with a RangePro X8 Battery
© 2020 Terraview 360, Inc. 6 Part Number: TSN0001, Rev A
4. Balance Charge the Battery using Battery Memory #1
a. Start up the Ultimate Duo 400W Charger (D400)
b. Press the STATUS “+” or “–“ button for the channel until the display screen reads:
BATT/PROGRAM
BATT MEMORY
c. Press ENTER “” to gain access to the ten (10) battery memory locations.
d. Use the STATUS “+” or “–“ buttons to scroll through the memory locations until the top line of
the display screen reads:
[ BATT MEMORY 1]
e. Press and hold ENTER “” until the unit beeps and the top line of the display screen reads:
LiHV BALANCE
f. To select a different mode, Press the STATUS “+” or “–“ buttons to cycle through the available
modes. Available modes include
i. LiHV BALANCE
ii. LiHV CHARGE
iii. LiHV FAST CHG
iv. LiHV STORAGE
v. LiHV DISCHARGE
g. When the correct mode is selected, Press and hold ENTER “” until the unit beeps. The unit
will perform a battery check to ensure the correct type of battery is properly installed.
Assuming there are no errors, the display screen will alternate between the following:
R: 6SER S:6SER
CONFIRM(ENTER)
R: 6SER S:6SER
CANCEL(STOP)
h. Press ENTER “” to proceed to the next step or press BATT/PROG “” to cancel. If continuing
with charging the display screen will read:
WARNING For LiHV
Battery only [OK]
i. Press ENTER “” to proceed to the next step or press BATT/PROG “” to cancel.
j. If not already completed, repeat steps 4.b through 0 for the other charging channel.
k. If after the program has started it is necessary to stop the program, press the BATT/PROG “”
button to stop the current program and return to the main menu.

Using the D400 Charger with a RangePro X8 Battery
© 2020 Terraview 360, Inc. 7 Part Number: TSN0001, Rev A
5. Troubleshooting Common Charging Errors
a. The channel times out before charging is complete
i. Error Message: OVER TIME LIMIT
ii. In the system settings,
(1) set the Safety Timer to OFF to prevent this from ever happening, OR
(2) set the Safety Timer to ON and 150 minutes
(a) Each Range Pro X8 RP6S24KHDA battery pack requires approximately 12,000 mAH
for a full charge. At 6 Amps this equates to two hours or 120 minutes.
(b) Another 30 minutes is added to support the extra time required to complete final
balancing at lower currents.
b. The channel stops charging due to an over charge capacity limit
i. Error Message: OVER CHARGE CAPACITY LIMIT
ii. In the system settings,
(1) set the Capacity Cut-Off to OFF to prevent this from ever happening, OR
(2) set the Capacity Cut-Off to ON and 12,600 mAH
(a) Each Range Pro X8 RP6S24KHDA battery pack requires approximately 12,000 mAH
for a full charge.
(b) Another 5%, or 600mAh, is added to permit support for some more extreme battery
drainage situations.
c. The channel charges batteries to 4.35V per cell
i. Error Message: None – determined when checking battery cell voltages after charging is
completed
ii. Within memory setup, anytime the BATT TYPE field is opened for editing, the TVC (Terminal
Voltage Charge) is reset to the default voltage for that battery type. The user is not
informed of this background change. If the program is then saved without ensuring the TVC
is set correctly, the memory setup will overwrite the previous setting and use the default.
(1) The custom memory program for the Range Pro X8 RP6S24KHDA battery pack uses the
LiHV setting, which has a default TVC value of 4.35 VDC.
(2) For the Range Pro X8 RP6S24KHDA battery pack the correct TVC value is 4.30 VDC.
(3) After changing the battery type and prior to charging, always confirm the TVC is set to
the correct value.
iii. Why does this resetting of the TVC sometimes happen unexpectedly?
(1) To start a charging sequence using Battery Memory 1, the user needs to PRESS & HOLD
the Enter “” key.
(2) To start editing setup for Battery Memory 1, the user needs to PRESS the Enter “”
key.
(3) If a user is not careful and, starting at the [BATT MEMORY 1] screen, presses the Enter
“” key twice in a row, the system enters edit mode for the Battery Type. Even if no
change is made in this field, the TVC is updated to match the default TVC for the battery
type selected. To prevent the default value from being saved either press BATT/PROG
“” to cancel without saving or prior to saving, adjust the TVC to the correct value.
d. The charger will only charge the battery at 0.1A and it takes a long time.
i. This can happen when a battery is significantly drained beyond normal operating voltages
and the cell voltages have fallen below a certain charging threshold.

Using the D400 Charger with a RangePro X8 Battery
© 2020 Terraview 360, Inc. 8 Part Number: TSN0001, Rev A
ii. When using the LiHV model as a basis for a customized program, if the total battery voltage
is below 20.4 volts (3.4 volts per cell), the charger will only trickle charge at 0.1A until the
battery reaches the minimum voltage threshold. After all cells exceed the minimum voltage
threshold the unit will switch to charging at full current until the process nears completion.
Near the end of the charging process the current will slowly decrease as the individual cells
are finely balanced.
iii. One way to accelerate the charging process when slow charging occurs is to start charging in
the LiPO mode, being sure to set the channel to 6Amps and a 6S configuration, which has a
lower charging threshold of 19.8 (3.3 volts per cell). After the battery voltage exceeds 20.4
volts per cell switch to the customized LiHV model to obtain a full charge of 4.30 volts per
cell.
Other manuals for RangePro X8
2
This manual suits for next models
1
Table of contents
Popular Batteries Pack manuals by other brands


EnerSys
EnerSys PowerSafe OPzV Installation, operation & maintenance instructions

KiloVault
KiloVault Uniti user guide

Dexter Laundry
Dexter Laundry 12VBA2-20.5 Safety instructions

ASTRO
ASTRO E5 Welcome guide

Roberts
Roberts Rechargeable Battery Pack user manual

Baintech
Baintech PowerTop User's operation manual


