Tesla BD300 User manual

1
USER MANUAL
TESLA SMART
CAMERA BABY BD300
EN
CZ
SK
PL
HU
SL
DE

2
WHAT‘S IN THE BOX
DESCRIPTION
- Tesla Smart Camera Baby B300
- Tesla Smart Baby Display D300
- 2x Power adapter
- 2x Micro USB cable
- User manual
- Bracket
- Screws
- Reset pin
Microphone
Status light
Speaker
Micro USB
Reset
Call/Pairing
Night light SD card slot

3
OK
MENU
MIC
Power - DC 5V/1A
Status light
- Blinking red light: connecting the network
(fast)
- Solid blue light: camera is working
correctly
- Solid red light: camera is malfunctional
Microphone Capture sound for your video
SD card slot Supports local SD card storage
(Max.128 GB)
Call/Pairing Press to make a call; press and hold to pair
Reset Press and hold for 5 seconds to reset the
camera (if you have modified settings, it will
return to factory defaults)
Microphone
Charging status light
Using status light
Zoom in/out
Menu
Direction
OK
Call
Back

4
Antenna
ON/OFF button
Speaker
Screen holder
SD card slot
Reset
Micro USB
Power - DC 5V/1A
Charging status light - Orange light: Charging
- Green light: Fully charged
Using status light -Yellow light: The monitor is on
- No light: The monitor is off
Microphone Capture sound for your video
Antenna Adjust the angle to get better signals
ON/OFF button Press and hold for 5 seconds to turn on and
turn off the monitor
Zoom in/out Zoom the image by 1X, 2X or 4X
Menu
- On the homepage, press to enter the
menu interface
- On the homepage, press and hold to enter
the setting interface
Direction Control the rotation directions; select the
menu items
OK Confirm
Call Make a call after pressing the button
SD card slot Supports local SD Card storage (Max.128G)
Reset Press with the pin to reset the monitor
BACK
- Press to back up
- On the homepage, press and hold to stop
playing music

5
Method 1: Install the camera on a flat surface.
Method 2: Use the included mounting bracket to fix
the camera to a clean surface.
INSTALLATION

6
Set up router - The camera supports only 2.4G
WiFi and does not support 5G WiFi. Please set the
parameters of the router before connecting to the
Wi-Fi network and record the SSID and password
of your WiFi.
Adding a device
1. Open the Tesla Smart App and choose to create a
new account or log in directly.
2. Click the „+“ sign in the upper right corner to add
the device.
3. Select the product.
4. Enter the WiFi password and confirm.
5. Follow the instructions. Note: please ensure that
the mobile phone and the camera are in the same
WiFi environment.
Download - Tesla Smart is available for both iOS
and Android OS. Search the name „Tesla Smart“ in
App Store or Android Market, or scan the QR-Code
to download the App.
CONNECTION

7
- Power on the camera and the monitor, and they
will automatically connect. If the connection fails,
please follow the steps below to pair. The pairing is
distance limited, so make sure the distance between
the camera and the monitor is no more than 200m.
- Pair the monitor and camera
- 1. Press the Menu button on the monitor screen,
and select > Camera.
- 2. Select the camera which you need to pair.
- 3. Press and hold the camera pairing button until
you hear the prompt tone.
- 4. Press the OK button on the monitor screen to
start pairing.
- Unpair the monitor and camera
- 1. Press the Menu button on the monitor screen,
and select > Camera.
- 2. Select the camera which you need to unpair.
- 3. Press and hold the OK button to release the
pairing.
PAIRING OF CAMERA AND MONITOR
6. Wait for the device to complete the connection.
7. „Add device success“ appears to indicate that the
device connection was successful.
In the camera interface, you can open settings by
clicking on the three dots in the upper right corner,
here you can set common functions.
Due to the continuous development of the App,
the layout and available features may be subject to
change.

8
Display usage
Rotate the camera - You can adjust the monitoring
angle for better vision. The direction buttons on the
monitor screen are available when the camera is
powered on. Press direction buttons to rotate the
camera horizontally and vertically, for better vision.
Photo & video
- Take a photo - You can take a photo when you
want to capture an interesting baby scene. Press the
Menu button on the monitor screen, select and
press OK to take a photo.
Record a video - You can record a video when
you want to capture a meaningful event with your
baby. Press the Menu button on the monitor screen,
select and press OK to record.
View the taken photos and recorded videos
1. Press the Menu button on the monitor screen,
select and press OK to enter the interface.
2. Select the camera and date, select the photo
or video you want to view, and press OK to enter
preview mode.
- For a video, press OK to play or pause in the
preview mode.
- Press the back button to quit preview or return to
the main menu.
FUNCTIONS

9
Play music - You can play music to soothe your
baby when he or she is crying or sleeping. There are
various soft pieces of music that you can select. Pre-
ss the Menu button on the monitor screen, select
and press OK to enter the music interface. You
can select different music, change the music cycle
mode, or adjust the music volume.
Feeding reminder - Reminds you to feed your
baby when you are too busy, or when you want to
give your baby a regular feed.
1. Press the Menu button on the monitor screen,
and select > Feeding Reminder.
2. Press the UP and DOWN direction buttons to
select between 4 time options, and press OK to
start the time setting.
3. When starting to set up one feeding time, press
the LEFT and RIGHT direction buttons to change
options between hour, minute, second, and on/off;
and press the UP and DOWN direction buttons to
change values and select on or off.
4. Select on or off to turn on or turn off feeding
reminders. You can set up to 4 feeding times in one
day. When the time is set up, a feeding alarm will
appear on the monitor screen.

10
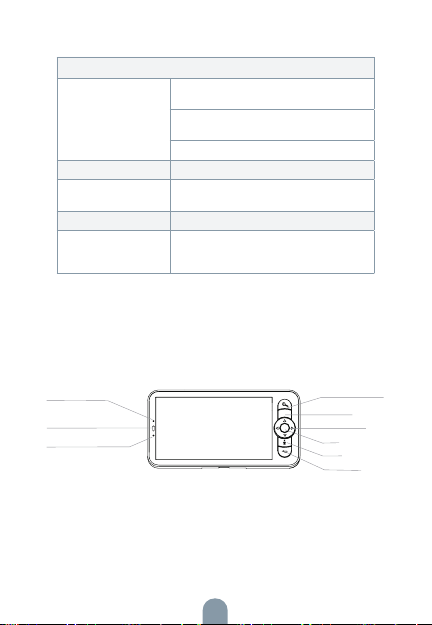
Night light - You can turn on the night light if
needed, and you can set lighting mode and lighting
colour. Press the Menu button on the monitor
screen, and select > . Or press the
Menu button, and select > Light > Night light.
Temperature and humidity detection - You
can monitor the temperature and humidity in your
baby room in real-time. When the temperature
and humidity are out of range, you get the alarms
immediately, and you can then take measures.
1. Press the Menu button on the monitor screen,
and select > Temperature and humidity.
2. Press the UP and DOWN direction buttons to se-
lect options between temperature range, humidity
range, and out of range reminder, and press OK to
start setting.
3. Press the LEFT and RIGHT direction buttons to
change options, and press the UP and DOWN
direction buttons to change values and units.
4. In the out of range reminder option, select to
turn the alarm on or off when the temperature and
humidity are out of range.
Smart care - You can turn on the functions of moti-
on detection, noise detection, and crying detection,
so that you can know the baby‘s status immediately,
no matter whether you are sleeping, working,
cooking, and so on.

11
1. Press the Menu button on the monitor screen,
and select > Smart Care.
2. Press the UP and DOWN direction buttons to
select options between motion detection, noise
detection, crying detection, and alarm volume, and
press OK to save.
3. When starting to set up the detection mode, pre-
ss the LEFT and RIGHT direction buttons to change
options, and press the UP and DOWN direction
buttons to adjust sensitivity.
4. When setting up the alarm volume, press the
LEFT and RIGHT direction buttons to adjust.
5. There will be an alarm when the set detection is
triggered, press OK to stop the alarm.
GENERAL SETTINGS
Set up brightness
1. Press the Menu button on the monitor screen,
select and press OK to enter the interface.
2. Press the UP and DOWN direction buttons to
adjust brightness.
Set up time
1. Press the Menu button on the monitor screen,
and select > Time setting.
2. Press the direction buttons to change the date,
time, and time displaying mode.
Set up language
1. Press the Menu button on the monitor screen,
and select > Language.

12
2. Select the language you need.
Set up sleep mode - You can set up sleep mode to
increase standby time.
1. Press the Menu button on the monitor screen,
and select > Sleep mode.
2. Select sleep mode as 1 minute, 5 minutes, 10
minutes, 30 minutes, 60 minutes, or off.
Turn on and off status indicator - If you turn on
the status indicator, you can get the working status
of the camera. You can also turn off the status
indicator if you think it will affect your baby’s sleep.
Press the Menu button on the monitor screen, and
select > . (Or Press the Menu
button-select > Light > Status light.)
SD card
1. Press the Menu button on the monitor screen,
and select > SD card management. Then you
can view both the total capacity and the remaining
capacity of your SD card.
2. (Optional) You can format the SD card as you
require, but make sure that any important data is
backed up.
Low battery alert - When the camera is low on
battery, the low battery alert will appear on the
monitor screen. Please charge the monitor as soon
as possible.

13
Pan/Tilt - Rotate your camera by sliding on your
smartphone, providing you with good vision.
Video flip - Flip your video stream up or down for
maximum flexibility.
Motion detection - Supports smart motion detecti-
on. The camera will detect movements, and then
send you push notifications and app alerts. You can
set up the motion detection area according to the
environment.
Crying detection - The camera can detect the
crying of your baby, and the camera will send you
push notifications and app alerts.
Record - Support 24H continuous recording with
high-capacity SD storage or Cloud storage.
Day & Night - Never miss a moment, even in
complete darkness, with powerful night-vision
technology.
Temperature & humidity detection - The camera
can detect the temperature and humidity of the
environment, and the camera will send you push
notifications and app alerts.
FUNCTIONS

14
Q: What should I do if the monitor screen is stuck
and it doesn’t work while pressing any buttons?
A: Press the reset button of your monitor with the
pin, and then press and hold the power button of
your monitor to restart it.
Q: Why can’t the camera or the monitor recognise
the SD card?
A: Confirm whether the SD card is compatible and
the format is FAT32.
Q: Why can’t I get the notifications with my cell
phone App when I connect the camera to the
monitor?
A: Please confirm that the App has been running on
the phone, and the relevant reminder function has
been opened; Message notification and authority
confirmation in the mobile phone system have been
opened.
Q: Why can‘t the monitor view video after the
camera is connected to the App?
A: The monitor has a 2 minute interruption time
when the camera is reset, and it will automatically
resume after 2 minutes. If it doesn’t recover, try to
pair the monitor and camera again.
FAQ

15
Product name Tesla Smart Camera Baby B300
Resolution 2304 x 1296px
Power supply DC5V/1A
Sensor 1/2.8‘‘ 3Mpx CMOS
IR Distance 10 m
Lens&FOV(H/V/D) 3.6mm F2.0, 91°/50°/110°
Dimensions 78 x 83 x 153 mm
Storage MicroSD card, Cloud, NVR
App Tesla Smart for Android and iOS
Connectivity WiFi 2.4G IEEE802.11b/g/n
Model TSL-CAM-B300
Product name Tesla Smart Baby Display D300
Resolution 1280 x 720px
Screen size 5‘‘ LCD
Power supply DC5V/1A
Battery 3000 mAh
Dimensions 157 x 45 x 81 mm
Storage MicroSD card
Connectivity IEEE802.11ah
Transmission distance 200 m
Model TSL-CAM-D300
TECHNICAL SPECIFICATION

16
This product is marked with the symbol for separate collection. The pro-
duct must be disposed of in accordance with the regulations for disposal
of electrical and electronic equipment (Directive 2012/19/EU on waste
electrical and electronic equipment). Disposal together with regular
municipal waste is prohibited. Dispose of all electrical and electronic
products in accordance with all local and European regulations at the
designated collection points which hold the appropriate authorisation
and certification in line with the local and legislative regulations. Correct
disposal and recycling help to minimise impacts on the environment and
human health. Further information regarding disposal can be obtained
from the vendor, authorised service centre or local authorities.
EU DECLARATION OF CONFORMITY
Hereby, Tesla Global Limited declares that the radio equipment type
TSL-CAM-B300/ TSL-CAM-D300 is in compliance with EU directives.
The full text of the EU declaration of conformity is available at the following
internet address: tsl.sh/doc
Connectivity: Wi-Fi 2,4 GHz IEEE 802.11b/g/n
Frequency band: 2.412 - 2.472 MHz
Connectivity: IEEE802.11ah
Frequency band: 865-868 MHz
Max. radio-frequency power (EIRP): < 20 dBm
Manufacturer
Tesla Global Limited
Far East Consortium Building,
121 Des Voeux Road Central
Hong Kong
www.teslasmart.com
INFORMATION ABOUT DISPOSAL
AND RECYCLING

17
BENUTZERHANDBUCH
TESLA SMART
CAMERA BABY BD300
EN
CZ
SK
PL
HU
SL
DE

18
WAS IST IM PAKET
BESCHREIBUNG
- Überwachungskamera Tesla Smart Camera Baby B300
- Tesla Smart-Baby-Display D300
- 2 x Netzteil
- 2 x Micro-USB-Kabel
- Benutzerhandbuch
- Stützrahmen
- Schrauben
- Reset-Nadel
Mikrofon
Statusanzeige
Lautsprecher
Micro USB
Reset-Taste
Anrufen/Ver-
binden-Taste
Nachtlicht
SD-
Kartensteckplatz

19
OK
MENU
MIC
Mikrofon
Ladezustandsanzeige
Betriebsanzeige
Vergrößern/Verkleinern
Menü
Kursor
OK
Anruf
Zurück
Stromversorgung: 5V/1A DC
Statusanzeige
- Blinkt rot: Netzwerkverbindung (schnell)
- Leuchtet blau: Die Kamera funktioniert
ordnungsgemäß
- Leuchtet rot: Die Kamera ist defekt
Mikrofon Nimmt Ton für Ihr Video auf
SD-Kartensteckplatz Unterstützt SD-Karten (max. 128 GB)
Anrufen/
Verbinden-Taste
Drücken, um einen Anruf zu tätigen;
gedrückt halten, um eine Verbindung zu
erstellen
Reset-Taste
5 Sekunden lang gedrückt halten, um die
Kamera zurückzusetzen (wenn Sie die
Einstellungen geändert haben, wird sie auf
die Werkseinstellungen zurückgesetzt)

20
Antenne
EIN/AUS-Taste
Lautsprecher
Stützrahmen
SD-Kartensteckplatz
Reset-Taste
Micro USB
Stromversorgung: DC 5V 1A
Ladezustandsanzeige -Oranges Licht: Laden
- Grünes Licht: Voll aufgeladen
Betriebsanzeige - Gelbes Licht: Das Display ist eingeschaltet
- Kein Licht: Das Display ist ausgeschaltet
Mikrofon Nimmt Ton für Ihr Video auf
Antenne Stellt den Winkel für ein besseres Signal ein
Ein /Aus-Taste 5 Sekunden lang gedrückt halten, um das
Display ein- oder auszuschalten
Vergrößern/
Verkleinern Vergrößert oder verkleinert das Bild um das
1-, 2- oder 4-fache
Menü
- Auf der Startseite, drücken Sie um das
Menü aufzurufen
- Auf der Startseite, halten Sie gedrückt, um
die Einstellungen aufzurufen
Kursor Steuert die Rotationsrichtungen; hilft bei der
Auswahl von Menüpunkten
OK Bestätigen
Anruf Tätigt einen Anruf, wenn die Taste gedrückt
wird
SD-Kartensteckplatz Unterstützt SD-Karten (max. 128 GB)
Reset-Taste Mit einer Nadel drücken, um das Display
zurückzusetzen
Back
- Klicken Sie hier, um ein Backup zu erstellen
- Auf der Startseite, halten Sie gedrückt, um
die Musikwiedergabe zu stoppen
Table of contents
Languages:
Other Tesla Baby Monitor manuals