Tesla 6 SERIES User manual

SERIES 643S606SUS
49S606SUS
55S606SUS
ENGOPERATING INSTRUCTION
Please read these instructions before operating
your set and retain them for future reference.
BiH/CG
HR
SLO
SRB
MK
UPUTSTVO ZA UPOTREBU
Prije upotrebe uređaja pročitati ova uputstva
i zadržati ih radi kasnijih referenci.
UPUTE ZA KORIŠTENJE
Prije korištenja uređaja pažljivo pročitati
upute i sačuvati ih za buduću upotrebu.
NAVODILA ZA UPORABO
Pred uporabo pozorno preberite navodila
in jih shranite za morebitno uporabo v prihodnosti.
UPUTSTVO ZA UPOTREBU
Pre upotrebe uređaja pročitati ova uputstva
i zadržati ih radi kasnijih referenci.
Ве молиме прочитајте го ова упатство пред да го
инсталирате и употребувате вашиот уред.


3
ENG
Note
1. The graphics in this manual are intended for reference only.
2. OSD on your TV may be slightly different from that shown in this manual.
3. The information provided in this document is subject to change without prior notice.
The manufacturer accepts no liability for damage resulting directly or indirectly from faults,
incompleteness or discrepancies between the user manual and the product described.
Contents
WARNINGS AND PRECAUTIONS. . . . . . . . . . . . . . . . . . . . . . . . . . . . . . . . . . . .4
Panel Buttons . . . . . . . . . . . . . . . . . . . . . . . . . . . . . . . . . . . . . . . . . . . . . . . . . . . . . .6
Terminals . . . . . . . . . . . . . . . . . . . . . . . . . . . . . . . . . . . . . . . . . . . . . . . . . . . . . . . . . .7
REMOTE CONTROL FUNCTIONS . . . . . . . . . . . . . . . . . . . . . . . . . . . . . . . . . . .8
PERSONAL VIDEO RECORDING (PVR) . . . . . . . . . . . . . . . . . . . . . . . . . . . . . 11
ELECTRONIC PROGRAMME GUIDE (EPG) . . . . . . . . . . . . . . . . . . . . . . . . . 12
Initial Setup & Home Features . . . . . . . . . . . . . . . . . . . . . . . . . . . . . . . . . . . . . 13
Menu Control . . . . . . . . . . . . . . . . . . . . . . . . . . . . . . . . . . . . . . . . . . . . . . . . . . . . 15
Menu Operation. . . . . . . . . . . . . . . . . . . . . . . . . . . . . . . . . . . . . . . . . . . . . . . 15
Picture . . . . . . . . . . . . . . . . . . . . . . . . . . . . . . . . . . . . . . . . . . . . . . . . . . . . . . . . 15
Sound . . . . . . . . . . . . . . . . . . . . . . . . . . . . . . . . . . . . . . . . . . . . . . . . . . . . . . . . 15
Time. . . . . . . . . . . . . . . . . . . . . . . . . . . . . . . . . . . . . . . . . . . . . . . . . . . . . . . . . . 16
Channel. . . . . . . . . . . . . . . . . . . . . . . . . . . . . . . . . . . . . . . . . . . . . . . . . . . . . . . 16
Setup . . . . . . . . . . . . . . . . . . . . . . . . . . . . . . . . . . . . . . . . . . . . . . . . . . . . . . . . . 18
Lock . . . . . . . . . . . . . . . . . . . . . . . . . . . . . . . . . . . . . . . . . . . . . . . . . . . . . . . . . . 18
Network . . . . . . . . . . . . . . . . . . . . . . . . . . . . . . . . . . . . . . . . . . . . . . . . . . . . . . 19
USB Control . . . . . . . . . . . . . . . . . . . . . . . . . . . . . . . . . . . . . . . . . . . . . . . . . . . . . 19
USB Menu. . . . . . . . . . . . . . . . . . . . . . . . . . . . . . . . . . . . . . . . . . . . . . . . . . . . . 19
Gentle Reminder When Using the USB Player . . . . . . . . . . . . . . . . . . . . 19
Movie Menu. . . . . . . . . . . . . . . . . . . . . . . . . . . . . . . . . . . . . . . . . . . . . . . . . . . 20
Music Menu . . . . . . . . . . . . . . . . . . . . . . . . . . . . . . . . . . . . . . . . . . . . . . . . . . . 20
Photo Menu . . . . . . . . . . . . . . . . . . . . . . . . . . . . . . . . . . . . . . . . . . . . . . . . . . . 21
TROUBLESHOOTING. . . . . . . . . . . . . . . . . . . . . . . . . . . . . . . . . . . . . . . . . . . . . 22
SPECIFICATIONS. . . . . . . . . . . . . . . . . . . . . . . . . . . . . . . . . . . . . . . . . . . . . . . . . 24

4
ENG
WARNINGS AND PRECAUTIONS
Read all of the instruction before operating the set. Keep the instruction for later use.
• Use only the attachments/accessories specified or provided by the manufacturer (such as
the exclusive supply adapter, battery etc).
• Please refer to the information on exterior back enclosure for electrical and safety
information before installing or operating the device.
• To reduce the risk of fire or electric shock, do not expose this device to rain or moisture.
• The ventilation should not be impeded by covering the ventilation openings with items,
such as newspaper, table-cloths, curtains, etc.
• The device should not be exposed to dripping or splashing and no liquid-containing
vessels, such as vases, should be placed on the device.
• The terminals marked with the symbol “ ”may have sufficient power to pose a risk of
electric shock. The external wiring connected to the terminals has to be installed by a trained
person or ready-made leads or cords should be used.
• To prevent injury, this device must be safely attached to the floor/wall in accordance with the
installation instructions.
• Danger of explosion if battery is incorrectly replaced. Replace only with the same or
equivalent battery type.
• The battery (battery or batteries or battery pack) should not be exposed to excessive heat
such as sunshine, fire or the like.
• Excessive sound pressure from earphones and headphones can cause hearing loss.
• Listening to music at high volume levels and for prolonged periods of time can damage
your hearing. In order to reduce the risk of damage to hearing, one should lower the volume
to a safe, comfortable level, and reduce the amount of time spent listening loud music.
• If the mains plug or appliance coupler is used to disconnect the device, it should be easily
approached.
• When not used or when being moved, please take care of the power cord set, e.g. tie up the
power cord set with cable tie or the like. It should be protected from sharp edges and the
like that can cause damage to the power cord set. When you decide to use it again, please
make sure that the power cord set is not damaged. If you discover any damages, please
contact a service person to replace the damaged power cord set with the one specified by
the manufacturer or having the same characteristics as the original one.
• Symbols, markings, signal lamps or similar indicators show that the device is completely
disconnected from the mains.
• Attention should be drawn to environmental aspects of battery disposal.
• No open flame sources, such as lighted candles, should be placed on the device.
• To prevent the spread of fire, always keep candles or other open flame sources away
from this product.
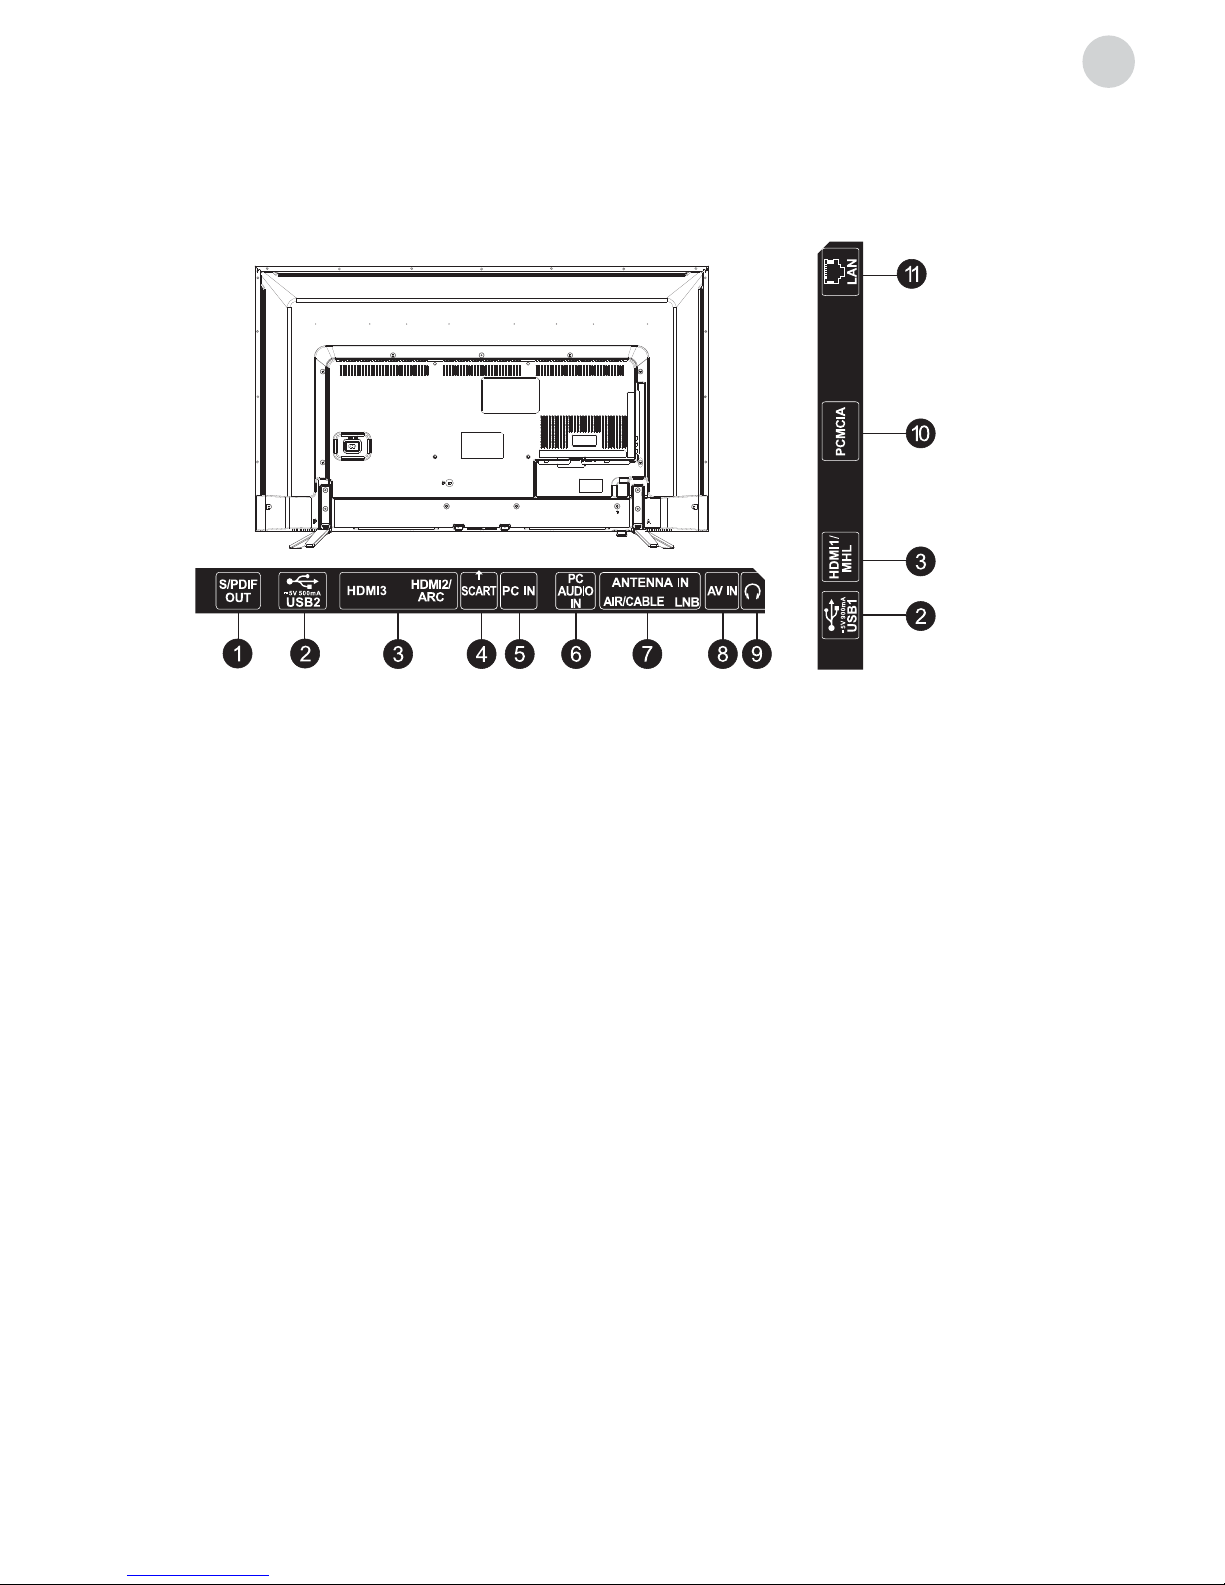
• Each USB terminal should be loaded with 500mA under normal operation.
• Protective earthing terminal. A CLASS I device should be connected to MAINS socket
outlet with a protective earthing connection.
Warnings

5
ENG
Install the device on a firm horizontal surface such as a table or desk. For ventilation, leave
open space of at least 10 cm all around the set. To prevent any faults or unsafe situations,
please do not place any objects on top of the set. This device can be used in tropical and/or
moderate climates.
• Do not install this device in confined spaces such as bookcases or similar units.
• Do not use the set in damp and cold areas. Protect the set from overheating.
• Keep away from direct sunlight.
• Do not use the set in dusty areas.
• Do not place candles to accessible, open areas to avoid flammable foreign material from
entering the TV.
• Use the remote control by pointing it towards the remote sensor. The items between the
remote control and the remote sensor will interfere with the normal operation.
• Do not expose the remote control to violent vibrations. Also, do not splash liquid on the
remote control and do not place the remote control in high humidity areas.
• Do not expose the remote control to direct sunlight which can cause deformation of the unit
due to heat.
• When the remote sensor is exposed to direct sunlight or strong light, the remote control will
not work. If this is the case, please change the light direction or the position of the TV, or use
the remote control closer to the remote sensor.
Correct disposal of the product. The symbol indicates that this product should not be
disposed of with other household waste throughout the EU. To prevent possible harm to
the environment or human health from uncontrolled waste disposal, recycle it responsibly to
promote the sustainable reuse of material resources. To return your used device, please use
the return and collection systems or contact the retailer where the product was purchased.
They can perform environmentally safe recycling of the product.
WEEE Directive
Positioning of the TV Set
Operating Environment
Precautions for Using Remote Control

6
ENG
Inadequate use of batteries may cause leakage. Therefore, please follow the steps below and
use them with care.
1. Please note the batteries polarity to avoid short circuit.
2. If the battery voltage is insufficient, which affects the remote control range, you should
replace used batteries with the new ones. Remove batteries from the remote control unit if
you do not intend to use it for a long time.
3. Do not use different types of batteries (for example, manganese and alkaline batteries)
together.
4. Do not put the batteries into fire. Do not charge or disassemble batteries.
5. Please dispose of batteries in accordance with the relevant environmental protection
regulations.
Place two AAA batteries in the remote control battery compartment, making sure that the
polarity markings inside the compartment are matched.
Note: The images are intended for reference only. Actual items may differ.
Precautions for Using Battery
PANEL BUTTONS
Note: When the input ports has no signal input, the TV will go into standby mode.
Note: The images are intended for reference only.
Bottom view
Remote Control Battery Replacement
Slide the cover
horizontally.
Place two AAA batteries
and make sure that the
polarity is correct.
Slide horizontally to
close the cover.
123
Press middle button:
1. In standby mode, press it to turn on the TV;
2. Without OSD, short press it to access source
menu;
long press to turn the TV to standby;
3. With OSD, short press it to confirm a
selection; long press it to turn off the TV.
Push left: decrease volume or go to left.
Push right: increase volume or go to right.
Push forward: channel up or go to above
Push backward: channel down or go to
below.
Power Indicator /
Remote Sensor
Speaker
Control buttons

7
ENG
TERMINALS
Note: The images are intended for reference only.
1. S/PIDF OUT: Use a RCA cable to connect your TV to a compatible audio receiver.
2. USB1: USB port.
3. HDMI1 (MHL) / HDMI2: Connect HDMI input signal from signal source such as DVD.
HDMI1 port supports MHL function, while HDMI2 port supports ARC function. All HDMI
ports support 4K2K input
4. SCART: SCART port
5. PC IN: Connect a PC to the TV by using a VGA cable.
6. PC AUDIO IN: Audio input for PC and Audio input for HDMI when the signal is DVI timing.
7. ANTENNA IN: Connect a coaxial cable to receive signal from the antenna, cable or
satellite.
8. AV IN: Connect VIDEO input signal from signal source such as DVD.
9. EARPHONE: Audio output, speakers will be muted when earphone is plugged when
select headphone.
10. PCMCIA: PCMCIA port.
11. LAN IN: Ethernet RJ45 Terminal.

8
ENG
REMOTE CONTROL FUNCTIONS
Remote Control
1. POWER ( ) Press to turn the TV on or to put it
in standby.
2. MUTE ( ) Press to mute or restore the
volume.
3. PICTURE Change picture mode.
4. SOUND Change sound mode.
5. Zoom Change aspect ratio.
6. Numeric buttons Choose channel directly.
7. YouTube Access the YouTube function.
8. RETURN Press to go back to a previously
viewed channel.
9. MENU Enter the menu options.
10. SOURCE Select the input source mode.
11. Up/Down/Left/Right (///)
Navigate through the menu.
12. ENTER Confirm the selection.
13. Browser Access the TV browser.
14. EXIT Exit the current menu.
15. HOME Access the home screen for smart and
advanced features.
16. Volume Up/Down (VOL+/VOL-)
Adjust the volume level.
17. Program Up/Down (PR+/PR-)
Change programs up or down.
18. CHN LIST Press to enter the channel list.

9
ENG
19. EPG Press to display the current EPG information
in DTV mode.
20. SUBTITLE Enable/disable subtitles in DTV/USB
mode.
21. FAV. (Favorite Channel)
Press to view your assigned favorite channels.
When using the TV browser, press this button can
add a bookmark.
22. Record (REC) Press to record the current
programme (available in DTV mode only).
23. INFO Press to display information about current
source.
24. USB Play Control Buttons
Play & Pause ( )
Press to pause playback, then press again to
continue playback.
Stop ( )
Press to stop playback.
Fast Backward Button ( )
Press to fast reverse.
Fast Forward ( )
Press to fast forward.
Previous ( )
Press to play the previous file.
Next ( )
Press to play the next file.
25. Color buttons Press to execute the fast-link
function in TV or DTV mode.
26. MTS (I/II) Press to select desired sound output
depending on the broadcasting channel.
27. FREEZE (HOLD) Freeze the picture on the screen
(not available in USB mode).
28. PVR LIST Press to display the list of recorded files.
29. QUICK No function.
30. SLEEP Select the sleep time, such as 10min,
20min etc.
31. AD (Audio Description)
Press to turn on audio description. Narrator will
describe to blind or visually impaired viewers
what is happening on the screen. Press again to
turn this function off (available in DTV mode only).

10
ENG
32. TEXT Press to enter or exit the teletext menu.
33. HOLD
Press to hold the teletext page on screen without
update and changes. Press again to release the
hold state.
34. Other Buttons
SIZE
Enlarge the teletext display: Press this button
once to enlarge upper half of the screen. Press
this button again to enlarge lower half of the
screen. Press this button again to return to normal
screen size.
REVEAL
Press this button to display concealed information,
such as solutions to riddles or puzzles. Press gain
to remove the information from the display.
MIX
Press this button to superimpose the teletext
over the TV programme. Press again to return to
normal teletext
SUB-PAGE
Press this button to enter or exit subpage mode (if
subpage is available). Press Red / Green button to
select the desired subpage.
INDEX
Press this button to display index page.
CANCEL
Press this button to temporarily return to TV
programme while searching for a Teletext page.
When the search is done, the page number will
be displayed on the upper left of the screen.
Press again to return to the Teletext page.
35. TV/ RADIO
Switch between the TV mode and radio mode.
Teletext Control Buttons (Only for DTV mode)

11
ENG
PERSONAL VIDEO RECORDING (PVR)
IMPORTANT NOTES:
Instant one-touch recording and playback
1. Please insert an external high-speed storage devices into the appropriate USB port at the
back of the TV, and make sure the device has enough free space.
2. Before the recording, suggest to format your USB device to ensure the operating speed. In
Option menu, select “PVR File System” to format the USB device.
3. During the recording, do not change channels or operate another function.
4. If the signal is interrupted or removed, the recording will stop until the signal is established.
This may cause you to lose program content.
5. Please do not turn the TV OFF during recording. This will make the TV exit the PVR and turn
to standby.
6. The file recorded can only be used in this TV, any copy communication is strictly
prohibited.
7. Use high-quality mobile device to record HD programs, otherwise the videos will be
jammed during the playback.
8. Back up all of the data in the USB storage device in case data was lost due to an
unexpected accident. We do not assume any liability for the losses by misuse or
malfunction. Data backup is consumer’s responsibility.
• Want to watch the recorded video while recording the program, press left direction
button to select and press ENTER button, the recorded video will start playing.
Select or can fast backward or fast forward the playing.
• If want to stop and exit the recording, select and press ENTER button.
Timeshift
Time-shift is the recording of television programs to a storage medium (such as your USB
device) for viewing at a later, more convenient time. Use it to record a program when your
viewing is interrupted or delayed. If you want to leave a while and watch the program without
missing the contents, you can press button to stop the program, and press button again
to start watching when you come back.
Note:
1. Before time-shift, you’d better format the USB device to ensure the enough space for
recording.
2. You can also set the preset time of recording in EPG funtion (Refer to next page).
In DTV mode and with a USB device properly plugged in, you can record the channel you are
watching and view at a later, more convenient time. Use it to record a program when your
viewing is interrupted or delayed.
Press [ REC ] button to start the recording, at the same time below control bar will show at the
bottom of the screen, and the “STOP” icon is highlighted.

12
ENG
EPG stands for Digital Electronic Programme Guide. It is supplied by the programme providers
and offers information about the programmes to be broadcast. You can access it in digital
mode by pressing the EPG button on the remote control.
1. Press the EPG button to enter the EPG interface. Current date and time will be displayed
on the second bar from the top. On the list below, the channel you are currently watching
will be highlighted.
2. To check programmes to be broadcast in future, scroll up using the button to the date
field. Use the button to select the date you want to check.
3. Press the button to scroll up to the top bar in the display, then press the button to
select “Time”, you can check the program list of a channel of someday.
Schedule
Press the yellow button to display the
recording schedule list. You can delete an
appointment by press the red button.
Reminder
Press the blue button to display a reminder
menu. You can set up the remind time and
repeat mode.
Recorder
Press the RED button to display the schedule
setting menu. By using navigation buttons, set
the schedule time by highlight the number of
year, month, day, hour or minute and press
ENTER button, then use up and down buttons
to adjust the number. Using same method to
set up the repeat mode, and then select
SAVE” button to save the setting.
Info
Press the GREEN button to show information
about the selected program.
ELECTRONIC PROGRAMME GUIDE (EPG)

13
ENG
INITIAL SETUP & HOME FEATURES
Initial setup
The first time you power on the TV, there will show a setup wizard, press ENTER button to
start and finish following steps:
Step 1 Select the OSD language as you need;
Step 2 Select the environment between “HOME” and “STORE”;
Step 3 Select the country;
Step 4 Set up the TV clock (time setting), default is “Auto Sync”;
Step 5 Read the legal statements;
Step 6 Set up the network configuration;
Step 7 Start auto tuning to search for programs, when finished, the programs will be
stored into memories and the initial setup will be completed.
NOTE: Before power on the TV, you need to connect the TV signal cable to the tuner
terminal well on the back of the TV.
Home
Press Home button to access the home page. Use navigation and OK buttons to select
and access a shortcut.
SkyShare (May not be available on some models)
1. Connect TV and mobilephone to the same router, then select Skyshare on the home page
and press ENTER to access; (Review Settings for network settings.)
2. Open the miracast function of the mobile phone;
3. Select TV device name on mobile phone (Such as “Android_7a2b”), TV device will connect
to the mobile phone automatically, and the content on the mobile phone will be played on
the TV.
Source
Select input source.
Network Applications
Such social applications as Facebook / YouTube / Twitter are provided for you.
For example, select the Facebook icon on the home page, press ENTER can access.
TV Browser
Select the TV Browser icon on the home page and press ENTER to access the internet surfing.
Features include speed dial and bookmarks etc.
Note: The browser may not support some web pages or videos due to network failure,
difference of regions or service interruption, which has nothing to do with the TV.
Media Player
Connect a USB device to the TV and select the Media Player on the home page, you can play a
video/music/photo file in your USB on the TV.
Opera TV Store
It is an on-line application store made for TV. Open it you can experience various types of
apps, such as News & Weather, Nature & Travel, Kids, Lifestyle, Sports, Music, Live TV & Video,
Games, Movies & TV etc.

14
ENG
Note 1 Some of the applications on the home page may not be available on some models,
and this manual doesn’t include the operation instructions of all applications on the home
screen.
Note 2 Browser only supports the HTML5 video file format.
Note 3 If service providers upgrade or modify their servers, applications such as YouTube and
Facebook may not function on this Television.
Note 4 Your remote control may not be compatible well with some network applications or fail
due to service interruption, that has nothing to do with this TV.
Note 5 Network application contents and services are controlled by network application
providers by means of networks and transmission facilities, which are subject to alteration,
suspension, removal, termination or interruption, or invalid access at any time without further
notice in that the manufacturer is unable to control or to be informed of the aforesaid change.
The manufacturer makes a further declaration that it disclaims any responsibility or liability
arising from customer’s failure to use the network application contents and services caused
by, including but not limited to, failure of network connection or communication lines,
technological updates, or the alteration, suspension, interruption, termination, disabling, or
removal of any contents or services by the network application providers etc.
Setting > Network > Wireless Network/ Wired Network
Wireless Network
1. Select “Wireless Network” and press ENTER button, and then select “ON” to turn on this
feature;
2. Wait a few seconds, the wi-Fi spots will be shown on the list, select and press ENTER button
to open the interface of inputting password.
3. Use navigation buttons to input the password, when finished, press the green button on
the remote control to start the connection. When connected successfully, the screen will
pop out a tip of “Success”.
Wired Network
1. Access main menu and select network sub-menu.
2. Select “Wired Network”, and then select “Auto Input”, wait a few seconds, the network
configuration will be finished successfully.
Note: Before getting started, make sure that your router is working well.

15
ENG
MENU CONTROL
For lasting update and upgrade, below descriptions of menu settings may not be in
compliance with your TV, this is normal and the actual content on your TV shall govern. We
have listed all functions of this model, and for those may not be in compliance with your TV,
there will be a mark ( ) before them, please pay attention to that and refer them if you are
confused.
Menu Operation
Press “MENU” key to enter the main menu .
Press the [] / [ ] key to select a menu.
Press the [] / [] key to select a menu.
Press “ENTER” key to enter the item.
Press “MENU” key to exit the item.
Note: The below menu options are under Antenna source.
Picture
Picture Mode: Choose between Standard, Movie, User and Dynamic.
Color Temperature: Choose between Nature, Warm, User and Cool.
Aspect Ratio: Choose between 4:3,Movie,Subtitle,Native,Panorama, Auto and 16:9.
Note1: Some options may not be available under some sources and video content.
Note 2: “Native” only works for the high definition signal.
Note 3: This manual is for universal use, your TV may not have “Panorama” mode, it is normal
and your actual product shall govern.
Noise Reduction: Choose between Off, Low, Middle and Strong.
MPEG Noise Reduction: Choose between Off, Low, Middle and Strong.
Dynamic Contrast: Set to On or Off as desired.
Film Mode: Set to On or Off as desired.
Screen (May not be available)
Select PC-VGA source, in picture settings select screen, you can set below items.
Auto Adjust: Adjust the screen automatically.
Horizontal Pos.: Adjust the horizontal position.
Vertical Pos.: Adjust the vertical position.
Size: Adjust the size.
Phase: Adjust the phase.
Sound
Sound Mode: Choose between Standard, Music, Movie, Sport, User.
Balance: Control the sound balance between the right and left speaker.
Auto Volume: Choose between On and Off.
Surround Sound: Turn virtual surround sound mode On or Off.
AD Switch (May not be available): Turn on or turn off the Audio description. When turn
on the audio description, a narrator will describe what is happening on the screen for
blind or visually impaired viewers.
SPDIF Mode: Set the SPDIF sound output mode to PCM or Auto.
Audio Out: Choose between Headphone out and Line out.

16
ENG
Note
1. “SPDIF” may not be available for some regions, your actual TV should govern.
Time
Auto Sync: Includes auto and manual two options.
Clock: Set the time.Only available when Auto Sync option is set to Manual.
Sleep Timer: Set the auto Off time to Off,10, 20, 30, 60, 90, 120, 180 or 240 minutes.
Auto Sleep: TV set auto to standby when there is no signal. Contain On and Off.
Time Zone: Select the time zone.
Summer Time: Select On or Off.
Note: Time Zone and Summer Time may not be available for some models.
Channel
5V Antenna Power
This option is only available in DVB-T source, select On to supply power for the TV’s antenna;
Select Off to turn off this function.
Program Edit
Edit the programs. You can press colored buttons on the remote control to skip programs,
delete programs , and add programs to the favorite list by pressing FAV button.
Signal Information
Showing the information of current DTV channel.
CI Information (Only available in DTV mode)
Enables the user to select from the CAM-provided menu. Select the CI menu based on the
menu PC Card.
Software Update (OAD) (Only for some regions and only available in DVB-T mode)
Select On to allow the TV to update the system software over the air. Select Off will turn off this
function.
OAD Scan (Only for some regions and only available in DVB-T mode)
When software update (OAD) is off, this option is disable. Select OAD scan mean that go to
scan channel to find the OAD update information.
Auto Tuning
Select desired source (DVB-S, DVB-T, DVB-C, ATV) from the source list before starting the auto
tuning.
DVB-S
Satellite Dish Settings (Step 1-3, refer to Fig1)
A set of satellite dish settings must be configured for each wanted satellite before performing
a channel scan.
Satellite: Select the satellite for this TV.
LNB Type: Make sure the LNB type is corresponding to your dish.
LNB Power: Enable or disable the power supply for the LNB.
22KHz: Select the 22KHz to set 22K switch to ON/OFF. The auto mode is used to
switch 22KHz on or off depending on the LNB type.
DiSEqC1.0/1.1: Select the DiSEqC mode for the selected LNB.

17
ENG
Step1 Highlight Satellite and press ENTER to access the satellite list and select one.
Step 2 Highlight LNB Type and press ENTER to select the LNB type.
Step 3 Make sure the 22KHz, DiSEqC1.0/1.1 switch is corresponding to the selected satellite.
After the above steps are finished, press the blue button to search for channels.
DVB-T/ DVB-C/ATV
Select “Auto Tuning” to search the programs automatically. Before searching, you may need to
select the country or tuner mode. If you want to stop the auto search, press MENU button or
EXIT button, a exiting dialog is popped out.
• Press to confirm exit.
• Press to continue searching.
DTV Manual Tuning
Search and store programs manually.
DVB-T/ DVB-C
In DVB-T mode, select DTV manual tuning and press ENTER to access the searching interface,
then press left and right buttons to search the programs manually.
1. Press or to select a channel No., highlight Search and then press ENTER to start the
search.
2. The search stops when a program is found and this program will be stored in the current
channel position. If you want to stop the search, press MENU button.
In DVB-C mode, select “DTV manual tuning”, then select “Search” to search the
programs manually.
ATV Manual Tuning
In ATV mode, select ATV Manual Tuning and press ENTER button to access.
Highlight and press or to select Storage To 1 (maybe other number),TV System and
channel No.. Then select search and press ENTER to start the search.
•Pressfor the unit to search towards higher frequency;
•Pressfor the unit to search towards lower frequency;
3. When a program is found, press the red button to stored it at the current channel position.
If you want to stop the search, press MENU button.
Figure 1

18
ENG
Fine-Tune
Use to make small adjustments to tuning of an individual channel. Fine-tune is not necessary
under normal conditions. However, in area of inferior broadcast conditions where adjustments
is necessary for a better picture and sound, use fine-tune.
1. Select a channel that you want to fine tune.
2. In Channel menu, select ATV Manual Tuning and press to highlight Fine-Tune.
3. Press or to fine tune until the best possible picture and sound are obtained.
Setup
OSD Language: Select your desired OSD language.
Audio Language: Set the primary or secondary digital audio language corresponding to
the signal.
Subtitle Language: Select the subtitle language.
HBBTV (May not be available): Turn on or turn off this feature.
PVR File System: Personal Video Record setting. If you want to use this function, you
must receive a digital program and plug a USB disk.
Note: Suggest to use a high speed mobile hard disk, or your TV may get stuck when
using the PVR and time shift function.
Restore Default: Restore Menu options to the factory defaults.
Note: User data on this TV will lose completely after operating this feature.
Link: HDMI link setting.
Network Upgrade: Connect the TV to the internet and you can upgrade the TV system
and network applications.
Software Update (USB): Select to update Software from USB.
Sticker Demo: Turn sticker Demo On or Off.
HDMI EDID: Switch the version of EDID.
Location: Select the environment you use this TV, options include home and store. If
select “store”, open the “Sticker Demo” and the TV will appear the function introduction
on the screen to help selling.
Note:
1. Audio Language and PVR File System only work under DTV source.
2. Do not power off the TV during the software upgrading process, otherwise the TV may not
work, and the customer should be responsible.
3. Network Upgrade and HBBTV may not be available for some regions, your actual TV
should govern.
Lock
Lock System: Select On to enable the following three menu items.you will be prompted
to enter the password. The default password is 0000.
Set Password: Use to change the current Lock Password.
Block Program (Only in TV mode): Allows you to password restrict access to specific
channels.
Parental Guidance (Only in TV mode): Allows you to password restrict access to shows
programs based on their parental rating.

19
ENG
Note:
1. If you change the password and forget it, you can enter the master password 8899
to reset it back to the default.
Network
Wired Network: Connect the TV to network by using a network cable.
Wireless Network: Connect the TV though Wi-Fi network.
Network Status: Check the network information such as IP, DNS and gateway etc.
Note: For details about network setting, please press HOME button to open the home
features, select “Settings” and select “Wired Network” or “Wireless Network” to set up.
For more information please refer to Page12 Settings part.
USB Control
USB Menu
You can view movie, music and photo files from your USB storage devices.
1. Connect USB storage device to USB input terminal.
2. Press Home button and select “Media Player”.
3. Press or to select the types of media modes: MOVIE, MUSIC and PHOTO.
MOVIE:Play movies from USB.
MUSIC:Play music from USB.
PHOTO:View photos from USB.
Reminder When Using the USB Player
1. Some USB storage devices may not be compatible to operate smoothly with this TV.
2. Back up all of the data in the USB storage device in case data was lost due to an
unexpected accident. We do not assume any liability for the losses by misuse or
malfunction. Data backup is consumer’s responsibility.
3. For large file sizes, the loading speed may be slightly longer.
4. The recognition speed of a USB storage device may depend on each device.
5. When connecting or disconnecting the USB storage device, ensure that the TV is not in
USB mode otherwise the USB storage device or the files stored in it may be damaged.
6. Please use only a USB storage device which is formatted in FAT16, FAT32, NTFS file system
provided with the Windows operating system. In case of a storage device formatted as a
different utility programme which is not supported by Windows, it may not be recognized.
7. When using a USB Hard Disk Drive which requires electric power source, ensure its power
does not exceed 500mA. If the power of the USB hard Disk exceed 500mA, the TV system
will be changed into standby mode, you must pull away the USB hand Disk and restart the
TV system.
8. An “Unsupported File” message will be displayed if the file format is unsupported or
corrupted.
9. FHD big picture needs longer time to process, which is not caused by the TV. Please be
patient to wait.
10. This TV may not support some multimedia files changed and upgraded as the change of
encoding format or other technical advances.

20
ENG
Movie Menu
1. Press [] / [] to select MOVIE. Press [ ENTER ] to enter.
2. Press [] / [ ] or [] / [] to select the desired folder and Press [ ENTER ] to open the
folder, press [/] to start playing.
3. Press [ ] to stop movie playing and return to movie list.
4. Press “EXIT” to the previous menu screens.
Movie Control Bar
1. Press [] / [] to select MUSIC. Press [ ENTER ] to enter.
2. Press [] / [ ] or [] / [] to select the desired folder and Press [ ENTER ] to open the
folder, press [/] to start playing.
3. Press [ ] to stop music playing and return to music list.
4. Press “EXIT” to the previous menu screens.
Music Control Bar
- Press [ MENU ] to display Movie Control Bar while playing the movie.
- Press [] / [ ] to select the desired settings.
- Press [ MENU ] to exit from Movie Control Bar.
- Press [ MENU ] to display Music Control Bar while playing the music.
- Press [] / [ ] to select the desired settings.
- Press [ MENU ] to exit from Music Control Bar.
Music Menu
Pause
Stop Skip Previous Fast Reverse Time Search Information
A/B Repeat Skip Next Fast Forward Play Mode Play List
Pause
Stop
Skip Previous Fast Reverse
InformationSkip Next Fast Forward
Play Mode
Other manuals for 6 SERIES
3
This manual suits for next models
3
Table of contents
Other Tesla LCD TV manuals