Tesla K43D301B2S User manual

Model: K43D301B2S
D-LED TV 43 DVB-T2
ANDROID SMART
OPERATING INSTRUCTION
ENG
Please read these instructions before operating your set and retain them for future reference.


3
ENG
Features � � � � � � � � � � � � � � � � � � � � � � � � � � � � � � � � � � � 1
Safety Warning and Notice � � � � � � � � � � � � � � � � � � 1
Packing list � � � � � � � � � � � � � � � � � � � � � � � � � � � � � � 3
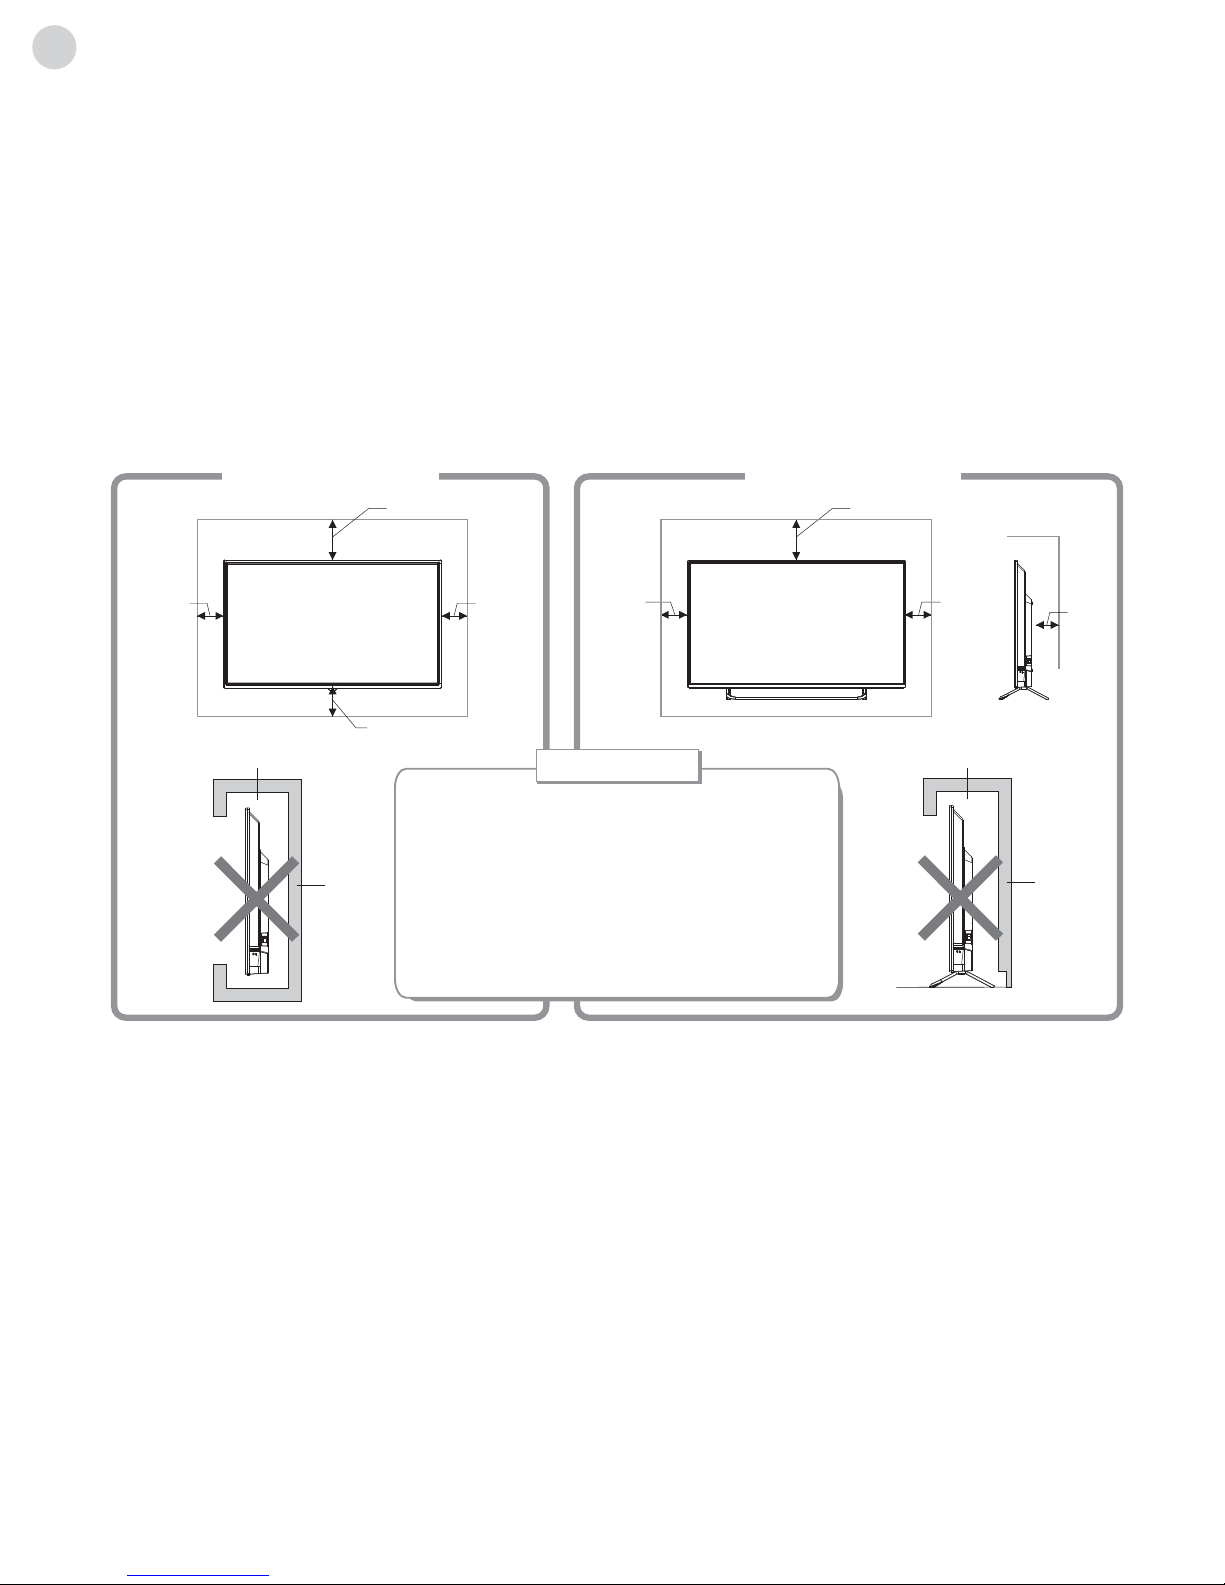
Mounting the TV set � � � � � � � � � � � � � � � � � � � � � 4
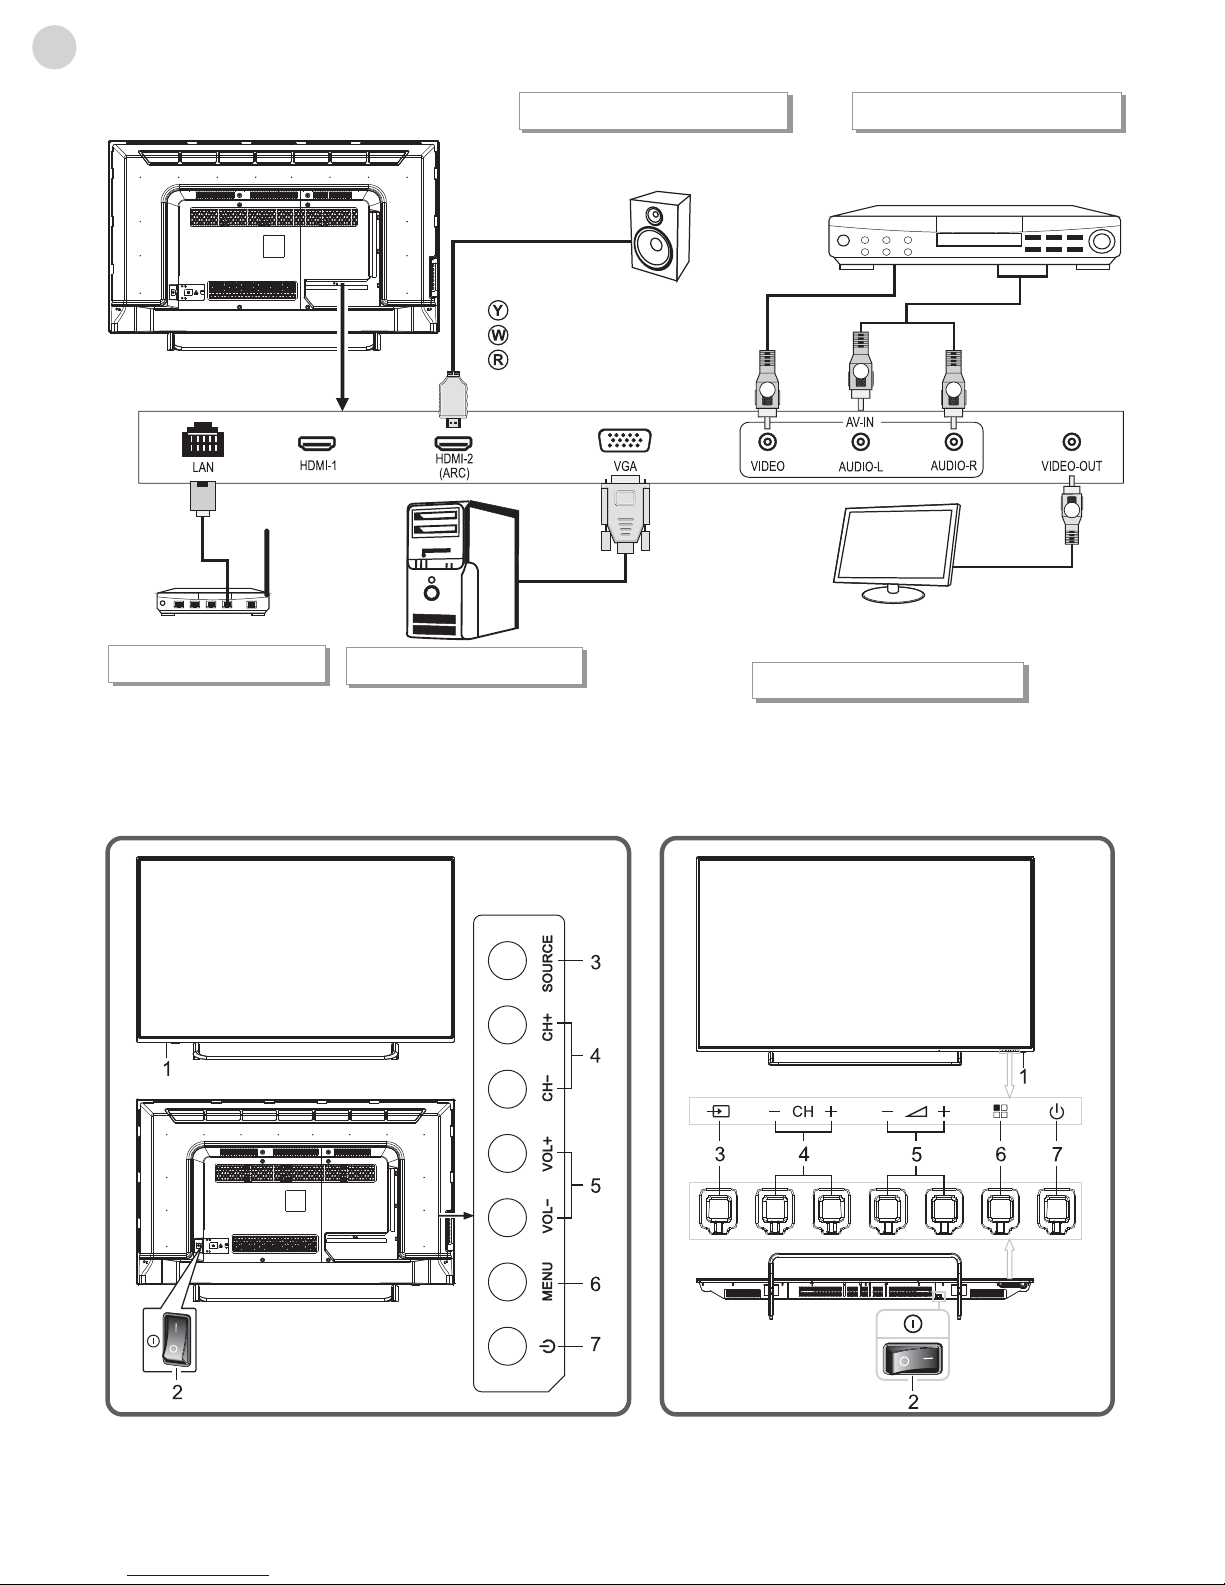
Connecting peripheral equipment � � � � � � � � 4
Panel Control Keys� � � � � � � � � � � � � � � � � � � � � � � � � � 6
Remote Control � � � � � � � � � � � � � � � � � � � � � � � � � � � � 7
Basic Operations � � � � � � � � � � � � � � � � � � � � � � � � � � � 9
Turning on/Standby � � � � � � � � � � � � � � � � � � � � � 9
Signal source selection � � � � � � � � � � � � � � � � � � � 9
Menu operation description � � � � � � � � � � � � � � 9
Program scanning � � � � � � � � � � � � � � � � � � � � � � � 9
Menu setting list � � � � � � � � � � � � � � � � � � � � � � � �10
REC option � � � � � � � � � � � � � � � � � � � � � � � � � � � �12
Time-shift option � � � � � � � � � � � � � � � � � � � � � � � 12
EPG option � � � � � � � � � � � � � � � � � � � � � � � � � � � � 13
Hotel Function (optional) � � � � � � � � � � � � � � � �14
Instructions for Intelligent Platform Operation14
Basic Operations � � � � � � � � � � � � � � � � � � � � � � � 14
Quick Start � � � � � � � � � � � � � � � � � � � � � � � � � � � � � 14
Smart Applications � � � � � � � � � � � � � � � � � � � � � 14
Settings � � � � � � � � � � � � � � � � � � � � � � � � � � � � � � � �17
Important Statement on Network Services � � �18
Troubleshooting� � � � � � � � � � � � � � � � � � � � � � � � � � � 18
Technical Specifications� � � � � � � � � � � � � � � � � � � � 20
Base Installation Instructions� � � � � � � � � � � � � � � � 21
CONTENTS
FEATURES
1� Quad-core Cortex A7 CPU, CPU with up to 1�2GHz, high task processing; quad-core Mali-450 GPU, rendering
sharper and more stable images�
2� More interfaces allow you to easily connect variety of audio-visual equipment, including computers, game consoles
and other audio-visual equipment�
3� Multi-channel USB interfaces, plug-in mouse and keyboard support, and one standard USB 3�0 USB interface�
4� Equipped with Android 4�4 smart operating system, unique and simple UI design and the possibility to download
large number of apps, it offers a richer and more exciting using experience�
5� Thanks to the built-in Wi-Fi module, web surfing is possible without additional network card and network cable�
6� Dynamic contrast technology improves clarity and contrast of the screen image�
7� With 3D graphics processing, 3D comb filter, dynamic color processing engine, intelligent motion
compensation, it makes the screen image more clear and smooth, without ghosting�
8� High-quality LCD, no flicker, low radiation, reduces eye fatigue, protects eyes�
9� Ultra-thin, narrow edge, green energy-saving design: TV automatically goes into standby mode when there is no
signal input within a few minutes thus effectively saving energy and prolonging the service life of the device�
SAFETY WARNING AND NOTICE
Thank you for choosing the high-performance and multifunctional smart LED-backlit LCD produced by our company�
This valuable thing will bring you better audiovisual experience� The design of this product has given consideration to
factors affecting personal safety, and the product itself has gone through strict tests prior to delivery� However, improper
operation may result in electric shock and fire disaster� To ensure safety, prolong the service life of this product, and have
the best possible performance out of it, please read the manual and marking label carefully before using it and comply
with the following safety instructions� Please keep the user manual for later use�

4
ENG
Warning Attention
May result in death
Indicates the behaviors that are prohibited
May result in personal injuries
or property losses
Indicates the operations that must be
performed
WARNING
• Power failure or unstable voltage�
• Abnormal sound or smell from the device�
• AC power cord is damaged�
• TV set is damaged due to falling off, knock or impact�
• Any liquid or foreign matters enter into the TV set�
• Only use 100-240VAC, 60/50Hz power supply�
• This TV must be connected to a three pin socket outlet for safety�
• All cables can be connected or pulled out only after power supply is turned off�
• Do not fix the TV set on instable surface, or else it may cause falling off, damage, or even fire�
• Do not put the TV set in the environment:
1� With direct sunlight, moisture, overheating or heavy dust;
2� With flammable or explosive substance;
3� With flammable or corrosive gas;
4� In bathroom, kitchen, etc�
• Do not use damaged or improper power socket, and ensure that the plug and socket are connected
properly�
• Keep the power plug and socket free of dust and metal pieces�
• Do not damage the power cord:
1� It is prohibited to refit the power cord;
2� Do not put heavy object on the power cord;
3� Keep the power cord away from heat source;
4� Do not drag the power cord when unplugging�
• Do not connect too many appliances to one power strip, or else it may cause fire due to high power
consumption�
• Do not let open flame (e�g� lit candle) approach the TV set, or else it may cause electric shock or fire�
• Do not put the container filled with water on the TV set, to avoid electric shock or fire caused by water drop
of splashing�
• Do not let any sharp object, metal or liquid enter into the signal connector or air vents, to avoid short circuit
and product damage as well as electric shock�
• Slots on the case are designed to release heat so as to assure that all inside components will not reach an
extra high temperature and can work normally for a long time� Please do not cover the holes while installing
the device�
Turn off the TV set immediately,
unplug the power cord from
the power outlet, and contact
authorized maintenance
personnel�
If coal gas or other flammable gases leak, do not unplug the power cord of the TV set or other electric
appliances; instead, close the valve of the gas immediately and open doors and windows.
Under Following Conditions:

5
ENG
ATTENTION
Mounting and Connecting
Packing list
• Do not let children climb onto the TV set�
• Keep the small accessories away from children's reach to avoid swallowing�
• If the TV set won't be used for a long time, please turn off the device and unplug the power cord�
• Before cleaning the TV set, unplug the power cord and wipe with soft cloth; do not use chemical reagents and avoid
foreign substances entering into the device� The incorrect cleaning (such as cleaning fluid, water, etc) may lead to
damage of product's appearance, erasing products printing information, even flow into the device and damage
components, causing the failure of the display�
• To adjust the position or angle of the TV set, please disconnect all wires and move slowly to avoid falling off�
• Do not rub with hard object, knock at, bend or squeeze the screen�
• Do not use the device immediately after transferring it from rooms with low temperature to rooms with high
temperature, because it will cause fogging inside the device and failures�
• If the screen is broken and the liquid splashes on the skin, please wash with clean water immediately for 15 minutes,
and seek medical attention�
• To carry the TV set with hands, please grasp the corners and hold the bottom; do not apply force on the panel�
• Displaying the same image for a long time or active image with fixed words, icons will leave "image persistence" on
screen which will not disappear after powering off for a long time� This undesirable phenomenon is not covered
by warranty�
• Healthy TV watching: Watch in appropriate light; poor light or long time watching may hurt your eyes�
• Unplug the power cord of the device to cut off the power supply�
• If a power plug or appliance coupler is used as disconnecting device, it should ensure easy operation�
• Power plug should be connected reliably� Loose power plugs may cause sparkle and fire�
• All the technical specifications in the user manual and on the packaging are subject to changes without prior notice� If
there is slight deviation between the user manual and actual operation, the latter shall prevail�
Do not touch the plug with wet hands, or else it may cause electric shock�
Do not turn on the TV set in thunderstorm weather; instead, unplug the power plug and antenna connector to
avoid lightning strike�
Do not disassemble the TV set by yourself, or else it may cause electric shock or fire� Contact qualified
personnel for maintenance�
1� The TV set� 2� User Manual� 3� Remote control�4� Power cord (or attached to TV set)�

6
ENG
10cm
30cm
10cm
10cm
10cm
10cm 7cm
30cm
Mount on the wall
Ventilation
Obstructing the air circulation
Wall
Wall
Mount on the base
• Please keep this space at least around the TV,
as shown in the figure�
• Do not cover the air vents or insert any object
into the enclosure�
• Do not put the device in limited space, e�g�
bookcase or embedded closet, unless the TV
set is properly ventilated�
Connecting peripheral equipment
You can connect various devices to the TV set and view high quality images� If the video device has HDMI, AV, PC and
other video output/input ports, you can select one of them and connect them to corresponding input or output ports
of the TV set� After connecting, press „SOURCE“ key, and the screen will display the menu of the signal source� Press the
„/” key to select the input signal, and press „OK“ key to confirm� The connecting mode is shown in the figure�
Note:
1� When connected to equipment with MHL function, please select HDMI3 as input signal source�
2� USB interfaces support peripheral equipment, including USB camera, USB mass storage device, USB mouse,
keyboard, etc�
3� ARC function is optional, and please refer to the device�
4� The peripheral equipment and cables described in this manual should be purchased separately�
5� The number of HDMI and USB interface are variable� Please refer to the configuration of the device�
Mounting the TV set
Tips on Installation
• The TV set should be mounted near the AC power socket for easy plugging and unplugging�
• For your safety, please select appropriate wall mount bracket or base�
• To avoid injuries, it is required to place the TV set on stable surface, or fix on firm wall�
• Ask qualified personnel to mount the TV set on the wall� Improper mounting may result in instable TV set�
• Do not place the TV set at any place susceptible to mechanical vibration�
• Do not place the TV set at any place that insects may enter�
• Do not mount the TV set against air conditioner, or else the internal panel of the display may condense moisture and
cause failure�
• Do not place the TV set on a surface with strong magnetic field, or else it may be interfered with and damaged by
electromagnetic wave�

7
ENG
To power socket
(100-240VAC 60/50Hz)
Connect to the audio amplifier
with coaxial interface
Mobile phone or other equipment
with MHL function
Connect to the AV device with
HDMI interface
Coaxial cable
Earphone port
USB 1 interface
Orange (Coaxial signal cable)
Power cord
MHL signal cable
HDMI signal cable
HDMI signal cable
HDMI signal cable
USB 2 interface CI port
Connecting power supply Coaxial-OUT connection
MHL function connection
Antenna connection
HDMI input connection
When connecting outdoor antenna to signal
port of the TV set, please turn off the main
power switch of the TV set first. Do not
approach the outdoor antenna to high voltage
mains power line to avoid electric shock. The
wired network antenna connected to this
TV set must be isolated from the protective
grounding, or else it will cause fire or other
hazards.
Warning

8
ENG
Panel Control Keys
Connect to the audio devices with
ARC function
Connect to the devices with AV
output interface
(e�g� DVD, VCR, game console)
Connect to the devices with video
input interface (e�g� Monitor)
ARC function connection
Network connection VGA input connection VIDEO output connection
AV input connection
HDMI signal cable
Video cable
VGA cable Video cable
Router
Audio cable
Yellow (VIDEO signal cable)
White (AUDIO-L signal cable)
Red (AUDIO-R signal cables)

9
ENG
Remote Control
Method for Installation of Remote Control Battery
Precautions for using the remote control:
Remove the battery compartment cover and insert two AAA (No� 7, 1�5V) batteries; make sure the polarity of the
batteries is in accordance with the polarity marks „+“ and „-“ in the battery compartment of the remote control�
1� Power LED indicator and remote receiving window�
2� Power switch (optional): press „I” end to turn power on, and press „O” end to turn power off�
3� SOURCE ( ): Press this key to enter the menu and select signal source; during OSD menu operations, press this
key to confirm the operation, with the same function as the ''OK'' key on the remote control�
4� CH+/CH- ( ): Channel up/down key; during OSD menu operation, press the keys to select items, with the
same function as the /key on the remote control�
5� VOL+/VOL- ( ): Volume up/down key; during OSD menu operation, press the keys to adjust the analog
value, with the same function as the /key on the remote control�
6� MENU ( ): Press this key to show the setup menu�
7� Standby: To switch the TV on or back to standby�
Note:
1. The appearance varies depending on the model, and the actual product shall prevail.
2. The „SOURCE“ and „MENU“ keys are invalid in smart mode; in this case, please operate with the remote control.
1� The remote control should be pointed at the remote control sensor during operation� An object placed between the
remote control and the remote control sensor may impede normal operation�
2� The remote control should be prevented from strenuous vibration� Besides, please do not set or place the remote
control under direct sunshine, as heating power may result in deformation of the remote control�
3� Remote control failure may occur when the remote control sensor of the main unit is under direct sunlight or strong
lighting; in this case, please change the angle of lighting or this TV set, or operate the remote control near the
remote control sensor�
4� Low battery will influence the remote control distance, in which case, the battery should be replaced with a new one�
If the remote control is going to be idle for a long time or the battery runs out, please take the battery out to prevent
the remote control from being corroded by battery leakage which may result in damage and failure of the remote
control�
5� Please do not use batteries of different types� It is not allowed to use old and new batteries together; the batteries
should be replaced in pair�
6� Please do not throw the batteries into fire or charge or decompose the batteries; do not charge, short- circuit,
disassemble/assemble, heat or burn used batteries� Please dispose the waste batteries pursuant to relevant
regulations on environmental protection�

10
ENG
Keys Function
POWER ( )Switch between working and standby status�
SNAPSHOT ( ) Capture the screen�
MUTE ( ) Turn on/off the sound�
Letter/number keys Press to enter letters and numbers�
F1 (3D) Turn on/off still image in TV mode�
Backspace ( )
Channel list ( ) Delete a character/view program list�
Home ( )Show the home page of smart TV�
MENU ( ) Show the OSD menu�
Cursor keys (, , , )Select items or adjust values�
OK Confirm the operation�
VOL+/VOL- Turn up/down the volume�
Return ( ) Press this key to return to previous page�
SOURCE Press this key to select the signal source� (only in TV mode)
CH+/CH- Change program channel�
INFO Show the information of the TV program�
16:9 Switch the aspect ratio�
Press this button to return to last watching channel�
L/R Select NICAM mode(under ATV signal source)
INDEX ( )Graphic homepage/Index (PLAY)
ZOOM/TS ( ) Enlarge graphic� (PAUSE)
REVEAL ( ) Show/hide graphic� (STOP)
TTX ( ) Open graphic function� (ROTATE)
HOLD ( ) Graphic stops updating� (LAST)
LIST ( ) Graphic directory� (NEXT)
REC ( ) Record program� (Fast Backward)
RADIO ( ) Change to radio mode� (Fast Forward)
Red key Special function key�
SUBTITLE (Green key) Show/close characters� (special function key)
FAV (Yellow key) Favorite channel� (special function key)
EPG (Blue key) Electronic channel instructions� (special function key)
Keys of the Remote Control
Note: The appearance of the remote control may be different from this diagram; please refer to the real object as standard.

11
ENG
Basic Operations
Turning on/Standby
Signal source selection
Menu operation description
Plug power cord into the electrical socket� Press „ “ button on the TV set (if it doesn't have this button, you needn't
operate this step), then press „ “ key on the remote control or on the TV set to turn on the TV� The screen displays
„Welcome“ menu� Press „/“ key on the remote control to select language which you wish, then select Start
and press „OK“ key on the remote control to confirm� The screen displays „Please Select Antenna Type and Start
AutoScan“� Press „/“ key on the remote control to select Antenna Type which you wish, then select Next and press
„OK“ key to go into next step (you can also select Skip and press „OK“ key to skip�) The screens shows the interface�
Press „/“ key on the remote control to select Search Type which you wish, then press „“ key and you can select
country where you are by pressing „///“ key on the remote control� The device starts auto channel search after
pressing „OK“ key� (If Antenna Type is DVB-C, you have to press „/“ key on the remote control to select Full Scan
or Quick Scan� Press the „Red“ key to set modulation� Press „Green“ key to set symbol rate� Press „Yellow“ key to set
Network ID� After selecting Start Scan, press „OK“ key to confirm� The device starts scan�
In power on state, press „ “ key to switch to standby mode�
Special Tips: This device uses energy saving technology� If there is no signal input in power on state, it will enter standby
state automatically in five minutes; the device will enter standby state automatically at specified sleep time�
After turning on the device, press „SOURCE“ key on the remote control or control panel to
show the „Input Source“ menu on the screen; press „/„key on the remote control or
„CH+/CH-“ key on the control panel to select a signal source� Press „OK“ key on the remote
control or „SOURCE“ key on the control panel to switch to the selected signal source�
The menu operations in this chapter are described in TV state; the operations in other states are basically the same�
The operation of intelligent mode, please refer to following intelligent platform operating instructions�
Press „MENU“ key on the remote control or control panel to show the main menu on the screen:
1� Press „/„key on the remote control or „VOL+/VOL-“ key on the
control panel to select a menu from Picture, Sound, Channel, Setting,
Parental Control�
2� Press „/“ key on the remote control or „CH+/CH-“ key on the control
panel to select an item in the menu�
3� Press „OK“ key on the remote control to enter the submenu�
4� Press „/„key on the remote control or „VOL+/VOL-“ key
5� When the main menu shows on the screen, press „Return“ key to exit the
main menu�
6� During menu operation, the icons of invalid options will change into grey�
Program scanning
Tune the programs before watching the TV for the first time� Before scanning, please make sure that the antenna has been
connected properly and select the desired Antenna Type� In the following example of channel searching, Antenna Type is
DVB-T�

12
ENG
Auto Tuning
Press „MENU“ key� Select Channel > Auto Tuning� Press „OK“ key, then press „/“ key to select Search Type:
ATV+DTV, ATV, DTV� Press „“ key� You can select country where you are by pressing „///“� Press „OK“ key to
confirm� The device starts auto tuning� During auto tuning, the screen displays a message „Are you sure you want to
exit DTV Tuning?“ by pressing „MENU“ key� Select YES and press „OK“ key to confirm, the device starts auto tuning
ATV channel, or select NO and press „OK“ key to cancel� During auto tuning ATV channel, the screen displays „Are you
sure you want to exit ATV Tuning?“ by pressing „MENU“ key� Select YES and press „OK“ key to confirm, or select NO
and press „OK“ key to cancel�
DTV Manual Tuning (In DTV signal source)
Press „MENU“ key, select Channel > DTV Manual Tuning� Press „OK“ key to enter DTV Manual Tuning menu� Press
„/“ key to select channel, then press „“ key to select and press ”OK //” key to confirm� After searching, the
DTV Manual Tuning menu closes automatically� During the search you may press „MENU“ key to interrupt the search
and return to the last menu�
ATV Manual Tuning (In ATV signal source)
Press „MENU“ key� Select Channel > ATV Manual Tuning� Press „OK“ key to enter ATV Manual Tuning menu� Press
„/“ key to select Channel/Color System/Sound System, and then press „/“ key to select which you wish, then
select Search� Press „/“ key to search from low frequency or high frequency� After selecting frequency, press
„/“ key to tune from low frequency or high frequency� During manual searching, you also may press „MENU“ key to
interrupt the search and return to the last menu�
Refer to the table below for the specific setting in the menu�
Menu setting list
Picture
Picture Mode Adjust the overall effect of images: Standard, Soft, User, Bright�
Contrast Adjust the overall layering of images: increase the analog value to improve the contrast and
decrease the analog value to reduce the contrast (0-100)�
Brightness Adjust the overall brightness of images: increase the analog value to improve the
brightness and decrease the analog value to reduce the brightness (0-100)�
Hue Adjust the hue of images: increase analog value to increases green and decrease analog
value to increases purple (0-100)�
Sharpness Adjust the sharpness of images: increase the analog value to increases the definition and
decrease the analog value to reduce the definition (0-100)�
Saturation Adjust the color depth of images: increase the analog value to improve the depth and
decrease the analog value to reduce the depth (0-100)�
Color Temperature Adjust the overall color temperature of images: Standard, Warm, Cold�
Aspect Ratio Adjust the Aspect Ratio: Full, 4:3, Film, Subtitle�
Noise Reduction Set the grade of noise reduction: Middle, High, Off, Low�
PC Image Mode Adjust the screen aspect ratio in PC mode, which is valid in VGA signal source�
Remark: The Contrast, Brightness, Hue, Sharpness and Saturation only can be adjusted in User mode.
Sound
Sound Mode Select the audio mode: Standard, Music, Movie, User�
Bass Adjust the bass: increase the analog value to increase the bass and decrease the analog
value to reduce the bass (0-100)�
Treble Adjust the treble: increase the analog value to increase the treble and decrease the analog
value to reduce the treble (0-100)�
Balance
Adjust balance degree of right & left audio track: move the analog value to left to increase
the left audio track; move the analog value to right to increase the right audio track
(L50-R50)� Generally, the balance is set to 0�

13
ENG
AD Select to turn on/off the AD switch
Surround Select to turn on/off the surrounding sound�
SPDIF Output Select digital audio output mode: PCM, RAW�
Alone Listen Select this option to turn off the image and output the audio only; press any key to exit�
Remark: The values of Bass and Treble can only be adjusted in User mode.
Channel
Antenna Type Select antenna type�
Auto Tuning
Refer to „Program scanning“�DTV Manual Tuning
ATV Manual Tuning
Uređivanje programa
(Program Edit)
Select Channel > Program Edit, then press „OK“ key to enter the submenu� Press „/“ key
to select a channel�
1� Skip: press the number key „ 1“ to enable/disable skip the channel�
2� Edit: press the number key „2“ to edit the channel info�
3� FAV: press the number key „ 3“ to add the channel to favorite;
4� Delete: press the number key „4“ to delete the channel�
5� Move: press the number key „5“, and press „/“ key to move the channel, then press
the number key „5“ to confirm�
Note: Editing the name of the digital channels is not possible.
Signal Information View signal information�
CI Information View CI information�
Setting
Audio Language Select audio language�
2nd Audio Language Select 2nd audio language�
Subtitle Turn on/off subtitle function�
Subtitle Language Select subtitle language�
2nd Subtitle Language Select 2nd subtitle language�
TTX Language Select TTX language�
OSD Duration Adjust the menu display time: 5 Seconds, 10 Seconds, 15 Seconds, 20 Seconds, 30
Seconds, Always�
Switch Mode Select switch mode: Mirroring, Black Screen�
Sleep Time Set the waiting time before standby: Off, 10 Minute, 20 Minute, 30 Minute, 60 Minute,
90 Minute, 120 Minute, 180 Minute, 240 Minute�
PVR File System Manage external devices and set up time-shift size�
Power Logo Display icon or not when turn on: Default, Off� (This function is optional, please refer to the
actual product�)
Software Update(USB) Upgrading software using USB interface� (USB 3�0 does not support software upgrading�)
Restore To Default Reset all the settings to default�
Remark: Audio Language, 2nd Audio Language, Subtitle, Subtitle Language, 2nd Subtitle Language and PVR File
System are only available under DTV signal.

14
ENG
Parental Control
Lock System Select to turn on/off lock system� Block program option can work when it is in on state�
The default password is 0000�
Set Password Set new password�
Block Program Select the channel that you'd like to lock or unlock�You have to enter the 4-digit password
when the program is locked�
Parental Guidance Adjust movie blocking level: this function help parents block unsuitable channel for their
child`s age
CI CAM Pin Code Input CI CAM Pin Code�
In DTV mode, press „REC“ key� REC option menu shows
on the screen, and system begins recording immediately�
Press „REVEAL“ key to stop and quit recording; after
stopping the recording, press „INDEX“ key� Recordings
list will pop up� Select the file you want to play, then press
„OK“ key to play it�
Note: The recording function can only support
memorizer with Fat32 file system. Memorizer with other
file systems need to be formatted; before Formatting
memorizer, back-up useful data because the content of
memorizer cannot recover after formatting.
REC option
Icon Description
Indicates the current channel�
Indicates that system is recording a program�
Indicates the using state of disk�
Play: Select this icon, press „OK“ key to play�
Stop: Select this icon, press „OK“ key to stop and quit�
Pause: Select this function, press „OK“ key to pause�
Rev: Select this icon, press „OK“ key to reverse playback, press „OK“ key several times to speed up� Press „INDEX“ key to play normally�
FF: Select this icon, press „OK“ key to fast forward, press „OK“ key several times to speed up� Press „INDEX“ key to play normally�
Slow Motion: Select this icon, press „OK“ key to slow down playback, press „INDEX“ key to play normally�
Playing Time: Select this icon, press „OK“ key, and input the playing time, then press „INDEX“ key to play to play�
Backward: Select this icon, press „OK“ key to make a 30s jump backward�
Forward: Select this icon, press „OK“ key to make a 30s jump forward�
Time-shift option
In DTV mode, press „ZOOM/TS“ key, the Time-shift
option menu shows on the screen and the program is
in suspended state� Press „INDEX“ key to resume play
program� Press „REVEAL“ key to stop and quit time-shift�
When user leaves program for a short time, time-shift
function can suspend and cache the playing program to
U disk� When user resumes playing, the program can
continue to be played�

15
ENG
EPG option
Change input signal source to
DTV(detailed information refers to
„Signal source selection“), press
„EPG“ key to get into electronic
program instruction interface, the
left side of interface is channel
area digital channel display list, the
right side of interface displays the
channel related program name
in order, press „/„key can
choose programs in different
times, press „/„ key to change
to programs of other channels�
Related remote controller shortcut operation as bellow:
1� Press „Red“ key to check program plan management list, press „/„key in program plan management list to
choose program, press „OK“ key to choose program, press „„ key can select bellow orders�
Clear Selected: delete current selected program in program plan management list
Clear all: delete all programs in program plan management list�
Close: closes the program plan management list�
2� Press „Green“ key to view the 24 hours channel program lists before the current session�
3� Press „Yellow“ key to view the 24 hours channel program lists after the current period�
4� Press „Blue“ key to view the current selected program information, select Set Remind in information interface, press
„/„key in setting remind interface to select starting time and mode, press „/“ key to modify time value
and mode; select to confirm, press „OK“ key to finish reminder setting, program put in plan management list; select
Close, press „OK“ key to drop out�
5� Play current program in current time, press „OK“ key�
Notes:
1. Electronic Program Guide-related information are provided by broadcasting company. Program entries may appear
blank or with no information. When new information is available, the screen display will be automatically updated.
2. Reminder setting time should be later than the current time; otherwise the appointment will be unsuccessful. The same
time period can only respond to one program
Icon Description
Indicates the current channel�
Indicates the current playing time�
Indicates the total playing time of the program�
Indicates the using state of disk�
Play: Select this icon, press „OK“ key to play�
Stop: Select this icon, press „OK“ key to stop and quit�
Pause: Select this function, press „OK“ key to pause�
Rev: Select this icon, press „OK“ key to reverse playback, press „INDEX“ key to play normally�
FF: Select this icon, press „OK“ key to fast forward, press „INDEX“ key to play normally�
Slow Motion: Select this icon, press „OK“ key to slow down playback, press „INDEX“ key to play normally�
Time Play: Select this icon, press „OK“ key, then press „/“ key to select time to play�
Backward: Select this icon, press „OK“ key to make a 30s jump backward�
Forward: Select this icon, press „OK“ key to make a 30s jump forward�
Program time period
Frequency area
Current time Program area

16
ENG
Hotel Function(optional)
Instructions for Intelligent Platform Operation
Basic Operations
Quick Start
Press „MENU“ key to display the main TV menu, and then press „4578“ key to
display the hotel function menu� Press „/“ key to enter into the menu and
select the item which you need to adjust, and then press „/„ key to adjust
the value or state�
Press „ “ key on the remote control to show the home page�
1� Press „///„ key to select an application;
2� Press „OK“ key to run the application;
3� Press „Return ( )“ key to return to previous page
Special Tips
The operations in smart mode are complicated� The user can
install Apps with different operation methods, and the operations
described in this manual are for reference only� Part of applications need external equipment to run normally� Certain
functions are invalid from the remote control� For more convenient operation, please operate with USB mouse and
keyboard�
Before using this device, please get familiar with the operations below for better experience�
Mouse Control
1� Click: Click the mouse and release immediately;
2� Press and hold: Click the mouse and hold for at least three seconds;
3� Clicking the left mouse key has the same effect as pressing „OK“ key on the remote control;
4� Clicking the right mouse key has the same effect as pressing „Return“ key on the remote control�
Language input setting
Language: Select the system language; select Settings > Language & input > Language, and press „OK“ key; press
„/“ key to select the desired language, and then press „OK“ key�
Selecting Input Method: In the smart mode, select Settings > Language & input > Default, and press „OK“ key; choose
input method in the sub-menu; you can also download and install third party input method�
Setting System Time: In the smart mode, select Settings > Date & time > Automatic date & time, press „OK“ key and
the system updates the clock from the network automatically; if the TV set isn't connected to the network, you can only
set the system time manually�
Screenshot: Before screen shooting, please insert the USB mass storage device into the USB interface, and press
„SNAPSHOT“ key� After screen shooting, the pictures are saved in the „:\Pictures\Screenshots“ folder in the USB mass
storage device�
ON
D
Browser: You can use the browser to show the text, video, audio and other information on the Internet� Before
accessing the Internet, please connect your TV set to the Internet; refer to „Settings > Wireless/
Ethernet“ for details.
Smart Applications

17
ENG
• How to access web address? Press „///“ key to select the address bar, and type the web address in the
address bar, then select the icon in the input method, and press „OK“ key to access the web address�
• How to save a page in the Bookmark? Select the icon in the browser interface, and press „OK“ key to enter the
browser tab and enter the web address� Select Account, and press „OK“ key� Press „/“ key to select the account
for storage, and then press „OK“ key� Select OK, and then press „OK“ key to add the bookmark�
• How to copy and paste the text in the web page? Place the cursor on the text that should be copied, press and
hold the left mouse key� When the pair of selecting cursors appears on the screen, drag the cursor to select the text�
Select Copy on the screen, and click the left mouse key� Select the target position, press and hold the left mouse key,
and click Paste in the popup dialog box�
E-mail: You can log in to the private or business e-mail accounts, and receive and send e-mails�
Apk Installer: The Apk installer helps users to manage applications, and allows users to install or uninstall apps on local
disk�
Note: Select Settings > Security > Unknown sources to allow installation of app from unknown sources.
• How to install an application? Enter Apk Installer, select Install and press „OK“ key to enter; Select the path of the
target installation file on the local disk, locate the installation package in the right panel, and then press „OK“ key�
• How to uninstall an application? Select Manage, and press „OK“ key to enter� Select the application to be removed,
and press „OK“ key� Select Uninstall, click „OK“ key, and the system will uninstall the application automatically�
Multimedia Player: In smart mode, select Multimedia in
the main interface, and press „OK“ key to run� Select the
file type from all, picture, song and video on the left�
• Playing Files from local disk device: Before playing
files in the local disk, insert the USB mass storage
device into the USB interface�
Select local disk device in the file directory in the center,
and press „OK“ key to enter� Select back in the directory,
press „OK“ key to return to the previous folder� Select
the target folder, press „OK“ key to enter the folder, and
press „Return“ key to return to the desktop�
Attention:
1� Nonstandard USB devices probably won't be recognized; in this case, please replace a standard USB device;
2� The stream media system has certain restriction on the format of files; the playing will be abnormal if it is out of the
system restriction;
3� Do not remove the USB device while playing, or else the system or device may have problem; Before replacing the
USB device, please turn off the device's power supply;
4� The system supports standard USB1�1, USB2�0 and USB3�0 devices, such as USB mass storage devices and
removable hard disks;
1Back to the previous webpage
2Go forward to the next webpage
3Refresh the webpage
4Webpage window of the browser�
5Close the current webpage window�
6Add a new webpage window�
7Input box for URL�
8Option for adding a bookmark�
9Input option of URL
10 Menu option of browser
11 Option for viewing bookmark

18
ENG
Picture Player Menu
Options
Video Player Menu Options
While playing, press „OK“ key to show the menu options as in the picture above; select an icon, and press „OK“ key to
perform the operation; you can press „Return“ key to exit playing, or press “ , , , i " keys on the remote
control to perform shortcut operation�
Music Player Menu Options
5� The maximum output current of the USB port of this device is 500mA, and the self-protection will be enabled if it is
beyond this limit; please use external power supply if an external device of higher current will be connected;
6� The system is complicated; when it is reading or playing files, the screen may be still or certain functions may be
invalid due to the compatibility and stability of the USB device; in this case, please turn off the device and re-initialize
the system�
Play the previous picture�
Pause/Play slideshow�
Play the next picture�
Rotate 90° right�
Show details of the picture�
Play the previous video�
Select the speed of fast rewind�
Pause/play the video�
Select the speed of fast forward�
Play the next video�
Select the start point for the playing time�
Play the previous track�
Pause / resume music playing�
Play the next track�
Zoom in the picture�
Zoom out the picture�
Rotate 90° left�
Playback settings
View the playlist�
Show details of the video�
Playing setup; show/hide subtitle and adjust the audio
settings in this option�
Set A-B repeat playing; set point A and point B, and the video
will repeat between A and B�
Set the repeat playing mode: All, Single, Random�
View the playing list�
Show details of the music�
Media Player UI icon introduction

19
ENG
Settings
Wireless setting
1� In smart mode, select Settings > Wi-Fi, press „OK“ key, then press „„key to choose WLAN switch, press „OK“
key to open the wireless network function; the device automatically searches for nearby wireless network signal�
When the network has searched icon indicate that the device connects to the network without a password�
When searching for the network to have icon indicate that the network is encrypted, you must enter the correct
password to connect to the network (Or select the on top right corner and press „OK“ key, then select Scan, and
the device will scan nearby wireless network signal);
2� Select the network you want, and press „OK“ key;
3� Type network connection password in the Password box, then select Connect and press „OK“ key to connect to
network;
4� If your router does not automatically obtain an IP address, you need to select Show Advanced Options, and press
„OK“ key� Select IP settings, and press „OK“ key, then select Static in the field;
5� Enter the IP address, gateway, domain names and other information; (IP address, gateway, domain names and other
information are available to the relevant network administrator);
6� Select Connect again and press „OK“ key to connect to the network�
Wi-Fi Direct
1� Select Wi-Fi, and press „OK“ key� Press „“ icon, press „OK“ key� Select Wi-Fi Direct, and press „OK“ key to enter�
Select SEARCH FOR DEVICES, and press „OK“ key, then the device will automatically search for a matching device;
2� Select the device you want to match, press „OK“ key to match the invitation;
3� After a successful match between the two devices, data can be transmitted to each other; (for the Wi-Fi Direct match
to be succesfull, both devices must support Wi-Fi Direct feature and be mutually compatible)
4� Press any key on the remote control to exit the Wi-Fi Direct function� (Except „POWER ( )“ key )
Ethernet: (Dial to connect to the network)
1� Select Ethernet and press „OK“ key, then press „“ key;
2� Select Proxy and IP settings, set the proxy and IP address;
3� Select PPPoE settings, press „OK“ key, enter your user name and password, select connection, press
4� „OK“ key to connect to the network�
Wi-Fi hotspot
1� Select More ���, and press „OK“ key, then press „“ key;
2� Select Tethering, press „OK“ key;
3� Select Wi-Fi hotspot, press „OK“ key to check the open WLAN hotspot functionality;
4� Select Settings Wi-Fi hotspots, press „OK“ key;
5� Enter the hotspot name in the Network SSID field; the system recognizes it as „AndroidAPP“;
6� In the security field, press „OK“ key to select security type� When it is an open network, a password is not required
to connect to the network, so select the security type None� But then any device can connect to your network� If you
select WPA PSK/WPA2 PSK encryption, you need to enter a password with more than eight characters, and if other
devices search for your shared WI-FI network, they then need to enter the correct password in order to connect to
your network;
7� The system will automatically configure a password for you, but you can also manually type a password in the
password box;
8� Select Save and press „OK“ key to save the settings, then other Wi-Fi devices in search for Wi-Fi networks will search
for your network in the area�
Sound: Music setting, video and other volume and system beep�
Instructions for Intelligent Platform Operation
Storage: View storage space and formatting information such as USB storage devices�

20
ENG
Important Statement on Network Services
Troubleshooting
Apps: Applications in Management System�
Security: Set the device to display the administrative password� Language & input: Set the system language and input
method� Backup & reset: Reset factory settings�
System Update: Update system�
Date & time: Set date and time�
About TV: View Models, System Version, Memory Information�
All contents and services obtained from this TV set belong to the third party and are protected by laws on copyright,
patent right, trademark right and/or other intellectual property right� The said contents and services are only for your
non-commercial purposes� It is not allowed to use any content or service without the authorization of the content owner
or the service provider�
Our company will undertake no liability for any direct, indirect and accidental losses or damages caused by your or a
third party's access to any content or service or any information or any third party software through this set under any
circumstances�
Third party service may be changed, deleted or stopped without prior notice� Our company neither implies nor
guarantees the continuous availability of some service or content within any period of time�
Our company is not held responsible for services related to the said service and content� Besides, we will not bear any
liability for client service� Please directly contact relevant content and service providers if you have any problem and
service request concerning relevant service or content�
Problem Possible causes Solutions
Snowflake spots occur
in the TV images
and there is noise in
accompanying sound�
1� The antenna connector is loose, or
the cable is damaged�
2� The antenna type is improper�
3� The antenna direction or position is
inaccurate�
4� The signal is weak�
1� Check if the antenna plug is loose or the cable
is in good condition�
2� Check the antenna type (VHF/UHF)�
3� Adjust the direction and position of the
antenna�
4� Try to use signal enhancer�
There is neither display
nor sound on the screen�
The indication light is
not on�
1� The power plug is loose or the
power supply is not connected�
2� The power switch is not turned on�
1� Check if the power line is connected�
2� Press the „ “ button on the panel�
Dotted line or strip
disturbance occurs in TV
images�
The signal is disturbed by car, neon
light, electric hair dryer, etc…
Do not use electric hair dryer aside the TV set
and adjust the antenna direction to reduce
disturbance�
Double images occur on
the TV screen�
1� TV signals are reflected by
surrounding high mountains or
mansions�
2� The direction of the antenna is
inaccurate�
1� Use high oriented antenna and use the
Fine Tune function of „TV“�
2� Adjust the direction of the antenna�
The images are
colorless�
The color saturation is adjusted too
low�
Enter „PICTURE“ setting to increase color
saturation�
Table of contents
Other Tesla LCD TV manuals