TestSafe miniPAT User manual

TESTSAFE
miniPAT
APPLIANCE TESTER
USER MANUAL

TABLE OF CONTENTS
SAFETY RULES 3
GENERAL DESCRIPTION 4-9
Overall Result 4
Earthing and Class I Appliances 5
Overall Result–Class I Appliances and Cables 5
Inserting the Battery 6
Low Battery Warning 6
Calibration 6
Visual Checking 7
Determining the Appliance Class 8-9
SAFE OPERATION 10
Preuse Check 10
APPLIANCE CHECKING 11-16
How to Test an Appliance 11
Class I and II Testing Examples 12-16
SPECIFICATIONS 17-18
LIMITED WARRANTY 19
2

SAFETY RULES
CAUTION RISK OF ELECTRIC SHOCK
This appliance tester has been designed with your safety in
mind.
However, no design can completely protect against incorrect
use.
Electrical circuits can be dangerous and/or lethal when lack
of caution or poor safety practices are used.
DO NOT USE the miniPAT tester on any appliance which is
connected to the electrical supply.
Ensure the appliance under test is fully isolated from the
mains.
Do not touch any exposed wiring, connections or other "live"
parts of any electrical circuit. If in doubt, do not proceed and
seek advice.
CAUTION: READ THE MANUAL!
Follow the instructions contained within this user manual
every time.
Training courses and DVD's can be found here:
www.pat-testing-course.com
3

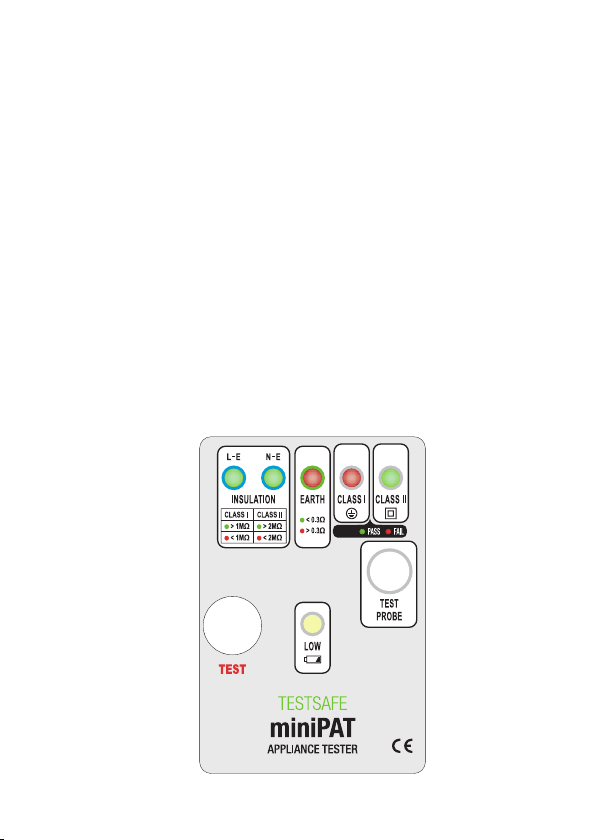
GENERAL DESCRIPTION
This miniPAT is a simplied version of a standard PAT tester
that uses low voltage to perform all of its testing function.
The miniPAT is also suitable for use on IT equipment.
The miniPAT is not intended to be used to perform high
volume or certification-type testing where readings are
required. It has been designed to be simple to use, but still
has all the necessary basic functions to check a normal
appliance.
The miniPAT gives indication of an appliance's safety and
allows users to decide if appliance or cables are OK to use.
It is also useful for checking correct operation in the time
period between annual PAT testing.
It can also be used to quickly give indication if an appliance
has insulation or earth fault.
The miniPAT give an indication that the insulation resistance
is acceptable. If this is not the case, the L-E or N-E LED light
will illuminate red, showing a likely insulation fault.
If the insulation and earth bond of the appliance are correct
the overall result LEDs will illuminate green.
Overall Result
The unit has an overall result indicator depending upon
which Class of appliance is being tested.
Class I appliances ‒ must be green.
Class II appliances ‒ must be green.
4

Earthing and Class I Appliances
Class I appliances and cables must always have an earth
wire tted for safety.
It is a critical safety feature of class I appliances and a class
I cable that the earth wire is connected.
As well as the insulation test the miniPAT will also verify that
the resistance between the earth chassis of the appliance
and the earth conductor (at the plug) connected to the
appliance is less than 0.3Ω (ohms).
If this is not the case, the earth bond LED will illuminate red,
showing a likely continuity fault between the earth at the
plug and the chassis of the appliance.
If the earth result is under 0.3Ω the earth LED will light up
green.
Overall Result ‒ Class I Appliances and Cables
When the insulation and the earth LED test results have
passed, the class I overall result LED will light up green,
showing that the appliance has passed the predetermined
tests.
Please note that due to the fact that this checker uses less
than 10V for its test, faulty voltage-dependent devices could
be undetected, such as surge protected extension leads.
5

Inserting the Battery
Your miniPAT comes complete with a PP3 battery in the
carry case.
Before use for the first time you need to insert the battery
into the tester. To do this:
1) Remove the tester from the green silicone protective boot
and unscrew the two screws in the side of the tester.
2) Lift off the lid and connect the battery to the connector.
3) Refit the lid in the reverse of the manner above, taking
care not to damage any cable within.
Your miniPAT is now ready to use.
Low Battery Warning
The miniPAT is tted with a low battery warning light which
will light up when the battery voltage is below 7V (volts).
If this happens, replace the battery.
Calibration
It is recommended that the unit should be calibrated every
12 months to ensure reading accuracy.
6

Visual Checking
Before carrying out any type of test on an appliance you
must check the following:
1) Plug
- For signs of cracks, damage and/or overheating.
- Ensure the cable is tightly in the plug and not loose.
2) Cable
- For splits in the cable and/or areas that have been
covered with insulating tape.
3) Appliance
- That the switch functions correctly and that it's not
cracked or damaged.
- There are no signs of overheating.
- All covers are in place.
If you nd any of the above faults the appliance should
be withdrawn from service and not used.
Do not carry out any testing if you nd an appliance that
is damaged in any way.
Before testing any appliance try and make sure any
switches are in the ON position.
7

Important Information - Determining the Appliance Class
Before you can check any appliance, you must first
determine the class of the appliance.
This will determine which LEDs you need to check whilst
testing.
Appliances and cables generally only fit into one of two
classes: Class I or Class II.
Class I Appliances
Class I appliances always require an earth wire from the
earth pin of the plug to the bodywork of the appliance for
safety. Examples of class I appliances include:
Kettles, toasters, irons, microwaves, washing machines,
PCs, monitors, shredders & laptop chargers.
Class I Cables
These must always have an earth for safety which runs from
the earth pin of the plug to the earth socket on the earth
socket on the other end of the cable. Examples include:
Kettle power leads, PC mains leads, laptop power supply
cables, monitor mains leads, 4 way extensions & extension
reels.
See cable examples on the following pages.
8

Class II Appliances
These appliances are double insulated for safety and DO
NOT require an earth cable safety.
Examples of Class II appliances are:
Mobile phone chargers, DVD players, hairdryers, food
mixers, straighteners, hedge trimmers, lawnmowers and
mains powered drills.
If you are unsure what class an appliance is, rst look for a
Class II symbol somewhere on the appliance identication /
rating plate.
The Class II Symbol looks like this:
What If Your Cannot Find the Class II Symbol?
Treat the appliance as a Class I.
If you are unsure about class identication and PAT testing,
why not take a look at the website below which offers a
training DVD?
www.pat-testing-course.com
9
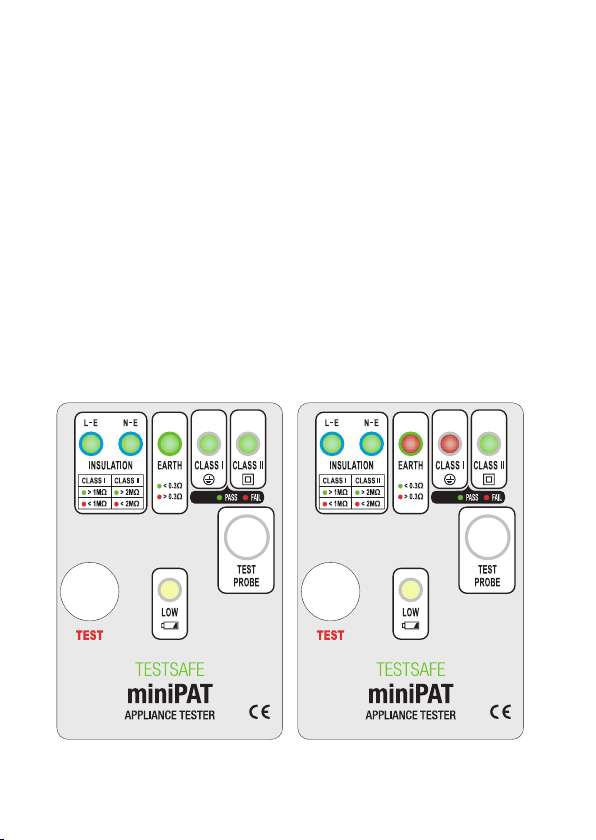
SAFE OPERATION
Pre-use Check
DO NOT CONNECT ANY APPLIANCE TO THE TESTER
DURING THIS CHECK.
1) Press the "TEST" button.
The LOW BATTERY indicator should NOT light up.
The Class I and the Earth LED should light up red.
The Class II and the Insulation LED should light up
GREEN.
2) If the above is correct then you can proceed to use the
tester.
10
APPLIANCE CHECKING
How to Test an Appliance
1) Plug the appliance into the miniPAT, then touch a metal
part of the appliance (unpainted screw or chassis) with the
tip of the test probe, making sure there is a good contact.
2) Press the "TEST" button and check the LEDs. The
appiance is a pass only if:
Class I: Insulation, Earth and Class I LEDs are green. See
Fig 1.
Class II: Insulation and Class II LEDs are green. See Fig 2.
Fig 1 Fig 2
11

Class I ‒ Example: PC
The appliance is plugged into the miniPAT. Touch the probe
onto the appliance casing and test.
As this is a Class I appliance all LEDs must be green.
12
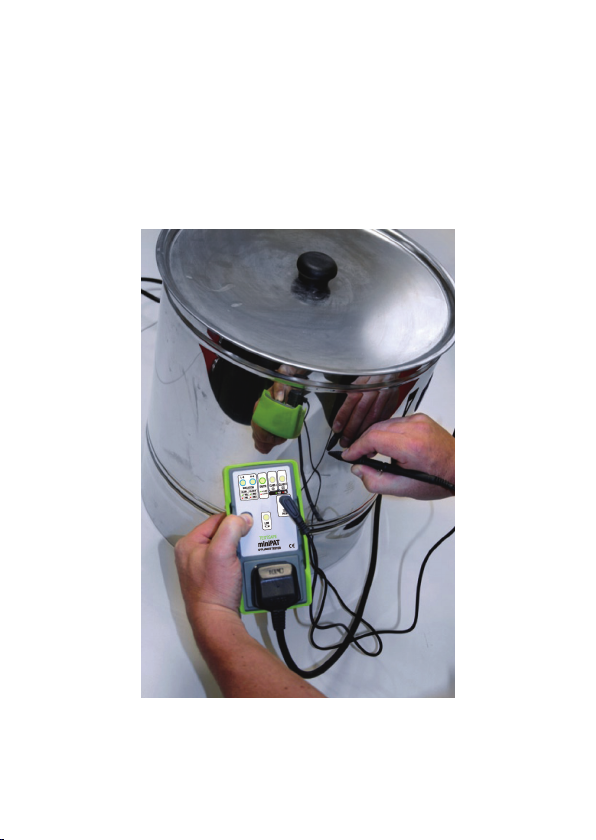
Class I ‒ Example: Electrical Water Urn
The appliance is plugged into the miniPAT. Appliance switch
is in the ON position. Attach the probe to clean metal work
on the appliance and test.
As this is a Class I appliance all LEDs must be green.
13

Class I ‒ Example: Extension Lead
Plug the extension lead into the miniPAT. Plug the supplied
earth adapter into the extension lead and repeat for each
socket.
14
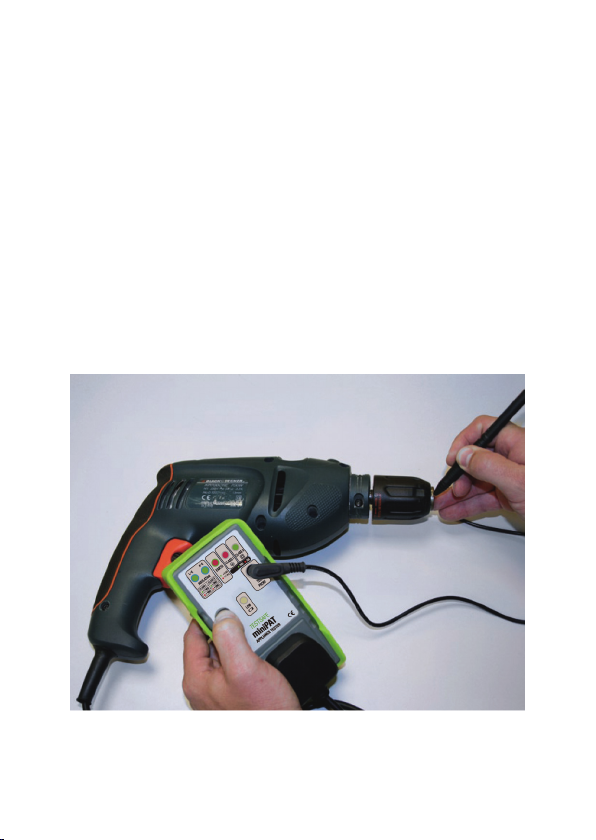
Class II ‒ Example: Drill
Plug the extension lead into the miniPAT. Attach the earth
probe onto any exposed metalwork and Test.
Latch the appliance in the ON position.
As this is a Class II appliance we need to check that both the
insulation and overall Class II LEDs are illuminated green.
This appliance has passed.
If the insulation on the appliance is faulty the insulation lights
will ash or remain steady red.
15

Laptop Supply and IEC Cables
If you are testing laptop power supply and kettle-type leads,
there is a special adaptor kit which is sold separately which
will allow you to easily test these with the test probe.
110V and 240V Industrial appliances can also be checked
using the adaptor kits.
Special Appliances
There are some appliances which are Class I which you
simply cannot access any metalwork with your test probe.
These are appliances such as laptop power supplies, some
shredders and some makes of desktop fan. There are also
some flat bottom kettles with entirely plastic casing which
come under this type of appliance.
The general rule of thumb is that with these appliances
only you can omit the earth test and treat them as Class II
only on the condition that there is no metalwork that can be
touched with a nger.
16

SPECIFICATIONS
ELECTRICAL
Resistance Ranges:
Class I Appliances and Cables
The L-E LED will light red when the resistance between line
to earth on the appliance or cable is lower than 1MΩ ±5%.
The N-E LED will light red when the resistance between
neutral to earth is lower than 1MΩ ±5%.
The earth bond LED will light green when the resistance
between the earth of the appliance or cable to the probe is
lower than 0.3Ω ±5%.
Class II Appliances
The Class II result light will be red if the insulation falls below
2MΩ.
The insulation LED's will ash alternately if the resistance is
between 2MΩ and 1MΩ.
The insulation LED's will be solid red if the insulation is
below 1MΩ.
Test Current: Line to Earth test current is 5uA maximum.
Neutral to Earth test current 5uA maximum.
Earth to Probe test current is 50mA maximum.
17

Maximum Output Voltage: 5V rms
Response Time: 0.1secs nominal
Battery Low Indicator: 7V nominal
MECHANICAL
Size: 72mm x 150mm x 36mm
Weight (less carrying case): Approx. 194g (with battery)
ENVIRONMENTAL
Operating Temperature Range: -15ºC to +55ºC
Storage Temperature: -20ºC to +70ºC
GENERAL
Battery: 9V / CE Marked / EN 61326-1
18

LIMITED WARRANTY
We warrant the product to be from defective material or
workmanship and agree to repair or replace this product if
faulty within a twenty-four-month period.
Consult the user manual for proper instruction regarding use
of this tester.
Our obligation under this warranty is limited to repairing or
replacing this test equipment which proves to be defective
within twelve-month period from the date of original
purchase.
This warranty does not apply to any products which have
been repaired or altered by unauthorized persons in any
way so as, in our sole judgment, or which have been subject
to misuse, abuse, misapplication, negligence or accidental
damage or which have had the serial numbers altered,
defaced or removed.
All warranties implied by law are hereby limited to a period of
12 months, and the provisions of the warranty are expressly
in lieu of any other warranties expressed or implied.
The purchaser agrees to assume all liability for any damages
or bodily injury which may result from the use or misuse of
the product by the purchaser, or its user, his employees, or
others, and the remedies provided for in this warranty are
expressly in lieu of any other liability we may have including
incidental or consequential damages.
19

DISTRIBUTED BY
PASS Ltd
1 Wilson Street
Stockton On Tees
TS17 7AR
United Kingdom
www.tester.co.uk
+44 800 247 1600
For Pat Testing Courses and a Training DVD with certicate
visit!
www.pat-testing-course.com
20
Table of contents


