Teuco 641 User manual

DE
FR
EN
ES
NL
PT
RU
EL
PL
TR
HR
Manuale d’uso
TRATTAMENTO AUTOMATICO ACQUA
Priručnik za uporabu
Kullanim kilavuzu
Instrukcja użytkowania
Εγχειριδιο χρησης
Инструкция по эксплуатации
Manual do usuário
Gebruikshandleiding
Manual del usuario
Gebrauchsanweisung
Manuel de l’utilisateur
User manual
DE
FR
EN
ES
NL
PT
RU
EL
PL
TR
HR
AUTOMATISCHE WASSERAUFBEREITUNG
TRAITEMENT AUTOMATIQUE DE L’EAU
AUTOMATIC WATER TREATMENT
OTOMATİK SU ARITMA SİSTEMİ
AUTOMATSKI TRETMAN VODE
AUTOMATYCZNE UZDATNIANIE WODY
АВТОМАТИЧЕСКАЯ ОБРАБОТКА ВОДЫ
ΑΥΤΟΜΑΤΗ ΕΠΕΞΕΡΓΑΣΙΑ ΤΟΥ ΝΕΡΟΥ
TRATAMENTO AUTOMÁTICO DA ÁGUA
AUTOMATISCHE WATERBEHANDELING
TRATAMIENTO AUTOMÁTICO AGUA

• This manual provides a guide for the safe use of your Teuco whirlpool bathtub. As such, it
should be read through carefully and in its entirety before using the product.
• This manual constitutes an integral part of the product and must be kept for future reference.
• Teuco Guzzini Spa reserves the right to make such changes as are deemed appropriate without
prior notice and without any obligation to update.
CONTENTS
INSTRUCTIONS FOR USE 3-5
- Principles for treating water with chemicals
- System control panel
- List of chemicals supplied with the automatic water
treatment
- Using for the rst time
- Warnings
- Setting the electrolysis system to off
- Setting the electrolysis system to manual mode
- Setting the electrolysis system to automatic mode
- Setting the pH level
- Setting the disinfectant potential of the water (ORP)
- Recommended pH/ORP values
MAINTENANCE 10
- Checking the chlorine level in the water
- Adding salt to the water
- Checking the pH detection electrode
- Checking the ORP (chlorine) detection electrode
- Putting away for winter
- Check sacricial anode corrosion
- PH and ORP probes
ALARMS 12-13
- System alarms and messages
2
EN
AUTOMATIC WATER TREATMENT
PRINCIPLES FOR TREATING WATER WITH
CHEMICALS
The automatic water treatment kit makes it possible
to monitor and control the basic parameters for the
water, cutting user interventions to a minimum.
The pH value is regulated by adding small doses
of a dilute acid solution; disinfection is guaranteed
by the constant presence of an amount of chlorine.
The system automatically generates and
maintains the chlorine level required for the water
and regulates the pH level.
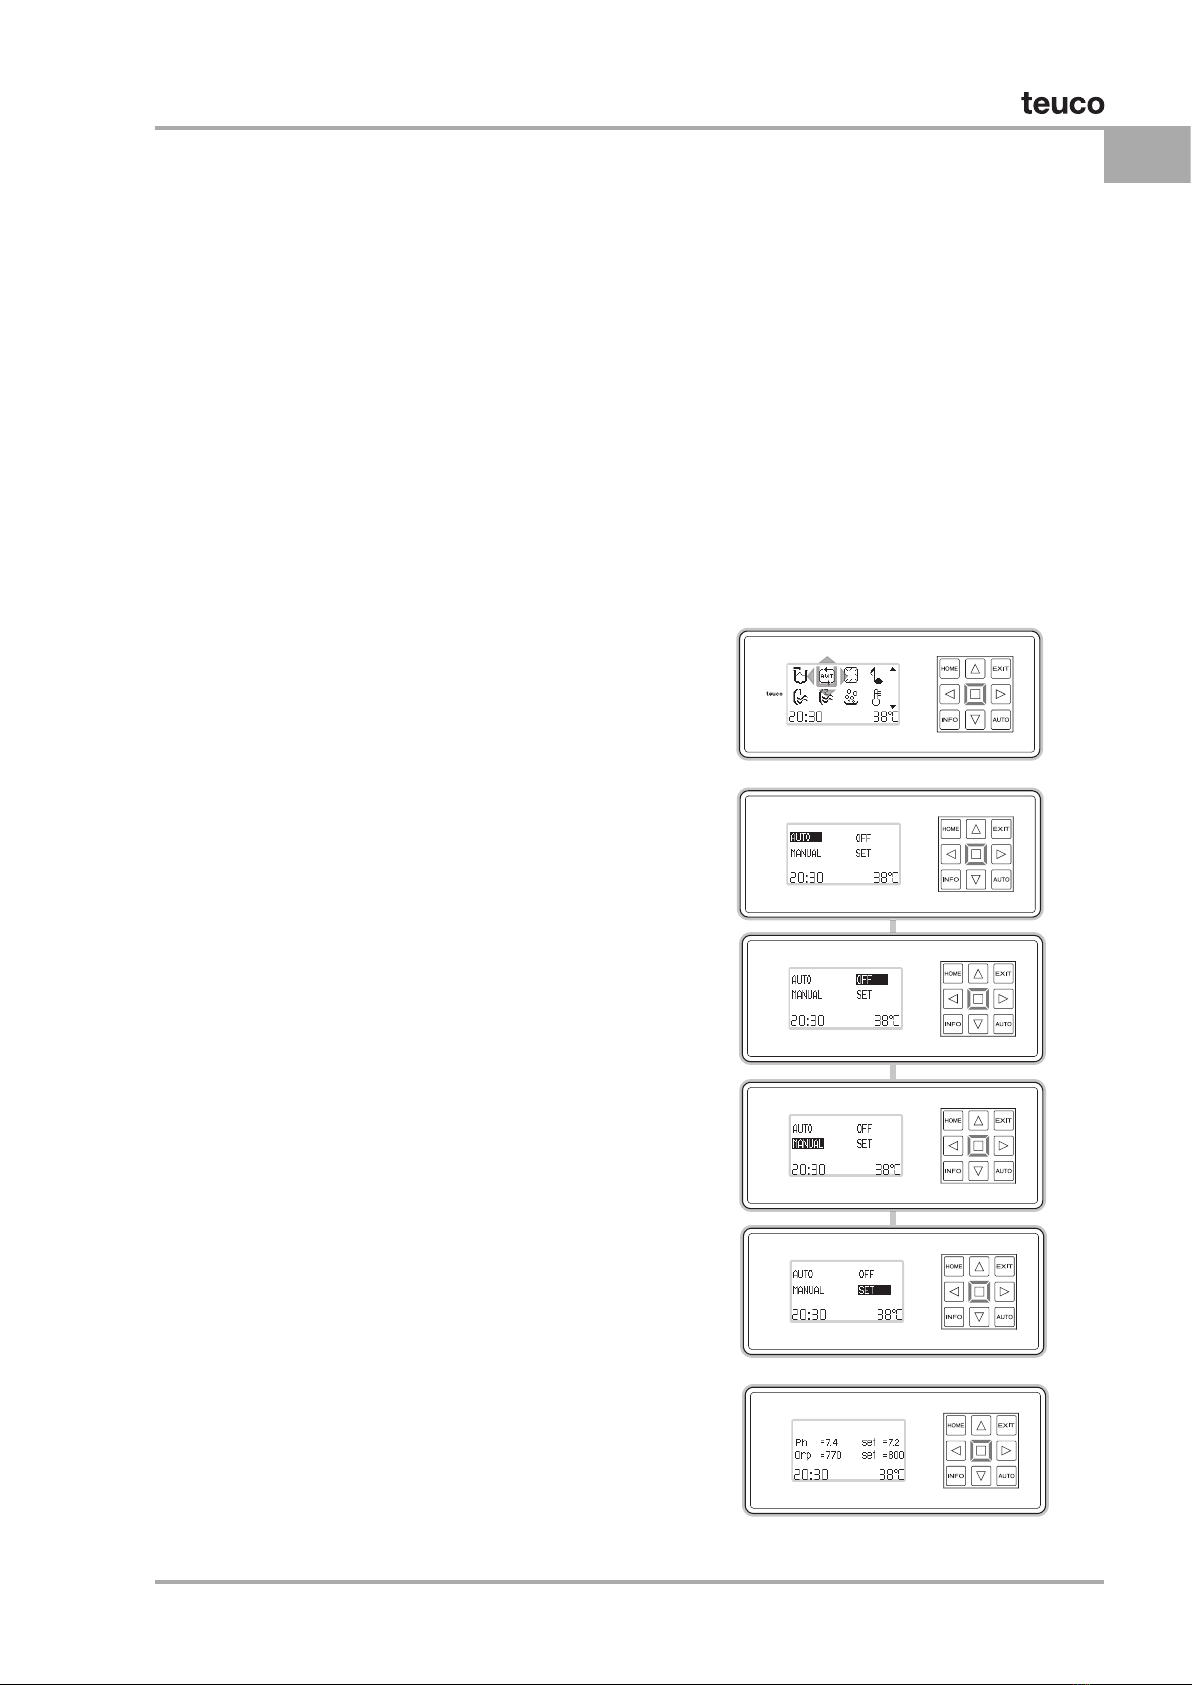
SYSTEM CONTROL PANEL
To open the automatic water treatment menu,
after selecting the icon, press the “OK” button.
This will open a new screen with 4 options:
1) “AUTO”: automatic water treatment operates
on the base of the parameters selected in the
“SET” menu.
2) “MANUAL”: the automatic treatment produces
chlorine continuously.
This mode switches off after 20 minutes.
3) “OFF”: automatic treatment is switched off.
4) “SET”: this opens the sub menu for viewing
the water parameters and to set the required
ORP and pH values.
Firstly, on each line is highlighted the actual
value detected by the sensor. The word “set” then
follows that is the value that has been set by the
control panel.
The value detected and the “set” value could
obviously not coincide.
Large discrepancies between the values detected
and the set point value that have not been
accompanied by an alarm signal could happen
when renewing the water contained in the mini-
pool and as a consequence of intensive use or
the pouring in of foreign substances or rainwater
into the mini-pool. This must not be interpreted
as a problem. To operate better, the system
could oscillate around the set values even during
normal functioning in stabilised conditions.
IINSTRUCTIONS FOR USE
3
EN
AUTOMATIC WATER TREATMENT
ORP
PH
ORP
sensor
PH
sensor
1
2
LIST OF CHEMICALS SUPPLIED WITH THE
AUTOMATIC WATER TREATMENT
a) Quick test tester 63000566000
This contains “STRIPS” for checking basic water
parameters, chlorine, alkalinity and pH.
b) Calcinex 0.5 L 63000548000
This serves to correct alkalinity levels.
c) pH-MInus 6 kg 63000552000
This serves to correct the pH value of the water
and to prepare the acid solution used to top up
the pool.
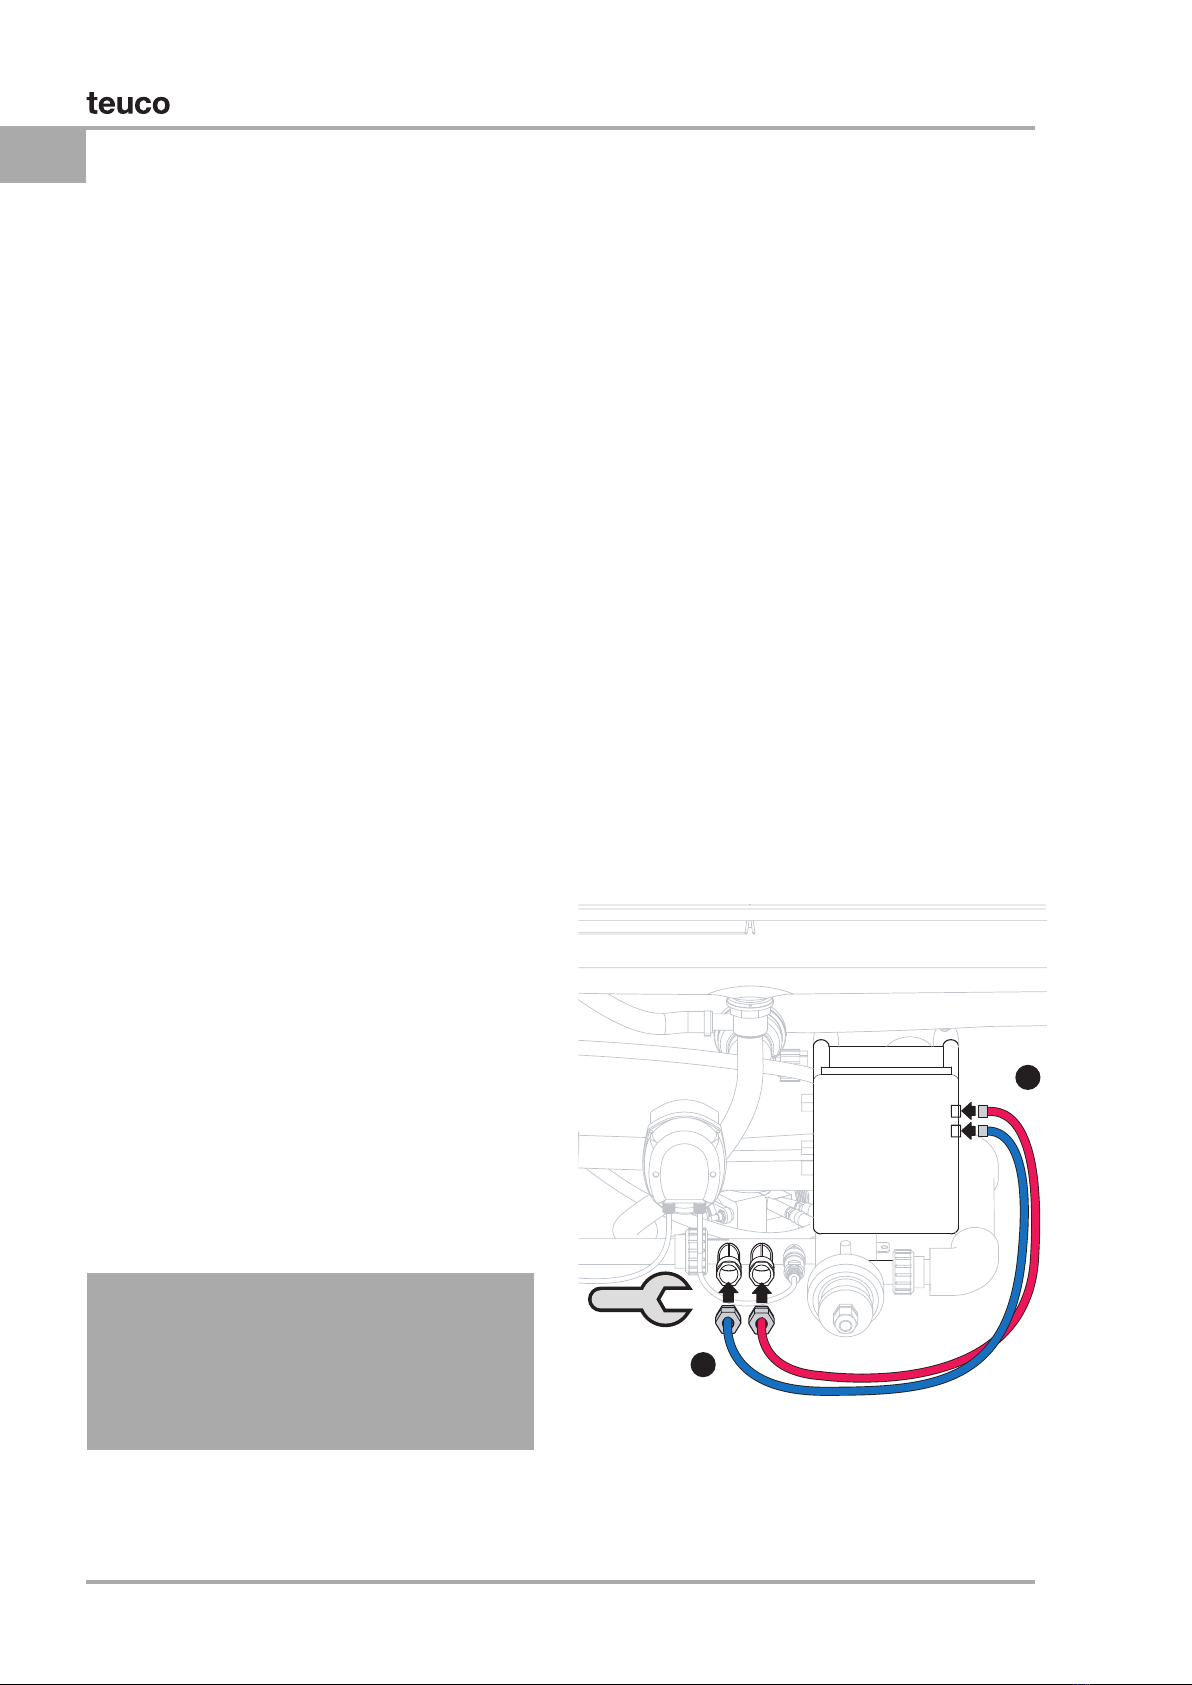
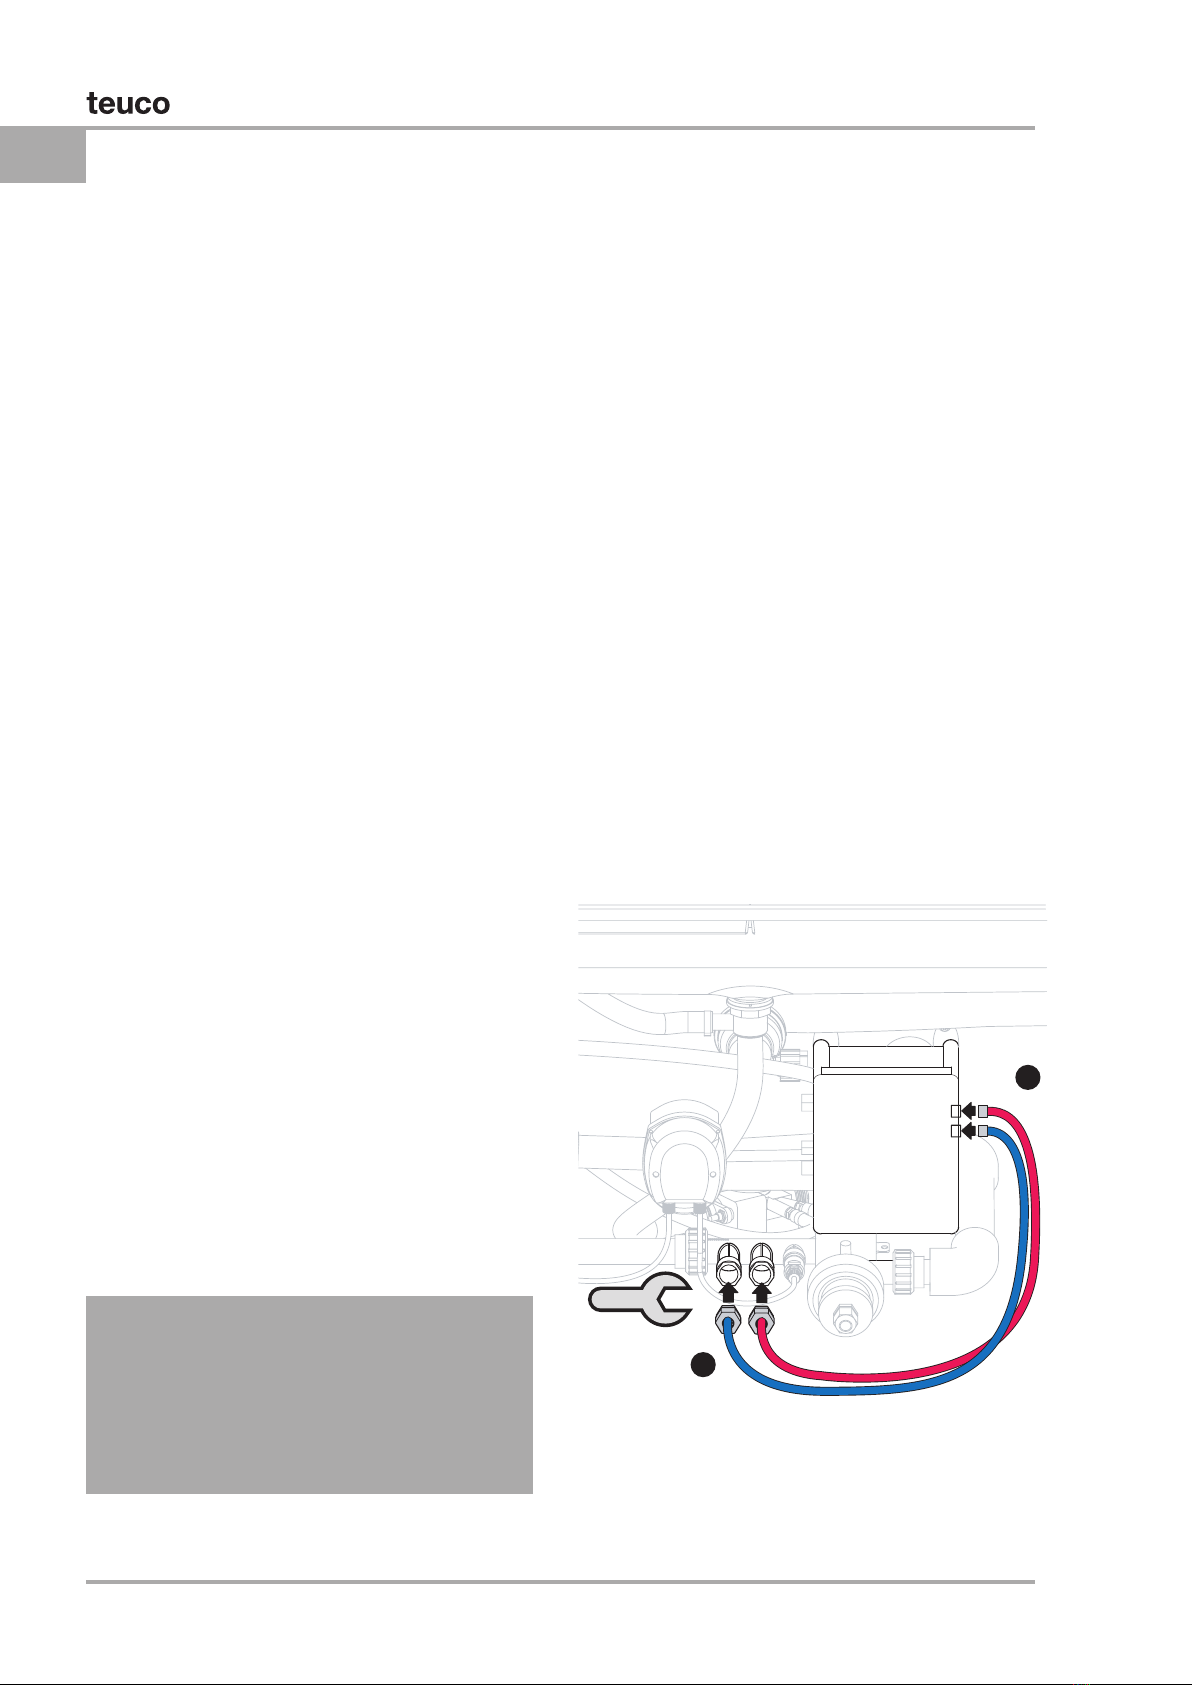
USING FOR THE FIRST TIME
- Remove the probes from their protective casing.
- Install the probes on the hydraulic device for
automatic water treatment.
- Make the electrical connection for the probes
on the electric panel as marked (ORP and pH) on
the probes; the pH probe connection is blue and
the ORP probe connection is red.
- Fill the pool with water until the it is operating
normally (see the manual for control panel use).
- Keep the probe casings to one side as they may
be useful if the system is going to be left unused
for long periods.
Continuous improvements made to the
product could bring about the availability of
new products/treatments at a date after the
publication of this manual. Periodically check the
availability of new chemical products approved
by Teuco, to take advantage of the relative
benets.
4
EN
AUTOMATIC WATER TREATMENT

Menù
Exit
Auto
OK
Menù
Exit
Auto
OK
Menù
Exit
Auto
OK
Menù
Exit
Auto
OK
15sec.
Menù
Exit
Auto
OK
Menù
Exit
Auto
OK
Menù
Exit
Auto
OK
Menù
Exit
Auto
OK
15sec.
Menù
Exit
Auto
OK
Menù
Exit
Auto
OK
Menù
Exit
Auto
OK
Menù
Exit
Auto
OK
Menù
Exit
Auto
OK
Menù
Exit
Auto
OK
Menù
Exit
Auto
OK
Menù
Exit
Auto
OK
Menù
Exit
Auto
OK
Menù
Exit
Auto
OK
15sec.
15sec.
15sec.
15sec.
15sec.
Menù
Exit
Auto
OK
Menù
Exit
Auto
OK
Menù
Exit
Auto
OK
Menù
Exit
Auto
OK
15sec.
Menù
Exit
Auto
OK
Menù
Exit
Auto
OK
Menù
Exit
Auto
OK
Menù
Exit
Auto
OK
15sec.
Menù
Exit
Auto
OK
Menù
Exit
Auto
OK
Menù
Exit
Auto
OK
Menù
Exit
Auto
OK
Menù
Exit
Auto
OK
Menù
Exit
Auto
OK
Menù
Exit
Auto
OK
Menù
Exit
Auto
OK
Menù
Exit
Auto
OK
Menù
Exit
Auto
OK
15sec.
15sec.
15sec.
15sec.
15sec.
< 25 8
25 ÷ 30 6
>30 4
Water tempera-
ture °C
Salt content
g/litre
- As soon as “H2O” disappears from the control
panel, set to “OFF” and add salt (non-iodised
cooking salt). The amount of salt required for
correct operation should be calculated according
to temperature and to the amount of water being
used. See the technical data sheet for the pool for
more information about water content and the table
listing solution concentrations.
- Prepare the ACID solution to put in the pool: make
a mix of 600g pH minus in 3 litres of mains water;
top up the tank.
Wait 2 hours before starting the TREAT.
In the meantime, use the strip to check the water
values.
Adjust alkali levels: if high (> 120 mg/l), using
CALCINEX (add 25 ml at a time, switch on the
hydro and after 10 minutes, check the value) – We
recommend repeating the operation as necessary,
when the alkali level is high (recommended range
80-150 ppm CaCO3) or when the water is cloudy.
If pH > 8.5 add a small amount of pH minus (10g at
a time, waiting for it to dissolve completely), directly
to the pool by hand so as to lower the pH to 8.
- 2 hours after adding salt, carry out
hyperchlorination, setting the automatic treatment
in manual mode.
This operation is recommended every time
that water is changed or as needed (after a day
of intensive use where the pool has not been
accessible, or if the water should turn green).
After 20 minutes, the TREAT will automatically set
itself to AUTO and continue to monitor the chlorine
parameters and the pH of the water.
5
EN
AUTOMATIC WATER TREATMENT

IMPORTANT NOTICES
1) Do not operate the device with amounts of salt
that are not correct for the temperature of use and
the amount of water in the pool; these operating
conditions will trigger an alarm on the control panel.
2) If the pH is very low (pH < 5) or if there is high
chlorine content (values > 900 ORP), replace some
or all of the water in the pool.
3) Never use other chemicals than those stated
here as this could cause damage to the device.
4) If the tub remains empty for a long period,
ensure that the sensors remain immersed in water,
or remove them and keep the extremities humid.
Use the wrapping in which they were originally
supplied and soak the sponge inside the wrapping
as necessary.
5) Never use iodised salt.
6) Never use copper-based products (anti-algae
treatments).
7) For cloudy, whitish water, correct the alkalinity
and then the pH.
8) Corroded accessories or skin irritations: this
means the chlorine concentration is too high
( > 900) and/or the pH is too low (< 6.5). Partially
empty the tank and top up again.
9) Coloured water: dissolved metals; carry out a
hyperchlorination (TREAT in MANUAL) and clean
the lters.
10) Foam: due to the type of device, there is a foam
effect but only while the water is moving (HYDRO
on). If foam is present even when the HYDRO is
switched off, proceed with a partial or total water
replacement to restore optimum water parameters.
11) Please make sure the AWT system is in stand-
by while using the product; otherwise manually set
the system to the OFF position.
6
EN
AUTOMATIC WATER TREATMENT
Menù
Exit
Auto
OK
Menù
Exit
Auto
OK
Menù
Exit
Auto
OK
Menù
Exit
Auto
OK
15sec.
Menù
Exit
Auto
OK
Menù
Exit
Auto
OK
Menù
Exit
Auto
OK
Menù
Exit
Auto
OK
15sec.
Menù
Exit
Auto
OK
Menù
Exit
Auto
OK
Menù
Exit
Auto
OK
Menù
Exit
Auto
OK
Menù
Exit
Auto
OK
Menù
Exit
Auto
OK
Menù
Exit
Auto
OK
Menù
Exit
Auto
OK
Menù
Exit
Auto
OK
Menù
Exit
Auto
OK
15sec.
15sec.
15sec.
15sec.
15sec.
Menù
Exit
Auto
OK
Menù
Exit
Auto
OK
Menù
Exit
Auto
OK
Menù
Exit
Auto
OK
15sec.
Menù
Exit
Auto
OK
Menù
Exit
Auto
OK
Menù
Exit
Auto
OK
Menù
Exit
Auto
OK
15sec.
Menù
Exit
Auto
OK
Menù
Exit
Auto
OK
Menù
Exit
Auto
OK
Menù
Exit
Auto
OK
Menù
Exit
Auto
OK
Menù
Exit
Auto
OK
Menù
Exit
Auto
OK
Menù
Exit
Auto
OK
Menù
Exit
Auto
OK
Menù
Exit
Auto
OK
15sec.
15sec.
15sec.
15sec.
15sec.
Menù
Exit
Auto
OK
Menù
Exit
Auto
OK
Menù
Exit
Auto
OK
Menù
Exit
Auto
OK
15sec.
Menù
Exit
Auto
OK
Menù
Exit
Auto
OK
Menù
Exit
Auto
OK
Menù
Exit
Auto
OK
15sec.
Menù
Exit
Auto
OK
Menù
Exit
Auto
OK
Menù
Exit
Auto
OK
Menù
Exit
Auto
OK
Menù
Exit
Auto
OK
Menù
Exit
Auto
OK
Menù
Exit
Auto
OK
Menù
Exit
Auto
OK
Menù
Exit
Auto
OK
Menù
Exit
Auto
OK
15sec.
15sec.
15sec.
15sec.
15sec.
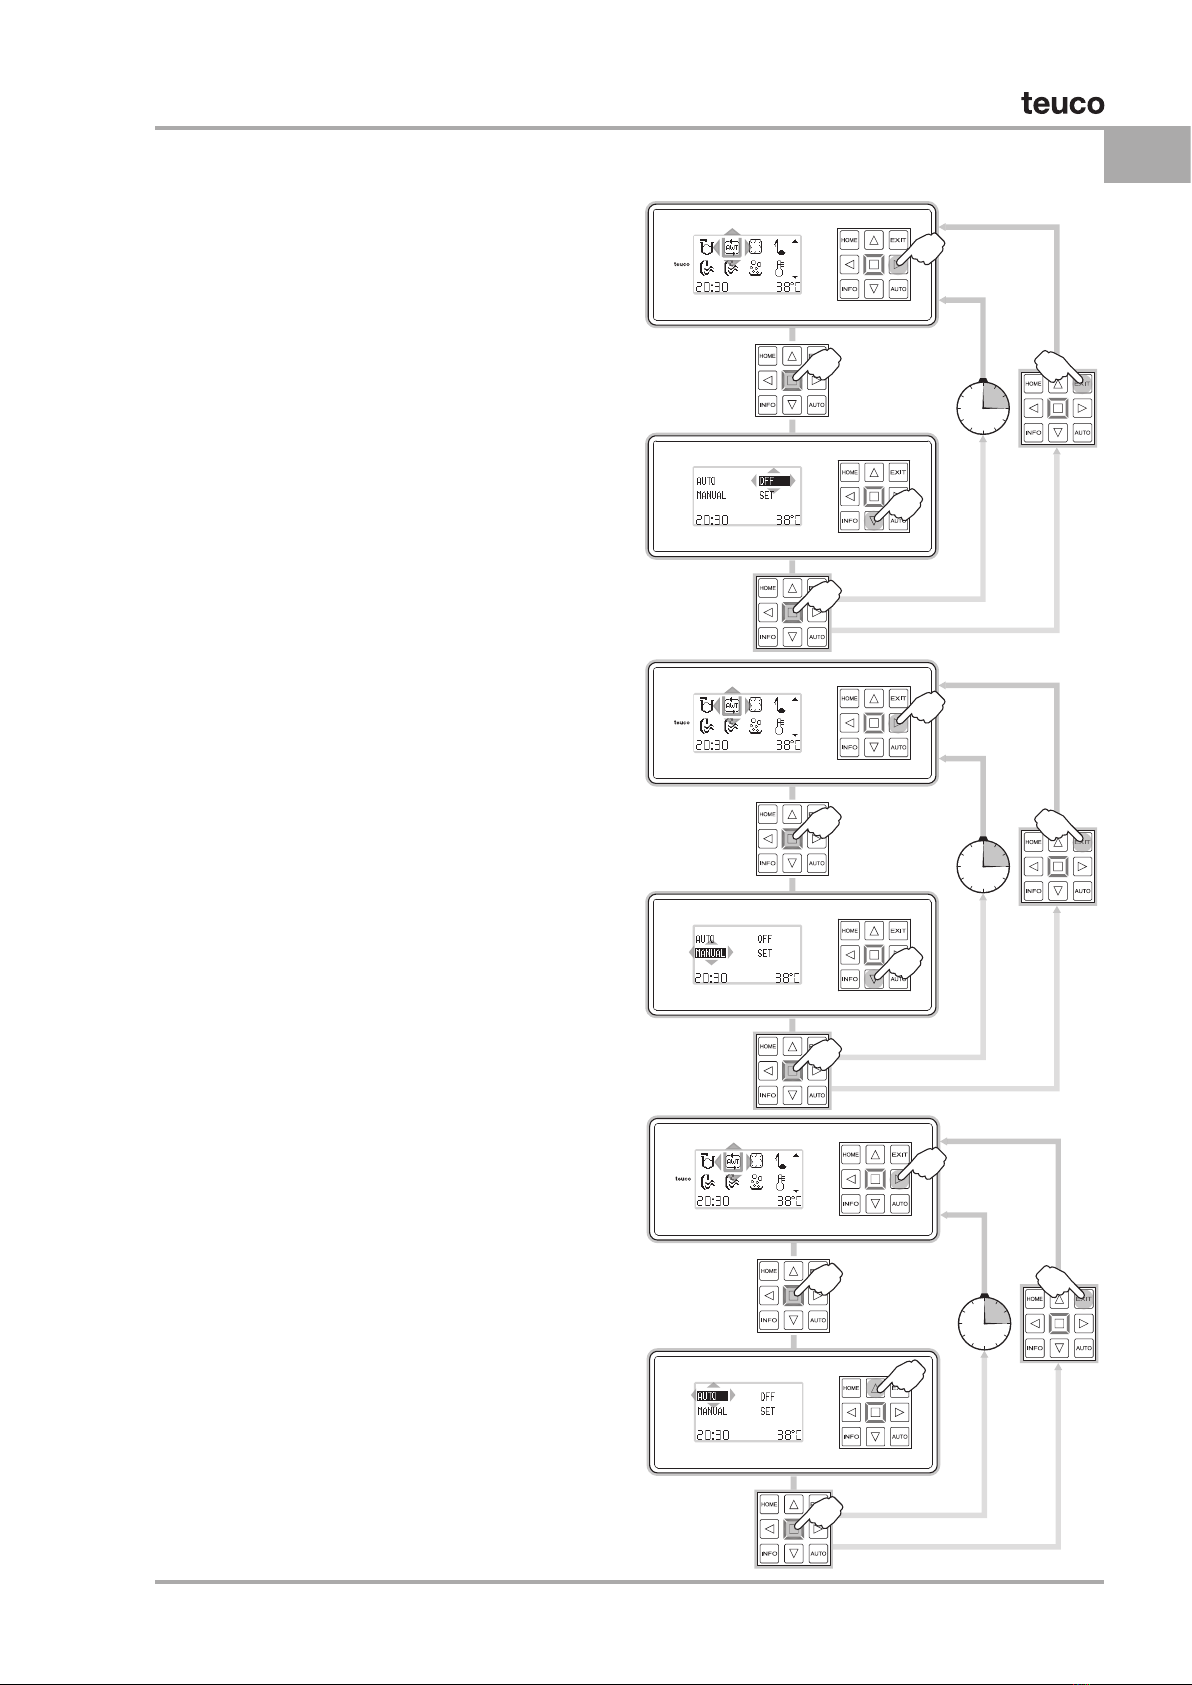
SETTING THE ELCTROLYSIS SYSTEM TO OFF
This operation is needed whenever probe
maintenance is required or when waiting for any
salt to dissolve completely in the water.
SETTING THE ELECTROLYSIS SYSTEM TO
MANUAL
The manual operation mode is recommended
when hyperchlorination is considered useful or
after intensive product use.
After 20 minutes’ operation, the system returns to
automatic operating mode.
SETTING THE ELECTROLYSIS SYSTEM TO
AUTOMATIC
The automatic operation mode is the recommended
mode. The water parameters are kept under
constant control.
STAND-BY STATUS OF THE ELECTROLYSIS
SYSTEM
During operation of the whirlpool baths, it is
automatically in stand-by: in this status, the system
momentarily prohibits the production of chlorine.
7
EN
AUTOMATIC WATER TREATMENT

15sec.
SETTING pH LEVELS
Users can set the pH levels as follows:
- open the automatic treatment menu by clicking
on the relevant icon.
- select SET.
- place the cursor over the previous pH value (PH
SET) and change it if required, selecting a setting
from the permitted range. This operation also
makes it possible to make a quick comparison
with the actual pH value, as detected by the
probe.
8
EN
AUTOMATIC WATER TREATMENT

15sec.
PH ORP
7 - 7.2
7.2
7.4
750
650-750
INTENSIVE
USE
DOMESTIC
USE
SETTING THE DISINFECTANT POTENTIAL OF
THE WATER (ORP)
SETTING THE ORP LEVEL
Users can set ORP levels as follows:
- open the automatic treatment menu by clicking
on the relevant icon.
- select SET.
- place the cursor over the previous ORP value
(ORP SET) and change it if required, selecting a
setting from the permitted range.
This operation also makes it possible to make a
quick comparison with the actual ORP value, as
detected by the probe.
RECOMMENDED pH/ORP VALUES
REMEMBER THIS RULE: pH xx => the chlorine
is more active (i.e., it acts faster and is used up
more quickly). pH xx => the chlorine less active
(i.e., it acts more slowly and is used up more
slowly).
9
EN
AUTOMATIC WATER TREATMENT

MAINTENANCE
CHECKING THE LEVEL OF CHLORINE IN THE
WATER
More or less every month, on the basis also of
the conditions of utilisation, check the chlorine
value in the water using the chlorine control kit.
Note that the chlorine control kit indicates mg/
litre which is different from the ORP value that
is visualised on the display and utilised to check
the system.
Even if the two parameters are not easily
correlated, in principle the correct functioning of
the AWT in the range of foreseen values and in
the absence of alarms corresponds to the level
of optimum chlorination indicated by the strip of
the control kit.
If after a chlorine strip check it is necessary to
increase or decrease the level of chlorine in
the mini-pool, the ORP value can be set higher
or respectively lower on the control panel. To
achieve the desired effect, the setting variations
of the ORP level require a time that can vary on
the basis of the utilisation conditions of the mini-
pool, temperature, amount of use, etc.
In the case of a large discrepancy between the
values of chlorine measured using the strip and
the optimum values indicated in the control kit,
or in the case of wanting to quickly bring the
chlorine parameter to the norm, carry out the
indicated procedure:
1. If there is an excessive presence of chlorine,
partially empty the contents of the tub and
reset the level with fresh water.
2. Switch on the hydromassage pump/activate
the accelerated ltration programmes to
remix the contents of water and after 4/5
hours of this operation, check the chlorine
level using the strip.
3. After topping up with water several times,
check that the quantity of salt in the water is
sufcient. Add as necessary (Signalled on the
control panel; refer to alarm section).
4. In the case of insufcient chlorination, proceed
with a hyperchlorination, setting the AWT in
manual mode. Switch on the hydromassage
pump/activate the accelerated ltration
programmes to remix the contents of water
and after 4/5 hours of this operation, check
the chlorine level using the strip.
10
EN
AUTOMATIC WATER TREATMENT

If the suggested corrective actions do not
obtain the desired result, contact the nearest
Authorised Technical Assistance Centre (refer to
the attached list).
ADDING SALT TO THE WATER IN THE
MINIPOOL
Add 500g cooking salt (NaCl) when the display
reads “LOW SALT” and start the “FILTER PLUS”
function on the alarms “MENU” page.
Make sure that the display no longer reads
“LOW SALT” (this might take a few hours).
If “LOW SALT” does not disappear, repeat the
above procedure.
For optimum salt level checks, use a salinity
detector.
CHECKING THE pH LEVEL OF THE WATER
Every month check the chlorine level in the water
using the control kit (quick tester) supplied as
standard.
In the case of excessive or insufcient chlorine,
decrease or respectively increase the value of
the “pH set” to correct the pH value.
The variations set of the pH value on the control
panel could require hours before becoming
operative on the basis of the utilisation conditions
of the mini-pool.
In the case that the pH is less than 5, it is
advisable to partially substitute the content of
water in the mini-pool to speed up the resetting
of the values.
In the case of a large discrepancy between
the values set on the control panel and the
values detected by the strip, contact the nearest
Authorised Technical Assistance Centre (refer to
the attached list).
11
EN
AUTOMATIC WATER TREATMENT
ORP
PH
ORP
sensor
PH
sensor
1
2
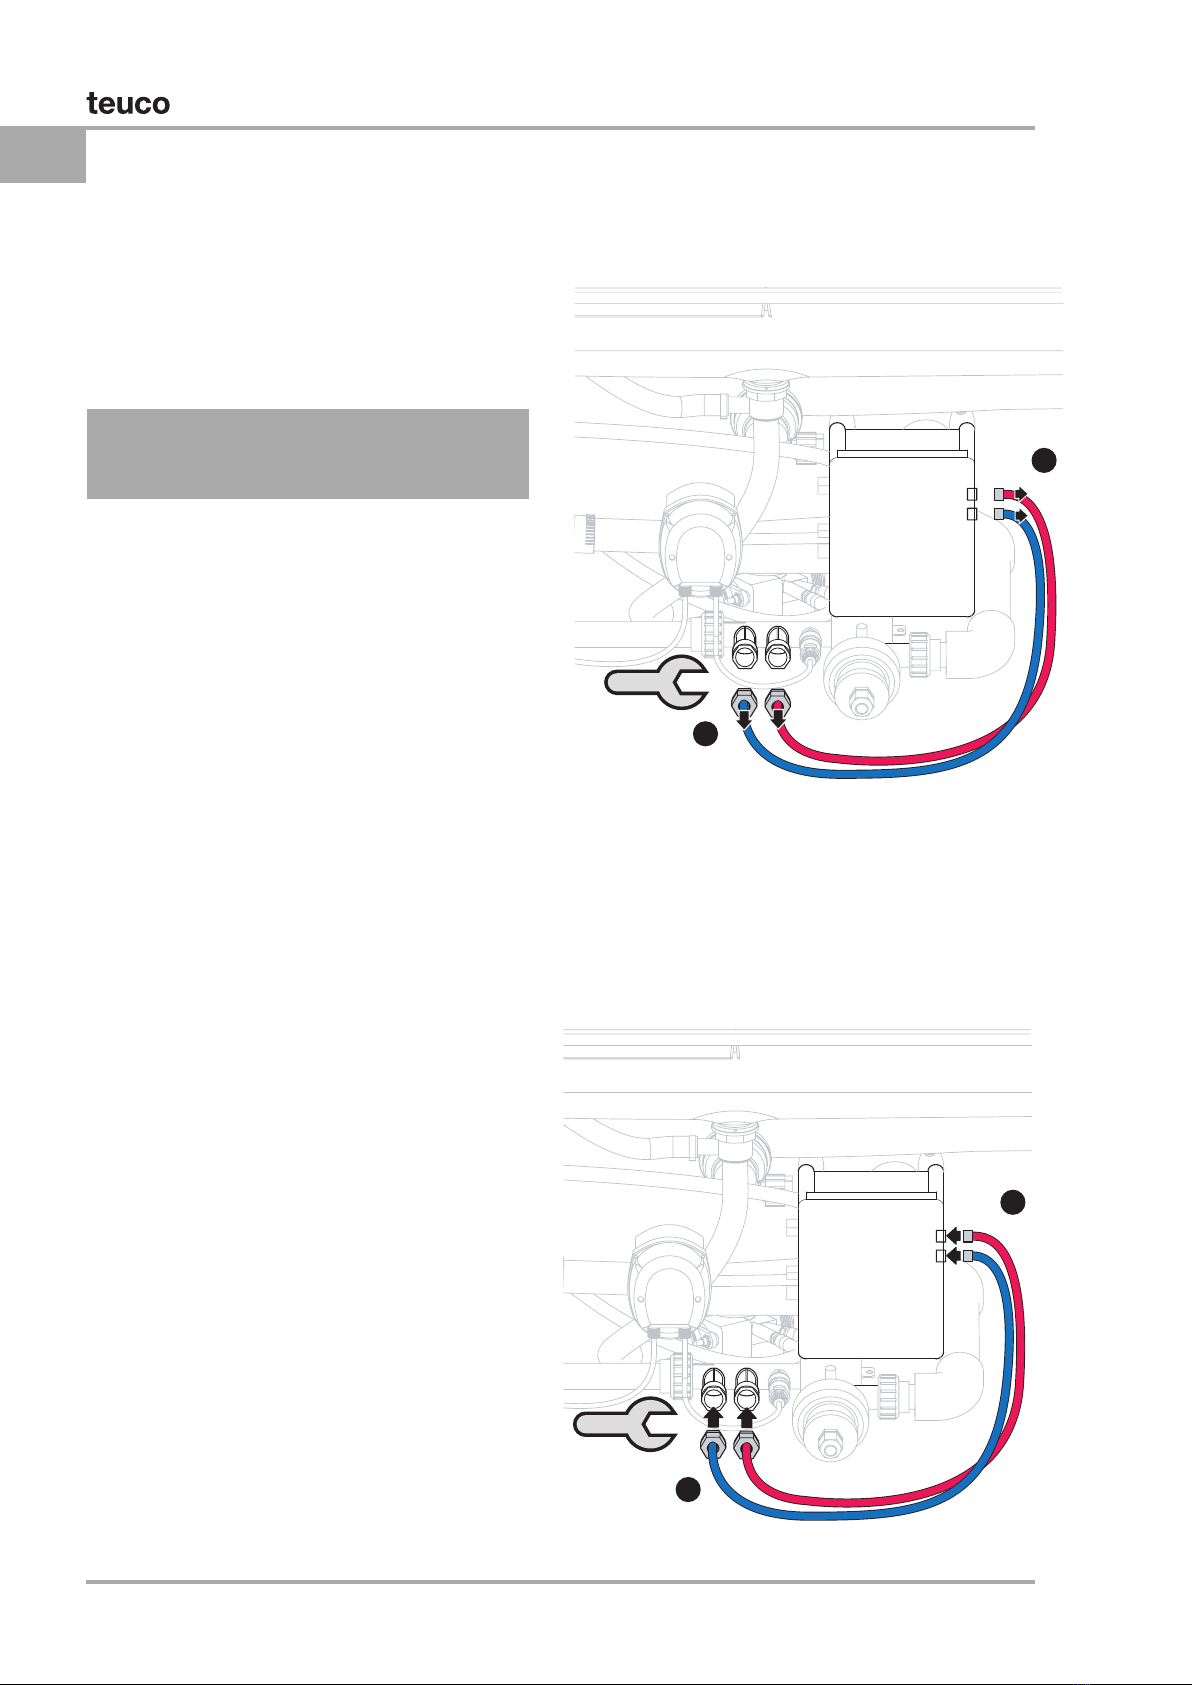
PUTTING AWAY FOR WINTER
Switch off power to the system and empty the
pool.
1) – For long periods of time: remove the
probes, making sure to keep the ends wet
(use the original cases, making sure to wet the
sponge as needed).
It is advisable to contact your nearest
Authorised Technical Assistance Centre (see
the attached list) to perform this operation.
2) – For short periods: no special procedures
are required.
Before using the water treatment kit again
after a winter pause, proceed as described
for rst-time use.
ORP
PH
ORP
sensor
PH
sensor
1
2
CHECK SACRIFICIAL ANODE CORROSION
The pool with AWT is equipped with sacricial anodes to protect against any corrosion caused by the
presence of salt and chlorine: These sacricial anodes are located inside the electrolytic cell and can be
easily inspected. During checks and maintenance, check the operation of the anodes. If they are very
corroded, the anodes must be replaced. The anode check must be done at least once per year.
PH AND ORP PROBES
Teuco provides a limited guarantee on the PH
and ORP probes since they are considered “wear
items” because they are subject to performance
degradation based on the use and maintenance
conditions and how they are stored during
periods when they are not used. At least once
a year, have them checked by our Technical
Assistance service.
12
EN
AUTOMATIC WATER TREATMENT

ALARMS
ALARMS AND SYSTEM MESSAGES
See the access mode for the alarms menu in the
control panel instructions.
If there is an anomaly in the system, the lit top
of the “OK” button will turn amber or ashing red
and a ashing exclamation mark will also appear
at the bottom of the display.
- Select the ALARMS icon from the INFO MENU,
using the arrow keys to move the cursor.
- Press HOME or OK to view the MENU
( ALARMS).
- Generally, if the top of the “OK” button is amber,
then it is possible to use the pool. If the top is
red and ashing, then it is not advisable to use
the pool.
Alarm Diagnostics Solution
HIGH PH Amber colour LED
switched ON.
The peristaltic pump
has stopped whilst the
electrolysis continues
to be operative.
The chemical values of the
water are out of range. There is
no dangerous situation.
If the signal remains for many
consecutive hours, wait for a
possible normalisation of the
situation before taking specic
measures.
HIGH pH: pH > 8 – it is advisable
to adjust the values by manually
entering a certain quantity of
pH minus, as per the dosage
indicated on the packet.
LOW pH: The pH is slightly less
than 7. Wait for the pH to return
to the recommended range
during utilisation, or manually
intervene by substituting a part
of the water (at least 200 litres).
VERY LOW PH: pH < 6.5.
Intervene manually, substituting
at least 500 litres of water.
LOW PH
VERY LOW PH
13
EN
AUTOMATIC WATER TREATMENT
TR H2O
MANUAL
Amber colour LED
switched ON.
AWT IN MANUAL
MODE. The treatment
of the water regulates
the pH on the basis of
the set value, whilst
the production of
chlorine without inter-
ruption is effectuated
for 20’.
This is not a fault, but a
signal of a non-automatic
functioning situation.
The alarm signal stops after 20’
and the system returns to au-
tomatic mode, or manually in-
tervening before the end of the
20’ by changing the AWT status
(switched off or in AUTO).
TR H2O OFF Amber colour LED
switched ON.
The AWT is switched
off and therefore both
the pH and the chlo-
rine content are not
controlled.
This is not a fault, but a
signal of a non-automatic
functioning situation.
When necessary, change the
AWT status (in MANUAL or in
AUTO).
HI SALT
LOW SALT
Amber colour LED
switched ON.
The quantity of salt in
the water is out of the
recommended range.
When there is not enough salt,
add 500g each time and wait
2 hours. Use an accelerated
ltration programme to mix
the water or repeatedly switch
on the hydromassage pump.
Repeat the operation until the
alarm disappears.
If there is too much salt, partial-
ly substitute the water content
(at least 150-200 litres of water
are recommended).
VERY HIGH PH
(TR H2O OFF)
VERY HIGH MV
(TR H20 OFF)
Red LED switched ON.
In this case, the AWT
is positioned in OFF
mode waiting for an
external intervention.
If the pH is very high, manual-
ly correct the pH values by
adding an adequate dose of pH
minus as per the instructions
on the packet and then activate
the AWT in the desired mode.
If the MV value is very high;
that is to say there is an abun-
dance of chlorine in the tub that
could be irritating. If possible,
wait 24 hours or proceed with
the partial substitution of the
water (at least 150-200 litres of
water). If the problem persists
and/or represents itself after
a few days, contact Technical
Assistance.
14
EN
AUTOMATIC WATER TREATMENT

ACID Amber colour LED
switched ON.
Prolonged functioning
of the acid intake
pump.
Possible lack of acid
in the tank.
This is not a fault but a signal
advising that the acid intake
pump has been operating for
several hours without mana-
ging to reduce the pH level.
Check the acid level in the tank
and top up as per the instruc-
tions. If the pH value stabilises,
the alarm disappears automa-
tically and the LED returns to
green.
ACID PUMP Amber colour LED
switched ON.
The peristaltic pump
has operated for a
long period and is now
blocked, whilst the
electrolysis continues
to be operative.
Check the level of acid in the
tank and top up as per the
instructions.
After this operation, put the
AWT into operation in the desi-
red mode.
If this alarm appears frequently
(indicatively every week) con-
tact Technical Assistance.
CHECK ORP
SENS
Amber colour LED
switched ON.
Fault regarding the
sensors.
The AWT continues to
function.
Contact Technical Assistance.
CHECK PRO-
BES
(TR H2O OFF)
Red LED switched ON.
Fault regarding the
sensors.
The AWT is switched
OFF.
Contact Technical Assistance.
- Press EXIT or OK to return to the INFO
MENU.
15
EN
AUTOMATIC WATER TREATMENT

• Ce manuel représente un guide qui vous permettra d’utiliser l’Hydromassage Teuco en toute
sécurité. Lisez-le attentivement avant de mettre en route l’appareil.
• Ce manuel doit toujours accompagner l’appareil. Le conserver pour toute consultation future.
• Teuco Guzzini Spa se réserve le droit de modier ses produits sans préavis ni remplacement.
SOMMAIRE
INSTRUCTIONS D’EMPLOI 17-19
- Principes du traitement chimique de l’eau
- Panneau de commande du système
- Liste des produits chimiques fournis en dotation avec le
kit de traitement automatique de l’eau
- Première mise en service
- Notes
- Programmer le système à électrolyse en modalité off
- Programmer le système à électrolyse en modalité
manuelle
- Programmer le système à électrolyse en modalité
automatique
- Programmer le niveau du PH
- Programmer la force de désinfection de l’eau (ORP)
- Valeurs conseillées PH/ORP
ENTRETIEN 24
- Vérier le niveau de chlore dans l’eau
- Ajouter le sel dans l’eau
- Contrôler l’électrode de détection du PH
- Contrôler l’électrode de détection de l’ORP (Chlore)
- Mise au repos pendant l’hiver
- Contrôle corrosion anodes consommables
- Sondes PH et ORP
ALARMES 27-29
- Alarmes et messages de système
16
FR
TRAITEMENT AUTOMATIQUE DE L’EAU

PRINCIPES DU TRAITEMENT CHIMIQUE DE L’EAU
Le kit de traitement automatique de l’eau permet
de mesurer et de contrôler les paramètres
fondamentaux de l’eau, réduisant ainsi au
minimum les interventions de la part de
l’utilisateur.
Le PH est réglé à travers l’introduction en petites
doses d’une solution diluée acide; la désinfection
est garantie par la présence constante d’une
quantité de chlore actif.
Le système crée et maintient, de façon
automatique, le niveau de chlore que l’on désire
avoir dans l’eau et il règle la valeur du pH.
PANNEAU DE COMMANDE DU SYSTEME
Pour accéder au menu traitement automatique de
l’eau, après avoir sélectionné l’icône, frapper la
touche “OK”.
On accède ainsi à une nouvelle page vidéo
contenant 4 options:
1) “AUTO”: le traitement automatique de
l’eau fonctionne sur la base des paramètres
sélectionnés dans le menu “SET”.
2) “MANUAL”: le traitement automatique produit
du chlore de façon continue.
Cette modalité s’interrompt au bout de 20 minutes.
3) “OFF”: le traitement automatique est éteint.
4) “SET”: accède au sous-menu qui permet
d’afcher les paramètres de l’eau et de
programmer les valeurs désirées pour ORP et pH
Chaque ligne indique, en premier la valeur actuelle
relevée par les sondes, puis, précédée du mot
“set”, la valeur programmée depuis le panneau de
commande.
La valeur relevée et celle de “set” peuvent bien sûr
coïncider entre elles.
Une différence importante entre la valeur relevée
et celle de set point, non accompagnée d’un signal
d’alarme, peut se vérier lorsqu’on change l’eau
dans la piscine, après un usage intensif ou en cas
de versements de substances étrangères ou d’eau
de pluie à l’intérieur de la piscine. Ce phénomène
ne doit pas être considéré comme un problème.
Même pendant le fonctionnement normal dans des
conditions stabilisées, le système, pour travailler
au mieux, peut permettre une certaine oscillation
autour des valeurs de set.
INSTRUCTIONS D’EMPLOI
17
FR
TRAITEMENT AUTOMATIQUE DE L’EAU
ORP
PH
ORP
sensor
PH
sensor
1
2
LISTE DES PRODUITS CHIMIQUES FOURNIS
EN DOTATION AVEC LE KIT DE TRAITEMENT
AUTOMATIQUE DE L’EAU
a) Quick test tester 63000566000
Contient “STRIPS” pour contrôler les paramètres
fondamentaux de l’eau, du chlore, de l’alcalinité
et du pH.
b) Calcinex 0.5 L 63000548000
Sert à corriger l’alcalinité de l’eau.
c) PH-MInus 6 Kg 63000552000
Sert à corriger la valeur du pH de l’eau et à
préparer la solution d’acide avec laquelle remplir
le réservoir
PREMIERE MISE EN SERVICE
- Retirer les sondes de leur étui de protection.
- Installer les sondes sur le dispositif hydraulique
du traitement automatique de l’eau.
- Effectuer le branchement électrique des
sondes sur le tableau électrique en respectant
les marques ORP et PH reportés sur les sondes
et sur le connecteur ; la sonde du PH est de
couleur bleue alors que celle de l’ORP est de
couleur rouge.
- Remplir la baignoire avec de l’eau jusqu’à
obtenir un fonctionnement normal de la mini-
piscine (consulter le manuel de mode d’emploi
du panneau de commande).
- Conserver les étuis de protection des sondes;
ils peuvent s’avérer utiles si le système est mis
au repos pendant une longue période.
Les améliorations constantes apportées au
produit peuvent comporter la disponibilité de
nouveaux produits/traitements après la date de
publication de ce manuel. Il est donc important
que vous vous informiez périodiquement sur la
disponibilité de nouveaux produits chimiques
approuvés par Teuco an de pouvoir proter des
bénéces relatifs.
18
FR
TRAITEMENT AUTOMATIQUE DE L’EAU

Menù
Exit
Auto
OK
Menù
Exit
Auto
OK
Menù
Exit
Auto
OK
Menù
Exit
Auto
OK
15sec.
Menù
Exit
Auto
OK
Menù
Exit
Auto
OK
Menù
Exit
Auto
OK
Menù
Exit
Auto
OK
15sec.
Menù
Exit
Auto
OK
Menù
Exit
Auto
OK
Menù
Exit
Auto
OK
Menù
Exit
Auto
OK
Menù
Exit
Auto
OK
Menù
Exit
Auto
OK
Menù
Exit
Auto
OK
Menù
Exit
Auto
OK
Menù
Exit
Auto
OK
Menù
Exit
Auto
OK
15sec.
15sec.
15sec.
15sec.
15sec.
Menù
Exit
Auto
OK
Menù
Exit
Auto
OK
Menù
Exit
Auto
OK
Menù
Exit
Auto
OK
15sec.
Menù
Exit
Auto
OK
Menù
Exit
Auto
OK
Menù
Exit
Auto
OK
Menù
Exit
Auto
OK
15sec.
Menù
Exit
Auto
OK
Menù
Exit
Auto
OK
Menù
Exit
Auto
OK
Menù
Exit
Auto
OK
Menù
Exit
Auto
OK
Menù
Exit
Auto
OK
Menù
Exit
Auto
OK
Menù
Exit
Auto
OK
Menù
Exit
Auto
OK
Menù
Exit
Auto
OK
15sec.
15sec.
15sec.
15sec.
15sec.
< 25 8
25 ÷ 30 6
>30 4
Température eau
°C
Contenu de sel
g/litre
- Dès que la signalisation “H2O” disparaît sur le
panneau de commande, mettre en modalité “OFF”,
ajouter le sel (sel de cuisine non iodé). La quantité
de sel nécessaire pour le fonctionnement correct
doit être calculée sur la base de la température
et de la quantité d’eau contenue. Consulter la
che technique de la mini-piscine pour connaître
la quantité contenue d’eau et le tableau pour
connaître la concentration de la solution.
- Préparer la solution ACIDE à verser dans le
réservoir: préparer un mélange avec 600 g de PH
minus dans 3 litres d’eau du réseau hydrique ;
remplir le réservoir.
Attendre 2 heures avant de faire démarrer le
TREAT.
Entre temps, vérier avec le strip les valeurs de
l’eau.
Régler l’alcalinité, si elle est trop élevée (> 120
mg/l), avec CALCINEX (ajouter 25 ml à la fois, faire
démarrer l’hydro et, après 10 minutes, vérier la
valeur) – Il est conseillé de répéter l’opération si
nécessaire quand l’alcalinité mesurée est élevée
(range conseillé 80-150 ppm CaCO3) ou quand
l’eau est trouble. Si PH > 8,5 ajouter manuellement
une petite quantité de PH minus (10 g à la fois, en
attendant qu’il se dissout entièrement) directement
dans la mini-piscine de façon à abaisser le PH à
une valeur d’environ 8;
- 2 heures après avoir ajouté le sel, effectuer
une hyper chloration en programmant le traitement
automatique en modalité manuelle.
Cette opération est conseillée à chaque
changement de l’eau ou selon les nécessités
(après une journée d’usage intensif lorsque la
mini-piscine n’est plus praticable, ou en cas d’eau
verte).
Au bout de 20 minutes, le TREAT se positionne
automatiquement sur AUTO et remplit sa fonction
de surveillance sur les paramètres chlore et PH de
l’eau.
19
FR
TRAITEMENT AUTOMATIQUE DE L’EAU

NOTES
1) Ne faites pas fonctionner le dispositif avec
une quantité de sel qui ne corresponde pas à la
température d’utilisation et à la quantité d’eau
contenue dans la mini-piscine; ces conditions de
fonctionnement engendrent un signal d’alarme
sur le panneau de commande.
2) En cas de PH trop bas (PH < 5) ou d’un
contenu de chlore trop élevé (valeurs > 900 de
ORP), remplacer en partie ou entièrement l’eau
de la piscine.
3) N’utilisez pas d’autres substances chimiques
en dehors de celles indiquées car elles pourraient
endommager le dispositif.
4) Si la piscine reste vide pendant une longue
période, s’assurer que les sondes demeurent
plongées dans l’eau ou les retirer en les
maintenant humides aux extrémités. Utiliser
pour cela les enveloppes dans lesquelles elles
ont été fournies et mouiller l’éponge interne si
nécessaire.
5) N’utilisez pas de sel iodé.
6) N’utilisez pas de produits à base de cuivre
(anti-algues).
7) Eau trouble blanchâtre: corriger d’abord
l’alcalinité puis le PH.
8) Corrosion d’accessoires ou irritation cutanée:
concentration élevée de chlore (> 900) et/ou
pH bas (< 6,5). Videz partiellement la piscine et
rétablissez le niveau.
9) Eau colorée: présence de métaux dissous;
effectuez une hyper chloration (TREAT en
modalité MANUAL) et nettoyez les ltres.
10) Présence de mousse: à cause de la typologie
de dispositif, un effet mousseux se vérie mais
seulement quand l’eau est en mouvement
(HYDRO actif); si la présence de mousse se
vérie même avec la fonction HYDRO éteinte,
procédez à la substitution partielle ou totale
de l’eau; rétablissez ensuite les paramètres
optimaux de l’eau.
11) Nous recommandons de s’assurer que durant
l’utilisation du produit, le système AWT soit en
mode veille; dans l’alternative agir manuellement
sur le système en le positionnant sur OFF.
20
FR
TRAITEMENT AUTOMATIQUE DE L’EAU
Table of contents
Languages:
Other Teuco Swimming Pool manuals


