manuals.online logo
Brands
  1. Home
  2. •
  3. Brands
  4. •
  5. Texsport
  6. •
  7. Grill
  8. •
  9. Texsport 15119 User manual

Texsport 15119 User manual

Other Texsport Grill manuals

Texsport 15100 User manual

Texsport

Texsport 15100 User manual

Texsport 14236 User manual

Texsport

Texsport 14236 User manual

Texsport 14444 User manual

Texsport

Texsport 14444 User manual

Texsport 14228 User manual

Texsport

Texsport 14228 User manual

Popular Grill manuals by other brands

Orbegozo GR 2300 instruction manual

Orbegozo

Orbegozo GR 2300 instruction manual

bora PT11 Operating and installation instructions

bora

bora PT11 Operating and installation instructions

Klarstein 10031664 manual

Klarstein

Klarstein 10031664 manual

Garland MWE3W Installation and operation manual

Garland

Garland MWE3W Installation and operation manual

Char-Broil 463722714 Product guide

Char-Broil

Char-Broil 463722714 Product guide

Nexgrill 720-0830HK Operating	 instruction

Nexgrill

Nexgrill 720-0830HK Operating instruction

Kenmore 415.16123800 Use and care guide

Kenmore

Kenmore 415.16123800 Use and care guide

Tucker Barbecues GTR Series Assembly, installation and operating instructions

Tucker Barbecues

Tucker Barbecues GTR Series Assembly, installation and operating instructions

Monogram ZGG540NCP1SS owner's manual

Monogram

Monogram ZGG540NCP1SS owner's manual

Equipex Sodir Savoy Operation manual

Equipex

Equipex Sodir Savoy Operation manual

Gaggenau VR 414 610 use and care manual

Gaggenau

Gaggenau VR 414 610 use and care manual

Miele KM 408-1 operating instructions

Miele

Miele KM 408-1 operating instructions

George Foreman GGR50B owner's manual

George Foreman

George Foreman GGR50B owner's manual

AOG T series quick start guide

AOG

AOG T series quick start guide

Gorenje TG2000CB Instruction manua

Gorenje

Gorenje TG2000CB Instruction manua

Weber Genesis Silver-B Permamount NG 051701 owner's guide

Weber

Weber Genesis Silver-B Permamount NG 051701 owner's guide

Glen SA 3037 user guide

Glen

Glen SA 3037 user guide

Stalgast 9730100 instruction manual

Stalgast

Stalgast 9730100 instruction manual

manuals.online logo
manuals.online logoBrands
  • About & Mission
  • Contact us
  • Privacy Policy
  • Terms and Conditions

Copyright 2025 Manuals.Online. All Rights Reserved.

INSTRUCTIONS
Item 15119 - Rotisserie Grill and Spit
Thank you for purchasing this Texsport grill and spit. Please read and understand each step of the set-up instructions. We
encourage you to set-up this tent at least once prior to your outdoor trip, ensuring that you have a satisfactory understanding of
the set-up process. We hope you enjoy your new grill and spit and that it will give you many years of outdoor pleasure.
LEASE FOLLOW THE SEQUENCE OF IMAGES TO ASSEMBLE YOUR ROTISSERIE GRILL AND S IT.
These are the parts you will need to assemble you rotisserie grill and spit
Grill Base with Chained Hooks
Skewer
Arm/ ot
Holders
“T” Legs 2 Bared
Skewer
Holder
Ringed
Skewer
Holder
STE 1 - Lay grill base upside
down and insert the 2 “T” legs
into the square leg holders.
Secure slightly by turning the
screw clamp on each side of
the grill.
STE 2 - Secure slightly by
turning the screw clamp on
each side of the grill.
STE 3 - Flip assembly right
side up and slightly loosen the
screw clamps to lower the grill
base to desired position.
Tighten the screw clamps.
QUESTIONS:
If you should have any ques-
tions, problems or comments,
please call our Customer Service
Department at 1-800-231-1402
or e-mail [email protected].
This Department is open M–F
from 8 a.m.–5 p.m. CST.
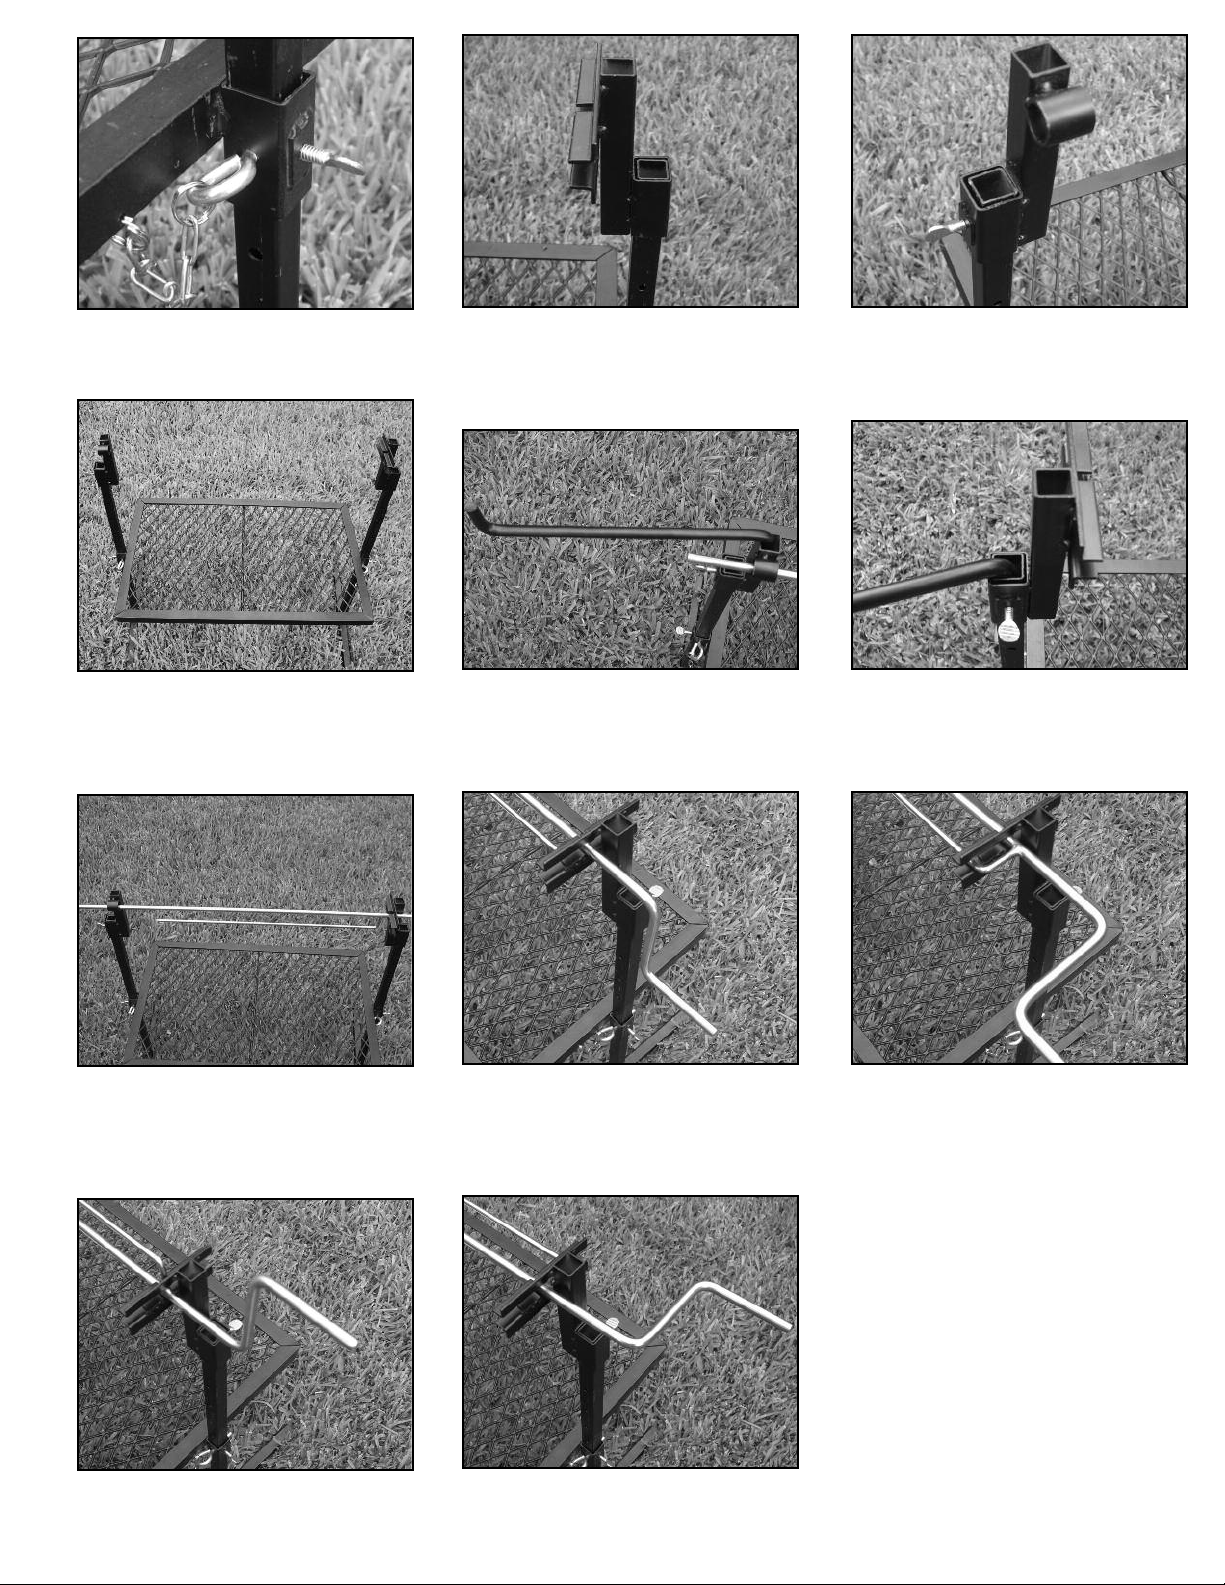
STE 4 - Insert the chained pin
into the “T” legs to secure the
grill base completely.
STE 5 - Insert the 2 bared
skewer joint to the top of the
“T” leg and secure with the
clamp screw.
STE 6 - Insert the ringed
skewer joint to the top of the
“T” leg and secure with the
clamp screw.
STE 7 - Your skewer holder
joints should be facing each
other as pictured.
STE 8 - Insert the arm/hot
holders into the skewer holder
joints.
STE 9 - If your pots are heavy,
we suggest that you insert your
arm/pot holder into the “T” leg
holes for better support.
STE 10 - Insert the skewer bar
into the ringed skewer holder
joint and slide the bar between
the 2 bared skewer joint.
STE 11 - To get the best rotis-
serie results, there are 4 differ-
ent positions for all around
cooking. The first position with
the skewer handle down.
STE 12 - Turning the skewer
handle 90˚ for the second
position.
STE 13 - Turning the skewer
handle another 90˚ (straight
up) for the third position.
STE 14 - Turning the skewer
handle another 90˚ for the
fourth position.
MODEL: ROTISSERIE
GRILL AND S IT
ITEM 15119
MADE IN CHINA
YHE10