the beach people BEACH CART User manual

Carefully read and understand this owner’s manual. Failure to follow these
instructions may result in property damage and/or personal injuries.
BEACH CART
ASSEMBLY INSTRUCTIONS

PARTS LIST
PART DESCRIPTION QTY
A 6mm diameter x 5cm long slotted head bolt, washer and nut 1
B 6mm diameter x 4.5cm long phillips head bolt, washer and nut 10
C 6mm diameter x 1.5cm long phillips head bolt, washer and nut 8
D 16 mm flat washer 5
E Cotter pin 5
F Rear axel 1
G Rear axel support 2
H Pull handle 1
I Front axel 1
J Front axel support 1
K Side wood panels 2
L Front wood panel 1
M Back wood panel 1
N 10” x 3.50-4 Pneumatic tires/inner tube/rim 4
O Wagon tray 1
P Metal spacer 2
TOOLS REQUIRED (not included):
#2 Phillips screwdriver, slotted screwdriver, 10mm wrench, long-nose pliers and an
adjustable wrench.
A B C D E F G I
H
J
O
P
N
M
L K

STEP 1
Locate the wagon tray (O) and rear axel (F).
Using bolts, washers and nuts (C) attach rear
axel to the wagon tray. Washers and nuts should
be on the under side of the wagon. Tighten
nuts and bolts using #2 Phillips screwdriver and
10mm wrench.
STEP 2
Slide rear axel supports (G) onto the axels and
attach to wagon tray (O) using bolts, washers
and nuts (C). Tighten nuts and bolts with #2
Phillips screwdriver and 10mm wrench.
STEP 3
Install front axel (I) onto front axel support (J)
and secure them with a flat washer (D) and a
cotter pin (E) making sure to bend both ends
of each pin so that you form a butterfly shape.
STEP 4
Connect entire front axel assembly to the wag-
on tray (O) using bolts, washers and nuts (C).
Tighten bolts with #2 Phillips screwdriver and
10mm wrench.
• Do not over inflate pneumatic tires. Follow the tire pressure guidelines listed on the tire. (25 psi cold)
• Do not use wagon if one or more tires is not properly inflated.
• Do not use wagon near or on stairs, or leave wagon unattended on steep slopes.
• Do not ride in wagon down slopes or up steep inclines.
• Do not stand up in wagon or ride wagon standing.
• Be extremely careful when operating the wagon on rough terrain or turning sharply.
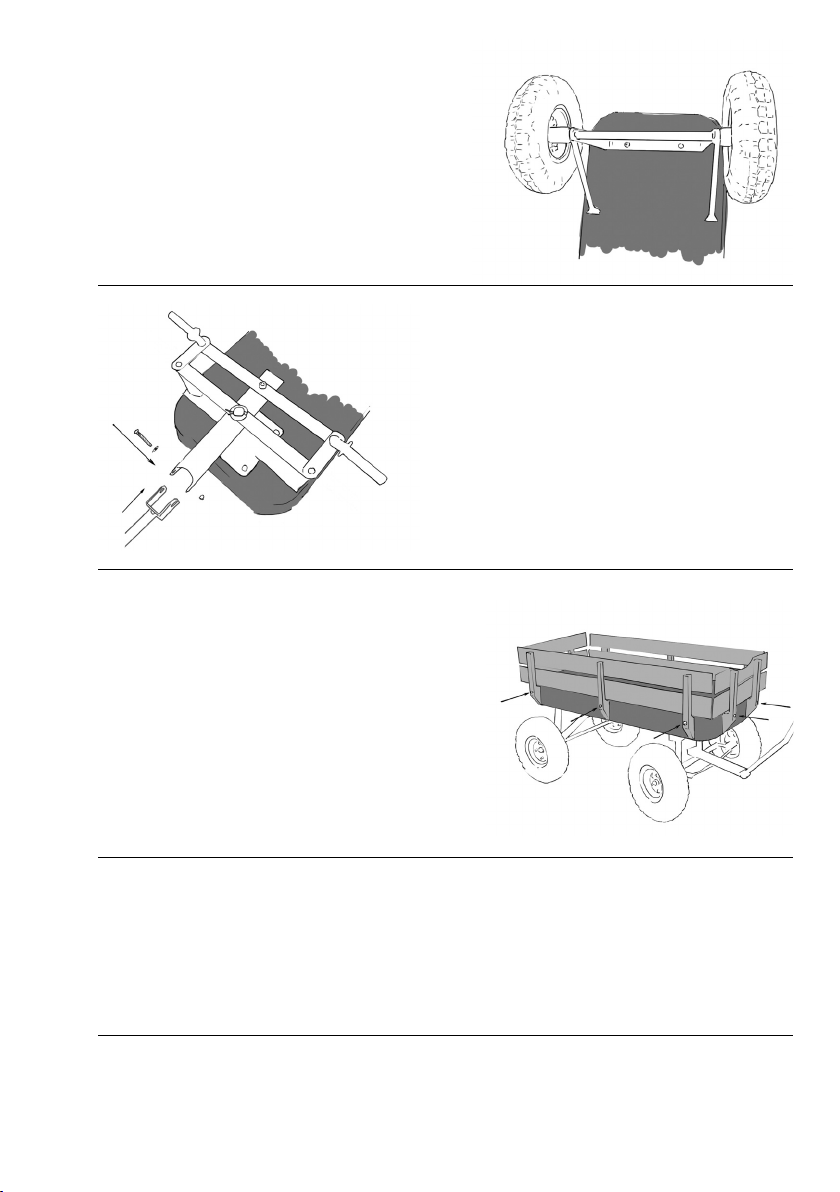
STEP 5
Place a metal spacer (P) then tires (N) to rear axel
assembly using cotter pins (E) and 16mm flat washers
(D). First slide tire onto the axel. Next, insert 16mm
flat washer and secure with cotter pin making sure
to bend both ends of each pin to protect against its
sharp edges. Repeat this process to attach the tires
to the front axel assembly.
STEP 6
Attach pull handle (H) to front axel assembly
using slotted head bolt, washer and nut (A).
Tighten nut and bolt using flat screwdriver and
10mm wrench.
STEP 7
Attach wood panels (K,L,M) to the front, rear and
sides of the wagon using bolts, washers and nuts (B).
The wood panels mount to the outside of the wagon
tray. (Note: The bolt should be inserted from the
inside of the wagon with the nuts on the outside).
Tighten nuts and bolts using #2 Phillips screwdriver
and 10mm wrench. Be sure not to over tighten the
nuts and this could push the bolt through the cap.
WARNING (NOT FOR CHILDREN UNDER 18 MONTHS OF AGE)
Adult supervision is always required while this wagon is being used by children.
CAUTION
• Adult assembly required.
• An adult should inspect the wagon periodically to check for loose fasteners or
damaged components and fix or replace the part(s).
• Make sure all exposed screw ends are capped to prevent possible injury.
• At the assembly process, make sure all cotter pins have been bent into a butterfly
shape to prevent possible injury.
• Maximum load weight of 130kg
• Always use in a safe manner. Avoid use in public streets or in places of high trac.
• Do not operate the wagon if any parts are missing or need to be replaced. Failure to
follow this warning could result in serious personal injury.
Popular Outdoor Cart manuals by other brands


Carts Vermont
Carts Vermont 20 manual

Westward
Westward 2CZY4 Operating instructions and parts manual

Numatic
Numatic EcoMatic EM-5 Assembly

Bosch
Bosch XL-Cart Operating/safety instructions

Tennsco
Tennsco Modular Cart Top Component Assembly Assembly Instructions/Parts Manual

Clam
Clam POLAR TRAILER HD MAX manual


