the canopyshop Bedside Table User manual


page
2
at
1. Introduction 3
2. Safety precautions and warnings 3
3. Product description 5
4. Parts overview 6
4.1 Exploded view veranda 6
4.2 Exploded view of additional components Ravenna veranda 7
4.2 Delivery inspection 7
4.3 Parts list 8
5. Preparation for assembly 11
5.1 Conditions for assembly 11
5.2 Inspection of tools and accessories 13
5.3 Measuring & determining dimensions 14
5.4 Joining verandas 16
6. Assembly 18
6.1 Positioning and placements of the posts 18
6.2 Grillo fencing 23
6.3 Mounting the wall profile 30
6.4 Pre-installing the gutter 31
6.5 Installing the middle beams 36
6.6 Preparing and installing the roofing sheets 39
6.7 Finishing 40
7. Maintenance 47
8. Disposal of waste 47
9. Warranty conditions 47
10. Contact 47
KEEP THIS MANUAL IN A SAFE PLACE FOR FUTURE USE!
For the duration and the terms and conditions of the warranty we recommend that you contact your Deponti
partner. We also refer you to our General Terms and Conditions of Sale and Delivery which are available on
request. The Canopy Shop owned by Bappco Ltd accepts no liability for any damage or injury resulting from a
failure to carefully follow the instructions in this manual or exercise due caution during transport, assembly, use
and maintenance of the veranda. As a result of our policy of continuous product improvement, certain product
details may differ from what is is described in this manual. For this reason the instructions provided only serve as
a guideline for installation of the product this manual describes. This manual has been compiled with the utmost
care, but The Canopy Shop cannot be held responsible for any errors in this manual or the consequences
thereof. Furthermore, all rights are reserved and no part of this manual may be reproduced in any way
whatsoever.
Contents

page
3
LEES
AANDACHTIG
!
M
A
N
U
1. Introduction
Congratulations on the purchase of your Ravenna Veranda!
Before you can start enjoying your Veranda it must be assembled properly. This manual provides
clear instructions for all the steps you must complete for correct assembly of your Ravenna
Veranda. We recommend that you take the time to read the entire manual before you begin
assembly.
Check whether you have received all the necessary parts before you begin assembly. For your safety,
follow all the applicable instructions. This also guarantees the safety of the installed roof. If you
should have any questions, please feel free to contact The Canopy Shop on 01536 446393.
READ
CAREFULLY
This manual should be kept in a safe, dry and shady place. In the event of damage or loss, the user
must request a new copy of the manual from the partner.
2. Safety precautions and warnings
Important:
Please read the safety precautions and warnings before assembling the veranda.
•During assembly, carefully follow the instructions and guidelines as described in this manual.
Never change the order of the steps to be performed. If any aspect of the assembly
procedure is unclear, please contact you’re the Canopy Shop. We reserve the right to make
technical changes without written notice.
•We normally recommend that the veranda must be assembled by at least two
people (qualified technicians/authorized installers) working together.
•Check the delivery immediately upon receipt. In the event of damage or an incomplete
delivery please contact The Canopy Shop immediately.
•The materials must be stored in a dry, ventilated area, not exposed to direct sunlight.
•Open the packaging carefully. Make sure that you do not damage the product.
•To prevent damage to your veranda, place the parts on a smooth, clean surface. Place the
profiles on a flat surface, protected from sun and rain.

page
4
•Adding or removing parts, the use or installation of materials. other than described in this
manual, may adversely affect the safety of the veranda and is therefore strongly
discouraged!
•Cordon off the assembly location so that others are kept at a safe distance.
•Always place a ladder on a firm, stable surface.
•Always wear the correct protective clothing (work gloves, dust mask, safety glasses, shoes
with non-slip soles, etc.) during installation or servicing.
•Mount the system against a firm, flat wall and on a flat and stable foundation. Ensure that
the wall and the ground are clean and dry.
•Never stand on the polycarbonate sheets.
The polycarbonate sheets are strong, but insufficiently resistant to point loads. Do not walk
on them!
•Make sure all fasteners are properly tightened. Check this regularly.
•Make sure you have used sealant on the veranda so it is completely waterproof.
•You must maintain and clean your veranda at least once a year. During this yearly
maintenance make sure all fasteners are properly tightened.
•Dispose the product in accordance with local laws and regulations.
•When safety regulations and instructions are not followed correctly, The Canopy Shop
will not accept any responsibility for damage(s) and injuries.
2. Safety precautions and warnings (continued)

page
5
The aluminium veranda type Ravenna is composed of posts, gutter profile, wall profile,
beams, polycarbonate roofing sheets, cover strips and the necessary assembly materials.
As standard, you have the choice between a round or classic decorative gutter and half-round or
square posts.
The Ravenna veranda is available as standard in widths of 4060, 5060, 6060 or 7060 as a single
section; there is no limit to the number of sections that can be joined end to end.
The roof can have a projection of 2500, 3000, 3500 or 4000 mm.
Details
Colours RAL7024 or RAL9005
Gutter Round or classic
Posts Square
Roof covering Polycarbonate (Opal/Clear/Ultra-clear/Solar control)
Width (mm) 4060/5060/6060/7060 or a multiple thereof.
Projection (mm) 2500/3000/3500/4000
A Ravenna veranda can be installed on any existing foundation or stone surface if it complies. For
added strength or when there is no good foundation present, a concrete base can be used. These
concrete bases can be easily installed out of sight under the posts with the supplied bolts.
The concrete bases are available with or without a rainwater discharge opening.
3. Product description
page
6
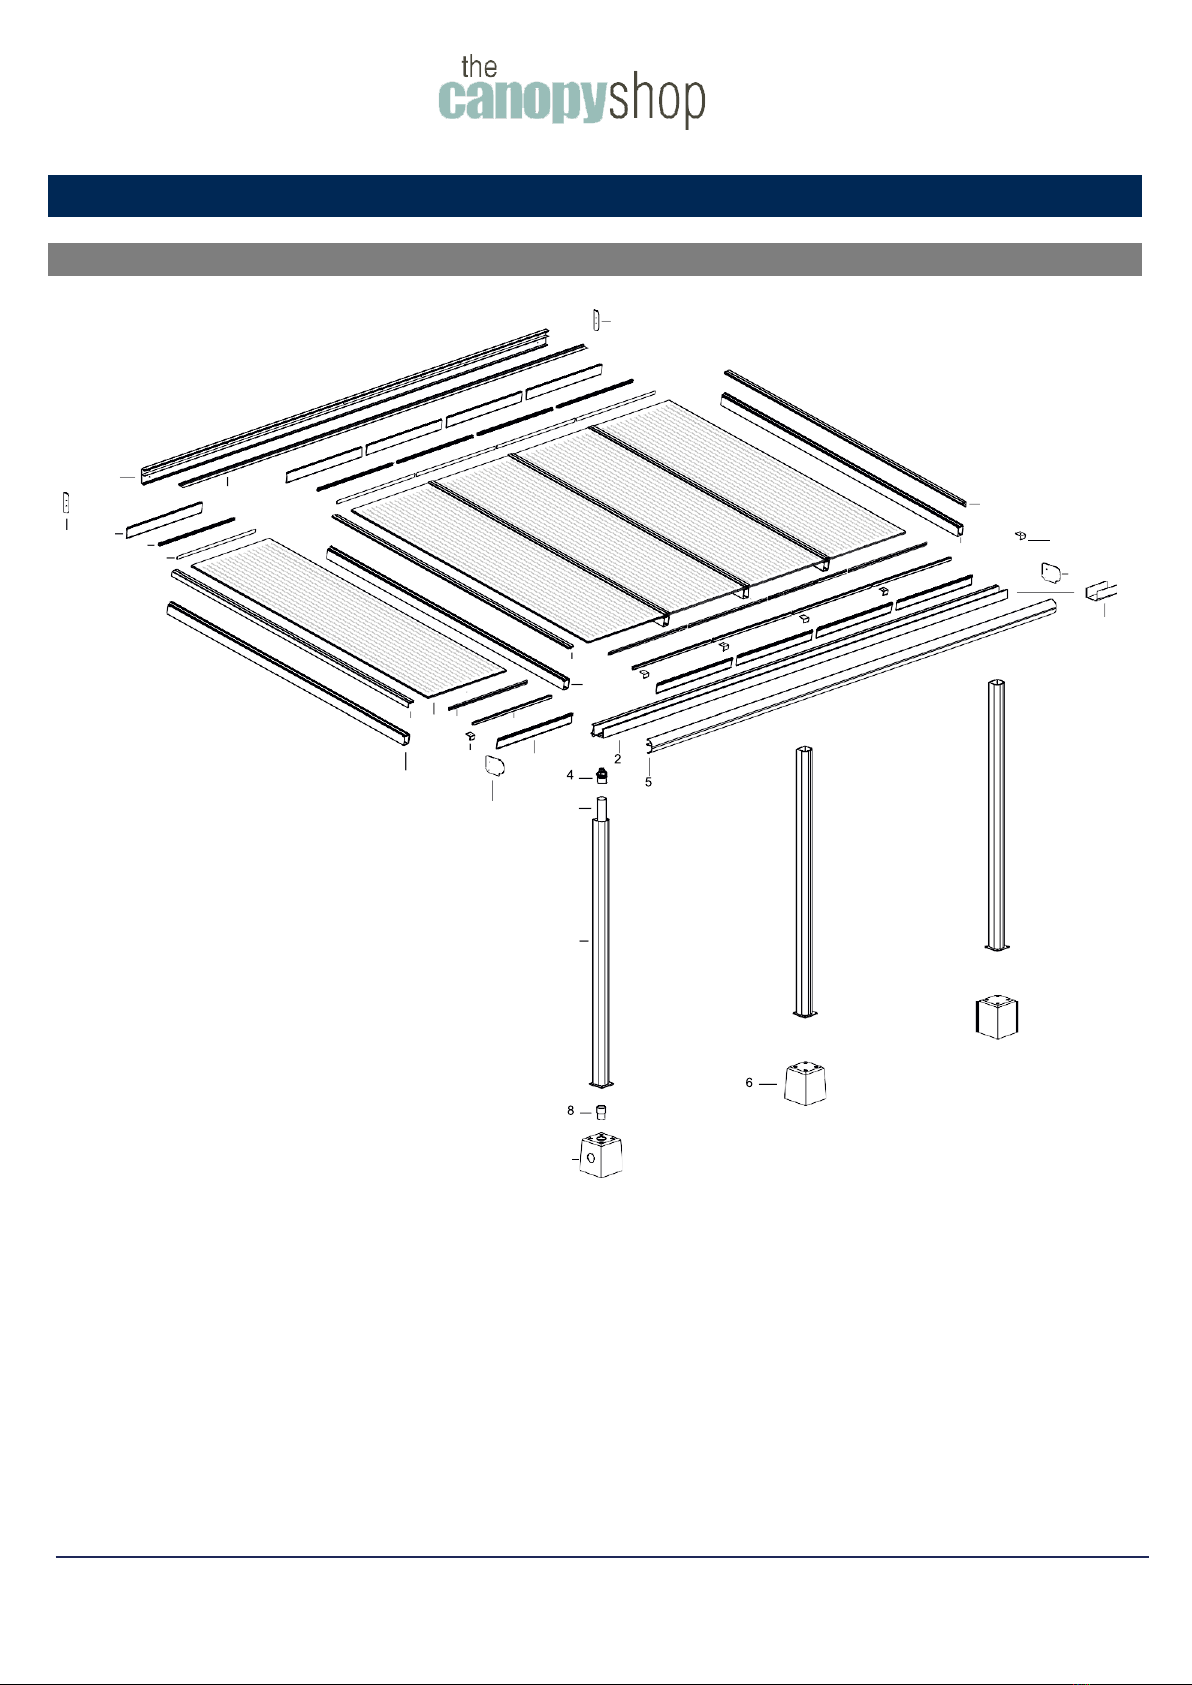
4. Parts Overview
4.1 Exploded view veranda
1
13
23
3
7
23
22
19
18
21
15
11
24
20
12
19 14 16
21
11
17
13
24 9
10

page
7
4.3 Delivery Inspection
The veranda shown in this manual is a 5x3 metre Ravenna with the posts on concrete bases. This
merely serves as an example. The type and number of components supplied depends on your order.
Note: Always carefully check the delivered items against the accompanying delivery note to ensure
that the quantity and quality are correct. Any visible defects must be reported in writing within 7
days of delivery.
4.2 Exploded view of additional components Ravenna veranda

page
8
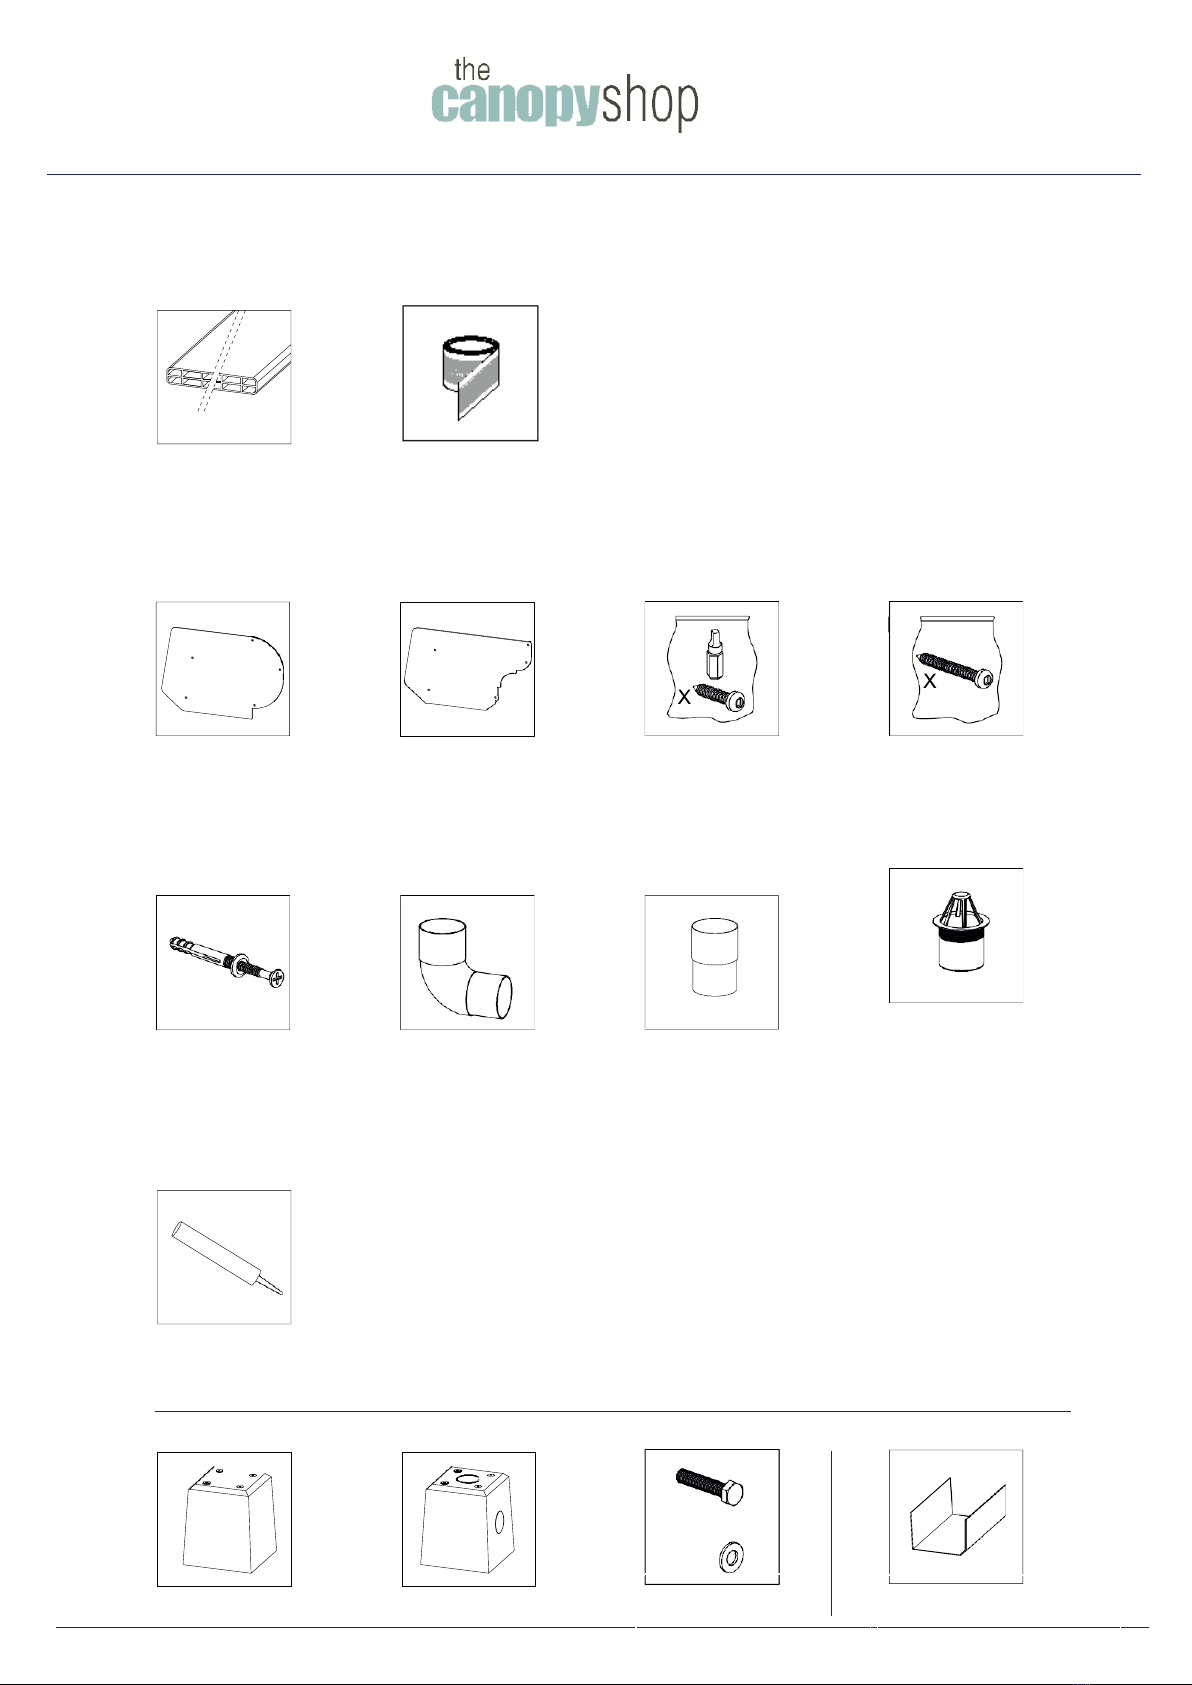
4.3 Parts list
The following overview shows which parts are packed together. Carefully check the individual
packaging units against the order form for quantity and quality.
02. Gutter 17. Condensation profile
long 18. Condensation
profile short
13.
Trim click strip 23. Side cover
wall profile
or
01.
Wall profile 22. Wall profile
rubber
05. Round
decorative profile 05A. Classic
decorative
profile
or
10.
Post round
with or without base
10A. Post square
with or without base
09. Rainwater
discharge
pipe ø 80 mm
11.
Side beam
1x sealing rubber
19. End cover strip
1x sealing rubber
21. Sheet stopper
12. in between beam
2x sealing rubber
20.
Top cover strip
2x sealing rubber
21.
Sheet stopper
16. Anti-dust tape
(Perforated)
14. Polycarbonate
sheet 980 mm
16. Anti-dust tape
(Perforated)
or
24. Side cover
gutter profile
24A. Side cover
gutter profile
Classic
1x bag of screws
short 4.2x16 + bit 1x bag of screws
long 4.2x40
1x set frame fixing
screws
08. 90° rainwater
discharge sleeve
or
08A. Rainwater
discharge sleeve
(Option)
04. Leaf catcher
1x coloured
sealant
06.
Concrete base
(Option)
07.
Concrete base with
rainwater discharge
(Option)
Hex bolt M8x40
Washer
03.
Gutter extension
(Option)
1x sealant gun
1x hole saw 80 mm

page 9

page 10
additional components Ribolla veranda (Exploded-view 4.2)

page 11
5.1 Conditions for assembly
•Note: The optimal processing temperature for the sealant is +5 °C to +40 °C.
Ground & façade
•A good flat stable surface is required for construction of the veranda.
•The location where the roof will be placed must be construction-ready and free of obstacles
(garden furniture, flower boxes, etc.) so installers can perform their work withouthindrance.
•Any obstacles, including utility lines (such as power cables, etc.), roots and debris, must have
been removed from the ground.
•The façade must be free of sun shades, etc.
•The place where the wall profile will be placed must be firm, even and flat.
Dimensions & slope
•This Ravenna Veranda roof should be installed with a slope of 15,7cm per metre.
The height of the wall profile and the passage height (distance from bottom of gutter to the
ground) are completely dependent on each other and determined by this slope.
•The maximum length of the roof is 4 metres. However, keep in mind the requirements
concerning the maximum free span and number of posts.
Posts & joined verandas
•Maximum distance between the posts is 4 metres.
•When verandas are joined, a post is always placed under the coupling.
•The rainwater discharge cannot be placed inside a post above which gutters are joined.
Attachments at walls
•Due to expansion of the materials, the veranda may not be placed tightly between two walls;
there must be a gap of 1.5 mm per metre of width of the veranda.
•When concrete bases are used the posts cannot be placed against the wall, because the
block is wider than the post.
•If you want to place a post against a wall, you must saw the flange off of one side and drill
two new holes in the flange so that you can secure the post in four places.
Screws and drilling
•We supply special 4.2x19 mm and 4.2x40 mm stainless steel screws with the veranda.
Note: Pre-drill a hole for each screw with a 3 mm drill bit!
If you continue to turn them after they are tight, the screw head may break off. It is
recommended that you screw carefully, with the torque limiter on your drill set properly.
•Note: Never drill and screw through the PVC rainwater discharge pipe in one of the posts.
5. Preparation for assembly

page 12
5.1 Conditions for assembly (continued)
Sealant
•We supply sealant in the colours RAL9001, RAL9016 and RAL7024. This supplied sealant has
been specially selected for the waterproof sealing of aluminium to aluminium or to most
common construction materials, such as walls, concrete, etc. Follow the instructions on the
tube.
•Note: This sealant is not suitable for sealing the polycarbonate sheets. If you need to seal
your sheets, because you have a rainwater discharge (downspout) pipe run through it for
example, we have special transparent sealant in our range.
Rubber seals
•A Ravenna veranda is standard equipped with pre-assembled, colour-matched rubber seals.
Before installation, the rubber seals for both the aluminium cover strips and the beams must
be cut to length.
•If the rubber seals are deformed, they can be straightened again with a little heat, from a hot
air heater or hair dryer for example.
Remove protective film
•It is recommended that the protective film be removed from the aluminium parts and the
roofing sheets at the last possible moment, to prevent damage. When mounting the roofing
sheets, however, the edges of the protective film must be pulled back a few centimetres
towards the middle of the sheet so the film does not get stuck in the profiles; otherwise it
will be difficult to remove later.
Warranty is void if the Ravenna veranda is not assembled and installed in accordance
with the instructions.

page 13
5.2 Inspection of tools and accessories

page 14
The Ravenna veranda is available in a large range of sizes. Moreover, the roof has a modular design
and can be quickly and easily made to size. However, please note that our current and future
modular options are based on standard sizes. If you do not install your roof using the standard sizes,
your options will also have to be adapted to size.
With the Ravenna veranda, you must cut the posts, the Grillo parts and the polycarbonate
sheet (optional for the side wall) to size.
B: Length of wall profile, gutter profile and gutter coverprofile.
½ B –165mm: Distance between the back posts (= installation width Grillo)
H1: Height from ground (ground level) to bottom of wallprofile.
H1 + 35mm: Height from ground (ground level) to bottom of the horizontale tube profile.
H1 + 145mm: Height from ground (ground level) to top of the horizontale tube profile.
H2: Height from ground to bottom of gutter profile (= installation height Grillo).
D: Distance from the front inside post to the back inside post (= installation width side wall Grillo).
D + 110mm: Distance from the centre of the front inside post to the centre of back inside post/rainwater discharge.
5.3 Measuring & determining dimensions
½ B –165mm
page 15
5.3.1 Height adjustments
A Ravenna veranda is designed for a slope of 15,7 cm per metre. All the static strength calculations,
as well as all sizes and dimensions in this manual, are based on this. The height of the wall profile and
the passage height (distance from bottom of gutter to the ground) are completely dependent on
each other and determined by this slope. However, these heights can be adjusted very easily while
maintaining the slope. However, these heights are very easy to adjust while maintaining the slope.
o Please note that choosing a different height also affects the height of other parts.
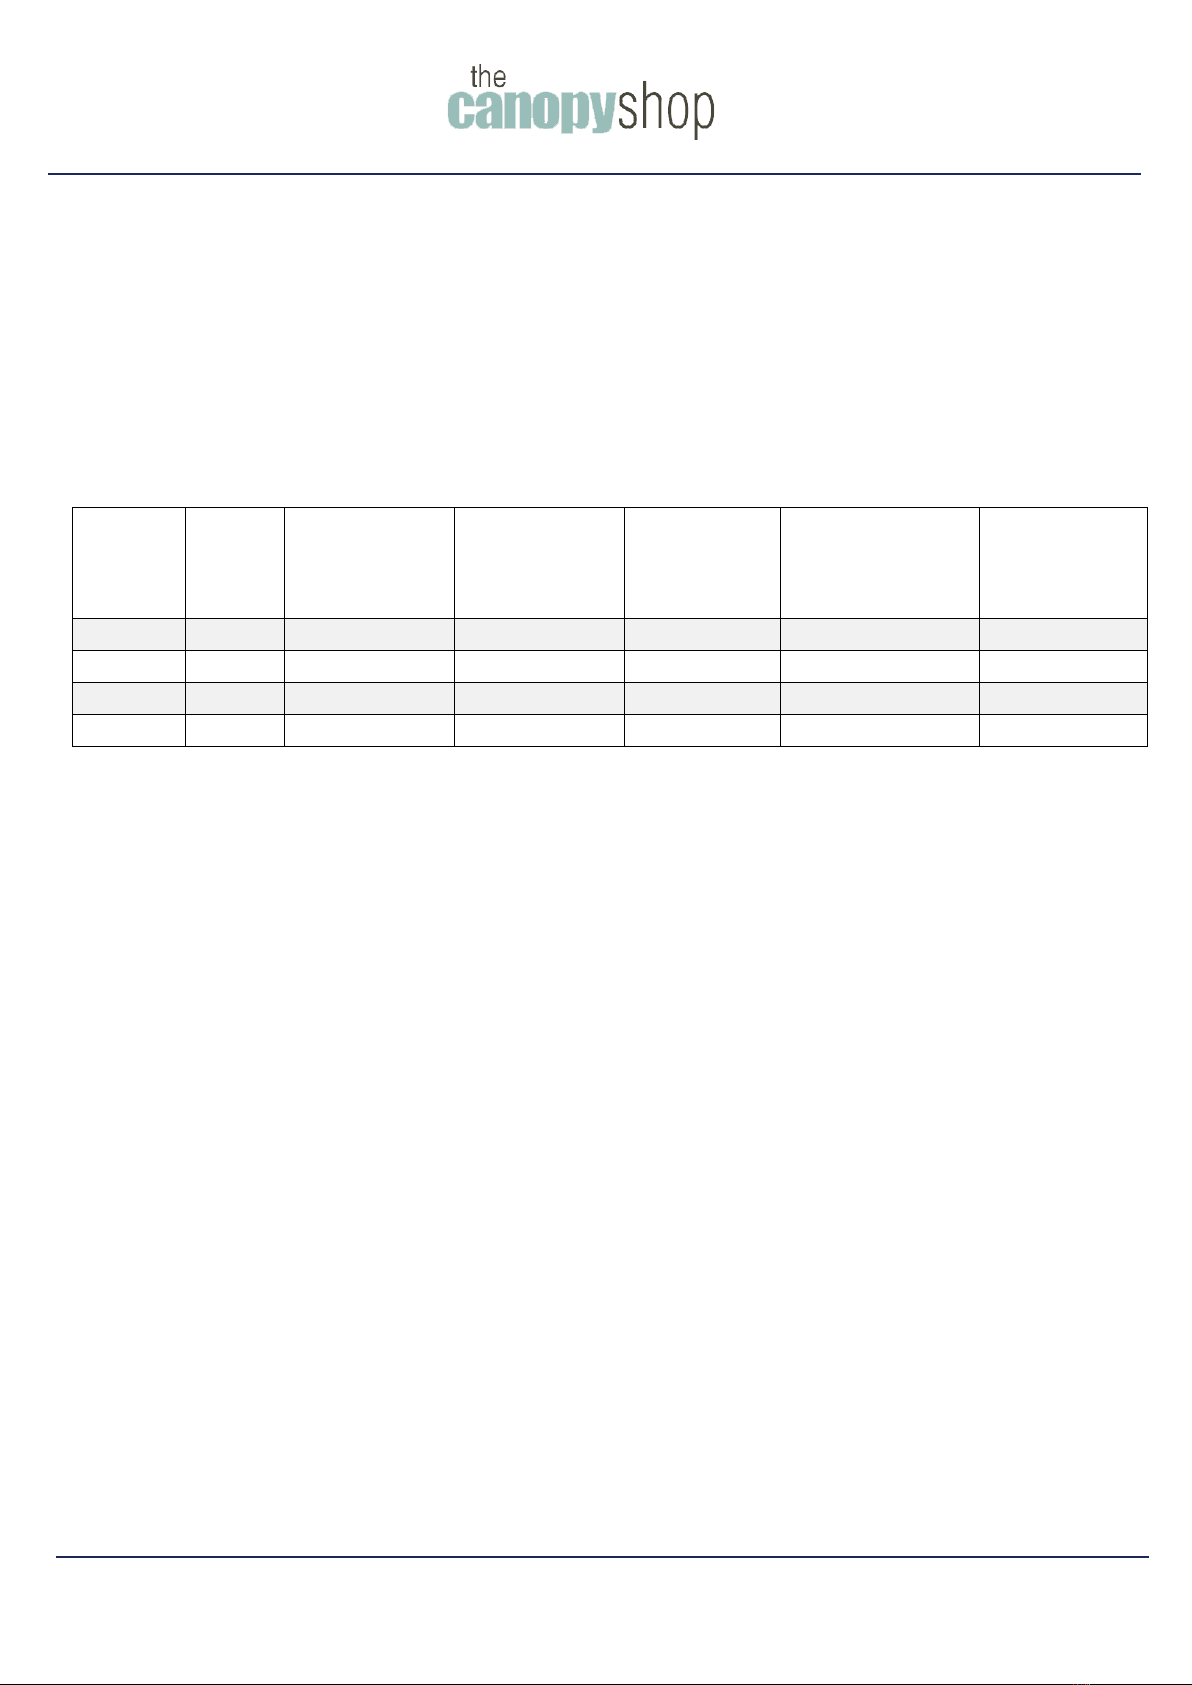
If you are going to install your veranda based on the standard dimensions, you can use the
dimension table below.
Projection
Beam
length
Distance from
the front inside
post to the back
inside post (D)
Height from
ground to
bottom of gutter
profile (H2)
Height from
ground to
bottom of wall
profile (H1)
Height from ground
to bottom of the
tube profile A
(H1 + 35mm)
Height from
ground to top of
the tube profile B
(H1 + 145mm)
2.5 metres
247 cm
244 cm
212 cm
250 cm
254 cm
265 cm
3 metres
297 cm
293 cm
204 cm
250 cm
254 cm
265 cm
3.5 metres
347 cm
343 cm
196 cm
250 cm
254 cm
265 cm
4 metres
397 cm
392 cm
189 cm
250 cm
254 cm
265 cm
If you choose to change the height the Ravenna veranda, make sure that you cut off the same amount
of centimeters on all the posts.

page 16
5.4 Joining verandas
There is no limit to the width in which the Ravenna verandas can be delivered. This is because
the verandas can be joined end to end.
In this case the gutter profile, wall profile and decorative profile are supplied in multiple lengths of
4060, 5060, 6060 or 7060 mm.
The centre-to-centre distance between the beams of a Ravennaveranda is 1000 mm (1 metre).
A roof with five one-metre sections has a total width of 5060 mm. The extra 60 mm is the distance
from the centre of the beam to the outside of the beam, which is 30 mm; this extra width is at both
ends, for a total of 60 mm.
When standard size sheets are used, the total width of joined roofs must therefore also end with 60
mm, e.g. 8060, 9060, 10060, etc.
So if you have ordered a roof with a width of 9060 mm, the delivery will consist of one 5060 mm
gutter section and one 4060 mm gutter section. Together this is 9120 mm. You must ensure that the
width ends with xx60, so these profiles must be shorted by a total of 60 mm before installation. This
can be done by removing 30 mm from both sections: 5030 mm + 4030 mm = 9060 mm. You can also
choose to shorten one profile by 60 mm. 5060 mm + 4000 mm = 9060 mm.
This shortening applies to the wall profile, gutter profile and decorative profile.
After this shortening the further assembly is identical to that for a normal roof.

page 17
It is recommended that you join the gutter sections with the supplied gutter extension before
installation. The installation steps are shown below:
1.
Clean and degrease the gutter
and the gutter extension.
4. Insert the second gutter ¼ of the
way into the other side of the
gutter extenstion and put sealant
on the edges.
2.
Insert the gutter extension ¼ of
the way into the gutter and put
sealant on the inside edge.
5.
Now press the second gutter
completely over the gutter
extension to form a seamless joint
3. Now press the gutter extension
further until it is half way into the
gutter.
6.
The gutter extension can now be
secured with the short stainless steel
screws in the chamber of the gutter and
on the front side under the decorative
profile. Put sealant on the assembly so it
is smooth and waterproof!
cleaner
3
1/4
1/4

page 18
6.1 Positioning and placement of theposts
Determine the positions of the posts and the optional concrete bases and the optional concrete bases with
rainwater drainage. The sizes shown in the drawing below are from the centre of the posts. Make sure the
positions are completely at right angles and make sure the height is level.
6. Assembly

page 19
6.1.1
Installing concrete bases
Place the concrete bases in the ground as accurately as possible. Make sure that the top of the concrete
base is placed at least 100mm below ground level, and place them level.
Connect the drain to the side outlet of the rainwater discharge concrete base.
6.1.2
Shorten the length of the posts.
Cut the posts to size before placing them.
If you are going to place your veranda according
to the standard sizes, you can use the sizes from
the table below.
If you choose to change the height the
Ravenna veranda, make sure that you cut off
the same amount of centimeters on all the
posts.
Use the image on the right and the below table
for the sizes and details.
Note: When shortening the posts, take into
account the depth of the concrete bases and the
footplate.
Projection
From ground to
bottom of gutter
profile (H2)
From ground
to bottom of
wall profile
(H1)
From ground to
bottom of the
tube profileA
(H1 + 35mm)
From ground
to top of the
tube profile B
(H1 + 145mm)
2.5 metres
212 cm
250 cm
254 cm
265 cm
3 metres
204 cm
250 cm
254 cm
265 cm
3.5 metres
196 cm
250 cm
254 cm
265 cm
4 metres
189 cm
250 cm
254 cm
265 cm
A = Length of the front post (above ground level) when installed at the the bottom of the horizontal tube (use your mounting
brackets + plastic end caps)
B = Length of the front post (above ground level) when installed by sawing the posts and screwing them against the front of
the horizontal tube. (This manual shows this situation again).
Table of contents
Other the canopyshop Outdoor Furnishing manuals


Popular Outdoor Furnishing manuals by other brands


Costway
Costway HW68236 -12 user manual

Canvas
Canvas COLLINGWOOD A111503701 Assembly instructions

Global Industrial
Global Industrial 277152BL user manual

Lemeks
Lemeks Palmako PA120-5959 Assembly, installation and maintenance manual

Arbor Technology
Arbor Technology Victoria picnic table and bench set Quick start quide

Extremis
Extremis Bistroo manual


