The Drip Store K-VEG100 User manual
INTRODUCTION
Thank you for purchasing one of The Drip Store’s Drip Tape Kit. After installing the drip kit, turn the water on
and flush the system. Then, close the end of the drip tubing tape and turn the water on again. Test the system
to make sure that no leaking occurs along the connections. Please take the time to read through the enclosed
instructions and follow them step by step. If you have any questions, please call us toll free at 1-877-597-1669
GENERAL DESCRIPTION
The Drip Store provides you with all the parts needed to install a Drip Tape system for rows of vegetables.
The Drip Tape kit can be easily installed above or below the ground. It is designed mainly for use in vegetable
gardens or on a variety of row crops.
When installing a low volume irrigation system, please remember that drip systems require clean water and
operate at lower pressures than regular sprinkler systems. During the installation, using the filter and the
pressure regulator provided, will insure that your system will remain trouble free for years to come.
INSTALLATION
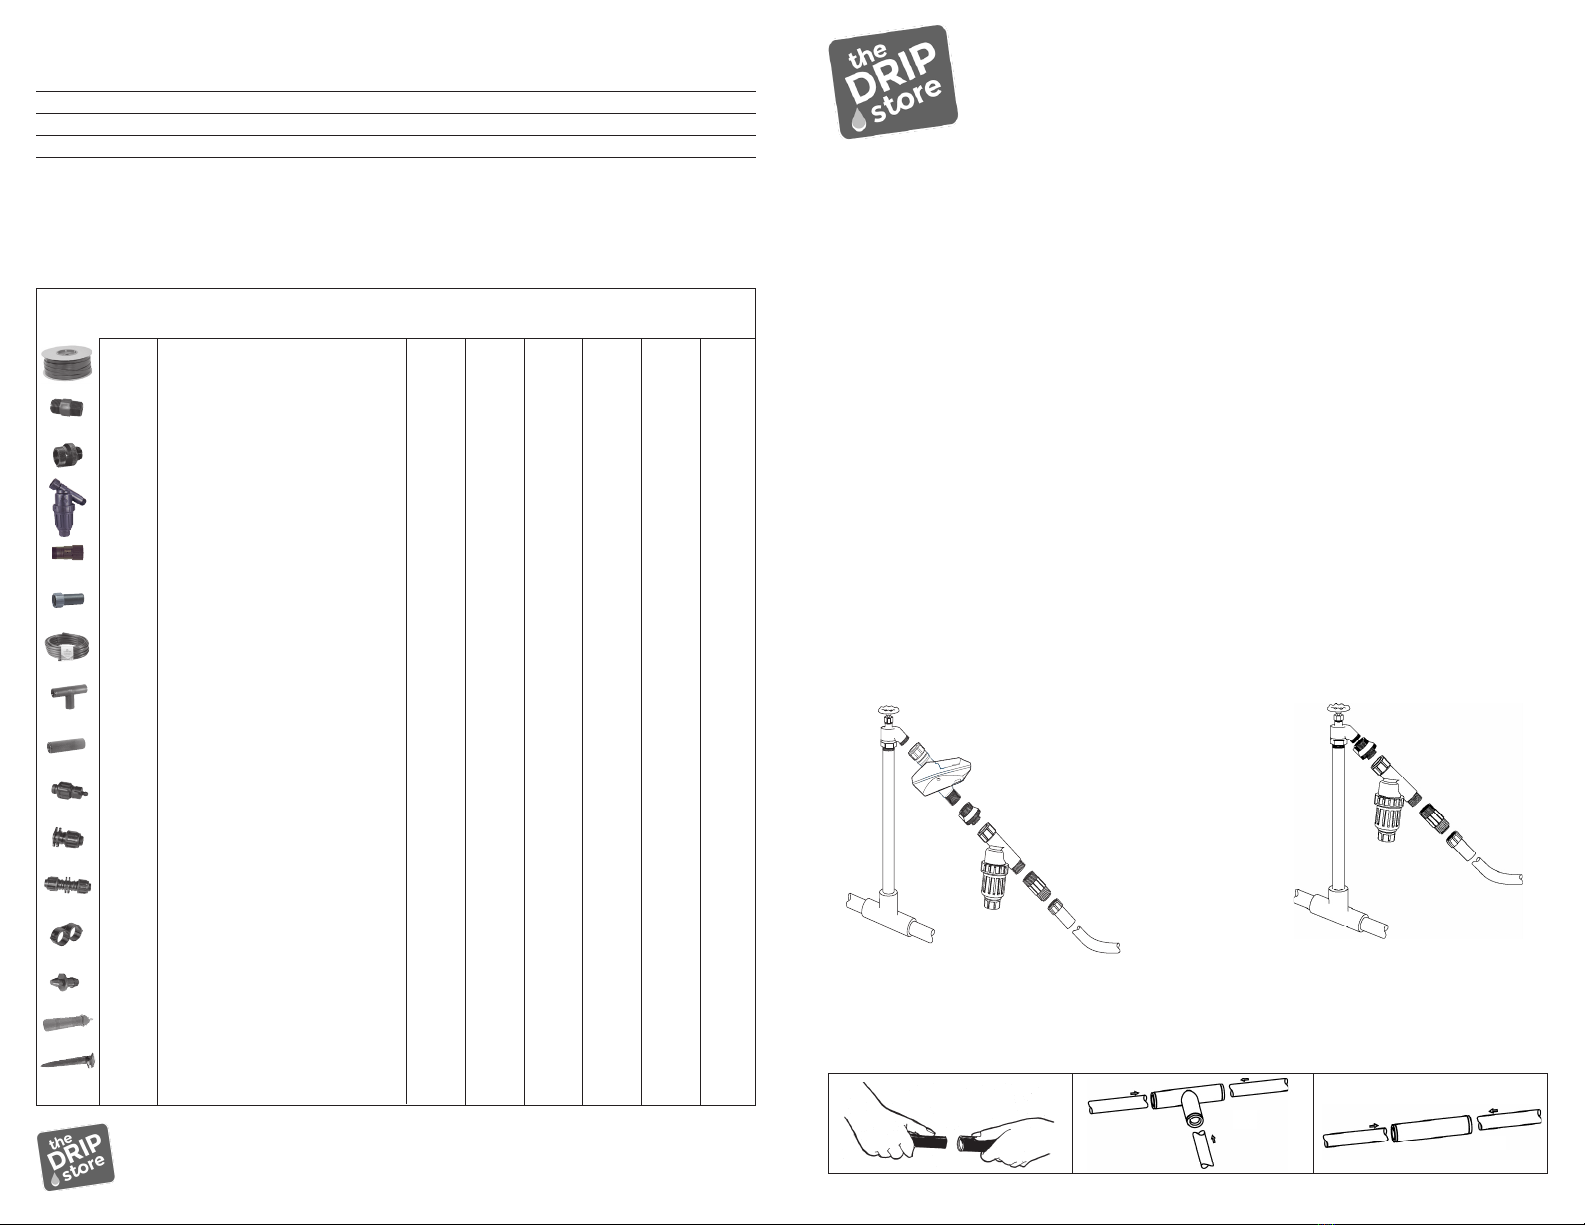
Begin the installation at the water source by attaching the backflow device to the faucet, then if you decide to
automate the system use our hose end timer. Connect the hose end timer to the faucet and then connect the
backflow device. Thread the “Y” filter to the outlet side of the backflow device, thread the pressure regulator
to the filter and thread the swivel adapter to the pressure regulator. Attach the 1/2” drip hose to the swivel
adapter by pushing and wiggling the 1/2” drip hose about 3/4” inside the adapter. Lay out the drip hose to the
vegetable garden (see different layouts). Make sure that the water flow direction in each component is in line
with the water flow arrows. After you install the drip hose and connect the drip tape into the drip hose, turn
the water on and flush the line. After flushing the lines, close the end of the drip hose and the end of Drip Tape
(see instructions how to connect each part). Turn the faucet on to pressurize the system and make sure that
there are no leaks from the filter assembly or fittings. If you use a controller, test the controller via the manual
button and then program the controller.
INSTALLATION INSTRUCTIONS
Vegetable Drip Tape Kit
Model K-VEG100, 300, 500 and 1000
WATERING SCHEDULE
Length of Watering Hot Warm Cool
Vegetable Germination 1 hour twice a day once a day every 2 days
Seedlings 45 minutes every day every 2 days every 3-4 days
Producing Plants 1 hour every day every 2 days every 3-4 days
Your plants require different amounts of water, so you will have to adjust your timing according to temperature,
wind and soil type. Use our chart as a guide, and your own experience to determine time and duration of
watering.
PARTS LIST
CONNECTING AND INSTALLING 1/2” FITTINGS
To install the 1/2” fittings, cut the drip hose with a hand pruner, being careful to keep dirt from entering
the line. Hold the fitting in one hand and the drip hose in the other and force the drip hose into the fitting by
wiggling it from side to side. Make sure that the drip hose is pushed about 1/2” inside the fitting.
Copyright ©2016 030716 All rights reserved. #10001
The Drip Store
Toll Free: 877.597.1669
— C001 Timer (not included)
— A015 Backflow Device
— F300 3/4” Filter
— A013 Pressure Regulator
— LF503 3/4” Swivel Adapter
— 1/2” Drip Hose
Head Assembly
without Timer
Part # Description
K-VEG
100
QTY
K-VEG
300
QTY
K-VEG
500
QTY
K-VEG
1000
QTY
T013 500’ of 5/8 inch, 15 mil drip tape with 0 0 1 2
12 inch spacing
A010 3/4 inch MPT x 3/4 inch MHT nipple 1 1 1 2
A015 3/4 inch FHT x 3/4 inch MHT 1 1 1 2
backflow preventer
F300 3/4 inch “Y” style filter with hose thread, 1 1 1 2
155 mesh, polyester screen, green
A013 3/4” FHT 25 PSI preset pressure regulator 1 1 1 2
LF503 3/4” FHT x .700 O.D. swivel adapter 1 1 0 0
with washer
T004 50’, 1/2” tubing .700 OD 1 0 0 0
LF005 1/2” .700 OD compression tee 1 4 7 10
LF001 1/2” .700 OD compression coupling 1 2 4 5
A026 5/8 inch drip tape with ¼ inch 5 15 25 50
barbed connector
A027 5/8 inch drip tape end 5 15 25 50
A023 5/8 inch drip tape coupler 2 3 5 5
A006 figure 8 hose ends 2 5 8 11
SF007 goof plugs, strip of 10 1 1 1 1
A019 tubing punch 1 1 1 1
S006 5 inch hold down stakes for 1/2” tubing 5 10 15 30
Instruction manual 1 1 1 1
USING THE PUNCH
To insert model A026 Drip Tape Reducer into 1/2” line, hold
the line in one hand and apply just enough pressure with the
punch to puncture tubing.
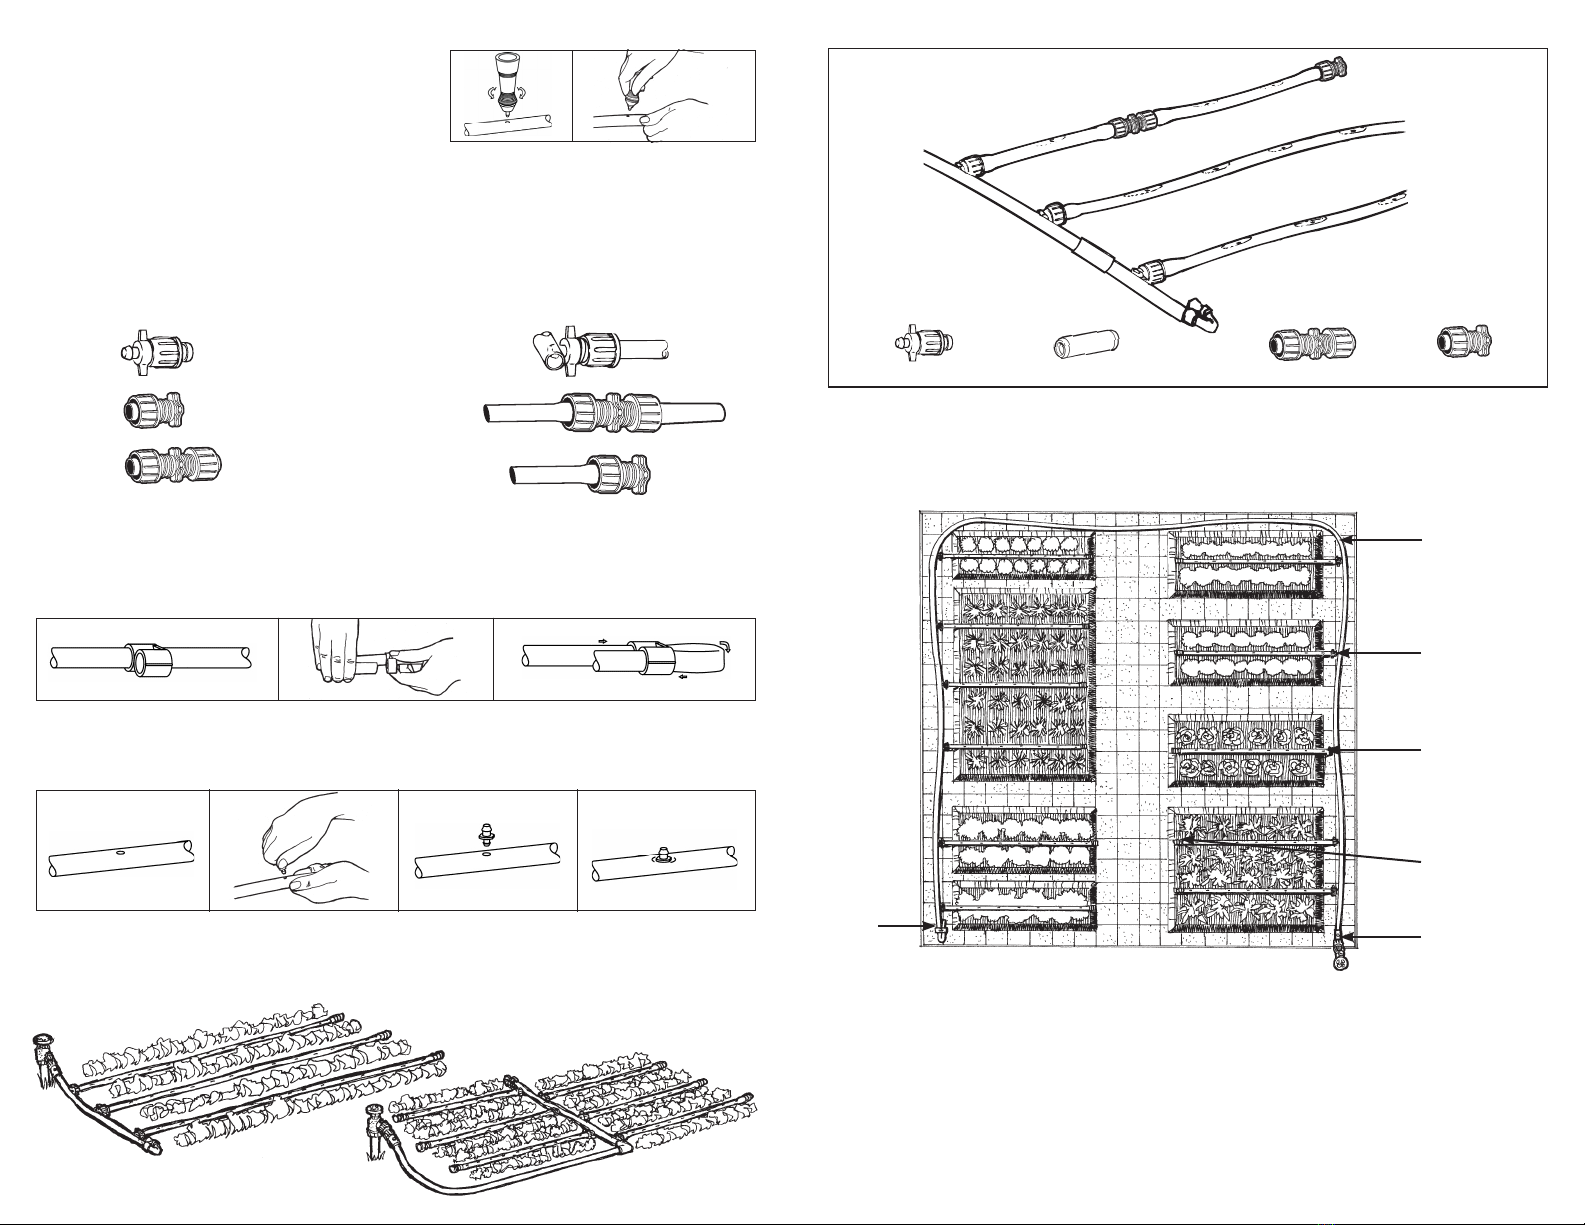
CONNECTING THE DRIP TAPE TO 1/2” DRIP HOSE
Layout the drip hose perpendicular to the vegetable rows and near the rows. Connect the Drip Tape to the 1/2”
drip hose using the Drip Tape reducer (model A026). Create a hole in the 1/2” drip hose near each vegetable
row using the punch (model A019). Inset the smaller size barbed end of the Drip Tape reducer (model A026)
into the 1/2” drip hose. Connect the Drip Tape to the larger end of the Drip Tape reducer by turning the ring
counter clockwise to expose the entire barb. Then, push the Drip Tape over the barb and thread the ring
clockwise toward the tape over the barb. Lay the Drip Tape along the vegetable row, preferably in the center of
the row. Before you close the end of the Drip Tape, turn on the water and flush the line. Use the same method
to connect the coupling (model A023) and the Drip Tape end (model A027).
• If your rows are less than two feet apart, install one line of Drip Tape between every two rows.
• If your rows are more than two feet apart, install a line of Drip Tape next to each row.
• The recommended depth for burying Drip Tape is 4” - 8”.
REPAIRING OR PLUGGING A HOLE ON 1/2” DRIP HOSE
If leakage occurs from the 1/2” tubing at the base of the tape reducer, remove that reducer and insert a goof
plug to close the hole, punch a new hole, and reinsert the reducer in a different place.
DIFFERENT LAYOUTS USING 1/2” DRIP HOSE AS THE MAIN LINE
Drip Tape layout in vegetable garden starting from 1/2” drip hose, then connecting Drip Tape reducers with
one line of Drip Tape between each vegetable row.
TIPS
• The Drip Tape in this kit is a 15-mil Drip Tape with drippers inserted every 12”.
• Flow rate per 100’: 21 GPH at 10 PSI to .6 GPH at 25 PSI.
• Maximum run recommended for an individual row of Drip Tape: 280 feet.
• Ideal spacing between the Drip Tape: 12” to 18”, depending on type of plants.
• Recommended layout: use 1/2” drip hose as the main line and model A026 reducer to branch
off the drip hose.
A026
A027
A023
A026 installed
A023 installed
A027 installed
1/2” Drip Hose
A026 Reducer
A027 Drip Tape End
LF503 3/4” Adapter
T013 Drip Tape
with dripper every 12”
A006
Figure “8” Hose End
Faucet
INITIAL SYSTEM START-UP
Before turning the system on for the first time, leave the 1/2” drip hose and drip tape end open and turn on the
water. Allow it to run freely for a few minutes. This will flush out any dirt that may be in the line.
Close the end of the drip hose by using a “figure 8” hose end and the drip tape using model model A027.
Check to see that the Drip Tape is operating correctly and that no leakage is occurring from the connectors.
A026 – Drip Tape Reducer LF001 – 1/2” coupling A023 – Connector A027 – Hose End
This manual suits for next models
3
Other The Drip Store Lawn And Garden Equipment manuals

Popular Lawn And Garden Equipment manuals by other brands

Sunforce
Sunforce SOLAR user manual

GARDEN OF EDEN
GARDEN OF EDEN 55627 user manual

Goizper Group
Goizper Group MATABI POLMINOR instruction manual

Rain Bird
Rain Bird 11000 Series Operation & maintenance manual

Cub Cadet
Cub Cadet BB 230 brochure

EXTOL PREMIUM
EXTOL PREMIUM 8891590 Translation of the original user manual


Vertex
Vertex 1/3 HP Maintenance instructions

GHE
GHE AeroFlo 80 manual

Land Pride
Land Pride Post Hole Diggers HD25 Operator's manual

Yazoo/Kees
Yazoo/Kees Z9 Commercial Collection System Z9A Operator's & parts manual

Premier designs
Premier designs WindGarden 26829 Assembly instructions

Snapper
Snapper 1691351 installation instructions