The GigRig Pro-8 User manual
The GigRig Ltd
Unit 85 Basepoint Business Centre
Swindon
SN5 7EX
TheGigRigTM Pro-8 Manual
1. Introduction
2. Main Diagram
3. Quick Start
4. Effects Loops
5. Control Functions:
1. Post Volume
2. Remote Switch 1 (normally closed)
3. Output 1 Mute
4. Output 2 Mute
6. Mode Switch
7. Expand Output
8. Special Features
9. TheGigRig Pro-8s Isolated Output
10. TheGigRig Pro-8 power
11. FAQs
12. Important Safety information
13. Thanks
14. Technical

All rights reserved. Design rights claimed. Moral rights asserted. Revised March 2010 Page 2
1. Introduction
I would personally like to thank you for purchasing TheGigRig Pro-8 and would also
like to congratulate you on having such great taste!
TheGigRig Pro-8 is the ultimate floor based dynamic audio guitar effects switcher and
amp. management system. It is the product of five years of research and design, 12
months of product development and a lifetime of musical experience.
At the press of a footswitch you have instant access and control over:
6 effects loops (1 stereo)
1 Remote switch (controlling amp effects or channel selection)
2 selectable outputs (one output is isolated to remove hum)
8 easily programmable presets, each with its own bypassable volume control
amp booster
True Bypass select to send your guitar signal direct to your amp
Using TheGigRig, your guitar signal will stay intact and will completely bypass any
unselected effect loop or audio function.
The tonal advantages TheGigRig Pro-8 gives you must be heard to be believed and
the amount of control it offers you is staggering. What’s more, the old problems
associated with effect pedals such as tone sucking, signal degradation, volume sags
and the famous tap dance are no longer an issue. TheGigRig Pro-8 takes care of the
lot.
All you need to do now is decide, ‘how do I want to sound today?’
Enjoy
Daniel Steinhardt
www.thegigrig.com

All rights reserved. Design rights claimed. Moral rights asserted. Revised March 2010 Page 3
2. TheGigRig Pro-8 Main Diagram
1
2
3
4
67
9
10
11
12
13
14
16
17
18
19
20
21
22
Fig1
23
5
8
15
1. Strong metal Lid (lid and tray construction)
2. Foot switch (8 strong foot or hand operated switches)
3. Control mini switches (6 mini switches) Replaceable.)
4. Effects loops mini switches (4 mini switches) Replaceable.)
5. Phase Switch (Reverses phase of out 2)
6. Output 2 (isolated) (Jack Socket)
7. Expand out/in (For use with two or more GigRigs)
8. Output 1 (Main amp) (Jack Socket)
9. 9V input (use TheGigRig Pro-8 supply only)
10. Box base (steel tray base)
11. Output 1 LED indicator (on when output is live)
12. Post volume level indicator (Brightness shows volume setting)
13. Post volume on indicator (on when post amp is in the signal path)
14. Remote switch 1 LED (normally closed when LED is off)
15. snd and rtn for effects pedals (6 separate loops at back of unit.)
16. Mode toggle switch (single or multi patch for top rail)
17. Effects loop LED (on when effect is in the signal path)
18. Pre-set LED (on when patch is selected)
19. Post volume control (Volume control for each patch)
20. Top reinforced switch rail (Strong Chrome rail for stomping on)
21. Midi option available (MIDI output Option, Not fitted)
22. Guitar input (on side) (Input from guitar or other instruments)
23. 9V output (on side) (Used to power all your 9V pedals etc.)

All rights reserved. Design rights claimed. Moral rights asserted. Revised March 2010 Page 4
3. TheGigRig Pro-8 Quick Start
Using TheGigRig Pro-8 couldn’t be simpler.
Connect your GigRig to your amplifier before applying power to your GigRig.
Plug the effects you wish to use into the effects loops in the back of TheGigRig Pro-8,
in the order you wish to use them (1 to 6). The effects send (snd) plugs into the input
of your effect and the output of your effect plugs into the return (rtn).
Your signal path moves from right to left, from effects loops 1~6.
The order in which you place your effects makes a big difference to your sound, so
experiment and find the sounds you like. (For more info, see the FAQ section or web
site. www.thegigrig.com)
Now plug your amp(s), into the output(s) on the left-hand side of TheGigRig Pro-8.
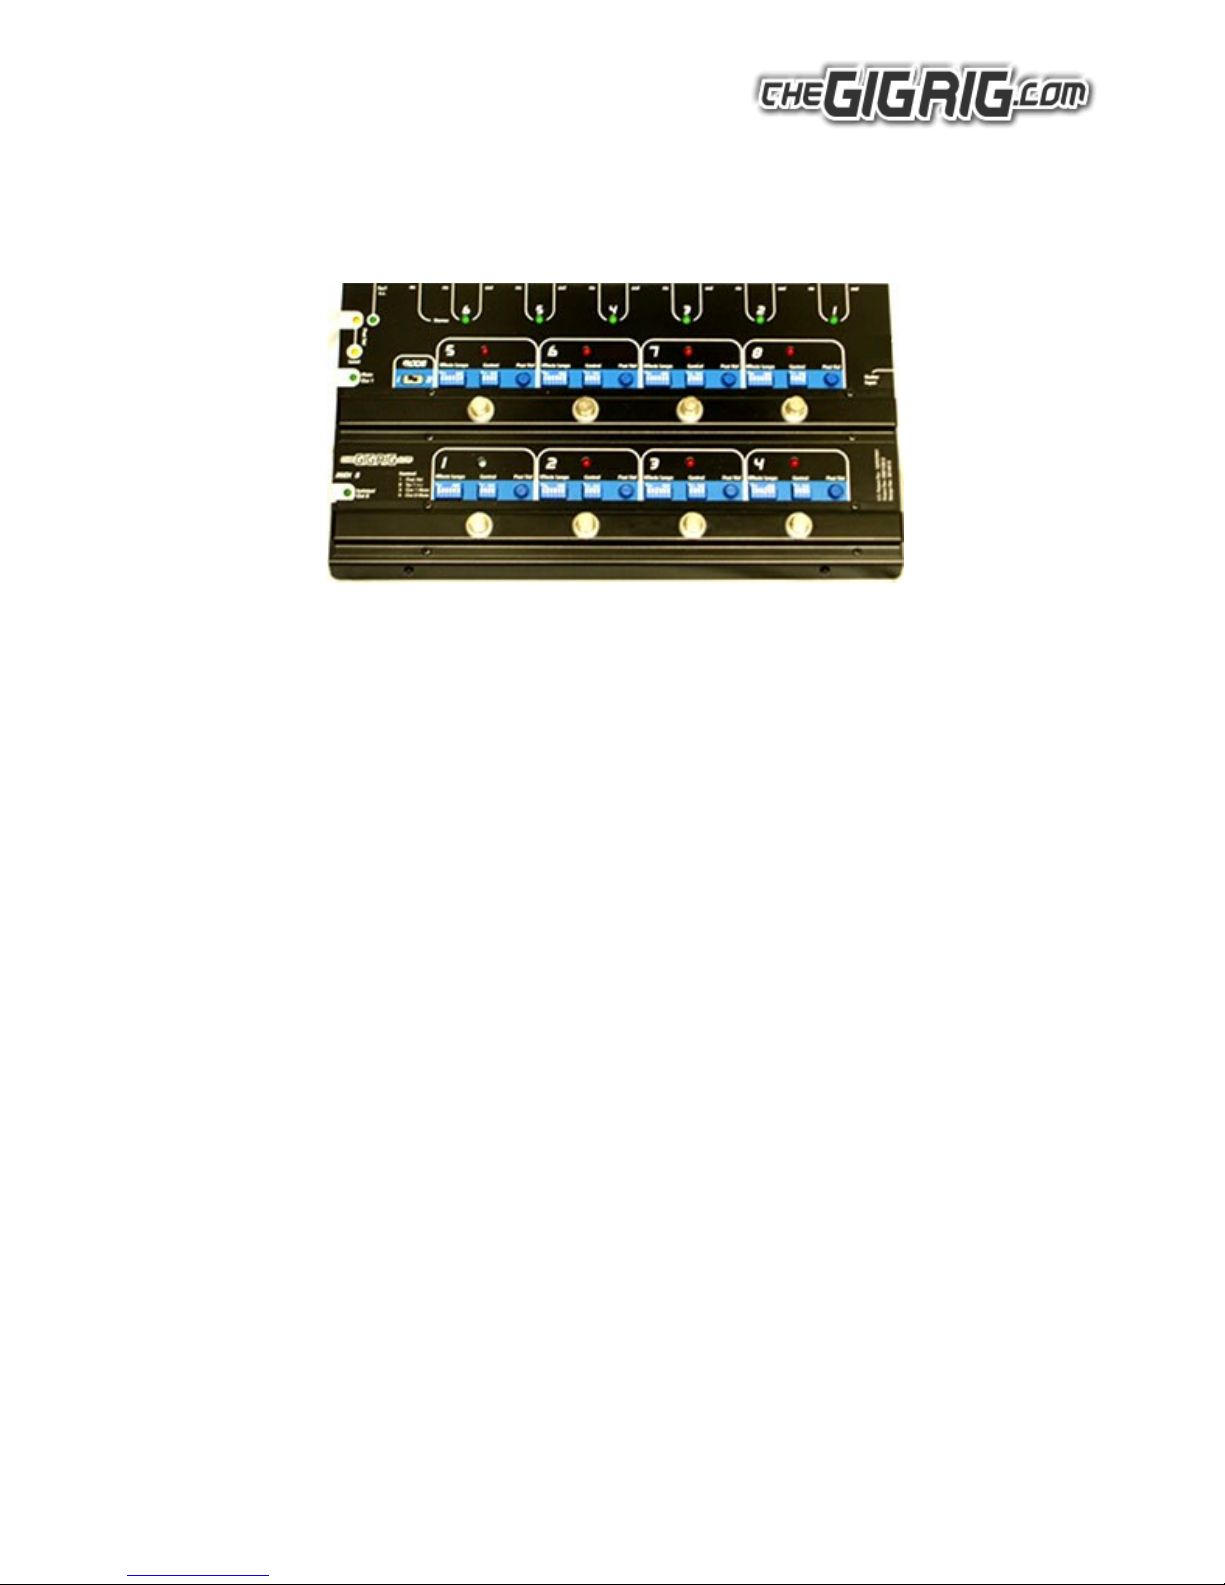
Let’s take a look at one of the 8 pre-sets:
The 6 effects loops’ switches operate the effects loops in
TheGigRig Pro-8.
The 4 Control switches operate the control functions; these
are:
1- Post volume; you can set a different volume for each pre-set in mode 1.
2- Remote switch 1 (normally closed)
3- Out 1 mute
4- Out 2 mute
To programme, simply turn on the effects loops and control functions switches you
want for your sound then move to the next patch and do the same again. That’s it!
When you step on the pre-set, this selects the effects and controls from the
associated patch, as shown in the picture, so only effects loops 5, will be ‘on’. As all
the other functions are switched ‘off ‘, foot switch 1 will place the effect connected
in loop 5 between your guitar and your amp. There will be noting else in your signal
path, nothing, not a sausage!
Remember, this is just a quick start guide. Because there are so many fantastic ways
to use TheGigRig Pro-8, we suggest that you take the time to read through the
manual and F.A Q.s.
You will learn how to:
Press a single footswitch and change channels in your amp, turn on and off reverb,
select any combination of effects loops, any combination of outputs (either or
both!), control input and output levels.
If you have 2 amps each with built in effects loops, you can even choose which of
your amplifiers’ pre-amps is sent to which power amp!
All of this is with the most direct and pure signal path possible.

All rights reserved. Design rights claimed. Moral rights asserted. Revised March 2010 Page 5
End of the Quick start……… Keep reading to become an expert:
TheGigRig Pro-8s main relays are arranged as shown in Fig 3 below:
29 is the guitar input. 9 is out 1, 7 is out 2. 25 is the stereo input.
Fig3
29
24
9
25
43
45
46
47
48
49
50
35
36
37
38
39
40
44
51
52
53
54
55
56
57
Guitarin
Out1
OpticalAmp
6Effectsloops
7
Out2
Buffer Transformer
Stereoin
N/Oswitch
AutoStereoSwitch

All rights reserved. Design rights claimed. Moral rights asserted. Revised March 2010 Page 6
4. Effects Loops
At the heart of TheGigRig Pro-8’s unique audio switching capabilities are the six
effects loops located on the back of box.
Each of these effects loops has a send (snd) and a return (rtn) except for loop 6
which has 2 returns for stereo effects. The effects loops are numbered 1~6 from
right to left so as to illustrate the direction your guitar signal travels.
E.g. your guitar signal travels from the input on the right hand side of TheGigRig Pro-
8 to the first effects loop i.e.: effect loop number 1, then 2 and so on, until it reaches
number 6.
From there, your signal travels to the outputs.
Your effects are plugged into these effects loops. The send (snd) from TheGigRig Pro-
8 is connected into the input of your effect and the output of the effect back to the
return (rtn).
The order in which you place your effects does make a difference to your sound.
Check out the F.A.Q’s section for more details on effects order; however, back to
those effects loops and why they are the key to retaining your tone!
Normally when effects pedals are plugged into each other in series you get what is
known as tone sucking or volume loss.
Most pedals act as a filter, even when the pedals aren’t on; the more pedals you
have in your chain the more filtering you get, so less of your higher frequencies get
through, this means less tone!
TheGigRig Pro-8 completely solves this problem as your guitar signal only travels
through the effects loops that are selected for each of the particular sound you use.
The unused pedals are disconnected and soft muted.
You can now connect in all your other less frequently used pedals, they will no longer
causes problems to your much-loved tone, if they are not selected, it’s as if they
don’t exist.

All rights reserved. Design rights claimed. Moral rights asserted. Revised March 2010 Page 7
So how does it do that?
Let’s take a closer look at one of TheGigRig Pro-8’s 8 pre-sets.
Each of TheGigRig Pro-8’s effects loops are controlled by a
gold contact relays. This is a high quality switch that, when
activated will send your signal through the effects loop or
will bypass the loop completly.
These relays are inturn controlled by the mini switches on
each pre-set they are marked ‘Effects Loops’.
With the pre-set above effects loop 5 has been selected.
When you step on this pre-set, your guitar signal will travel from the guitar input
through effects loop 5 ONLY. Everything else is completeley bypassed.
The difference this makes to your tone is amazing. You get the shortest, purest signal
path possible. You can now switch in other effects loops to create your sound.
Presing a foot switch that has already been selected a second time will switch the
GigRig into true bypass.
Look at the F.A.Q’s section to see how to use the effects loops in TheGigRig Pro-8 in
combination with the effect loop in your amp.
If you use more than one guitar such as a spare for when you break a string or an
electro acoustic, you can plug these into the effects loops and control them with
TheGigRig Pro-8.
For example, an acoustic guitar could be plugged into effects loop 1 and switch in or
out using the GigRig. You can also use the isolated output 2 to send your acoustic
directly into the P.A. without introducing hum.
You can then programme a pre-set for the songs in which you use an acoustic.
Therefore, when you step on it, it will disconnect your main guitar, plugged into
‘guitar in’, and mute the output to your amplifier sending your acoustic straight to
the front of house system.
You can make TheGigRig Pro-8 as simple or as complicated as you like.
That’s the whole point. It’s entirley up to you.

All rights reserved. Design rights claimed. Moral rights asserted. Revised March 2010 Page 8
5. Control Functions
TheGigRig Pro-8’s unique control functions make it both powerful and flexible.
Each of the 8 pre-sets has a row of four mini switches, which operate the control
functions.
These are:
1. Post Volume
2. Remote Switch 1
3. Output 1 Mute
4. Output 2 Mute
Let’s go through them one at a time:
1. Post Volume.
This is a class 'A' Volume controlled wide band amplifier on the output of TheGigRig
Pro-8.
It was designed not to mess with your tone and is of the highest audio quality.
The circuit for this post effects amplifier is on its very own true bypass relay so you
must turn on switch 1 for the Post Vol pot to have any effect. (When we say true
bypass, we mean true bypass).
This volume control can cut your output by 1/5th or boost it by X3.
Use the small volume pot next to the control switches to control the level.
This is perfect for boosting solo sounds or compensating for the drop of output in
some old effects pedals. More than this it also compensates for loss of tone when
using long leads to your amplifier.
Furthermore, as it is ‘post’ effects loop it won’t mess with the sound of your effects.
2. Remote switch.
If you use an amplifier with built in effects such as reverb or vibrato or an amp with
two channels, then this remote switch is priceless. The amp can now be controlled
by TheGigRig Pro-8.
Instead of plugging an extra footswitch into the back of your amp, simply plug the
footswitch out from your amp into the remote switch on TheGigRig Pro-8.
Normally closed refers to the polarity of the switch in default position (off or bypass).
E.g. If you would like to use the remote switch to control the reverb in your amp,
simply plug a lead from the footswitch out of your amp and into the remote switch.
With a channel-changing amp, you can plug the footswitch from your amp to the
remote switch in TheGigRig Pro-8.
3. & 4: Output 1 & 2 Mute.
On the far left hand side of TheGigRig Pro-8 you will see two outputs.
Not surprisingly, these are called out 1 main and out 2 isolated.

All rights reserved. Design rights claimed. Moral rights asserted. Revised March 2010 Page 9
TheGigRig Pro-8 enables you to choose any combination of these outputs. Simply
mute the output that you don’t want your signal to go to, by turning on the ‘output
mute’.
Note. You should always use output 1 first. Never use output 2 on its own. (Output 1
provides the signal ground; you should only have one signal ground to your system.)
You can have a clean amp in one output and a dirty sounding amp in the other.
Alternatively, if you only use one amp, you can send a line directly to the desk as well
as your amp and then switch between them.
For stage safety, the GigRigs output 2 will also give you and your equipment
protection from over 1000V if a mains fault should occur in the desk electrics.
Idea: Use output 1 for your electric and output 2 for your acoustic sent directly into
the PA system. You can plug your acoustic into RTN of loop 1.
Using combinations of the effects loops and the control functions the possibilities
are virtually endless. And, it all happens at the stomp of a single footswitch.

All rights reserved. Design rights claimed. Moral rights asserted. Revised March 2010 Page 10
6. Mode Switch
The mode switch governs how the top rail will function.
Mode 1 is Single mode.
When the mode switch is set to 1, only one pre-set sound
can be activated at any one time.
Selecting another pre-set will cancel the previous pre-set.
If you want to programme your 8 pre-sets and use these
combinations only, the single mode (mode 1) will enable you to do just this.
Mode 2 is Multi Mode.
This is where it gets interesting. In multi mode, you can add your pre-sets together,
like a mixer. When you select a top rail pre-set, TheGigRig Pro-8 will add that
combination to the pre-sets already selected. To deselect, simply press the
footswitch again.
In mode 2 the bottom rail (pre-sets 1-4) will still be in single mode and the top rail
(pre-sets 5-8) will be in multi mode.
Using TheGigRig Pro-8 in this way, you can have 4 main sounds on the bottom rail
and add in effects and control features to these sounds using the top rail. TheGigRig
Pro-8 then becomes a serious effects mixer.
There are a few things to remember when using Multi Mode:
1. When two pre-sets using Post Vol are selected; the highest volume level takes
precedence.
2. Be careful not to add a pre-set using Out 1 mute to a pre-set using Out 2 mute as
this will result in no output at all.
3. If you want all 8 foot switches to be configured to multi mode, hold down foot
switch 5 when you power on your GigRig; remember, this condition will only hold
until you power on again.

All rights reserved. Design rights claimed. Moral rights asserted. Revised March 2010 Page 11
7. Expand Output
Expand Output:
This output is for use when you have more than one GigRig product.
If two or more GigRigs EXP sockets are connected together and they are in mode 1,
the two GigRigs will act as one large GigRig. An external pull up switch on this input
will switch TheGigRig into true bypass mode.
This output will pulse high when a switch is pressed. This can be used as a mute or
control pulse etc. for other equipment. See the web site for other GigRig equipment
using the exp. signal.
You can add two more effects loops to your Pro-8 using the GigRig Loopy2. The
Loopy2 will communicate to your Pro-8 using the EXP input.
See Web site for details.
You can add and control more than two amplifiers with your Pro-8, without
introducing Hum. The GigRig Humdinger is an exceptional cable and amplifier driver
designed to work with or without the GigRig Pro-8.

All rights reserved. Design rights claimed. Moral rights asserted. Revised March 2010 Page 12
8. TheGigRig Pro-8 Special Functions
A range of special functions for the adventurous guitarist:
Hold down a foot switch for over 5 seconds to access the following special
functions:
Foot Switch 1: True Bypass
Hold down foot switch 1 for 3 seconds and TheGigRig will connect your Guitar
directly to your amplifier. True Bypass; no signal degradation, no loss of tone. This is
the same as a patch with all the switches in the off position.
Foot Switch 2: Reserved for Midi option (not fitted)
Foot Switch 3: Slow clean Modulation effect (3.3Hz)
Switch control switch 1 (post vol) to the ‘on’ position to access this effect. Hold down
foot switch 3 for three seconds. You can now use the post volume control for the
slow modulation intensity (depth).
You can combine this modulation effect with your effects loops on this Patch.
You can also mix in other effects by setting the mode switch to mode 2. and adding
in other effects. Try it!
Foot Switch 4: Fast clean Modulation effect (5.3Hz)
Switch control switch 1 (post vol) to the ‘on’ position to access this effect. Hold down
foot switch 4 for three seconds. You can now use the post volume control for the fast
modulation intensity (depth).
You can combine this modulation effect with your effects loops on this Patch.
You can also mix in other effects by setting the mode switch to mode 2. and adding
in other effects. Try it!
Foot Switch 5: Self Test (and light show)
Hold down for 3 seconds to run through the wizzy light show. The output will be
muted until the show and self-test is completed.
The pop gate feature will be disabled at the end of the show.
Foot Switch 6: Reserved for Midi option (not fitted)
Foot Switch 7: Software version
Hold down for 5 seconds to read the software version number. The version number
will flash on and off.
Foot Switch 8: Pop-Gate on.
Hold down for 5 seconds to switch on the PopGate circuit.
The PopGate creates a complex sequence of events, using a fast acting circuit in
combination with the output relays, to gate out transient pops caused by old (and
some new) high gain effects pedals.
The Pop-Gate can be switch back to off by holding down foot switch 5 or resetting
the power to TheGigRig.

All rights reserved. Design rights claimed. Moral rights asserted. Revised March 2010 Page 13
Switching off Special Functions.
If you like to rest your foot on the foot switches whilst playing, then this can be a
problem as the special functions will switch in after 5 seconds! Now, if you hold
down foot switches 1 when powering up the GigRig, all the special functions will be
switched off, resting your foot on a switch continually will now have no effect.
If you like the special functions defeated; however, you still want to use the tremolo
feature on foot switches 3 and 4; hold down foot switch 3 when powering the GigRig
The special functions will be re-enabled when the GigRig is powered on in the normal
way.

All rights reserved. Design rights claimed. Moral rights asserted. Revised March 2010 Page 14
9. TheGigRig Pro-8s Isolated Output
Isolated output… Output 2
Let’s cut through the jargon, like earth loops and earth impedance and get right
down to the source of Hum.
If you have one Guitar into one effects pedal into one amp, you won’t get hum.
Although your power supply is connected to the mains, it won’t be connected to the
mains earth. Therefore, your precious guitar signal has just one path to ground;
through the screen of your leads into your amp and through to the mains ground.
The hum problem occurs when you have more than one path to ground for your
signal. Using two amplifiers has always been an issue, because they both MUST be
connected to mains ground; however, you only want one signal ground for your
audio!
TheGigRig Pro-8 has a very special output for your second amplifier, or any other
earthed equipment you need to feed with your signal.
Only use output 2 when you have already used output 1, that’s the golden rule.
Output 1 will provide your signal ground.
Phase Switch.
Phase switch with the same sound going to two amplifiers of different models. The
amplifier speaker cones could be either, moving forward at the same time (in phase)
or, one may be moving forward whilst the other is moving backwards (out of phase).
If this occurs then, when the sounds mix, the sound waves will cancel, giving a
reduced tone at a distance from the speakers.
To Change the Phase to match your amplifiers:
You will find a small button next to the isolated output (see 5 in Fig1). When this
button is pressed ‘in’, Out 2 will stay in phase with Out 1 and when this button is out,
yes you guest it, Out 2 is then out of phase with Out 1.
When you have set the phase correctly, you can then swap your two amplifiers
between out 1 and out 2, without causing a phasing problem.
For three or more amplifiers, please see our web site for a cost-effective humdinger
of a solution.

All rights reserved. Design rights claimed. Moral rights asserted. Revised March 2010 Page 15
10. TheGigRig Pro-8 power
Before powering TheGigRig Pro-8, connect the output(s) to your amplifier(s) first.
This will prevent ear-blasting hum from your amplifier when you connect the input.
It is not necessary to power down the TheGigRig Pro-8 when installing new effects
pedals, simply select bypass for silent installation.
POWER OUT
On the right and side of the GigRig is a 9V power output; this output is only for use
with vintage low current effects such as distortion and fuzz effects it is extra
smoothed to give a very clean supply; it also has an electronically healing fuse to
protect your vintage effects from any possibility of damage.
Note it may take a few seconds for this fuse to recover after overload.
A short circuit on this output will cause the main power supply to shut down. The
green light on the Generator supply will flash until the short circuit has been
removed.
This output can deliver 1.5A continuous power.
USING OTHER 9V SUPPLIES.
This is not recommended. Other 9V supplies may appear to work; however, it is likely
that problems will occur. TheGigRig Pro-8 is fused internally at 6.3A.
EMERGENCY USE:
If TheGigRig Pro-8s 9V power supply is not available. You can, in an emergency,
power your effects pedals separately from the GigRig, TheGigRig Pro-8 can then be
powered temporarily using a 9V regulated power supply with an output capability of
1A or more.

All rights reserved. Design rights claimed. Moral rights asserted. Revised March 2010 Page 16
11. FAQ’S
Q. What’s the best order to put my effects in?
Answer:
The order that you place your effects makes a dramatic difference to your guitar
sound.
Do you phase your distortion or do you distort your phaser?
Of course, there are no set rules and with TheGigRig Pro-8, you can experiment as
much as you like. I’ve found the following to be a good place to start.
1st Envelope filters, auto wahs and wah pedals.
2nd Compression
3rd Overdrive, distortion and fuzz. (Use in order of the least amount of gain to the most)
4th Modulation effects (phase, chorus, flange, tremolo)
5th Delay effects (shorter delays, followed by longer delays)
6th Reverb
Q. How do I use TheGigRig Pro-8 with the effects loop in my amp?
Answer:
The effects loop in your guitar amplifier gives you an insertion point between your pre-
amp and your power amp for you to connect your effects.
With TheGigRig Pro-8, you can insert the pre-amp section of your amplifier into any
point in the signal chain.
E.g. Say I want my compression and overdrive pedals going into the front of the amp
and my modulation and delay effects in my amps effects loop, I would use the effect
loop that is after my overdrive and before my modulation effects. The send from
TheGigRig Pro-8 is plugged into the front of your amp and the effects send from the
amplifier is plugged into the return of TheGigRig Pro-8. What you’ve done is placed
your pre-amp where you want it in your signal path. The output of TheGigRig Pro-8
then goes to the return on your amplifier.
If you have 2 amps, each with their own effects loops you can actually choose which
pre-amp you send to which power amp!
Q. I have spilled my beer onto one of the micro-switches; it is now difficult to use or
faulty.
Answer:
Don’t panic, you don’t have to give up beer! All the micro-switches are in sockets and
can be easily replaced, without opening TheGigRig box. Take great care not to damage
the paintwork. See our web site for replacement parts.
Q. I would like TheGigRig to work differently, to suit my personal needs:
Answer:
Well you just can’t please some people can you! Still TheGigRig Pro-8 is software
upgradeable, so please ring our customer services or send an email and we will

All rights reserved. Design rights claimed. Moral rights asserted. Revised March 2010 Page 17
Q. How do I justify buying TheGigRig Pro-8 to my partner?
Answer:
This is a very important question; every guitarist with a partner will know what I’m
talking about.
The tonal advantages that TheGigRig Pro-8 gives you must be heard to be believed and
the amount of control it offers you is staggering. However, here is why I truly believe
that TheGigRig Pro-8 makes good sense.
Inevitably, as musicians grow in experience and ability, their taste and tonal
preferences also change.
TheGigRig Pro-8 makes sense because it changes with you! As long as guitar pedals
exist, TheGigRig Pro-8 will be of immense value.
If you want a different overdrive sound, You simply plug in the effects pedal that gives
you the sound that you like. You don’t need to change your entire rig; you can pick and
choose the sounds that inspire you and let TheGigRig manage the lot.
There are so many great effects pedals and similar devices on the market, you are sure
to find the sounds that inspire you, from the subtle to the ridiculous and everything in
between.
Not only have effects pedals been inspiring musicians for over half a century, but they
generally hold their value a lot better than their digital technology based
counterparts.
Because technology becomes obsolete, great tone doesn’t

All rights reserved. Design rights claimed. Moral rights asserted. Revised March 2010 Page 18
12. Important Safety information
TheGigRig Pro-8 is a low voltage device and so it is completely electrically safe;
however, this is not true for some older guitar amplifiers.
The GigRig is NOT for use with old two pin mains plug amplifiers.
Your amplifier must have an earth connection. If you intend to use a vintage
amplifier with a two-pin mains plug DON’T. Take your amp to be serviced by a
qualified technician. In most cases a new 3-wire mains lead can be fitted for just a
few pennies.
Amplifiers fitted with a ground switch.
Under no circumstances should the GigRig be used with this type of amplifier.
Some vintage amplifiers where fitted with a Ground switch to reduce earth loops
and reduce hum. This switch is now commonly known as the DEATH switch. If your
amplifier has such a switch, GET IT SERVICED NOW! The switch will be removed and
an earth lead will be added with a three-pin plug.
A very good site for further information about old amplifier safety is:
http://www.hsga.org/learningarchive/ampsafety.html
Do not use your GigRig in wet conditions. If TheGigRig Pro-8 accidentally gets wet, it
should be left in a warm dry place for 24 hours before it is used or stored. (Remove
the lid to aid drying.)
13. Thanks.
Many thanks for purchasing TheGigRig Pro-8; we take our commitment to
you and your sound very seriously. Please keep up to date with all the latest
information on our web site, www.thegigrig.com
You may be surprised how inventive other users can be with TheGigRig and you may
find sharing your ideas a great deal of fun.
These instructions may change without notice. Consult our web site for updates.
All rights reserved. Design rights claimed. Moral rights asserted. Revised March 2010 Page 19
14. Technical
TheGigRig Pro-8s Technical Specification:
Guarantee is not affected if you open the GigRig.
Bypass mode:
True bypass. Direct connection from guitar to amplifier. (DC connected)
Effects bypass:
True bypass, direct AC connection between send and return. (AC coupled)
Pop Gate. Settling time = 30 seconds from power up.
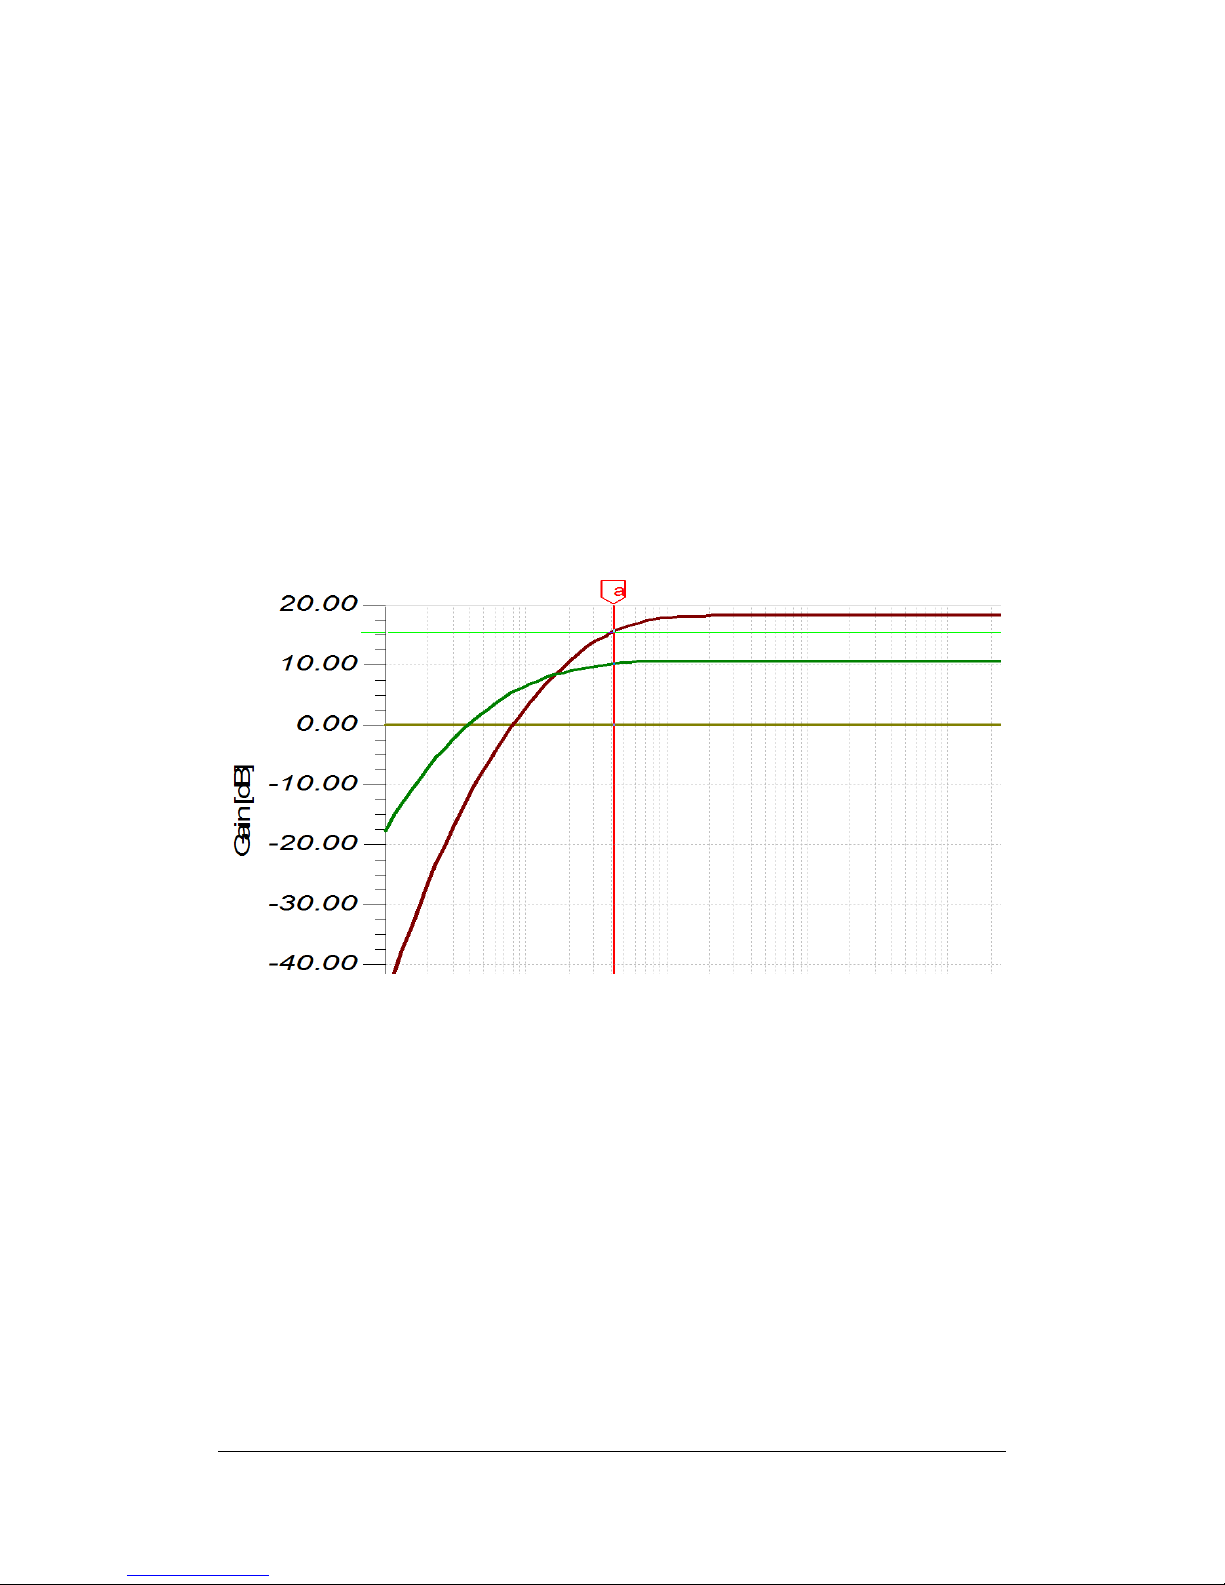
Maximum gain For TheGigRig Pro-8 is shown in Green (middle) trace.
Bandwidth is 10Hz To 200KHz.
Post effects Amplifier: Class A
Gain of post effects amplifiers X3 = +9.5 dB
Attenuation of Post effects amps Divide by 5
Bandwidth 10 Hz to 200 kHz
Flatness 1dB Flat to 50 KHz (studio quality)
Input impedance of post effects amplifier 500k Ohm
Distortion Signal level dependent 2%
AC output impedance of post effects amplifier 500 Ohm
Isolated output Flat to 30KHz. Compensates for cable capacitance.
Internal Microprocessors = RISC microprocessor clocked at 4MHz.

All rights reserved. Design rights claimed. Moral rights asserted. Revised March 2010 Page 20
Sw normally short circuit
Stereo:Stereo return is routed automatically to out 2 when effects loop 10 is selected and a
jack plug is inserted into the stereo rtn.
Power:
External power supply minimum 3A regulated. Thermal and short circuit protected.
Current consumption (no effects powered). All outputs on, all LEDs on = approximately
600mA.
Current consumption (Maximum number of external effects powered). All outputs on, all LEDs
on = approximately 2.7A.
Maximum current for external effects = 1.8A (electronically protected, 6V at 1.8A, It can take
1 min for fuse to self-repair after overload).
System fuse for Internal protection = 6.3A.
Physical size:
Dimensions of 370mm X 200mm X 80mm.
All values are approximations. No responsibility will be taken for errors or omissions in the
above specification.
This specification is subject to change without notice. Consult our Web site for
amendments.
www.thegigrig.com
Warranty:
TheGigRig Pro-8 is covered by a standard warranty of one year from the purchase
date; however, The GigRig Ltd will abide by the warranty period for electrical and
electronic equipment stated within your country.
(We support our customers, not just our products.)
Disposal: TheGigRig contains no batteries or Lead. Return the unit
to TheGigRig Ltd for disposal or use standard disposal for electrical
equipment recommended in your country.
Do not dispose of electrical products in household waste!
Legal Stuff:
In the unlikely event of a failure; TheGigRig Ltd. will not be held responsible or
compensate for any loss of earnings or any other losses incurred by failure of this
equipment. The use of this equipment is at the owner’s own risk.
Small Print:
TheGigRig Pro-8 is protected by copyright, moral rights, patent and design registration.
Patent Pen 0321552.2…. Patent Granted GB2405987
USA Patent Pending US10/937,997
Design Registration # 3014412
‘GigRig’ is a stylised trademark. No 2343300
The GigRig and its Power supply are RoHs compliant.
Any company/individual found copying the functionality, look or feel, circuits or software
functions for commercial gain will be liable for legal action. Licences may be granted to non-
competing companies.
Compliant to BS EN 60950-1:2002
© The GigRig Ltd. May 2007
Table of contents
Other The GigRig Recording Equipment manuals


