The GigRig Pro 14 User manual

©
The GigRig ltd Jan 2009
All rights reserved. Design rights claimed. Moral rights asserted. © May 2008 Page
TheGigRig Pro 14
TM
Manual
1. Introduction
2. Main Diagram
3. Quick Start
4. Effects Loops
5. Contro Functions:
1. Post Vo ume
2. Pre Amp and Buffer
3. Remote Switch 1 (norma y c osed)
4. Remote Switch 2 (norma y open)
5. Output 1 Mute
6. Output 2 Mute
6. Mode Switches
7. Aux. Out
8. Bypass
9. Specia Features
10. The iso ated output (Out 2)
11. Using the EXT input/outputs
12. Power Supp y
13. F.A.Q’s (Frequent y Asked Questions)
14. Safety
15. Thank you
16. Technica

©
The GigRig ltd Jan 2009
All rights reserved. Design rights claimed. Moral rights asserted. © May 2008 Page 2
1. Introduction
I wou d persona y ike to thank you for purchasing TheGigRig Pro 14 and
wou d a so ike to congratu ate you on having such great taste!
TheGigRig Pro 14 is the u timate f oor based dynamic audio
switcher/guitar, effects and amp management system. It is the product
of four years of research and design, 3 further years of product
deve opment and a ifetime of musica experience.
At the press of a footswitch you have instant access and contro over:
10 true bypass effects oops (1 stereo)
2 Iso ated Remote switches (contro ing amp fx/channe se ection)
2 se ectab e outputs (one output is iso ated and phase reversab e!)
1 programab e pre effect oop c ass A buffer
14 easi y programmab e presets, each with its own bypassab e vo ume
contro circuit
Tuner out for si ent on-stage tuning
True Bypass se ect to send your guitar signa direct to your amp
The tona advantages that TheGigRig gives you must be heard to be
be ieved and the amount of contro it offers you is staggering. What’s
more, the o d prob ems associated with effect peda s such as tone
sucking, signa degradation, vo ume sags, pops and thuds and the famous
tap dance are no onger an issue. TheGigRig takes care of the ot.
Don’t forget to register your Pro-14 on ine at www.thegigrig.com where
you’ find oads of great info to he p you get the most out of your gear.
If you ever have any questions just drop us a ine at info@thegigrig.com
It’s a ways great to get feedback from our customers, so be sure to keep
in touch and et us know how you get on.
Danie Steinhardt
danie @thegigrig.com

©
The GigRig ltd Jan 2009
All rights reserved. Design rights claimed. Moral rights asserted. © May 2008 Page 3
2. TheGigRig Main Diagram
1. Strong metal housing (lid and tray construction)
2. Foot switch (16 strong foot or hand operated switches)
3. Control mini switches (10 mini switches) Replaceable.
4. Effects loops mini switches (6 mini switches) Replaceable.
5. Mode toggle switch bottom rail (two modes for each rail)
6. Phase Switch (In phase when pushed in)
7. Output 2 (isolated) (Jack Socket, transformer output 1KV isolation)
8. Expand connection (communicate with another GigRig)
9. Output 1 (Jack Socket, primary output)
10. 9V input (use TheGigRig supply only)
11. Output LED (on when output is live)
12. Post volume level indicator (Brightness shows volume setting)
13. Post volume active indicator (on when post amp is in the signal path)
14. Remote switch 1 LED (normally closed when LED is off)
15. Remote switch 2 LED (normally open when LED is off)
16. Mode toggle switch top rail (single or multi patch for top rail)
17. Effects loop LED (on when effect is in the signal path)
18. Pre-set LED (on when patch is selected)
19. Post volume control (Volume control for each patch)
20. Foot switch rail (Strong Chrome rail for stomping on)
21. Pre Volume knob and LED (master volume. LED is on when in use)
22. AUX. output (on side) (used for silent tuning or signal routing)
23. Guitar input (on side) (Input from guitar or other instruments)
24. 9V out (on side) (Supplies protected power to your effects pedals)
25. Bypass select switches (Selects true or buffered bypass, select out 2 off)
13 14
15
16
17
18
19
20 21
22
23
25
1
2
3
4
5
6
7
8
9
10
11
12

©
The GigRig ltd Jan 2009
All rights reserved. Design rights claimed. Moral rights asserted. © May 2008 Page 4
3. TheGigRig Pro-14 Quick Start
Using TheGigRig cou dn’t be easier.
First, connect your Pro-14 to your amp ifier before app ying power.
TheGigRig can supp y power to your 9V effects peda s. See (24) above, 9V
out.
P ug the effects you wish to use into the effects oops in the back of the
Pro-14 in the order you wish to use them. The effects send (snd) from
the Pro-14’s effects oops p ugs into the input of your effect and the
output of your effect p ugs into the return (rtn).
Your signa path moves from right to eft, from effects oops 1~10.
The order in which you p ace your effects makes a big difference to your
sound, so experiment and find the sounds you ike. (For more info see
F.A.Q’s.)
Now p ug your amp(s), into the output(s) on the eft-hand side of
TheGigRig.
Let’s take a ook at one of the 14 pre-sets:
The 10 effects loops’ switches
operate the effects loops in
TheGigRig.
The 6 Control switches operate
the control functions.
These are:
1- Post effect loop olume; you
can set a different olume for
each pre-set
2- Pre-effect loop buffer
3- Remote switch 1 (normally
closed)
4- Remote switch 2 (normally
open) use these switches to
control amp Functions such as
channel selection and re erb.
5- Out 1 mute
6- Out 2 mute
To programme, simp y turn on the effects oops and contro functions you
want for this pre-set. That’s It!

©
The GigRig ltd Jan 2009
All rights reserved. Design rights claimed. Moral rights asserted. © May 2008 Page 5
When you step on the foot switch shown, effects oops 2, 6 and 10 wi be
‘on’ as we as the pre-buffer function and output 1 wi be muted.
Remember, this is just a quick start guide. Because there are so many
fantastic ways to use TheGigRig Pro-14 we suggest that you take the time
to read through the manua and F.A Q.s.
You wi earn how to:
Press a sing e footswitch and change channe s in your amp, turn on and off
your amps reverb, se ect any combination of effects oops, any
combination of outputs (either or both!), program a buffer and output
eve s per preset.
If you have 2 amps each with bui t in effects oops, you can even choose
which of your amp ifiers’ pre-amps is sent to which power amp!
A of this is with the most direct and pure signa path possib e.
End Of the Quick start……… Keep reading to become an expert:
TheGigRig Pro-14’s main signa path is shown in Fig 3 be ow:
29 is the guitar input. 9 is out 1, 7 is out 2. 25 is the stereo input
.
Amp+Buffer
Fig 3
29
23
24
9
25
28 27
26
31 32 33 34
43
45
46
47
48
49
50
35 36 37 38 39 40 41
42
44
51
52
53 54
55
56
57
58
Guitar in
Out 1
Post Amp
10 Effects loops
7
Out 2
Buffer
Transformer
Stereo in
N/O switch
N/C Switch
Auto Stereo Switch

©
The GigRig ltd Jan 2009
All rights reserved. Design rights claimed. Moral rights asserted. © May 2008 Page 6
4. Effects Loops
At the heart of the Pro-14’s unique audio switching capabi ities are the 10
effects oops ocated on the back of unit.
Each of these effects oops has a send (snd) and a return (rtn) except
for oop 10 which has 2 returns for stereo effects. The effects oops are
numbered 1~10 from right to eft so as to i ustrate the direction your
guitar signa trave s.
E.g. your guitar signa trave s from the input on the right hand side of
TheGigRig to the first effects oop i.e.: effect oop number 1, then 2 and
so on, unti it reaches number 10.
From there, your signa trave s to the outputs.
Your effects are p ugged into these effects oops. The send (snd) from
TheGigRig is connected into the input of your effect and the output of
the effect back to the return (rtn).
The order in which you p ace your effects does make a difference to your
sound.
Check out the F.A.Q’s section for more detai s on effects order; however,
back to those effects oops and why they are the key to retaining your
tone!
Norma y when effects peda s are p ugged into each other in series you
get what is known as tone sucking and vo ume oss.
Each peda acts as a fi ter even when the peda s aren’t on; the more
peda s you have in your chain the more oss you get.
So, ess of your signa is getting through, this means less tone.
TheGigRig so ves this prob em as your guitar signa wi on y trave s
through the effects oops that are se ected for each particu ar sound you
use.
You can now connect in a your other ess frequent y used peda s, they
wi no onger causes prob ems to your much- oved tone,
if they are not
se ected, it’s as if they don’t exist.

©
The GigRig ltd Jan 2009
All rights reserved. Design rights claimed. Moral rights asserted. © May 2008 Page 7
So how does it do that?
Let’s take a c oser ook at one of
TheGigRig Pro-14’s 14 pre-sets.
Each of the Pro-14’s effects oops is
contro ed by a very specia re ay. A
high qua ity switch that, when
activated, wi send your signa
through the effects oop or wi
bypass the oop comp ete y.
These re ays are inturn contro ed by
the mini switches on each pre-sets
marked ‘Effects Loops’.
With the pre-set above effects oops 2, 6 and 10 have been se ected.
When you step on this pre-set, your guitar signa wi trave from the
guitar input through effects oops 2, 6 and 10 ONLY.
E erything else is completeley bypassed.
The difference this makes to your tone is amazing. You get the shortest,
purest signa path possib e.
You can use the effects oops in many other ways.
Look at the F.A.Q’s section to see how to use the effects oops in
TheGigRig with the effect oop in your amp.
If you use more than one guitar such as a spare for when you break a
string or an e ectro acoustic, you can p ug these into the effects oops
and contro them with TheGigRig.
For examp e, an acoustic guitar cou d be p ugged into the RETURN of
effects oop 1 and switch in or out using the GigRig. You can a so use the
iso ated output 2 to send your acoustic direct y into the P.A. without
introducing hum.
You can then programme a pre-set for the songs in which you use an
acoustic. Therefore, when you step on the foot switch, the GigRig wi
disconnect your main guitar (p ugged into ‘guitar in’) and mute the output
to your amp ifier sending your acoustic straight to the front of house
system. (the GigRig wi protect you and your equipment from over 1000V
if a fau t in the stage system shou d occure)
You can make TheGigRig as simp e or as comp icated as you ike.
That’s the who e point. It’s entir ey up to you.

©
The GigRig ltd Jan 2009
All rights reserved. Design rights claimed. Moral rights asserted. © May 2008 Page 8
5. Contro Functions
TheGigRig Pro-14’s unique contro
functions make it both powerfu and
f exib e.
Each of the 14 pre-sets has a row of
six mini switches, which operate the
contro functions.
These are:
1. Post Effect Loop Vo ume
2. Pre Effect Loop Buffer
3. Remote Switch 1 (norma y
c osed)
4. Remote Switch 2 (norma y open)
5. Output 1 Mute
6. Output 2 Mute
Let’s go through them one at a time:
1. Post Volume.
This is a c ass ‘A’ accurate y contro ed amp ifier on the output of
TheGigRig.
It was designed not to mess with your tone and is of the highest audio
qua ity; no feedback path used.
The circuit for this post effects oop amp ifier is on its very own re ay
so you must turn on (switch 1) for the Post Vo knob to have any
effect. (When we say true bypass, we mean true bypass).
This vo ume contro can a so cut your output by 2/3rds or boost it by
X3.
Use the sma vo ume knob next to the contro switches to contro the
eve . This is perfect for boosting so o sounds or compensating for the
drop of output in some o d effects peda s.
Furthermore, as it is ‘post’ effects oop it won’t mess with the sound
of your effects.
2. Pre Amp and Buffer.
The Pre Amp and buffer, contro ed by switch 2, is a Low noise X3 amp
and c ass ‘A’ buffer. If se ected, it is the first function your guitar
signa wi go through.
Primari y this is used to drive the impedance of your guitar signa into
your effects. For some peda s, true bypass is the way to go, the
dynamics between the peda s and your guitar need to work together.

©
The GigRig ltd Jan 2009
All rights reserved. Design rights claimed. Moral rights asserted. © May 2008 Page 9
Vintage fuzz’s and Treb e Boosters can sound awfu if they receive
Buffered inputs; however, a buffer can improve the tone of some
effects, not to mention driving the ong cab e between the Pro-14 and
the amp ifier. Try the buffer on each preset and see which you prefer.
The pre buffer can a so be used as a master vo ume input eve , from a
gain of X3 down to nothing. If your guitar has a very high output, you
can use this vo ume contro to reduce the eve , or boost the eve to
drive your peda s harder. So, now with every pre-set, you have the
choice between buffered or true bypass, attenuation or Gain.
3. & 4. Remote switches 1 & 2.
If you use an amp ifier with bui t in effects such as reverb or vibrato
or an amp with two channe s, then these remote switches are
price ess. Your amp can now be contro ed by the Pro-14.
Instead of p ugging an extra footswitch into the back of your amp,
simp y p ug the footswitch out from your amp into the remote switches
on the Pro-14. (The remote switches are fu y iso ated and wi switch
tip to ring if stereo p ugs are used.)
Norma y c osed and Norma y open refers to the po arity of the
switch in defau t position (off).
E.g. If you wou d ike to use the remote switch to contro the reverb in
your amp, simp y p ug a ead from the footswitch out of your amp and
into either of the remote switches.
One of them wi mean your reverb defau ts to ‘on’, and the other wi
defau t to off.
With a channe -changing amp, you can simp y p ug the footswitch from
your amp to the remote switch in TheGigRig Pro-14.
5. & 6. Output 1 & 2 Mute.
On the far eft hand side of the Pro-14 you wi see 2 outputs.
Not surprising y, these are ca ed output 1 and output 2.
TheGigRig enab es you to choose any combination of these outputs.
Simp y mute the output that you don’t want your signa to go to by
turning on the ‘output mute’ for that particu ar output. Contro switch
5 mutes OUT1 and contro switch 6 mutes OUT2.
Use a c ean/dirty amp set up or two comp imentary sounding amps, you
can even send a ine direct y to the desk as we as your amp and then
switch between them.
Using combinations of the effects oops and the contro functions the
possibi ities are virtua y end ess.
©
The GigRig ltd Jan 2009
All rights reserved. Design rights claimed. Moral rights asserted. © May 2008 Page 0
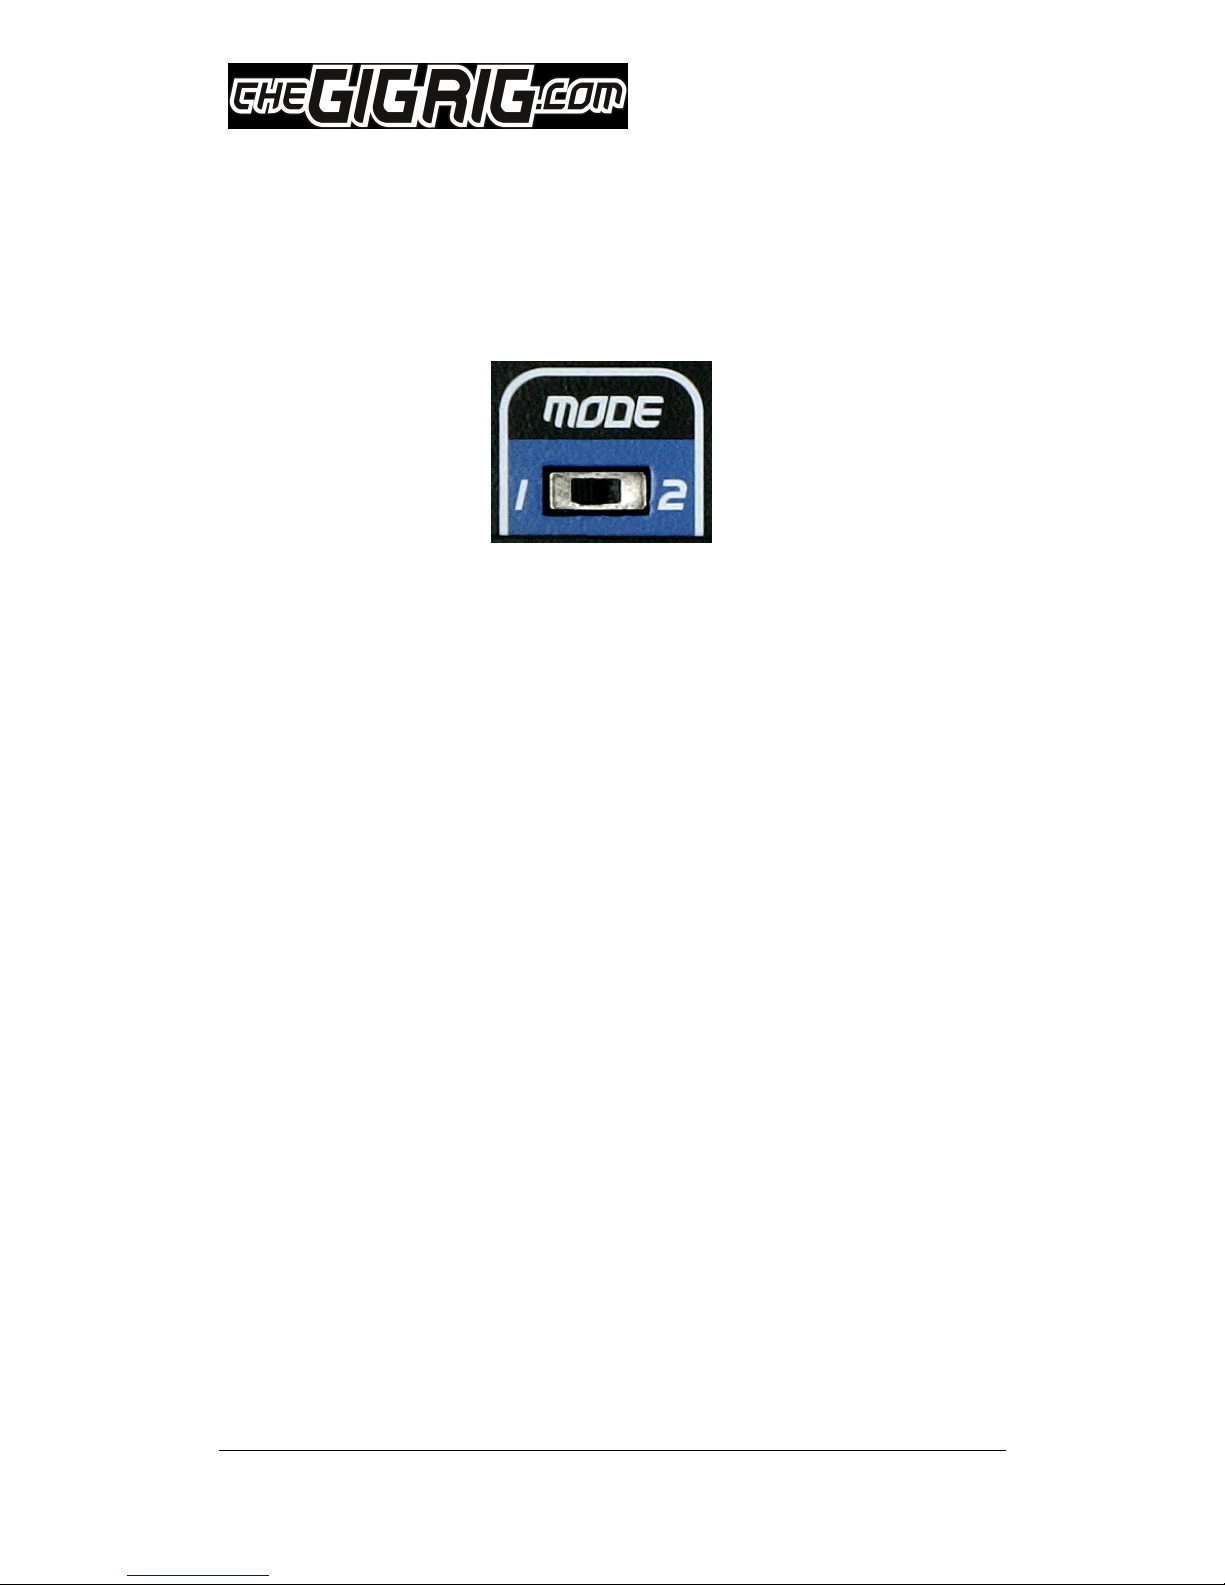
6. Mode Switches
Both rai s on TheGigRig Pro 14 have their own mode switches.
The mode switch governs how each particu ar rai wi function.
Mode 1 is Single mode.
When both rai s are in sing e mode, on y one pre-set can be activated
at any one time.
Se ecting another pre-set wi cance the previous pre-set.
If you want to programme your 14 pre-sets and use these
combinations on y, the sing e mode (mode 1) wi enab e you to do just
this. (You can; however, se ect two patches at once by pressing
buttons on the top and bottom banks simu taneous y.)
Mode 2 is Multi mode
This is where it gets interesting. In mu ti mode, you can add your pre-
sets together. When you se ect a pre-set, TheGigRig wi add that
combination to the pre-set a ready se ected.
To dese ect, simp y press the footswitch again.
As you can se ect a different mode for each rai , you can have the
bottom rai (pre-sets 1~7) in sing e mode and the top rai (pre-sets
8~14) in mu ti mode.
Using the Pro-14 in this way, you can have 7 main or core sounds on the
bottom rai and add in effects and contro features to these core
sounds using the top rai pre-sets. What is so great about setting up
your pro-14 in this way is that you can add to any of your core tones
but when you need to go to your core tone again it wi c ear any of the
added on presets.
There are a few things to remember when using Mu ti mode:
1. When two pre-sets using Post Vo are se ected, the highest eve
takes precedence.
2. Be carefu not to add a pre-set using Out 1 mute to a pre-set using
Out 2 mute as this wi resu t in no output at a .
3. Press bypass to c ear a pre-sets at once.

©
The GigRig ltd Jan 2009
All rights reserved. Design rights claimed. Moral rights asserted. © May 2008 Page
7. Aux/Tuner Out
At the far right hand side of the top rai on TheGigRig Pro-14 you wi see
a footswitch abe ed ‘Aux‘.
This footswitch contro s an auxi iary output
ocated on the right hand side of the Pro-14 next
to the guitar input jack.
When se ected the guitar signa is routed direct y
from the guitar input to the ‘Aux out’. A other
outputs are disconnected.
The most common use for this feature is si ent
on-stage tuning. When not se ected your tuner
input is automatica y muted.
Instead of your guitar signa routing through your
tuner a the time and perhaps dep eting your tone, you can send your
signa through the Aux at the press of one switch.
A though this is the most common way to use this feature, it is certain y
not the on y way. The Aux output is an independent output that you may
use in any way you wish.
Note, If the Aux out is used to drive a third amp ifier, you may need an
externa ground iso ation device to reduce hum. See the GigRig humdinger
for a safe so ution to Amp grounding and hum reduction.
©
The GigRig ltd Jan 2009
All rights reserved. Design rights claimed. Moral rights asserted. © May 2008 Page 2
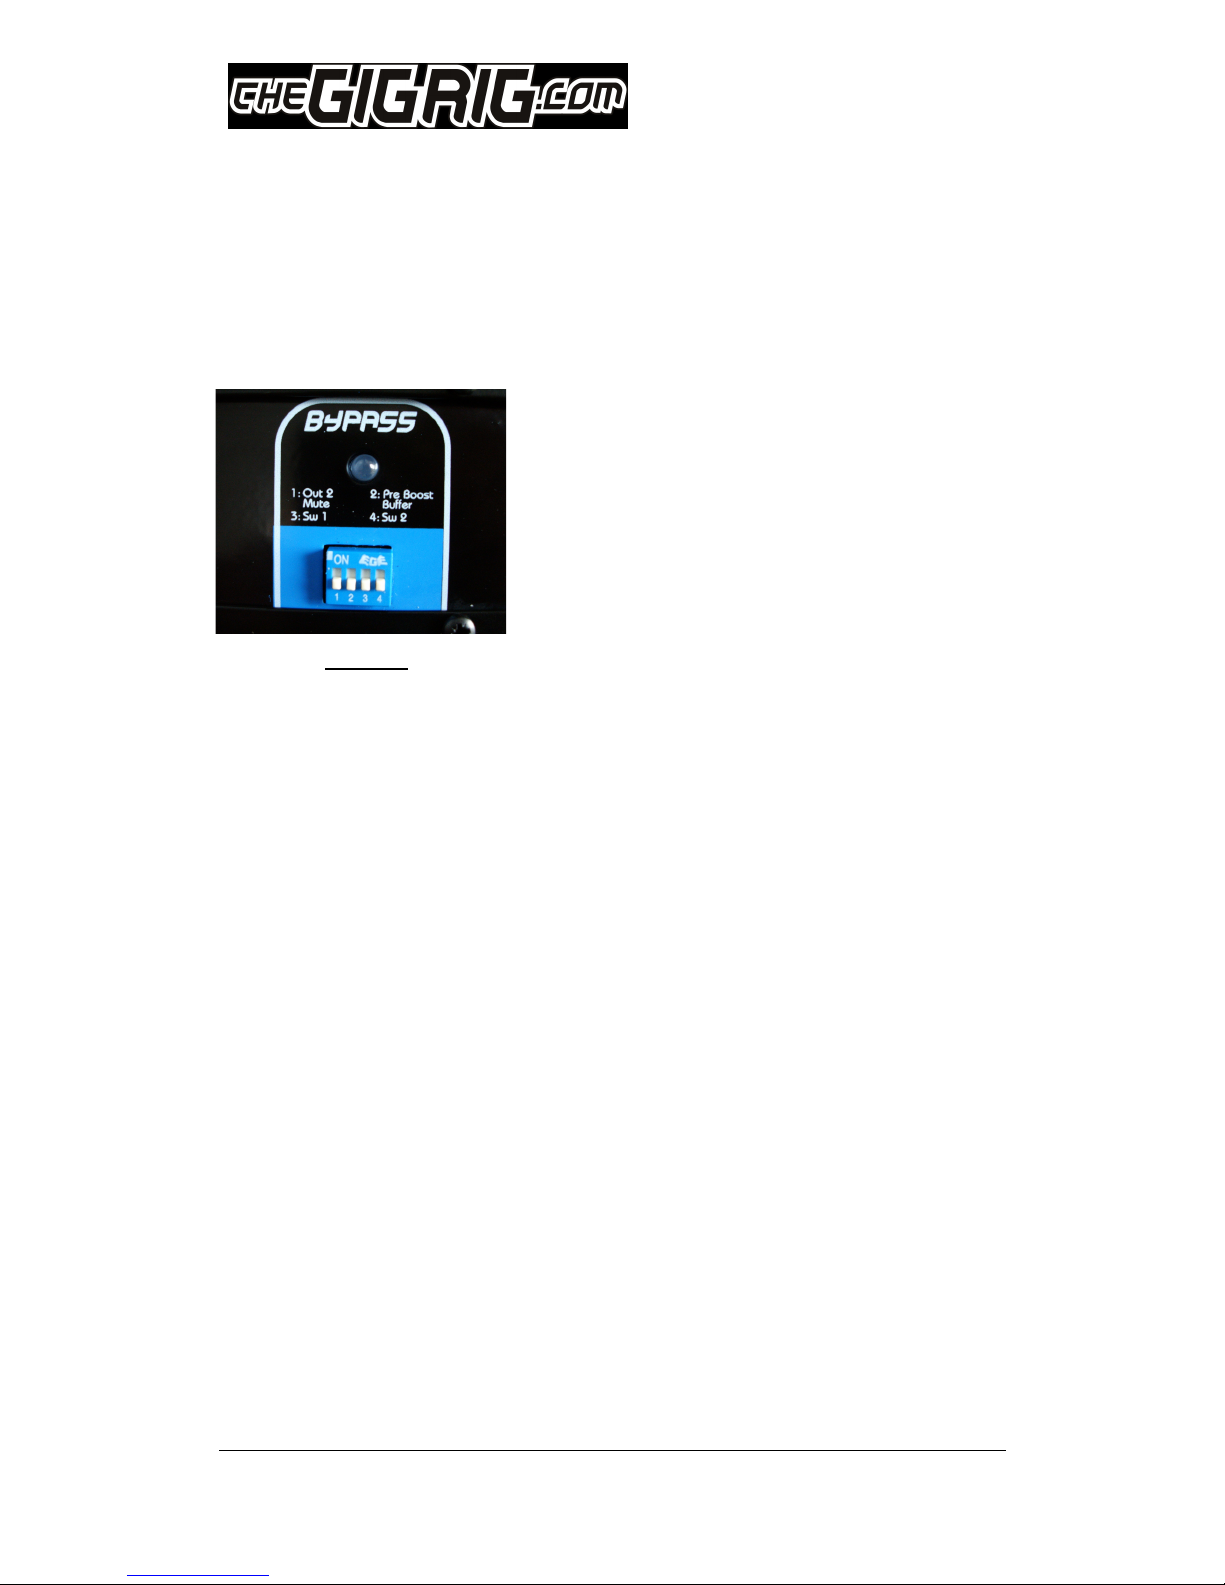
8. Bypass
On the bottom rai at the far right hand side, you wi see a
footswitch abe ed ‘Bypass’.
With a the switches in the down position
se ecting Bypass wi do exact y that; the
re ays inside The Pro-14 wi drop into
defau t mode and your guitar signa wi be
routed direct y to the outputs.
This comp ete y bypasses every effects oop,
pre and post amp ifiers and wi send your
guitar direct y to your amp(s).
The b ue Bypass LED indicates that the bypass has been se ected.
Tone Tip: True bypass, when used with ong cab es, can affect your tone.
Most pickups wi tune down s ight y reducing the top end and enhancing
the mid range.
This is why we have inc uded four contro switch functions on the bypass.
1. OUT 2 MUTE
With this function enab ed OUT 2 wi mute when you hit bypass.
2. PRE BUFFER BOOST
This wi activate our very specia pre effects oop buffer/booster. This
wi drive a the capacitance in your ong cab e runs when you hit bypass,
so now there’s no need to use a patch just for a bypass tone with a
buffer, its right here on the bypass switch.
True Bypass, buffered or gain, it’s comp ete y up to you.
3. SW1 When this switch is on the GigRig Foot switch contro er SW1 wi
be activated. For examp e this can be used to set a channe on your
amp ifier for your bypass sound etc. (Norma y c osed f oating switch)
4. SW2 When this switch is on, the GigRig Foot switch contro er SW2
wi be activated. (Norma y open f oating switch)
Note. Ho ding down the bypass foot switch for five seconds or more wi
switch on the pop gate circuit.

©
The GigRig ltd Jan 2009
All rights reserved. Design rights claimed. Moral rights asserted. © May 2008 Page 3
9. Specia Functions
A range of specia functions for the adventurous guitarist.
Set the mode switch to 1 and ho d down a foot switch for over 3 seconds
to access the fo owing specia functions:
Foot Switch 1: Light show (and self-test)
Ho d down for 3 seconds and the bottom bank wi run through the wizzy
ight show (and se f test). The output wi be muted unti the show is
comp eted.
The pop gate feature wi be disab ed on the bottom bank at the end of
the show. Try ho ding down switches 1 and 8 together for 3 seconds.
Foot Switch 2: Software ersion bottom bank
Ho d down for 3 seconds to read the software version number. The
version number wi f ash on and off.
Foot Switch 3: Very Slow clean Tremolo effect (2.3Hz)
Switch contro switch 1 (post vo ) to the ‘on’ position to access this
effect. Ho d down foot switch 3 for three seconds or more to enab e the
tremo o. Now use the post vo ume contro for the tremo o intensity
(depth).
Tip; switch in the pre buffer switch (contro switch 2) to reduce to the
desired vo ume eve using the pre vo ume contro .
You can now combine this tremo o effect with your effects oops on this
Pre-set.
You can a so mix in other effects by setting the upper bank to mode 2.
Try it!
Foot Switch 4: medium speed clean Tremolo effect (3.2Hz)
This works the same as above, but with a faster tremo o sound.
Foot Switch 5: Fast speed clean Tremolo effect (5.4Hz)
This works the same as above, but with a sti faster tremo o sound.
Foot Switch 6: Bank on

©
The GigRig ltd Jan 2009
All rights reserved. Design rights claimed. Moral rights asserted. © May 2008 Page 4
Ho d down for 3 seconds to switch a pre-sets on the bottom bank to ‘on’.
Tip. This is a usefu test mode. When se ected check to see that on y the
green output LEDs that have effects p ugged in are ‘on’. Do the same
using switch 13 for the top bank; you can do both foot switches together
if you ike.
Foot Switch 7: bank off
Ho d down for 3 seconds to c ear the bottom bank.
Foot Switch 8: Light show (and self-test)
Ho d down for 3 seconds and the top bank wi run through the ight show.
The output wi be muted unti the show is comp eted.
The pop gate feature wi be disab ed on the top bank at the end of the
show.
Note, you can see the output ights f ash when you press a foot switch if
Pop-Gate is on.
Try ho ding down switches 1 and 8 together for 3 seconds, just for fun.
Foot Switch 9: Software ersion top bank
Ho d down for 3 seconds to read the software version number. The
version number wi remain disp ayed; they wi not f ash.
Foot Switch 10: Very Slow clean Tremolo effect (2.3Hz)
Switch contro switch 1 (post vo ) to the ‘on’ position to access this
effect. Ho d down foot switch 10 for three seconds or more to enab e the
tremo o. Now use the post vo ume contro for the tremo o intensity
(depth).
Tip; switch in the pre buffer switch (contro switch 2) to reduce to the
desired vo ume eve using the pre buffer vo ume contro .
You can now combine this tremo o effect with your effects oops on this
Pre-set.
You can a so mix in other effects by setting the upper bank to mode 2.
Try it!
You can even mix tremo o effects between the top and bottom rai . Use
Aux to exit this mode.
Foot Switch 11: Mixing Tremolo (3.2 Hz)
Ho d down for 3 seconds to se ect the same Tremo o effect as with
switch 10. But, with a s ight y faster tremo o

©
The GigRig ltd Jan 2009
All rights reserved. Design rights claimed. Moral rights asserted. © May 2008 Page 5
Foot Switch 12: Mixing Tremolo (5.4Hz)
Ho d down for 3 seconds to se ect the same Tremo o effect as with
switch 11. But, with a faster tremo o.
Foot Switch 13: bank on
Ho d down for 3 seconds to switch a patches/presets on the top bank to
on.
Tip. This is a usefu test mode. When se ected check to see that on y the
green output LEDs that have effects p ugged in are on. Do the same using
switch 6 for the bottom bank; you can do both together.
Foot Switch 14: Bank off
Ho d down for 3 seconds to c ear the top bank.
Tip, this feature can be very usefu , as it wi not c ear mode 2 patches
set on the bottom bank un ike the bypass switch. If both banks are set to
mode 1 ho ding down this switch wi se ect Standby mode. (A
patches/presets and bypass ight off with the guitar connected to the
amp)
Bypass Foot Switch
Ho d down for 3 seconds or above to enab e the pop gate feature on the
bottom bank.
TheGigRig wi now gate out pops and c icks from your effects peda when
they are se ected.
To disab e the pop gate feature, on this Rai , ho d down foot switch 1 for
3 seconds or more.
Note. you can see the output ights f ash when you press a foot switch if
Pop-Gate is on.
Foot Switch Aux.
Ho d down for 3 seconds or above to enab e the pop gate feature on the
top bank.
The GigRig wi now mute out pops and c icks from o d high gain your
effects peda when they are se ected and de se ected.
To re enab e the pop gate feature, on this bank, ho d down foot switch 8
for 3 seconds.
Note. you can see the output ights f ash when you press a foot switch if
Pop-Gate is on.
Tips and Tricks:

©
The GigRig ltd Jan 2009
All rights reserved. Design rights claimed. Moral rights asserted. © May 2008 Page 6
Foot Switch Resting Mode.
Some Guitarists ike to rest there foot on the switches whi st p aying. To
prevent the GigRig from entering Specia Function Mode, whi st resting a
foot on a switch, ho d down Foot switch 1 or 8 whi st powering on the
GigRig. The specia functions wi be defeated on the chosen rai . You can
ho d down both 1 and 8 together at power up to defeat a specia
functions.
Powering the GigRig in the norma manner wi return the GigRig to norma
functiona ity with Specia functions activated.
Mixer Mode (bypass off)
Access mixing mode by ho ding down the bypass switch when powering up
your GigRig, then switch the top mode switch to mode2.
Mixing mode changes the function of your GigRig. The top bank wi now
work independent y to the bottom bank. You can use the bottom bank as a
seven effects GigRig and the top bank, in mode 2, as an effects mixer.
The bypass switch wi no onger switch off the top bank; so, now when
you add echo, it wi stay added. The bypass switch wi on y c ear your
patches on the bottom bank. Try setting your favourite sounds on the
bottom bank and then set the top bank so that each patch switches in one
sing e effect. This is fantastic for experimentation.
Powering the GigRig in the norma manner wi return norma functiona ity.
Mixer Mode (bypass on)
You can use a shorted audio jack in any EXT input to save ho ding down
bypass each time you power on, This, sets the GigRig as above; however,
the Bypass wi now c ears a the Presets and connect your guitar to your
amps.

©
The GigRig ltd Jan 2009
All rights reserved. Design rights claimed. Moral rights asserted. © May 2008 Page 7
10. The Iso ated Output (Out 2)
Isolated output… Output 2
Lets cut through the jargon, ike earth oops and earth impedance and get
right down to the source of Hum.
If you have one Guitar into one effects peda into one amp, you won’t get
hum. A though your effects power supp y is connected to the mains, it
won’t be connected to the mains earth. Therefore, your precious guitar
signa has just one path to ground. Through the screen of your eads into
your amp and through to the mains ground. No prob em… A wi be we .
The prob ems occur when you have more than one path to ground for your
signa . Using two amp ifiers has a ways been an issue, because they both
MUST be connected to mains ground.
The GigRig Pro 14 has a very specia output for your second amp ifier, or
any other earthed equipment.
On y use output 2 when you have a ready used output 1. Now, Output 2 wi
not on y prevent hum it wi a so give you, and your equipment, protection
from over 1000V from front of house or other equipment mains fau ts.
Phase Switch.
Again, cutting through the techno jargon, with the same sound going to
two amp ifiers of different mode s, the amp ifier speaker cones cou d be
both moving forward at the same time or one may be moving forward
whi st the other is moving back. If this occurs then, when the sounds mix
in the room, they can cance s at some frequencies and positions giving a
reduced and unp easant tone.
On the Pro-14, you wi find a sma button next to the iso ated output
(Out 2). When this button is pressed ‘in’, Out 2 wi stay in phase with Out
1 and when the button is out, yes you guessed it, Out 2 is then out of
phase with Out 1.
When you have set the phase correct y, you can then swap your two
amp ifiers over, without causing a phasing prob em.
The GigRig is a ‘True Phase’ switcher meaning that the signa that comes
out the end is the same phase as the signa that goes into it regard ess of
if you choose the Pre-Buffer or Post Vo ume features.

©
The GigRig ltd Jan 2009
All rights reserved. Design rights claimed. Moral rights asserted. © May 2008 Page 8
11. Using the EXT input/outputs.
This output a ows you to connect a number of GigRig products together
so they can ta k to each other, remote y switch TheGigRig into Bypass, or
separate the top and bottom banks. (See the GigRig Loopy2 product to
use this EXP input to expand your peda board further).
BANK SEPARATION.
This feature a ows you to separate your 14 channe GigRig into
effective y two seven channe GigRigs.
For examp e you may want to use the top bank in mode 1 to se ect which
guitar you wou d ike to use and the bottom bank, a so in mode 1, to se ect
the effects peda combination for your sound.
You can separate the two banks, top rai and bottom rai of the GigRig by
simp y inserting a shorted 3mm jack p ug (connect both wires together)
into any EXT input. The bypass and mode functions wi sti work as
norma .
You can use a standard stereo jack p ug if a mono p ug is not to hand.
(Connect a three wires together).
You can a so use Bank Separation mode with two or more GigRigs
connected together.
Two GigRigs, with a connection between EXT on each GigRig wi work as
one big 28 channe GigRig.
Two GigRigs used together with no connection between EXT sockets wi
obvious y give you two 14 channe GigRigs.
Two GigRigs with a connection between EXT on each GigRig and a shorted
p ug in any free EXT socket wi give you effective y four seven channe
GigRigs.
The EXT input can a so be used to send TheGigRig into bypass standby
mode. A short 5V pu se, 5mS or onger, wi send TheGigRig into ow power
Standby mode. The output indicators wi be eft on and a other ights,
inc uding bypass, wi be switched off; your guitar wi be routed direct y
to both outputs.
Note, both EXT sockets, eft side and right side, on TheGigRig are
identica .

©
The GigRig ltd Jan 2009
All rights reserved. Design rights claimed. Moral rights asserted. © May 2008 Page 9
12. Power Supp y
Before powering TheGigRig, connect the output(s) to your amplifier(s) first.
This prevents the buzz and thud sounds.
It is not necessary to power down the TheGigRig when insta ing or
removing new effects peda s; simp y se ect bypass for si ent insta ation.
TheGigRig can supp y 9V at up to 1.5A for your effects peda s. This supp y
is smoothed and e ectronica y fused (1.8A). Note it may take a minute for
this fuse to recover after over oad.
A short circuit on this output wi cause the main power supp y to shut
down. The green ight on the supp y wi f ash unti the short circuit has
been removed.
USING OTHER 9V SUPPLIES.
This is not recommended. Other 9V supp ies may appear to work;
however, it is very ike y that prob ems wi occur when a oops are
active. TheGigRig is fused interna y at 6A.
EMERGENCY USE:
If TheGigRig 9v Generator power supp y is not avai ab e, you can, in an
emergency power your effects peda s separate y, TheGigRig can then be
powered temporari y using a 9V regu ated power supp y with an output
capabi ity of 1A or more. (Temporary on y).

©
The GigRig ltd Jan 2009
All rights reserved. Design rights claimed. Moral rights asserted. © May 2008 Page 20
13. FAQ’S
We are constant y updating the FAQ’s on the website. Make sure you check it out.
Here are just a few
Q. What’s the best order to put my effects in
?
A. The order that you p ace your effects makes a dramatic difference to
your guitar sound.
Do you phase your distortion or do you distort your phaser?
Of course, there are no set ru es and with TheGigRig, you can experiment
as much as you ike. I’ve found the fo owing to be a good p ace to start.
1
st
Enve ope fi ters, auto wahs and wah peda s.
2
nd
Compression
3
rd
Overdrive, distortion and fuzz.
(Use in order of the east amount of gain
to the most)
4
th
Modu ation effects (phase, chorus, f ange, tremo o)
5
th
De ay effects (shorter de ays, fo owed by onger de ays)
6
th
Reverb
Q. How do I use TheGigRig Pro-14 with the effects loop in my amp?
The effects oop in your guitar amp ifier gives you an insertion point
between your pre-amp and your power amp for you to connect your effects.
With TheGigRig, you can insert the pre-amp section of your amp ifier into
any point in the signa chain. We advise the use of a HumDinger in this set-
up to make sure there are no possib e earth oops. Here’s how we do it.
e.g. Say I want my compression and overdrive peda s going into the front
of the amp and my modu ation and de ay effects in my amps effects oop, I
wou d use the effect oop that is after my overdrive and before my
modu ation effects. The send from the Pro-14 is p ugged into the input of
the HumDinger, and the iso ated out of the HumDinger is p ugged into the
front of your amp. The effects send from the amp ifier is p ugged into the
return of the Pro-14. What you’ve done is p aced your pre-amp where you
want it in your signa path. The output of the Pro-14 then goes to the
return on your amp ifier.
If you have 2 amps, each with their own effects oops you can actua y
choose which pre-amp you send to which power amp!
This manual suits for next models
1
Table of contents
Other The GigRig Switch manuals


