The Hampton Bay L-GG019PST User manual
THANK YOU
We appreciate the trust and confidence you have placed in Hampton Bay through the purchase of this grill gazebo. We strive to continually create
quality products designed to enhance your home. Visit us online to see our full line of products available for your home improvement needs. Thank
you for choosing Hampton Bay!
Item #1000 812 320
Model #L-GG019PST
USE AND CARE GUIDE
GRILL GAZEBO
Questions, problems, missing parts? Before returning to the store,
call Hampton Bay Customer Service
8 a.m. - 6 p.m., EST, Monday-Friday
1-877-527-0313
WWW.HOMEDEPOT.CA
2
Table of Contents
Table of Contents..........................................................2
Safety Information......................................................... 2
Warranty ..................................................................................2
What is Covered.......................................................................2
What is Not Covered ................................................................2
Pre-Assembly ................................................................ 3
Planning Installation ................................................................3
Hardware Included................................................................. 3
Package Contents ....................................................................4
Assembly ................................................................... 5-6
Care and Cleaning ........................................................ 7
Safety Information
1. Some parts may contain sharp edges. Wear protective
gloves.
2. When assembling and using this product, basic safety
precautions should always be followed to reduce the risk of
personal injury and damage to equipment. Please read all
instructions before assembly and usage.
DANGER: This unit is heavy! Do not assemble this item
alone.
WARNING: Do not leave the gazebo where there is a risk
of high wind, as possible damage will occur to the
structure.
CAUTION: Do not climb on top of the gazebo. Falling off
the gazebo can result in serious injury, possibly even death.
NOTICE: For outdoor use only.
Warranty
2 YEARS WARRANTY
WHAT IS COVERED
This limited warranty is extended to the original purchaser and applies to defects in materials and workmanship of your item provided the
item is maintained with care and used only for personal, residential purposes. The item is warranted to be free from defects in material or
workmanship for a period of 2 years.
WHAT IS NOT COVERED
We do not reimburse for transportation of delivery costs, or compensate the individual or any outside party for assembling or disassembling
the product.
Contact the Customer Service Team at 1-877-527-0313 or visit www.homedepot.ca.

3 WWW.HOMEDEPOT.CA
Please contact 1-877-527-0313 for further assistance.
Pre-Assembly
PLANNING INSTALLATION
Before beginning assembly of the product, make sure all parts are present. Compare parts with the Hardware Included and Package
Contents list. If any part is missing or damaged, do not attempt to assemble the product. Contact customer service for replacement parts.
HARDWARE INCLUDED
NOTE: Hardware not shown to actual size.
AA BB CC DD EE
FF GG
Part Description Quantity
AA M6X20 Bolt 16
BB M6 Washer 40
CC M6X40 Bolt 8
DD M6 Nut 8
EE M6X20 Bolt 8
FF Dia.5X180MM ‘7’ Shape Stake 12
GG M6 Wrench 1
4
Pre-Assembly (continued)
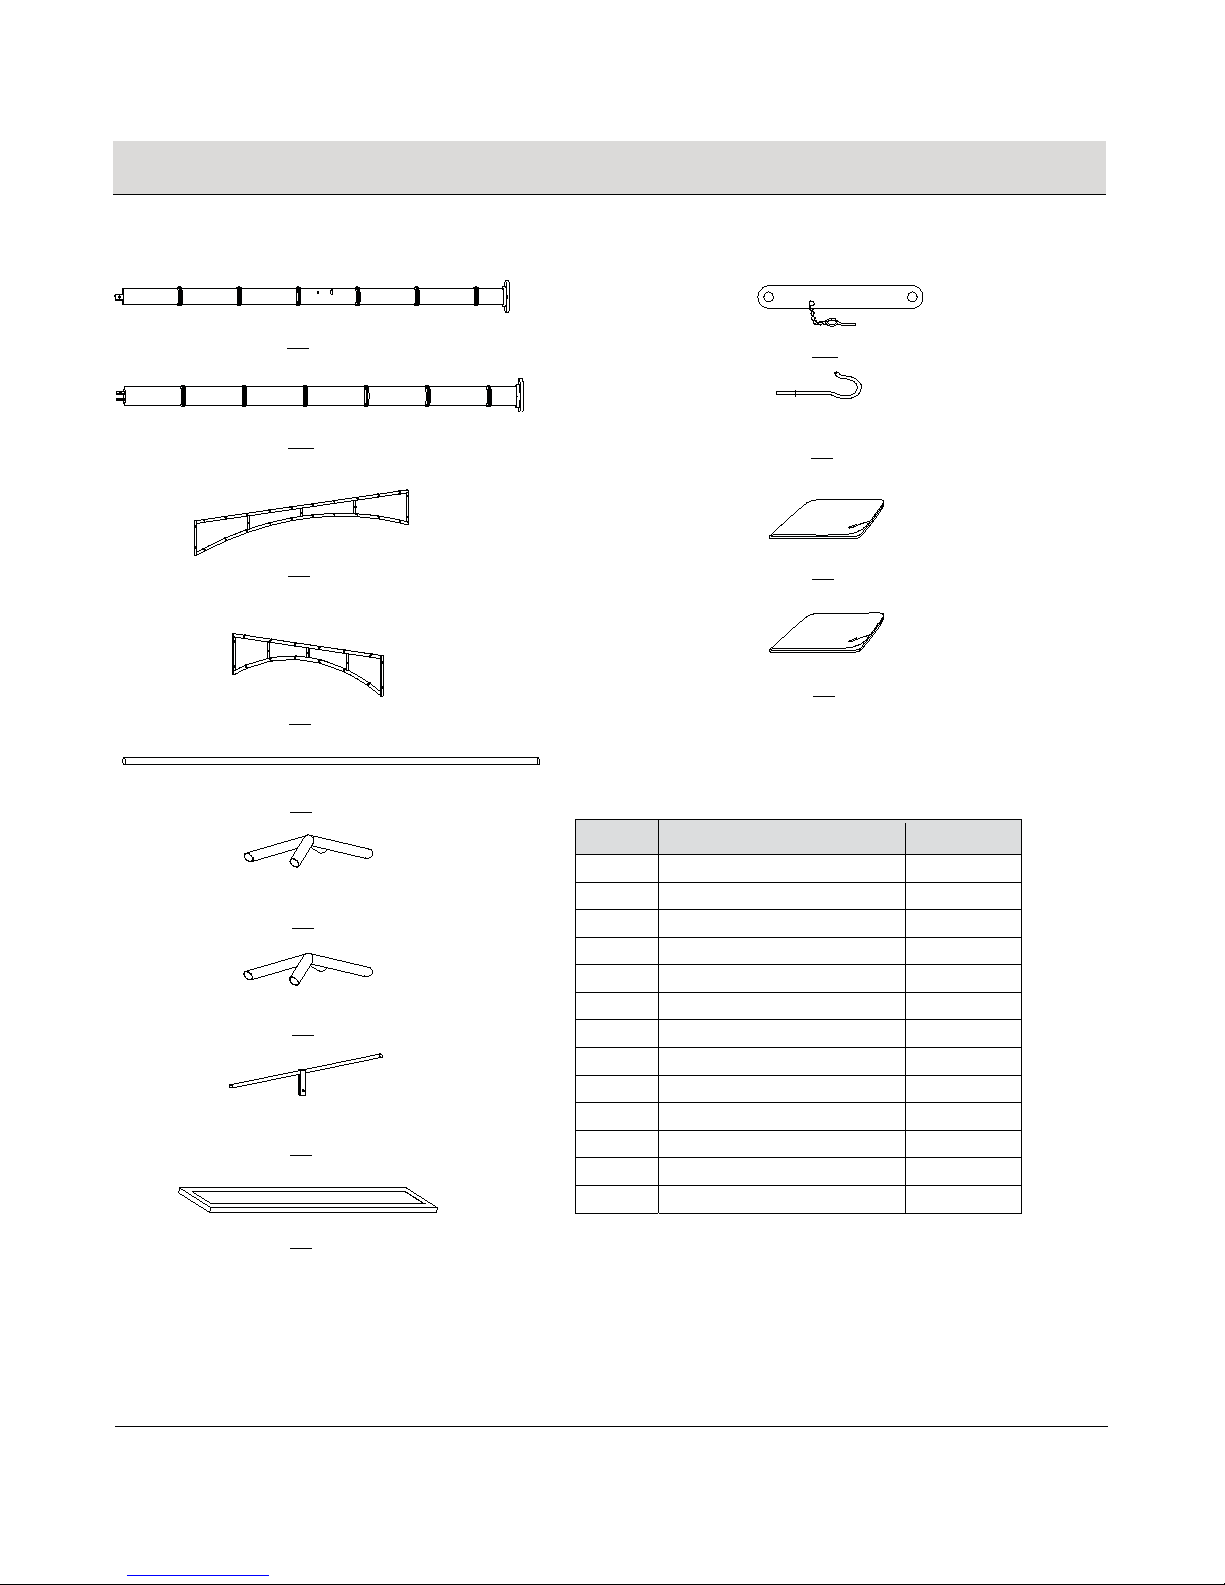
PACKAGE CONTENTS
Part Description Quantity
A1 Pole 1 2
A2 Pole 2 2
B Long Screen 2
C Short Screen 2
D Corner Pole 4
E Big Center Connector 1
F Small Center Connector 1
G Small Top Pole 4
H Tabletop 2
I Support bar 4
J Hook 1
K Small Canopy 1
L Big Canopy 1
.
.
.
.
.
.
.
.
.
A1
A2
B
C
D
E
F
G
H
I
.
J
K
L
5 WWW.HOMEDEPOT.CA
Please contact 1-877-527-0313 for further assistance.
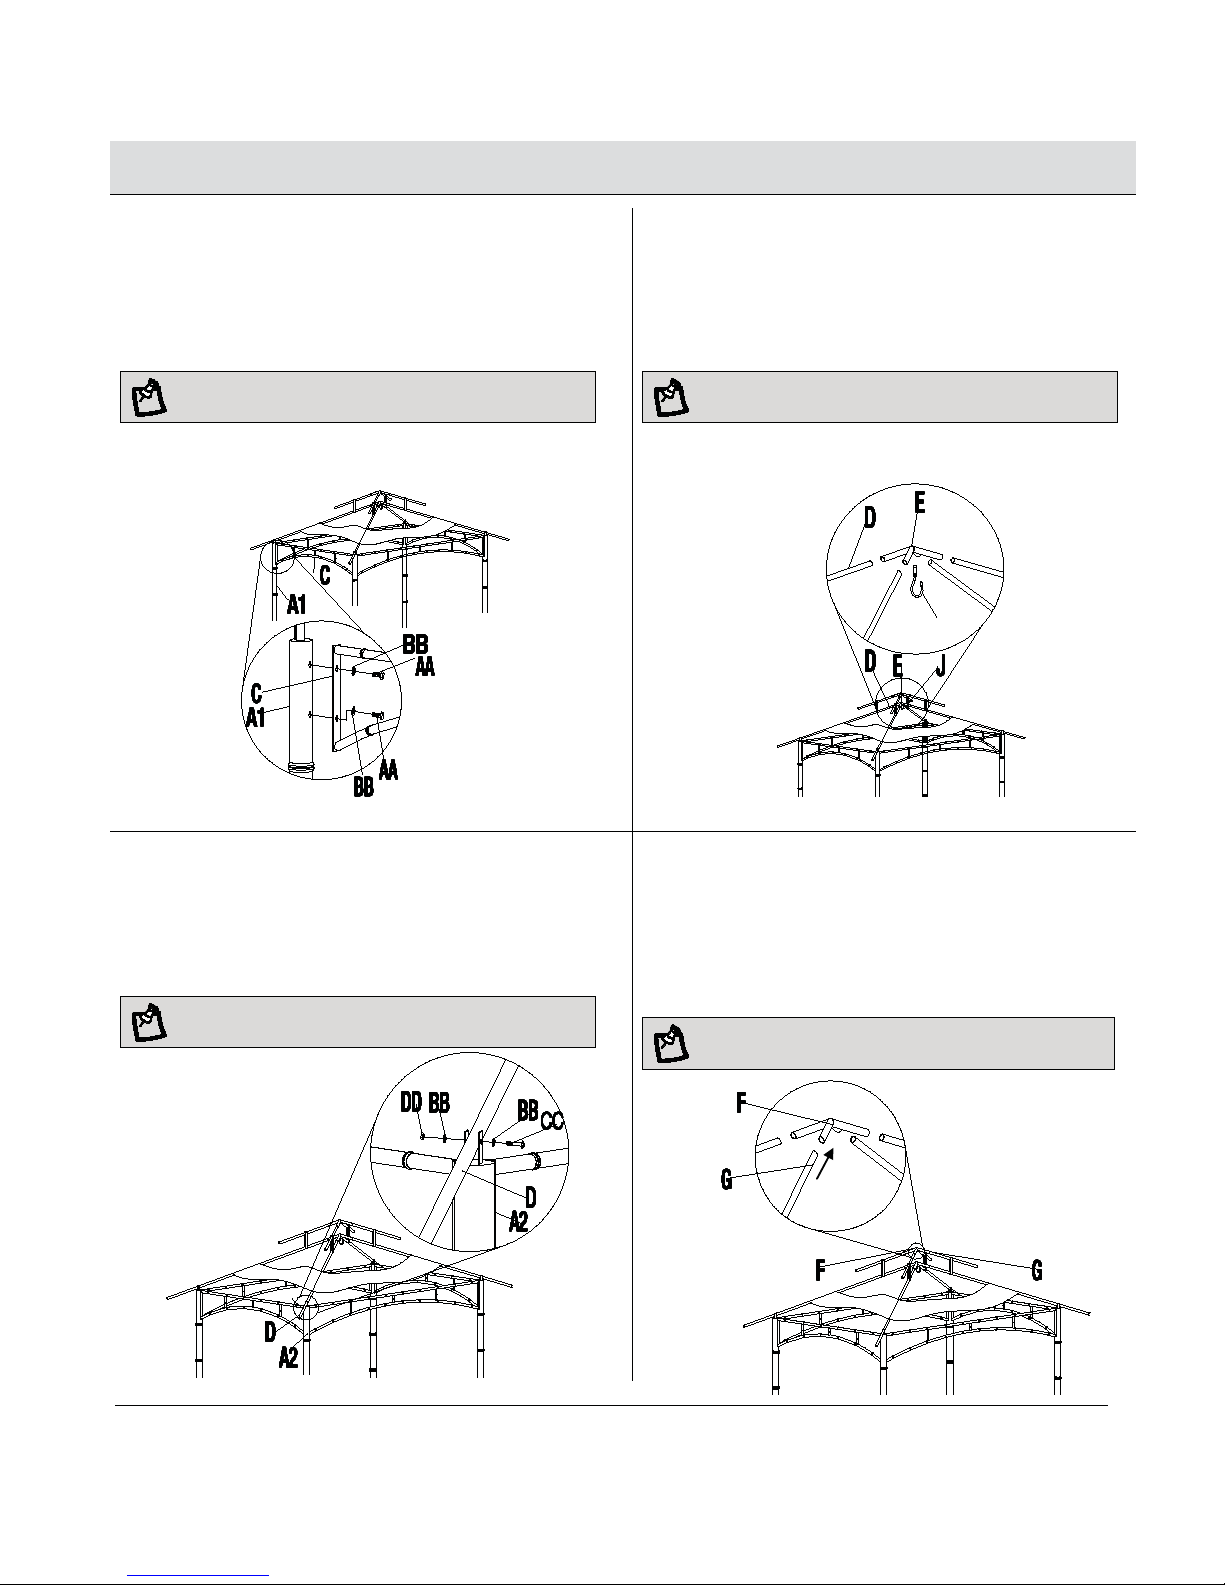
Assembly
1 Attaching the screens to the poles 2 Attaching the big center
connector
ƑAttach the short screen (C) and long screen (B) to pole 1 (A1),
pole 2 (A2) using bolts (AA) and washers (BB).
NOTE: To avoid destroying the finish, please handle it with
care.
ƑPut the hook (J) into the big center connector (E). Insert the
corner top pole (D) into the big center connector (E).
NOTE: To avoid destroying the finish, please handle it with
care.
3 Attaching the corner top pole 4 Attaching the small center
connector
ƑAttach the corner top pole (D) to the top of pole 2 (A2) using
bolts (CC), washers (BB) and nuts (DD).
NOTE: To avoid destroying the finish, please handle it with
care.
ƑInsert the small top poles (G) into the small center
connector (F), then assemble the four corners of the small
canopy (K).
NOTE: To avoid destroying the finish, please handle it with
care.

6
Assembly (continued)
5 Attaching the canopy 6 Attaching the support bar to the
table top
ƑPut the big canopy (L) onto the big top. Do not fold. Attach the
small top pole (G) to corner top pole (D) using bolts (CC),
washers (BB) and nuts (DD). Then assemble the four corners
of the small canopy (K).
NOTE: To avoid destroying the finish, please handle it with
care.
ƑAttach the support bar (I) to the tabletop (H) using bolts (EE)
and washers (BB).
NOTE: To avoid destroying the finish, please handle it with
care.
7 Attaching the table top to the
poles 8 Finalizing the assembly
ƑAttach the tabletop (H) to the poles (A1 and A2) using bolts
(EE) and washers (BB).
NOTE: To avoid destroying the finish, please handle it with
care.
ƑSecure the other end of the support bar (I) to the poles (A1
and A2), then insert the pin on the pole into the hole at the
end of the support bar (I). Secure the gazebo using the
stakes (FF).
NOTE: To avoid destroying the finish, please handle it with
care.

7 WWW.HOMEDEPOT.CA
Please contact 1-877-527-0313 for further assistance.
Care and Cleaning
ƑBefore using, clean the gazebo completely with a soft dry towel.
ƑDo not put your gazebo in wet conditions where there is a risk of rust developing.
ƑWhen not in use, store in a cool, dry area.

Questions, problems, missing parts? Before returning to the store,
call Hampton Bay Customer Service
8 a.m. - 6 p.m., EST, Monday-Friday
1-877-527-0313
WWW.HOMEDEPOT.CA
Retain this manual for future use.

MERCI
Nous apprécions la confiance que vous accordez à Hampton Bay avec l'achat de ce kiosque. Nous nous efforçons de créer continuellement des
produits de qualité conçus pour améliorer votre maison. Nous vous invitons à nous visiter en ligne pour voir notre gamme complète de produits
disponibles pour vos projets d'amélioration résidentielle. Nous vous remercions d'avoir choisi Hampton Bay!
Article No.1000 812 320
Modèle No.L-GG019PST
MANUEL D’EMPLOI ET DE SOIN
PAVILLON DE JARDIN ET GRILL
Questions, problèmes, pièces manquantes? Avant de rendre au magasin,
appelez le Service au Client de Hampton Bay
de 8h à 18h, de l’est, Lundi au Vendredi
1-877-527-0313
WWW.HOMEDEPOT.CA

2
Sommaire
Sommaire....................................................................... 2
Information de Securité................................................ 2
Garantie ...................................................................................2
Ce qui est couvert....................................................................2
Ce qui n'est pas couvert ..........................................................2
Pré-Assembage ............................................................ 3
Planification d'assemblage......................................................3
Matériel inclus ....................................................................... 3
Contenu de l'emballage ...........................................................4
Assemblage ............................................................... 5-6
Entretien et nettoyage.................................................. 7
Informations sur la sécurité
1. Certaines pièces peuvent comporter des
2. Lors de l'assemblage et l'utilisation de ce produit, les
précautions de sécurité de base doivent toujours être
respectées pour réduire le risque de blessures et de
dommages matériels. Veuillez lire toutes les instructions
avant l'assemblage et l'utilisation
AVERTISSEMENT : Ne pas laisser le kiosque où il
existe un risque de vent fort, car la structure pourrait être
endommagée
DANGER : Cette unité est lourde ! Ne pas assembler ce
produit seul..
ATTENTION : Ne pas monter sur le toit du kiosque. Tomber
du kiosque peut entraîner des blessures graves, voire la
mort.
AVIS : Pour usage extérieur seulement.
Garantie
GARANTIE DE 2 ANS
CE QUI EST COUVERT
Cette garantie limitée est offerte à l'acheteur original et couvre les défauts de matériaux et de fabrication de votre article à condition que
l'article est entretenu et utilisé uniquement à des fins résidentielles et personnelles. Cet article est garanti exempt de défauts de matériaux
ou de fabrication pendant une période de 2 ans.
CE QUI N'EST PAS COUVERT
Nous ne remboursons pas les frais de transport ou de livraison, ni récompensons l'individu ou tout tiers pour l'assemblage ou le
désassemblage du produit.
Contacter l'équipe du service à la clientèle au 1-877-527-0313 ou à visiter www.homedepot.ca.

3 WWW.HOMEDEPOT.CA
Veuillez contacter le 1-877-527-0313 pour de l’aide additionnelle
Pré-assemblage
PLANIFICATION D'ASSEMBLAGE
Avant de commencer l'assemblage de ce produit, s'assurer que toutes les pièces sont présentes. Comparer les pièces avec le matériel
inclus et les listes du contenu de l'emballage. Si une pièce est manquante ou endommagée, ne pas tenter d'assembler le produit. Nous vous
invitons à contacter le service à la clientèle pour les pièces de rechange.
MATERIEL INCLUS
REMARQUE : Le matériel illustré n'est pas à
l'échelle réelle
AA BB CC DD EE
FF GG
Pièce Description Quantité
AA Boulon M6X20 16
BB Rondelle M6 40
CC Boulon M6x40 8
DD Écrou M6 8
EE Boulon M6X20 8
FF 180MM7’Piquet Dia.5X 12
GG Clé M6 1

4
Pré-assemblage (suite)
CONTENU DE L'EMBALLAGE
Pièce Description Quantité
A1 Poteau 1 2
A2 Poteau 2 2
B Grillage long 2
C Grillage court 2
D Poteau d'angle 4
E Grand connecteur central 1
F Petit connecteur central 1
G Petit poteau supérieur 4
H Table 2
I Barre de soutien 4
J Crochet 1
K Petit auvent 1
L Grand auvent 1
.
.
.
.
.
.
.
.
.
A1
A2
B
C
D
E
F
G
H
I
.
J
K
L

5 WWW.HOMEDEPOT.CA
Veuillez contacter le 1-877-527-0313 pour de l’aide additionnelle
Assemblage
1 Fixation des grillages aux poteaux 2 Fixez Petit raccord
ƑFixez le grillage court (C) et le grillage long (B) au poteau1 (A1)
et au poteau 2 (A2) à l'aide des boulons (AA) et des rondelles
(BB)
REMARQUE : Pour éviter d'abîmer le fini, veuillez
manipuler avec soin.
ƑInsérez le crochet (J) dans le grand connecteur central (E).
Insérez le poteau d'angle supérieur (D) dans le grand
connecteur central (E)
REMARQUE : Pour éviter la destruction de la finition,
veuillez manipuler avec soin
3 Fixation du poteau
d'angle supérieur 4 Fixation du petit connecteur
central
ƑFixez le tube supérieur (D) au-dessus des mats. (A1, A2) avec
une vis (CC), une rondelle plate (BB) et un écrou (DD)
REMARQUE : Pour éviter la destruction de la finition,
veuillez manipuler avec soin.
ƑInsérez les tubes (G) dans le petit raccord (F).
REMARQUE : Pour éviter la destruction de la finition,
veuillez manipuler avec soin

6
Assemblage (suite)
5 Fixation du grand auvent 6 Fixation de la barre de soutien à
la table
ƑMettez le grand auvent (L) au chapiteau. Ne pas plier. Fixez le
petit poteau supérieur (G) au poteau d'angle supérieur (D) à
l'aide des boulons (CC), des rondelles (BB) et des écrous (DD).
Ensuite, assemblez les quatre coins du petit auvent (K)
REMARQUE : Pour éviter la destruction de la finition,
veuillez manipuler avec soin.
Fixez la barre de soutien (I) de la table (H) au moyen de
boulons (EE) et des rondelles (BB)
REMARQUE : Pour éviter la destruction de la finition,
veuillez manipuler avec soin.
7 Fixation de la table aux poteaux 8 Finalisation de l'assemblage
Fixez le plateau (H) aux poteaux (A1 et A2) à l'aide des boulons
(EE) et des rondelles (BB)
REMARQUE : Pour éviter la destruction de la finition,
veuillez manipuler avec soin.
ƑFixez l'autre extrémité de la barre de soutien (I) aux poteaux
(A1 et A2), puis insérez la goupille dans le trou du poteau
situé à l'extrémité de la barre de soutien (I). Fixez le
pavillon de jardin à l'aide des piquets (FF)
REMARQUE : Pour éviter la destruction de la finition,
veuillez manipuler avec soin.

7 WWW.HOMEDEPOT.CA
Veuillez contacter le 1-877-527-0313 pour de l’aide additionnelle
Entretien et nettoyage
ƑAvant l'utilisation, nettoyer le kiosque complètement à l'aide d'un linge doux et sec.
ƑNe pas mettre votre kiosque dans des conditions humides où existe un risque de développement de rouille.
ƑLorsqu'il n'est pas utilisé, ranger dans un endroit frais et sec.

Questions, problèmes, pièces manquantes? Avant de rendre au magasin,
appelez le Service au Client de Hampton Bay
de 8h à 18h, de l’est, Lundi au Vendredi
1-877-527-0313
WWW.HOMEDEPOT.CA
Conserver ce manuel pour une utilisation future
Table of contents
Languages:
Popular Outdoor Furnishing manuals by other brands


YOTRIO
YOTRIO Berkshire FWS80632 Assembly instructions

Stryker T-Tops
Stryker T-Tops SUNBRELLA SG900 Installation guide & owner's manual

Costway
Costway EP24950US user manual

Vivere
Vivere JUNIPER WOOD 15ARCJW Assembly instructions

Palram
Palram Draco 1350 manual

Rutland County Garden Furniture
Rutland County Garden Furniture The Egleton Log Store manual