The Loudspeaker Kit M4S User manual


Assembly manual M4S Kit
2
You will need:
•Phillips head screwdriver
•Woodworking glue
•Damp cloth
•Good quality masking tape
•Ratchet tie down strap (optional)
•Brick or other weight (optional)
Preparation
Lay the contents of the box out and check you have everything you need to complete the kit
(see parts list on back page). Find a suitable work surface and make sure it won’t be ruined if
you spill some glue. If covering the work surface, avoid using newspaper as newsprint may rub
off onto your kit. Baking paper is a good choice.
Easier assembly with mitres
LSK kits now employ mitre construction, which offers greater ease of assembly with much less
sanding. Butt joints are eliminated, avoiding visible hairline cracks that often appear after
painting. Mitre construction puts the join right on the edge where it is less visible. Most
constructors avoid using mitres due to the difficulty in getting the angles correct. Our
manufacturing process provides a level of accuracy that is very difficult to achieve in a home
workshop.

Assembly manual M4S Kit
3
Masking tape
We recommend avoiding cheap masking tape, which tends to break when applied under
tension. If you aren’t using the weight and ratchet strap, you are relying on the masking tape
along to apply pressure to the join as the glue sets.
Lay out the rear, side, top and bottom panels as shown with mitres facing the work surface.
Align carefully and arrange so that all panels are touching at the edges, with no gaps.
Tape all four joints where the rear panel meets the side and top panels. It’s a good idea to
avoid covering the corners so that you can ensure all panels remain aligned during taping.
Lift the panels using the hole for the terminals, turning them over to the other.

Assembly manual M4S Kit
4
Tip: placing masking tape as shown assists with folding up the panels.
Apply a bead of wood working glue to the bottom of the mitre join. Then apply a second bead.
Since the glue will tend to run down towards the bottom, it’s a good idea to apply the glue
above half way up to ensure even coverage.

Assembly manual M4S Kit
5
Confirm the amount of glue applied by folding up the first panel. The glue should cover the
entire surface in contact. It’s preferable to see the glue ooze beyond the join slightly. This
provides visual feedback on whether the glue has set. Once set, PVA glue becomes
transparent.

Assembly manual M4S Kit
6
Apply a single thick bead for the top and side panels. Test the first pair of mitres to confirm
glue coverage, then glue and fold up all the other panels. It is best to fold up and then tape one
join at a time. Ensure the glue covers the join before moving on to the next step.

Assembly manual M4S Kit
7
Ensure the front baffle has the correct orientation. The port on the front and terminals on the
back should be oriented so they are both on the bottom. In the picture above they are both on
the right as the speaker is placed on its side.
Apply a thick glue bead around the internal surfaces of the mitres. You may prefer a zig zag
pattern with a thinner bead. It’s a good idea to remove the panel and confirm even coverage.

Assembly manual M4S Kit
8
Once you have confirmed adequate glue coverage, press the baffle into place and wipe off all
excess glue with a damp cloth. Secure panels firmly with masking tape. Apply pressure when
pressing the tape into position. The tape holds the panels together as the glue sets.
Cover all joins with tape, as shown below. An optional step for improved clamping pressure is
securing top, bottom and side panels together with a tie down ratchet strap. Avoid damage to
the surface of the MDF by placing cardboard strips under the straps at all four corners. Be
careful to avoid applying too much force, which can damage the corners of the MDF.

Assembly manual M4S Kit
9
Place a cardboard protector on top of the baffle then a brick on top to apply pressure.
We don’t recommend using F clamps due to the risk of forcing panels apart. The advantage of
using a brick is that this avoids the temptation to use excessive force.
Drying time
Typical wood glues can achieve moderate strength in as little as 30 minutes. If you are using
PVA glue then a good indicator that it has set is the transparency. PVA becomes transparent
once set. Ideally it’s best to leave the enclosure clamped over night before moving on to
assembly or finishing.
Grille assembly
This kit uses a clever neo magnet attachment system that avoids the use of traditional grille
clips. Flat packs contain neo magnets which have been concealed in the front baffle and grille.
Sequence tip
Final assembly should be done after you have applied
your chosen finish. Otherwise, drivers and terminals
will get damaged and the internal lining will be
covered in MDF dust.
Assembly manual M4S Kit
10
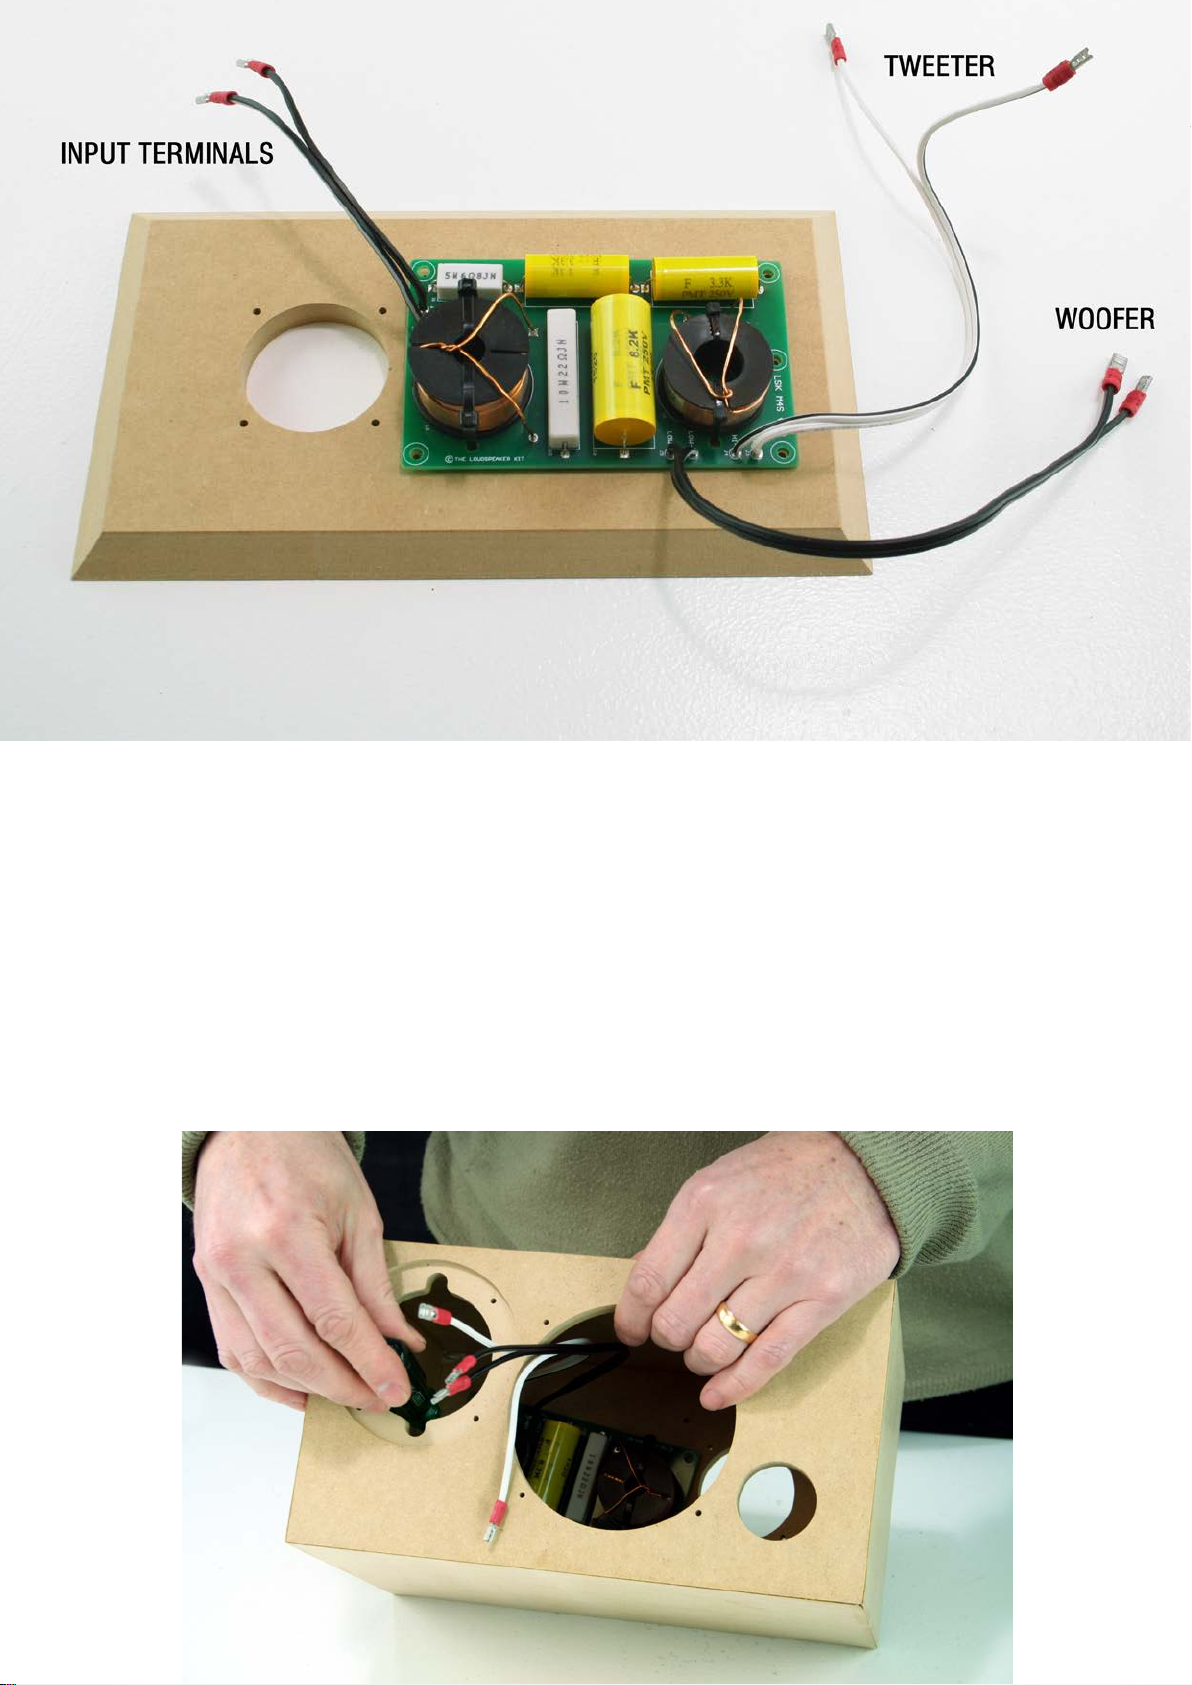
Installing the crossover board
There are three sets of cables:
•Input terminals: located near the larger inductor on the end of the board.
•Tweeter output: easily identified by the white cable
•Woofer output: black cable next to the tweeter outputs
The board is fixed in place with 5 short button head self tapping screws. It’s best to screw them
in place with a screwdriver by hand. Driver cutouts allow access as shown below.
Sequence tip: Normally this step would follow finishing the speaker. Otherwise sanding will
get MDF dust over the crossover.

Assembly manual M4S Kit
11
With the passive crossover in place, find the input terminals and feed them out through the rear
opening. insert the black acoustic lining, which covers the rear, top and bottom internal faces of
the enclosure. Check that it does not block the internal opening of the port. Glue is not
necessary.
Installing terminals
Tip: It’s often necessary to open out the connector slightly with a flat head screwdriver, since
the fit is quite tight.
Note: The cable with the white strip
goes to the negative terminal
-
+

Assembly manual M4S Kit
12
We recommend using a Phillips head screwdriver, as some powered drivers are more likely to
cause damage if the head slips off the screw head. Impact drivers should be avoided. If using
a powered driver, it’s best to use one which has a clutch, so that once the screws are
adequately tightened, the driver will not over-tighten. This avoids stripping the MDF pre drilled
holes or damage to the screw heads. If using a screwdriver, your left hand can hold the shaft to
avoid slipping.
Installing drivers
Find the white wire loom for the tweeter and push the connectors onto the driver tabs.
The connectors are designed to prevent mixing up positive and negative terminals. Avoid
excessive force, which can damage terminals. Lower the tweeter into its recess, aligning the
terminals with the cutout slots. Then secure in place with the provided screws.
The remaining black wire loom is for the woofer. Press the connectors into place and screw the
woofer in place.

Assembly manual M4S Kit
13
Grille assembly
Lightly sand the grille frame so that the edges are slightly rounded over. This provides a more
appealing effect when the grille fabric is in place. Shown below is the original grille prior to
sanding and then the grille after sanding.
Painting
Although the grille frame will be covered with black cloth, it’s best to paint it black to ensure the
lighter colour of the raw MDF won’t be seen. You can use any paint that is suitable for MDF. In
this manual we show the use of a very handy paint which many DIYers use as a finish for their
speaker boxes as well. It is a textured paint which can be applied direct without any priming. It
can be brushed, rolled or sprayed. It’s also a very fast drying paint, which allows you to move
on to gluing the cloth to the frame much quicker than other options.
If you prefer to use a spray can, don’t skip priming as most spray paints won’t provide a very
good finish when applied to raw MDF. For best results with a spray can, we suggest two prime
coats and then two top coats, being careful to observe the recommended time between coatss.
Typically spray painting will take longer than 4 hours. By contrast, the texture paint we use
allows you to start gluing on cloth in as little as 30 minutes. This can vary depending on
climate.
Pre-installed neo
magnets allow the grille
to snap into place

Assembly manual M4S Kit
14
Lay out the grille on a suitable covering to protect your work surface. It’s a good idea to use
disposable gloves for rolling the grille. The paint we use here is Acry-tech DuraTex which can
be purchased through Cannon the Australian Distributor. The ideal roller has a 5mm short nap
– and is small to avoid soaking up too much paint into the roller. Here we’re using a sample
roller. Although you can purchase a texture roller designed for Duratex, we don’t recommend it
for grilles as the texture is quite coarse.
Handy tip: Avoid extra clean up and paint waste by dipping the roller directly into the paint tub.
You can use a scrap of cardboard as shown above to ensure the paint is even spread around
the roller.
A few points to note:
•If you are painting a number of grilles at a time, start with one side for all of them. By
the time you have done one side for all of them, you may be able to progress to the
underside.
•Avoid applying the paint too thick – thinner application with a low nap roller provides a
smoother finished result
•Texture can be improved by rolling over previously applied paint that has not yet dried
– as the paint starts to become tacky the texture can be better controlled
•Two coatss are ideal for grilles
•The second coat can be applied when the first is touch dry. If the first coat is thin, often
the first grille will be ready for the second coat as soon as you have painted the other.

Assembly manual M4S Kit
15
Masking
On the backside of the grille, you will notice a trench inset from the edges. This is the cut line
and defines the area where the cloth will be glued to the frame. The area inside this line needs
to be masked. This allows you to use spray contact adhesive, which provides flat and even
coverage in addition to a fast application. You can measure and cut your own masking or
download the PDF template file (print 100% scale on an A4 sheet). Or you may prefer to
simply use masking tape.
A few features of our mask:
•Masking tape tabs to lift the mask after glue application
•Sticky tabs where the masking tape holds down the mask to the frame

Assembly manual M4S Kit
16
Spray contact adhesive is the simplest and quickest to use and it goes on evenly. Be sure to
carefully follow the instructions on the can as each one is slightly different.
Glue is only required on the back surface as shown here – no glue is required to the sides.
Allow a suitable setting time for the glue. This is different for each product. If you attempt to
attach the cloth too soon, the results may be less than ideal.
At this point, the advantage of using the mask becomes clear. You can quickly remove it with
the masking tape tabs and move on to the next step, without excess glue causing problems.
Now press the cloth onto the glue on the back of the frame. Start with one side and then follow
with the opposing side, stretching the cloth so that wrinkles are seen. These will be removed
when the other pair of sides are glued in place.
Avoid contact of the cloth around the corners. It’s important that these are done last.

Assembly manual M4S Kit
17
Repeat with the other pair of sides. When the final end is pressed into place, all wrinkles
should be removed.
Wrinkle free corners
The biggest challenge in assembling a grille is the corners. If not done correctly, these will
bunch up with many wrinkles. The secret is to stretch the fabric into place.
Hold the cloth with both hands, then pull it back over the frame. Stretch it firmly, pulling back
into the correct position. After stretching it into place, press down to the glue area.
If you find that you have wrinkles on first attempt, you can remove it and try again. It’s
important to work without interruption at this stage, as there is a limited work time involved with
the adhesive.

Assembly manual M4S Kit
18
Now you can use your thumbnail to find the cut line. Pressing your nail into the trench, score all
the way around. Then with a sharp blade, slowly and carefully cut away the grille cloth, using
the trench as a guide.
Tips for a better cut:
•Cut with multiple passes – avoid the temptation to try to cut all the way through in one
pass
•Cut slowly and carefully, ensuring the the blade stays on track
•Cut with a shallow vertical angle – this avoids any tearing you can get if the blade is
too vertical

Assembly manual M4S Kit
19
Parts List:
•2 x 4½” Woofers
•2 x Tweeters
•2 x Crossover Networks
•2 x Round input Terminals
•12 x Panels of CNC machined MDF featuring our unique panel locking system
•2 x CNC machined MDF grille frame with grille cloth
•34 x Self tapping Screws
•2 x 25mm Tuning Ports
•2 x Pieces of Acoustic Lining
•Grille cloth
SPECIFICATIONS:
Woofer Size: 4½”
Woofer Cone: Paper
Tweeter: Soft dome
Frequency Response: 65Hz (-3dB) to 20Khz, +/- 2dB
Recommended Amplifier: 50-100W RMS
Crossover: 1st order @ 2.7Khz
Sensitivity: 86 dB
Power Handling: 50W RMS, 100W peak
Impedance: Nominal 8 ohm (minimum 6.6 ohm)
Dimensions: 260mm high x 145mm wide x 180mm deep
Other manuals for M4S
1
Table of contents
Other The Loudspeaker Kit Speakers manuals


