THE STANDING DESK THE KLOUD User manual

1
FOR VIDEO INSTALL INSTRUCTIONS GO TO TheStandingDesk.com/install
STANDING
THE
DESK
THE KLOUD
FLEXI LIFT TABLE
ASSEMBLY INSTRUCTIONS
CAUTION: It is important to read these instructions thoroughly before assembly to avoid potential risk and
injury. Familiarize yourself with the inventory of parts and the accompanying illustrations to assure safe and
proper assembly.
2
FOR VIDEO INSTALL INSTRUCTIONS GO TO TheStandingDesk.com/install
THE KLOUD
FLEXI LIFT TABLE
ASSEMBLY INSTRUCTIONS
STANDING
THE
DESK
SAFETY INFORMATION
Thank you for choosing The Kloud, a high-performance 2 column lift base. It has been manufactured with care and precision
and it has passed numerous quality and safety checks to ensure trouble-free and safe operation. You can be assured of
lasting satisfaction with your Kloud model.
Important Safety Information:
1. Assembly and operation of The Kloud must be done in accordance with these assembly and operating instructions -
otherwise there is a risk of injury.
2. The Kloud is solely intended to serve as an ergonomic adjustment device for desks in accordance with the weights
and measurements given in these assembly instructions. Any usage other than that mentioned in these instructions
is inappropriate; the manufacturer disclaims liability for any resulting damages. In such cases the user assumes
responsibility for all risk.
3. Please also take into account the general, legal and other regulations and legal provisions that are applicable - including
those that apply in the operator`s country - as well as the applicable environmental protection regulations. The
regulations of trade associations or other supervisory authorities that are in force locally must always be observed.
4. The manufacturer cannot be held responsible for any losses or damage resulting from unauthorized modications to
The Kloud
5. Keep the assembly and operating instructions near the device.
6. Never leave children unattended with this base. Children can not properly evaluate the hazard presented by the force
action of this base.
Please pay attention to these assembly and operating
instruction to avoid a risk of injury!
There is considerable risk involved in improperly constructing, setting up and using the retracting compression spring
columns that are under compression. Therefore it is compulsory to adhere to all safety requirements in this assembly guide
and instruction manual. You are thereby providing for your safety as well as the safety of others.
When setting up the table the necessary room and safety distances to adjacent parts/furnishing objects must be observed.
As The Kloud is placed among other items, the regulations of trade associations or other supervisory authorities that are in
force locally have to be considered.
Children or other persons unable to understand or appreciate the dangers involved are not allowed in the assembly area
during construction and set up of the table, which should be conducted by qualied personnel.
This equipment is not intended for use by persons, including children, with limited physical or mental capabilities or
insucient experience and/or insucient knowledge.
The compression spring table is intended for proper use in commercial oce and administrative areas.
It must be ensured that the loading on the compression spring table matches the set spring force.
After setting up the table, ensure that this assembly guide is always visible and accessible to other users. If necessary,
inform others of their responsibility.
Lifting capacity: maximum weight 154lbs (70kg) including construction above the top frame (table top, desk top
accessories, etc.) Alteration of the system in any form is not permitted.

3
FOR VIDEO INSTALL INSTRUCTIONS GO TO TheStandingDesk.com/install
STANDING
THE
DESK
THE KLOUD
FLEXI LIFT TABLE
ASSEMBLY INSTRUCTIONS
CLEANING RECOMMENDATION
Cleaning recommendations for powder-coated surfaces
For optimal care and cleaning of powder-coated surfaces the recommendations below should be followed:
• Use only a soft cloth or industrial cotton wool. Refrain from rubbing hard.
• Surface and cleaning agent temperatures <25°C. (Do not steam clean surface.)
• Clean stains with a damp soft cloth. Use cold or lukewarm water. Small amounts of neutral or alkaline detergent
additives may be used if necessary.
• Do not apply detergent for extended periods of time. If necessary repeat cleaning process after 24 hours. Wipe with
cold water immediately after cleaning. (Use a damp (not wet) cloth.)
• Do not use scratching or abrasive agents.
• Do not use acidic or strongly alkaline detergents.
• Do not use organic solvents which contain ester, ketone, alcohols, aromatic compounds, glycol ether, halogenated
hydrocarbons or similar substances.
NOTE: Do not lubricate or use cleaning agents on the dry guides in the guide columns. Never use any silicone products as
this can lead to squeaking of the guide columns.
AVOID INJURY
- Do not remove strapping until the base is placed on the work surface
risk of pinch point.
- Do not activate the release lever before the table is fully assembled
and in the upright position.
-
- Table leg column may extend suddenly with great force and speed,
which will damage the table and could cause serious injury.
WARNING
RISK OF INJURY. Legs extend suddenly.
DO NOT remove safety lock pins unless table is fully assembled and in
upright position.
DO NOT activate release lever unless table is fully assembled and in upright
position, or legs are fully extended.
READ and follow directions to assemble table.
SAVE
SAVE Pins and RE-INSERT when legs are fully compressed BEFORE
transporting table.
WARNING

4
FOR VIDEO INSTALL INSTRUCTIONS GO TO TheStandingDesk.com/install
THE KLOUD
FLEXI LIFT TABLE
ASSEMBLY INSTRUCTIONS
STANDING
THE
DESK
CAUTION:Never activate the manual release before the table is completely
assembled and standing properly on the oor. Otherwise there is a safety risk
when extending the unloaded columns.
TOOLS/
ACCESSORIES
TOOLS/
ACCESSORIES
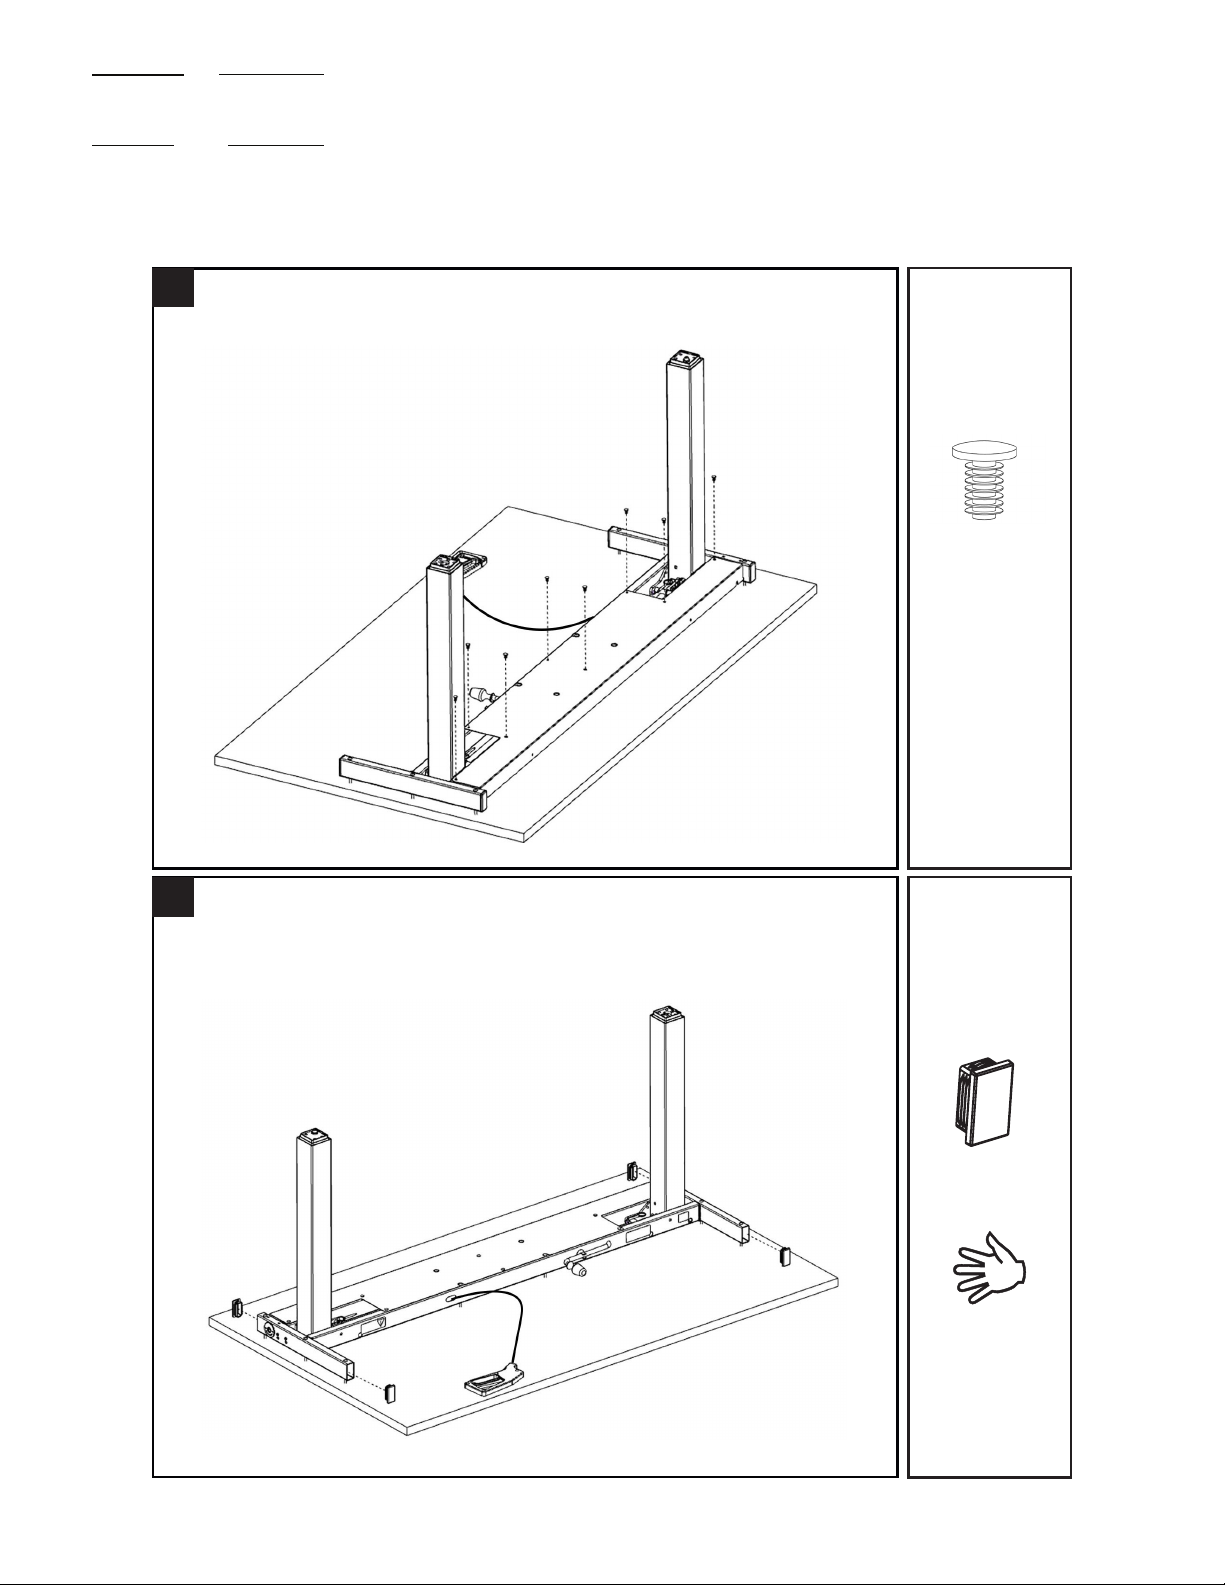
Place work surface on oor. Set table base assembly on top of work surface.
Remove packaging wrap once the frame is placed on the work surface
Lift legs perpendicular to the frame and install front bolts.
1
2
2x
m8x14
m6

5
FOR VIDEO INSTALL INSTRUCTIONS GO TO TheStandingDesk.com/install
STANDING
THE
DESK
THE KLOUD
FLEXI LIFT TABLE
ASSEMBLY INSTRUCTIONS
TOOLS/
ACCESSORIES
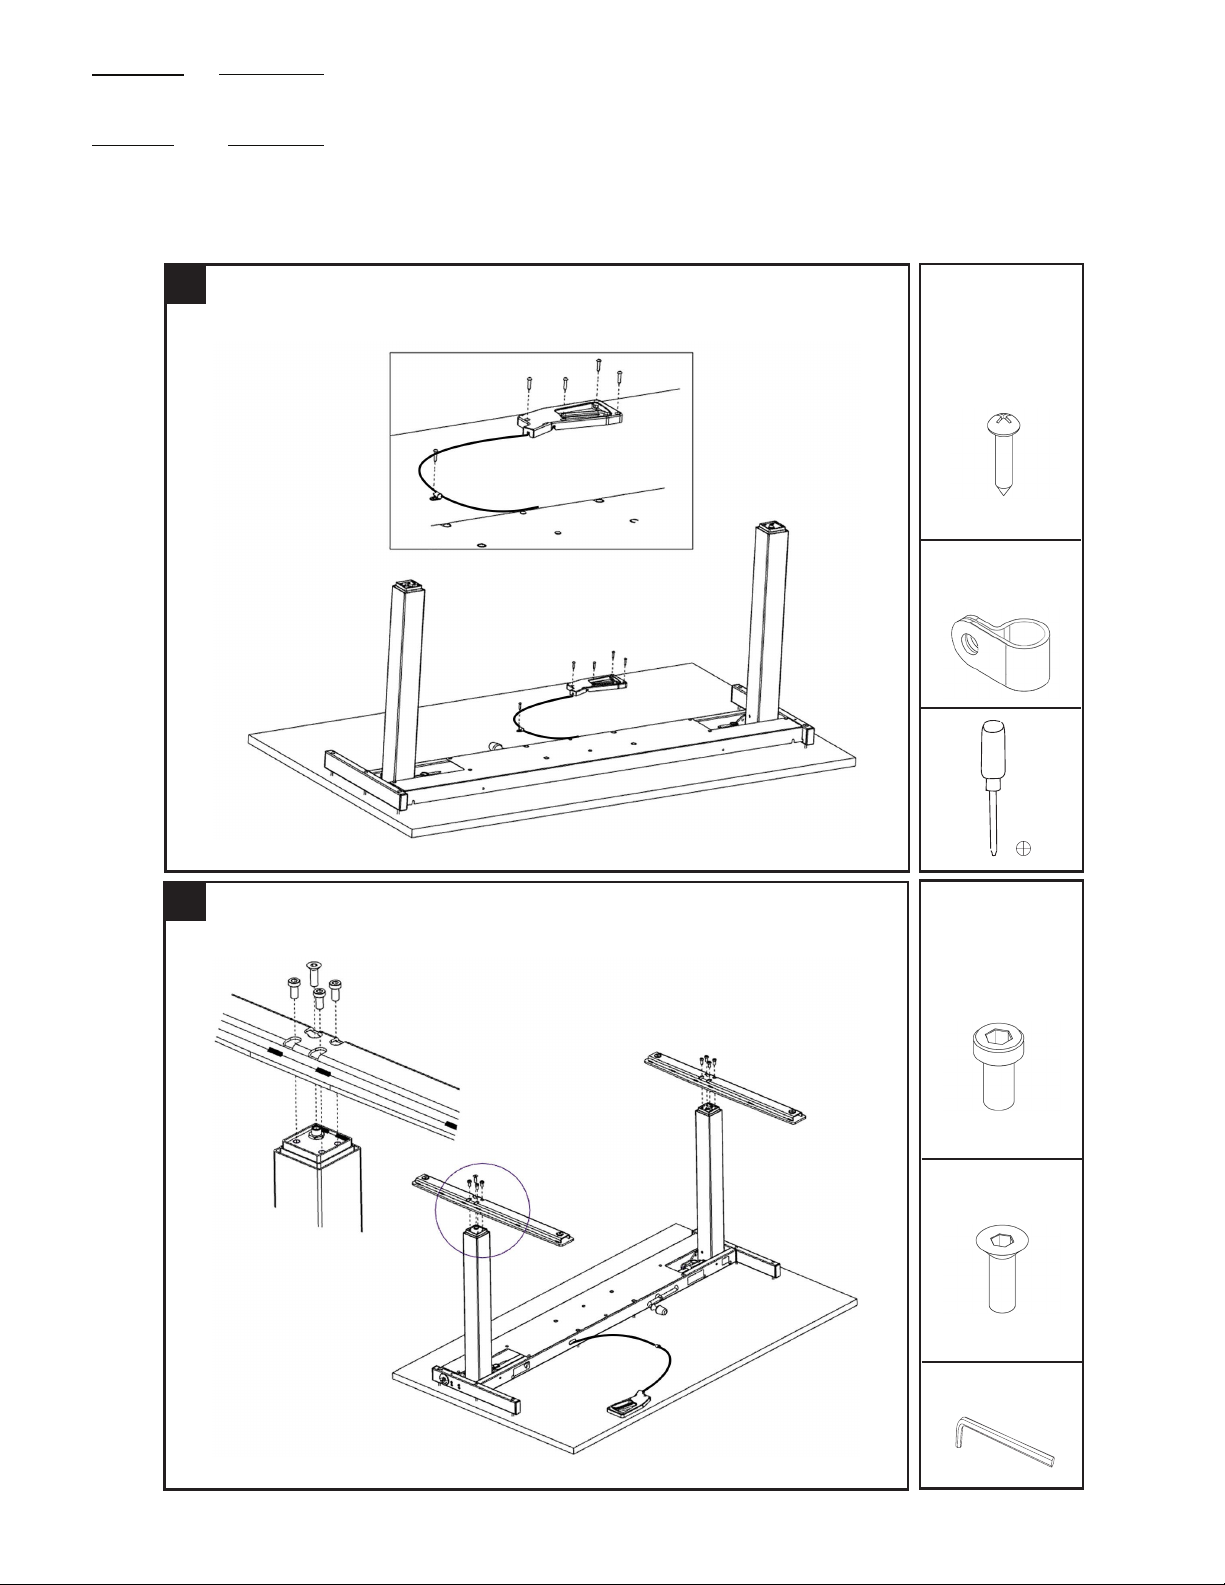
Move table base to rear of the work surface and slightly overhang the
table frame to remove the cover. Gently rotate the cover to allow the
tabs to drop out of frame.
2x
m8x14
.
TOOLS/
ACCESSORIES
Install back bolts. Tighten front and back bolts (4 total).
3
4
CAUTION: Do not remove the safety pins
until the table is completely assembled.
m6

6
FOR VIDEO INSTALL INSTRUCTIONS GO TO TheStandingDesk.com/install
THE KLOUD
FLEXI LIFT TABLE
ASSEMBLY INSTRUCTIONS
STANDING
THE
DESK
TOOLS/
ACCESSORIES
Replace cover by securing cover tabs into table frame. Gently rotate the
cover back into the at position.
.
TOOLS/
ACCESSORIES
Move table base into position on work surface. Secure base to work
surface with screws. REFERENCE DRILL GUIDES ON PAGE 12
5
6
10x
#12x2
7
FOR VIDEO INSTALL INSTRUCTIONS GO TO TheStandingDesk.com/install
STANDING
THE
DESK
THE KLOUD
FLEXI LIFT TABLE
ASSEMBLY INSTRUCTIONS
TOOLS/
ACCESSORIES
Attach cover using 8-12 xmas tree fasteners depending on frame size.
8x - 12x
xmas tree
fastener
7
TOOLS/
ACCESSORIES
Install tube caps.
4x
8
End cap
8
FOR VIDEO INSTALL INSTRUCTIONS GO TO TheStandingDesk.com/install
THE KLOUD
FLEXI LIFT TABLE
ASSEMBLY INSTRUCTIONS
STANDING
THE
DESK
TOOLS/
ACCESSORIES
.
Attach feet with bolts. Use the single counter sunk bolt in the threaded
nut position on the leg as shown.
7x
m8x16
1x
m8x25
countersunk
10
m5
Install handle to work surface with screws. Attach Bowden Cord with
Bowden Cord Clip to work surface.
5x
#8
TOOLS/
ACCESSORIES
9
Bowden
Cord Clip

9
FOR VIDEO INSTALL INSTRUCTIONS GO TO TheStandingDesk.com/install
STANDING
THE
DESK
THE KLOUD
FLEXI LIFT TABLE
ASSEMBLY INSTRUCTIONS
Install glides by screwing them in clockwise and adjusting
with wrench. (OPTION - Install locking casters in the front of
table and non-locking casters in rear of table with wrench.)
TOOLS/
ACCESSORIES
11
4x
Glides
2x
(Option)
2x
Non-Locking
Casters
Locking
Casters
1/2”
TOOLS/
ACCESSORIES
Flip table.
12
HEAVY OBJECT: Two person lift required.
10
FOR VIDEO INSTALL INSTRUCTIONS GO TO TheStandingDesk.com/install
THE KLOUD
FLEXI LIFT TABLE
ASSEMBLY INSTRUCTIONS
STANDING
THE
DESK
TOOLS/
ACCESSORIES
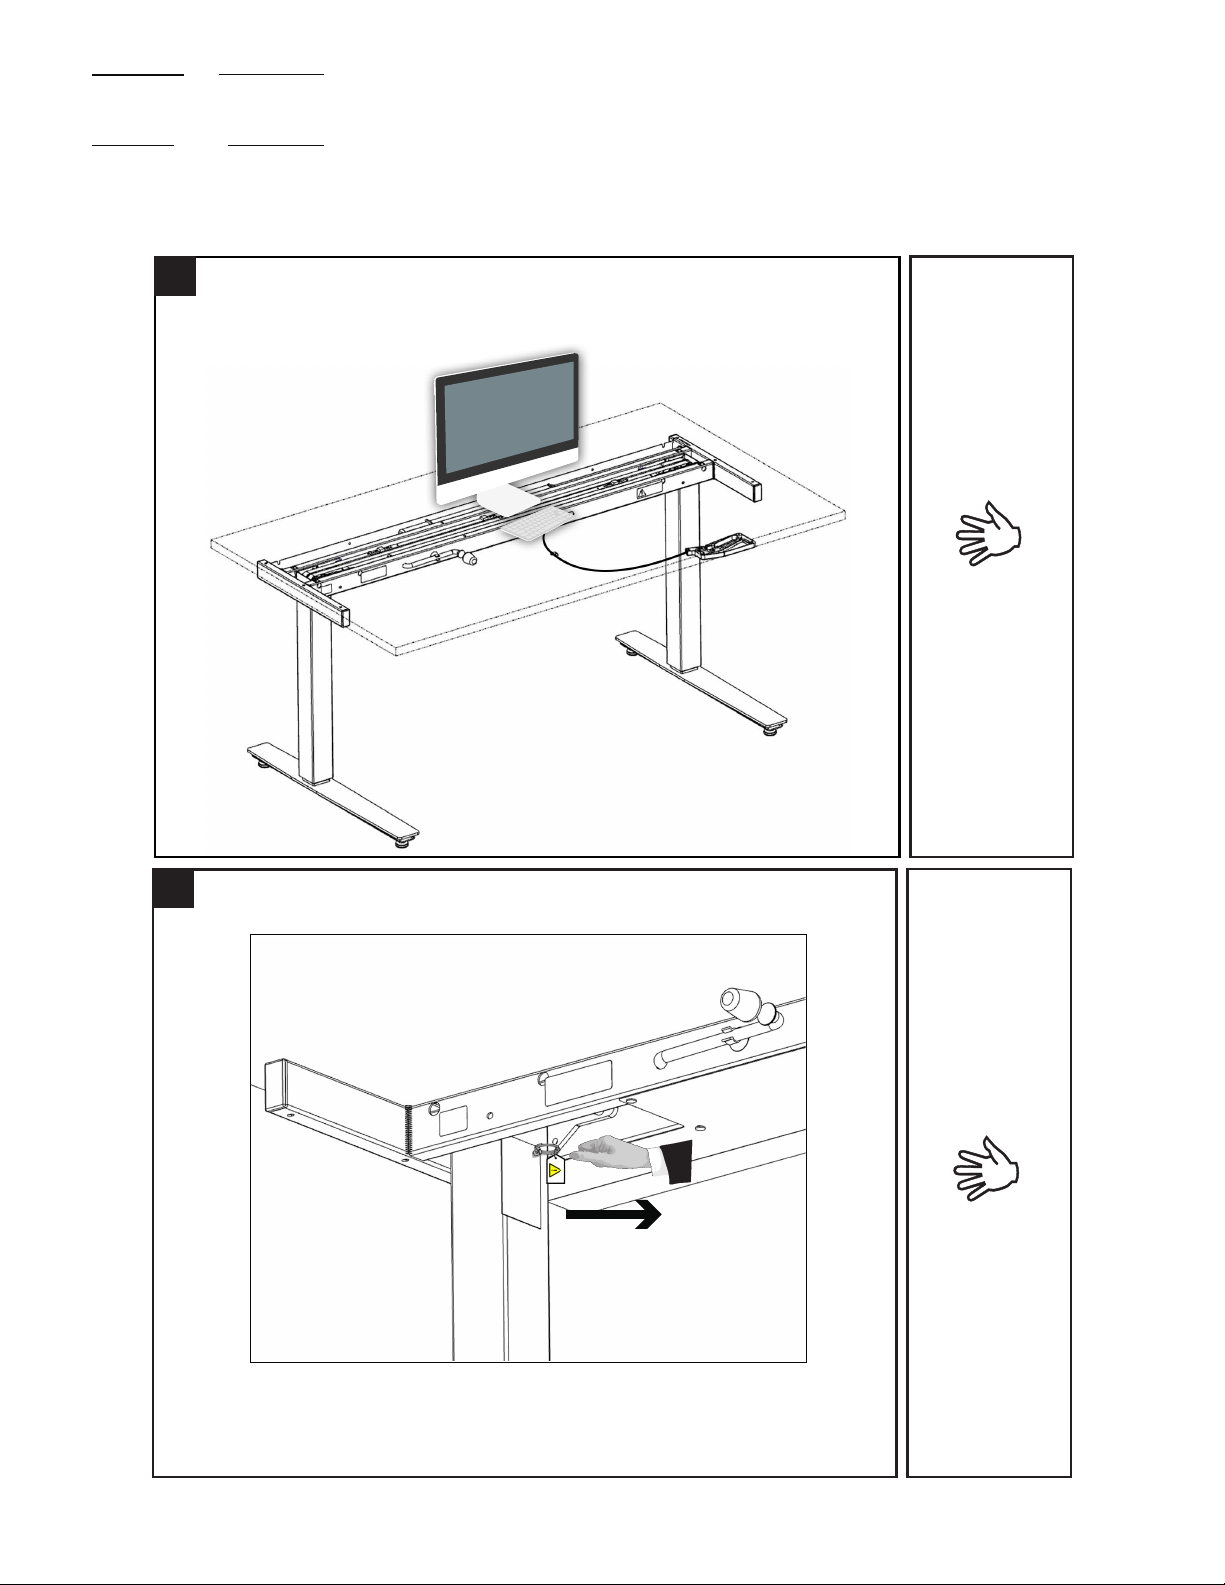
Add intended weight load while desk is in xed position.
13
If pin is stuck, apply light downward pressure to the table top.
9TOOLS/
ACCESSORIES
Remove pin from each column.
14
11
FOR VIDEO INSTALL INSTRUCTIONS GO TO TheStandingDesk.com/install
STANDING
THE
DESK
THE KLOUD
FLEXI LIFT TABLE
ASSEMBLY INSTRUCTIONS
TOOLS/
ACCESSORIES
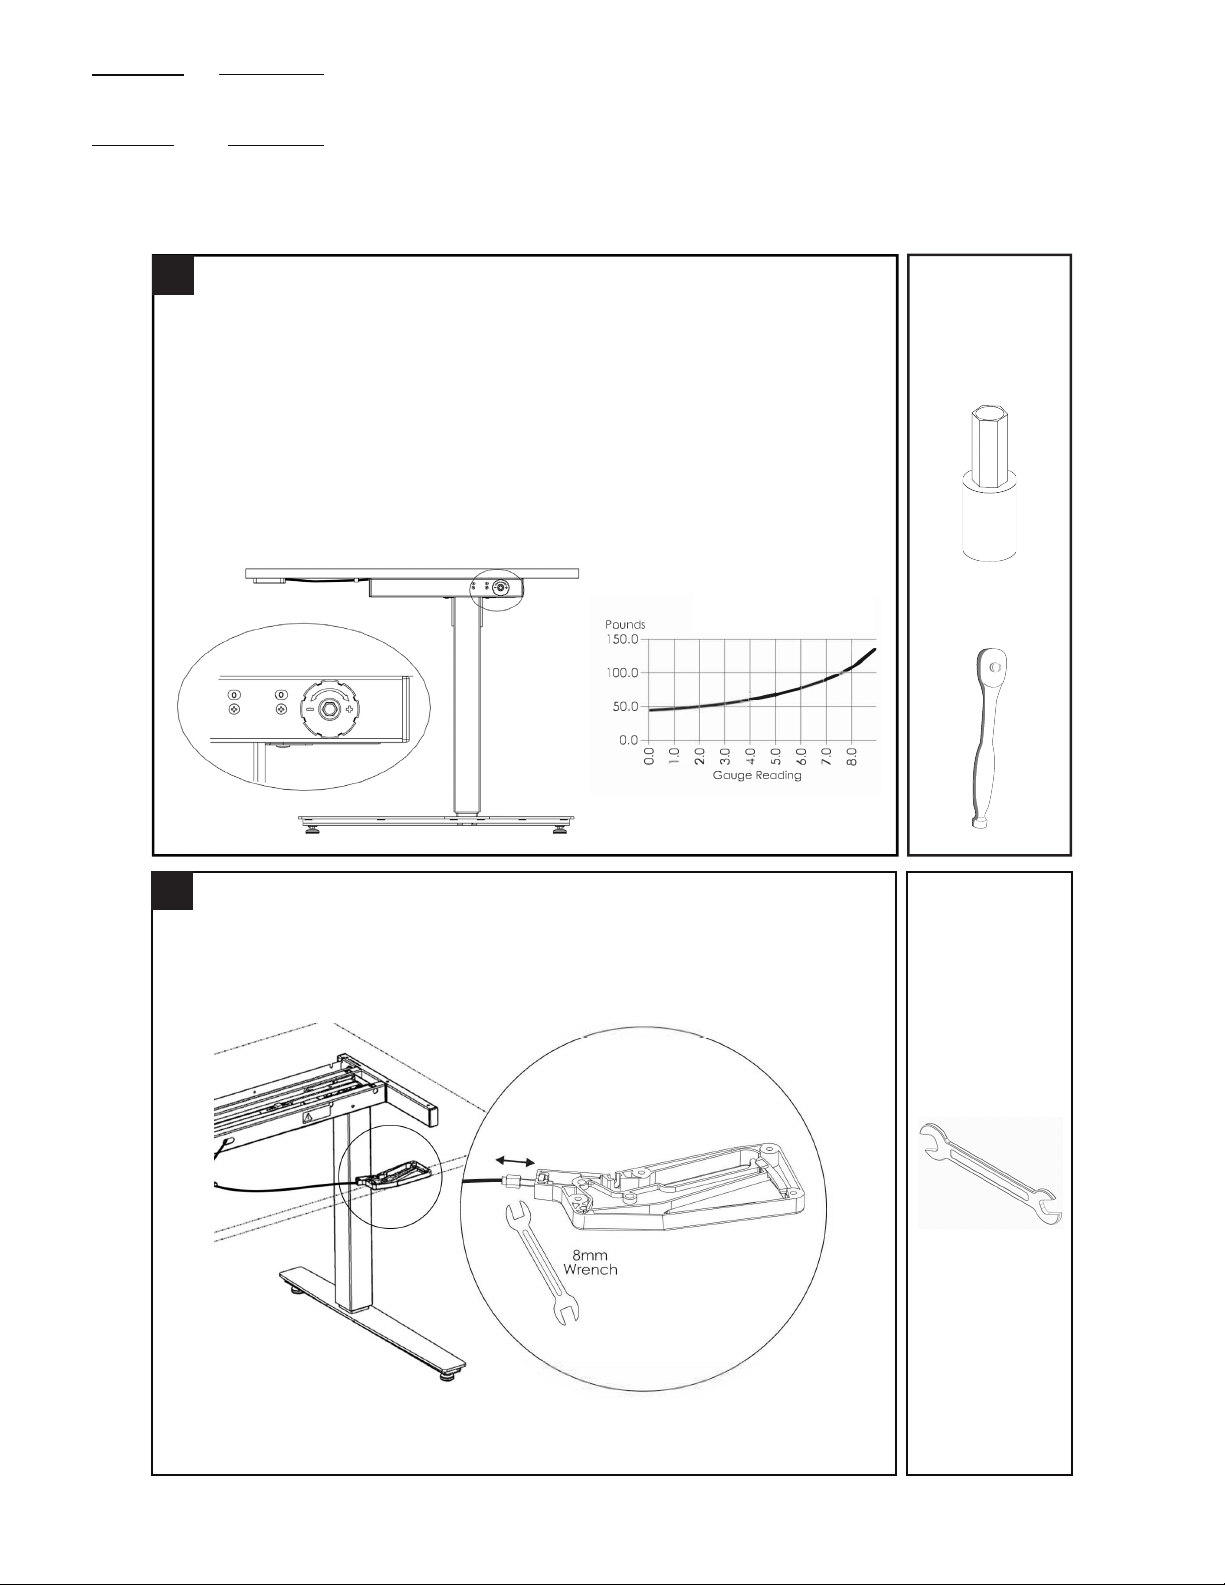
Using the ratchet wrench or manual driver with the l0mm hex bit, adjust
the pneumatic force by turning the hex adjustment found on the side, next
to the gauge.
• See the graph below right for a 48” table base. At the 0/0 gauge reading, weight
is set for just under 50 lbs. That moves up slowly to about 60 lbs at the 4/0 gauge
reading and then increases more rapidly, to over l00 lbs at the 8/0 gauge reading.
Do not adjust past the 8/0 setting due to risk of damage.
• If you know the approximate weight of the table top (work surface plus contents),
you can go to the gauge reading for that weight.
• The goal in making this adjustment is to equalize the force needed to raise the
table with the force needed to lower it. This is important when testing operation.
15
Adjust cable tension if necessary.
• If the table does not lock into place when the lever is released, tighten the
cable adjustment nut one-half turn and recheck.
• If the table stays locked in one place or moves slowly, loosen the cable adjust-
ment nut one-half turn and recheck.
If needed adjust bowden cable. The lever of the hand release
should have a little play in a non activated position.
TOOLS/
ACCESSORIES
16
8mm
10mm
Hex Bit
Ratchet
Wrench

12
FOR VIDEO INSTALL INSTRUCTIONS GO TO TheStandingDesk.com/install
THE KLOUD
FLEXI LIFT TABLE
ASSEMBLY INSTRUCTIONS
STANDING
THE
DESK
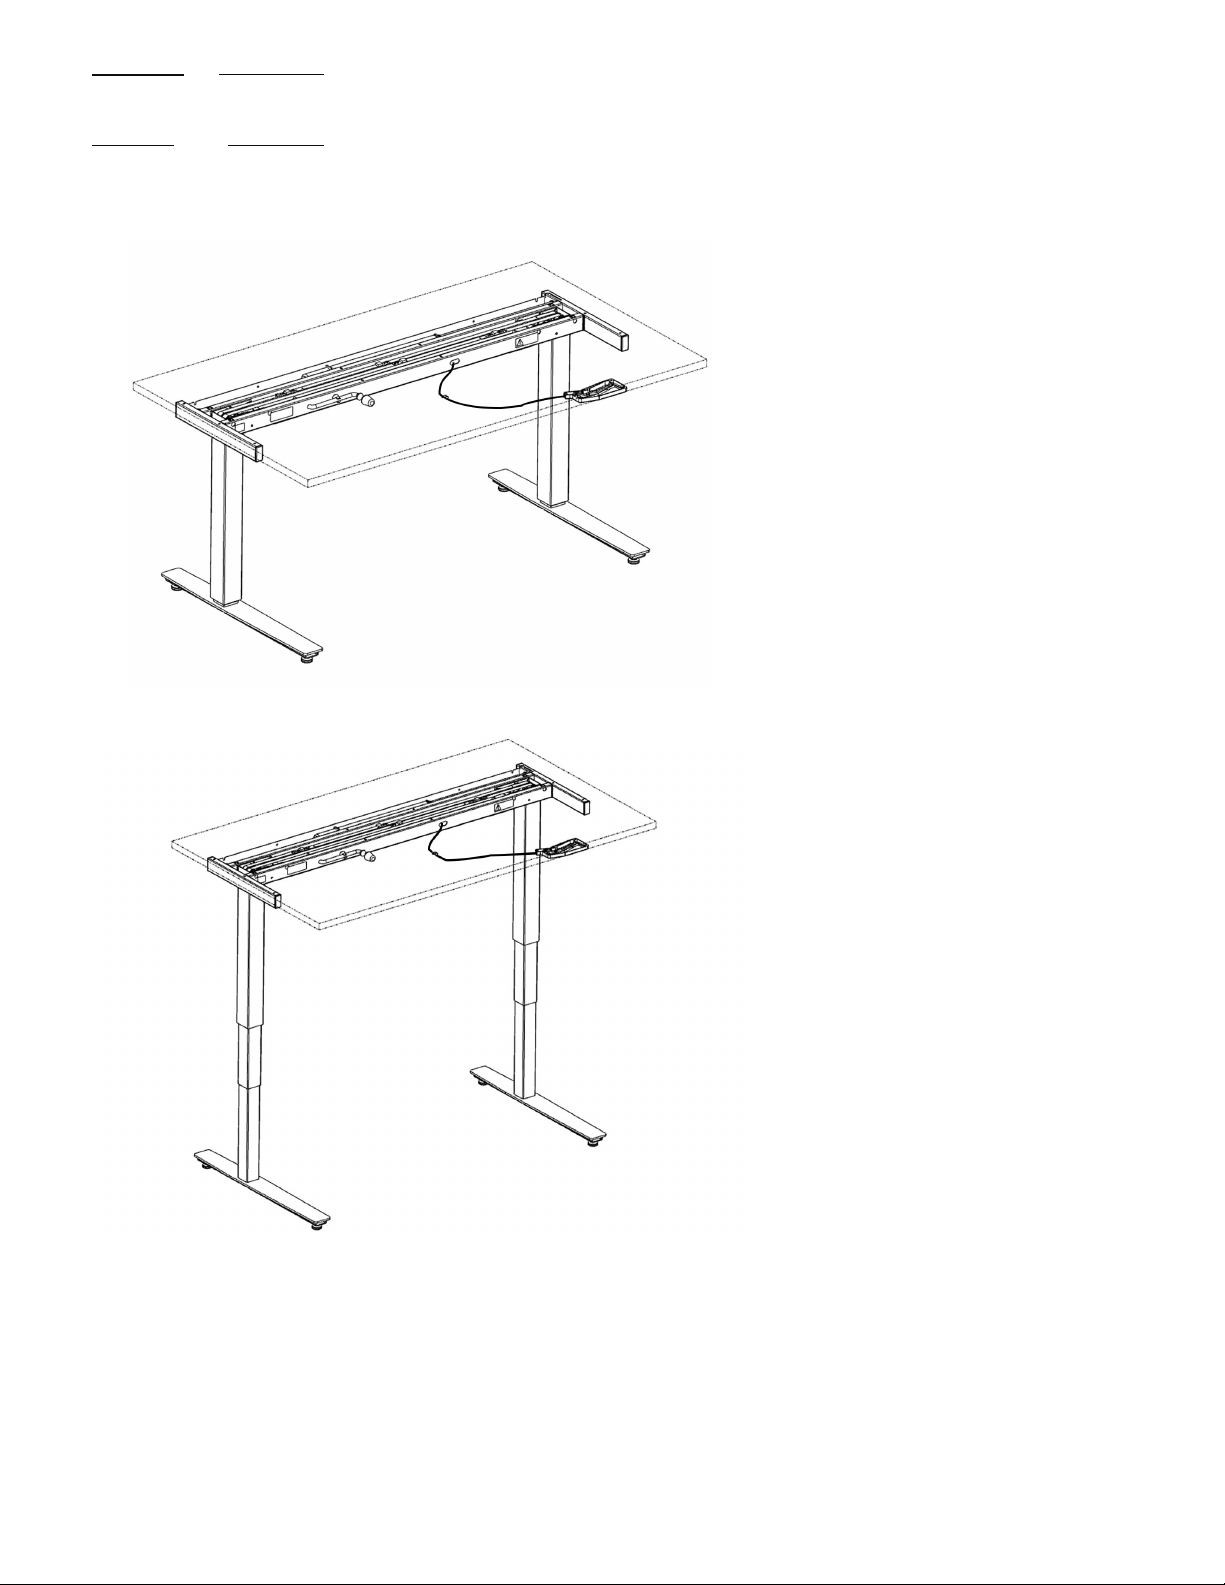
Lightly press one hand onto the tabletop and activate the lever with the
other hand until the table is at the desired height.
10
17 TOOLS/
ACCESSORIES
Work surface mount hole diagram.
REFERENCE
48” width work surface 60” width work surface
13
FOR VIDEO INSTALL INSTRUCTIONS GO TO TheStandingDesk.com/install
STANDING
THE
DESK
THE KLOUD
FLEXI LIFT TABLE
ASSEMBLY INSTRUCTIONS
500 mm Extension
Table of contents
Other THE STANDING DESK Indoor Furnishing manuals


Popular Indoor Furnishing manuals by other brands

Furniture of America
Furniture of America CM7683Q Assembly instructions

Evan furniture
Evan furniture BELLUNO V1 Assembly instruction

TikkTokk
TikkTokk Nanny Panel Playpen Assembly guide

BLACK RED WHITE
BLACK RED WHITE STYLIUS B169-KOM2W1B3S Assembly

VIVO HOME
VIVO HOME VH961 Assembly instructions

John Lewis
John Lewis Eyelet Curtain Pole Kit manual


