Thenow TDX200-BG02 User manual

WALL-MOUNTED VENTILATOR
TDX200-BG02
User Manual
Add:59th LinSheng Road ,Tinglin Town,JinShan District,Shanghai,China
Tel: 400-187-8599
Website : www.thenowair.com
Shanghai Thenow Purification Technology Co.,Ltd
Product Feature
Product Structure
Operation Panel
Product Instructions
Installation Guidelines
Maintenance
Safety Message Conventions
SimpleTroubleshooting
Technical Data
Packing List
03
03
04
05
06
06
07
07
08
09
Health From THENOW
03 04
Product Feature
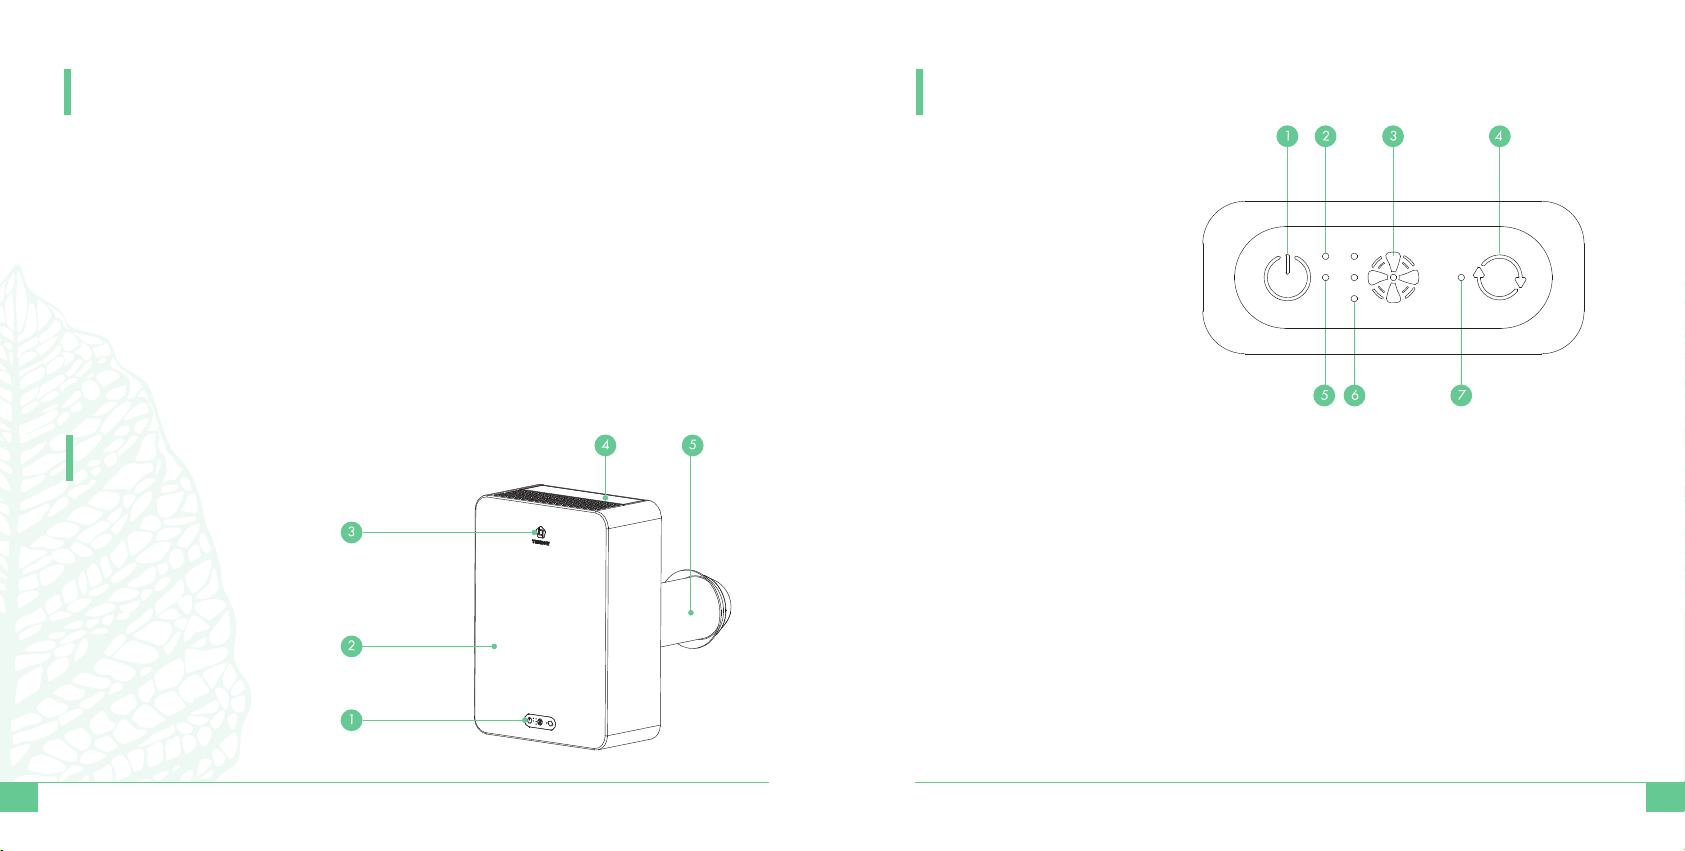
Product Structure
Operation Panel
Electric Auxiliary Heating
Electric auxiliary heating is PTC electric auxiliary heating technology. Using
additional electric heating to increase the heating capacity, even in the cold
winter, can also give customers a fresh and comfortable air.
Super Quiet
Adopting low noise fan, through improving workmanship, the noise of the unit
becomes lower while maintaining the original high air volume.
Ultra-thin
Ultra-thin design, wall-mounted installation,easy to install and save space.
1-Power
2-PTC Heating Indicator
3-Air Speed
4-Reset
5-Power Indicator
6-Speed Indicator
(L/M/H from top to bottom)
7-Filter Replacement Indicator
1-Control Panel
2-Ventilator Unit
3-LOGO
4-Filter Mounting Port
5-Fresh Air Duct
(Individually Packed)
LED Indication Description
1) Power Indicator
LED light is turned on while the power switch on; When the power switch
off, the LED light is off.
2) Air Speed Indicator
In the power-on state, the corresponding LED isturned onaccording to the
air speed; in the power-off state, the LED is off.
3) Filter Replacement Indicator
When thesetting filterlife is used out, the LED lights up; After changing the
filters, filter lifewas reset, the LED goes out.
4) PTC Heating Indicator
When the auxiliary heat is turned on, the LED light is turned on; when the
auxiliary heat is turned off, the LED goes out.

05
Installation Guidelines
06
Product Instructions Maintenance
Function Description
1)Power Switch
a. Press to turn on/off
b. When the machine is turned on, the air valve stepping motor starts and
the air outlet opens
c. When off, the air valve stepping motor starts and the outlet closes
d. Press and hold the power switch for 3 seconds to turn on/off PTC
(Electric Auxiliary Heating)
2)Air Speed Button
Press the air speed button, the fan will cycle between the speeds (under
power-on condition)
3)Reset Button
a. Short press is invalid, shutdown status is invalid
b. Press and hold the button for 3 seconds to reset the filter timing (under
power-on condition)
According to the needs of purification and fresh air, choose a suitable place
to place and install it by professional installation personnel. When the
machine is placed, it shall be ensured that the machine is installed smoothly
on the wallbracket and that the fresh air outlet on the back of the machine is
well connected withthe fresh air duct.
1. Turn on the power and press the power switch to start the machine. The
default mode is mid-speed/no electric auxiliary heating.
2. In the power-on state, every time you press the air speed button, the
machine will becycled between the three air speed, and the corresponding
LED indicator lights up synchronously.
3. In the power-on state, press and hold the power button for 3 seconds to
turn on/off the electric auxiliary heating function. The default is off.
Warning: The following installation must be performed by professionals.
1. First drill a large through hole (Ø130MM) and four expansion screw holes
(Ø6mm) in the designated position on the wall.
2. According to the thickness of the wall, adjust the total length of the fresh air
duct, insert the fresh air duct from the house, and tighten the flange.
3. Use the expansion screws in the accessory package to install the wall bracket
on the wall, and install the M4*8 machine screws on the wall bracket.
4. Insert the power cord into the ventilator unit, and install the unit on the wall
bracket steadily to ensure that the fresh air outlet and the fresh air duct are well
connected. Turn on the machine, run and debug, Installation is finished when
the machine is operating normally.
Warning: 1 HEPA filter cannot be washed.
2)The Pre-filter must be dried before installing into the machine.
)
Pre-filter cleaning steps:
Turn off the machine first, click the "door" at the top, the door will pop up and
open, and then you can take out the HEPA filter and the Pre-filter; The HEPA
filter must be taken out firstly, and then remove the Pre-filter.
2. Put the Pre-filter into clean water and dry it, then install the HEPA filter and
the Pre-filter (note the direction of HEPA filter placement), please install the
pre-filter firstly then HEPA filter.、
3. Close the "door".
1.
Note: When the filter replacement indicator on the operation panel is on, it
means that the filter needs to be replaced.
07
Safety Message Conventions
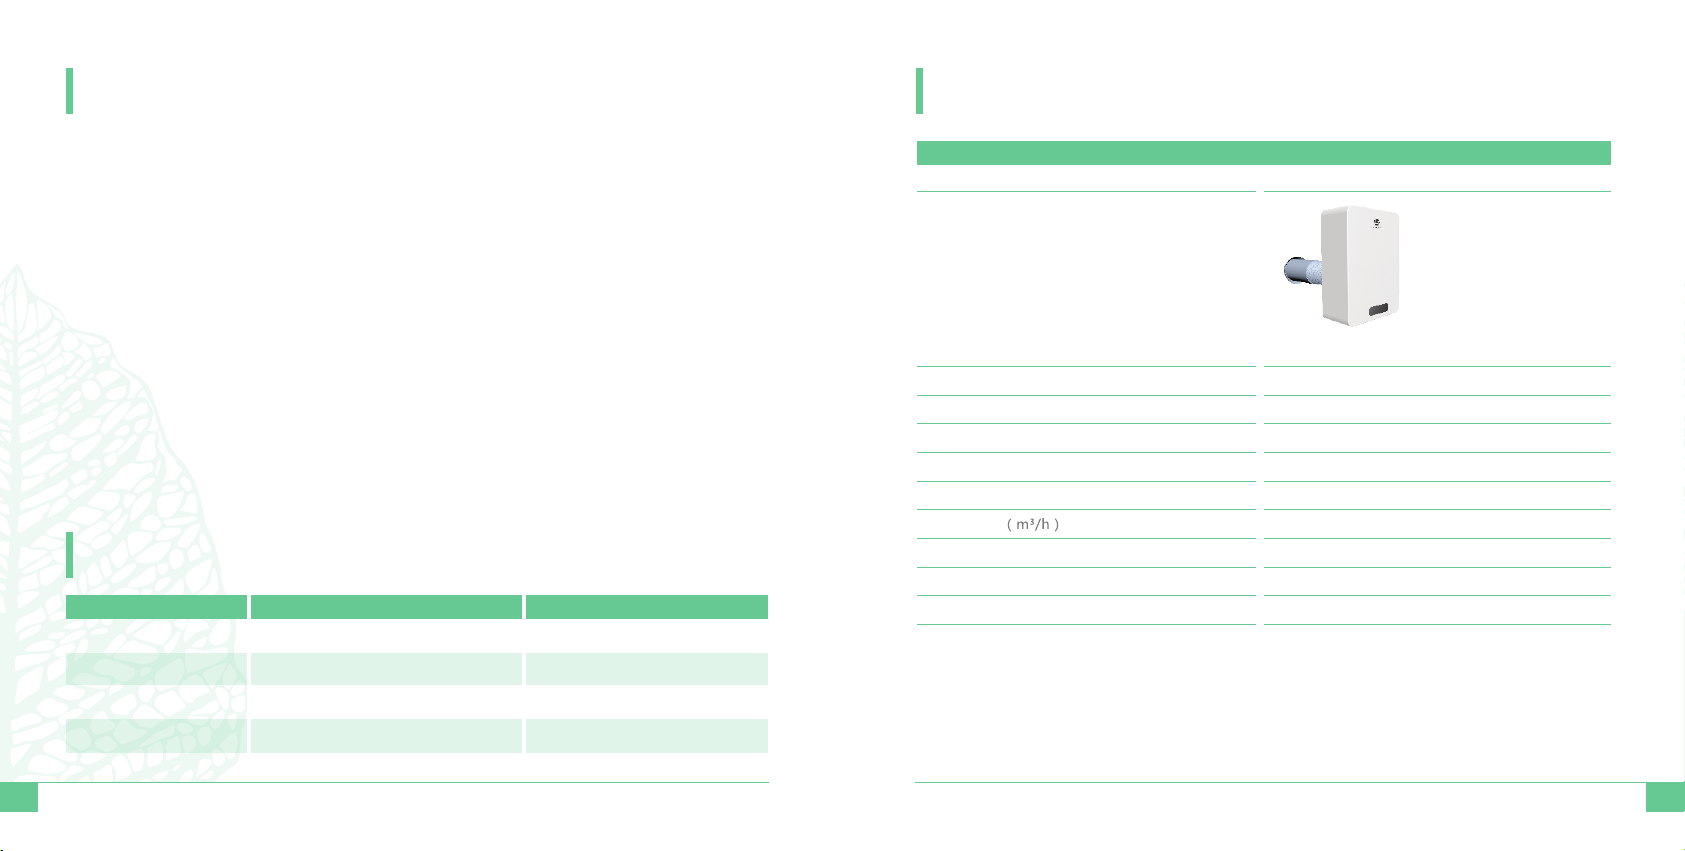
Model
Appearance
Size (mm )
Rated Voltage (V)
Frequency (Hz)
Rated Power(Without Heater) (W)
Rated Power(With Heater) (W)
Standby Power (W)
Noise (dB )
Weight (KG)
Application Area
TDX200 -BG02
320*450*157mm
220V ~
50Hz
16W
420W
≤2w
200
47dB
20KG
33~66
08
SimpleTroubleshooting
Technical Data
1. Always operate this unit from a 220V/50Hz AC.
2. Never pull the power cord directly when you want to disconnect the power,
please grasp the plug to unplug the power supply .
3. Do not plug or unplug the power plug with wet hands.
4. Stop use it when you find any broken of the power cord or plug or too loose
after plug in, contact with Thenow or its distributor in time.
5. Do not over bending, stretch, whipping, weight and extrude the power cord.
6. Do not replace the power cord without permission. If find any broken, in avoid
any danger happening, please contact Thenow or its distributor to change.
7. Do not place objects in the air inlet and outlet, and do not block the air inlet
and outlet.
8. This product is prohibited from water.
9. Do not get close to the fire source, and do not let thesparks generated by
combustible gas or cigarettes and other objects sucked into the unit.
10. If the product will not be used for a long time, please turn off the power and
unplug the power plug.
11. Please do not modify the unit, do not disassemble and repair the unit by non-
professional person. In case of malfunction and abnormal function, please
contact with Thenow or its distributors in time.
Fault Possible Cause Solution
Unit dose not start up No power or mismatch voltage Check wiring of loose, broken of
frayed connections
Loud noise No filter was put in Check filters
Smoke and odors are
difficult to remove Time to clean or change filters Clean the pre-filter or change
HEPA filter
Fresh air decreased Time to clean or change filters Clean the pre-filter or change
HEPA filter
Thenow Wall-mounted Ventilator Performance Parameter
Fresh Air
m2)
(

09
1、Ventilator Unit
2、Power Cord
3、Wall Bracket
4、User Manual
5、Product Certificate
6、Warranty Card
1pc
1pc
1pc
1pc
1pc
1pc
Packing List
The pictures on this manual and the outer packaging are for reference
only, and the boxed products are the actual products.
Table of contents


