ThePondguy 580175 Instruction Manual

Specialty Pond Sprayer
3 Gallon Capacity Sprayer
Installation & Maintenance Manual
(Item # 580175)
1 Year Warranty
Important Information........................2
Product Contents & Technical Specs.............3
Assembly Instructions.........................4
Replacement Parts ...........................8
Warranty Information.........................8
Table of Contents:

2
Thank you for purchasing this compression sprayer. Like any quality tool, it should be
used and maintained properly. Here are important safety information and easy-to-follow
instructions that will make using your sprayer easier and more eective.
If you have a problem or question, call our CUSTOMER CARE DEPARTMENT at 866-POND-
HELP (766-3435). Before you assemble and use your sprayer, read the following safety
information. It is helpful and important!
DANGER:
This sprayer operates with liquid under pressure. Failure to observe CAUTIONS and follow instructions
for use and maintenance can cause tank, hose or other parts to become corroded, weakened and/
or burst. This can result in SERIOUS INJURY or PROPERTY DAMAGE from forcible ejection of parts or
high-pressure discharge of spray material. DO NOT USE ANY FLAMMABLES IN THIS SPRAYER as it is
not designed nor intended for such use. Some spray materials can ignite or explode. Do not spray in an
enclosed space, near an open ame such as found in a BBQ grill or water heater, near an electric motor
or open switch, or any source of heat. DO NOT SMOKE while spraying. Use of ammables could result
in SERIOUS INJURY or PROPERTY DAMAGE from unintended ignition or explosion. DO NOT USE ANY
CAUSTICS OR ACIDS IN THIS SPRAYER, since these can damage or weaken the sprayer and its parts,
resulting in SERIOUS INJURY or PROPERTY DAMAGE.
CAUTION:
• Before using any pesticides or any other spray material in your sprayer, READ THE LABEL ON THE
SPRAY MATERIAL CONTAINER AND FOLLOW ITS INSTRUCTIONS FOR MIXING AND USE INCLUDING
THE NEED FOR PROTECTIVE CLOTHING. Some spray materials are dangerous and should not be used
in this sprayer as they can damage the sprayer parts, or may be harmful to the user. This could result in
SERIOUS BODILY INJURY or PROPERTY DAMAGE.
• BEFORE USING YOUR SPRAYER, thoroughly INSPECT both the inside and outside of the sprayer. Be
sure the hose is securely attached to the tank and shut-o valve, and that the spray wand and nozzle
are attached and not damaged. A loosely connected hose, shut-o valve, spray wand or nozzle can
come o when sprayer is under pressure and cause SERIOUS INJURY or PROPERTY DAMAGE.
• DO NOT PRESSURIZE sprayer if tank, hose or other parts appear to be damaged, discolored, brittle,
excessively soft or loose.
• DO NOT PUMP or use sprayer with head or body over pump as pressure in sprayer can forcibly eject
pump if it is not properly locked in place, and this can cause SERIOUS INJURY.
• DO NOT use hot or boiling liquids in sprayer since this may weaken or damage tank, pump or hose.
• DO NOT PRESSURIZE WITH ANY MECHANICAL DEVICE such as an air compressor, since this can
create dangerous pressure and bursting of parts and result in SERIOUS INJURY.
• Wear a long-sleeved shirt, pants, gloves, goggles or similar protective clothing when spraying.
• Do not leave residue or spray material in sprayer after use. It may damage or clog the sprayer
or its parts.
• Empty, clean and drain sprayer tank and hose after each use, according to directions.
• Do not smoke or eat while mixing spray materials or spraying, and wash up afterwards.
• Use only authorized replacement parts when servicing your sprayer. Other parts may not t properly
or may be weakened by spray materials and fail under pressure, resulting in SERIOUS INJURY from
forcible ejection of parts or unexpected high-pressure discharge of spray material.
• WARNING: Keep sprayer and all spray materials away from children and pets.
• WARNING: Make sure you RELEASE ALL OF THE PRESSURE in the sprayer:
1. Immediately after each use, even if you stop spraying for just a few minutes.
2. Before removing pump, hose, spray wand or nozzle.
3. Before trying to unclog nozzle, spray wand, shut-o valve or house.
4. Before servicing sprayer in any way.
5. Before use when sprayer is left in the sun or other warm place for an extended period.
Important Information:
3
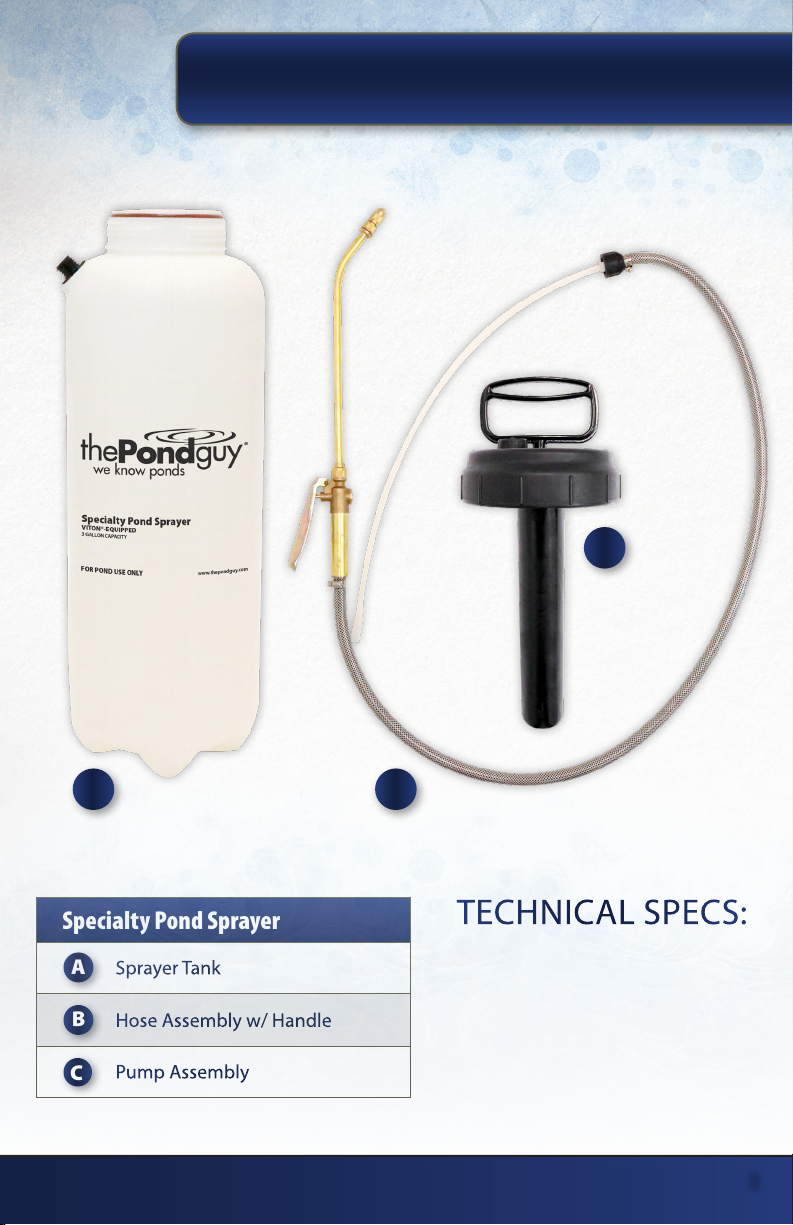
Specialty Pond Sprayer
ASprayerTank
BHose Assembly w/ Handle
CPump Assembly
Product Contents
SPECIALTY POND SPRAYER:
A B
C
TECHNICALSPECS :
• 3 Gallon Sprayer Tank
• Brass Spray Nozzle
• Replaceable Filter
Product Contents:
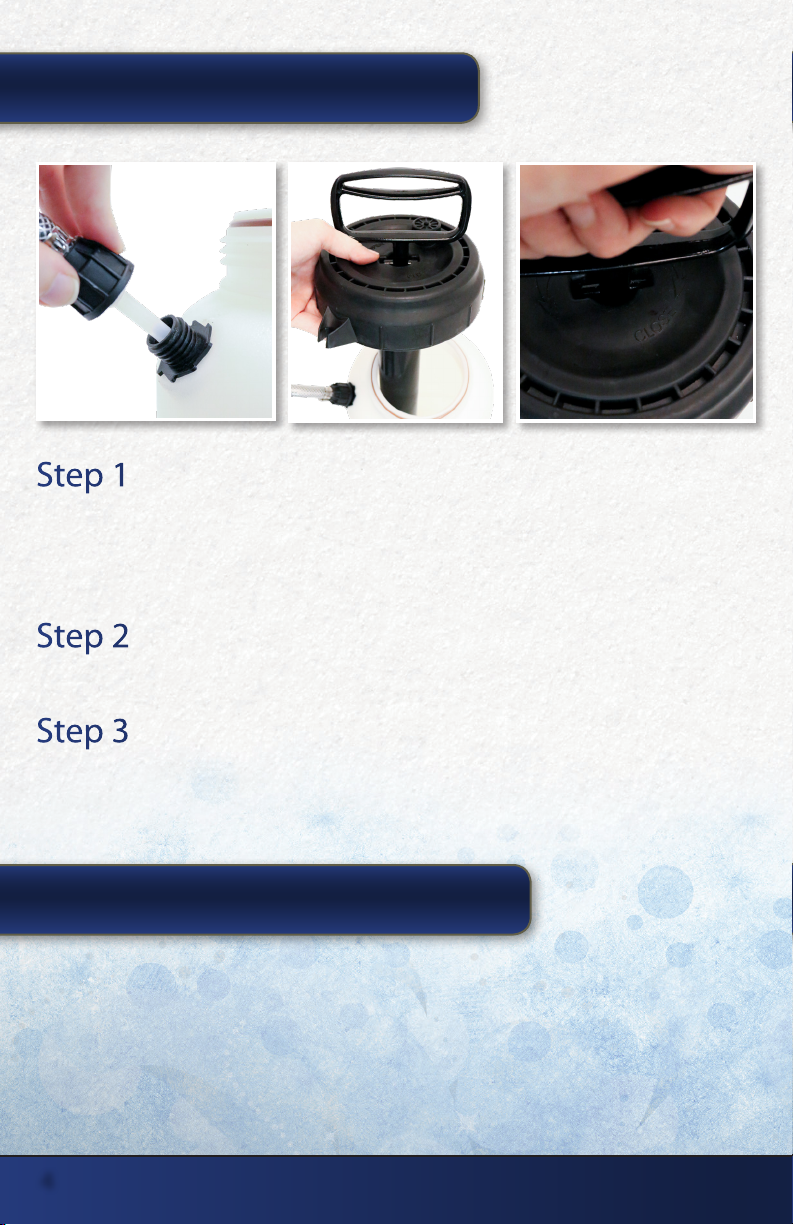
Step 1
INSERT supply tube into the sprayer tank. Securely thread the cap nut onto the sprayer tank.
NOTE: This is a compression tting and will screw on tightly.
CAUTION: Make sure the cap nut is threaded all the way down. If loose, it may come o with
force, or spray may escape, resulting in SERIOUS INJURY.
Step 2
INSERT Pump Assembly into the top of the sprayer tank until the cap is resting on the mouth of
the sprayer tank.
Step 3
THREAD the Pump Assembly into the top of the sprayer tank. Turn the Pump Assembly handle
clockwise until tight.
4
HOW TO FILL YOUR SPRAYER:
Before lling, be sure to read, understand and follow exactly the label instructions on spray
material container!
1. With pump handle all the way down and in the locked position, turn left to unscrew and lift
out the pump assembly.
2. Add water and chemical as directed. Don’t ll beyond the MAX FILL line.
3. Replace pump assembly and turn (clockwise) into place, turning tightly enough to seal.
HOW TO USE YOUR SPRAYER

5
HOW TO PRESSURIZE (PUMP UP) YOUR SPRAYER:
1. Unlock pump handle by pushing down and turning handle. Do not unscrew pump cap or
remove pump.
2. Using the handle, pump up and down. The more you pump, the more pressure you
will build up inside the tank. When it becomes dicult to pump, your tank has reached
maximum pressure.
NOTE: Use low pressure (fewer strokes) for a coarse spray. Use high pressure (more strokes)
for a ne mist or a long-reaching stream.
HOW TO SPRAY:
Steps to Spray:
1. Squeeze lever to spray.
2. Release lever to stop.
Steps to Adjust the Nozzle:
1. Tighten nozzle for ne mist.
2. Loosen nozzle for coarse or long range.
NOTE: If you tighten the nozzle all the way down, the spray may stop completely.
HOW TO RELEASE THE PRESSURE IN YOUR SPRAYER:
WARNING: Always release pressure before trying to service sprayer in any way or before
removing or disconnecting nozzle, spray wand, shut-o valve, hose
assembly or any other part!
1. Turn pressure relief valve counter clockwise and pull up to release pressure.
2. Slowly unscrew pump from tank and remove it. Keep head and body away from pump.
Important Tips and Information:
• The soft parts, o-rings and gaskets will ultimately wear out and need replacing, just like the oil
lter on your car. How often they need replacing depends on how much you spray, the spray
materials you use, and whether or not the sprayer is regularly cleaned after use.
• If you leave your sprayer in the garage over winter, particularly in the northern areas, the soft
parts may dry out and need servicing before you use your sprayer for the rst time in the
spring. Lubricate soft parts with petroleum jelly before storing.
WARNING: Make sure all of the pressure in your sprayer is released before cleaning or
servicing your sprayer in any way or before removing any part of it!
MAINTAINING YOUR SPRAYER
NOTE: Clean your sprayer each time you nish using it to help keep it trouble free.
1. When nished with job, spray away all the material in your sprayer or empty it into the
original chemical container.
2. Remove pump and add some clean water and a few drops of liquid dish washing soap.
3. Replace pump and shake tank to mix soap and water.
4. Pressurize and spray out soapy solution.
5. Release any pressure remaining and remove pump.
6. Remove hose and supply tube by unscrewing connection at tank (No tools required).
7. Turn tank upside down and let dry.
8. Holding hose and spray wand up, open shut-o valve and let wand and hose drain.
TIP: Back-ush your wand, hose and supply tube with a garden hose for maximum cleansing.
Pressure Relief Valve
How to Maintain Your Sprayer:
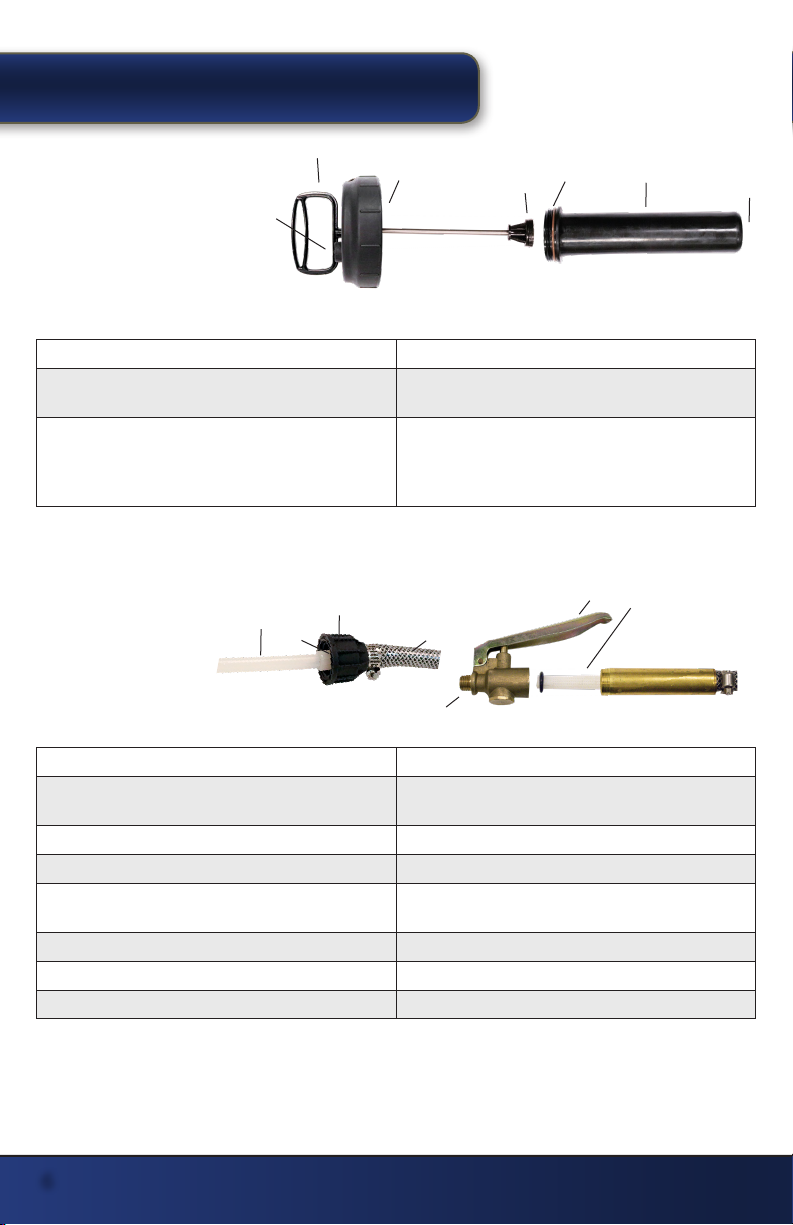
D. Plunger assembly/pump handle.
E. Pump Cap
F. Plunger Cap
G. Cylinder Gasket
H. Cylinder Assembly
I. Pump Cylinder Check Valve
J. Pressure Relief Valve
NOTE: To open pump assembly: Unscrew cylinder assembly (H) and pull out plunger assembly (D)
from cylinder assembly (H).
The pump leaks at the tank opening: Clean the tank gasket.
Pumping doesn’t pressurize your sprayer: Lubricate the plunger cup (F) with petroleum jelly.
If damaged, sprayer must be replaced.
Pump won’t pressurize and/or liquid gets into the pump:
Clean the pump cylinder check valve (I). If damaged, check
valve must be replaced. The check valve is included in the
O-Ring Kit (580176). Check to make sure pressure relief valve
is in the closed position.
SERVICING THE HOSE ASSEMBLY AND SPRAY HANDLE
NOTE: To open hose assembly: Unscrew cap nut (M) and pull out supply tube (K) from
spray tank (A).
K. Supply Tube
L. Supply Tube to
Hose Connector
M. Cap Nut
N. Hose
O. Spray Lever
P. Valve Port
Q. Filter
Sprayer leaks between tank (A) and hose assembly (B): Clean and inspect cap nut (M) and o-ring. Re-tighten by hand.
You pump up the sprayer and nothing but air comes out of
the nozzle:
Inspect, clean and reinsert the supply tube (K). Inspect, clean
and reinsert filter (Q).
There is a leak between spray handle and spray wand: Inspect and clean o-rings on spray wand (P) and spray handle.
Spray will not stop: Inspect and clean o-rings on spray wand and spray handle.
Little or no spray is coming out of the spray nozzle: Clean the valve port (P) and filter (Q) in the spray handle with
toothpick or soft brush and rinse with water.
Hose (N) is damaged or leaking: Replace with part #580179.
Debris repeatedly clog sprayer: Strain solution with cheese cloth or filter.
Spray nozzle is clogged: Clean with toothpick or soft brush and rinse with water.
ADDITIONAL HELP AND INFORMATION:
For any questions regarding ordering replacement parts, our warranty service, pond sprayer
assembly or usage call us at 866-POND-HELP (766-3435).
O
PSPRAY HANDLE CLOSE-UP
K
M
LN
CAP NUT CLOSE-UP
6
D
H
E
FG
I
Q
J
Servicing Your Sprayer:

NOTES:
7

8
View other great products on-line at www.thepondguy.com
REPLACEMENTPARTS :
REPLACEMENT PART ITEM #
Pond Sprayer 3 Gallon 580175
O-Ring Kit 580176
Pump Assembly 580177
Nozzle Assembly w/ Filter 580178
Hose Assembly w/ Handle 580179
PRODUCT WARRANTY:
The Pond Guy Specialty Pond Sprayer carries a 1-year warranty. The Pond Guy® will repair or
replace any units found to be defective. This limited warranty is extended exclusively to the
original purchaser and begins from the date of original purchase receipt. Abuse or misuse of
this product or power cord alterations void all warranty. Please call for a Return Authorization
Number prior to returning product by calling our Customer Care Department at 866-766-3435.
Failure to request an RMA number may result in delay or dismissal of your warranty claim
THANK YOU FOR CHOOSING:
The Pond Guy®Inc.
We Know Ponds™
15425 Chets Way
Armada, MI 48005
866-POND-HELP (766-3435)
thepondguy.com
V1
Table of contents


