ThermaRay AS Series User manual

INS20190711-02
Read carefully these instructions before installation, operation
of the heater. Failure to adhere to the instructions could result in
re, electric shock, serious personal injury, and death or property
damage. Review frequently for continuing safe operation and
instruction of future users, if necessary.
IMPORTANT
INSTRUCTIONS
1- Read all instructions before installing or using this heater.
2- This heater is hot when in use. To avoid burns, do not let bare
skin touch hot surfaces. Keep combustible materials, like
furniture, pillows, bedding, papers, electrical cords, clothes,
and curtains at least 36 in. (915 mm) from the front of the
heater and away from the sides.
3- Extreme caution is necessary when any heater is used by
or near children or invalids and whenever the heater is left
operating and unattended.
4- Do not operate any heater after it malfunctions. Disconnect
power at service panel and have heater inspected by a reputable
electrician before reusing.
5- Do not use outdoors.
6- To disconnect heater, turn o the circuit breaker that is
connected to the heater, then disconnect it from the thermostat/
control at the wall.
7- Do not insert any foreign objects in the heater as this may cause
an electric shock or re, or damage the heater.
8- Certain components may produce arcing or sparking. Do not
use it in areas where gasoline, paint, or ammable vapors or
liquids are used or stored.
WARNING
When using electrical appliances, basic precautions should
always be taken to reduce the risk of re, electrical shock and
injury, including the following.
9- Use this heater only as described in this manual. Any other use
not recommended by the manufacturer may cause re, electric
shock, or injury to persons.
10- The thermostat should not be considered an infallible device in
cases where maintaining a temperature is considered critical.
Examples: Hazardous material storage, computer server
room, etc. In these particular cases, it is imperative to add a
monitoring system to avoid the consequences of a thermostat
failure.
11- Never paint the front panel of the heater.
12- Heater should not be blocked in any manner.
13- For ceiling installation only.
14- Check voltage rating of heater to make sure it is same as
supply voltage.
15- Do not install the heater directly over a shower cubicle,
nor in places where it will be exposed for a long period
to high humidity or moisture.
16- This heater is hot when in use. To avoid burns, do not install
this heater in an accessible place. Allow 8 ft. (2.4 m)
minimum clearance from the oor.
17- A badly installed heater can be permanently damaged and
present a risk of re or electric shock. The heater must be
rmly xed to the ceiling structure.
SAVE THESE
INSTRUCTIONS
MAINTENANCE
INSTRUCTIONS
1- Cleaning should be done while the heater is disconnected
from the main service panel. Wait until the housing
and heating element cool before performing maintenance.
2- To clean the painted surface, use a cloth moistened with a
mixture of water and vinegar in equal proportions.
3- A detergent can be used to remove residue due to its
environment (warehouse, industrial premises, etc.), but it is
strongly recommended to test a small section in area that
is not visible.
4- Do not use abrasives or corrosive chemicals as this may damage
the paint and the appearance of the product.
5- The front panel of the panel can not be repainted.
6- The back of the panel can be repainted with latex paint.
7- Any other servicing should be performed by a qualied
technician.
WARRANTY
Please refer to the product sheet at www.ouellet.com.
OPERATING
INSTRUCTIONS
1- The heater must be properly installed before it is used.
2- Turn the power on at the circuit breaker panel.
3- The use of the heater may vary depending on the type of
control used. Please refer to the operation manual of the
thermostat, timer or switch.
670 Wilsey Road, Unit 6
Fredericton, New Brunswick, Canada, E3B 7K4
Tel.: 1 866 457-4600
www.thermaray.com
INSTRUCTIONS
Architectural Radiant Panel
AS Models
Conforms to UL STD 2021
Certied to CSA STD C22.2 No.46
INSTALLATION
INSTRUCTIONS
CAUTION
- High temperature, risk of re, keep electrical cords, drapery, furnishings, and other
combustibles at least 36 in. (915 mm) from the front of the heater. To reduce the risk
of re, do not store or use gasoline or other ammable vapors and liquids in the
vicinity of the heater.
- Allow 2 in. (50.8 mm) minimum clearance between the back of the panel and the
ceiling structure.
- Allow 8 ft. (2.4 m) minimum clearance from the oor.
- 6 in. (152 mm) space between the panel and adjacent walls is recommended.
- Allow 36 in. (915 mm) minimum clearance between the heater and a device
sensitive to heat of 40 °C (104 °F) and higher.
- Use power supply wire suitable for at least 75 °C (167 °F).
- Canadian installations shall be made according to the provisions of Section 62 of
the Canadian Electrical Code, Part 1, and to regulations of all authorities having
jurisdiction. United States installations are to be made in accordance with the National
Electrical Code and local codes where applicable. When determining the number of
branch circuits required to accommodate the heating load, note the branch circuit must
be derated in accordance with Canadian Electrical Code or National Electrical Code as
applicable. The heater must be grounded to prevent the risk of electric shock.
- For proper heater performance, ensure the supply voltage matches the voltage printed
on the heater nameplate. DO NOT connect the heater to a higher voltage. Connection to
lower voltages is permitted but will cause the heater to operate at a reduced wattage.
- Ensure the electrical supply is de-energized before connection in an approved box using
approved wire connectors.
- Replace and screw the cover of the internal junction box before testing.
INSTALLATION
1- To avoid a risk of re caused by overheating of the wires, all wires connected to the
heating panels must be provided for a minimum temperature of 75 ˚C (167 °F).
2- Allow 2 in. (50.8 mm) minimum clearance above the panel.
3- It is recommended to use steel suspension cable 3/64 in. (1.8 mm) in diameter.
4- To access the internal junction box, remove the 2 screws holding the plate in place.
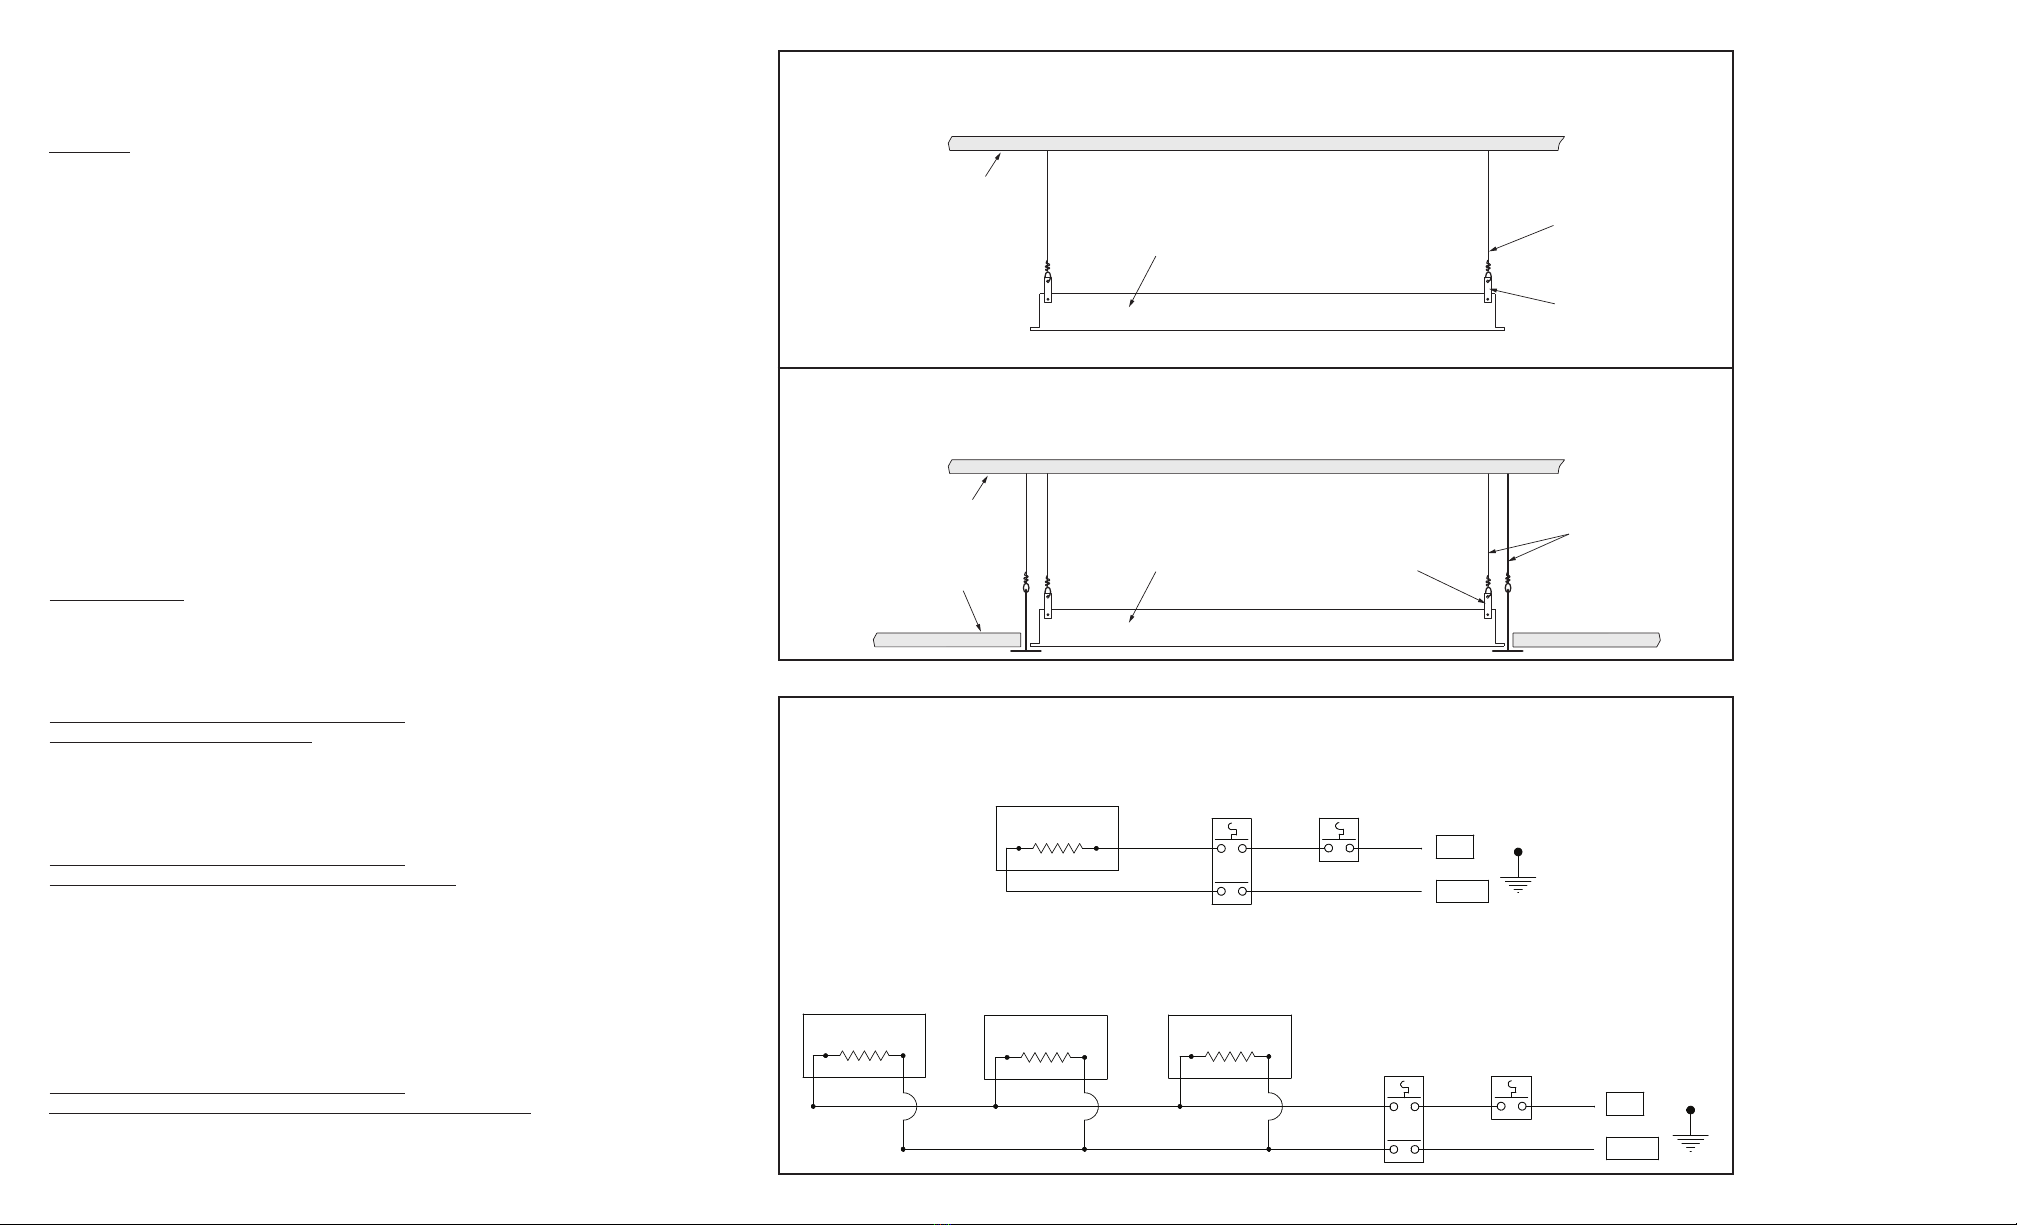
INSTALLATION OF THE RADIANT PANEL
SUSPENDED FROM A CEILING
1- Make sure the ceiling can support the heating panels.
2- A suspension cable (not included) must be attached to the 4 suspension clips and
attached to the ceiling structure.
3- The panels will be installed suspended from the ceiling. Figure 1.
4- Proceed to the electrical wiring according to Figure 3.
INSTALLATION OF THE RADIANT PANEL
INSERTED INTO A T-BAR SUSPENDED CEILING
1- Make sure the ceiling can support the heating panels.
2- Remove the acoustic tiles at the appropriate places in order to distribute the heat as
evenly as possible.
3- It may be necessary to remove a T bar if they are too close together.
4- Make sure the suspension cables of the T bars are secure and that they do not
interfere with the installation of the panels.
5- Remove the panel on the T bars and suspend the ceiling panel using suspension
cable. Figure 2. A suspension cable (not included) must be attached to each
of the 4 suspension clips and attached to the ceiling structure.
6- Proceed with the electrical wiring according to Figure 3.
INSTALLATION OF THE RADIANT PANEL
SURFACE OR RECESSED MOUNTED ON GYPSUM CEILING
1- Make the selection of the required framing models.
2- Refer to the SF or PF Frames installation instructions.
3- Proceed with the electrical wiring as shown in Figure 3.
Radiant panel
L1
L2/N
External
control
double-pole
Interconnection of 2 or more radiant panels
Wiring diagram
External
control
single-pole
L1
L2/N
Radiant panel Radiant panel Radiant panel External
control
double-pole
External
control
single-pole
Figure 3
Suspension cable
Suspended ceiling
Suspension cables
Suspension clip
Suspension clip
Installation of the radiant panel suspended from a ceiling
Installation of the radiant panel inserted into a T-Bar suspended ceiling
Radiant panel
Radiant panel
Ceiling structure
Ceiling structure
Figure 1
Figure 2
IMPORTANT
Allow 2 in. (50.8 mm) minimum clearance between the back
of the panel and the ceiling structure.
IMPORTANT
Allow 2 in. (50.8 mm) minimum clearance between the back
of the panel and the ceiling structure.
Popular Heater manuals by other brands

CONVECTAIR
CONVECTAIR CALYPSO 7826 Installation and user guide

SINED
SINED STUFA-INFRAROSSI-PARETE-2000 manual

Ruffneck
Ruffneck FR Series owner's manual

NARVI Oy Finland
NARVI Oy Finland NC 16 installation, user and maintenance instructions

Claudgen
Claudgen CA1509S Installation & operation guide

Ferroli
Ferroli BLUEHELIX TECH RRT 24 H Instructions for use, installation and maintenance


Dyna-Glo
Dyna-Glo BF10PTDG/PMDG manual

BIEMMEDUE
BIEMMEDUE PHOEN 110 instruction manual

Empire Heating Systems
Empire Heating Systems SR-6-4 Installation instructions and owner's manual

Desa
Desa PORTABLE FORCED AIR HEATER owner's manual

Alva
Alva EIH500 quick start guide

ACESOL
ACESOL Classic Series Installation manual. instructions for use