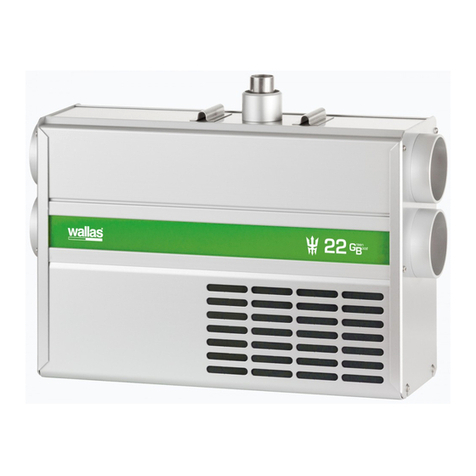
wallas 30 GB User manual

40 Dt
2467
1066
2448
1028
1030
4411
4413
3410
3419
2460
3416
30012
30011
367215
3413
3411
3417
4414
2419
2410
2411
2417
2466
3441
4430
2441
22 GB 30 GB
5400
en
Technical information
Hull lead-through
Supplies and accessories
Hull lead-through
Exhausttubeø28/45mminox
Exhausttube,stainless28mm
Heat insulation, 30 mm, Fiber glass
Inlet grill ø 75 mm
Intake grill d 75
Warm air duct ø 75 mm
Insulated warm air duct d 75 mm
Sealable deck lead-through
Silencer
Magnetic valve 12V/0,5 A
Tanktting/diesel
Tank feed through, diesel
Warm air 3-way divider
Warm air ventilation ø 75 mm
Bulkhead lead through 75 mm
Duct adapter ø 60/75 mm
Insulated warm air duct d 60 mm
Warm air duct, 60 mm
Bulkhead lead through 60 mm
Warm air ventilation ø 60 mm
Sealable deck lead-through
Warm air ventilation ø 75 mm, white
GSM/GPRS Remote control system
Warm air ventilation ø 60 mm, white
Standard delivery
Installation accessory
Special installation
Accessory
Stern lead-through, 28 / 45 mm
D80021A
- 55 -
22 GB / 30 GB
490529

22 GB / 30 GB / 40 Dt
en
Technical information
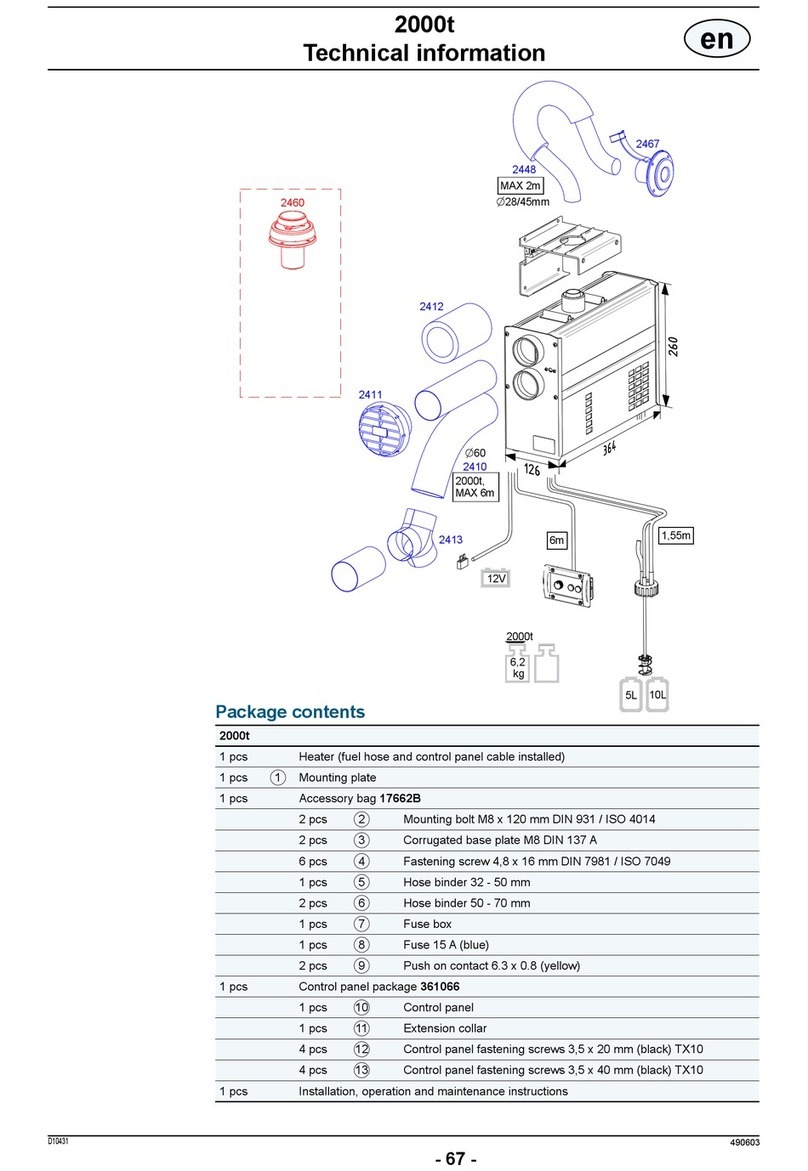
Package contents
MountingboltM8x140mm
Washer M8
Corrugated base plate M8
Hose clamp 20 - 32 mm
Hose clamp 32 - 50 mm
2 pcs
2 pcs
2 pcs
1 pcs
1 pcs
Diesel heater
Fuel hose (4m)
Accessory bag 17724A
Power cable with connector and integrated fuse 15 A (4m)
Mounting plate
1 pcs
1 pcs
1 pcs
1 pcs
1 pcs
Fasteningscrew4,8x16mm
6 pcs
Installation, operation and maintenance instructions1 pcs
Control panel cable, 6 m
Control panel
Controlpanelfasteningscrews3,5x20mm(black)TX10
Control panel package 361062
Hose clamp 8 mm
1 pcs
1 pcs
Fuellter
Hose clamp 10 mm
Fuellterpackage603721
Rubber hose ø 5 mm
Rubber hose ø 6 mm
1 pcs
4 pcs
2 pcs
2 pcs
1 pcs
1 pcs
4 pcs
1 pcs
Hose clamp 60 - 80 mm4 pcs
1 pcs PipeclipD6x12mm
1 pcs Fasteningscrew4,2x13mm
Controlpanelfasteningscrews3,5x40mm(black)TX104 pcs
Extensioncollar1 pcs
D80041A
- 56 -
22 GB / 30 GB
490529

12 V DC
30 GB 40 Dt
22 GB
en
Technical information
Fuel Diesel oil, light furnace oil
0,8 - 1,75 A (during
ignition ca. 5 - 10 min. 8
A)
Appr. 10 kg
Appr. 17 lbs
Operating voltage
Fuel consumption
Heating power
Power consumption
Dimensions (L x H x W)
Weight
Maximum permitted length of
exhaust pipe
Maximum permitted length of
fuel hose
Minimum area of the replacement air
opening
Suitable Exhaust gas lead-throughs
Technical information
2467 and 2460
1,0 - 3,9 A (during ignition
ca. 5 - 10 min. 8 A)
Heating air volume, min *)
Heating air volume, max *)
1066 and 2466
Maximum permitted length of
outlet air duct
Maximum permitted length of
inlet air duct
Warm air connection
Fresh air connection
Solenoid valve
Remote control
Timer
Connections
0,1 - 0,33 l/h
0,026 - 0,078 US gph
0,2 - 0,4 l/h
0,053 - 0,11 US gph
61 m3/h
3 cfm
103 m3/h
cfm
86 m3/h
51 cfm
147 m3/h
86 cfm
424x278x140mm
16 11/16“x1015/16”x51/2”
8 m
26’
100 cm2
16squareinches
8 + 8 m
26’ + 26’
2 + 2 m
6,5’ + 6,5’
2 m (ø 28/45 mm)
6,5’ (ø 28/45 mm)
4 m (ø 28 mm)
13’ (ø 28 mm)
2xø75mm(215/16”)
2xø75mm(215/16”)
1,5 - 4 kW
5,000 - 14,000 btu
1200 - 3200 W
3,500 - 10,500 btu
0,55 - 1,0 A (during
ignition ca. 5 - 10 min. 8
A)
0,1 - 0,25 l/h
0,026 - 0,053 US gph
51 m3/h
3 cfm
79 m3/h
47 cfm
1100 - 2500 W
3,500 - 7,500 btu
Due to physical laws of thermodynamics, Wallas-Marin announces measured values with 10 % tolerance.
*)thevaluesaredenedinWallas-referencemeasurementpointwithmaximumductinglengths.Bothtubes
included four 90° bends.
5 + 5 m
16.5’ + 16.5’
D80011
- 57 -
22 GB / 30 GB
490529

K00120
en
Technical information
Operation description
The 22 GB 30 GB and 40 Dtheatersareforcedairdieselheaterswithoutanex-
posedflame.
The 22 GB and 30 GB models take combustion air from outside the boat through
the outercoaxialexhaustgaspipeandblowtheirexhaustoutthroughtheinner
coaxialpipe.Thecoaxialpipeconnectstoacommonthroughhullfittingthat
allowsbothinletairandexhausttopassseparately.Thisprocessimproves
efficiency,windresistance and lowers the minimum power level. The model 40 Dt
takes combus-tionairfromitsplaceofinstallationandblowstheexhaustgasout
throughasinglepipe.
For all these models, fresh makeup air is taken from desired areas with air intake
ducting, e.g. from outside of the boat or inside the cabin. This enables good air
circulation and cabin air replacement. Diesel engine compartment installations are
supportedbytheseparatemakeupairintakeducts,quarantiningthemakeupair
awayromanysmellsornoxiousengineumes.
The heat generated by forced air fuel combustion, is transferred to the circulation
airbyaheatexchanger.Theheatingpowercanbeadjustedreelybetweenhigh
and low output settings by manual rheostat control or by thermostat. The heated
air is circulated through the cabin through the warm air ducting.
In hot and/or humid conditions, these heating units can be used for simple fresh air
ventilation and circulation.
When starting the device, the glow plug ignites the pumped fuel in the burner bowl.
Theglow/startandshutdownsequencesareactoryprogrammed,so-startsand
stops are automatically controlled.
The fuel pump inside the heater case regulates the fuel feed and the system
electronicscontrolboththeuelandairmixturetomaintaintheidealcleanburning
process. The temperature sensor inside the burner feels the ignition and lights up
the red signal light (1) to indicate a successful start. When stopping the device, an
automatic after cooling process takes place. This process cleans the burner, purg-
ing any unburned fuel.
The heaters are completely made out of corrosion resistant materials.
Heater’s operation principles
D80031
- 58 -
22 GB / 30 GB
490529

en
Installation
Heater installation
Countryspecicregulationsshallbefollowedinanyinstallation.
The warranty of boat products is valid only in boat installations. The warranty is not
valid in installations to vehicles or other spaces.
The device is meant for marine pleasure craft use. The device is not designed for
continuoususeforexampleinliveaboardboatsorcommercialsettings.Insuch
usethedevicewillrequiremorefrequentservicingnotcoveredbywarranty.
Things to note when selecting the installation location
The device shall be installed into a dry space in a protected location. The device
mustbemountedtoasolid,stablebulkheadorwall.Deckoroormountingisnot
possible with these models. When installing, please note that the device needs to
be removable for servicing. Connections and location should be made so that the
device can be easily disconnected for removal. For maintenance, it is useful to
leave 200 mm (7 7/8”) empty space below the heater for the removal of the bottom
cover of the heater.
The heater should be installed vertically level when the boat is on an even keel.
Thestaticinclinationmustnotexceed5°.Whilethedevicewilltoleratebeing
temporarily tilted to a steep angle (even for some hours), the burner will not yield
optimal performance if it is constantly inclined.
Select the place of installation to allow a minimum amount of bending in the warm
air ducting. Avoid installing the heater and control panel in the immediate vicinity of
any potential water intrusion. If possible, install the control panel on a vertical sur-
face. We recommend that the device be installed by an authorized Wallas service
shop or installer.
Things to note when installing pipes, hoses and cables
Power cables, warm-air ducting and fuel hoses must be protected in locations
where they are susceptible to mechanical damage due to sharp edges or heat.
Allcablesandhosesshouldhaveauidprecluding“driploop”topreventwateror
otheruidsfromfollowingwiresorhosestotheheater.
Installation space
The device can be installed within the heated space or outside of it. If located
outside the heated area, heating performance can be improved by installing the an
intake air tube to the heated space (warm return air). If located inside the heated
area, air refreshing performance can be improved by installing the an intake air
tube to the outside air (cold, dry fresh air to be heated).
The heater cannot be installed into a space which may include gasoline
fumes (danger of explosion).
D10081
- 59 -
22 GB / 30 GB
490529

8 mm
12 mm
13 mm
ø 35 / ø 50 mm
ø 76 mm
ø 83 mm
ø 2 mm
ø 5 / ø 6 mm
PZ 2
PH 2
TX10
Always use original Wallas accessories and parts with Wallas
equipment.
In a metal-hulled boat, you must ensure that the device, the exhaust
gas lead-through, the fuel connection, the control panel, and all other
parts are insulated from the boat’s hull. This must be done to
•prevent electrochemical corrosion
•prevent voltage from being transmitted from the hull to the device
or vice versa during electrical faults.
The necessary installation tools
Installation en
D10081
- 60 -
22 GB / 30 GB
490529

K00038
K00101
40 Dt
22 GB
30 GB
1
7
6
354
2
Fastening the device
Fixthemountingplate(1)withscrews(2)toasuitableplaceandcheckthatthe
bottom of the heater is in horizontal position.
Lift the heater into the installation plate and lock the device with the mounting bolts
(3). There has to be a washer (4) and a corrugated base plate (5) under the head
of the screw. Be sure that the edge of the mounting plate will lock to the slot in the
sideprofileoftheheater.
Connecttheexhaustgaspipewithahoseclamp(6)22 GB and 30 GB or (7) 40
Dt.
Installation en
D10081
- 61 -
22 GB / 30 GB
490529

1 2
69 mm (2 23/32’’)
104 mm (4 3/32’’) 3
4
100 mm (3 15/16’’)
65 mm (2 9/16’’)
17,5 mm
(11/16’’)
17,5 mm
(11/16’’)
ø 2 mm (3/32’’)
56,1 mm (2 13/64’’)
4,5 mm (11/64’’)
47 mm (1 27/32’’)
en
Installation
Control panel installation
Cut a suitable installation hole for the control panel in the selected location. Try to
install the panel in a vertical surface in a location that will remain dry.
Measurements of the control panel installation cut-out.
If necessary, predrill holes for the ø 2 mm ( 3/32”) screws.
You can utilize the sample of the box when drawing the lines of the
installation hole.
Connect the control panel cable from
the device to the control panel (1).
Use the fastening screws to install the
control panel to the installation cut-out
(2).
An extension collar (3) is used when control
panel is surface mounted.
The box of the panel includes 4 pcs screws 3,5
x 40mm (black) TX10 (4).
The thermostat sensor is in the panel face, so select the location with
thermostatic operation/regulation in mind. Do not install close to
heat source or close to a window or door. Avoid locations that might
be contacted by direct sunlight. The length of the control panel cable
is 6 m. A 10 meter cable 363058 is available as an accessory.
D10091
- 62 -
22 GB / 30 GB
490529

K00104
K00114
12 V
en
Installation
Connections of the device
Things to note about the connections
In installation, to make the mounting and demounting for service easier, it is recom-
mendedtoleavesomeextralengthofloosecablesandfuellinebycreatingacoil.
If the installation location is cramped, it is recommend to connect the cabels and
the fuel line to the device before mounting the unit to bracket. This will help the
installation of device.
COLD AIR
IN
WARM AIR
OUT
EXHAUST
OUT
COMBUSTION AIR
IN
(22 GB, 30 GB)
Remote control (accessory)
Timer (accessory)
Solenoid valve
(accessory)
Use pliers to hold
the pump inlet elbow
steady, while you
tighten the 12 mm fuel
line nut!
Accessories are connected to
the control panel, the image
shows the place.
Take care of the strain relief.
D10101
- 63 -
22 GB / 30 GB
490529

0 - 4
4 - 6
6 - 10
4 (11 or 10 AWG)
6 (9 or 8 AWG)
10 (7 or 6 AWG)
en
Installation
Electrical connections
Things to note about the connections
The device uses 12 V (nominal) direct current voltage. To minimize current losses,
make the power cable as short as possible and avoid joining. The cross-sectional
area of the cable is dependent on the length of the power cord. The cross-sectional
area of the cable must be consistent all the way from the stove to the battery. The
maximumlengthofthepowercordis10m,basedon6AWGcable.
Total length of the power cord (m) Cross-sectional area of the cable in square mm
(US Gauge)
Ifathickercableisrequired,makeaseparatejointinthepowercord.Seepicture
onthenextpage.
Main switch
A main switch must be installed on the device’s “positive (Red)” cord. Always cut
the power at the main switch (after cooling has completed), if the device is going to
be left unused for a long period of time.
Recommended main switch should be 20 V DC / 20 A DC minimum.
Never use the main switch to cut the power before the cooling phase
is completed.
The cross-sectional area of the cable
D10021B
- 64 -
22 GB / 30 GB
490529

Electrical connections of the device
12 V direct current system
Connect the red wire of the power cord to the plus terminal of the battery and the
black or blue wire to the minus terminal. A 15 A main fuse must be installed near
the battery on the red plus wire of the power cord. See picture.
24 V direct current system
If the device is to receive power from a 24 V system, always connect a charg-
ing voltage reducer and a 12 V battery before connecting the device. Without the
battery the voltage reducer will not be enough on its own as it cannot generate the
largeamountofcurrenttheglowplugrequires.Afterthe12Vbattery,theconnec-
tion is the same as in a 12 V system.
24 V direct current system
Device’s quick
coupling
Jointing
A jointing should only be made in long
power cords, if necessary, in which case
the cord must be replaced with a thicker
one. The jointing should be less than 1
meter from the device.
Main switch Main fuse
Power cord
Checking the connection
The device consumes most power when it is started up (glowing). At this point volt-
age losses are also at their highest. During the glowing phase, the voltage must be
atleast11,5Vmeasuredatthequickcoupling.Seepicture.Ifthevoltageislower
than this, the device may not start.
The unit should be connected to a battery used for purposes other than
starting the engine, if possible.
Installation en
D10021B
- 65 -
22 GB / 30 GB
490529

5 l 2024
10 l
30 l
130 l
2027
4030
4130
200x300x130mm
380x195x210mm
590x200x300mm
800x400x600mm
en
Installation
Fuel connections
Things to note about the connections
Thestandardlengthofthefuelhoseis4m(max8m).Cutthefuelhosetoalength
suitable for installation.
The lift height of the pump should be less than 2 m; preferably 0.5 – 1 m.
ThefuelpipemustalwayshaveaWallaslter.Thefuelltercanbeinstalled
either near the device, near the tank, or in another location where it can be easily
checked and replaced, when necessary.
Dieselenginefuelltersand/orseparatorsarenotapprovedforuse.Allsoftcon-
nections should be made with rubber or silicone hose which is resistant to diesel.
Country-specicrequirements
Thestandardfuelhoseisplastic.Pleaseobservecountry-specicrequirements
withregardtothematerialofthefuelhose/pipeandthefuellter.Theinnerdiam-
eterofanewreplacementhoseshouldbeequaltotheinnerdiameteroftheplastic
hose. Copper pipe 300692andmetallters30016 are available as accessories.
Fuel feed
Iftheliftheightexceeds2m,thefuelfeedmustbecheckedand,ifnecessary,ad-
justed. The fuel feed must also always be checked, if parts of the fuel system, such
as the pump or the electronics card, have been replaced.
Fuelsystemadjustmentsaredevicespecic.Theseadjustmentsshouldonlybe
carried out by an authorized service shop.
Connectiontoaxedtank
Thedevicemusthaveadedicatedconnectionwithafuellteroutsidethetank.
Connection to a separate tank
Caprun-throughsandsinteredltersareusedonplastictanks.
The fuel tank should be mounted securely.
Thefuelconnectionsmustbetightenedrmlysothattheaircannot
leak into the hose. Always check the cleanliness of the connection
surfaces before tightening. Air leaks in the fuel system will cause the
device to malfunction.
(accessory)
(accessory)
(accessory)
(accessory)
Volume length x height x width Order code
Wallas fuel tanks
D10111B
- 66 -
22 GB / 30 GB
490529

Ø 25 mm
(Ø 1”)
en
Installation
Installation instructions for Tank connection 30018
•You will need to make a Ø 25 mm (1”) hole in the upper surface of the fuel
tank. Choose the location of the hole so that when the fuel tank tilts the end of
the intake pipe will stay in the fuel even if the tank is not full. If the end of the
intakepipedoesnotreachthefuel,thedevicewillquicklychokeontheairin
the fuel system.
•Cut the fuel intake pipe (Ø 3.17/0.8 mm) to the appropriate length. The end of
the pipe must not touch the bottom of the tank in order to keep water and sedi-
ment from the system. It is recommended to cut the pipe short enough to leave
the engine intake pipe at a lower level. This way the device cannot empty the
tank.
• Installthepipestraightendrstandanglethetwo“ears”belowthethreaded
barrel inside the hole and then align the threaded barrel vertically so the ears
are hooked on the underside of the tank top. Carefully slip the rubber washer
over the bent pipe end and over the threaded barrel, followed by the metal
washer and the nut. Thread the nut to the threaded barrel and tighten, sealing
thettingtothetopsurfaceofthetank.
Rubber seal press head
Rubber seal
Tightening nut
Intake pipe Ø 6/3 mm
Fuel tank
If the device uses the main tank, note that the device cannot take the
fuel from the same fuel output line as the engine.
D10031A
- 67 -
22 GB / 30 GB
490529

en
Installation
Barrel nut
Support sleeve ø 2 mm Barrel nut
Sinter bronze lter
Olive ø 5 mm
Cap seal
Protection spiral
Washer
Seal
Screw cap
Vent hose
Installation instructions for Tank connection
If the fuel will be taken from a separate tank, you must install a tank connection
367215 (4 m) / 367216 (6 m).
•Tighten the barrel nut tightly to the fuel pump connector. Keep the parts and
the hose clean and ensure that the connection is tight, because an air leak in
the connector will stop the device from functioning.
•Install the tank connection in the tank.
D10041A
- 68 -
22 GB / 30 GB
490529

2 4
4
3
1 3
20°
90°
en
Installation
Tank-externallters
Filters can be installed in a ø 5 or ø 6 mm plastic or 1/8’’ metal pipe. Ensure that the
fuelpipesarecleanbeforeinstallingthelter.Theremustbenodebrisorimpurities
betweenthepumpandthelterastheywillclogthepump.Theltertypemustbe
selectedaccordingtotheoperatingconditionsandcountry-specicrequirements.
Fuellter30015
Theltercanbeinstalleddirectlyinthe30011 tank connection by using a ø 6 mm
rubber hose (1) and 10 mm hose binders (2).
Alternatively,theltercanbeinstalledbetweentwoø5mmfuelhoseswithø5mm
rubber hose (3) and ø 8 mm hose binders (4).
Air bubble
Installthelterinthedirectionofthe
arrow on it.
Fuellter30014
Thislterisintendedforcoldconditions.
Theltercanbeinstalleddirectlyinthe30011 tank connection by using a ø 6 mm
barrel nut and 6 mm olive.
Alternatively,theltercanbeinstalledbetweentwoø5mmfuelhoseswithø5mm
barrel nut, ø 5 mm olive and ø 2 mm support sleeve.
For connecting a 30011
tank connection
For connecting a ø 5 mm
fuel hose
For connecting a ø 5 mm
fuel hose
Fuellter30016
Usedincountrieswhereametallicfueltransfersystemisrequired.A1/8” metal pipe
is used for the installation.
Filter’s brass frame
Sinter bronze lter
Olive connection 1/8”
Seal
D10051B
- 69 -
22 GB / 30 GB
490529

6
1
4
16
en
Installation
Installation instructions for Solenoid valve 30012 (accessory)
The solenoid valve 30012 prevents the tank from emptying in case the fuel line
breaks.
Thefuelltershouldbeinstalledbeforethesolenoidvalve.
Solenoid valve
Solenoid valve connection to the circuit board
Picture 1
Picture 2
Picture 3
Our recommendations in the fol-
lowing
installation scenarios:
1. Fuel level is below the heater/stove.
Picture 1.
•Recommended installation scenario
• Nospecialaccessoriesrequired
2. Fuel level may temporarily rise above
the heater/stove (e.g. in the fuel tank
llerpipeorwhentheboattilts).
Picture 2.
• Nospecialaccessoriesrequired
3. Fuel level is above the heater/stove.
Picture 3.
•Non-recommended installation sce-
nario
•Solenoid valve 30012 must be in-
stalled in the fuel hose near the tank.
If the fuel level in the tank is above the device, a solenoid valve
30012 must be installed in the fuel line immediately after the tank
lead-through.
D10061A
- 70 -
22 GB / 30 GB
490529

en
Installation
Selecting the fuel
When selecting the fuel type, take note of the temperature limits of each particular
fuel.Thelimitvaluesprovidedherearetobetreatedasguidelines.Conrmthe
actual temperature limits from the fuel supplier.
•light furnace oil (diesel heating oil) / diesel, summer grade, temperature must
not fall below –5 °C.
•light furnace oil (diesel heating oil) / diesel, winter grade, temperature must not
fall below –24 °C.
•light furnace oil (diesel heating oil) / diesel, arctic winter grade, temperature
must not fall below –40 °C.
Conrmtheactualtemperaturelimitsforthefuelyouareusingfrom
the fuel supplier.
Thelightfurnaceoil/dieselqualitiesanddenitionsvarybycoun-
try. Always check the right fuel from your importer / dealer
D10071A
- 71 -
22 GB / 30 GB
490529
Ifthetemperaturedropslowerthantheminimumlevel,paraffinmayforminthe
fuel.Thismayresultinthefuelfilterandpumpbeingclogged.Theclogwill
dissolveonly if the fuel temperature rises clearly over 0 °C.
The less aromatic substances the fuel contains, the less deposits will be formed.
Normal furnace oils contain 35–40 % of aromatic substances. In city diesels and
green furnace oils (green diesel heating oil) the concentration is 20 %.
22 GB and 30 GB are designed to work also with future renewable (HVO 15940)
and blended (B10 EN 16734, B20/B30 EN 16709) bio road diesels. This means
the 22 GB and 30 GB are ready for fuels being developed for the future.

K00047
FUEL
200 mm
400 mm
500 mm
min 300 mm
(12”)
en
Installation
Goose neck
Safety distances
Exhaust gas connections
Exhaust gas lead-throughs
Exhaustgaslead-throughs2467 and the closable model 2460 are suitable for de-
vice 22 GB and 30 GB.Theø28/45mmlead-throughsfittheexhaustgaspipe
2448.
Exhaustgaslead-throughs1066 and the closable model 2466 is suitable for
device 40 Dt.Theø28mmlead-throughsfittheexhaustgaspipe1028.
Allexhaustgaslead-throughsarestainlesssteel.
General instructions for exhaust gas connections
LOCATION
Airmustalwaysflowfreelypastthelead-through.Installthelead-throughonaflat
surface. Avoid corners or recessions where wind pressure can disturb the function-
ing of the device.
Theminimumdistanceofthelead-throughfromthefueltank’sfillerholeis400mm
(16”).
The minimum distance of the side lead-through from the surface of the water is
500 mm (20”). Especially in sail boats it should be noted that the lead-through must
never be submerged.
It is recommended to place the lead-through in the side as far back as possible or
directly in the transom.
INSTALLATION
When preparing the installation cut-out for the lead-through, it is a good idea to use
the lead-through as a model for the cut-out; especially if the lead-through is circu-
lar. If necessary, seal the installation cut-out with silicone in addition to the lead-
through seal. Note! Do not use silicone on a wooden boat.
Thesidelead-throughmustalwaysbeequippedwithaso-calledgoosenecksec-
tion.
The goose neck will effectively prevent splash water from getting to the device.
The highest point of the goose neck must always be above the surface of the wa-
ter.
Thedevicewillgoout,iftheexhaustgasleadthroughissubmerged.
OTHER THINGS TO NOTE
Exhaustgasishot.Alwaysensurethatthereisnothingthatissusceptibletoheat
damagewithin200mm(8”)oftheeffectiveareaoftheexhaustgases(e.g.ropes,
fenders or the side of another boat).
All lead-throughs raise the temperature of their surroundings. A wooden deck, in
particular, may dry due to the heat. Remember that the surface of the lead-through
is hot during use.
Aexhaustgastubewithalengthofmorethan2meters(7’)hastobeequipped
with a drainage lock 602293 (condense water) located to the lowest point of the
tube.
TheExhaustgaspipemustbemadeofstainlesssteel.
Ifnecessary,sealtheconnectionsbetweentheexhaustgaspipeandthelead-
through with heat-resistant silicone.
When installing the lead-through to the stern side or to otherwise leaning position,
besurethatthewaterdonotstucktheexhaust.Drillapp.2mm(3/32”) hole to the
lead-throughortotheexhaustpipe.
Installation to the stern side
D10121
- 72 -
22 GB / 30 GB
490529

127
en
Installation
Insulation kits
Insulation kit for a metal-hulled boat
An insulation kit must be used to insulate the lead-through from the boat’s metal
hull.
Theinsulationkitinsulatestheexhaustgaslead-throughandthedevicefromeach
other.
In fault situations the electric circuit runs between the metal hull and the device.
Thiscanresultintheoxidationormalfunctioningofthedevice’scircuitboard,the
circuit board may be damaged.
Insulation kit 2461 for circular coaxial lead-throughs (2467 and
2460)
M5 nut
M5 star washer
Washer 15/5 x 1.2
Rubber washer 20/10 x 3
Rubber hose 8/4, 5 x 35
Cut the length according to the
thickness of the hull or deck.
Insulation cap 87/61 x 4
Two insulators outside
the hull
M5 x 25 screw
Insulation kit 602308 for a side lead-through (1066)
The exhaust pipe will be cut and the
insulation kit will be xed with hose
clamp to the ends of the tube.
D10131
- 73 -
22 GB / 30 GB
490529

K00040
2448
(1028+2045)
2467
min 150 mm
(5 29/32”)
ø 74 mm
(2 29/32”)
max25mm
(31/32”)
125 mm
(4 29/32”)
30 - 50 mm
(1 3/16” - 1 31/32”)
1028
2045
2467
en
Installation
Specicinstructionsforindividuallead-throughs
Side lead-through 2467
A side lead-through is installed in the side of the boat or in the transom. In sail
boatsitisrecommendedtoinstallitinthetransom.Theinstallationalwaysrequires
a so-called goose neck piece.
Make the necessary installation cut-outs and spread a suitable sealing agent on
both sides of the seal and on the screw holes. This will ensure that the connection
is waterproof.
Side lead-through 2467 installed.
The installation cut-out is ø 50 mm
(1 31/32”) and the screw holes are 4
x ø 6 mm.
Length difference of the pipes
The 1028 exhaust gas pipe must be 30–50 mm (1 3/16” - 1 31/32”) longer
than the 2045 inlet pipe. This way the exhaust gas pipe will stay in
placeinthelead-throughmorermly.Themeasurementdependson
the overall length of the piping.
2467 Side lead-through
FasteningscrewM5x40mm
Nut M5
Gasket
4 pcs
4 pcs
1 pcs
Side lead-through
Accessory bag 17679
1 pcs
1 pcs
Washer5,3x10mm4 pcs
Hose clamp 32 - 50 mm1 pcs
Package contents
D10141
- 74 -
22 GB / 30 GB
490529
This manual suits for next models
4
Table of contents
Other wallas Heater manuals