thermastor Humiport 10 User manual

1
www.UsePhoenix.com • [email protected]Toll-Free 1-800-533-7533
Owner’s Manual — Humiport 10/20
Installation, Operation & Service Instructions
Read and Save These Instructions
Specifications subject to change without notice.
TS-382
12/10
The Phoenix Humiport line of ThermoHygrometers offers
the restoration professional the optimum balance between
cost, accuracy and response time.
The Phoenix Humiport 10 and 20 feature 2 point
calibration and offer 2% accuracy for relative humidity and
have the largest display in the industry. They also include
a backlit display option and auto-off feature. The Phoenix
Humiport 20 has a detachable probe with a coiled cord
that extends over four feet to eliminate problems reaching
difficult areas or reading the meter display when the probe
is recording areas over your head or near the floor.
Each Humiport Meter offers a large display for easy
reading, and all of the important restoration information
including, temperature (either F or C), relative humidity (%),
dew point (F or C) and the popular “grains per lb” mixing
ratio. There is even an “altitude” input that makes sure
the grains calculation is extremely accurate. A listing of
altitudes by state and (some) cities is available at www.
usephoenix.com, so you can set the meter to your specific
area.
The Phoenix Humiport meters record conditions, calculate
data and can display: MIN (minimum), MAX (maximum),
AVG (average) and HOLD. The Phoenix Humiport 05 offers
3% accuracy for relative humidity between 5% – 95% and a
temperature range of -4 to 122 degrees Fahrenheit.
The Phoenix Humiport 10/20
• Fastresponse
• Accurate+/-2%RH
• Grains/lbdisplay
• Dewpoint
• Largedisplay
• Min/Max/Avg.andHoldfunctions
• Altitudeinputforgppcalculation
4201LienRd•Madison,WI53704
Humiport 10
Displaying
temperature and
mixing ratio in grains
per pound.
Humiport 20

2
www.UsePhoenix.com • [email protected]Toll-Free 1-800-533-7533
1 Appropriate Use
The measuring device must only be operated within the
products specifications.
The measuring device must only be used under the
conditions and for the purposes for which it was designed.
Modification to this device will void the warranty and
may compromise the accuracy and safe operation of this
device.
Before Initial Operation:
• Openthebatterycaseonthebackoftheinstrument.
• Pullouttheinsulatingtapefromthetopofoneofthe
batteries.
• TheHumiportisreadytouse.
2 Humiport 10/20
The hand-held devices for measuring temperature and
humidity have the following features:
• Largedisplaywithbacklighting
• Three-waythumbwheeloperation
• Ruggedandeasytohandleenclosure
• Highaccuracy
The Humiport 10 is equipped with a fixed probe whereas
the Humiport 20 consists of a flexible probe connected to
the main body through a cable.
3 The Humiport 10/20 Display
Table of Contents
Introduction ................................................................1
1. Appropriate Use ....................................................2
2. Display .................................................................2
3. Operation .............................................................2
3.1ThreePositionsoftheThumbWheel.................2
4. Upper Menu..........................................................3
5. Lower Menu ..........................................................3
5.1 Single-Point Calibrations of ..............................3
TemperatureandRH
6. MeasuringtheHumidityRatio.................................3
7. ReplacingtheBattery ............................................3
8. Maintenance and Adjustment .................................3
9. Specifications .......................................................4
10.Warranty/SensorRepair.........................................5
Serial No. ___________________________
PurchaseDate______/______/_____
Dealer’s Name ___________________________________
Read the operation and maintenance instructions carefully
before using this the Humiport 10/20.
Do not measure near live electrical components.
Avoid using in temperature conditions outside of that
recommended (overheating can lead to their destruction)
Calibration should only be adjusted when used with a
recommended calibration source or known standard.
Allow approximately 2 minutes for stabilization when taking
measurements in dramatically different environments.
IMPORTANT WARRANTY INFORMATION BELOW:
The plastic protection cap must be placed on the sensing
head whenever the meter is not in use. Without this
protection the sensing elements can be mechanically
damaged or chemically contaminated. Meter failures due
to damage or contamination of the sensing elements are
not covered under warranty.
Upper menu with
date and clock
Lower menu for configuration
and adjustment
Hold MAX MIN AVG
Sensor 1
88:88
-1.8.8.8.8
Temperature reading
Temperature Display
Units (°C, °F)
Humidity reading
Display value g/m3,%rH,
dp°F, °C,g/Kg.gr/lb (gpp)
%rH °F °C
Sensor 1
-1.8.8.8.8
g/m3%rHdp°F °C
Unit1 Unit2 TimeDate
Auto Off CAL 12LH
g/kg g/lb Alt(ft)

3
www.UsePhoenix.com • [email protected]Toll-Free 1-800-533-7533
4 Operation
The Humiport can be adjusted using the three-way “Thumb
Wheel”onthelefthandsideofthedevice.
Up and down movement of the wheel is used to navigate
through different menu items on the screen. Items that
flash intermittently on the screen are items that can be
adjusted. Pressing the wheel inward will act as a “click” or
selection of the highlighted item.
Whentheunitisrstturnedon,movingthewheelupor
down will select the upper or lower menus on the screen.
3.1 Three Positions of the Thumb Wheel
Press or “click” in the middle position
s Turn up
t Turn down
Quickly press to switch unit on.
Press and hold for 2 seconds at
start-up to switch on and activate
the display backlight. (Can only be
activated from an off condition.)
Press and Hold again for 2
seconds to turn off.
sActivate the upper menu with HOLD
MAX MIN AVG.
Select with s,activate selection
with , or interrupt with tor by not
pressing the wheel for 20 seconds.
sActivate the lower menu for
configuration and adjustment.
Select with t, activate selection
with , or interrupt with tor by not
pressing the wheel for 20 seconds.
5 Upper Menu
The following functions can be selected in the upper menu:
HOLD MAX MIN AVG
Once the upper menu
is activated s, select
the function with sand
t; confirm by . The
selected function remains
displayed once it is
entered while the other
functions are not visible.
Once a selection has
been made, press to
exit the menu.
The flashing upper menu
can be interrupted with
or by not pressing the
thumb wheel 20 seconds.
HOLD: The current value
on the display will remain.
MAX: Displays the maximum value since the unit was
turned on.
MIN: Displays the minimum value since the unit was
turned on.
AVG: The arithmetical average value is displayed since the
unit was turned on.
6 Lower Menu
The following functions can be selected in the upper menu:
Unit1 - Unit2 - TimeDate - AutoOff - CAL 1 2 LH
Select with t. The
selected function flashes
and is confirmed by means
of . The menu can be
cancelled by sor by not
pressing the wheel for 20
seconds.
Hold MAX MIN AVG
Sensor 1
88:88
-1.8.8.8.8
%rH °F °C
Sensor 1
-1.8.8.8.8
g/m3%rHdp°F °C
Unit1 Unit2 TimeDate
Auto Off CAL 12LH
g/kg g/lb Alt(ft)
Hold MAX MIN AVG
Sensor 1
88:88
-1.8.8.8.8
%rH °F °C
Sensor 1
-1.8.8.8.8
g/m3%rHdp°F °C
Unit1 Unit2 TimeDate
Auto Off CAL 12LH
g/kg g/lb Alt(ft)
4
www.UsePhoenix.com • [email protected]Toll-Free 1-800-533-7533
12:00
30:12
00:59
20:0
°C
0:0
°C
CAL 1
CAL2: This selection gives the user the possibility to adjust
an offset for sensor 2 (rel. humidity). This is a single
point calibration. The offset will be adjusted based on a
lowercalibrationanchorpointof11%RH.Singlepoint
calibrations should be performed in the range of 30% to
95%RH.
Note: The value on the lower display should be set to % RH
before using CAL2.
TheoffsetvalueappearsontheupperdisplayandtheRH
value appears on the lower display when in CAL2 mode.
Theoffsetcanbeadjustedupto±10%RH.Calibrations
cannot be performed using other humidity values (e.g.
DP - dew point). Once activated, adjust with sand tand
confirm by .
Important: Humidity calibrations should only be performed
by knowledgeable individuals using the proper calibration
equipment.
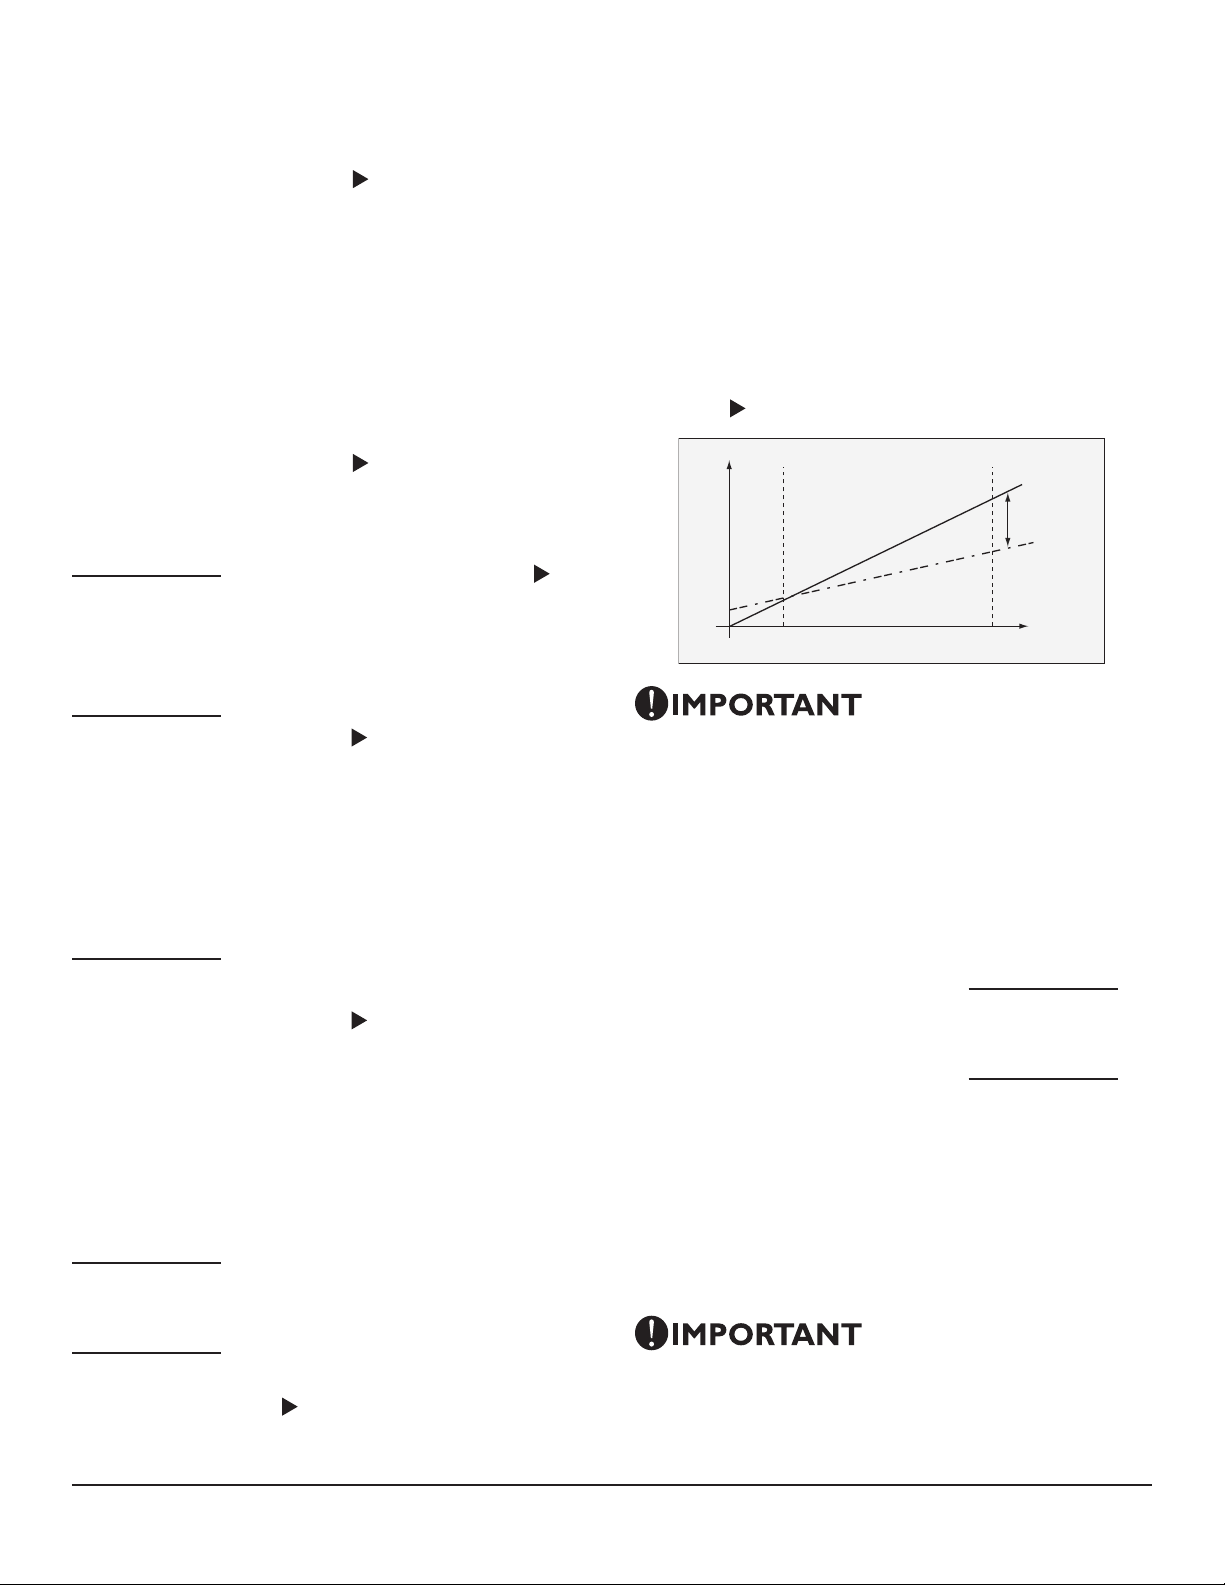
Two-Point Calibration for Relative Humidity
A two-point calibration involves
adjusting the sensor at a lower
and upper concentration of relative
humidity.
Note: The lower display should be
set to %R before attempting a two-
point calibration.
CAL2L, CAL2H: The lower
adjustment value can be calibrated
in menu CAL2L whereas the upper
adjustment value can be calibrated in menu CAL2H. The
lowervalueshouldlaybetween10%to40%RH(preferably
33%RH.)Andthehighervalueshouldlaybetween60to
90%RH(preferably76%RH).
The calibration of each point can be adjusted a maximum
of±10%RHinincrementsof0.1%RH.
Important: A two-point calibration should only be performed
by a reputable calibration laboratory.
The original factory calibration can be reset by adjusting
the offset for CA2L and CAL2H to 0.0% RH.
00:0
%rH
80:0
%rH
SENSOR 1
20.0
°F°C
SENSOR 2
80.0
°F°C
Displayed Value
Measured Value
Factory Calibration
Offset
New Calibration
Line
11%
Unit1: This selects display value of
temperature on the upper numeric
display. You have a choice of °C and
°F. You can select with sand t;
confirm by .
Unit2: This selects the humidity
value displayed on the lower numeric
display. Click the wheel down to scroll
through the display options that
includeb/m3, %r.h. dp°C, dp°F as well
asg/Kgandgr/lb(gbb)identied
the downward pointing arrow at the
bottom of the screen.
You can select with sand t;
confirm by .
Time: Set time. Once activated, hours
and minutes are set in sequence by
using sand tand confirm by .
Date: Set date. Once activated,
the ay, month, and year are set in
sequence by using sand tand
confirm by .
AutoOff: The AutoOff function enables
the user to define and set a period of
time (in minutes) for the instrument
to automatically switch off. “OFF” will
appear if the timer is set to less than
1 minute. This means that the unit
can only be turned off manually. Once
activated, adjust with sand tand
confirm by .
One point calibration of temperature
and humidity.
CAL1: This selection gives the user
the possibility to adjust an offset
for sensor 1 (temperature). This is
a single point calibration. The offset
value appears on the lower display
and the temperature value appears
on the upper display when in CAL 1
mode. The offset can be adjusted
up to ±10°C or ±°F. Once activated,
adjust with sand tand confirm
by .
Factory calibration can be restored by
adjusting the offset to 0.0.

5
www.UsePhoenix.com • [email protected]Toll-Free 1-800-533-7533
7 Measuring the Humidity Ratio
The Humiport can calculate and
display humidity or mixing ratio
ing/Kgorgr/lb(gpp).Inorder
to properly calculate this value
the air pressure or altitude must
be known. To display the correct
humidity ratio value, the local
altitude must be set to within
±200 ft. of the local altitude.
To adjust altitude, first make sure
the display on the lower display
(sensor2)issettogr/lb(gpp).
Now scroll through the lower menu
items and select the lower right
arrow on the screen above the Alt. (ft) label on the case.
Move the wheel up and down to adjust the altitude. You
can adjust the altitude with sand tand confirm by .
For altitude in your area you can do a web search using
your city name and the work “elevation” or use the City
AltitudeGuideavailablefromPhoenixRestoration.
8 Changing The Battery
Ifthesymbol“BAT”appearsonthedisplay,thebatteries
have to be changed within a few hours. Open the battery
caseonthebackoftheinstrument.Removetheempty
batteries and insert new ones. Ensure batteries are
inserted to provide the correct polarity.
Important: The Humiport can be damaged if the batteries
are inserted incorrectly and reverse polarity results.
Use only EC LR6 AA batteries. Do not uses rechargeable
batteries. Use only high quality batteries.
Hold MAX MIN AVG
Sensor 1
88:88
-1.8.8.8.8
%rH °F °C
Sensor 1
-1.8.8.8.8
g/m3%rHdp°F °C
Unit1 Unit2 TimeDate
Auto Off CAL 12LH
g/kg g/lb Alt(ft)
9 Maintenance And
Adjustments
Clean the device with a damp cloth as necessary. Do not
use any cleaning fluids, use just plain water to dampen the
cloth. Do not touch the sensor. Ensure the unit is off while
cleaning.
Whenusedforindoorenvironmentalmeasurement,we
recommendannualcalibration.Recalibrationshouldbe
carried out more frequently in a harsh environment.
Recalibrationshouldonlybeperformedbyacalibration
laboratory, or by using a standard calibration method
suchasuseofsaturatedsaltsolutions.Regardlessof
the method, calibrations should occur at a minimum of
two%RHconcentrations.Humiditysensorcanalsobe
calibrated to another recently calibrated humidity sensor.
PhoenixRestoration(Therma-StorLLC)offerscalibration
services for all types and makes of hand held temperature
and humidity monitors. For more information on the
PhoenixCalibrationservicecall1-800-533-7553.
10 Specications
Measurement Range:
RH 0to95%RH
Temp -4 to 122°F (-20 to 50°C)
Calculated Values:
Dew Point °F, °C
HumidityRatio grams/Kgdryair,
grains/lbdryair(gpp)
Accuracy:
RH ±2%RH
Temp ±0.5°F at 32 to 103°F
otherwise ±0.9°F
(±0.3°C at 0 to 40°C
otherwise ±0.5°C)
Resolution:
RH 0.1%
Temp 0.1°F, (o0.1°C)
Response Time:
RH T90<6.0seconds
General:
SupplyVoltage 4-1.5VBattery
BatteryLife 500hours(typical)
WorkingTempRange 32to122°F(0to50°C)
StorageTempRange -4to140°F(-20to60°C)
CECompatiblility EN61000-6-2,EN50147-3
Weight: 0.5 lbs. (200 g)

6
www.UsePhoenix.com • [email protected]Toll-Free 1-800-533-7533
11 Warranty And Repair
The Humiport is warranted against defects in material
of workmanship for a period of one year. The warranty
does not cover calibration drift, use beyond the stated
specifications or mishandling resulting in damage to the
unit.
If you believe your Humiport has a defect in workman-
ship,contactPhoenixRestorationtoarrangefora
replacement unit.
If you have damaged your Humiport and you feel it may
need repair or replacement you can also contact Phoenix
Restorationtolearnabouttheirproductrepairservices.Do
not send units requiring repair or replacement to Phoenix
withoutrstobtaininganRMAnumber.Packagesreceived
withoutaRMAnumberwillbereturnedtothesender
unopened.
ContactPhoenixRestorationat1-800-533-7553.

7
www.UsePhoenix.com • [email protected]Toll-Free 1-800-533-7533
Warrantor:
Therma-Stor LLC
4201LienRd
Madison,WI53704
Telephone:1-800-533-7533
PhoenixRestoration(Phoenix)warrantsthisunittobefreeofdefectsinmaterialsand
workmanshipforaperiodof12monthsfromdateofpurchase.ThisWARRANTYisVOIDifthe
unit shows evidence of having been tampered with or shows evidence of being damaged as a
result of excessive corrosion; or current, heat, moisture or vibration; improper specification;
misapplication; misuse or other operating conditions outside of Phoenix’s control. Components
which wear are not warranted, including but not limited to switches, displays, batteries and
calibration. Phoenix’s warranty does not apply to defects resulting from any action of the
purchaser, including but not limited to mishandling, improper interfacing, operation outside of
design limits, improper repair, or unauthorized modification.
If the unit should malfunction, it must be returned to the factory for evaluation. Phoenix Customer
ServiceDepartmentwillissueanAuthorizedReturn(AR)numberimmediatelyuponphoneor
written request. Upon examination by Phoenix, if the unit is found to be defective according to the
warranty it will be repaired or replaced at no charge. If the product is found not to be covered by
the warranty, the customer will be offered the opportunity to purchase a replacement, refurbished
unit.
Phoenix is pleased to offer suggestions on the use of its various products. However, Phoenix
neither assumes responsibility for any omissions or errors nor assumes liability for any damages
that result from the use of its products in accordance with information provided by Phoenix, either
verbal or written. Phoenix warrants only that the parts manufactured by it will be as specified and
freeofdefects.PHOENIXMAKESNOOTHERWARRANTIESORREPRESENTATIONSOFANYKIND
WHATSOEVER,EXPRESSEDORIMPLIED,EXCEPTTHATOFTITLE,ANDALLIMPLIEDWARRANTIES
INCLUDINGANYWARRANTYOFMERCHANTABILITYANDFITNESSFORAPARTICULARPURPOSE
AREHEREBYDISCLAIMED.
Limitation of Liability: The remedies of purchaser set forth herein are exclusive and the total
liability of Phoenix with respect to this order, whether based on contract, warranty, negligence,
indemnification, strict liability or otherwise, shall not exceed the purchase price of the component
upon which liability is based. In no event shall Phoenix be liable for consequential, incidental or
special damages.
Phoenix Humiport 05/10/20 Limited Warranty
This manual suits for next models
1
Table of contents
Other thermastor Measuring Instrument manuals


Popular Measuring Instrument manuals by other brands


Avisoft
Avisoft UltraSoundGate 416-200 user guide

Mobeye
Mobeye ThermoGuard TwinLog CML2255 user manual

Agilent Technologies
Agilent Technologies 35670A quick start guide

Precision Digital Corporation
Precision Digital Corporation ProtEX FarVu PD6870 instruction manual

SBS
SBS 3500 instruction manual

Indu-Sol
Indu-Sol Proftest II user manual