ThermoLife 6A Series User manual
Easy touch Easy warm
Thermostat Instruction
INSTALL
02
01
03
04
01 Introduction....................................................................................................
03 Installation......................................................................................................
04 Wiring Instruction..........................................................................................
05 Thermostat Symbols......................................................................................
06 Startup Wizard....................................
07 WiFi Connection.................................
09 Troubleshooting..................................
10 Dimension...........................................
08 Function and Operation.....................
02 Technical Specifications...............................................................................
Table of
Contents.
8.1 Temporary Override Temperature.....
8.2 Mode....................................................
8.3 Key-Lock.............................................
8.4.1 Clock.......................................................
01
01
05
05
01
02
03
04
07
13
14
07
07
09
08
8.4.2 Event Setting..........................................
8.4.3 Readout...................................................
8.4.4 Advanced Setting...................................
8.5 Open Window...................................
8.4 Menu....................................................
09
10
12
07
10
APP
for ET-6AW
TECHNICAL SPECIFICATIONS
INTRODUCTION
Supply voltage: 85-265Vac 50/60Hz
Standby power: <1W/2W(WiFi version)
Max load: 15A(electric heang)/3A(water heang)
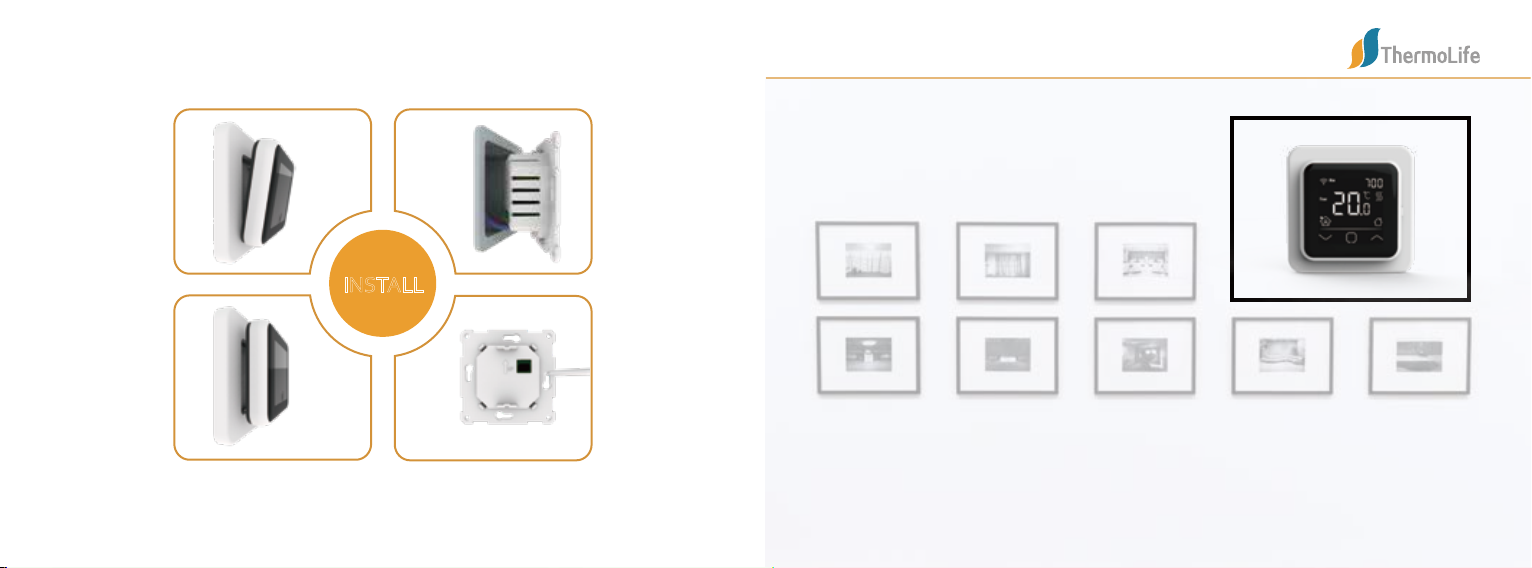
INSTALLATION
The 6A series is a smart thermostat used to control electric floor heang system or water
heang system. It will keep home at comfortable temp whilst minimizing energy use. Install the
app on your smart phone to control heang system remotely with the WiFi thermostat.
01 02
IP class: IP20
Cable specificaon: ≤2.5mm²
Connect the wire as
shown in the wiring
instrucon.
Fix the back secon
to switch box with
screws provided.
Re-install front panel
whilst ensuring the
pins engage properly
in the circuit board
socket.
Put your fingers into
the gap between the
front panel and frame
then pull to separate
them.
》》 》
Step 1: Step 2: Step 3: Step 4:
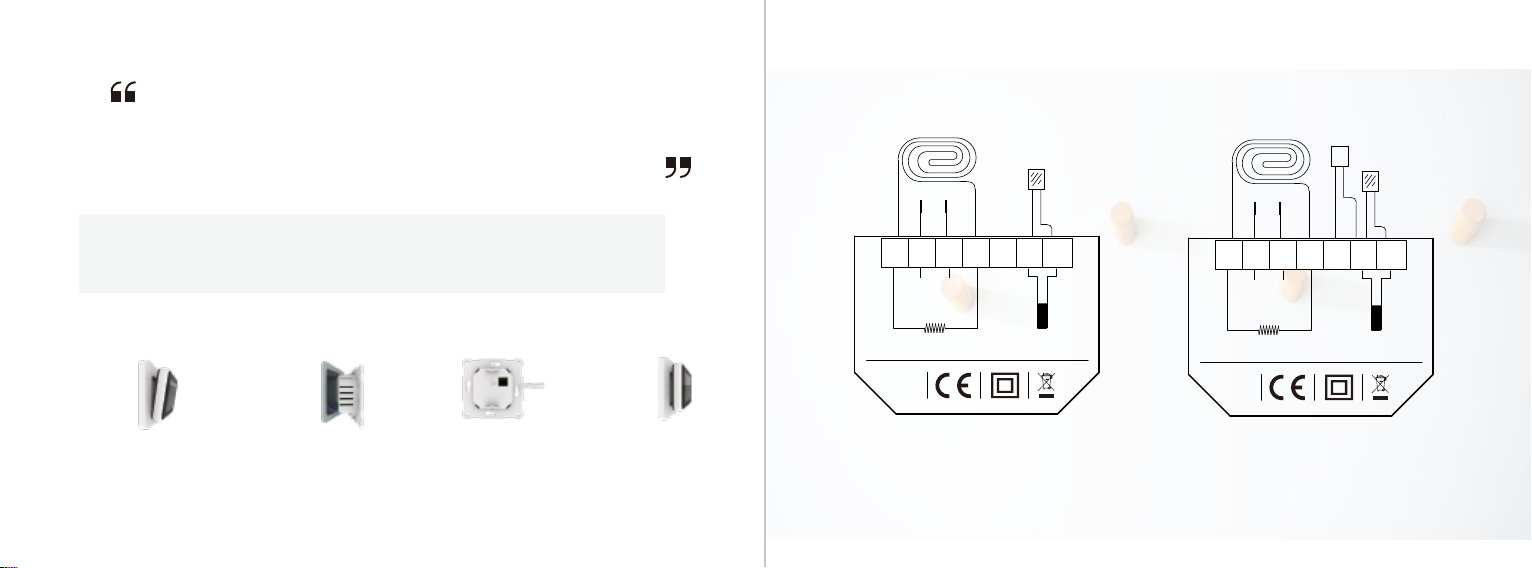
WIRING INSTRUCTION
MAX LOAD: 15A
SENSOR
L1N1 N L
SENSOR
POWER
85V-265V
50/60Hz
IP 21
N1 N L L1 S2 COM S1
POWER
FLOOR SENEOR
MAX LOAD: 15A
SENSOR
L1N1 N L
SENSOR
POWER
85V-265V
50/60Hz
IP 21
N1 NLL1 S2 COM S1
POWER
FLOOR SENEOR
ROOM SENEOR
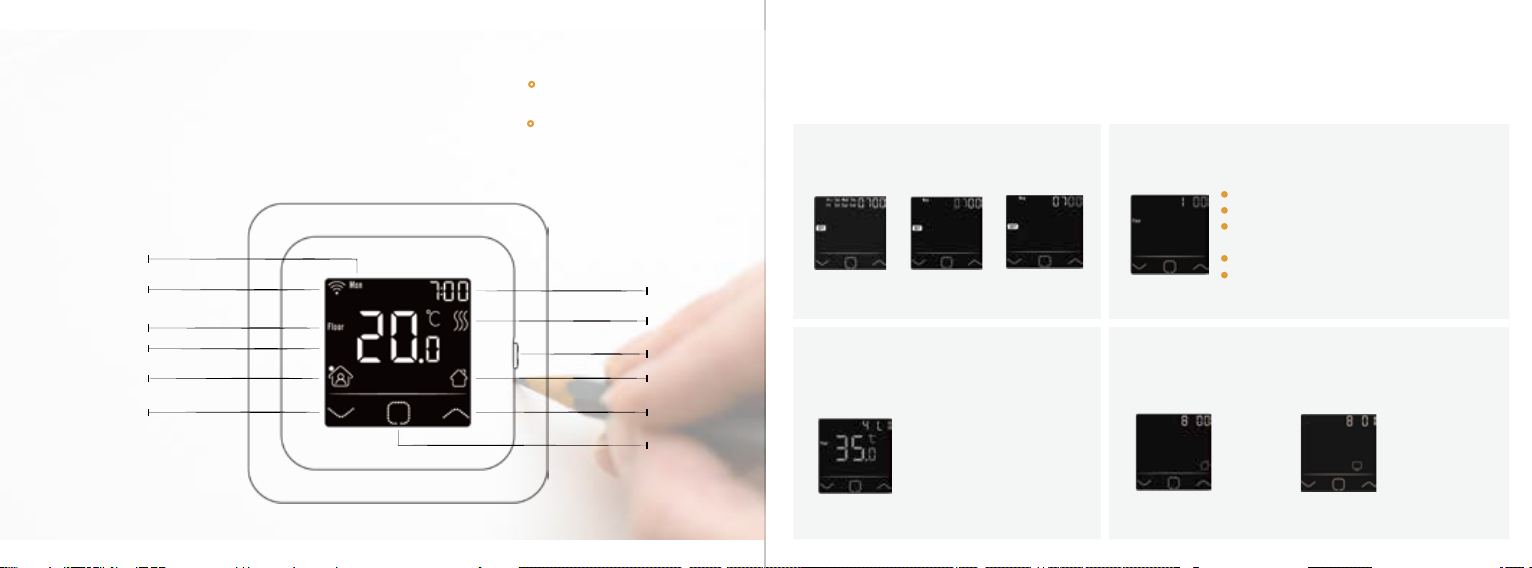
THERMOSTAT SYMBOLS
When the thermostat has been installed
and turned on electricity,
switch down the side switch to turn it on,
switch up the switch to turn it off. Press the up-key and
down-key to select
parameter.
Press the confirm-key
to confirm the selecon
STARTUP WIZARD
When the thermostat turns on for the first me, it will run startup wizard. The wizard leads you
through a basic setup roune to ensure that you have the right sengs.
Clock
Day set Hour set Minute set
Sensor selecon
Floor sensor: run by floor sensor(default).
Room-in sensor: run by built-in room sensor.
Both-in sensors: run by built-in sensor with
floor temp limit.
Room-out sensor: run by external room sensor.
Both-out sensors: run by external room sensor
with floor temp limit.
Floor temp limit
(If you choose Both sensors)
If you choose both sensors,
floor temp limit must be set
to protect floor.
Home or office
Home Office
There are 5 opons:
03 04
On/Off switch
Home
Up key
Confirm key
Heating symbol
Clock
Day
WiFi symbol
Floor temp
Actual temp
Event
Down key
1 2
34
> >
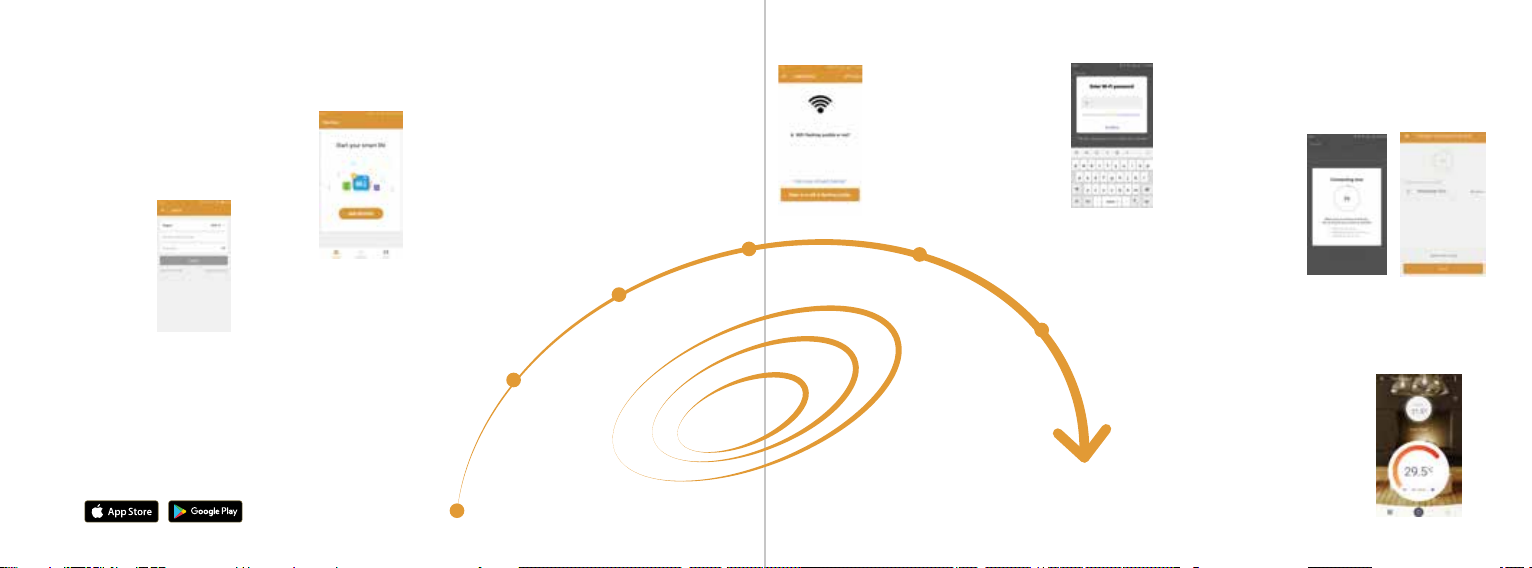
WIFI CONNECTIONION
Step 3: click “Add Device”on the boom of the screen.
Step 5: Fill in the phone with the WiFi network password,
click “confirm”.
Step 7: You can check the real-me temperature, adjust or set the temperature,
switch on/off or do other operaons on the main interface.
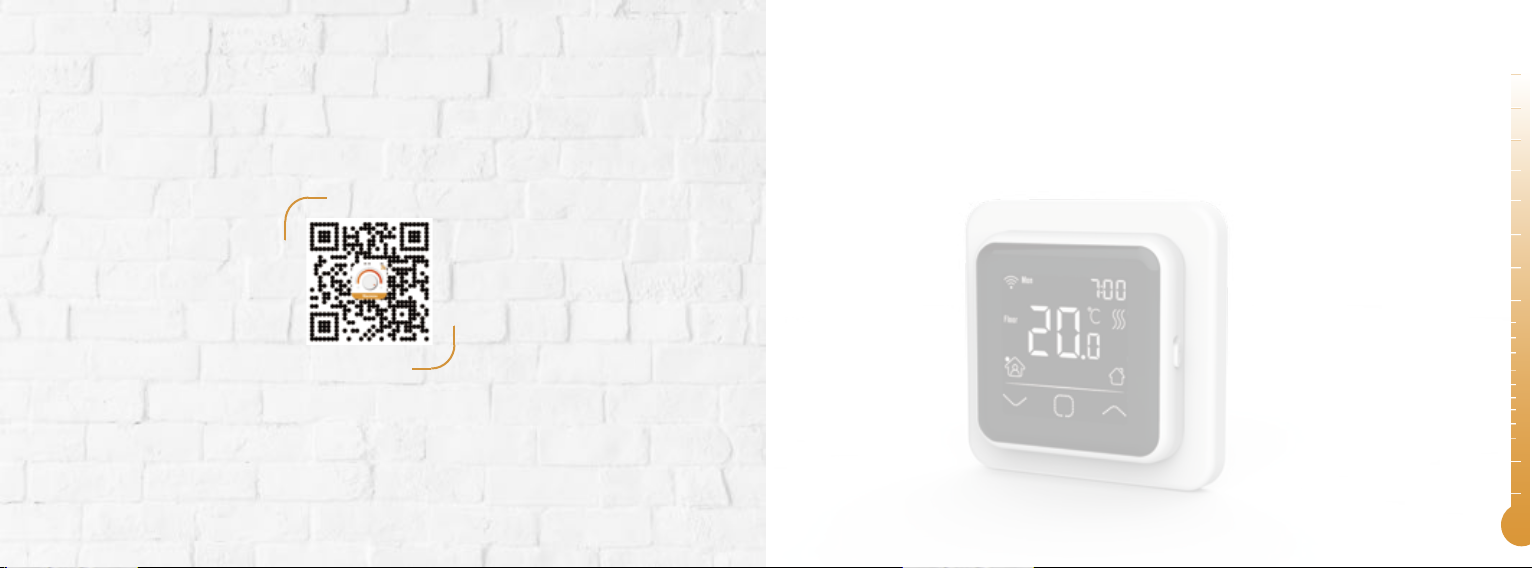
Step 1: Scan the QR code through a browser or download
the APP from the major applicaon markets to install it.
Step 2: Click the APP, log in through the registered
phone number or email address.
Step 4: Check the thermostat WiFi flag is
fast flashing. if not,operate the thermostat
according to the APP ps unl it flashes
quickly. Click the “Make sure WiFi is
flashing quickly” buon .
Step 6: Click “Done” aer the APP is connected to the
thermostat successfully, then finished the distribuon.
05 06
FUNCTION AND OPERATION
8.1Temporary Override Temperature
On the actual temp page, Press the up-key and
down-key to set temporary override temp. The
temp is only valid at the current event and it will
not be saved.
8.2 Mode
On the actual temp page, Press the confirm-key to enter mode selecon.
There are 3 modes:
Auto mode: It is the fault mode. Thermostat will run with event
parameters to save energy. These parameters can be set in Event
Seng. It will show home if you choose it otherwise office.
Manual mode: Thermostat will run with the set temp for ever.
An-frozen mode: Thermostat will run with the low seng temp
for ever. The maximum is 15°C.
Lock the keys to prevent the sengs from being changed. On the actual temp page,
press and hold the confirm-key and up-key for 3 seconds at the same me to lock or
unlock all of the keys.
8.3 Key-Lock
Set day and time
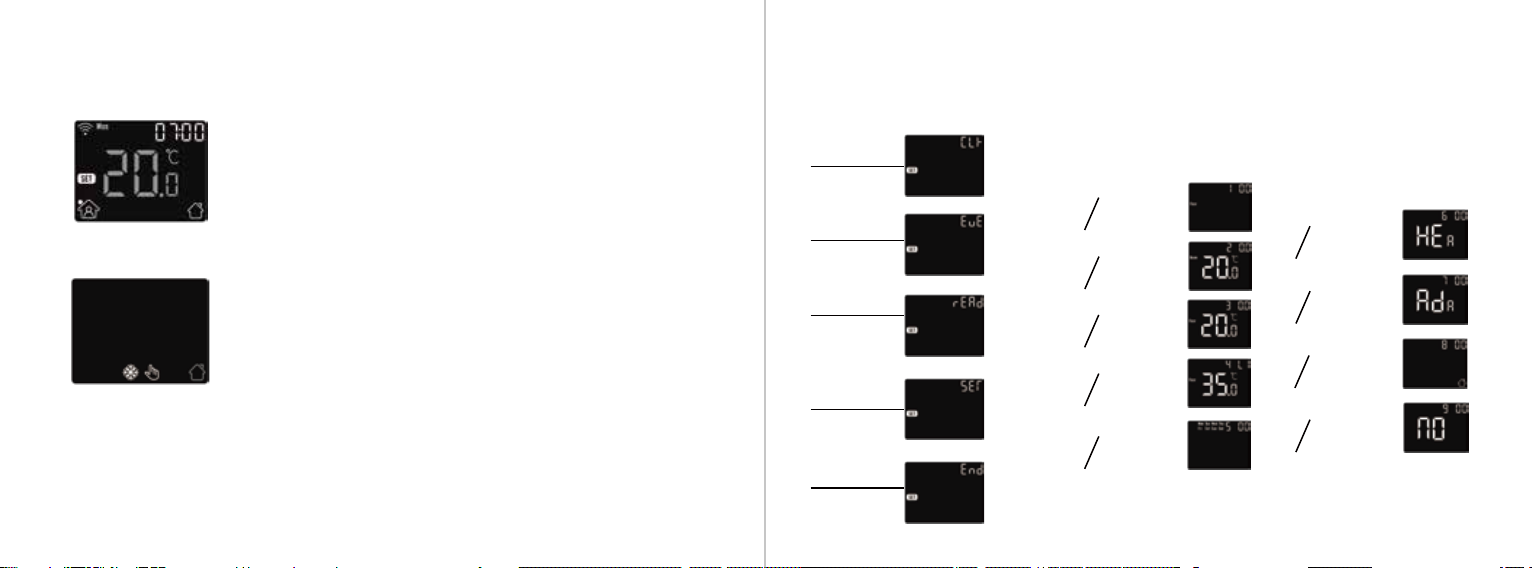
CLK
Set event’s
parameters
EVE
Read heating
time of a certain
period
READ
Various settings
SET
Back to actual
temp page
END
Sensor selection
1
Room temp
calibration
2
Floor temp
calibration
3
Floor temp limit
4 LI
Schedule selection
5
Used for heating
or cooling
6
Adaptive function
7
Located in home
or office
8
Reset to factory
settings
9
> > > >
> > >
07 08
8.4 Menu
On the actual temp page, press and hold the confirm-key for 3 seconds to enter menu.
------Sitemap of the menu

Press the confirm-key to enter day selecon of event seng.
Press the up-key or down-key to select a day or end.
Press the confirm-key to enter the event selecon of the day, or back to the actual temp page if you select end.
Press the up-key or down-key to select a event.
Press the confirm-key to enter the event’s start me hour set.
Press the up-key or down-key to set the start me hour.
Press the confirm-key to enter the event’s start me minute set.
Press the up-key or down-key to set the start me minute.
Press the confirm-key to enter the event’s temp set.
Press the up-key or down-key to set the temp.
Press the confirm-key to back to the event selecon, or back to day selecon if the event is last one.
8.4.1 Clock
Press the confirm-key to enter day set.
Press the up-key or down-key to set day.
Press the confirm-key to enter hour set.
Press the up-key or down-key to set hour.
Press the confirm-key to enter minute set.
Press the up-key or down-key to set minute.
Press the confirm-key to back to the actual temp page.
8.4.2 Event Seng
* If you want to back to the actual temp page, you should back to the day selecon and select end.
Default parameters
The default page of the menu is CLK. Day and clock is set here.
* If the thermostat is WiFi version, it will update me automacally aer connect to WiFi.
In auto mode, program runs according to the parameters of the event. Event seng is the
way to change the parameters.On the clock page, Press the up-key or down-key to select EVE.
Day
(Wake) (Leave) (Back) (Sleep)
Home
Mon-Fri
06:00 20.0
°
C08:30 15.0
°
C17:00 2 0.0
°
C23:00 15.0
°
C
Sat/Sun 06:00 20.0 °C08:30 20.0 °C17:00 20.0 °C23:00 15.0 °C
Day
(Work) (Offwork)
Office Mon-Fri 07:00 20.0 °C18:00 15.0 °C
Sat/Sun 07:00 15.0
°
C18:00 15.0
°
C
Lookup the heang me (in percent) within a certain period.
On the clock page, press the up-key or down-key to select READ.
Press the confirm-key to enter Readout, the page will show the heang me in the last day.
Press the up-key or down-key to select 1 day, 30 days, 365 days,it will show the heang me within the
certain period.
Press the confirm-key to back to the actual temp page.
The thermostat provides advanced sengs to suit various special situaons. These are normally set by
technicians during inial installaon.
On the clock page, press the up-key or down-key to select SET.
Press the confirm-key to enter advanced seng.
Each seng can be accessed by press confirm-key and adjust the parameter by press up-key or down-key.
09 10
8.4.3 Readout
8.4.4 Advanced Seng
11 12
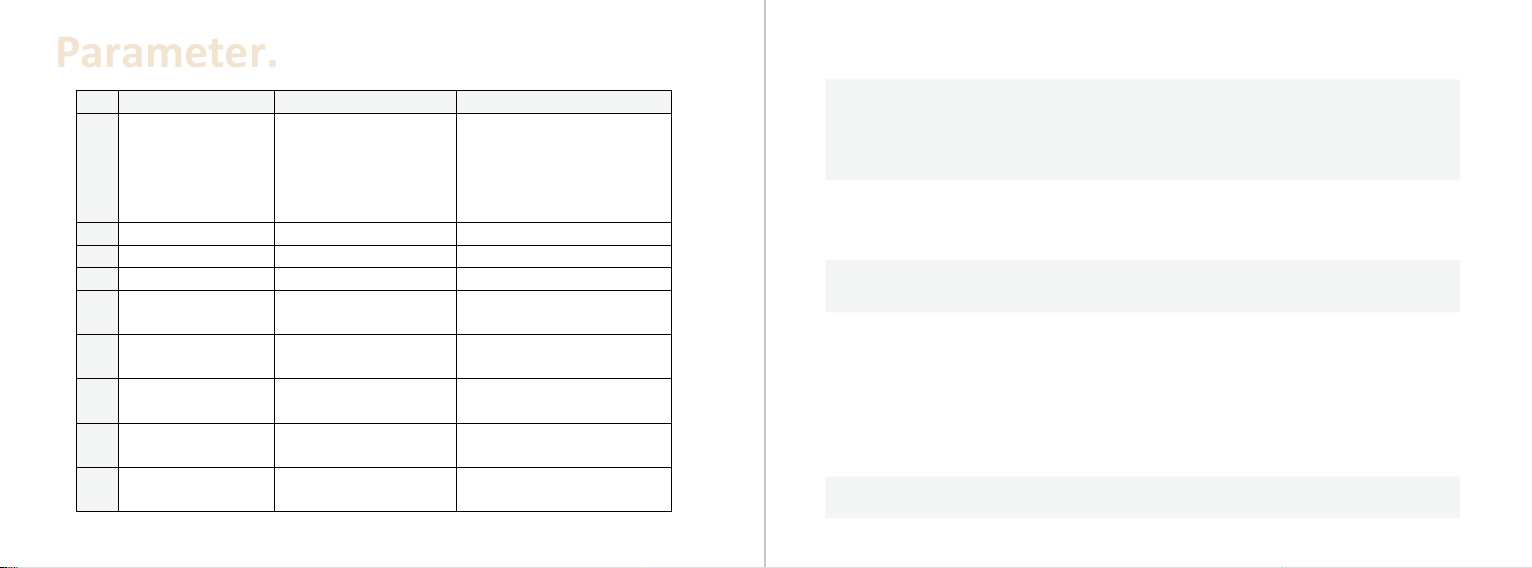
No.
Name
Default
Ranges
1 Sensor selecon 00: Floor sensor 00: Floor sensor
01: Room-in sensor
02: Both-in sensors
03: Room-out sensor
04: Both-out sensors
2 Room tempcalibraon 0.0
°
C -5.0
°
C -- 5.0
°
C
3 Floor tempcalibraon 0.0°C -5.0°C -- 5.0°C
4 Floor templimit 35.0°C 20.0°C -- 50.0°C
5 Schedule 00: 7 00: 7
01: 5+1+1
6 Used for 00: Heang 00: Heang
01: Cooling
7 Adapve funcon 00: Adapve 00: Adapve
01: No
8 Located in 00: Home 00: Home
01: Office
9 Reset 00: No 00: No
01: Reset
There are 5 opons:
Floor sensor: run by floor sensor(default).
Room-in sensor: run by built-in room sensor.
Both-in sensors: run by built-in sensor with floor temp limit.
Room-out sensor: run by external room sensor.
Both-out sensors: run by external room sensor with floor temp limit.
If sensor selecon is room sensor or both sensors, this funcon will find the sharply drop of the
room temp.
Parameter.
2. Room temp calibraon: calibrate the temp detected by room sensor.
3. Floor temp calibraon: calibrate the temp detected by floor sensor.
4. Floor temp limit: if you choose both sensors, floor temp limit must be set to protect floor.
5. Schedule: Select a weekly schedule for the event.
1. Sensor selecon:
7: each day from Mon to Sun can be set individually.
5+1+1: 5 days from Mon to Fri have the same events, Sat and Sun can be set individually.
6. Used for: heang or cooling.
7. Adapve funcon: aer several days of installaon and use, Adapve funcon ensures that
the required temp has already been reached when the next event begins.
8. Located in: Home or Office.
9. Reset: all parameters are restored to default values.
There are 2 opons:
8.5 Open window
When it happens, the thermostat shuts off the heang for 15 minutes. It can save energy and protect the floor.
When the window is closed, turn the thermostat off then turn it on again, it will run properly again.

TROUBLESHOOTING
E1: Room-in sensor error.
E2: Floor sensor error.
E4: Room-out sensor error.
86
86 59
51
52
249
12
13 14
DIMENSION(MM)
Other manuals for 6A Series
1
Table of contents
Other ThermoLife Thermostat manuals


Popular Thermostat manuals by other brands


LK Systems
LK Systems ICS-RF quick guide

Ecobee
Ecobee Smart Si installation manual

Honeywell
Honeywell T8635L1013 - MicroElectric Communicating... brochure

Heatit
Heatit Z-TRM3 Installer manual

Neptronic
Neptronic TRO24T4XYZ3 Specification & installation instructions

Carrier
Carrier P474-1100RF owner's manual


