ThermoLife ET-81W User manual
V1.5
Easy touch Easy warm
Thermostat Instruction
INSTALL
02
01
03
04

01 Introduction....................................................................................................
03 Installation......................................................................................................
04 Wiring Instruction..........................................................................................
05 Thermostat Symbols.....................................................................................
06 WiFi Connection.................................
08 Troubleshooting.................................
09 Dimension...........................................
07 Function and Operation.....................
02 Technical Specifications...............................................................................
Table of
Contents
01
02
05
01
03
04
07
13
14
7.1 On/Off..................................................
7.2 Temporary Override Temperature....
7.3 Key-Lock.............................................
7.5 Holiday Mode......................................
07
07
08
08
7.6 Hold Mode...........................................
7.7 Edit Setting.........................................
7.8 Setup...................................................
7.9 Open Window detection....................
7.4 Set the Time........................................
09
09
12
07
10
APP
for ET-81W

TECHNICAL SPECIFICATIONS
INTRODUCTION INSTALLATION
The 81 series is an intuive programmable thermostat used to control
electrical floor heang system or water heang system. It will keep home
at comfortable temp whilst minimizing energy use. Install the app on your
smart phone to control heang system remotely with the WiFi thermostat.
01
02
Supply voltage: 85-265Vac 50/60Hz
Standby power: <1W
IP class: IP21
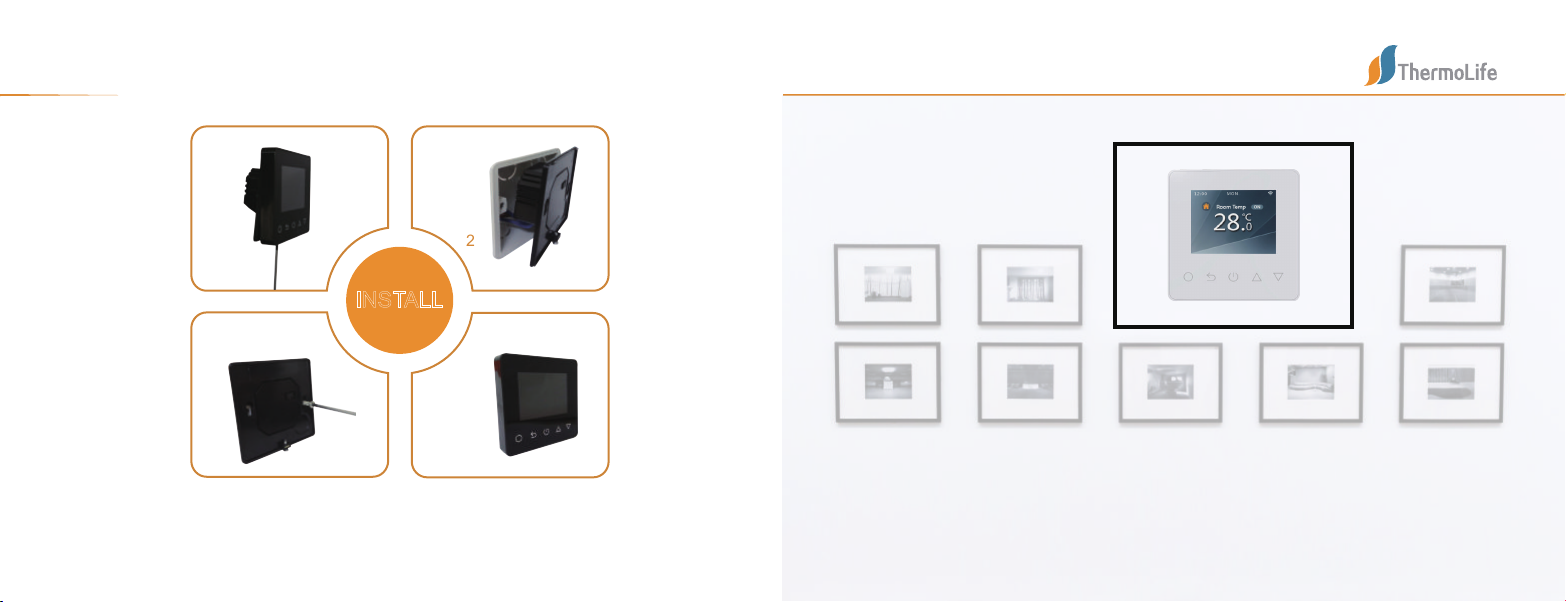
Insert the back panel into wall box with
provided screws.
Align top part of front panel and back panel
to fit these two parts. Then fix them with
screw.
Loosen fixing screw located in the boom
of the thermostat to get the front panel.
Step 1:
Connect the thermostat according to the
Wiring Instrucon.
Step 2:
Step 4:

Down
UP
Power
Confirm
Return
Clock
Period
Temperature
On/Off
WiFi
Day indicator
Please keep the max load around 90% of 16A to prolong the lifeme.
THERMOSTAT SYMBOLS
03 04
WIRING INSTRUCTION
MAX LOAD: 16A
SENSOR
L1N1 N L
FLOOR
SENSOR
POWER
85V-265V
50/60Hz
IP 21
N1 NLL1 S2 COM S1
POWER
FLOOR SENEOR

05 06
WIFI CONNECTIONION
Step 3: Click “Create family” to enter family informaon
and click “Done”.
Aenon: Please authorize locaon permissions when
create family.
Step 5: Click “Wifi thermostat”, and follow ps to operate
thermostat,when the WIFI icon flash quickly, please click
“Press to connect”.
Step 1: Scan the QR code or download the Warmme
from APP store/Google browser.
Step 2: Register and log in with mobile number/
email address in the APP.
Aenon: Please read and agree “Privacy
Policy and Service agreement” before
registraon.
Step 4: Click “Add Device” or “+” on the
top-right to add device.
Step 6: Enter Wifi password, and click “Confirm”.
Step 8: You can check the real-me temperature and
set temperature etc. at the control interface.
!
Step 7: If device added successfully, you can change the
device name and set region, then, click “Done”.
Aenon: If failed, please confirm the Wifi is 2.4G version
and check the Wifi signals, then, use the “AP mode” in the
top right to connect again.

07 08
Set the Time
On the actual temp interface, Press and ‘Time’ will be displayed.
Press to enter day seng.
Press to set day.
Press to enter hour seng.
Press to set hour.
Press to enter minute seng.
Press to confirm and back to the advanced sengs.
Press to back to the actual temp interface.
* If the thermostat is WiFi version, it will update me automacally aer connecng to WiFi.
Holiday Mode
FUNCTION AND OPERATION
On/Off
Press to turn On/Off.
Note: When frost protecon is acve, the thermostat will maintain the frost protecon
temp when it is Off.
Temporary Override Temperature
The temporary override temp is only valid at the current event and it will not be saved.
On the actual temp interface, press to set temporary override temp.
Press to confirm and back to the actual temp interface.
Lock all keys to prevent the sengs from being changed. On the actual temp
interface, press and hold for 3 seconds to lock or unlock all the keys.
Key-Lock
In Holiday Mode, the thermostat will maintain the set temp unl the holiday me ends.
On the actual temp interface, Press and ‘Time’ will be displayed.
Press to select ‘Holiday’.
Press to enter holiday days seng.
Press to set holiday days.
Press to enter temp seng.
Press to set temp.
Press to confirm and back to the actual temp interface.
* Set the holiday days to zero or double press to cancel Holiday Mode.
09 10
Hold Mode
In Hold Mode, The thermostat will hold the set temp unl you cancel this mode.
On the actual temp interface, Press and ‘Time’ will be displayed.
Press to select ‘Hold’.
Press to enter Hold ON/OFF seng.
Press to set Hold ON.
Press to enter temp seng.
Press to set temp.
Press to confirm and back to the actual temp interface.
* Set hold OFF or double press to cancel Hold Mode.
Edit Seng
Edit seng can set and change the parameters. If you don’t choose Holiday Mode or Hold Mode. The
thermostat runs according to the parameters of Edit.
On the actual temp interface, press and ‘Time’ will be displayed.
Press or to select ‘Edit’.
Press to enter day selecon .
Press or to select a day.
Press to enter the event selecon of the day.
Press or to select a event.
Press to select event’s starng me.
Press or to set the hour of starng me.
Press to enter the minute seng.
Press or to set the minute of starng me.
Press to enter the temp seng.
Press or to set the temp.
Press to confirm and back to the event selecon of the day.
* Press some mes or double press to back to the actual temp interface.
Setup
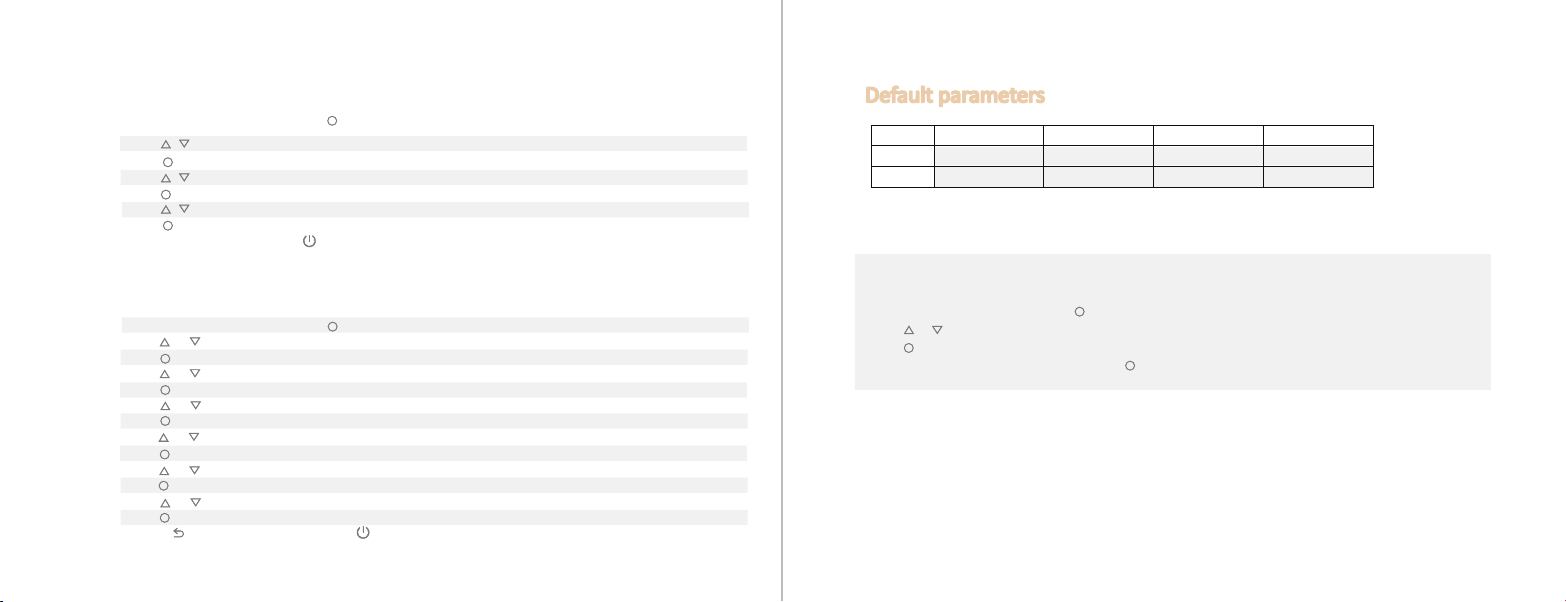
Default parameters
Day
Wake
Leave
Back
Sleep
Mon-Fri
07:00 22.0°C
08:30 19.0°C
17:00 22.0°C
22:00 19.0°C
Sat/Sun 08:00 22.0°C 08:30 22.0°C 17:00 22.0°C 22:00 19.0°C
The thermostat provides Setup to suit various special situaon. These are normally set by technicians during
inial installaon.
On the actual temp interface, press and ‘Time’ will be displayed.
Press or to select ‘Setup’.
Press to enter Setup.
Each parameter can be accessed by pressing and adjust the values as required.

11 12
1. Temp calibraon: Calibrate the temp detected by room sensor or floor sensor.
2. An-frozen funcon: This opon allow you to bring warmth to your plant and pet with a
lower temp. In hydronic heang system, it will keep away from freezing.
3. Sensor select:
Room sensor: Run by room sensor.
Floor sensor: Run by floor sensor.
Both sensors: Run by room sensor with floor temp limit.
4. Floor temp limit: If you choose both sensors, floor temp limit must be set to protect floor.
5. Temp unit: °C and °F can be selected.
6. Output delay: This opon help you avoid inadvertent operaon on heang.
7. Temp tolerance: The value is 1°C. The thermostat start to work when the actual temp is
1°C lower than set temp and stop to work when the actual temp is 1°C higher than set temp.
8.Brightness: This opon allows you to change the brightness of the display.
9.Energy use: This opon allows you to enter the various data used to calculate energy use.
Then use this informaon to calculate electricity consumpon.
10. Schedule: Select a weekly schedule for the Edit. There are 2 opons:
7: each day from Mon to Sun can be set individually.
5+1+1: 5 days from Mon to Fri have the same events, Sat and Sun can be set individually.
11. Adapve funcon: Aer several days of installaon and use, Adapve funcon ensures
that the required temp has already been reached when the next event begins.
12. Reset: All parameters are restored to default values.
This funcon only works when room sensor or both sensors is selected. The thermostat with this
funcon will shut off automacally for 15 min when the window opens, as it can detect that the
room temp plummets.
Open window detecon
No.
Name
1
Temp calibraon
2
An-frozen funcon
An-frozen
Sensor select(Room
4
Floor temp limit
5
Temp unit
6
Output delay
9
10
11
Schedule
12
Default
0.0°C
0.0°C
ON
5.0°C
30 °C
°C
1
Ranges
-5.0°C -- 5.0°C
-5.0°C -- 5.0°C
ON/OFF
5.0°C -- 15.0°C
20°C -- 50°C
°C/ °F
Floor sensor
Room sensor
An-frozen
switch
Temperature
3
,Floor) Floor temperature
sensor
Room temperature sensor
Floor temperature sensor
Both sensors
0 S
7
Temp tolerance
8Brightness
Energy use Power rang
Power consumpon
Adapve funcon
Factory reset
°C
80%
0W
5+1+1
ON
Back
0 S/30 S/60 S/90 S
0.5 /1 /2 /3°C°C°C°C
0%--100%
0W-4500W
ON/OFF
7/5+1+1
Yes/Back

TROUBLESHOOTING
E1: Room sensor error.
E2: Floor sensor error.
86
86
16 26 59
51
51
13 14
D
Table of contents
Other ThermoLife Thermostat manuals


Popular Thermostat manuals by other brands

Elsner
Elsner 71190 Installation and adjustment

Bryant
Bryant Evolution Connex Control installation instructions

Carrier
Carrier A94134 Installation, start-up, and operating instructions

Robertshaw
Robertshaw 200-403 installation instructions

York
York Hx 3 S1-THXU280 User's information manual

Genebre
Genebre 3917 00 user manual

Belimo
Belimo EXT-RCF-24 installation manual

BAYweb
BAYweb BW-WT2 owner's manual

Honeywell
Honeywell Perfect Climate Comfort Center PC8900 quick guide

White Rodgers
White Rodgers 1F85-0471 Installation and operating instructions

Pepco
Pepco Energy Wise Rewards Instructions for use

Multitek
Multitek RF Room Thermostat user manual


