ThermoLife 84 Series User manual

V1.0
Easy touch Easy warm
Thermostat Instruction
INSTALL
02
01
03
04

01
Introduction............................................................................................................... 01
03
Installation...................................................................................................... 02
04
Wiring Instruction.......................................................................................... 03
05
Thermostat Symbols................................................................................................ 04
06
WiFi Connection................................. 05
07
Function and Operation..................... 07
02 Technical Specifications............................................................................... 01
Table of
Contents
7.1 On/Off................................................. 07
7.2 Temporary Override Temperature... 07
7.3 Key-Lock........................................... 07
08
Troubleshooting................................. 13
09 Dimension........................................... 14
7.4 Brightness......................................... 07
7.6 Holiday Mode..................................... 08
7.7 Hold Mode.......................................... 09
7.8 Edit Setting........................................ 09
7.9 Advanced Setting.............................. 10
7.5 Set the Time...................................... 08
APP
for ET-84W

TECHNICAL SPECIFICATIONS
INTRODUCTION INSTALLATION
The 84 series is an intuitive programmable thermostat used to control
electrical floor heating system or water heating system. It will keep
home at comfortable temp whilst minimizing energy use. Install the
app on your smart phone to control heating system remotely with the
WiFi or zigbee thermostat.
01 02
Supply voltage: 85-265Vac 50/60Hz
Standby power: <1W
Max load: 16A
IP class: IP21
Cable specification: ≤2.5mm²
Step 1: Loosen fixing screw
located in the bottom of the
thermostat to get the front
panel.
Step 2: Connect the thermo-
stat according to the Wiring
Instruction.
Step 3: Insert the back panel
into wall box with provided
screws.
Step 4: Align top part of front
panel and back panel to fit
these two parts. Then fix
them with screw.
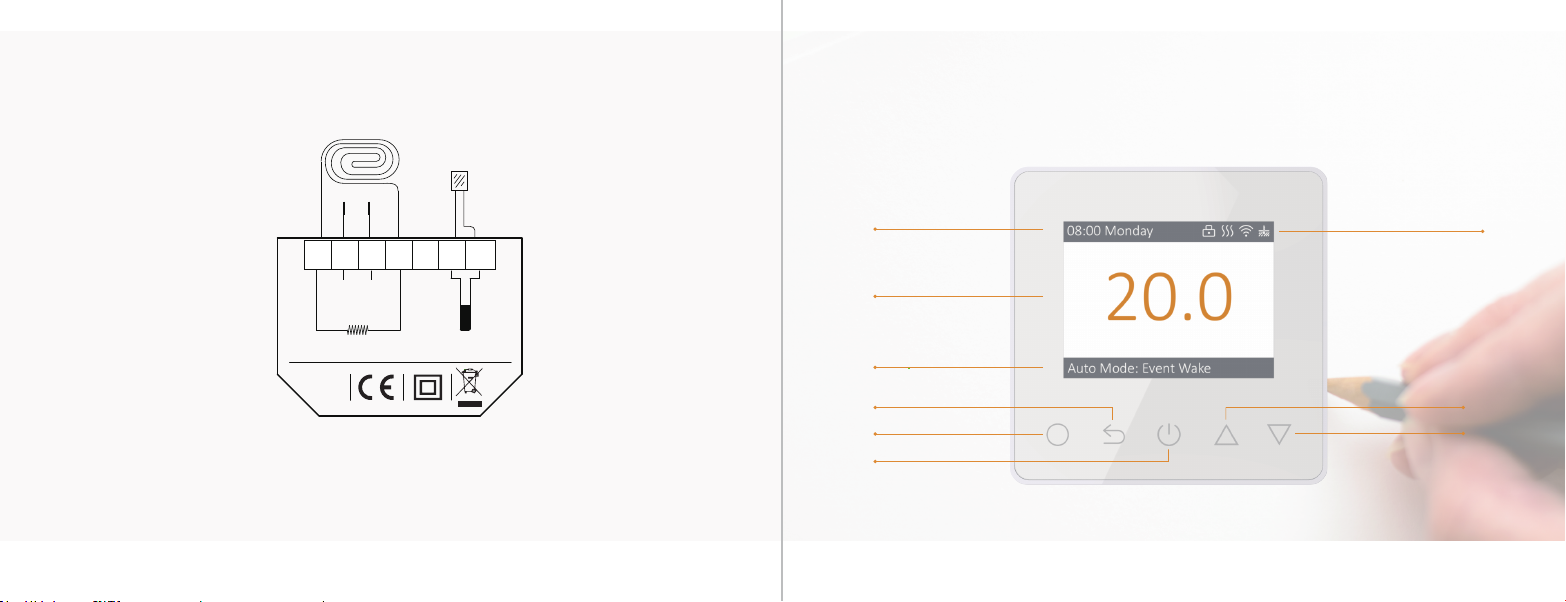
Down Key
UP Key
Power Key
Confirm Key
Return Key
Clock
Period
Detected Temperature
Lock / Heat / WiFi / Floor Sensor
Suggestion: Please keep the max load around 90% of 16A to prolong the lifetime.
THERMOSTAT SYMBOLS
03 04
WIRING INSTRUCTION
MAX LOAD: 16A
SENSOR
L1N1 N L
FLOOR
SENSOR
POWER
85V-265V
50/60Hz
IP 21
N1 NLL1 S2 COM S1
POWER
FLOOR SENEOR

05 06
WIFI CONNECTIONION
Step 3: Click ‘Add Device’ or ‘+’ on the top-right to add device.
Step 5: Operate ET-84W.
If the WiFi icon flash quickly,
click ‘Press to connect’.
Step 1: Scan the QR code or download the Warmme from
APP Store/Google Play.
Step 2: Register and log in with mobile
number/email address in the APP.
Attention: Please read and agree
‘Privacy Policy and Service
agreement’ before registration.
Step 4: Click ‘WiFi thermostat’. Step 6: Enter WiFi password, and click ‘Confirm’.
Step 8: You can check the
actual
tempera-
ture and set temperature etc. at the control
interface.
Step 7:If ET-84W added successfully, you can change
the device name and set region. Then click ‘Done’.
Attention: If failed, confirm the Wifi is 2.4G version and check the
Wifi signals, then use the ‘AP mode’ in the top right to connect
again.

07 08
FUNCTION AND OPERATION
1 On/Off
Press to turn On/Off.
Note: When frost protection is active, the thermostat will maintain the frost protection temp when
it is Off.
2 Temporary Override Temperature
The temporary override temp is only valid at the current event and it will not be saved.
On the actual temp interface, press to set temporary override temp.
Press to confirm and back to the actual temp interface.
Lock all keys to prevent the settings from being changed.
On the actual temp interface, press and hold for 3 seconds to lock or unlock all the keys.
3 Key-Lock
Change the brightness of the display.
On the actual temp interface, Press to enter Setting.
Press to select Brightness.
Press to enter Brightness.
Press to set brightness.
Press to back to Setting.
4 Brightness
5 Set the Time
On the actual temp interface, Press to enter Setting.
Press to select Time.
Press to enter Set Day.
Press to set day.
Press to enter Set Hour.
Press to set hour.
Press to enter Set Minute.
Press to set minute.
Press to back to Set Day.
* If the thermostat is WiFi/ZigBee version, it will update time automatically after connecting to internet.
6 Holiday Mode
In Holiday Mode, the thermostat will maintain the set temp until the holiday time ends.
On the actual temp interface, Press to enter Setting.
Press to enter Mode.
Press to select Holiday Mode.
Press to enter Set Days.
Press to set days.
Press to enter Set Temp.
Press to set temp.
Press to back to the actual temp interface.

09 10
7 Hold Mode
8 Edit Setting
9 Advanced Setting
Default parameters
In Hold Mode, The thermostat will hold the set temp until you cancel this mode.
On the actual temp interface, Press to enter Setting.
Press to enter Mode.
Press to select Hold Mode.
Press to enter Set Temp.
Press to set temp.
Press to back to the actual temp interface.
Edit setting can set and change the parameters. If you choose Auto Mode. The thermostat runs
according to the parameters of Edit Setting.
On the actual temp interface, Press to enter Setting.
Press to select Edit Setting.
Press to enter Select Day.
Press to select day.
Press to enter Select Event.
Press to select event.
Press to enter Start Time-Hour.
Press to select start time-hour.
Press to enter Start Time-minute.
Press to select start time-minute.
The thermostat provides Advanced Setting to suit various special situation. These are normally
set by technicians during initial installation.
On the actual temp interface, Press to enter Setting.
Press to select Advanced Setting.
Press to enter Advanced Setting.
Each parameter can be accessed by pressing and adjust the values as required.
Press to enter Set Temp.
Press to set temp.
Press to back to Select Event.
Press to back to the actual temp interface.
Day
Mon-Fri
Sat/Sun
Wake
07:00 22.0°C
08:00 22.0°C
Leave
08:30 19.0°C
08:30 22.0°C
Back
17:00 22.0°C
17:00 22.0°C
Sleep
22:00 19.0°C
22:00 19.0°C

11
12
Advanced Setting 1. Room Temp Calibration: Calibrate the room temp detected by room sensor.
2. Floor Temp Calibration: Calibrate the floor temp detected by floor sensor.
3&4. Anti-frozen function: This option allow you to bring warmth to your plant and pet with a lower
temp. In hydronic heating system, it will keep away from freezing.
5. Floor temp limit: If you choose both sensors, floor temp limit must be set to protect floor.
6. Temp tolerance: The value is 1°C. The thermostat start to work when the actual temp is 1°C lower
than set temp and stop to work when the actual temp is 1°C higher than set temp.
7. °F/°C: °C and °F can be selected.
8. Sensor selection:
Floor sensor: Run by floor sensor.
Room sensor: Run by room sensor.
Both sensors: Run by room sensor with floor temp limit.
9. Schedule: Select a weekly schedule for the Edit. There are 2 options:
7: each day from Mon to Sun can be set individually.
5+1+1: 5 days from Mon to Fri have the same events, Sat and Sun can be set individually.
10. Output delay: This option help you avoid inadvertent operation on heating.
11. Adaptive function: After several days of installation and use, Adaptive function ensures that the
required temp has already been reached when the next event begins.
12. Open window: This function only works when room sensor or both sensors is selected. The
thermostat with this function will shut off automatically for 15 min when the window opens, as it can
detect that the room temp plummets.
13. Language: There are four lanuages:
English/German/Spanish/French.
14&15. Power Set & Energy Use: This option allows you to enter the various data used to calculate
energy use. Then use this information to calculate electricity consumption.
16. Factory Reset: All parameters are restored to default values.
No.
1
2
3
4
5
6
7
8
9
10
11
12
13
14
15
16
Default
0.0°C
0.0°C
ON
5.0°C
30°C
1.0°C
°C
Floor
5+1+1
0S
OFF
OFF
English
0W
-
-
Name
Room Temp Calibration
Floor Temp Calibration
Anti-frozen Switch
Anti-frozen Temp
Floor Temp Limit
Temp Tolerance
°F/°C
Sensor Selection
Schedule
Output Delay
Adaptive Function
Open Window
Language
Power Set
Energy Use
Factory Reset
Ranges
-5.0°C -- 5.0°C
-5.0°C -- 5.0°C
ON/OFF
5.0°C -- 15°C
20.0°C -- 50°C
0.5°C/1.0°C/2.0°C/3.0°C
°F/°C
Floor/Room/Both
7/5+1+1
0S/30S/60S/90S
ON/OFF
ON/OFF
English/German/Spanish/French
0W -- 4500W
-
NO/YES

TROUBLESHOOTING
E1:Room sensor error.
E2:Floor sensor error.
86
86
16 26 59
51
51
13 14
DIMENSION(MM)

This manual suits for next models
1
Table of contents
Other ThermoLife Thermostat manuals


