Thermorail S60SBN User manual
240V Liquid-Filled Heated Towel Rail
Installation Guide
S60SBN / S60SBG / S60SAB / S60SBB / S62SBN / S62SBG / S62SAB / S62SBB

2
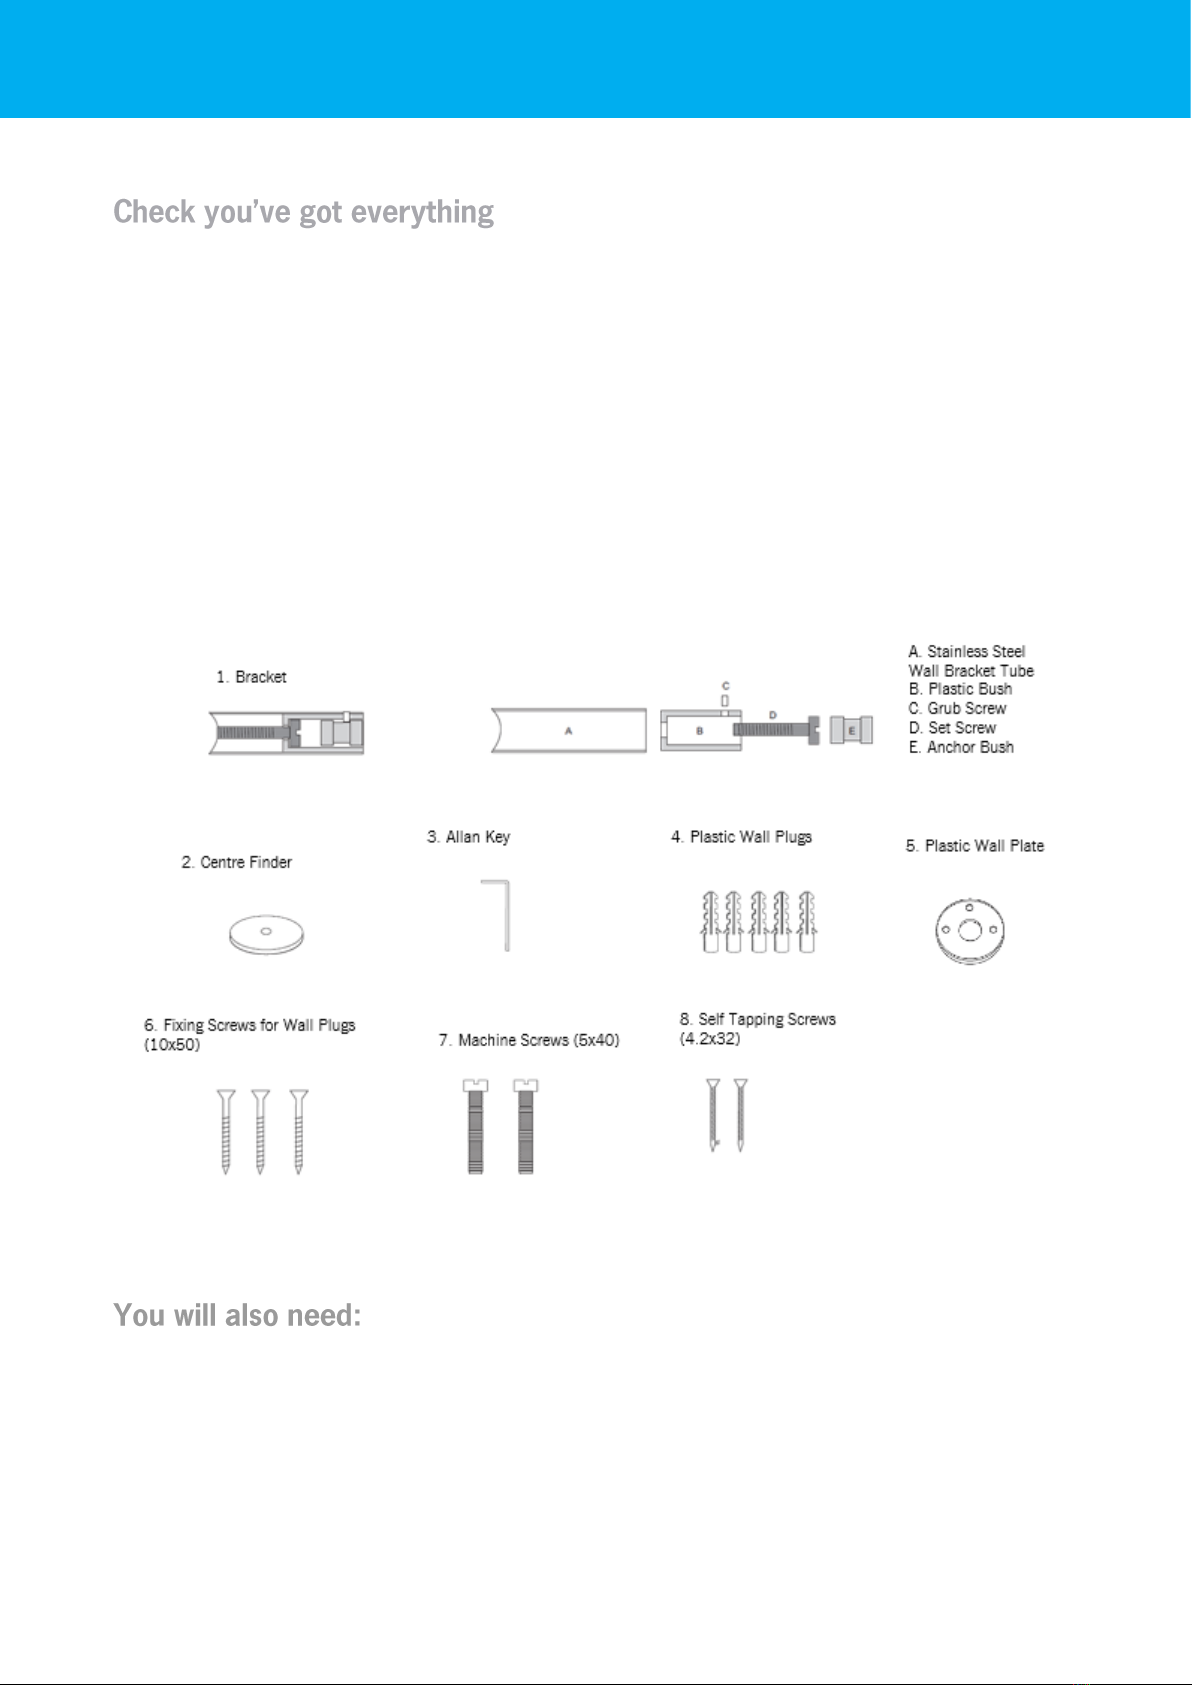
What’s in the box?
3
Installation Steps
4
Technical Specifications
6
Safety & Care Information
7
Warranty Information
8
Warranty Registration
9
Notes
10
Contact Us
12
Contents
3
:
•Thermorail Heated Towel Rail
•Bracket Pack including:
•3 x Brackets
•Centre finder
•Allan key
•5 x Plastic wall plugs
•Plastic wall plate
•3 x Fixing screws for wall plugs
•2 x Machine screws
•2 x Self-tapping screws
•Flat head screwdriver
•Pencil
•Spirit level
•Tape measure
•Drill bits
What’s in the box?
4
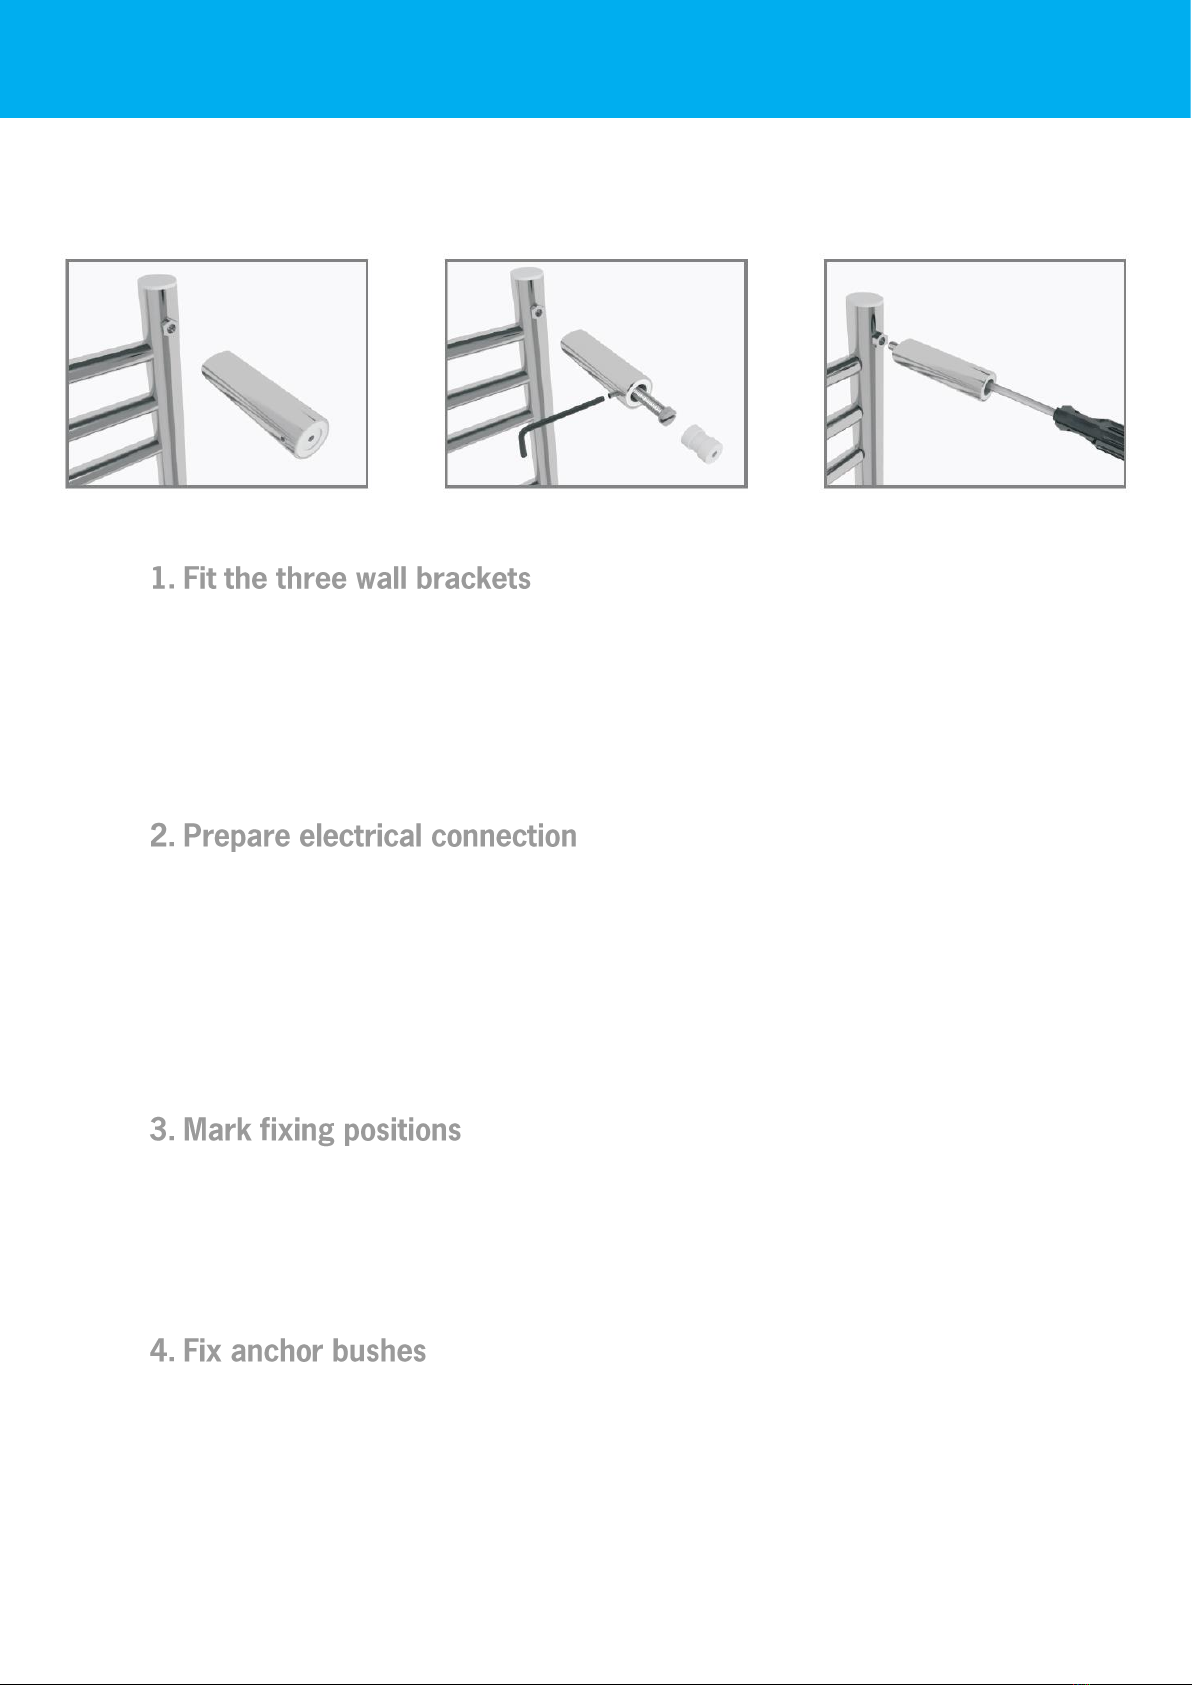
To fit all three wall bracket tubes to the nuts on the back of the towel rail,
partially undo the grub screw in each stainless steel tube using the allan key
provided (Fig.1). Drop the anchor bush out of the tube (Fig.2). Using a flat
head screwdriver, attach the bracket tube to the nut taking care not to over-
tighten the set screw. Ensure that the hole for the grub screw is facing down,
out of normal view (Fig.3).
If the electrical connection is to be in a standard round junction box, place
the metal disc of the element cover onto the plastic wall plate. Align the
holes in the disc to those of the junction box and using the two 5mm x
40mm machine screws, attach the metal disc and plastic plate to the
junction box. Should the electrical connection wires exit directly from a
conduit, guide the wiring through the centre of the metal disc and mark the
two holes on the wall for drilling.
Ensure that the rail is straight and level before carefully marking the outside
circumference of the three tubes against the wall. Remove the rail from the
wall. In order to avoid a hazard for very young children, this appliance should
be installed so that the lowest heated towel rail is at least 600mm above
the floor.
Place the centre finder within the pencilled circle and mark the centre spot
for drilling. Drill the holes to the correct depth using a 6mm masonry drill
and insert the plastic wall plugs. Attach the 3 anchor bushes firmly to the
wall using the 10 x 50 fixing screws.
Installation Steps
Fig.1
Fig.2
Fig.3
The Thermorail models in this guide need to be hard wired and the wiring is
supplied connected at the bottom right.
Fig. 1
Fig. 2
Fig. 3

5
Electrical connection options
•Junction Box: If the electrical connection is to be inside a junction box, cut
the electrical cord down to 200mm from where it exits the metal wall disc
of the element cover.
•Conduit from the wall: if the electrical connection is to be directly from a
conduit in the wall, cut the electrical cord down to 100mm from where it
exits the metal wall disc of the element cover.
The towel rail can now be placed over the
anchor bushes. To allow for easier
connection, secure only the top left-hand
side grub screw using the allan key until the
rail is held and cannot be pulled from the
wall –this will allow for an easier electrical
connection at the bottom right-hand side of
the rail.
Push the electrical cord through the centres of the metal disc and plastic
plate (Fig.4). Connect the wiring and then attach the metal disc to the
junction box or wall using the fasteners provided. Only once the element
cover has been fastened, press the rail against the wall and tighten the grub
screws in each of the bracket tubes to secure the rail to the wall. Push the
cover plate over the metal disc and plastic plate.
Ensure you have 240Volt power at the connection point between you
Thermorail Heated Towel Rail and the mains supply. Once checked tick this on
page 9.
Fig.4
Installation Steps

6
S60SBN
6
W600 x H790 x D118
90
Brushed Nickel
S60SBG
6
W600 x H790 x D118
90
Brushed Gold
S60SAB
6
W600 x H790 x D118
90
Antique Brass
S60SBB
6
W600 x H790 x D118
90
Brushed Brass
S62SBN
8
W620 x H1215 x D118
150
Brushed Nickel
S62SBG
8
W620 x H1215 x D118
150
Brushed Gold
S62SAB
8
W620 x H1215 x D118
150
Antique Brass
S62SBB
8
W620 x H1215 x D118
150
Brushed Brass
Supply Voltage
240V
Wiring Side
Bottom Right-Hand
Warranty
5 Years
Wiring Type
Hardwired Only
Protection Rating
IPX5
Technical Specifications

7
Thermorail Heated Towel Rails should be installed and tested by a qualified
electrician and in accordance with current local regulations. We recommend that
the rail is installed onto a flat uniform wall at least 600mm from the floor and
with a 300mm clearance from permanent fixtures. Where possible the Thermorail
Heated Towel Rail should be screwed into studs or if fixing to hollow walls suitable
anchors should be used to ensure rail in secure.
Please read and understand this installation guide in full before commencing
installation. If you have any queries in regard to installation, please call
1300 368 631.
•Observe and adhere to electrical guidelines and IP ratings when placing your
Thermorail in wet areas
•Ensure any timers or switches used are installed in correct zones according
to the IP rating of the timer/switch
•Ensure that your Thermorail is protected by a suitably rated RCD circuit
•Do not use the towel rail to hold towels or other articles that have been in
contact with oil, petroleum-based products or dry cleaning fluids
•This appliance is intended to warm and dry towels and therefore is hot to
touch. When near young children or infirm persons, close supervision is
necessary.
•Do not immerse your Thermorail in any liquid
The finish of your Thermorail Heated Towel Rail is protected by a lacquer. Clean
with a soft cloth and mild detergent. Do not use any harsh abrasives or thinners
on the Heated Towel Rail as this will damage the finish. Do not use and mashing
tape or solvents on the rail. The finish is a soft decorative finish and should be
handled as such and preferably installed after other trades such as paint,
plasterboard and tiling. Wipe over with a soft cloth and handle carefully.
Safety & Care Information
mation

8
Thermogroup covers all its products with a satisfaction guarantee. In addition,
Thermogroup will supply a replacement product where a fault is shown to be
caused by manufacture, materials or workmanship providing the goods have been
installed correctly and according to installation instructions. This guarantee does
not include removal, freight or installation costs. Thermogroup’s products come
with guarantees that cannot be excluded under Australian Consumer Law and you
are entitled to a replacement or refund for a major failure & compensation for any
other reasonable foreseeable loss or damage. You are also entitled to have the
goods repaired or replaced if the goods fail to be of acceptable quality and the
failure does not amount to a major failure.
Thermorail Plated Range are covered by a 5-year warranty. To use the warranty,
repair or service the customer must provide purchase invoice/receipt, and
completed warranty registration form.
If the product develops a fault within the warranty period due to normal wear and
tear, Thermogroup at its discretion will recognise whether it’s a faulty product or
not. If it is impossible or not economical for the manufacturer to repair the product,
the manufacturer will replace the faulty product with a new unit of the same model
or if there is no stock available of the same model as the product, the manufacturer
will replace the product with a new unit of a similar size. No responsibility can be
taken for altered dimensions and lining up of existing holes.
The repair service offered within the warranty period only covers the faults and
problems as developed from the manufacturer’s errors. Any damage caused by
improper use or carelessness or incorrect wiring is not covered.
Thermogroup is not responsible for any monetary loss or injuries caused by
improper use of this product.
Warranty Information

9
The Thermorail Heated Towel Rail warranty against manufactures defects is a
limited liability warranty and will only apply if the product is registered online.
Online registration must be completed within 60days of installation. Failure to
complete this form will void the warranty.
Fill out and sign below to declare that all the information recorded on this form
correlates to the installation
240Volt Power at Connection See Page 5
0
S60SBN
(Example)
Timer / Isolating Switch / None
TRTS
✓
1
Timer / Isolating Switch / None
2
Timer / Isolating Switch / None
3
Timer / Isolating Switch / None
4
Timer / Isolating Switch / None
5
Timer / Isolating Switch / None
6
Timer / Isolating Switch / None
7
Timer / Isolating Switch / None
8
Timer / Isolating Switch / None
9
Timer / Isolating Switch / None
10
Timer / Isolating Switch / None
Warranty Registration
Installer
Name:
Email:
Address:
Postcode:
Phone:
Signature:
Customer
Name:
Email:
Address:
Postcode:
Phone:
Signature:

10
Notes

11
Contact us
Notes

12
sales@thermogroup.com.au
www.thermogroup.com.au
1300 368 631
Contact Us
This manual suits for next models
7
Table of contents
Other Thermorail Heater manuals


